Macros are plenty of fun, but they can only do so much. If you can’t find a readymade macro action that does the job you want, you can’t use a macro. No such limit applies in the world of Visual Basic code, where you can do just about anything (if you spend enough late-night hours at the computer keyboard).
Here are some examples of tasks you can accomplish with code, but not with macros:
Modify a whole batch of records at once.
Deal intelligently with errors so Access doesn’t pop up a cryptic message.
Perform complex calculations. You can calculate an order confirmation code using a secret algorithm, or transform a line of text into Pig Latin.
Interact with other programs on your computer. For example, you can copy some data out of a table and into a Word document.
Write even more sophisticated validation routines that lock out bad data.
The goal of this chapter (and the next) isn’t to make you a full-time code jockey. If that’s your ambition, you can continue on to read entire books about programming Access. Instead, this chapter aims to teach you just enough to get the lowhanging fruit of Access programming. In other words, you’ll pick up enough VB smarts to use the popular and practical code tricks discussed in the next chapter. You’ll also build a great foundation for future exploration.
Note
The version of Visual Basic that Access and other Office applications use is called VBA, which stands for Visual Basic for Applications
Although Visual Basic code’s stored in your database, you need to use a different tool to view and edit it. This tool’s called the Visual Basic editor.
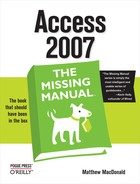
The Visual Basic editor works in concert with Access, but it appears in a separate window. To get to the Visual Basic editor, in the Access ribbon, choose Database Tools → Macro → Visual Basic. Access launches the standalone window shown in Figure 16-1, complete with an old-fashioned menu and toolbar.
Note
You can close the Visual Basic editor at any time. If you don’t, Access shuts it down when you exit.
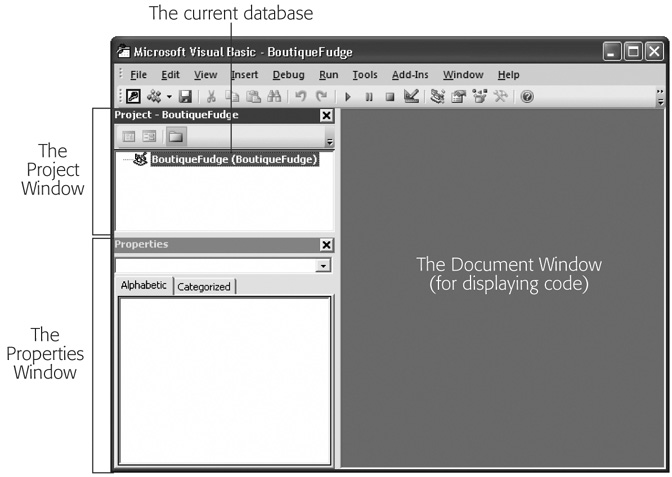
Figure 16-1. When you start out in the Visual Basic editor, you’ll notice that everything’s blank. There aren’t any code modules in the Project window, and there isn’t any code on display (yet).
The Visual Basic editor window’s divided into three main regions. At the top left, the Project window shows all the modules in your database. (Each module’s a container for one or more code routines.) Initially, the Project window’s almost empty, because you haven’t created any code yet. In Figure 16-1, the Project window has a single item (named “BoutiqueFudge” to correspond with the current database). However, this project doesn’t contain any modules with code.
Note
Depending on the recent tasks you’ve undertaken in Access, you may see an oddly-named acwztool project in the Projects window. This project’s an Access add-in that powers most of the wizards you use in Access. Don’t try to browse any of the code in this project—Access doesn’t let you.
Just under the Project window is the Properties window, which shows settings that you can change for the currently selected item in the Project window. At the bottom’s the Immediate window, a quick testing tool that lets you run code without first putting it in your database. Everything else is empty space that’s used to display your code files, once you create them. This region starts off blank.
In the following sections, you’ll learn the most straightforward way to create a piece of code:
First, you’ll create a brand new module, which is the container where you place your code.
Then, you’ll write the simplest possible code routine inside your module.
Finally, you’ll run your code to see it in action.
And when you’ve finished all this, you’ll consider how code can plug into the forms and reports that are already in your database. (This is where things really start rocking.)
Usually, you’ll build code routines that connect to forms, and spring into action when specific events (Section 15.5) take place. However, in this chapter you’ll start a bit slower by creating a standalone code routine that runs only when you tell it to.
The first step’s to add a new module for your code. In the Visual Basic editor’s menu, choose Insert → Module. Figure 16-2 shows what you’ll see.
Figure 16-2. Once your project has at least one module, the Project window shows a Modules group. Access gives new modules boring names like Module1, Module2, and so on. To choose something better, select the module in the Project window, and then, in the Properties window just underneath, change the “(Name)” property. DataCleanupCode makes a good module name.
When you add a new module, the Visual Basic editor automatically opens a code window that shows the contents of that module. (If your database has more than one module, you can open the one you want by double-clicking it in the Project window.) Initially, a brand new module has just one line of code, which looks like this:
Option Compare Database
This line’s an instruction that tells Visual Basic how to handle operations that compare pieces of text. Ordinarily, Visual Basic has its own rules about how to deal with text, but this statement tells it to use the Access settings instead.
The Access settings depend on the locale of the current database (like whether your version of Windows is using U.S. English or Japanese kanji script). Option Compare Database’s ultimate result’s that most English-speaking people case-insensitive comparisons. That means fudge is considered the same as fUdGe, which is the same way Access treats text when you write queries.
Before you write code that actually does anything, you should add one more instruction to the top of your code file. Just before (or after) the Option Compare Database instruction, add this:
Option Explicit
This instruction tells Visual Basic to use stricter error checking, which catches common typos when using variables (Section 17.1).
Tip
You can tell Visual Basic to add the Option Explicit line automatically to all new code files. To do so, select Tools → Options, check the Require Variable Declarations option, and then click OK. Access experts always use this setting.
As with other Access database objects, when you close the Visual Basic editor, Access prompts you to save any newly created modules. If you don’t want to wait that long, then choose File → Save [DatabaseName] where DatabaseName is the name of your database file.
Note
Once you’ve saved your module, you can see it in the Access window’s navigation pane. If you’re using the Tables and Related Views mode, your module appears in the Unrelated Objects category. If you’re using the Object Type mode, then it appears in a separate Module category. If you double-click a module in the navigation pane, then Access opens it in the Visual Basic editor.
Inside every module (except the empty ones) are one or more Visual Basic subroutines. A subroutine’s a named unit of code that performs a distinct task. In the VB language, subroutines start with the word Sub followed by the name of the subroutine. Subroutines end with the statement End Sub. Here’s an example subroutine that’s rather unimaginatively named MyCodeRoutine:
	Sub MyCodeRoutine()
	    ' Your code goes here.
	End Sub
This small snippet of VB code illustrates two important principles. First, it shows you how to start and end any subroutine (by using the Sub and End Sub statements). This code also shows you how to create a comment. Comments are special statements that Access completely ignores. Comments are notes to yourself (like explaining in plain English what the following or preceding line of code actually does). To create a comment, you just place an apostrophe (') at the beginning of the line.
Tip
The Visual Basic editor displays all comments using green text so you can clearly see the difference between comments and code.
Right now, MyCodeRoutine doesn’t actually do anything. To give it more smarts, you add code statements between the Sub and End Sub. The following exceedingly simple code routine shows a Message box:
	Sub MyCodeRoutine()
	    ' The following statement shows a message box.
	    MsgBox "Witness the power of my code."
	End Sub
This code works because the Visual Basic language includes a command named MsgBox. (See the box “The Visual Basic Language Reference” in Section 16.2 for advice on how to master all the commands you have at your disposal.) You use this command to pop up a basic Message box with a message of your choosing. The message itself is a piece of text (or string in programmer parlance), and like all text values in VB, it needs to be wrapped in quotation marks so Access knows where it starts and where it ends. (Access forces you to obey the same rules when you use text in an expression.)
Once you’ve typed this in (go ahead—try it!), you’re ready to run your code routine. To do so, place the cursor anywhere inside the subroutine so the Visual Basic editor knows what code you’re interested in. Now, on the Visual Basic toolbar, click the Run button (which looks like the play button on a VCR control), or, from the menu, choose Run → Run Sub/UserForm. Figure 16-3 shows the result.
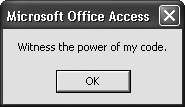
Figure 16-3. Your first code routine isn’t terribly useful, but it does prove that you know enough to write a line of code and run it.
Access runs the code in a subroutine one line at a time, from start to finish. When you show a MsgBox, your code pauses until you click the OK button in the Message box, at which point it carries on and finishes the subroutine.
Note
Remember, Access considers VB code potentially dangerous, so it doesn’t run it in an untrusted database. In other words, if you see the security message (Section 15.2.2), then you need to click Options to show the Microsoft Office Security Options dialog box, choose the “Enable this content” option, and then click OK. Or you can create a trusted location for your database files. Section 15.2.4 has the full story.
Running a code routine directly is a bit awkward. At least when you run a macro directly, you can launch it from the navigation pane or use a handy button in the ribbon (Section 15.1.2). Neither option’s available with VB code. Instead, you need to open the Visual Basic editor, choose the right module, scroll to the right subroutine, and then click Run. No one actually takes this approach, because it’s just too tedious.
Fortunately, there’s a better approach. You can place code in a form, and then set it to run automatically when something important happens. The following sections explain how.
Instead of running code routines straight from the editor, Access fans wire them up to form events, just as you can with macros. Here’s how you can try this out:
The fastest way’s to right-click a form in the navigation pane, and then choose Design View.
Add a new button.
To do so, choose Forms Tools | Design → Controls → Button, and then draw the button onto your form.
When the Button wizard begins, press Esc to cancel it.
You don’t need to create a macro for your button. Instead, this button’ll be powered by pure VB code.
If the Property Sheet isn’t currently visible, then choose Forms Tools | Design → Tools → Property Sheet.
In the Property Sheet, choose the Other tab, and then set the Name property to give the button a good name.
Access uses the button name to name the subroutine for your button. It’s much easier to remember what CommitOrder_Click does than Command42_Click. Now’s also a good time to set the text that’s shown on the button (the Caption property) if you haven’t already done so.
In the Property Sheet, choose the Event tab, and then select the button’s On Click event.
When you click inside an Event box, a drop-down arrow appears in it.
Click the drop-down arrow next to On Click, and then choose [Event Procedure].
This step tells Access that you’re supplying VB code for this event, rather than a macro.
Click the ellipsis (…) in the On Click Event box.
This step opens the Visual Basic editor and creates a code routine for your button. If you’ve already created the code routine, then Access switches to your existing code so you can edit it.
The first time you add code to a form, Access creates a new module for that form. This module’s named after the form and placed in a special group in the Project window named Microsoft Office Access Class Objects (see Figure 16-4). If you add more code to the same form, whether it’s connected to the same control or another one, Access inserts the code routine in the existing module for that form.
Tip
Form modules don’t appear in the navigation pane. If you want to edit them, then you have to open the Visual Basic editor yourself, and then, in the Project window, double-click the module. Or you can open the corresponding form, select the appropriate event, and use the ellipsis button to jump straight to the code routine that interests you.
![The module for a form is always named Form_[FormName]. Here’s the module you’ll see for a form named OneButtonForm.](http://imgdetail.ebookreading.net/data/2/0596527608/0596527608__access-2007-the__0596527608__httpatomoreillycomsourceoreillyimages2080313.jpg)
Figure 16-4. The module for a form is always named Form_[FormName]. Here’s the module you’ll see for a form named OneButtonForm.
When you follow these steps, Access doesn’t just create a new module; it also inserts a new, empty subroutine for your event. Assuming your button was named ButtonOfPower, you’ll see code that looks like this:
	Private Sub ButtonOfPower_Click()
	End Sub
This subroutine looks similar to the subroutine you created earlier, but with two differences:
It starts with the word Private. This word ensures that other modules can’t use this subroutine. Instead, it’s accessible only to the form where your button’s placed. (If you don’t specify Private, then you get the default accessibility, which is Public, and your code routine’s available to all. Most of the time, it doesn’t matter which one you use, but Private’s considered tidier.)
It has a name in the format [ControlName]_[EventName]. For example, the subroutine shown above responds to the On Click event of a button named ButtonOfPower.
Note
Wait a second—isn’t it the On Click event? Just to keep you on your toes, Visual Basic uses a slightly different naming convention for events than the Access form designer. It ignores the word “On” and leaves out any spaces, which means that On Click becomes just Click. It’s best not to worry about the naming discrepancy. Instead, let Access create the right subroutine names for you.
To try out your subroutine, you need to add some code. So far, you’ve learned only one code command, so try using that to show a message:
	Private Sub ButtonOfPower_Click()
	    MsgBox "You clicked the ButtonOfPower."
	End Sub
Now switch back to the form and click your button. You should see the message shown in Figure 16-5, which indicates that your code caught the event and responded successfully.
Tip
You don’t need to save your module when you make changes. Instead, you can freely jump back and forth between your code window and the form you’re using in the Access window to test every change you make.
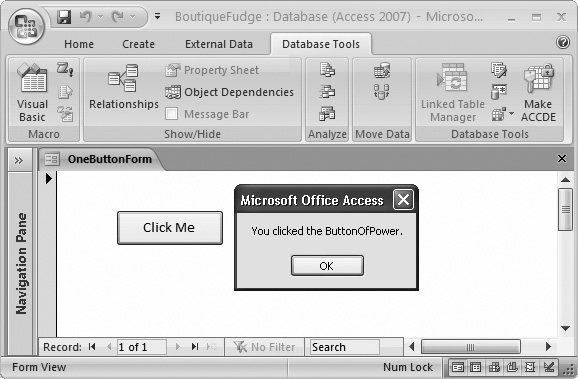
Figure 16-5. Events make code run automatically. In this case, if you click the ButtonOfPower, then Access instantly shows a message.
If you delete the ButtonOfPower later on, Access doesn’t remove your code. Instead, it stays there, inactive. This behavior’s good if there’s something really useful in that code that you might want to use somewhere else later on. (In this case, a little cutting and pasting can help you out.) But if it’s just a bunch of old code, use the Visual Basic editor to delete the subroutine as soon as you get the chance.
Based on what you’ve learned so far, you may wonder why you would ever bother to create an ordinary module by hand. After all, there’s no convenient way to run the code, and you can’t connect it to a control event in a form.
Ordinary modules become useful if you create a fantastically useful piece of code that you want to use in several different places. You could design the perfect search routine and use it in two, three, or four dozen different forms. And you could cut and paste the code into each subroutine that needs it. Except that duplicate code is always a Bad Idea (just like duplicate data). Why? Consider what happens if you need to fix a problem or add an improvement. With duplicate code, you’ll be forced to hunt down each copy of the code and repeat the same change. That’s a sure way to waste your holiday weekends.
The solution’s to take your useful, reusable code routine, and place it in a module. You can then call that code routine wherever you need it—and you can edit it just once when you need to update or fix it. To call a code routine in another module, you use the name of the module, followed by a period (.), followed by the name of the subroutine. Here’s an example:
	Private Sub ButtonOfPower_Click()
	    MyCodeRoutine
	End Sub
Here’s a play-by-play account of what happens when you use this code:
You click the ButtonOfPower button.
Access finds the ButtonOfPower_Click code, and then runs it.
The code runs another routine, the MyCodeRoutine subroutine in the MyModule module. This code shows the Message box you saw earlier (Section 16.1.2).
After MyCodeRoutine completes, Access runs the rest of the code in ButtonOfPower_Click. In this example, there aren’t any code statements, so the process ends here.
You can break a single task into as many subroutines as you want. You can also call subroutines that call other subroutines, which call still more subroutines, and so on. Access doesn’t care. All it’s interested in are the actual code statements.
Note
You can use this trick only with public subroutines. Private subroutines aren’t accessible to code outside the module where they’re stored. All subroutines are automatically public unless you add the word Private before the word Sub. So the MyCodeRoutine example you saw in Section 16.1.2 is public.
If the ButtonOfPower_Click and MyCodeRoutine subroutines are both in the same module, there’s a bit of a shortcut. You no longer need to include the module name when you call MyCodeRoutine. Instead, you can use this code:
	Private Sub ButtonOfPower_Click()
	    MyCodeRoutine
	End Sub
Now Access assumes MyCodeRoutine must be in the same module, and it looks for it there. Also, in this case it doesn’t matter whether MyCodeRoutine is public or private—either way, your code can call it.
Tip
If you want to reuse a piece of code in several places in the same form (for example, in response to different button clicks), then consider creating your own subroutine and putting your code there. If you want to reuse a piece of code in several different forms, then consider putting it in a subroutine in a separate module.
As you learned in Chapter 15, the most exciting macros are those that take charge of your forms and controls. In VB code, this task’s spectacularly easy. You just need to know the names of all the controls you want to work with.
Suppose you’re creating a (somewhat dangerous) code routine that clears a text box. You plan to use this routine to reset the text in the Description field. Here’s the line of code that does the job:
Description = ""
This line’s a basic Visual Basic assignment statement (a line of code that modifies a piece of data), and it all revolves around the equal sign (=). When Access runs this line of code, it takes the content on the righthand side of the equal sign (in this case, an empty set of quotation marks that represents no text), and it stuffs that content into the receptacle on the left-hand side (in this case, the Description field). The end result’s that the current content in the Description field is wiped out.
Note
You can also use the familiar square brackets so that it’s [Description] rather than Description. The brackets are optional, unless you’ve been reckless enough to break the good field naming rules you learned about in Section 2.5.1. If you have a text box name with a space in it, then you always need to wrap the name in square brackets.
Of course, you can also substitute a specific piece of text:
Description = "Type something here, please"
The effect of running this code is just the same as if you typed in the new text yourself (except it happens a whole lot faster). As you know, when you modify any field, you place the current record into edit mode. As soon as you move to another record or close the form, Access commits your edit and saves your new values in the database.
There’s only so much you can do with fixed text values. After all, when you use a fixed piece of text, you need to decide at the outset exactly what you want to use. By the time you actually click a button and trigger your code, you may want something different. For that reason, programmers rarely used fixed values in this way. Instead, they use more complex expressions, which are a lot like the Access expressions you used for query calculations (Section 7.1) and validation rules (Section 4.3).
With text, you can use the & operator to create a large piece of text out of several smaller pieces. Here’s an example that takes the current description and adds a sentence at the end that identifies the product by name.
Description = Description & " This is a description for " & ProductName & "."
If the Description starts off as “Enjoy delectable waves of fudge.”, it may end up being “Enjoy delectable waves of fudge. This is a description for Fudge Tsunami.”
More commonly, expressions manipulate numeric or date values. Here’s the code for an IncreasePrice button that ratchets up a price by 10 percent every time you click the button (and best of all, you can click it as many times as you like):
	Private Sub IncreasePrice_Click
	    Price = Price * 1.10
	End Sub
For a review of the different operators you can use with expressions to perform different types of calculations (like addition, multiplication, division, and so on), go back to Section 7.1.2.
Note
Visual Basic treats Yes/No fields (Section 2.3.7) as True/False fields. The end result’s the same, but the syntax you use is just a bit different. To set the value of a Yes/No field, you use one of two built-in Visual Basic keywords: True or False.
You can actually do a whole lot more with the controls on your form. Rather than just changing their content, you can also change their color, font, position, visibility, and many other details. The secret to unlocking the magic is to realize that all controls are programming objects.
In the programming world, an object’s nothing more than a convenient way to group together some related features. The Description field isn’t just a single value, it’s an entire text box object, and that means it has all sorts of built-in features. If you understand how text box objects work, then you have you a way to get to these other features.
Note
Access invites some confusion because it uses the word object in two different ways. Throughout this book, you’ve referred to all the ingredients of your database (things like tables, queries, and forms) as database objects. Programmers use the word “object” in a stricter sense to refer to a programming construct that brings together related features (and that’s how this chapter uses the term).
You can interact with objects in three ways:
Properties. Properties are pieces of information about an object. You change properties to modify the object or how it behaves. A text box object has a FontSize property that controls its text’s size.
Methods. Methods are actions you can perform with an object. For instance, every form has a Requery method that lets you rerun the query that gets its data.
Events. Events are notifications that an object sends out, which you can respond to with your code. You can react to button clicks using the button control’s On Click event.
The following sections take a closer look at these three object ingredients.
Properties aren’t anything new. After all, you’ve spent considerable time tweaking them with the Property Sheet to get just the right formatting and behavior (see Section 13.1.2). However, properties show a whole different side when you change them using your code. With code, you can modify properties dynamically in response to various actions (like clicking a button or editing the text in a text box). This technique opens up a world of new possibilities.
The secret to accessing the built-in features of an object is the lowly period (which programming nerds call the dot operator). Suppose you want to modify the background color of the Description text box. You can do this job by setting the BackColor property of the corresponding text box object. Here’s how it’s done:
Description.BackColor = vbYellow
This line of code takes the Description object, and then uses the dot operator to pick out its BackColor property. The BackColor is then set with the help of a specially-created keyword, called vbYellow. As you saw with events, the name of a property in code doesn’t always match the name of the property in the Property Sheet. In code, property names never include spaces.
You can use this line of code in any subroutine in a form module, as long as that form really and truly has a text box control named Description.
Note
Access colors are set using cryptic numbers. VB simplifies life for the most common colors by giving you predefined names to use, which start with the letters vb. These names are just shorthand ways to refer to the corresponding color numbers. Behind the scenes, vbYellow is really the number 65535. (If you search the Access Help for “vbYellow,” you’ll find the full list of eight color constants. You’ll also learn how to get more color choices in Section 16.4.1.)
If you don’t include the dot, then you end up using the default property. For the text box object, the default property’s Value, which represents the content of the field. That’s why you can write code like this, which doesn’t include the dot operator:
Description = "A very fine product, indeed."
So now that you know that all the controls on your forms are objects with a whole range of useful details that you can change, the important question is: How do you know what properties there are, and how do you find the ones you want? Several guidelines can help you out:
Identical controls have identical properties. Even though every text box on your form is represented by a distinct text box object, each object has exactly the same properties. Obviously, the property values will differ, but you can rest assured that if you find a BackColor property in one text box, you’ll find a BackColor property in every other one as well.
Similar controls have similar properties. All controls have a BackColor property, whether it’s a text box, button, or a lowly label. Even the objects that represent parts of the form (like Detail, FormHeader, and FormFooter) provide a BackColor property for setting background colors. This bit of standardization allows you to reuse what you learn with one control on another control.
You can look it up in the Property Sheet. The property names you use in code usually correspond to the property names you see in the Property Sheet. One difference is that the names you use in code never have spaces, so the BackColor property in the Property Sheet becomes the BackColor property in code.
You can find it with Visual Basic IntelliSense. The Visual Basic editor offers a great feature that can help you find the property you want. As soon as you type the period after the name of an object, it pops up a list with all the properties and methods you can use for that object (Figure 16-6).
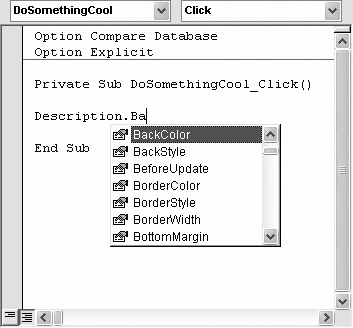
Figure 16-6. When you type an object name, and then enter the period, Visual Basic pops up a list of choices. If you type a few letters, Visual Basic moves to the matching part of the list. If you see the property you want, then you can insert it by clicking it or pressing the Space bar.
Note
The IntelliSense list actually contains two types of elements: properties (which are separate characteristics that are associated with an object) and methods (which are actions you can perform on an object). Properties are far more common, and they’re marked with an icon that looks like a hand holding a card. Methods have an icon that looks like a flying green eraser. You’ll learn how to use methods in Section 16.3.2.
Table 16-1 lists some control properties that you may want to manipulate with Visual Basic code.
Table 16-1. Useful control properties
|
Property |
Type of Data |
Description |
|---|---|---|
|
Value |
Depends |
Stores the a control’s value. Usually, each control’s linked to a field, so the Value property lets you read or change a value from the current record. Depending on the field’s data type, the property could be text, a number, a True/False value, and so on. |
|
True or False |
Determines whether a control value can be changed. If you set this property it to False, it locks the control so the person using the form can’t edit the field (although your code can still change the Value property). Controls that are turned off look a little different from enabled controls—typically, they have a grayedout or “dimmed” appearance. | |
|
True or False |
Determines whether the person using a form can see a control. If you set this property to False, then the control disappears from the form. This property’s a handy way to hide fields that don’t apply. If a customer lives in Zambia, you can hide the State box. | |
|
A number |
Determines the color that’s used for text (the foreground color) and the color that’s shown behind the text (the background color). | |
|
Left and Top |
A number |
Determines the position of a control on a form. The Left property provides the distance between the left edge of the form and the left edge of the control. The Top property gives the distance between the top of the form and the top edge of the control. Both values are in pixels (see Section 16.3.1). |
|
A number |
Determines the size of a control, in pixels. | |
|
A text string and a number (respectively) |
Determines the font that’s used to show the text in a control. FontName is the name of the font (like “Arial”) and FontSize is the point size (like 10). | |
|
True or False |
Determines whether text should be bolded or italicized. | |
|
Picture[1] |
A text string |
Lets you show a background picture on part of a form, or a tab, image, or button. You supply a path that points to a picture file. |
|
Text[2] |
A text string |
Provides the current text inside a text box. In most cases, this property gives you the same information as the Value property. However, if someone’s edited the text but hasn’t yet moved to another control, these properties differ. In this situation, Value is the text that’s stored in the table and Text is the newly edited information that hasn’t been applied yet. |
|
Caption[3] |
A text string |
Sets the text for a label or button control, or the title of a form. This property’s important when you create labels that aren’t linked to fields in a table. You could use a label to display a status message. |
|
ItemsSelected[4] |
A collection object |
Provides a collection, which is a special type of object that contains zero or more subobjects. This collection holds the values of all the items currently selected in the list. The ItemsSelected property’s useful only if you’ve created a list that supports multiple selections. Otherwise, use the Value property. |
[1] These properties are more specialized, and they don’t apply to most controls. [2] These properties are more specialized, and they don’t apply to most controls. [3] These properties are more specialized, and they don’t apply to most controls. [4] These properties are more specialized, and they don’t apply to most controls. | ||
Methods let you perform actions with an object. In many cases, calling a method does more than setting a property. In fact, a single method may launch a complex operation that affects many properties. The Requery method tells your form to get the latest data from the database, and then refresh all its controls.
Tip
When you use controls, you’ll spend most of time working with properties. In fact, controls have a whole lot of properties, but just a few odd methods.
To use a method, you type the object name, followed by a period, followed by the method name. However, you don’t use the equal sign because you aren’t setting the method. You’re just calling it into action.
Here’s an example that refreshes the current record on a form using the Refresh method:
Form.Refresh
In some cases, a method requires some extra information. If this is the case, you’ll know, because Visual Basic’s IntelliSense lets you know as you write your code (see Figure 16-7).
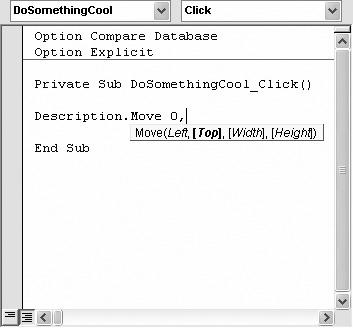
Figure 16-7. The rarely used Move method lets you reposition and resize a control in one blow. Once you type the name of this method, the Visual Basic editor shows you the four values you can supply. In this example, only the first value (Left) is required—the others are placed in square brackets, which means you can leave them out.
If you need to supply extra information for a method, you must add a space after the method name, followed by the appropriate value. If you need to supply several values, you separate each one with a comma. Here’s an example that moves a control to the top left corner of a form:
Description.Move 0, 0
Table 16-2 lists the most important control methods.
Table 16-2. Useful control methods
|
Method |
Description |
|---|---|
|
Moves the cursor into the control, so that it becomes the currently active control. This technique’s useful when you’re performing validation. If you notice an error in a field, you can send the person back to the control that has the error. | |
|
Reverse any recent (uncommitted) changes in a control. You can also call this method on a form to abandon all changes and revert back to the original values. If the form isn’t currently in edit mode, then this method does nothing. | |
|
Recalc[5] |
Recalculates any expressions (Section 13.2.3) in the controls of a form. |
|
Refresh[6] |
Gets the latest values for this record from the table, and then refreshes the form accordingly. This method’s useful if you’ve just triggered another task that may have modified the record, or if you’re using a multiuser database (see Chapter 18), where several people might be changing a record at once. |
|
Requery[7] |
Re-runs the query that’s used to get the data for the form, and then shows that data, starting at the first record. This method’s like Refresh, but instead of affecting the current record, it refreshes them all. You can also use this method on a lookup list to refresh its contents. |
[5] These methods apply only to form objects, not individual controls. [6] These methods apply only to form objects, not individual controls. [7] These methods apply only to form objects, not individual controls. | |
As you know, events are the notifications that objects use to tell your code something important has just happened. You’ve already mastered events, and you’ve used them in this chapter to react to button clicks. For a list of the most common control events, refer to Section 15.5.1.
One topic that you haven’t considered yet is how events can provide extra bits of information. As you may have already noticed, every subroutine includes a pair of parentheses. Here’s a second look:
Private Sub ButtonOfPower_Click()
In the examples you’ve seen so far, those parentheses don’t contain anything at all. However, they exist for a reason. Some events provide your code with additional event information, and this information’s sandwiched between the two parentheses.
Consider the On Key Press event of a text box, which occurs every time someone types a character. It provides a special numeric code that represents the key that was pressed. (Programmers call this the ASCII code.)
If you add a subroutine to respond to the On Key Press event, then Access generates code like this:
	Private Sub MyTextBox_KeyPress(KeyAscii As Integer)
	End Sub
This code means that the On Key Press event’s providing your code with another piece of information. It’s an integer (whole number) named KeyAscii, and you can use it in your own code. Here’s an example that simply shows the key code in a Message box:
	Private Sub MyTextBox_KeyPress(KeyAscii As Integer)
	    MsgBox "Your pressed the key with the code: " & KeyAscii
	End Sub
Some events provide several pieces of information. In these cases, you’ll spot a whole list between the parentheses. Each piece of information’s separated by a comma, and called a parameter.
Note
Technically, parameters are a type of variable. Variables are handy containers that store some information. (This information can vary, which is what gives them their name.) You’ll learn more about using variables in Section 17.1.
Here’s an example for the On Mouse Move event (which occurs when you move the mouse pointer over the control). The opening declaration for the subroutine is so long that it had to be split over two lines using the underscore:
	Private Sub SomeControl_MouseMove(Button As Integer, _
	  Shift As Integer, X As Single, Y As Single)
	End Sub
In this case, you get four pieces of information. The Button parameter indicates which mouse buttons are currently pressed. The Shift parameter indicates whether the Shift, Ctrl, and Alt keys were held down while the mouse was moved. Finally, the X and Y parameters indicate where the mouse pointer is (its coordinates).
Now that you’ve learned the basics of Visual Basic, you’re probably itching to get to work with some practical code. The following sections present two examples that put control objects to work.
Tip
If you’re eager to learn more, you can find an object-by-object reference in the Access Help. To get to Access Help, choose Help → Microsoft Visual Basic Help. Next, click through these topics: Visual Basic for Applications Language Reference → Microsoft Forms Visual Basic Reference → Reference. You can then see a list of all the objects Access has to offer (click Objects), or browse through a combined list of events, methods, or properties that are offered by the Access objects (click Events, Methods, or Properties).
Record editing’s a two-stage process. First, you change one or more field values, which places the record into edit mode. Then, you close the form or move to another record, which commits your change. Or you hit Esc, which cancels your changes, and then reverts to the original values.
If you’re using the Record Selection bar (meaning the Record Selectors property of the form’s set to Yes in the Property Sheet, which is the standard setting), Access indicates when you’re in edit mode by changing the tiny arrow in the form’s top-left corner to a tiny pencil icon. This icon’s a helpful indicator that something’s changed on your form and you need to decide whether to go through with the update. However, Access newbies and pros alike can easily miss the tiny pencil icon. That’s why some people prefer to make the change much more obvious by showing a message on the form, or changing the background color.
The following example demonstrates this technique. Figure 16-8 shows the result.
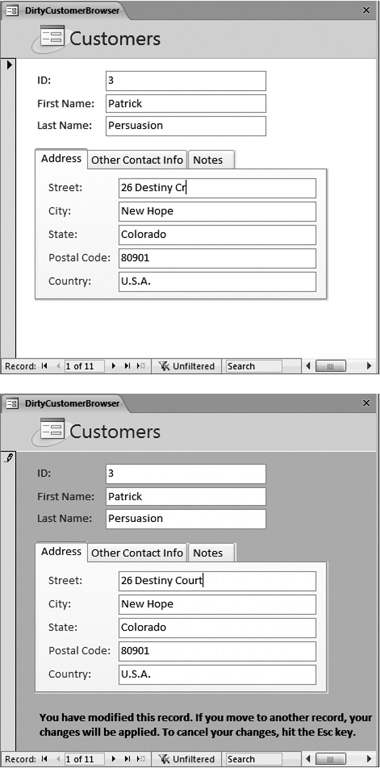
Figure 16-8. Top: The form seems normal at first glance. Bottom: If you change any value, the form background changes color, and a text message appears at the bottom.
In order to create this example, you need to start by building the right form. Take an ordinary form, and then add a label to the form footer (see Section 13.1.1). Give the label a respectable name, like InfoMessage, by changing the Name in the Property Sheet. Now you’re ready to write some code.
Note
Control names are important. You use the control name to refer to the control object in your code. And when you’re reading a piece of code, no one—not even you—knows what Label44 means.
Before you add the code to your form, you need to determine two things:
Where does the code go? In other words, you need to identify the event that should trigger your code. Once you’ve answered this question, you can create the right subroutine.
What does your code need to do? In other words, you need to decide what objects you’re using and what properties you’re modifying. Once you’ve figured this part out, you can write the code in your subroutine.
In this example, you need to respond to the On Dirty event of the form. This event occurs when the record’s changed in any way, and the form switches into edit mode. (Deeply repressed programmers say this moment’s when the form “becomes dirty.”) If several values are modified, the On Dirty event fires only for the first change. After that, the form’s already in edit mode, and already “dirty.”
Note
Each individual control also has its own On Dirty event, which fires the first time someone changes a particular control. You don’t want to pay any attention to these events. Instead, you want to use the On Dirty event of the form, so you catch all possible changes.
Here’s the subroutine you need to react to the On Dirty event of your form:
	Private Sub Form_Dirty(Cancel As Integer)
	End Sub
Note
This subroutine looks a little different from the previous ones you’ve seen because it includes cancellation support. Don’t worry about this feature right now—you’ll learn all about it in Section 17.1.3.
You can type this into an existing form module by hand (as long as you use exactly the same name for your subroutine), or you can add it using the Property Sheet (just select the Form in the Property Sheet list, find the On Dirty event, choose Event Procedure from the list, and then click the ellipsis button).
Now comes the fun part—writing the code. First, you need a statement that changes the form’s background color. Although the form object doesn’t provide a BackColor property, the objects that represent the individual parts of the form (Details, FormFooter, and FormHeader) do. So you can use code like this:
Detail.BackColor = vbRed
You also need to fill in a message in the label:
	InfoMessage.Caption = "You have modified this record. " & _
	 "If you move to another record, your changes will be applied. " & _
	 "To cancel your changes, hit the Esc key."
Place these two code statements into the Form_Dirty subroutine, and you’re ready to go.
Right now, the form has a flaw. When you make your first change, the label appears and the background color changes, just as it should. However, once you commit that change by moving to another record, the color and message remain. This result’s obviously not what you want.
To fix this problem, you need to react to another event: the form’s After Update event. This event takes place after Access has successfully applied the change. Here’s the code you need to return the form back to its normal appearance:
	Private Sub Form_AfterUpdate()
	    Detail.BackColor = vbWhite
	    InfoMessage.Caption = ""
	End Sub
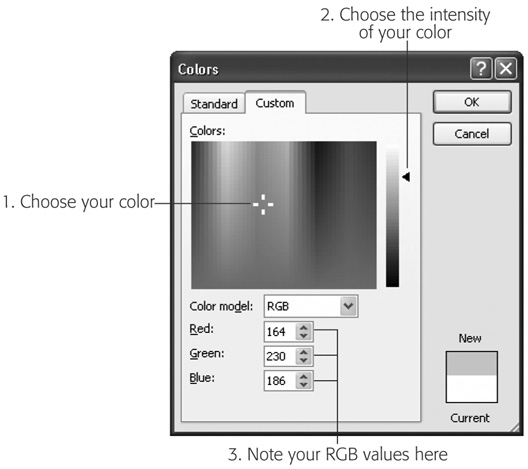
Figure 16-9. To pick a color, click the color grid. (The crosshairs shows your current location.) Then, use the vertical slider to adjust your color’s intensity. You see the Red, Green, and Blue values change as you change the color.
Note
You don’t want to use the Before Update event, because it takes place just before the change is committed. At this point, you have no way of knowing if Access will spot some invalid data, show an error message, and prevent the update (in which case the red background color should remain).
The example still isn’t quite complete. Besides committing a change, someone can also hit Esc to cancel it. You need to respond to this possibility as well, and use the same code to return the form to normal. In this case, you use the form’s On Undo event:
	Private Sub Form_Undo()
	    Detail.BackColor = vbWhite
	    InfoMessage.Caption = ""
	End Sub
This step completes the example. To see all three subroutines together, and try them out, download the sample database for this chapter (Section 3.4.2.3 explains the deal on sample databases).
A mouseover effect is an action that takes place when you move the mouse over some region of a form. You could do things like highlight the control underneath by changing its formatting or content. Web designers often use mouseover effects to create buttons that change their appearance when you hover over them.
You can easily create a mouseover effect in Access. You simply need to respond to the On Mouse Move event. You can use the form’s On Mouse Move event if you want to watch the mouse move all over. More typically, you can use the On Mouse Move event for specific controls, which allows you to detect when the mouse moves over those controls.
The form in Figure 16-10 uses a mouseover effect.
As usual, to create this, you need to start by adding the extra controls you need, like the Don’t Click Me button (which we’ll name DoNotClickButton) and the image (named HappyFace).
Once those details are in place, you need to create two subroutines. The first responds to the On Mouse Move event of the button. It swaps in the n you move over the button:
	Private Sub DoNotClickButton_MouseMove(Button As Integer, _
	  Shift As Integer, X As Single, Y As Single)

	    HappyFace.Picture = "c:ImagesUnHappy.jpg"
	End Sub
This code assumes that you’ve placed the picture file (named UnHappy.jpg) in a folder named c:Images.
As with all your code, you can type this into an existing form module by hand or, more conveniently, you can use the Property Sheet to create it (Section 16.2).
Tip
The On Mouse Move event happens very frequently. As you move the mouse from one side of the form to the other, you trigger it dozens of times. For that reason, you should make sure that the code that you use in response to that event is fast, or it could make your whole form feel sluggish.
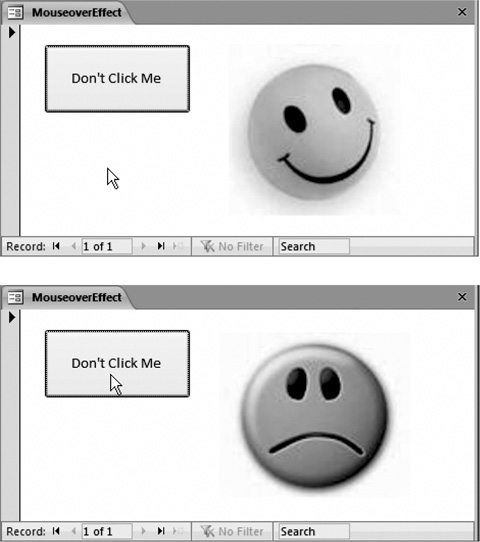
Figure 16-10. Top: The form as it first appears. Bottom: When you move the mouse over the Don’t Click Me button, the image at the side changes from a happy face to a frowning face. Move anywhere else, and the happy face returns.
The second subroutine responds to the On Mouse Move event of the form’s detail section, which happens when you move out of the button and over the blank space around it. This subroutine switches the image back to its original happy face:
	Private Sub Detail_MouseMove(Button As Integer, _
	  Shift As Integer, X As Single, Y As Single)

	    HappyFace.Picture = "c:ImagesHappy.jpg"

	End Sub
The way this example’s currently written has one weakness. Right now, it relies on the UnHappy.jpg and Happy.jpg files being in specific locations on the hard drive. This detail’s hard to guarantee—after all, who’s to say you won’t move them somewhere else or try to open the database on another computer?
A better solution is to place the images in the same folder as the database file. You can point Access to that location using code like this:
HappyFace.Picture = CurrentProject.Path & "Happy.jpg"
This code works using a special object that’s always available in any code you write: the CurrentProject object, which provides information about your current database and the objects it contains. CurrentProject has a Path property, which gives you the location of the current database as a text string.
With this code in place, you can confidently copy your database anywhere, as long as you make sure the image files are placed in the same folder.