
Forms suit a database like pocket protectors on a programmer. They streamline day-to-day tasks and give your database a sharp, distinctive look. In order to be a master database builder, you need to be able to craft top-notch forms.
In the previous chapter, you learned how to design several common types of forms. In this chapter, you’ll take form building to the next level with a whole new arsenal of techniques. First, you’ll learn how to create a form in the no-holds-barred Design view, where you can tweak and polish every square inch of your form. Then, you’ll take a tour of Access’s different controls, and jazz up your form with links, tabbed panels, and buttons. You’ll also learn how to work with linked tables by creating special types of forms called subforms that work in harmony with other forms.
In the previous chapter, you learned how to quickly create different forms using the ribbon’s buttons and the Form wizard. But serious form gurus take a different approach—they build a form by hand. There are two ways you go about this task:
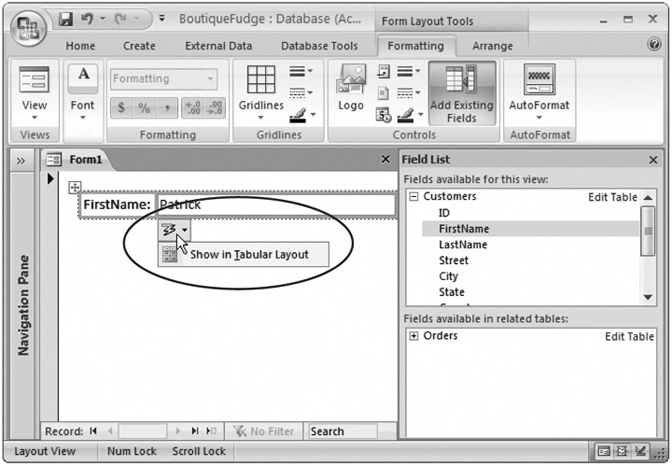
Create a form in Layout view. Choose Create → Forms → Blank Form. Then, drag the fields you want from the Field List pane onto your form (Figure 13-1). You learned everything you need to pull this off in Chapter 12. You can quickly create a standard form with a stacked or tabular layout, but it doesn’t give you any extra frills.
Create a form in Design view. Choose Create → Forms → Form Design. Now you’ll start with a blank form in the design window. You can drag fields onto your form from the Field List pane (just as you do in Layout view), and you can add a wide variety of more specialized controls from the ribbon.
Note
If you don’t see the Field List pane, then choose Form Layout Tools | Formatting → Tools → Add Existing Fields (in Design view) or Form Design Tools | Design → Controls → Add Existing Fields (in Layout view).
Of course, while you’re working with a form, you can easily jump back and forth between the two views. (Just right-click the tab title, choosing the view you want, or click the view buttons at the window’s bottom-right corner.) You can add fields to your form using either view. However, when you add fields in Layout view, Access automatically positions them in a layout. When you add fields in Design view, they start out layout-free. Access assumes that people who use Design view want more control over how their fields are placed.
Tip
Remember, you can move a free-floating field into a layout after the fact by dragging it into place. Figure 12-13 (Section 12.3.3) shows how.
There’s another, more important difference between Layout view and Design view. In Design view, you can add one of over a dozen fancy controls, like buttons, boxes, and labels. These controls make the difference between the cookie-cutter forms Access creates automatically, and forms that exhibit your own personal style.
In Chapter 12, you learned that a report’s divided into separate sections (like a report header, a details section, a report footer, and so on), each of which appears in a specific place. The same’s true for forms. However, newly created forms start life with only one section: the details section, which defines the content for each record.
If you want to add a title or logo at the top of your form, or some sort of summary information or message at the bottom, you’ll want to include a header and footer section. To add these elements to your form, right-click anywhere on the form’s surface, and then choose Page Header/Footer.
When working with form sections, remember to keep them small (as shown in Figure 13-2). Each form section should be just large enough to fit the content you’re displaying. If you create an oversized form with a lot of blank space, the results look unprofessional. You’ll get unnecessary scroll bars on your form’s sides, which let you scroll off into nothingness.
Tip
You can’t make a form smaller than the controls it contains. This fact’s the source of a frequent stumbling block for form designers. If Access doesn’t let you resize a form, then something, somewhere, is still too big. (If all else fails, check that you don’t have a large box in the form header or form footer sections.)

Figure 13-2. Even though this form easily fits all its fields in the display area, it still has scroll bars. If you switch to Design view, you’ll see why—the form’s wider and longer than it needs to be.
Note
If your database is set to use overlapping windows instead of tabs (Section 1.3.6), then you’ll see a slightly different problem—your form windows are unnecessarily large. In fact, they may not even fit in the main Access window, in which case Access chops off the edges.
You first learned about controls—graphical widgets like labels and text boxes—when you created advanced reports in Chapter 12. Access gives you the same ability to use controls with forms. In fact, you use the same ribbon section to add them. However, many of the controls that didn’t make much sense with reports really shine with forms.
Note
Behind the scenes, everything on a form’s actually a control. Each time you add a field, you end up with two linked controls: a label that displays the field name, and a text box that holds the field value.
One of the simplest and most useful controls is the humble label. Using the label, you can add formatted text anywhere on your form. You could choose to use labels to highlight additional instructions, as shown in Figure 13-3.
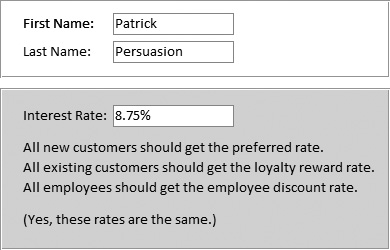
Figure 13-3. Use labels to add helpful instructions (or cheeky commentary) to your forms. Line and rectangle controls add a little polish.
To add a control, follow these steps:
Head to the ribbon’s Form Design Tools | Design → Controls section.
The Controls section has one-stop shopping for all the controls you can use.
Optionally, switch on the Use Control Wizards button. This button activates the wizards for controls.
Some types of controls, like buttons and lists, come equipped with helpful wizards. As soon as you drop one on your form, the wizard pops up to help you perfect it. Ordinarily, wizards are switched on. However, control experts who know exactly what they want may find that the wizards just slow them down.
When the Use Control Wizards button (found the Form Design Tools | Design → Controls section’s far-right side) is not highlighted, the Control wizards leave you alone.
Click the icon for the control you want.
On most people’s screens, Access can’t fit the control name on the ribbon’s control button. (Thirty-inch monitor owners, congratulate yourselves and skip to the next paragraph.) Hover over each control icon for a moment, and Access displays the control name in a tooltip.
Once you click your icon, it remains highlighted. Your mouse cursor changes to a cross with a small picture of the control superimposed. That change is your indication that your control’s ready and waiting for you to drop it onto the form.
To place your control on the form, drag the mouse to draw the control on the form.
If you don’t get it right the first time, then you can always drag a control to a new position, or drag its borders to resize it.
If you decide that you don’t want to add the control you picked, then just click the Select button (at the far right of the Form Design Tools | Design → Controls section). It looks like a mouse pointer. When you click Select, your mouse pointer returns to normal. You can now click on the form to select an existing control. You don’t create a new one.
If your control has a Control wizard and you choose to use Control Wizards (see step 2), the wizard appears now.
Answer all the questions to configure your control, or just hit Esc to skip out of the wizard and do all the configuration on your own.
If you’re adding a label, supply some text for the control.
After you drop a label onto your form, Access waits for you to type in some text (which is set in the Caption property). If you don’t type anything for your label, Access assumes you don’t really want the label, and just gets rid of it.
If the Property Sheet isn’t already visible (at the right side of the window), click Form Design Tools | Design → Tools → Property Sheet to show it.
To configure the control’s many settings, or properties, you need to use the Property Sheet.
Change the appropriate settings in the Property Sheet.
If you’ve added a bound control (see the box "Bound Controls), select the Data tab, and then set the Control Source field to the name of the field you want to display.
Tip
If you have a label control that doesn’t fit all the text you’ve entered, you can bump its size up in one step. Just right-click the control, and then choose Size → To Fit. Access resizes the label so it’s just large enough to fit all its content. Don’t try this with other controls like text boxes—it won’t work.
Optionally, give your control a better name by setting the Name property (in the Other tab).
If you’ve just created a new label, Access bestows a name like Label46. If you want to honor your control with something more becoming, just change the text in the Name property. You’ll have an easier time finding your control in the drop-down list in the Property Sheet next time you want to change it.
Format your control.
Although you can adjust many formatting details via the Property Sheet, the ribbon’s much easier to use. Use the Form Design Tools | Design → Font section for basic font and color formatting, and use the Form Design Tools | Design → Controls chunk to add a stylized border around your control.
Later in this chapter, you’ll consider how to create some popular form designs with controls. But first, it’s worth taking a quick overview of all the controls on the rib-bon so you can see exactly what’s available (and what isn’t). Table 13-1 introduces you to every member of the control family.
Table 13-1. Form Controls
|
Control | |
|---|---|
|
Label |
Displays fixed text. Perfect for captions, notes, and helpful instructions. |
|
Text Box |
Displays the value of a field from a record. You can also use a text box to show the result of an expression, as described in Section 11.5. |
|
Displays the value of a Yes/No field. If it’s Yes, the check box has a checkmark. | |
|
Shows a button that can be in two different states: normal and pressed. You switch it from one state to the other by clicking it. The toggle button’s a rarely used oddity, but you can substitute it for the check box to display the value of a Yes/No field. In this case, the button’s depressed if the field value is Yes. | |
|
Combo Box |
Displays a list that pops into view when you click the drop-down arrow. This list can be a list of values you supply, or it can be drawn from another table. Access automatically uses a combo box for lookup fields or linked tables. |
|
Displays a large box with a list of items. This list can be a list of values you supply, or it can be drawn from another table. You can use list boxes and combo boxes interchangeably—the key difference is the fact that list boxes take more space and combo boxes let you type in your own values that aren’t in the list. | |
|
Attachment |
Shows the first file in an attachment field. If this file’s a picture, the picture’s displayed directly on the form. Otherwise, all you see’s a small icon that indicates the file type. If the attachment field holds more than one file, then you can step through each one using the arrows in the minibar (which appears when you click this field), as described in Section 12.1.2.3. |
|
The option group’s a rectangular container that holds one or more option buttons. | |
|
Displays a fixed hyperlink—blue underlined text that, when clicked, transports the clicker to a specific Web page. Section 13.2.5 shows how it works. | |
|
Line and Rectangle |
The line and rectangle controls are just decoration. Skillful designers use them to separate sections and highlight important information. |
|
Displays a picture that you supply. Perfect for logos and eye candy that sets your form apart. Set the Size Mode property to determine whether your picture’s chopped down to fit its box (Clip), stretched to fit (Stretch), or resized without changing the shape (Zoom, which is the standard setting). You can even use the Picture Tiling property to repeat a picture over a larger surface. To keep your pictures (and database files) small, use compact .jpg files rather than bloated .bmp files. | |
|
Displays several tabs of information. You can see the content in one tab at a time—you click to pick which tab you want. This Windows staple allows you to pack more information into a smaller space. Section 13.2.4 shows an example. | |
|
Subform |
Displays a form inside a form. Usually, a subform shows linked records from a related table. You’ll see how this works in Section 13.3.1. |
|
Creates a basic chart using the Chart wizard that’s included with Office. Alas, charts aren’t very well integrated into Access. If you want to provide a graphical view of your data, then you’re better off using a pivot chart (see Chapter 9) or just exporting your raw data to Excel, which is much more capable. | |
|
Shows content, which is known as an object, from another program using a somewhat old-fashioned standard called OLE. You can use this control to do things like embed a spreadsheet, audio file, or Word document within your form. Most folks resist the urge, because the results tend to be awkward and confusing. | |
|
Bound Object Frame |
Similar to the unbound object frame, but this control retrieves the object you want to display from a field in the current record. This feature seems nifty, but the quirky and outdated OLE standard causes more trouble than it’s worth. If you want this sort of feature, then you’re far better off using an attachment field with an attachment control (Section 2.3.8), which is designed to solve these problems. |
|
Indicates where a page break should fall. This control has an effect only when you use your form to create a printout. Usually, you should steer clear of this control in forms and use it exclusively in reports, which are tailor-made for printing. | |
|
ActiveX is a control building standard that’s supported by many different programming platforms. If there’s a specialized widget that you need to use in Access, you may be able to buy an ActiveX control from a component company, and then drop it onto your forms. Beware, though—using ActiveX controls often requires hefty amounts of code, and it’s beyond the scope of this book. |
By now, you’re probably comfortable working with controls in Design view. Here’s a quick refresher if your memory needs a little jump start:
Create a control. Use the ribbon to pick the control you want, and then draw it in the right place.
Move a control. Just drag. You can also move several controls at once, as explained in Figure 13-4.
Resize a control. Drag the edges of the rectangle that surrounds it. If you have a linked label-and-text-box combination (which Access creates when you add a field), then be careful to click the right part. Figure 11-9 (Section 11.1.5) shows where to click to move just the caption, just the field value box, or both.
Modify a control. Select it, and then, in the Property Sheet, find the setting you want to change.
Delete a control. Select it, and then hit Delete to wipe it out forever.
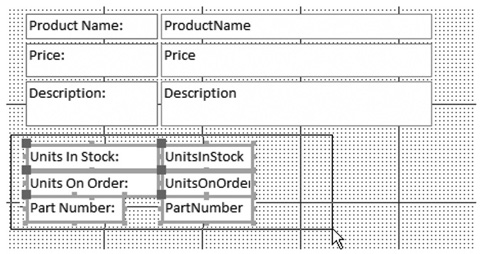
Figure 13-4. To move multiple controls at once, start by clicking somewhere on the form surface. Drag a selection box around all the controls you want to move, as shown here. Then, once all the controls are highlighted, drag any one of them. All the controls move as a unit. (You could also hold down Shift, and click each control one by one.)
If your controls aren’t contained in a layout, it can be difficult to get them neatly arranged. In an effort to help, Access supplies some shortcuts that can line up rogue controls and iron out minor variances. The following sections provide a few useful tips for using these features.
If you have a group of controls that needs to be neatened up, select them all (by drawing a selection box, as shown in Figure 13-4), right-click the selection, and then choose an option in the Align submenu. Use the ever-popular “left” option to line all the controls up along their left edges. You can also line up controls on the right (see Figure 13-5), top, or bottom edges.
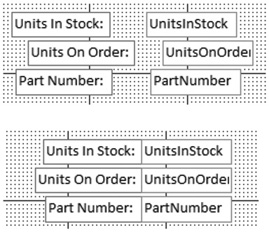
If you have controls of different sizes, then you can tell Access to make them all the same size. Select them all, right-click the selection, and then choose an option from the Size menu. Use To Widest to make all the controls as wide as the widest one of the bunch (see Figure 13-6). Alternatively, you can shrink controls down by choosing To Narrowest, or change their heights with To Tallest and To Shortest.
If you have controls that are scattered unevenly over the form, you can reposition them so that a consistent amount of space appears between them. To do so, select all the controls, and then head to the ribbon’s Form Design Tools | Arrange → Position section. In the Position section, you’ll find several buttons to adjust the spacing between controls:
Make Vertical Spacing Equal spaces out controls so they’re an even distance apart (from top to bottom).
Make Horizontal Spacing Equal spaces out controls so they’re an even distance apart (from side to side).
Increase Vertical Spacing and Increase Horizontal Spacing add a bit more space between all the controls you’ve selected.
Decrease Vertical Spacing and Decrease Horizontal Spacing remove a bit of space between all the controls you’ve selected.
If you have overlapping controls, you may want to decide which one’s placed on top and which one on the bottom. To do so, select one of the controls, head to the ribbon’s Form Design Tools | Arrange → Position section, and then choose Bring to Front (to move the control to the top) or Send to Back (to banish it to the background).
It goes without saying that most forms don’t have overlapping controls. The exception’s if you’re aiming for a unique graphical effect, or if you’re trying to use a rectangle to frame a bunch of controls (in which case the rectangle needs to sit behind the other controls).
Ordinarily, your controls have a fixed, unchanging size. This characteristic lets you precisely arrange a large number of controls next to each other. However, fixedsize controls also have a downside. If you resize the Access window to make it very large, then the controls can’t use the extra space. Conversely, if you make the Access window very small, then you’re sure to cut off part of your form. In other words, fixed-size controls make for easy design, but they’re inflexible.
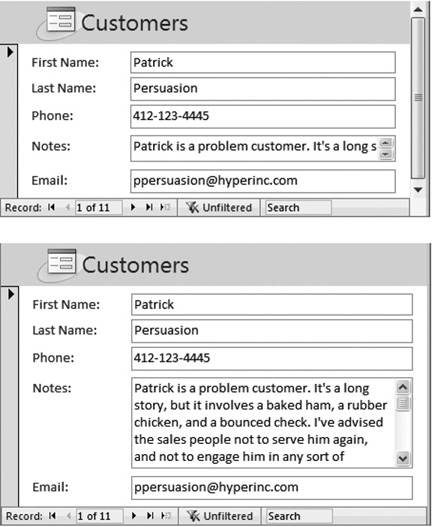
Most people don’t worry too much about these limitations. They design their forms to fit comfortably on an average-sized screen (see the box “How Big Is Your Screen?” in Section 13.1.5.1). However, if you have one or more fields that display a large amount of data—like a memo field (Section 2.3.1.1) that’s chock-full of text—you might want to get a bit more ambitious.
Access 2007 introduces a feature called anchoring, that lets you create controls that can grow to fill extra space when the Access window’s resized. Anchoring’s a little tricky to get right, but if you have huge text fields, it’s worth the trouble.
Essentially, anchoring lets you attach a control to the sides of the form. As a result, when the form changes size, the control’s dragged to a new position or resized. Figure 13-7 shows an ordinary form that uses standard anchoring settings. Nothing happens when this form’s resized.
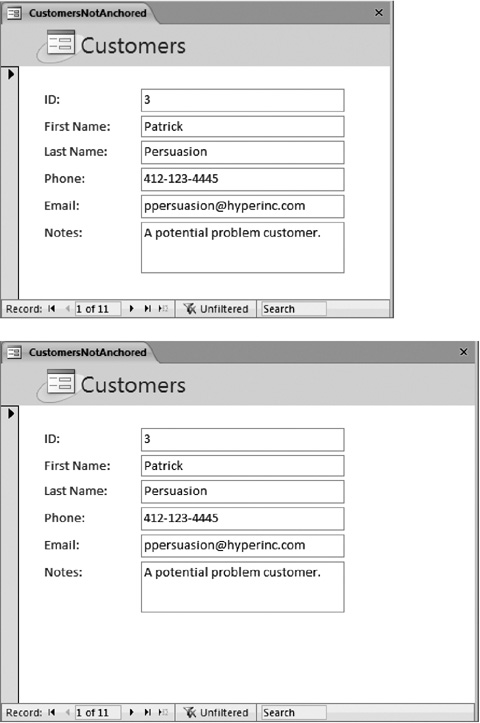
Figure 13-7. Ordinarily, all controls are anchored to the form’s top-left corner (top). If the form window changes size, nothing happens to the controls, because the top-left corner never moves (bottom).
If you anchor a control to a form’s right side, it’s a different story. As the form’s resized wider, the control hugs the right side, moving to a new position. Similarly, if you attach a control to the bottom of the window and make it taller, then the control keeps close to the bottom, no matter how small or large the window becomes. The really exciting bit’s what happens when you anchor a control to opposite sides. In this case, its position doesn’t change, but its size does. If you anchor a control to a form’s left and right sides, then the control widens as the form widens. Figure 13-8 shows how life changes when you anchor your control to different sides.
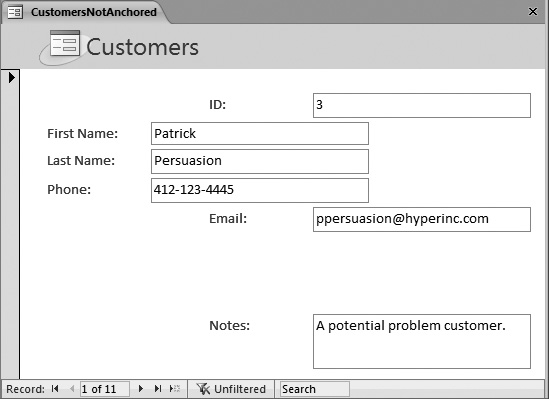
Figure 13-8. This form includes controls that are anchored to different sides. The ID and Email fields are anchored to the top right, and the Notes field is anchored to the bottom right. As the form grows, the controls change position.
Theoretically, you can use anchoring to create all kinds of bizarre effects. You could anchor controls to all different sides of the form, so they move and overlap as the form changes size, scrambling the form in complete confusion. More realistically, people use anchoring to achieve two effects, which are demonstrated in the following two sections.
Ordinarily, you size a text box, and its size never changes. But with anchoring, you can make controls stretch wider or narrower to match your Access window’s size. And as long as you don’t put any other controls in the way, you don’t have a problem with overlapping controls.
Just follow these steps:
First, make sure your form doesn’t have extra blank space. In Design view, shrink the width of the details section so it’s just wide enough to fit your controls.
If you leave extra blank space, then it’s harder to see anchoring at work. Flip back to Figure 13-2 for a quick review of how to size forms properly.
Choose the controls that you want to expand along with the window’s size.
If you have the form shown in Figure 13-7, you may choose all the text boxes. Hold down the Shift key while you click to select them all.
Figure 13-9 shows the final result you’re after.
Note
If your controls are in a layout (Section 12.3), you need to remove them from the layout before you apply anchoring. Although you can apply anchoring settings to an entire layout container, they won’t work the way you want them too because they’ll influence the size of both the field value boxes and the field captions.
Figure 13-9. Top: These text boxes could stand to grow so they can accommodate long names and email addresses. But you don’t want them to be so wide that people need to scroll from side to side if their monitors have a lower resolution than yours. Bottom: The solution’s anchoring, so the text boxes always use the available space, and not one whit more.
Choose Form Design Tools | Arrange → Size → Anchoring → Stretch Across Top. (If you prefer to adjust your anchoring settings in Layout view, then choose Form Design Tools | Arrange → Position → Anchoring → Stretch Across Top.)
This action anchors your control to three sides of the form: the top, left, and right. The top anchoring just makes sure the control stays at the same vertical position if the form window grows taller or shorter. The anchoring to the left and right sides ensures that the text box grows as the form widens, and shrinks as it narrows.
In the previous example, you saw how to use anchoring to make a control grow horizontally. You can also use anchoring to make a control grow vertically, but there’s a catch. In most forms, you have several controls placed one on top of the other. If you’re not careful, when a control gets taller, it starts blotting out the control underneath it.
The solution’s to make sure that only one control on the form can grow vertically. This control (probably a large field that’s stuffed with text) then expands to consume all the extra space. All the controls above this control must be anchored to the top of the form. All the controls underneath it must be docked to the bottom so they stay out of the way.
Here’s how to put this model into practice:
In Design view, shrink the width of the details section so it’s just wide enough to fit your controls.
As with all types of anchoring, extra space is your enemy.
Select the control that you want to grow vertically to get the extra space.
Consider the form in Figure 13-9, which shows customers. In this case, it’s the Notes field that has the most text and would benefit most from the extra space. Even if you anchor the Notes field to both sides, you’ll still get only a bit of extra space. Better to use whatever blank space you can get at the bottom of the form.
Choose Form Design Tools | Arrange → Size → Anchoring → Stretch Down and Across.
This action anchors your control to all four sides of the form: the top, bottom, left, and right. As a result, the control grows when the form’s widened or heightened. If you want the control to grow vertically but not horizontally, you choose Anchoring → Stretch Down instead.
Select the first control under the control that grows vertically. Choose Anchoring → Bottom Left.
This action anchors the control to the left and bottom sides. That way, as the form’s heightened, the control drops down to make space for the one above.
You could also use the Stretch Across Bottom option. In this case, the control’s still anchored to the bottom, but it grows horizontally to fit the width of the form.
Note
In the previous example, you didn’t need to anchor the labels in front of every field, because they stayed fixed in place. However, in this example, you do need to use Bottom Left anchoring for all the labels that appear underneath the control that stretches vertically. (Otherwise, this label doesn’t line up with its value box.) You never use one of the stretch anchoring options with a label, because you don’t want your label to change size.
Repeat step 4 for each control underneath.
If you forget a control, you see a telltale sign. When you resize the form window smaller, some controls overlap because the different anchoring settings don’t agree.
Assuming you anchor everything correctly, you get the result that’s shown in Figure 13-10.
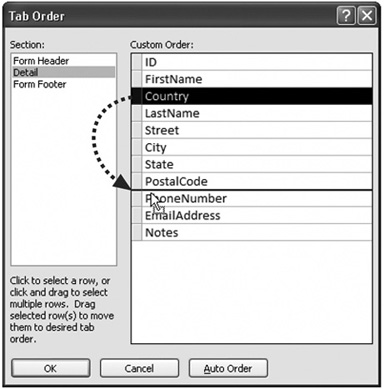
When you’re using a form to edit a record, you need to skip from one field to another. You can jump anywhere you want by using your mouse, but hard-core keyboard jockeys don’t want to waste time raising their fingers from the keys. Here’s where the Tab key comes into the picture.
You probably already know that the Tab key lets you move from one control to another in any Windows application. The Tab key also works in the datasheet, letting you skip from one column to the next. So it should come as no surprise that the Tab key also works in your forms.
The first time you press Tab in a form, you may be in for an embarrassing surprise. If you’ve spent a fair bit of time fiddling with your controls and rearranging them, then the Tab key doesn’t necessarily take you to the control you expect. Figure 13-11 illustrates the problem.
Figure 13-11. You’d expect that you could press the Tab key here to jump from the FirstName field to the LastName field. But try it and you wind up in the Country field instead, halfway down the form.
Note
The Tab key always works correctly if you’re using a tabular or stacked layout, because Access keeps it up to date as you move the controls around. It’s only when you’ve taken your controls out of a layout that you’ll see the problem described here.
Getting a form straightened out so that the Tab key moves from one control to the next in an orderly fashion is called setting the tab order. Essentially, every control that supports tabbing has three important properties (which you can find in the Other tab in the Property Sheet). These properties are:
Tab Stop determines whether a control supports tabbing. If set to Yes, you can tab to this control. If you change this setting to No, then it doesn’t matter how much tabbing you do—you’ll never get here. When you first add a control, this property’s always set to Yes.
Auto Tab has an effect only if the control’s using an input mask (see Section 4.2). If you set Auto Tab to Yes, then as soon as you type the last character into the mask, you’re automatically tabbed to the next control. This feature’s handy for really fast data entry, but it can be annoying if you make a mistake, because you’re tabbed out of the control before you can fix it.
Tab Index controls the tab order—in other words, where you go each time you hit Tab. When you first open a form, you start at the control that has a tab index of 0. When you hit Tab, you then move to the control with the next highest tab index (like 1). This process continues until you reach the control with the highest tab index. Hit Tab again, and you’ll start back at the beginning.
Note
The only controls that have these properties are controls that can accept focus—in other words, controls you can click and interact with. Obviously, text boxes, checkboxes, and buttons support tabbing. However, labels and pictures don’t, because there’s no way to interact with these items.
Every time you add a new control, Access gives it a new, higher tab index. Even if you drop a new control at the top of the form, Access puts it at the end of the tab order. To fix this problem, you could select each control in Design view, and then change the Tab Index setting by hand. However, a much less time-consuming alternative lets you set the tab order for the entire form in one go. Here’s how it works:
Right-click a blank spot on the form design surface, and then choose Tab Order.
The Tab Order dialog box appears. It lists all the controls on your form that support tabbing, from lowest to highest Tab Index.
In the Selection list, choose the section of your form you want to work with. It’s almost always the details section.
The Tab Order dialog box lets you set the tab order separately for each section of your form. If your form includes a header and footer, you can choose to work with the header, footer, or details section. However, it’s very rare to find a form that has controls to support tabbing outside the details section.
If you want to let Access take a crack at setting the correct tab order, then click Auto Order.
When you click Auto Order, Access sets the tab order based on the controls’ position. The order goes from left to right, and then from top to bottom. Most of the time, the Auto Order feature gets you the right tab order (or at least gets you closer to it).
To move a single control to a new position in the tab order, drag it.
This step’s a bit tricky. Figure 13-12 shows how it works.
Click OK when you’ve got the tab order perfected.
So far, you’ve seen how to create a form from scratch, and add all the controls you want. However, you haven’t used this newfound power to do anything special. Sure, you’ve picked up the ability to add extra labels, lines, and rectangles. But that kind of eye candy pales in comparison to the truly helpful features Access lets you add to your forms. Want to prevent people from entering buggy data? Check. Want to add Web page-style hyperlinks? No problem. The list of what you can do to soup up your forms’ abilities is almost endless. The following sections show you the most popular ways to take charge of the controls on a form.
In a database, almost every piece of information’s subject to change. However, that doesn’t mean people should have free range over every field.
Suppose Boutique Fudge creates a form named CurrentOrders that lets people in the warehouse review outstanding customer orders, sorted by date. The warehouse personnel need to review each order, pack it up, and then ship it out. The only change they need to make is to update the order status (to indicate when it’s been sent out), or add a record to the shipment log. Other details, like the order date, the order contents, and the customer who’s receiving the order, should be off limits. The warehouse people have no reason to change any of this information.
Forms are powerful tools in scenarios like this, because they let you prevent changes in certain fields. That way, there’s no chance that a misplaced keystroke can wipe out a legitimate piece of information.
Every bound control (a control that displays a field from your table) provides the following two properties that you can use to control editing. You can change these properties using the Property Sheet in Design view (Section 11.4).
Locked determines whether or not you can make changes in a field. If Locked is set to Yes, then you can’t edit the field value. However, you can still select the text in a text box, and then copy it.
Enabled lets you deactivate a control altogether. If Enabled is set to No, the control appears with dimmed (gray) text. Although you can still see the field value in a disabled control, you can’t interact with it in any way. If it’s a text box, you can’t even select and copy the text it contains.
Tip
If you want to prevent edits altogether, consider using the Allow Edits, Allow Deletions, and Allow Additions form properties instead, which are described in Section 12.3.6.
In Chapter 4, you learned how to prevent errors from creeping into your tables by using validation rules, default values, and input masks. This bulletproofing’s an essential part of database design.
However, validation rules don’t help in some situations because the rules apply sometimes, but not always. You don’t want the sales people at Boutique Fudge to enter a new order with an old date. Clearly, that’s a mistake—a new order should receive today’s date. To try and stamp out the problem, a clever database designer like yourself may use the following validation rule on the OrderDate field:
<=Date( )
However, a few weeks later you discover that the catering department neglected to enter the information about their orders on time. For record-keeping purposes, these orders need to indicate when the order was originally placed. So you need to remove your well-intentioned validation rule before you can enter these records.
It turns out situations like these abound in real life. Fortunately, there’s a way to handle this scenario without giving up on validation. The trick’s to place the validation in the controls on the form. That way, different forms can use different validation rules. If you want to make completely unrestricted changes, then you can edit the data directly using the datasheet for the table.
If you plan to move the validation out of your tables and into your forms, then you’ll be interested in the following control properties, which you can tweak in the Property Sheet:
Validation Rule sets an expression that the value must meet in order to be considered valid. For example, the expression <=Date() compares the current field value to the date returned by the Date( ) function (which is today’s date). The entry’s allowed only if it’s today’s date or before. You can find many more examples of validation expressions in Section 4.3.2.
Validation Text sets the error message that appears if you attempt to enter a value that violates the validation rule. This custom text replaces Access’s generic error message—“The value you entered does not meet the validation rule defined for the field or control”—which doesn’t make much sense to real people.
Input Mask sets a pattern that both guides and restricts people’s input. Input masks are a good way to deal with fixed-length text values like phone numbers, postal codes, and social security numbers. Section 4.2 has more about how input masks work and how to create them.
Default Value sets the value that appears in a field when you create a new record. (You’re free, of course, to change the default value if it’s not what you want.) You’ll find it particularly useful to set default values at the form level, because defaults often apply to a specific task rather than the entire table.
An expression’s a formula that manipulates some information, like numbers, dates, or text, and displays the final result (see Figure 13-13). Often, expressions perform calculations with field values. You’ve used expressions before to crunch the numbers in queries (Chapter 7) and reports (Chapter 10), and now you’ll put them to work in your forms.
To create an expression, follow these steps:
Add a text box control to your form (from the ribbon’s Form Design Tools | Design → Controls section).
You need to use the text box, because it can show dynamic values like expressions. A label can show only a fixed piece of text, so it’s no help.
In the Property Sheet, choose the Data tab. Place your expression in the Control Source setting.
Remember, expressions start with the equals sign. The expression =Price*1.15 calculates the price with tax for a product by multiplying the value in the Price field by 1.15.
Figure 13-13. In this form, the expression ="You have " & [DueDate]-Date( ) & " days to finish” calculates the number of days between the current date and the project due date, and places that number in a complete sentence. You’ll see this information appear as soon as you type in a due date and move to another field. (You can get around this requirement, and force the fields to update themselves as you type, by using a tiny bit of VBA code that triggers a recalculation. Section 17.4.2 shows an example.)
Optionally, set Enabled to No to hammer home the point that this value can’t be edited.
When you create a control that uses an expression, Access doesn’t let you edit the calculated value. It’s just as if you set the Locked property to Yes. However, some people may still try to change this value. If you think this scenario’s a problem, set Enabled to No so that the control appears dimmed and nobody can tab to it. This setting also means that you can’t copy the value in the text box.
Optionally, apply formatting.
You can adjust fonts and colors using the ribbon’s Form Design Tools | Design → Font section. To configure the way Access shows numeric values, switch to Layout view, and then use the Form Layout Tools | Formatting → Formatting section.
![In this form, the expression ="You have " & [DueDate]-Date( ) & " days to finish” calculates the number of days between the current date and the project due date, and places that number in a complete sentence. You’ll see this information appear as soon as you type in a due date and move to another field. (You can get around this requirement, and force the fields to update themselves as you type, by using a tiny bit of VBA code that triggers a recalculation. Section 17.4.2 shows an example.)](http://imgdetail.ebookreading.net/data/2/0596527608/0596527608__access-2007-the__0596527608__httpatomoreillycomsourceoreillyimages2080191.jpg)
One of the control world’s unsung heroes is the tab control, which lets you present large amounts of content in a limited space. The tab control’s trick’s the way it lets you organize this content into separate pages. You can see only one page at a time, and you choose which one by clicking the corresponding tab (see Figure 13-14).
The tab control isn’t all good news. Its main drawback’s that you need to use extra clicks to get from one tab to another. For that reason, the tab control isn’t a great choice in forms that you’ve set up to create new records. In those instances it’s better to streamline the new record creation process and have all the controls on one page, so you can move through them quickly. A tab control makes most sense in forms that are primarily designed for editing or reviewing data. If this data can be subdivided into logical groups, and if editing tasks often involve just one group, then the tab control’s a good choice.
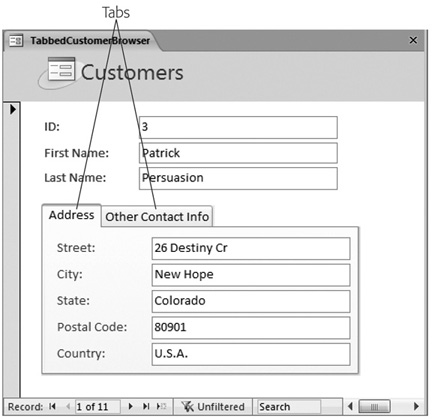
Figure 13-14. It makes sense to put customer address information on a separate tab, because all these fields make up a logical group of related information.
To use a tab control, follow these steps:
In the ribbon’s Form Design Tools | Design → Controls section, click the Tab Control icon.
Once the tab control appears, you may want to move or resize it so it fits into your form perfectly.
Add all the tab pages you need.
Every new tab control starts with two pages. You can move from page to page by clicking the correct tab.
To create a new page, right-click any page (but not the tabs themselves), and then choose Add Page. To remove an existing page, right-click it, and then choose Delete Page.
Give the tabs good names.
The tabs that Access creates start out with pointless names like Page19 and Page20. To change the name, select the page, and then change the Caption setting in the Property Sheet. The page that displays customer address fields could have the caption “Address Information”.
To rearrange your pages, right-click the tab control, and then choose Page Order. Access opens a Page Order dialog box with a list of tabs. To change the order of a tab, select it, and then click Move Up or Move Down.
You can drag controls from the rest of your form onto a page, or you can add new controls from the ribbon. Either way, remember to select the tab you want first, and then add the controls you need. Even in Design view, you can see only one page of a tab control at a time.
Links are the less powerful cousin of buttons. Whereas command buttons (Section 13.2.7) can perform almost any action, links are limited to exactly two tasks:
Launching your default browser and navigating to a specific site.
Opening a file (like a Word document) in the program that owns it.
To create a link, follow these steps:
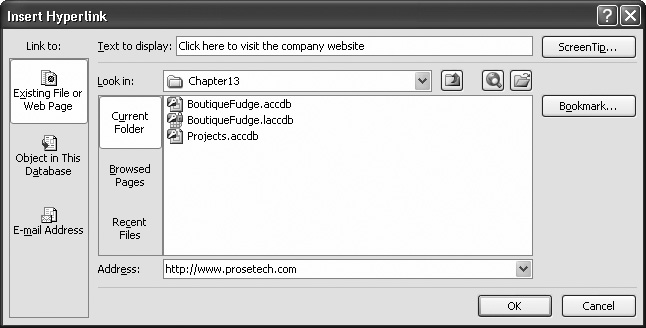
In the ribbon’s Form Design Tools | Design → Controls section, click the Hyperlink icon.
Assuming you have Control Wizards switched on (Section 13.1.2), the Insert Hyperlink dialog box appears (see Figure 13-15). Using this window, you can supply the text for the link and the destination where the link transports people when clicked.
Click the Existing File or Web Page option on the dialog box’s left side.
You can also use the Object in This Database option to create a link that opens another database object, like a form. However, command buttons are better suited to this task.
Alternatively, you can choose E-mail Address to create a link to an email address. When you click this link, your default email program launches, and creates a new message with the starter text you supply.
In the “Text to display” text box, enter whatever you would like the link to say.
Common choices for the text include the actual Web address (like http://www.mycompany.com) or a descriptive message (like “Click here to go to my company’s Web site”).
If you want to set a custom tooltip for this hyperlink, then click the ScreenTip button. Type in your message, and then click OK.
As you no doubt already know, a tooltip’s a little yellow message-bearing window that opens above a hyperlink when your mouse pointer hovers over the link. If you don’t specify a custom tooltip, then Access shows the full path or URL (Web address) instead.
If you want to add a link to a document, browse to the appropriate file, and then select it. If you want to add a link to a Web page, then type the URL into the Address text box.
If you’re adding a link to a document, then Access sets the address to the full file path, as in C:MyDocumentsResume.doc. You can type this path in manually, and if your network supports it, you can use UNC (Universal Naming Convention) paths that point to a file on another computer using the name of the computer, as in \SalesComputerDocumentsCompanyPolicy.doc.
Note
You’re free to link to files on your computer or those that are stored on network drives. Just remember that when you click the link, Access looks in the exact location you’ve specified. If you move the target file to a new location, or you open the database on another computer, Access can’t find the linked file.
Click OK to insert the hyperlink.
The new hyperlink appears on your form. You can then drag it wherever you want.
To use a hyperlink, just click it. You’ll notice that the mouse pointer changes to a pointing hand as soon as you move over the hyperlink.
There are two list controls in Access forms: the list box and the combo box. The difference is that the list box shows several items at once (depending on how large you make it). The combo box shows just one item—to see the list, you need to click the drop-down arrow.
Access gives you two ways to use list controls:
You can use them to edit a field. Access automatically creates a combo box control when there’s a lookup defined for the field (as described in Section 5.2.5). This combo box works the same as a lookup list in the datasheet.
You can use them to navigate to the record you want. In this case, the list shows the field value for every record in the table. When you chose one of the values, Access jumps to the corresponding record.
Using lists for navigation is a true Access power trick. If you often look for a record using the same criteria (like if you hunt down products by name or employees by social security number), this technique’s much faster than using the navigation buttons or filtering the records.
Here’s how to create a list for navigation:
Make sure the Control Wizard feature’s turned on.
If you’re not sure, check that the Form Design Tools | Design → Controls → Use Control Wizards button’s highlighted.
In the ribbon’s Form Design Tools | Design → Controls section, click the List Box or Combo Box icon.
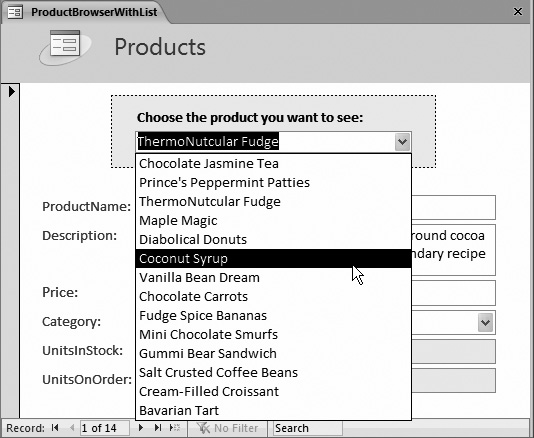
Both these controls work exactly the same when you’re using them for navigation. The only difference is that the List Box takes more space. If you decide to use it, then place it at the side of the form. People usually choose the Combo Box (Figure 13-16).
Draw the control on the form.
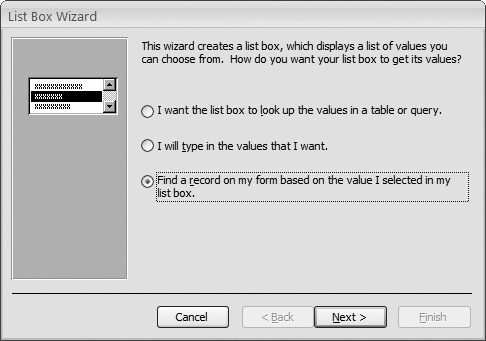
As soon as you finish, a wizard appears to help you set up the list (Figure 13-17). This process works in a similar way to the Lookup wizard you used to set up table relationships (Section 5.2.5).
Choose “Find a record on my form”, and then click Next.
You’ll learn about the other options in the next section.
Choose the field you want to use for the lookup, and then click Next.
The example in Figure 13-16 uses the ProductName field. Technically, the list always works the same way—it finds items based on their unique primary key value (Section 2.4). The list you’re creating actually has two columns. The first column stores the primary key, and the second column shows the value that’s in the field you selected. However, on your form, you don’t see the primary key, because it’s hidden.
Figure 13-16. In this form, a list box lets you jump to the product you want with one click. Notice that this list doesn’t take the place of the ProductName text box control. You use the list to find the record you want, and the text box to change the product name. Of course, if you never needed to change product names in this form, you wouldn’t need to include the ProductName text box.
Leave the “Hide key column” checkbox turned on, and click Next to continue.
If you don’t plan to show the primary key column—and usually you won’t—just click Next to breeze past this window.
Enter a text caption for your list.
This caption appears in a label next to the list control. You may want to use something like “Click the product you want to see”. You can move or delete the label after the fact.
Click Finish to create the list.
Now you can try out your list. Right-click the tab title and choose Form View to switch back to the form. Then, choose an entry from the list to jump straight to the appropriate record.
The last control you’ll consider is one of the most powerful. Command buttons let you trigger just about any action, like opening a new form, printing a report, or polishing off last year’s taxes. (All right, some tasks are more difficult than others, but if you’re willing to hunker down with some Visual Basic code, almost anything’s possible.)
When you add a button to a form, Access launches the useful Command Button wizard, where you can choose the action you want from a list of ready-made choices. The Command Button wizard then helps you build a macro (see Chapter 15) that does whatever you requested.
The choices in the Button wizard provide a good menu of possibilities. Some Access fans find that they can do almost everything they want to do by just using buttons and the wizard. Other people eventually want to do something more original, in which case they need to create their own macros or write custom code (tasks you’ll tackle in Part Five).
The following steps lead you through the Button wizard:
In the ribbon’s Form Design Tools | Design → Controls section, click the Button icon.
Draw the button onto your form.
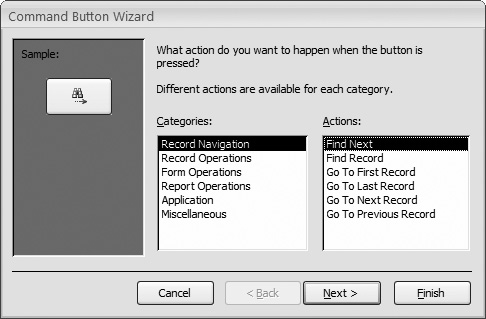
When you finish, the Control wizard starts, and gets right down to business. The first questions it asks is what action you want to perform (see Figure 13-18).
Choose the action you want to perform.
Most actions are self-explanatory. Here are some of the highlights:
In the Record Navigation category, you can use commands like Go To First Record, Go To Last Record, Go To Next Record, and Go To Previous record to create your own navigation buttons. If you do, then set the form’s Navigation Buttons property to No to hide the standard buttons.
In the Record Operations category, you can create a new blank record (Add New Record) or do something with the current one (like Delete Record, Duplicate Record, and Print Record). You can even choose to commit changes right away before you navigate to the next record (Save Record), or undo the last change (Undo Record).
In the Form Operations category, you can close the current form (Close Form) or print it (Print Current Form). You can also open another form (Open Form), which is one of the most used button actions because it helps you move from task to task.
Note
When you use the Open Form action, you have the option of applying filtering based on the current record. Sadly, this feature’s somewhat broken. In Chapter 14 (Section 14.3.1), you’ll consider a more detailed example that uses filtering to show related records.
In the Report Operations category, you can work with other reports using commands like Open Report, Preview Report, and Print Report. These actions help you make the jump from reviewing data (in a form) to printing it (in a report).
In the Application category, you’re limited to one action—the self-explanatory Quit Application.
In the Miscellaneous category, you’ll find options to run a separate query (Run Query) or fire off a macro (Run Macro). You’ll learn how to create macros in Chapter 15.
Click Next.
The next step depends on what action you selected. Some actions require extra information. If you chose to show a form or print a report, Access prompts you to pick the form or report you want to use.
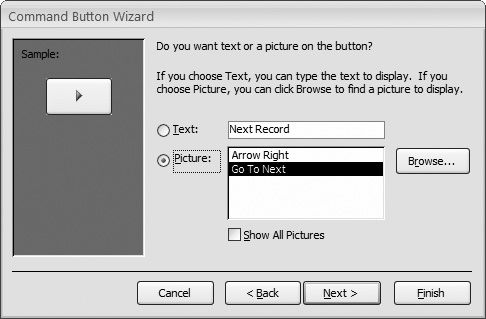
Once you’ve finished supplying any extra information, Access asks you to sup-ply the button text and choose a picture (Figure 13-19).
Figure 13-19. Pictures are tempting, but the ones Access includes are decidedly old-fashioned. Most Access fans decide to create picture-less buttons. If you want to include a picture, then turn on the Show All Pictures checkbox to see everything Access has to offer (even pictures that may not make sense for your current action), or use the Browse button to add in your own picture.
Enter some text and choose a picture. Then, click Next.
You can change these details after the fact by modifying the Caption and Picture properties (which appear in the Format tab).
Supply a name for the button.
The name’s what appears in the Property Sheet list. Better names make your button easier to find. And if you write code that works with your buttons (Chapter 16), better names make for code that people can more easily read and understand.
Click Finish.
To try out your button, switch to Form view, and then give it a click.
As you learned in Chapter 5, few tables are truly independent. Most are linked to others in a web of relationships. Forms can take advantage of these relationships to show linked information. You can use a single form to view (and edit) information about customers and their orders. Or, you can look at products and product categories. This freedom just isn’t possible in the Datasheet view.
Note
Enterprising Access developers use join queries (Section 6.3) to show information from more than one table. However, you can’t edit the linked information in a join query. In a properly designed form, you don’t have this limitation—you can change the information in both the parent and child records.
Access is intelligent enough to notice relationships when you create a new form for a parent table. To see what this ability means in practice, select a table that’s the parent of another table. You can use the ProductCategories table in the Boutique Fudge database, because every category’s a parent record that’s linked to one or more child records in the Products table. (You can also use the Customers table, because customers are linked to orders, or the Orders table, because orders are linked to order items. To try this out, use the Boutique Fudge database that’s included with the downloadable content for this chapter.)
Figure 13-20 shows what happens if you select the ProductCategories table, and then choose Create → Forms → Form. Access creates a form that displays the records you expect (the categories), and the linked records in the child table (in this case, the products).
Note
Don’t bother creating a split form or a multi-item form. Access ignores relationships when you create these form types.
If your table’s the parent of more than one child table, then Access shows only records from one table. It chooses the first relationship it finds. If this relationship isn’t the one you want, don’t worry—it’s easy to change once you understand how the subform control works. The next section has the inside scoop.
Access shows linked records using the subform control. You can add the subform control to any form to show linked records. It’s available in the ribbon’s Form Design Tools | Design → Controls section with all the other controls. If you add it by hand, then Access prompts you to pick the table you want to show.
Three properties determine what the subform control shows. First, the Source Object property identifies the object in the database that has the related records. You can choose an existing table, query, or form.
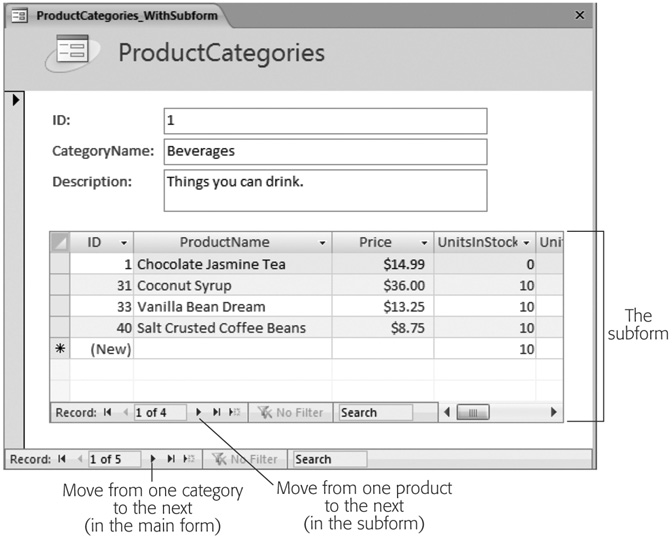
Figure 13-20. This form lets you browse through the different product categories. Each time you move to a new category, a mini datasheet on the form shows the linked product records. Using this form, you can edit products and product category information.
The next two properties—Link Master Fields and Link Child Fields—let you define the way the two tables are related. The master field’s the field in the form, and the child field’s the field in the source object. In the product category example, the master field’s ID (in the ProductCategories table) and the child field’s ProductID (in the Products table). Once this link’s defined, Access knows how to filter the subform. It looks at the master field, and displays only records that have the same value in their child fields. In Figure 13-20, Access shows only the products in the current category.
Usually, the master field corresponds to the parent table, and the child field’s in the child table. However, you can reverse this relationship. You could create a form of products that includes a subform that shows each product’s matching category. When you use this approach, the subform includes only a single record (because only one parent’s linked to any child).
Now that you understand how the subform control works, you can add it to your forms with wild abandon. There’s no reason you can’t add several subforms to show a whole collection of related data at once. If you’re creating a form for the Customers table, then you could display two subforms—one for the orders made by that customer, and one for the payments. You just need two subform controls with different data sources.
Tip
When your form includes a subform, consider using the anchoring features described in Section 13.1.4.4 so the subform grows to fit the available space when the form’s resized.
When you set the Source Object property to a table or query, Access always displays the linked records in a mini datasheet. If you’re intent on customizing every last piece of your form, you may not want that behavior. Interestingly, Access lets you control exactly how linked records are shown, if you do a little more work.
The trick’s to set the Source Object to the form that you want to show in the subform control. Then, the form appears in its Default view mode, which is whatever that form’s Default View property is set to (see Section 12.3.5). You can show linked records in a tabular or stacked form. Figure 13-21 shows an example.
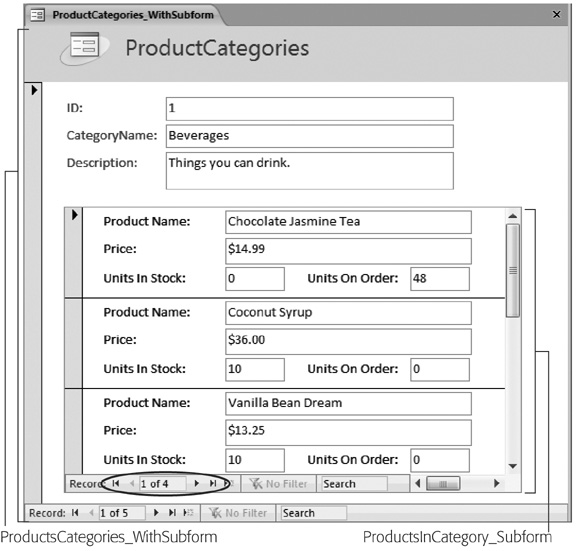
Figure 13-21. Thanks to the magic of subforms, this window actually shows two forms at once: ProductCategories_ WithSubform and ProductsInCategory_ Subform. In this example, the subform uses Continuous Form view (Section 12.3.5), so it shows a list of all the matching products. To see the rest of the products, you need to use the second set of navigation buttons (circled).
Depending on the effect you’re trying to achieve, you may already have a suitable form lying around ready to use. If you’re designing a form for the ProductCategories table, you can use the form you created for the Products table in a subform control. However, you’ll often want to use a completely separate form so you can customize it just the way you want. In the products table example, you may want to show products differently in the subform than they appear in their own dedicated form. After all, there’s less space available when you use the subform control, so you may choose a more compact format and leave out the report header altogether.
Tip
If you choose to create a dedicated form to use with a subform control, consider indicating that in the name. The name “ProductsInCategory Subform” suggests a form that’s designed for use as a subform.
Sometimes, try as you might, there’s no way to fit everything in the small subform area of a form. In this case, you have two options: Try to rearrange your subform to make it more compact, or use two separate forms. Section 14.3.1 in Chapter 14 shows how you can use navigation and filtering to show related records in a separate form.