
3. Basic Game Framework: A Matching Game

• Placing Interactive Elements
A3GPU203_MatchingGame.zip
To build our first game, I’ve chosen one of the most popular games you can find on the Web and in interactive and educational software: a matching game.
Matching games are simple memory games played in the physical world using a simple deck of cards with pictures on them. The idea is to place pairs of cards face down in a random arrangement. Then, try to find matches by turning over two cards at a time. When the two cards match, they are removed. If they don’t match, they are turned face down again.
A good player is one who remembers what cards he or she sees when a match is not made and can determine where pairs are located after several failed tries.
Computer versions of matching games have advantages over physical versions: You don’t need to collect, shuffle, and place the cards to start each game. The computer does that for you. It is also easier and less expensive for the game developer to create different pictures for the cards with virtual cards rather than physical ones.
To create a matching game, we first work on placing the cards on the screen. To do this, we need to shuffle the deck to place the cards in a random order each time the game is played.
Then, we take the player’s input and use that to reveal the pictures on a pair of cards, and we compare the cards and remove them if they match.
We also need to turn cards back to their face-down positions when a match is not found and check to see when all the pairs have been found so the game can end.
Placing Interactive Elements
Creating a matching game first requires that you create a set of cards. Because the cards need to be in pairs, we need to figure out how many cards are displayed on the screen and make half that many pictures.
For instance, if we want to show 36 cards in the game, there are 18 pictures, each appearing on 2 cards.
Methods for Creating Game Pieces
There are two schools of thought when it comes to making game pieces, like the cards in the matching game.
Multiple-Symbol Method
The first method is to create each card as its own movie clip. In this case, there are 18 symbols. Each symbol represents a card.
One problem with this method is you are likely duplicating graphics inside of each symbol. For instance, each card would have the same border and background. So, you would have 18 copies of the border and background.
Of course, you can get around this by creating a background symbol that is then used in each of the 18 card symbols.
Note

Using multiple symbols, one for each card, can prove useful if you are picking cards from a large group—like if you need 18 cards from a pool of 100. Or, it could be useful if the cards are being imported into the movie from external media files, like a bunch of JPG images.
The multiple-symbol method still has problems when it comes to making changes. For instance, suppose you want to resize the pictures slightly. You’d need to do that 18 times for 18 different symbols.
Also, if you are a programmer teaming up with an artist, it is inconvenient to have the artist update 18 or more symbols. If the artist is a contractor, it could run up the budget as well.
Single-Symbol Method
The second method for working with a set of playing pieces, such as cards, is a single-symbol method. You would have one symbol, a movie clip, with multiple frames. Each frame contains the graphics for a different card. Shared graphics, such as a border or background, can be on a layer in the movie clip that stretches across all the frames.
Note
Even the single-symbol method can use many symbols. For instance, if your playing pieces are deck of poker cards, you might place the four suits (spades, hearts, diamonds, and clubs) in symbols and use them in your main deck symbol on the cards. That way, if you want to change how the hearts look across your whole deck, you can do this by just changing the heart symbol.
This method has major advantages when it comes to updates and changes to the playing pieces. You can quickly move between and edit all the frames in the movie clip. You can also easily grab an updated movie clip from an artist with whom you are working.
Setting Up the Flash Movie
Using the single-symbol method, we need to have at least one movie clip in the library. This movie clip contains all the cards and even a frame that represents the back of the card that we must show when the card is face down.
Create a new movie that contains a single movie clip called Card. To create a new movie in Flash CS5, choose File, New, and then you are presented with a list of file types. You must choose Flash File (ActionScript 3.0) to create a movie file that works with the ActionScript 3.0 class file we are about to create.
Put at least 19 frames in that movie clip, representing the card back and 18 card fronts with different pictures on them. You can open the MatchingGame1.fla file for this exercise if you don’t have your own symbol file to use.
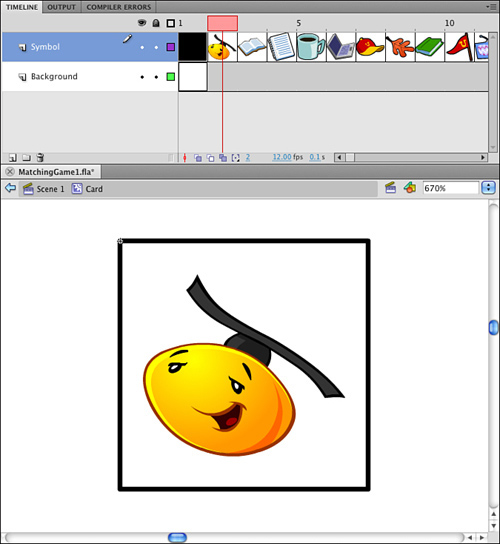
Figure 3.1 shows a timeline for the Card movie clip we are using in this game. The first frame is the “back” of the card. It is what the player sees when the card is supposed to be face down. Then, each of the other frames shows a different picture for the front of a card.
Figure 3.1 The Card movie clip is a symbol with 19 frames. Each frame after the first represents a different card.
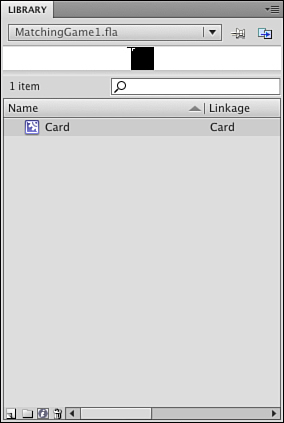
After we have a symbol in the library, we need to set it up so that we can use it with our ActionScript code. To do this, we need to set its linkage name in the library (see Figure 3.2).
Figure 3.2 The library shows the linkage name for the Card object.
There is nothing else needed in the Flash movie. The main timeline is completely empty. The library has only one movie clip in it, the Card movie clip. All we need now is some ActionScript.
Creating the Basic ActionScript Class
To create an ActionScript class file, choose File, New, and then select ActionScript File from the list of file types; by doing so you create an untitled ActionScript document that you can type into.
We start an ActionScript 3.0 file by defining it as a package. This is done in the first line, as you can see in the following code sample:
package {
import flash.display.*;
Right after the package declaration, we need to tell the Flash playback engine what classes we need to accomplish our tasks. In this case, we tell it we need access to the entire flash.display class and all its immediate subclasses. This gives us the ability to create and manipulate movie clips like the cards.
The class declaration is next. The name of the class must match the name of the file exactly. In this case, we call it MatchingGame1. We also need to define what this class affects. In this case, it affects the main Flash movie, which is a movie clip:
public class MatchingGame1 extends MovieClip {
Next is the declaration of any variables that are used throughout the class. However, our first task of creating the 36 cards on the screen is so simple that we don’t need to use any variables—at least not yet.
Therefore, we can move right on to the initialization function, also called the constructor function. This function runs as soon as the class is created when the movie is played. It must have exactly the same name as the class and the ActionScript file:
public function MatchingGame1():void {
This function does not need to return any value, so we can put :void after it to tell Flash that nothing is returned from this function. We can also leave the :void off, and it is assumed by the Flash compiler.
Inside the constructor function, we can perform the task of creating the 36 cards on the screen. We make it a grid of 6 cards across by 6 cards down.
To do this, we use two nested for loops. The first moves the variable x from 0 to 5. The x represents the column in our 6×6 grid. Then, the second loop moves y from 0 to 5, which represents the row:
for(var x:uint=0;x<6;x++) {
for(var y:uint=0;y<6;y++) {
Each of these two variables is declared as a uint, an unsigned integer, right inside the for statement. Each starts with the value 0, and then continues while the value is less than 6. And, they increase by one each time through the loop.
Note
There are three types of numbers: uint, int, and Number. The uint type is for whole numbers 0 or higher. The int type is for whole numbers that can be positive or negative (integers, in other words). The Number type can be positive or negative numbers, whole or floating point, such as 3.5 or −173.98. In for loops, we usually use either uint or int types because we only move in whole steps.
So, this is basically a quick way to loop and get the chance to create 36 different Card movie clips. Creating the movie clips is just a matter of using new, plus addChild. We also want to make sure that as each new movie clip is created, it is stopped on its first frame and is positioned on the screen correctly:

Note
Adding a symbol in ActionScript 3.0 takes only two commands: new, which allows you to create a new instance of the symbol; and addChild, which adds the instance to the display list for the stage. In between these two commands, you want to do things such as set the x and y position of the new symbol.
The positioning is based on the width and height of the cards we created. In the example movie MatchingGame1.fla, the cards are 50 by 50 with 2 pixels in between. So, by multiplying the x and y values by 52, we space the cards with a little extra space between each one. We also add 120 horizontally and 45 vertically, which happens to place the card about in the center of a 550×400 standard Flash movie.
Before we can test this code, we need to link the Flash movie to the ActionScript file. The ActionScript file should be saved as MatchingGame1.as, and located in the same directory as the MatchingGame1.fla movie.
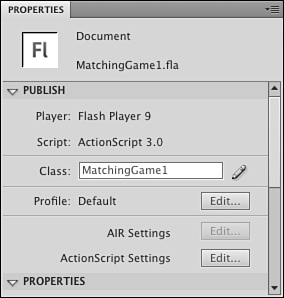
However, that is not all you need to do to link the two. You also need to set the Flash movie’s Document class property in the Property Inspector. Just select the Property Inspector while the Flash movie MatchingGame1.fla is the current document. Figure 3.3 shows the Property Inspector, and you can see the Document class field at the bottom right.
Figure 3.3 You need to set the Document class of a Flash movie to the name of the AS file that contains your main script.
Note
You can test a movie when either the Flash movie itself is the current document or an ActionScript file is the current document. When an ActionScript file is the current document, look in the upper-right part of the document window for a Target indicator. This tells you what Flash movie is compiled and run when you test. If the wrong file is shown as the Target, you can use the drop-down menu to change it.
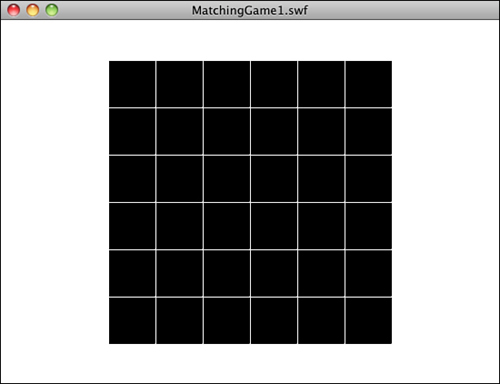
Figure 3.4 shows the screen after we have tested the movie. The easiest way to test is to go to the menu and choose Control, Test Movie.
Figure 3.4 The screen shows 36 cards, spaced and in the center of the stage.
Using Constants for Better Coding
Before we go any further with developing this game, let’s look at how we can make what we have better. We copy the existing movie to MatchingGame2.fla and the code to MatchingGame2.as. Remember to change the document class of MatchingGame2.fla to MatchingGame2 and the class declaration and constructor function to MatchingGame2.
Suppose you don’t want a 6×6 grid of cards; maybe you want a simpler 4×4 grid or even a rectangular 6×5 grid. To do that, you need to find the for loops in the previous code and change the loops so they loop with different amounts.
A better way to do it is to remove the specific numbers from the code all together. Instead, have them at the top of your code and clearly labeled, so you can easily find and change them later.
Note
Putting specific numbers in your code, such as the 6s for the row and column lengths, is called hard coding. It is considered to be bad practice for programmers because it makes it harder to adjust your program later, especially for others who want to inherit your code and find where they can adjust it.
We’ve got several other hard-coded values in our programs. Let’s make a list:
Horizontal Rows = 6
Vertical Rows = 6
Horizontal Spacing = 52
Vertical Spacing = 52
Horizontal Screen Offset = 120
Vertical Screen Offset = 45
Instead of placing these values in the code, let’s put them in some constant variables up in our class to make them easy to find and modify:
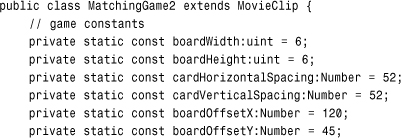
Note
Notice that I chose private static const when defining each constant. The private means these variables can only be accessed inside this class. The static means they have the same values in all instances of the class. And, the const means that the values can never change. If you were to use public var instead, it would give you the opposite declaration: can be accessed outside of the class and holds different values for each instance. Because this is the one and only instance of the class and there are no outside scripts, it really makes no difference, except for neatness.
Now that we have constants, we can replace the code in the constructor function to use them rather than the hard-coded numbers:
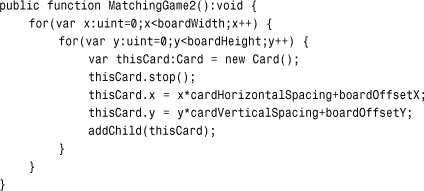
I also changed the name of the class and function to MatchingGame2. You can find these in the sample files MatchingGame2.fla and MatchingGame2.as.
Note
As we move through this chapter, we change the filenames of both the ActionScript file and the movie. If you are following along by creating your own movies from scratch, remember to change the document class in the Property Inspector so each movie points to the right ActionScript file. For instance, the MatchingGame2.fla movie needs to use the MatchingGame2.as file, so its document class should be set to MatchingGame2.
In fact, open those two files. Test them one time. Then, test them again after you change some of the constants. Make the boardHeight only five cards, for instance. Scoot the cards down by 20 pixels by changing boardOffsetY. The fact that you can make these changes quickly and painlessly drives home the point of using constants.
Shuffling and Assigning Cards
Now that we can add cards to the screen, we want to assign the pictures randomly to each card. If there are 36 cards in the screen, there should be 18 pairs of pictures in random positions.
Chapter 2, “ActionScript Game Elements,” discussed how to use random numbers. However, we can’t just pick a random picture for each card. We need to make sure there are exactly two of each type of card on the screen. No more, no less; otherwise, there are no matching pairs.
Note
This process is kind of the opposite from shuffling a deck of cards. Instead of mixing the cards and then picking new cards from the top of the deck, we are using an ordered list of cards and picking new cards from random spots in the deck.
To do this, we need to create an array that lists each card, and then pick a random card from this array. Arrays are variables that hold a series of values. We look more closely at them at the start of Chapter 4, “Brain Games: Memory and Deduction.”
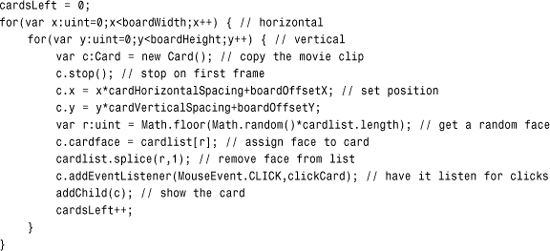
The array is 36 items in length, containing 2 of each of the 18 cards. Then, as we create the 6×6 board, we are removing cards from the array and placing them on the board. When we have finished, the array is empty, and all 18 pairs of cards are accounted for on the game board.
Here is the code to do this. A variable i is declared in the for statement. It goes from zero to the number of cards needed. This is the board width times the board height, divided by two (because there are two of each card). So, for a 6×6 board, there will be 36 cards. We must loop 18 times to add 18 pairs of cards. This new code goes at the start of the constructor function:
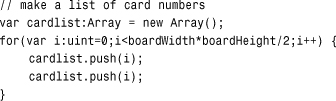
The push command is used to place a number in the array twice. Here is what the array looks like:
0,0,1,1,2,2,3,3,4,4,5,5,6,6,7,7,8,8,9,9,10,10,11,11,12,12,13,13,14,14,15,15,16,16,17,17
Now as we loop to create the 36 movie clips, we pull a random number from this list to determine which picture displays on each card:

The new lines are in the middle of the code. First, we use this line to get a random number between zero and the number of items remaining in the list:
var r:uint = Math.floor(Math.random()*cardlist.length);
The Math.random() function returns a number from 0.0 up to just before 1.0. Multiply this by cardlist.length to get a random number from 0.0 up to 35.9999. Then, use Math.floor() to round that number down so that it is a whole number from 0 to 35—that is, of course, when there are 36 items in the cardlist array at the start of the loops.
Then, the number at the location in cardlist is assigned to a property of u named cardface. Then, we use the splice command to remove that number from the array so it isn’t used again.
Note
Although we usually need to declare and define variables, we can also add dynamic properties such as cardface to an object. This can only be done if the object is dynamic, which the Card object is by default because we did not define it otherwise. The cardface property assumes the type of the value it is assigned (such as a Number, in this case).
This is not the best programming practice. A better practice is to define a class for the Card, complete with an ActionScript file declaring a package, class, properties, and constructor function. However, this is a lot of extra work when only one little property is needed, so the benefits of convenience outweigh the benefits of sticking to strict programming practices.
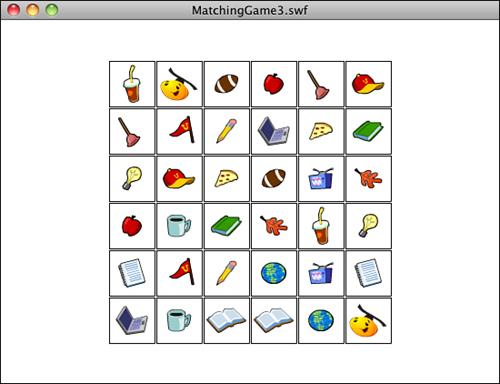
In addition, the MatchingGame3.as script includes this line to test that everything is working so far:
c.gotoAndStop(c.cardface+2);
This syntax makes the Card movie clip show its picture. So, all 36 cards are face up rather than face down. It takes the value of the property cardface, which is a number from 0 to 17, and then adds 2 to get a number from 2 to 19. This corresponds to the frames in the Card movie clip, where frame 1 is the back of the card, and frame 2 and so on are the picture faces of the cards.
Obviously, we don’t want to have this line of code in our final game, but it is useful at this point to illustrate what we have accomplished. Figure 3.5 shows what the screen might look like after we run the program with this testing line in place.
Figure 3.5 The third version of our program includes code that reveals each of the cards. This is useful to get visual confirmation that your code is working so far.
Game Play
Now that the game board is set up, we need to let the user click cards to try to find matches. We also need to keep track of play state, which in this case means whether the player is clicking the first card or second card and whether all the cards have been found.
Adding Mouse Listeners
The first step is to get each of the cards we create to respond to mouse clicks. We can do this by adding a listener to each of these objects. The addEventListener function does this, and it takes two parameters: which event to listen for and what function to call when the event occurs. Here is the line of code that we’ll put just before the addChild statement.:
c.addEventListener(MouseEvent.CLICK,clickCard);
You also need to add another import statement at the start of the class to tell Flash you want to use events:
import flash.events.*;
The syntax for the event in this case is MouseEvent.CLICK, which is just a simple click on the card. When this happens, it should call the function clickCard, which we have yet to create. We need to create it before testing the movie again because Flash doesn’t compile our movie with a loose end.
Here is a simple start to the clickCard function:

Note
Using a trace statement call to check your code is a great way to program in small steps to avoid headaches. For instance, if you add 27 lines of code at once and then the program doesn’t work as expected, you must locate the problem in 27 new lines of code. If you add only five new lines of code, however, and then use a trace statement to display the values of key variables, you can solve any problems with those five lines of code before moving on.
Any time you have a function that responds to an event, it must take at least one parameter, the event itself. In this case, it is a value of type MouseEvent, which we assign to the variable event.
Note
You need to accept the event parameter on an event listener function whether you care about its value or not. For instance, if you create a single button and know that the function only runs when that button is pressed, you still need to accept the event as a parameter and then not use it for anything.
In this case, the event parameter is key because we need to know which of the 36 cards the player clicked. The event parameter value is actually an object with all sorts of properties, but the only property we need to know about is which Card object was clicked. This would be the target, or more precisely, the currentTarget of the event.
However, the currentTarget is a vague object to the ActionScript engine at this point. Sure, it is a Card object. However, it is also a movie clip, which is a display object, too. We want to get its value as a Card object, so we define a variable as a Card, and then use a Card to specify that we want the value of event.currentTarget to be returned as a Card.
Now that we have a Card object in the variable thisCard, we can access its cardface property. We use trace to put it in the Output window and run a quick test of MatchingGame4.fla to make sure it is working.
Setting Up Game Logic
When a player clicks a card, we need to determine what steps to take based on their choice and the state of the game. There are three main states we need to deal with:
• State 1—No cards have been chosen; player selects first card in a potential match.
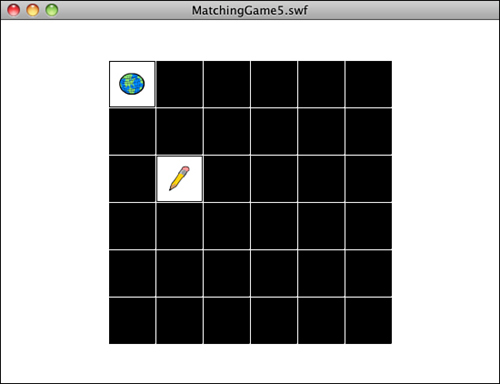
• State 2—One card has been chosen; player selects a second card. A comparison must be made and action taken based on whether there is a match.
• State 3—Two cards have been chosen, but no match was found. Leave those cards face up until a new card is chosen, and then turn them both over and reveal the new card.
Figures 3.6 through 3.8 show the three game states.
Figure 3.6 State 1, where the player is about to choose his or her first card.

Figure 3.7 State 2, where the player is about to choose his or her second card.
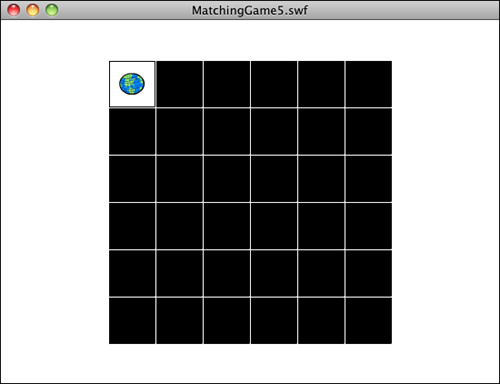
Figure 3.8 State 3, where a pair of cards was selected, but no match found. Now the player must choose another card to start a second pair.
Then, there are some other considerations. What if the player clicks a card, and then clicks the same card again? This means the player probably wants to take back the first choice, so we should turn that card over and return to the first state.
We can predict that we need to keep track of which cards are chosen when the player is going for a match. So, we need to create our first class variables. We call them firstCard and secondCard. They are both of type Card:
private var firstCard:Card;
private var secondCard:Card;
Because we haven’t set any values for these variables, they both start off with the default object value of null. In fact, we use the null values of these two variables to determine the state.
Note
Not all types of variables can be set to null. For instance, an int variable is set to zero when it is first created, unless you specify otherwise. You can’t set it to null even if you want to.
If both firstCard and secondCard are null, we must be at the first state. The player is about to choose his first card.
If firstCard is not null and secondCard is null, we are at the second state. The player will soon choose the card that he hopes matches the first.
If both firstCard and secondCard are not null, we are in the third state. We use the values of firstCard and secondCard to know which two cards to turn face down when the user chooses the next firstCard.
Let’s have a look at the code:
So far, we can see what happens when the player clicks the first card. Notice that the gotoAndStop command is similar to the one we used to test the card shuffle earlier in the chapter. It must add 2 to the frame number so that the card values of 0 to 17 match up with the frame numbers of 2 to 19 that contain the 18 card faces.
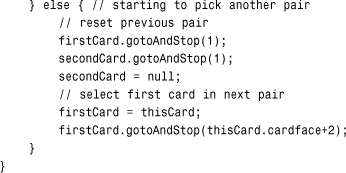
Now that we have the value of firstCard set, we can expect the second click. This is handled by the next two parts of the if statement. This part handles the case of when the player clicks the first card again and turns it back over and sets the value of firstCard back to null:
![]()
If the player clicks a different card for the second card, a comparison must be made between the two cards. We’re not comparing the cards themselves, but the cardface property of the cards. If the faces are the same, a match has been found:
If a match has been found, we want to remove the cards and reset the firstCard and secondCard variables; this is done by using the removeChild command, which is the opposite of addChild. It takes the object out of the display list and removes it from view. They are still stored in variables in this case, so we must set those to null so the objects are disposed by the Flash player.
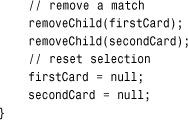
The next case is what happens if the player has selected a firstCard, but then selects a second card that doesn’t match. When the player goes on to click yet another card, the first two cards turn back over to their face-down position, which is frame 1 of the Card movie clip.
Immediately following that, it should set the firstCard to the new card and show its picture:
That’s actually it for the basic game. You can test out MatchingGame5.fla and MatchingGame5.as to play it. You can select pairs of cards and see matches removed from the board.
You can consider this a complete game. You could easily stick a picture behind the cards in the main movie timeline and have the reward for winning simply be the revelation of the full picture. As an extra add-on to a website, it works fine. However, we can go much further and add more features.
Checking for Game Over
It is likely that you want to check for a game over state so that you can reward players with a screen telling them that they have completed the game. The game over state is achieved when all the cards have been removed.
Note
In the examples in this chapter, we take the player to a screen that displays the words Game Over. However, you could show them an animation or take them to a new web page, too. But we’ll stick to the game programming here.
There are many ways to do this. For instance, you could have a new variable where you keep track of the number of pairs found. Every time you find a pair, increase this value by one, and then check to see when it is equal to the total number of pairs.
Another method would be to check the numChildren property of the MatchingGame object. When you add 36 cards to it, numChildren is 36. As pairs get removed, numChildren goes to zero. When it gets to zero, the game is over.
The problem with that method is that if you place more items on the stage, such as a background or title bar, they are also counted in numChildren.
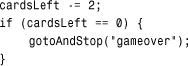
In this case, I like a variation on the first idea. Instead of counting the number of cards removed, count the number of cards shown, so create a new class variable named cardsLeft:
private var cardsLeft:uint;
Then, set it to zero just before the for loops that create the cards. Add one to this variable for every card created:
Then, in the clickCard function, we need to add new code when the user makes a match and the cards are removed from the screen. This goes in the clickCard function.
Note
You can use ++ to add one to a variable, -- to subtract one. For instance, cardsLeft++ is the same as writing cardsLeft = cardsLeft + 1.
You can also use += to add a number to a variable and -= to subtract a number. For instance, cardsLeft -= 2 is the same as writing cardsLeft = cardsLeft - 2.
That is all we need for coding. Now, the game tracks the number of cards on the screen using the cardsLeft variable, and it takes an action when that number hits zero.
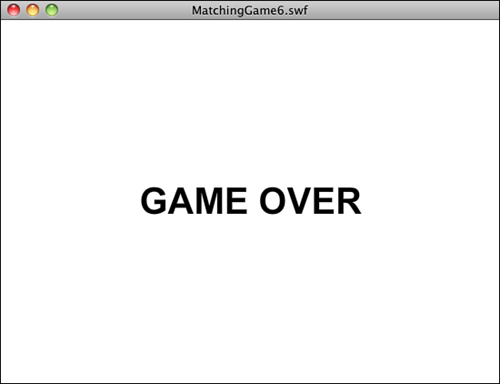
The action it takes is to jump to a new frame, like the one shown in Figure 3.9. If you look at the movie MatchingGame6.fla, you can see that I added a second frame. I also added stop(); commands to the first frame. This makes the movie stop on the first frame so the user can play the game, instead of continuing on to the second frame. The second frame is labeled gameover and is used when the cardsLeft property is zero.
Figure 3.9 The simplest gameover screen ever.
At this point, we want to remove any game elements created by the code. However, because the game only creates 36 cards and then all 36 are removed when the player finds all the matches, there are no extra items on the screen to remove. We can jump to the gameover frame without any items on the screen at all.
The gameover screen shows the words Game Over in the sample movie. You can add additional graphics or even animation here, too. Later in this chapter, we look at how to add a Play Again button to this frame.
Encapsulating the Game
At this point, we have a game that runs as a whole Flash movie. The movie is MatchingGameX.fla, and the ActionScript class is MatchingGameX.as. When the movie runs, the game initializes and starts. The movie is the game, and the game is the movie.
This works well in simple situations. In the real world, however, you want to have introduction screens, gameover screens, loading screens, and so on. You might even want to have different screens with different versions of the game or different games completely.
Flash is great at encapsulation. A Flash movie is a movie clip. You can have movie clips inside of movie clips. So, a game can be the movie, or a game can be a movie clip inside the movie.
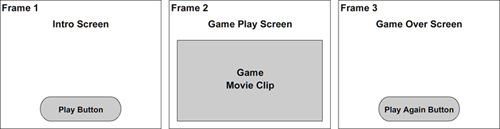
Why would you want to do this? Well, for one thing, it makes it easy to add other screens to your game. So, we can make frame 1 an introduction screen, frame 2 the game, and frame 3 the gameover screen. Frame 2 would actually contain a movie clip called MatchingGameObject7 that uses the class MatchingGameObject7.as.
Figure 3.10 shows a diagram of the three frames we plan to have in our updated movie and what each one contains.
Figure 3.10 The second frame of the movie contains a movie clip, which is the actual game. The other frames contain supporting material.
Creating the Game Movie Clip
In MatchingGame7.fla, there are three frames. Let’s skip right to the second frame. There, we can see a single movie clip. You might not even notice it at first because it is a completely empty movie clip and so appears as a small circle at the upper-left corner of the screen.
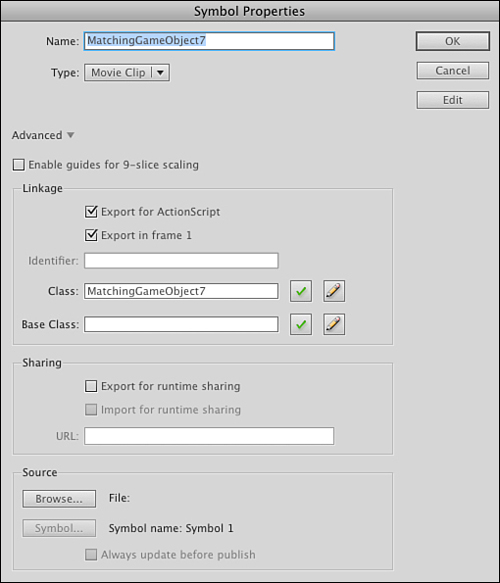
In the library, this movie clip is named MatchingGameObject7; and as shown in Figure 3.11, it is assigned the class MatchingGameObject7. You do this by selecting it in the Library, and then pressing the tiny i button at the bottom of the Library panelF or right-clicking and choosing Properties.
Figure 3.11 This movie clip uses the Matching-GameObject7.as file as its class.
Essentially, this movie clip takes over the entire game, and the main movie timeline is now a larger movie clip wrapped around it.
When the movie gets to frame 2, the MatchingGameObject7 movie clip springs into existence, runs the class constructor function in its MatchingGameObject7.as class, and the game plays inside this movie clip.
When the movie goes on to frame 3, the whole game disappears because the movie clip only exists on frame 2.
This enables us to put frames before and after the game (and thus leaves the game code alone to just worry about the game).
Adding an Introduction Screen
Most games would have an introduction screen. After all, we don’t want to throw players right into the game. They might need an introduction or instructions.
The intro screen contains some scripting on the main timeline in frame 1. First, it must stop the movie so that it doesn’t continue past frame 1. Then, it should set up a button to allow users to start the game.
Note
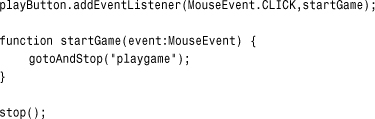
If you want to keep all code off of the main timeline, you could set up a new AS class file to be the document class for the whole movie. It would run on frame 1, and you could do the same sorts of things in this class file as you could on the timeline. However, it is irresistibly easy to add this little bit of code to the main timeline and avoid creating more files than necessary. The frame script first needs to assign a listener to a button we create on the first frame. We assign the name playButton to that button.
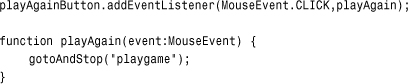
The event listener calls the function startGame, which issues a gotoAndStop command to the main timeline, telling it to go to the frame called playgame, which is frame 2.
We also put a stop command on the frame so when the movie runs, it stops on frame 1 and waits for the user to click this button:
On the second frame, the empty movie clip MatchingGameObject7 sits. Then, we need to rename the document class AS file to MatchingGameObject7.as so that it is used by this movie clip and not the main movie.
Note
To create an empty movie clip, go to the library and choose New Symbol for its top menu. Name the symbol, set its type to Movie Clip, and set its properties. Then, drag the movie clip from the library to the stage. Place it at the upper-left corner so its 0,0 location is the same as the stage’s 0,0 location.
We need to make one change in the code. There is a reference to the main timeline when the game is over. The gotoAndStop command no longer works properly because the game is taking place in the movie clip and the gameover frame is on the main timeline. We need to change this as follows:
MovieClip(root).gotoAndStop("gameover");
Note
You would think that you could simply program root.gotoAndStop("gameover"). After all, root is indeed the main timeline and the parent of the movie clip. However, the strict ActionScript compiler does not allow it. The gotoAndStop command can be issued only to movie clips, and technically, root can be other things, such as a single-frame movie clip called a sprite. So to ensure the compiler that root is a movie clip, we type it using the MovieClip() function.
The gameover frame of the movie is the same, for the time being, as in MatchingGame6.fla. It is just a frame with the words Game Over on it.
The MatchingGame7.fla movie is a little different from the preceding six versions in that it doesn’t have a document class assigned to it. In fact, there is no MatchingGame7.as file at all. The game code is now in MatchingGameObject7.as. Take a close look at how this movie is put together, along with Figure 3.10, to understand how the game fits into the larger main movie.
Adding a Play Again Button
On the last frame, we want to add another button that enables players to play again.
This is as simple as duplicating the original play button from frame 1. Don’t just copy and paste; instead, create a duplicate of the button in the library. Then, change the text on the button from Play to Play Again.
Your gameover frame should now look like Figure 3.12.
Figure 3.12 The gameover screen now has a Play Again button on it.
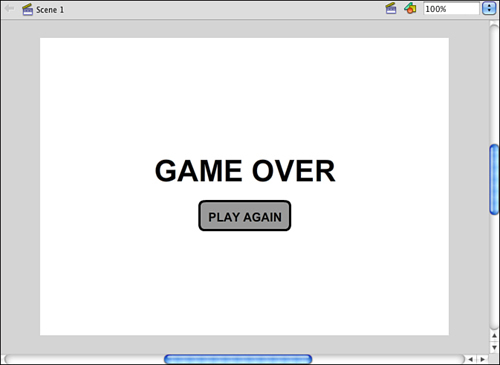
After you have added this button to the third frame, name it playAgainButton using the Property Inspector so you can assign a listener to it. The frame script should look like this:
Test out MatchingGame7.fla and see these buttons in action. You’ve got a versatile game framework now, where you can substitute content in the intro and gameover pages and restart the game without fear of leftover screen elements or variable values. This was quite a problem in ActionScript 1 and 2, but isn’t an issue with this sort of framework in ActionScript 3.0.
Adding Scoring and a Clock
The goal of this chapter is to develop a complete game framework around the basic matching game. Two elements commonly seen in casual games are scoring and timers. Even though the matching game concept doesn’t need them, let’s add them to the game anyway to make it as full-featured as we can.
Adding Scoring
The first problem is deciding how scoring should work for a game like this. There isn’t an obvious answer. However, there should be a positive reward for getting a match and perhaps a negative response for missing. Because it is almost always the case that a player misses more than he or she finds matches, a match should be worth far more than a miss. A good starting point is 100 points for a match and −5 points for a miss.
Instead of hard coding these amounts in the game, let’s add them to the list of constants at the start of the class:
private static const pointsForMatch:int = 100;
private static const pointsForMiss:int = -5;
Now, to display the score, we need a text field. Creating a text field is pretty straightforward, as you saw in Chapter 2. We first need to declare a new TextField object in the list of class variables:
private var gameScoreField:TextField;
Then, we need to create that text field and add it as a child:
gameScoreField = new TextField();
addChild(gameScoreField);
Note that adding a text field requires us to also import the text library at the start of our class. We need to add the following line to the top:
import flash.text.*;
We could also format it and create a nicer-looking text field, as we did in Chapter 2, but we leave that part out for now.
The score itself is a simple integer variable named gameScore. We declare it at the start of the class:
private var gameScore:int;
Then, we set it to zero in the constructor function:
gameScore = 0;
In addition, it is a good idea to immediately show the score in the text field:
gameScoreField.text = "Score: "+String(gameScore);
However, we realize at this point that there are at least several places in the code where we set the text of gameScoreField. The first is in the constructor function. The second is after the score changes during game play. Instead of copying and pasting the previous line of code in two places, let’s move it to a function of its own. Then, we can call the same function from each of the places in the code where we need to update the score:
![]()
We need to change the score in two places in the code. The first is right after we find a match, just before we check to see whether the game is over:
gameScore += pointsForMatch;
Then, we add an else clause to the if statement that checks for a match and subtract points if the match is not found:
gameScore += pointsForMiss;
Here is the entire section of code so you can see where these two lines fit in:
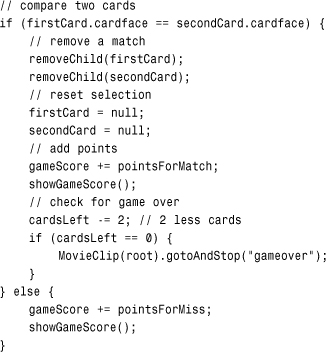
Notice we are adding points using the += operation, even if there is a miss. This is because the pointsForMiss variable is set to -5. So adding -5 is the same as subtracting 5 points.
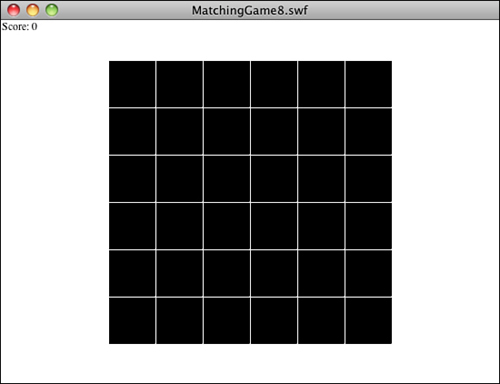
We also put in the showGameScore() function call after each change to the score. This makes sure the player sees an up-to-date score, as shown in Figure 3.13.
Figure 3.13 The score now appears in the upper left, using the default font and style.
Note
In moving from MatchingGame7.fla to MatchingGame8.fla, you need to do more than just change the filenames. In the movie, you need to change both the name and the class of the MatchingGameObject7 movie clip to MatchingGameObject8. It would be an easy mistake to only change the name of the movie clip but leave the class pointing to MatchingGameObject7.
Then, of course, you need to change the name of the ActionScript file to MatchingGame8.as and change the class name and constructor function name, too.
This is true of future versions of the matching game in the rest of this chapter, too.
MatchingGame8.fla and MatchingGame8.as include this scoring code. Take a look to see it in action.
Adding a Clock
Adding a clock timer is a little harder than adding a score. For one thing, a clock needs to be updated constantly, as opposed to the score, which only needs to be updated when the user tries a match.
To have a clock, we need to use the getTimer() function. This returns the time in milliseconds since the Flash movie started. This is a special function that requires a special Flash class that we need to import at the start of our program:
import flash.utils.getTimer;
Note
The getTimer function measures the number of milliseconds since the Flash movie started. However, it is never useful as a raw time measurement because the player doesn’t ever start a game the instant the movie appears onscreen. Instead, getTimer is useful when you take two measurements and subtract the later one from the earlier one. That is what we do here: get the time the user pressed Play, and then subtract this from the current time to get the amount of time the game has been played.
Now we need some new variables. We need one to record the time the game started. Then, we can simply subtract the current time from the start time to get the amount of time the player has been playing the game. We also use a variable to store the game time:
private var gameStartTime:uint;
private var gameTime:uint;
We also need to define a new text field to display the time to the player:
private var gameTimeField:TextField;
In the constructor function, we add a new text field to display the time. We also move to the right side of the screen so that it isn’t on top of the score display:
![]()
Before the constructor function is done, we want to set the gameStartTime variable. We can also set the gameTime to zero:
gameStartTime = getTimer();
gameTime = 0;
Now we need to figure out a way for the game time to update. It is changing constantly, so we don’t want to wait for user action to display the time.
One way to do it is to create a Timer object, as in Chapter 2. However, it isn’t critical that the clock be updated at regular intervals, only that the clock be updated often enough so players get an accurate sense of how long they have been playing.
Instead of using a Timer, we can just have the ENTER_FRAME event trigger a function that updates the clock. In a default Flash movie, this happens 12 times a second, which is certainly enough:
addEventListener(Event.ENTER_FRAME,showTime);
All that is left is to make the showTime function. It calculates the current time based on the current value of getTimer() and the value of gameStartTime. Then, it puts it in the text field for display:
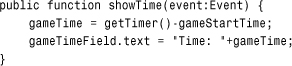
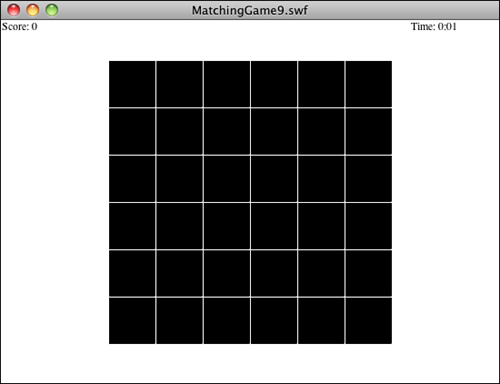
Figure 3.14 shows the screen with both the score and the current time. However, the time format uses a semicolon and two digits for the seconds. You see how to do this next.
Figure 3.14 The time is now displayed at the upper right.
Displaying Time
The showTime function displays the number of milliseconds since the game started. Typical players don’t care about milliseconds; they want to see a normal clock with minutes and seconds displayed as they would see on a digital watch.
Let’s break this out in another function. Instead of just including the raw gameTime in the text field as in the preceding code example, we can call a function to return a nicer output:
gameTimeField.text = "Time: "+clockTime(gameTime);
The idea is that the old code would show this:
Time: 123726
The new code shows the following:
Time: 2:03
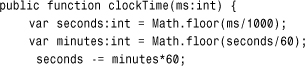
The clockTime function takes the time in raw milliseconds and converts it to minutes and whole seconds. In addition, it formats it to use a colon (:) and makes sure that a zero is placed correctly when the number of seconds is fewer than ten.
The function starts off by dividing the number of milliseconds by 1,000 to get the number of seconds. It then divides that by 60 to get the number of minutes.
Next, it must subtract the minutes from the seconds. For instance, if there are 123 seconds, that means there are 2 minutes. So, subtract 2*60 from 123 to get 3 seconds left over, since123 is 2 minutes and 3 seconds:
Now that we have the number of minutes and seconds, we want to make sure that we insert a colon between them and that the seconds are always two digits.
I use a trick to do this. The substr function enables you to grab a set number of characters from a string. The number of seconds is between 0 and 59. Add 100 to that, and you have a number between 100 and 159. Grab the second and third characters from that as a string, and you have a range of 00 to 59. The following line is how it looks in ActionScript:
var timeString:String = minutes+":"+String(seconds+100).substr(1,2);
Now just return the value:
return timeString;
}
The time now displays at the top of the screen in a familiar digital watch format, rather than just as a number of milliseconds.
Displaying Score and Time After the Game Is Over
Before we finish with MatchingGame9.fla, let’s take the new score and time displays and carry them over to we finish with the gameover screen.
This is a little tricky because the gameover screen exists on the main timeline, outside of the game movie clip. To have the main timeline know what the score and time are, this data needs to be sent from the game to the root level.
Before we call the gotoAndStop command that advances the movie to the gameover screen, we pass these two values up to root:
MovieClip(root).gameScore = gameScore;
MovieClip(root).gameTime = clockTime(gameTime);
Notice that we pass the score up as a raw value, but we run the time through the handy clockTime function so that it is a string with a colon and a two-digit second.
At the root level, we need to define those new variables, which use the same names as the game variables: gameTime and gameScore. I’ve added this code to the first frame:
var gameScore:int;
var gameTime:String;
Then, on the gameover frame, we use these variables to place values in new text fields we finish with:
showScore.text = "Score: "+String(gameScore);
showTime.text = "Time: "+gameTime;
Note
To simplify things here, we’re including the "Score: " and "Time: " strings in with the Score and Time fields. A more professional way to do it is to have the words Score and Time as static text or graphics on the screen and only the actual score and time in the fields. In we finish with that case, encasing the gameScore variable inside the String function is definitely necessary (because the .text property of a text field must be a string). Setting it to just gameScore is trying to set a string to an integer and causes an error message.
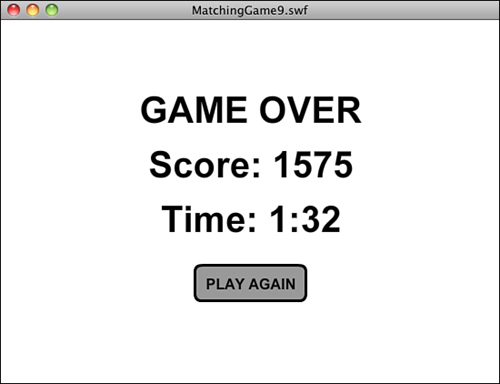
We don’t need to use code to create the showScore and showTime dynamic text fields; we can simply do that on the stage with the Flash editing tools. Figure 3.15 shows what the gameover screen now looks like when a game is complete.
Figure 3.15 A more complete gameover screen, with the final score and time.
Note
Since we’ve got text fields in our timeline we also need to make sure they are set up properly to display fonts. In the same movie, these fields are set to use Arial Bold and that font has been included in the library.
This completes MatchingGame9.fla and MatchingGameObject9.fla. We now have a game with an intro and gameover screen. It keeps track of score and time and we finish with displays them when the game is over. It also enables the player to play again.
Next, we finish the game by adding a variety of special effects, such as card flips, limited card-viewing time, and sound effects.
Adding Game Effects
Gone are the early days of games on the Web, just when the idea of a game in a web page was cool enough to get your attention. Now, you have to work to add quality, like little touches such as animation and sound, to your games.
Let’s spruce up this simple matching game with some special effects. Although they don’t change the basic game play, they make the game seem a lot more interesting to players.
Animated Card Flips
Because we are flipping virtual cards over and back, it makes sense to want to see this flip as an animation. You can do this with a series of frames inside a movie clip, but because you’re learning ActionScript here, let’s do it with ActionScript.
Note
Using a timeline animation rather than an ActionScript one is difficult here because of the nature of the cards. You do not want to animate 18 different cards, just 1. So, you probably put the card faces inside another movie clip and change the frame of that nested movie clip rather than the main Card movie clip. Then, the Card movie clip can have frames 2 and on, which is an animated sequence showing a card flip. It is not easy to envision unless you do a lot of Flash animating.
Because this animation affects the cards, and only the cards, it makes sense to put it inside the Card class. However, we don’t have a Card class. We opted at the start of this chapter to not use a Card class and just allow Flash to assign a default class to it.
Now it is time to create Card class. If we make a Card.as file, however, it is used by any Card object that is in the folder. We have MatchingGame1.fla through MatchingGame9.fla with Card objects in it. So, to make it clear that we only want MatchingGame10.fla to use this Card class, we change the name of the symbol and the class it references to Card10. Then, we create a Card10.as ActionScript class file.
This class enables an animated flip of the card, rather than just changing the card instantly. It replaces all the gotoAndStop functions in the main class. Instead, it tells the card to startFlip. It also passes in the frame which the card should show when the flip is over. The Card10 class then sets up some variables, sets up an event listener, and proceeds to animate the card over the next 10 frames:
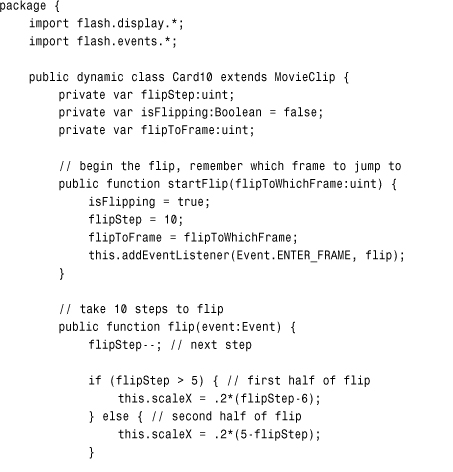
So, the flipStep variable starts at 10 when the startFlip function is called. It then is reduced by one frame each thereafter.
Note
The scaleX property shrinks or expands the width of a movie clip. A value of 1.0 is the default. A value of 2.0 stretches it to twice its width, and a value of .5 makes it half its width.
If flipStep is between 6 and 10, the scaleX property of the card is set to .2*(flipStep-6), which would be .8, .6, .4, .2, and 0. So, it gets thinner with each step.
Then, when flipStep is between 5 and 0, the new formula of .2*(5-flipStep) is used. So, it would be 0, .2, .4, .6, .8, and then 1.0, and it returns to normal size.
At the fifth step, the card jumps to the new frame. It appears to shrink, goes to nothing, jumps to the new frame, and then grows again.
To accomplish this effect, I had to make one change to how the graphics on the Card movie clip were arranged. In all previous versions of the game, the cards had their upper-left corner at the center of the movie clip. For the change to scaleX to make it appear that the card was flipping around its center, however, I had to center the card graphics on each frame over the center of the movie clip. Compare the Card movie clips in MachingGame9.fla and MatchingGame10.fla to see the difference. Figure 3.16 shows how this looks when editing the movie clips.
Figure 3.16 The left side shows the registration point of the movie clip at the upper left, as it is in the first nine example movies of this chapter. The right side shows the movie clip centered as it is for the final example.

At the last step, the event listener is removed completely.
The great thing about this class is it works just as well when the card is being turned back face down, going to frame 1.
Look at MatchingGameObject10.as and see where all the gotoAndStop calls have been replaced with startFlip. By doing this, we are not only creating a flip animation, but we are also giving the Card class more control over itself. Ideally, you might want to give cards complete control over themselves by having the Card10.as class more functions, such as those that set the location of the cards at the start of the game.
Limited Card-Viewing Time
Another nice touch to this game is to automatically turn over pairs of mismatched cards after the player has had enough time to look at them. For instance, the player chooses two cards. They don’t match, so they remain face up for the player to inspect. After 2 seconds, however, the cards turn over, even if the player hasn’t begun to select another pair.
To accomplish this, we use a Timer. A Timer makes adding this feature relatively easy. To start, we need to import the Timer class into our main class:
import flash.utils.Timer;
Next, we create a timer variable at the start of the class:
private var flipBackTimer:Timer;
Later in the clickCard function, we add some code right after the player has chosen the second card, not made a match, and his or her score has been decreased. This Timer code sets up the new timer, which calls a function when 2 seconds have gone by:
![]()
The TimerEvent.TIMER_COMPLETE event is triggered when a timer is done. Typically, a Timer runs a certain number of times, triggering a TimerEvent.TIMER each time. Then, on the last event, it also triggers the TimerEvent.TIMER_COMPLETE. Because we only want to trigger a single event at some point in the future, we set the number of Timer events to one, and then look for TimerEvent.TIMER_COMPLETE.
When 2 seconds go by, the returnCards function is called. This is a new function that works like the later part of the old clickCard function. It flips both the first and second selections back to the face-down state, and then sets the firstCard and secondCard values to null. It also removes the listener:
The returnCards function duplicates code that was in clickCard before, so in MatchingGameObject10.as I’ve replaced this duplicate code in clickCard with a simple call to returnCards. This way, we only have one spot in our code that returns a pair of cards to the face-down state.
Because returnCards demands a single event parameter, we need to pass that parameter into returnCards whether we have something to pass. So, the call inside clickCard passes a null:
returnCards(null);
If you run the movie, flip two cards, and then wait, the cards flip back on their own.
Because we have a removeEventListener command in the returnCards function, the listener is removed even if the returnCards function is triggered by the player turning over another card. Otherwise, the player turns over a new card, the first two cards turns back, and then the event is triggered after 2 seconds regardless of the fact that the original two cards are already face down.
Sound Effects
No game is truly complete without sound. ActionScript 3.0 makes adding sound relatively easy, although there are quite a few steps involved.
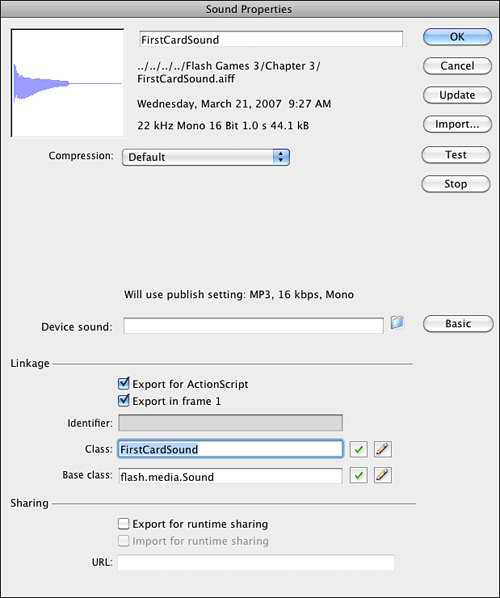
The first step is to import your sounds. I’ve created three sounds and want to bring them each into the library:
FirstCardSound.aiff
MissSound.aiff
MatchSound.aiff
After we have imported them, they need to have properties changed. Name them all after their filenames, but minus the .aiff extension. Also, check the Export for ActionScript option and give them the same class name as symbol name. Figure 3.17 shows one of the sound’s Properties dialog box.
Figure 3.17 Each sound is a class and can be accessed in ActionScript by its class name.
Next, we set up the main game class to play the sounds at the right time. First, we need to import two new classes so we can use sound:
import flash.media.Sound;
import flash.media.SoundChannel;
Then, we create class variables to hold references to these sounds:
![]()
I like to pass all sound playback through a single function. Let’s call it playSound and add it to the end of the class:
![]()
When we want a sound to play, we call playSound with the sound variable we want to use, as follows:
playSound(theFirstCardSound);
In MatchingGameObject10.as, I’ve added playSound(theFirstCardSound) when the first card is clicked and when a card is clicked while two mismatched cards are shown. I’ve added playSound(theMissSound) when the second card is turned over and there is no match. I’ve added playSound(theMatchSound) when the second card is turned over and a match is found.
This is all it takes to add sound effects to the game.
Note
You might at this point want to review your publish settings to choose your sound compression settings. Alternatively, you could set the sound compression for each sound individually in its symbol properties. Either way, you probably want to use something pretty low, such as 16kbps MP3, because these are simple sound effects.
Modifying the Game
A few more tiny changes before we are done with the game.
First, when we recenter all the cards, it throws off the horizontal and vertical offsets for the card placement, so that needs to be readjusted:
private static const boardOffsetX:Number = 145;
private static const boardOffsetY:Number = 70;
How did I come up with those numbers? Well, if you really want to know:
• The stage is 550 pixels across. There are 6 cards, each spaced 52 pixels apart. That’s 550-6*52 for the total space remaining on the left and the right. Divide by 2 to get the space to the right. However, the cards are centered at 0,0, so I need to subtract half of the width of a card, or 26. So, (550-6*52)/2-26=145;
• Same for the vertical offset: (400-6*52)/2-26=70;
Another loose end to consider is the cursor. When users go to click a card, they don’t get a special “I can click this” cursor. That is easily changed by setting the buttonMode property of each card as it is created:
c.buttonMode = true;
Now, we have a finger cursor when the user rolls over the cards. This is the case for the Play and Play Again buttons because those are Button symbols.
One last change I made is to increase the frame rate of the movie from the default 12 frames per second to 60. You can do this by choosing Modify, Document to change the main movie document properties.
At 60 frames per second, the flips are much smoother. With the super-fast ActionScript 3.0 engine, even slow machines can run this game at this high frame rate.
That wraps up the matching game, leaving us with the final version files:
MatchingGame10.fla
MatchingGameObject10.as
Card10.as