
1. Using Flash and ActionScript 3.0

• Creating a Simple ActionScript Program
• Writing and Editing ActionScript
• ActionScript Game Programming Strategies
• ActionScript Game Programming Checklist
ActionScript is a great programming language for making games. It is easy to learn, fast to develop with, and very powerful.
We start by looking at ActionScript 3.0 and the Flash CS5 Professional authoring environment. Then, we build some simple programs to get familiar with this new version of ActionScript.
What Is ActionScript 3.0?
ActionScript 3.0 was introduced in 2006 and has been the primary programming language for Flash ever since. The original version of ActionScript was introduced in 1996 with the release of Flash 4. It wasn’t called ActionScript yet, and you couldn’t even type your code. Instead, you chose statements from a series of drop-down menus.
Flash 5 in 2000 improved on that greatly with the formal introduction of ActionScript 1.0. This scripting language contained all the bells and whistles of other web-based development languages, such as Macromedia Director’s Lingo and Sun’s Java. But, it came up severely short in speed and power.
Flash MX 2004, also known as Flash 7, brought us ActionScript 2.0, a much more powerful version of the language that made it easier to create object-oriented programs. It was much closer to ECMA Script, a standard for programming languages developed by the European Computer Manufacturers Association. JavaScript, the programming language used in browsers, is also based on ECMA Script.
Note

The Flash Player has two separate code interpreters built in to it. The first is for older content and will interpret ActionScript 1.0/2.0 code. The second is a faster code interpreter that works with ActionScript 3.0. You get the best performance out of your games if you stick to only using ActionScript 3.0 code.
ActionScript 3.0 is the culmination of years of development. As each version of Flash came out, developers pushed it to the limit. The next version took into account what developers were using Flash for and what the weaknesses of the current version of ActionScript were.
Now we have an excellent development environment for 2D game development. You’ll find that one of its main strengths is being able to get games up and running with only a small amount of code.
Note
Flash CS5 Professional is actually Flash 11. Adobe has simply bundled together versions of various pieces of software—such as Flash, PhotoShop, Illustrator, and Dreamweaver—into their “CS5” package. The technical version number of Flash in CS5 is Flash 11. It is correct to refer to it as either Flash 11 or Flash CS5. The playback engine installed in browsers uses a different numbering scheme and is version 10 of the Flash Player.
Creating a Simple ActionScript Program
Source Files
A3GPU201_HelloWorld.zip
When introducing a new programming language, it is tradition to start off with Hello World programs. The idea is to simply write a program that does nothing other than display the words Hello World on the screen.
Note
The Hello World program dates back to 1974 when it was included in an internal tutorial document at Bell Labs. It was the first program that I learned when I sat in front of a PDP-11 terminal in school in the late 70s. Just about every introductory programming book has a Hello World example at the beginning.
A Simple Use of trace
We can create a limited version of Hello World by using the trace function in a script in the main timeline. All that trace does is output some text into Flash’s Output panel.
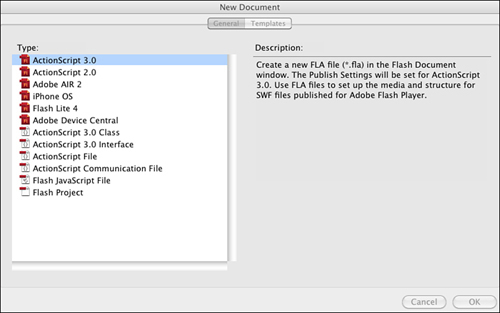
To create a new Flash movie, choose File, New from the menu. You are presented with the New Document window seen in Figure 1.1.
Figure 1.1 Choose ActionScript 3.0 to create a new Flash movie.
After clicking OK, you get a new Flash movie named Untitled-1. It appears as a Flash document window, as shown in Figure 1.2.
Figure 1.2 The Flash document window includes a timeline and a stage work area. There are many ways to configure Flash’s workspace, so your panels might be in different locations.

The top part of the document window includes a timeline, with frames starting with 1 and extending to the right—a little more than 50 frames can be seen in Figure 1.2, although this depends on the window size. The number of frames can extend as far as an animator needs, but as game programmers, we usually only need a few frames to build our games.
The timeline can have one or more layers in it. By default, there is one layer, named Layer 1, in the window.
In Layer 1, you see a single keyframe, represented by a box with a hollow dot under frame number 1.
Note
Keyframe is an animation term. If we were learning to animate with Flash, instead of learning to program, we would be using keyframes all the time. Basically, a keyframe is a point in the timeline where the positions of one or more of the animated elements are specifically set. Between keyframes, the elements would change position. For instance, if there were a keyframe on frame 1 where an element is on the left side of the screen and a keyframe on frame 9 where the same element is on the right side of the screen, in between these keyframes, on frame 5, the element would appear in the middle of the screen.
We don’t use keyframes for animating, but instead use them to place elements on the screen in different modes: such as intro, play, and gameover.
You can place a script in any keyframe in any layer of the timeline. To do this, select the keyframe, choose the Window menu, and then select Actions.
This brings up the Actions panel. You can see the result in Figure 1.3. It might look different to you because it can be customized in a number of ways, including having a full set of ActionScript commands and functions in a menu on the left side.
Figure 1.3 The Actions panel can also be accessed by the keyboard shortcut Alt+F9 (Windows) or Option+F9 (Mac).

The Actions panel is basically just a text-entry window. However, it can do much more for you, such as help you format your code. We don’t use the Actions panel much for the purposes of this book because most of our code is in external classes.
To create this simple Hello World program, enter the following text into the Actions panel:
trace("Hello World.");
That’s it. You’ve created your first ActionScript 3.0 program. To test it, choose Control, Test Movie, Test or use the shortcut Command+Return on Mac or Ctrl+Enter on Windows. If you didn’t build the movie yourself, you can open HelloWorld1.fla and use this file to test.
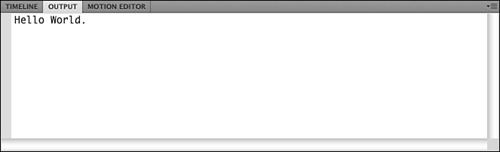
Now, look for the Output panel. It appears, even if you had that panel closed. But, it tends to be a small panel, so it could easily appear in a corner of your screen without you noticing. It might even appear in a set of panels along with the timeline, for instance. Figure 1.4 shows what it should look like.
Figure 1.4 The Output panel shows the results of the trace function call.
Although this Hello World program technically does output “Hello World,” it only does so while you are testing the movie in Flash CS5. If you were to embed this movie in a browser, it would show nothing on the screen. We need to do a bit more work to create a real Hello World program.
Creating Screen Output
To have the words Hello World display on the screen, we need more than one line of code. In fact, we need three.
The first line creates a new text area to be displayed on the screen, called a text field. This is a container to hold text.
The second line places the words Hello World into that text field.
Then, the third line adds that text field to the stage. The stage is the display area of a Flash movie. You can arrange elements on the stage while authoring a movie. During playback, the stage is the area the user sees.
In ActionScript 3.0, creating objects like a text field doesn’t add them to the stage. You need to do that yourself. This comes in useful later when you want to group objects together and not have everything placed directly on the stage.
Note
Any visual element in ActionScript 3.0 is called a display object. It could be a text field, a graphic element, a button, or even a user interface component (such as a pop-up menu). Display objects can also be collections of other display objects. For instance, a display object can hold all the pieces in a chess game, and the chess board is another display object underneath it. The stage itself is a display object, actually a display object known as a movie clip.
Here are the three lines of code for our new Hello World program. These simply replace the one line of code in frame 1 of the timeline from the preceding example:

Note
While typing this code, Flash might automatically insert a single line at the top of your script: import flash.text.TextField;. It does this because as soon as it sees you use the TextField object it assumes you want to include that part of the ActionScript 3.0 library in your Flash movie. With that included, you can create TextField objects.
The code creates a variable named myText of the type TextField. It then sets the text property of this text field to “Hello World” before adding it as a child of the stage display object.
The var keyword before the first use of the myText variable tells the compiler that we are creating a variable named myText; the colon and the type, TextField, tell the compiler what type of value this variable holds (in this case, a reference to a text field).
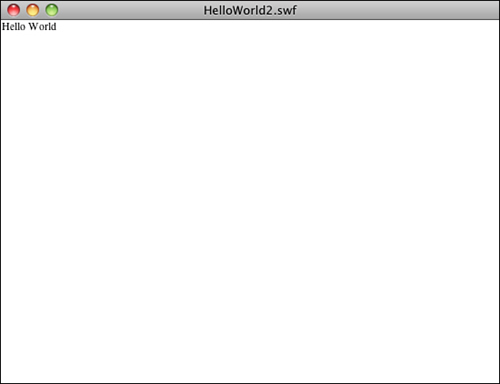
The result of this program is a tiny “Hello World” in the default serif font at the upper-left corner of the screen. Choose Control, Test Movie to see it. The source file is HelloWorld2.fla. Figure 1.5 shows this little text field that we have created.
Figure 1.5 The window shows a tiny “Hello World” at the upper left.
The reason the text appears at the upper left and in that particular font is that we have not set any other properties of the text field. After we learn a little more, we can set the text location, size, and font.
Our First ActionScript 3.0 Class
We aren’t using scripts in the timeline unless we have something that specifically needs to be done on a certain frame in the timeline. For the most part, our code exists in external ActionScript class files.
So, let’s rebuild the Hello World program as an external class.
Note
A class is another way of referring to a Flash object, like a graphic element or the movie itself. We also often refer to a class as the code portion of an object. So you have a movie and the movie’s class. This would define what data is associated with the movie and what functions it can perform. In the movie, you might have a movie clip element in the library and that movie clip has its own class that defines what it can do.
To make an external ActionScript file, choose File, New, and select ActionScript 3.0 Class. You might get asked to specify a name for the class, so type HelloWorld3.
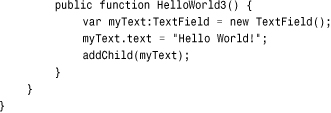
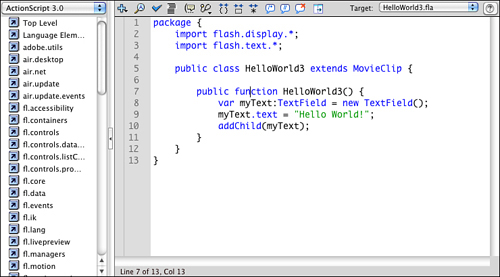
This opens a new ActionScript document window that occupies the same space as the Flash movie document window. Instead of a timeline and a stage work area, however, we just have a large text editing area, as shown in Figure 1.6.
Figure 1.6 The ActionScript document contains a simple Hello World program.

As you can see in Figure 1.6, this program is much longer than the three-line Hello World program we built earlier. Let’s take a look at what each part of the code does.
A class file starts off by declaring that it is a package containing a class. Then, it must define what parts of ActionScript are needed in the program. In this case, we need to display objects on the stage and create a text field. This requires the use of the flash.display classes and the flash.text classes:

Note
You quickly come to know what library classes you need to import at the start of your programs. These are two out of only a handful that we use throughout this entire book. For more unusual ActionScript functions, you can always look in the Flash Help entry for that function to see which class library to import.
The next line of code is the class definition. In this case, it needs to be a public class, which means that it can be accessed by the main movie. The name of the class is HelloWorld3, which must match the name of the file, which is HelloWorld3.as.
This class extends MovieClip, which means it works with a movie clip (in this case, the stage itself):
public class HelloWorld3 extends MovieClip {
The class contains a single function. The name of this function is HelloWorld3, which exactly matches the name of the class. When a function is named the same as the class name, it is executed immediately as soon as the class is initialized. This is called the constructor function.
In this case, the class is attached to the movie, so this function runs as soon as the movie is initialized.
Inside the function are the same three lines of code we used in the previous example:
To get this code working in a movie, you need to create a fresh new movie. The example is called HelloWorld3.fla. This movie doesn’t need to have anything in the timeline at all, but it must be assigned a document class. This indicates which ActionScript file controls the movie.
To set a document class, look for the Properties panel that usually appears when you select the stage of the Flash movie. If you don’t see it, you can bring it up by choosing Window, Properties. You see the panel shown in Figure 1.7 on the right. Then, enter the class name HelloWorld3 into the document class field.
Figure 1.7 The document class for this movie is set to HelloWorld3.
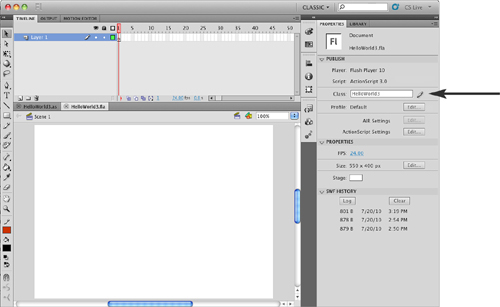
Now the movie knows that it must load and use the HelloWorld3.as file. When you test the movie, it compiles the AS class file into the movie. Running the movie will initialize the class, which will run the HelloWorld3 function and display the “Hello World” text.
Working with Flash CS5
Although most of our work is in ActionScript, we need to know some terms and some basics about working with the Flash CS5 timeline, stage, and library.
Note
If you are new to Flash, check out “Using Flash” in the Help documentation. That section provides a detailed explanation of the stage, timeline, library, and other Flash workspace elements and tells you how to handle the Flash interface.
Display Objects and Display Lists
We’ve already discussed display objects. They are essentially any graphic element. The most versatile of all display objects is the movie clip, which is a full graphic element that includes any number of other display objects, plus a timeline for animation.
A simpler version of the movie clip is a sprite. A sprite is essentially a movie clip with only one frame. When we create display objects from scratch in ActionScript, we are usually making sprites. They are naturally more efficient than movie clips because they don’t have the overhead of multiple frames of animation.
Other display objects include things such as text fields, bitmaps, and video.
Some display objects, such as movie clips and sprites, can have other display objects in them. For instance, you can have a sprite that contains several other sprites, as well as some text fields and bitmaps.
Nesting display objects provides you a way to organize your graphic elements. For instance, you could create a single game sprite to hold all the game elements you create with ActionScript. Then, you could have a background sprite inside of it that contains several background sprite elements. A game pieces sprite could sit on top of that and contain moveable game pieces.
Because movie clips and sprites can contain multiple objects, they each maintain a list of these items to determine the order in which they are displayed. This is called a display list. We can modify this display list to place objects in front of or in back of other objects.
We can also move display objects from one parent display object to another. This isn’t making a copy of the object, but is actually removing it and adding it again. This makes display objects incredibly versatile and easy to work with.
The Stage
The stage is the main graphics work area in Flash. It is a representation of the screen that is seen by users when they are playing the game.
Figure 1.2 showed the document window with the stage taking up a majority of the space. It also shows the timeline at the top.
Many of our games have a completely blank stage and empty timeline. All the graphic elements are created by the ActionScript code.
However, many games have graphic elements already sitting on the stage. This is particularly important when a nonprogrammer graphic designer is involved in making a game. The designer might want to lay out interface elements and adjust them during development. It is simply not practical to have those elements created by ActionScript in cases like this.
During development, the stage can be used as a place to create quick graphic elements. For instance, you can draw using the drawing tools on the stage, select the shape, and then press F8 to create a quick movie clip in the library.
The Library
The Flash library contains any media that you need in your game and is bundled into the final SWF file. You can also import other media elements into your movie, as you see when we import external bitmap images in Chapter 6, “Picture Puzzles: Sliding and Jigsaw.”
Figure 1.8 shows the Library panel. Most of the items in the library are movie clips. The first item is a button, and several that are in the Sounds folder are sounds.
Figure 1.8 The Library panel shows all the media objects enclosed in the current movie.
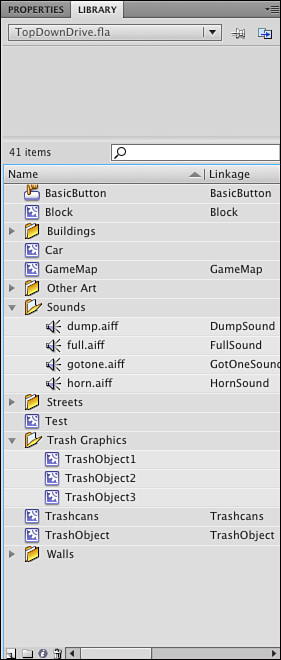
In Figure 1.8, some of the movie clips have a name in the Linkage column. These are items that can be pulled from the library by our ActionScript code at runtime.
The Timeline
A Flash movie is broken up into frames. The timeline at the top of the window enables you to choose the frame that is displayed in the stage work area at the bottom of the window. Because we are not producing animations, but game applications, we are using the frames to differentiate between different game screens.
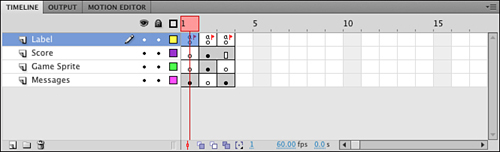
Figure 1.9 shows a timeline. Only three frames are in use. They are all keyframes. The first is for a game introduction screen and contains some instructions. The second is the frame where the game is played. The third is a “Game Over” message and a Play Again button.
Figure 1.9 The timeline has been expanded slightly using the pull-down menu at the right, so the frames are a little larger.
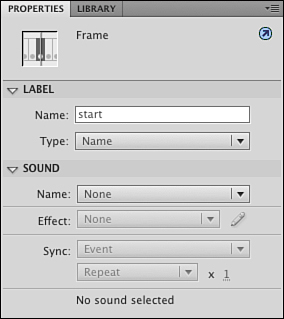
Each keyframe has a label, although you cannot see it in the timeline. You can see a little flag in the top layer of each frame, which signifies that there is a label there.
To see and set the frame labels, you need to select the frame, and then check the Properties panel. It contains a Frame field. In this case, it has been set to “start,” and you can edit it if you need (see Figure 1.10).
Figure 1.10 The Properties panel enables you to set or change the frame label.
If you look back at Figure 1.9, you can see that there are four layers. The first layer, Label, contains three keyframes. The way you create frames and keyframes is to use F5 to add a frame to a layer, and then F7 to add a keyframe among those frames.
The second layer, named Score, contains only two keyframes, frame 1 and 2. So, frame 3 is just an extension of frame 2. This means the score elements present during game play on frame 2 is still present on frame 3.
The timeline, stage, and library are your primary visual tools for developing your games.
Writing and Editing ActionScript
Although it is usually somewhat necessary to work in the Flash document to create a game, we are spending most of our time in the ActionScript document window.
We saw this window in Figure 1.6, but Figure 1.11 shows it differently. On the left is a hierarchical menu of ActionScript 3.0 syntax.
Figure 1.11 The ActionScript document window features several useful tools at the top.
At the top of the window, you see two tabs. That is because two documents are open: HelloWorld3.fla and HelloWorld3.as. This enables you to work on the Flash movie and the ActionScript document at the same time. You can switch between them by clicking the tabs. You can also have other ActionScript files open, which proves handy if you are working with multiple ActionScript classes at the same time.
Notice in Figure 1.11 that the lines of code are indented. The proper way to do this is by using the Tab key. When you press Return or Enter at the end of a line of code, the cursor automatically appears indented to the proper level at the next line. If you want to remove a Tab stop to pull a line closer to the left, press Delete or Shift+Tab.
Note
You can also select a section of code and press Tab to move it all over to the right by one Tab stop. You can Shift+Tab to move a whole section to the left, too.
The script window tools at the top perform various functions that every ActionScript programmer should know how to use. Here is a list (as shown in the window, from left to right):
• Add a New Item to the Script—This is a massive drop-down menu that gives you access to every ActionScript command. There is so much that it is difficult to use for standard commands, but can be useful to find more obscure ones.
• Find—Use this to open the Find and Replace dialog box. You can also use Command+F (Mac) or Ctrl+F (Windows).
• Check Syntax—This is a handy way to have the Flash compiler do a precheck on the syntax of your script. You can see the results in the Output panel.
• Auto Format—This takes your entire script and reformats it with consistent tabbing, spacing, and brackets. If you decide to use this, be sure to visit the Preferences for Auto Format to make some decisions about what this button should and should not do.
• Show Code Hint—This is probably the most useful of all the buttons. When you start typing a function, such as gotoAndStop(), you get a code hint that instantly appears letting you know what parameters the function accepts. However, if you want to edit the function call later, you can position the cursor inside the function parameters and then use this button to bring back the hints.
• Debug Options—This drop-down menu enables you to set and remove breakpoints. We discuss debugging later in this chapter in the “Testing and Debugging” section.
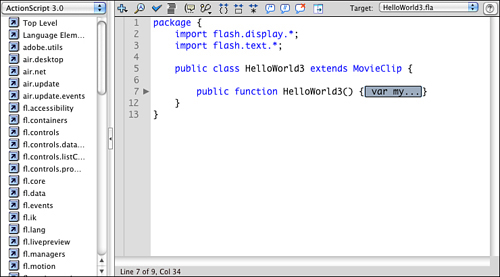
• Collapse Between Braces—If you click this button, the current section of code, between curly braces, collapses to a single line. The code is still there, but hidden. You can click on the triangle (Mac) or plus sign (Windows) to the left side of the window or the Expand All button to expand it. Figure 1.12 shows what it looks like when some code has been collapsed.
Figure 1.12 A block of code has been collapsed. This is handy when you have a huge script and want to hide sections of code you are not working on.
• Collapse Selection—This collapses the code currently selected.
• Expand All—This reverts all collapsed sections to their normal status.
• Apply Block Comment—Select some code and press this button to turn the selection into a comment by adding /* before and */ after. See the next section “ActionScript Game Programming Strategies” for more about commenting your code.
• Apply Line Comment—The current line is turned into a comment. If multiple lines are selected, all the lines are turned into comments by adding // in front of each line.
• Remove Comment—Turns selected comments back into code. This is handy when you want to temporarily remove code from your program. You can comment those lines of code so they don’t compile, and then remove the comment marks to bring the code back.
• Show/Hide Toolbox—This button toggles the list of ActionScript at the left side of the window.
At the right of the buttons is a drop-down menu labeled Target. This button enables you to select a Flash movie document that compiles and runs when you select Control, Test Movie. This makes it possible to make a change to your code and test the movie without having to switch back to the document window first. Usually, the Flash movie document last viewed is shown here, but you can select a document if multiple ones are open.
Another important feature of the ActionScript document window is the numbers to the left. Each line has its own number. When you get compiler errors when trying to publish your movie, they refer to the line number so you can track down the problem.
ActionScript Game Programming Strategies
ActionScript 3.0 is very versatile. You can follow any number of programming styles and still create games that work well.
However, some programmers prefer certain styles over others. I have chosen a method for this book that allows us to focus on the core game code, perhaps sacrificing some advanced organization.
Single Class Method
The third Hello World program earlier in this chapter is simply one class file linked to a Flash movie of the same name. This simple approach is fast and easy.
Note
An alternative is to use different class files for different game objects and processes. This can make it difficult to keep track of what code is where in small games. For instance, if a ball collides with a paddle in a game, is the collision detection in the ball object’s class or the paddle object’s class?
You are certainly welcome to break the code up into multiple classes if you are familiar with that type of organization from your experience with other programming languages.
With one class file, all our class properties can be clearly defined as variables at the top of the class.
The document class controls the main timeline, meaning that we can call public functions in the class from buttons placed on the stage by designers. We can also easily control the main timeline, jumping to different frames.
Smallest-Step Approach
This next piece of information might be the most important in the book. It is simply this:
If you can’t figure out how to program something, break it into smaller steps until you can.
Beginner programmers, and some experienced programmers who simply forget this rule, often get stuck while writing code. They think: “I don’t know how to make the program do a certain task.”
However, this is simply a case of the task actually being several tasks, not just one.
For example, a programmer might want to make a spaceship rotate around when the player presses the arrow keys. The programmer gets frustrated because he or she is not sure how to accomplish this task.
The key is to break up the task of “rotating a spaceship:” Check to see whether the left arrow is pressed. Subtract from the rotation property of the ship sprite. Check to see whether the right arrow is pressed. Add to the rotation property of the ship sprite.
The task of rotating a spaceship is actually four smaller tasks combined into one.
Sometimes beginning programmers make the same mistake in a bigger way. They assume they cannot create an entire game because it seems too complex. But, if you break the game into smaller and smaller tasks (and take each one step at a time), you can create any game.
A simple whack-a-mole game might require fewer than a hundred tasks, whereas a complex platform game might require several hundred. But each task, if broken into its simplest steps, is just as easy to build.
Good Programming Practices
While learning to use ActionScript 3.0 to make games, it is also a good idea to keep some general good programming practices in mind. These aren’t so much rules as guidelines. Even I break them here in there in the very pages of this book. There is no doubt that you would be a better programmer if you learn about these practices.
Use Comments Well
Comment your code with meaningful but simple comments.
What seems like extra work now will have you thanking yourself months from now when you need to go back and modify your code.
If you are working with other programmers, or think there is even a remote chance that someone else will have to modify your code at some point in the future, this guideline should become a rule.
There are generally two types of comments: line comments and block comments. A line comment is simply a short phrase at the end of a line or sometimes a single line comment just before the line of code. A block comment is a larger comment, usually one sentence or more, before a function or a section of code:
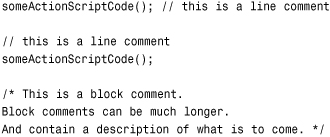
It is equally as important to make your comments meaningful and brief. Don’t just restate what the code already says, like this:
// loop 10 times
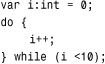
for (var i:int=0;i<10;i++) {
Also, don’t use a paragraph of text when a few words will do. A long and wordy comment can be just as useless as no comment at all. Don’t overdo it.
Use Descriptive Variables and Function Names
Don’t be afraid to use long and descriptive names for variables and functions. If you do, the code becomes partially self-explanatory. Here is an example:
What does that code do? It looks like it places copies of a movie clip on the screen. But what movie clip and for what purpose? How about the following?
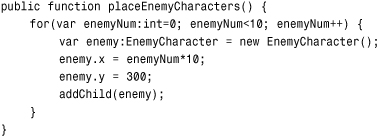
Returning to this code months later will be much easier.
Note
One common exception to this is the use of i as the incremental variable used with for loops. In the preceding example, I would have left the i and not changed it to enemyNum. Either way is fine, but it has become pretty standard for programmers to use i in for loops. In fact, nested for loops usually go on to use j and k in the inner loops, too.
Turn Repetitive or Similar Code into Functions
If you need to use the same line of code more than one time in a program, consider turning it into a function of its own and call that function instead.
For instance, there might be several places in your game where you want to update the score. If the score is displayed in a text field named scoreDisplay, you do it like this:
scoreDisplay.text = "Score: "+playerScore;
But instead of including this same line of code in five places, you should put a function call in the five places instead:
showScore();
Then, the function can look like this:
![]()
With this code only in one place, it is trivial to change the display word Score to Points. You don’t need to search and replace throughout your code because it is only in one spot.
You can do the same even if the code isn’t identical. For instance, suppose you have a loop where you place 10 copies of movie clip A on the left side of the stage and another loop where you place 10 copies of movie clip B on the right side of the stage. You could create a function that takes the movie clip reference and the horizontal position for placement and places the movie clips. Then, you can call it twice, once for movie clip A and once for movie clip B.
Test Your Code in Small Pieces
As you write your code, test it in as small pieces as possible. This way, you catch errors as you write your code.
For instance, if you want to make a loop that places 10 circles on the screen at random locations with random colors, you want to first create the 10 circles at random locations. Test it and get that portion working just like you want. Then, add the random color functionality.
This basically is an extension of the “smallest-step approach.” Break your programming tasks into small steps. Create the code for each step. Then, test each step.
Basic ActionScript Concepts
Let’s take a look at the most basic programming syntax in ActionScript 3.0. If you are new to ActionScript but have been using another programming language, this is a quick way to see how ActionScript works.
In case you have used ActionScript or ActionScript 2.0 before, I point out some places where ActionScript 3.0 differs.
Creating and Using Variables
Storing values in ActionScript 3.0 can be done with a simple assignment statement. However, you need to declare a variable the first time you use it. You can do this by placing var before the first use of the variable:
var myValue = 3;
Alternatively, you could declare the variable first and use it later:
var myValue;
When you create a variable in this way, it is a versatile Object type. This means it can hold any type of variable value: a number, a string such as "Hello", or something more complex like an array or movie clip reference.
However, if you declare a variable to be of a specific type, you can only use the variable to store values of that same type:
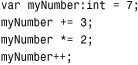
var myValue:int = 7;
An int variable type can be any integer, positive or negative. A uint variable is only for positive integers. If you want to use fractional values, also known as floating-point numbers, you must use the Number type:
var myValue:Number = 7.8;
There are also String and Boolean types. Strings hold text, and Boolean values must be either true or false.
These are the basic primitive types. However, you can also have arrays, movie clip and sprite references, and new types that match the code classes you create.
Note
There is a definite efficiency advantage to using narrowly defined variables. For instance, int values can be accessed many times faster than Number values. This can help you speed up critical game processes if you stick to as basic of a type as possible for all variables.
Operations on numeric variables are like almost any other programming language. Addition, subtraction, multiplication, and division are performed with the +, -, *, and / operators:
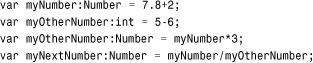
You can also use special operators to simplify operations. For instance, the ++ operator increments a variable by one. The -- operator decreases it by one:
myNumber++;
You can use +=, -=, *=, and /= to perform an operation on the original variable. For instance, this adds seven to the variable:
myNumber += 7;
You can also use parentheses to set the order of operations:
var myNumber:Number = (3+7)*2;
Strings can also be manipulated with the + operator and the += operator:
![]()
When we use variables in classes, they become properties of that class. In that case, we must define them further as either private or public. The difference is that private variables cannot be accessed by code outside of the class. For most purposes, this is what you want as the class functions should be the only things that can alter the class variable values.
Note
There are also variables that hold more than just a single value. Arrays, for instance, hold a series of values and are very useful for game programming. We’ll take a look at arrays at the beginning of Chapter 4, “Brain Games: Memory and Deduction.”
Condition Statements
The if statement in ActionScript is the same as it is in many programming languages:
![]()
The == comparison checks for general equality. You can also use >, <, >=, and <= for greater than, less than, greater than or equal to and less than or equal to, respectively.
You can add else and else if to extend the if structure:
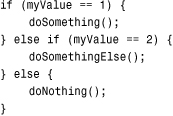
You can also have more complex conditions with && and ||. These represent the and and or comparison operators.
Note
Other programming languages use and and or in condition statements. But in ActionScript 3.0, only && and || are accepted.
![]()
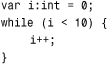
Loops
Looping is done with the for statement or the while statement.
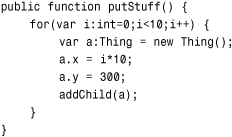
The for statement has three parts: the initial statement, a condition, and a change statement. For instance, the following code sets the variable i to zero, loops as long as it is less than 10, and increases the value of i each time through the loop:
![]()
You can use the break command to exit a loop at any time. The continue command skips the rest of the lines of code in the loop and begins the next iteration through the loop.
A while loop is basically a loop that continues forever as long as an initial condition is met:
A variation of the while loop is the do loop. It is essentially the same, except the conditional statement is after the loop, ensuring that it executes at least once:
Functions
To create functions in ActionScript 3.0, you just need to declare the function, what parameters it takes, and what it returns. Then define the function with the code inside it.
If the function is in a class, you need to also define whether it is a public or private function. A private function cannot be accessed outside of the class. With our single-class game development method, we are using mostly private classes.
Note
You might find that functions are sometimes referred to as methods. In the documentation, the term method is used often, but the keyword function is used to define it, as you see in the following function. So, I prefer to use the term function.
Here is a simple function from inside a class. If this function were in the main timeline, rather than in a class, we would leave the private keyword off:

All this example function does is to return true if either the number is seven or the string is less than three. It is a simple example to show the syntax behind creating a function.
Testing and Debugging
No one, not even the most experienced programmer, writes perfect code. So, we must write code, test, and debug.
Types of Bugs
There are three reasons to debug your code. The first is that you get an error message when it compiles or runs. In this case, you must figure out the problem and correct it. Usually, you can see the problem immediately (for example, a misspelled variable name).
The second reason is that the program does not work as expected. Perhaps a space ship is supposed to move, but doesn’t. Or, user input is not accepted. Or, maybe the bullets the hero fires at the enemy pass right through them. This type of bug needs to be hunted down, and it can sometimes take a while.
Note
By far, the most common type of question I get from other programmers is that they have some code that doesn’t work as expected. Can I tell them what is wrong with it?
Yes, but the answer is right there in front of them; they just need to use their debugging skills to find it. And, as the creator of the code, they are usually in a much better position to do that than I am.
A third reason to debug your code is to improve it. You can track down inefficiencies and problems that cause slowdowns. Sometimes this is just as critical as a bug because a slow game might be unplayable.
Methods of Testing
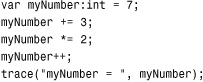
You can track down issues with your code in several ways. The simplest is to just walk through the code in your head. For instance, walk through the following code, line by line, and do the calculations like you were the computer:
You don’t need to run the code to tell that the value of myNumber is now 21.
For situations where the code is too long or the calculations are too difficult, a simple trace command sends information to the Output panel for you to examine:
I use trace statements often while developing. For instance, if the player makes a bunch of choices at the start of the game, I send the results of those choices to the Output panel with trace. That way, while I’m testing, I have a reminder of what options I chose before playing the game in case something unexpected happens.
Using the Debugger
With Flash you can use a runtime debugger to check your code while your movie is running.
Setting a Breakpoint
The simplest way to debug a program is to set a break point. You can do this by selecting a line of your code and choosing Debug, Toggle Breakpoint from the menu. You can also press Command+B (Mac) or Ctrl+B (Windows) to set or remove a breakpoint.
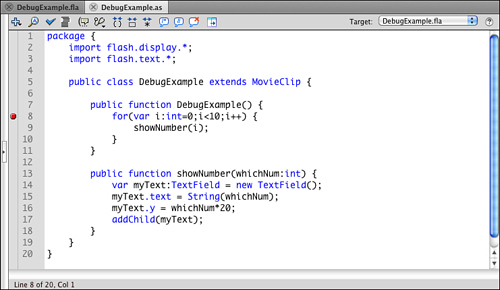
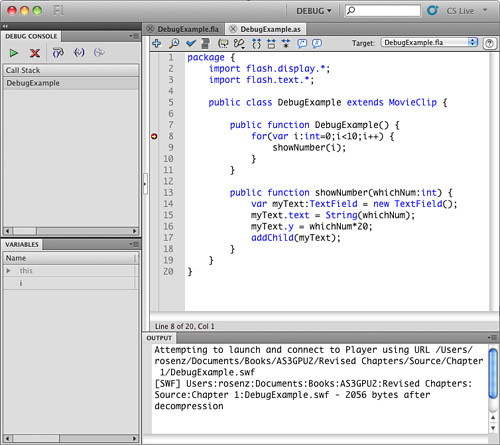
Figure 1.13 shows the DebugExample.as code with a breakpoint set. You can see it as a dot on the left side of the window before the eighth line. The program simple creates 10 text fields with the numbers 0 through 9 in them and places them vertically down the left side of the screen.
Figure 1.13 The cursor was placed in line 8, and then Debug, Toggle Breakpoint was chosen to set a breakpoint there.
After a breakpoint is set, you can use Debug, Debug Movie, Debug rather than Control, Test Movie, Test to test the movie. When the program hits the line with the breakpoint, it pauses and displays a variety of information to you in various debug windows.
With the breakpoint set at line 8 and if you use Debug, Debug Movie, a whole set of debugging panels show up, in addition to the running Flash movie. You can see them all in Figure 1.14.
Figure 1.14 The debug panels show you various information about the state of your program.
Stepping Through the Code
There are five buttons at the top of your Debug Console panel at the upper left. The first is a Continue button, which continues the movie from the point at which it is stopped. The second is an X. This ends the debugging session and continues the movie from this point on without debugging.
The other three involve stepping through the code. The first executes the current line and moves on to the next. If the current line of code calls another function, it runs that function. On the other hand, the next button, Step In, steps the program into a new function if one exists on the same line. Using this button again and again means you visit every individual line of the program, instead of skipping over function calls.
The last button steps out of the current function. So, use this button to finish the current function and go to the next line of the function you just left.
Figure 1.15 shows the debug panels after you step into the showNumber function and then move down a few lines. You can see that the Variables panel shows the value of i. You can also expand the myText variable to see all the properties of the text field.
Figure 1.15 The debug panels show the progress of the program as you step through it.
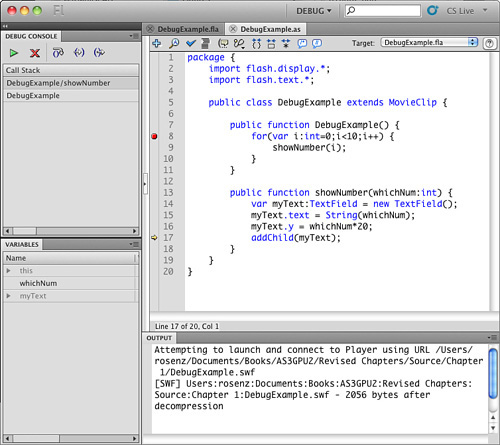
At the upper left, you can see where you are in the program. You are currently in the showNumber function, which was called from the constructor function for the class. This comes in handy when you have a function that could be called form multiple places.
Knowing how to use the debugger to fix bugs and unexpected behavior is just as important as knowing how to write the code in the first place. As you work on the games in this book and try to modify them to fit your needs, also work on learning how to debug.
Publishing Your Game
After you have completed a game and tested it to your satisfaction, it is time to publish it. Flash games are usually published to the Web by embedding them in HTML pages.
Flash makes this relatively easy, but there are some options you should understand before publishing.
You can access the Publish Settings dialog by choosing File, Publish Settings. Make sure you are viewing the Flash movie (.fla) file first, not the ActionScript class (.as) file. Publish settings are associated with the Flash movie file.
There are typically three sections in the Publish Settings dialog: Formats, Flash, and HTML.
Formats
The Formats settings, shown in Figure 1.16, enable you to select which files to export.
Figure 1.16 Only Flash and HTML formats are selected for export.

The image formats are mostly for substitutions when the user doesn’t have the Flash player installed. Projectors are for stand-alone applications, as opposed to creating Flash format (.swf) files for playback in web browsers.
If you have a custom web page template that you already use on your site, the HTML option might not be necessary. In that case, you don’t want a default page to embed your game into. However, you might want to export it anyway, and then take the body code from this sample page to use in the proper space on your own page.
Flash
The Flash settings are the most critical to exporting a complex Flash movie like our games. You want to set it to export Flash Player 10 files with ActionScript version set to ActionScript 3.0 (see Figure 1.17).
Figure 1.17 These are a good set of settings for general Flash game use.
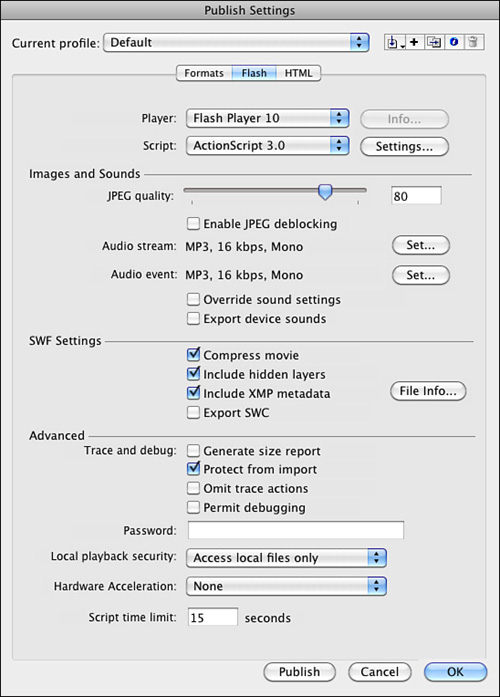
You also want to set the Protect from Import option. This makes it harder for someone to download your movie and modify it for his own use.
Note
Unfortunately, there is no surefire way to protect your Flash movie after it has been put on the Web. There are decompiler programs out there that take a compressed and protected SWF file and convert it to a usable FLA movie. Using Protect from Import and Compress Movie makes this more difficult, but it is always a danger.
Of particular interest to game developers is the Hardware Acceleration setting. None is the normal mode or what previous older versions of Flash have used. But with CS5 you also have the option to set it to Direct or GPU. The first attempts to draw graphics directly to the screen, instead of to the browser window. GPU attempts to use the graphics processor in the computer to do some drawing and video playback.
Test both if you wish, though you have to do it in a browser as testing in Flash uses neither. Flash drops back to the None setting if either Direct or GPU mode is not available on the playback computer.
The rest of the Flash settings concern compression and security settings. You can check the Flash documentation for detailed descriptions of each.
HTML
The HTML settings are only important if you want to use the HTML page created by Publishing on your site. It is at least a good idea to see how Adobe thinks you should publish your Flash movies. Figure 1.18 shows these options.
Figure 1.18 The HTML settings let you choose an HTML template to export with the Flash movie.

The default setting of Flash Only uses JavaScript to embed the movie. It relies on the file swfobject.js, which is produced when publishing, too. The main HTML page then loads the JavaScript in this file, which then places the Flash movie in a <div> tag inside the web page.
Note
Why go to all the trouble of using JavaScript when you can just use a simple <object>/<embed> tag, like you might have done in years past? Because of a patent dispute, Microsoft had to change the way media is embedded into pages in Internet Explorer. Any media embedded directly into a page now requires a click to activate it in Internet Explorer 7 and some versions of Internet Explorer 6. However, this JavaScript method avoids that extra click.
One popular option is to have the Flash movie scale to fill the entire browser window. This can be done by simply changing the Dimensions setting to Percent and the Width and Height to 100. Now the movie scales as large as it can, while still fitting in the window and maintaining its proportions.
Changing the Scale to Exact Fit enables it to lose its proportions and scales vertically to fit the window height and horizontally to fit the window width.
Because all the vector graphics in Flash scale nicely and your code works fine at any scale, it is sometimes a good idea to allow the player to adjust the size of the game by simply changing the size of their browser window. This way, people with small monitors and large monitors can play the games as they like.
Another option is the Quality setting. At the default High setting, the Flash player renders the image at high resolution to get the best anti-aliasing effects at the edges of vector shapes. Changing it to Medium lessens the resolution of anti-aliasing, but increases the performance of the movie. Using Auto High means that it tries to use the High setting, but drops down to Medium if playback is too slow. Using Low quality removes all anti-aliasing, but offers the highest playback speed.
The last option, Best, is like the High setting. The difference is that High still favors speed over quality when animating. Best favors quality regardless of speed.
ActionScript Game Programming Checklist
When you are building a Flash game, there are a lot of factors to consider. Sometimes it is easy to forget a key element which leads to the game not working correctly. To help you avoid some simple problems, here is a handy checklist that you can refer to.
Publishing and Document Settings
It is easy to forget that there are critical settings in the Publish Settings dialog and the movie’s Properties panel.
Document Class Set Correctly?
Figure 1.7 showed how to set the document class using the movie’s document panel. Forgetting to set this means that the movie runs and simply ignores the class that you created.
Publish Settings Set Correctly?
Make sure you set the Publish Settings so that the Flash movie is compiled for Flash 10 and ActionScript 3.0. It is doubtful that your movie even compiles if these are not set correctly, but it might be possible.
Check Security Settings
In the Publish Settings in the Flash section, there is a Local Playback Security setting. It can be set to either Access Local Files Only or to Access Network Files Only. To make sure Flash movies are secure, you have to choose one or the other.
This can be a problem if you have local files you need to access, and this is set to Access Network Files Only. If you are using external files at all and things are not working as expected when you upload to a server, make this the first place you check.
Class, Function, and Variable Names
Even if you try to follow the good programming practices noted earlier in this chapter, you can still make some simple mistakes that could be hard to track down.
Remember Case Sensitivity
When you name a variable or function, case matters. So, myVariable and myvariable are completely different. Likewise, a class named myClass runs the function myClass when it initializes. If you have named it myclass by accident, however, it is not called.
Differences in variable names are usually caught by the compiler because a misspelled variable name would not have been initialized. But, it is possible to forget that you have declared a variable and declare it again with different capitalization. This is something to be on the watch for.
Are Movie Clip Class Files Present?
If a movie clip is given a Linkage name to be used by ActionScript, it can use either the default dynamic class, or you can create a class for it. For instance, you can make an EnemyCharacter movie clip and then have an EnemyCharacter.as class file that is tied to it.
However, it is easy to forget this class or misname it. For instance, an Enemycharacter.as (lowercase c) file is simply ignored and not attached to the EnemyCharacter movie clip.
Do Classes Extend the Correct Type?
You can start off a movie’s class with a definition like this:
public class myClass extends Sprite {
However, by extending a Sprite rather than a MovieClip, you are assuming that the movie only has one frame. Any code that refers to other frames don’t work as expected.
Is the Constructor Function Set to the Right Name?
If you have a class named myClass, the constructor function should be named exactly myClass; otherwise, it does not run when the class is initialized. Alternatively, if you don’t want it to run right away, name it something like startMyClass and call it after the frame starts.
Runtime Issues
There are also problems that don’t cause compiler errors and don’t appear to be problems at all at first. Then, they can show up later in development and be very frustrating to track down.
Are You Setting Properties Before the Object Is Ready?
This one drives me crazy. Basically, what happens is that you jump to a new frame in the movie or a movie clip, and then try to set or access a property of an object there. However, the frame and its objects haven’t been initialized yet, so the property doesn’t exist.
TooEarlyExample.fla and TooEarlyExample.as illustrate this. The class jumps the main timeline to frame 2, where two text fields await. It immediately tries to set the text of the first field, but that just calls a runtime error message. The second field is set when the movie is done initializing and runs the script in that frame. That script in turn calls a function in the class. This function sets the text of the second field without a problem.
Are You Disposing of Objects?
Although this might not cause much of a problem, it is a good practice to remember to dispose of all the objects you’ve created after you are done using them. For instance, if you have the player shoot bullets around the screen, they might be able to hold down a key and shoot thousands in a minute. When they leave the visible area of the screen, you don’t want these to hang around in memory and get tracked.
To completely remove an object, you just need to get rid of all references to it in your variables and arrays and use removeChild to take it out of its display list.
Are All Variables Well Typed?
Another factor that might not cause immediate problems, but might still be a long-term issue, is variable typing. Don’t use the Number type when int or even uint will do. The latter is much faster and takes up less memory. If you have thousands of numbers stored in arrays, you might see some slowdown by using Number when int would do.
Worse than this example is using untyped variables, which are Objects. They can store numbers and integers, but have far more overhead. Also, look out for creating MovieClips that can be single-framed Sprites.
Did You Remember to Include All Fonts?
Using dynamic ActionScript with text fields is tricky. If you put text fields on the stage and forget to embed the fonts that they use, you get error messages. Worse than that, if you dynamically create text fields and try to use fonts that aren’t embedded in your movie, then you might just get blank spaces instead of text.
The way you add fonts to your movie is to go to the Library panel and use its top right pull-down menu to add a font to the Library. Keep in mind that you might need to embed multiple versions of a font to handle variations like Arial versus Arial Bold.
See the section “Using Point Bursts in a Movie” in Chapter 8, “Casual Games: Match Three and Collapsing Blocks,” for more discussion on the difficulties involved with embedding fonts.
Testing Issues
These items relate to things that can happen during testing or things that should be part of your testing approach.
Do You Need to Disable Keyboard Shortcuts?
If you are using keyboard input while testing your movies, you might find that some keys don’t respond. This is because the test environment has some keyboard shortcuts that are taking these key presses.
To turn the keyboard shortcuts off in the testing environment and allow your movie to act like it would when on the Web, choose Control, Disable Keyboard Shortcuts.
Have You Tested at Other Frame Rates?
If you are using time-based animation, it shouldn’t matter what frame rate you are set to, 1 or 60; the animation should move along at the same speed. However, it is worth testing at a low frame rate, say 6 or 12, to see what users on slow machines might see. We use time-based animation throughout this book.
Also, it is worth testing at slow and high frame rates to see whether there isn’t some system that is still using time-based animation or responses.
Have You Tested from a Server?
A similar problem rears its head when you assume that objects are all present at the start of a movie. The truth is that Flash movies stream, which means they begin playing before all the media has been loaded.
When you are testing a movie locally, however, all the media is instantly there. Then, when you upload and test on a server, some of it might be missing for the first few seconds or even minutes.
Note
When you test a movie, you can restart the test by selecting View, Simulate Download. Also, look at View, Download Settings to set a desired simulated download rate, like 56K. Then, the movie restarts with the objects streamed in at the desired rate. I’d also test with a live server to be sure.
The solution to any problem that might arise is to have a loading screen that does nothing but wait for all media to be streamed. We look at an example of a loading screen in Chapter 2, “ActionScript Game Elements.”
This checklist should make it easier for you to avoid common problems and devote more time to creating games and less time to tracking down bugs.
Now that we have the basics of ActionScript 3.0 covered, the next chapter looks at some short examples of building blocks that you can use to make games.