
10. Questions and Answers: Trivia and Quiz Games
• Storing and Retrieving Game Data
Different games can be used for different purposes. However, few games can be used for as diverse purposes as quiz games. You can have a quiz about almost any subject and at any difficulty level. The most difficult part about making quiz games is making them interesting. After all, a few multiple-choice questions is nothing more than a test. And few people like taking tests.
Quiz and trivia games are data driven. They rely on the questions and answers as primary game elements. This text data is best stored in external files and imported into the game dynamically. We’ll look at strategies for doing this before starting on the games.
After that, we’ll build a quiz game that takes an external text file and uses the questions and answers within for the game data. Then we’ll go a step further and use external images in a picture quiz game.
Storing and Retrieving Game Data
Source Files
A3GPU210_XMLExamples.zip
A trivia game needs a list of questions and answers. The best way to bring in this data at the start of a game is by reading in an XML file.
Understanding XML Data
XML stands for eXtensible Markup Language. Its purpose is to have a simple format to be used to exchange information between systems.
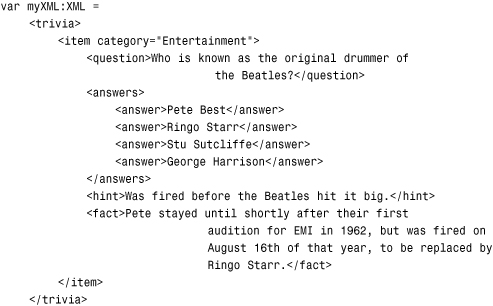
If you’ve never seen an XML file before, but you have worked with HTML, you’ll notice a similarity. Less than and greater than symbols are used in XML to enclose key defining words called tags. Take a look at this example:

This XML file represents a one-item trivia quiz. The data is in a nested format—tags inside of other tags. For instance, the entire document is one <trivia> object. Inside of that, is one <item>. In this <item> is one <question>, an <answers> object with four <answer> objects, and a <hint> and <fact> object.
Note

The individual objects in XML documents are also called nodes. A node can simply hold some data or it can have several child nodes. Some nodes have extra data associated with them, like the item node in the example has category. These are called attributes.
You can place an XML document right inside your ActionScript 3.0 code. For instance, the example movie xmlExample.fla has this in the frame 1 script:
Notice how no quotes or parenthesis were needed around the XML data. It can simply exist within ActionScript 3.0 code (although you can see how this might get unwieldy if the data were longer).
But now that we have some XML data in an XML object, we can play with how to extract information from it.
Note
XML data handling was vastly improved with ActionScript 3.0. Previously, you had to use more complex statements to find a specific node in the data. The new XML object in ActionScript 3.0 is different from the XML object in ActionScript 2.0, meaning that you can’t directly convert from one to the other. So, beware of old code examples that might be in ActionScript 2.0 format.
To get the question node from the data, we would simply do this:
trace(myXML.item.question);
That’s pretty straightforward. To get an attribute, you would use the attribute function:
trace(myXML.item.attribute("category"));
Note
A shortcut to getting the attribute is to use the @ symbol. So, instead of myXML.item.attribute("category"), you can also write myXML.item.@category.
In the case of the <answers> node, we’ve got four answers. These can be treated like an array and accessed with brackets:
trace(myXML.item.answers.answer[1]);
Getting the number of nodes inside another node, like the <answer> nodes, is a little more obscure. But, it can be done like this:
trace(myXML.item.answers.child("*").length());
The child function returns a child of a node specified by a string or number. But using "*" returns all the child nodes. Then, using length() returns the number of child nodes. If you simply try to get the length() of a node, you’ll only get 1 as a result because one node is always one node long.
Now that you know how to find your way around XML data, let’s start dealing with larger XML documents imported from external files.
Importing External XML Files
When XML is saved as a file, it is similar to a plain-text file. In fact, you can open an XML file with most text editors. The file trivia1.xml is a short file with just 10 trivia quiz items in it.
To open and read an external file, we’ll use the URLRequest and URLLoader objects. Then, we’ll set an event to trigger when the file has been loaded.
The following code sample shows XML loading code from xmlimport.as. The constructor function will create a URLRequest with the name of the XML file. Then, the URLLoader will start the download.
Note
You can pass any valid URL to URLRequest. Using just a filename, as we are here, means that the file should be next to the SWF Flash movie, in the same folder. However, you can specify a subfolder, or even use ../ and other path functions to give it a relative URL. You can also use absolute URLs. This works both on the server, and while testing locally on your machine.
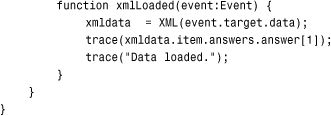
We’ll attach a listener to the URLLoader. This listener will call xmlLoaded when the file has been completely downloaded:

The xmlLoaded function takes the data loaded from event.target.data and converts it to XML for storage in xmldata. As a test, it will put the second answer of the first question to the Output window:
Note
XML objects are like arrays in that they are zero based. So the first answer in the previous example is at position 0, and the second answer is at position 1.
Trapping Load Errors
Errors happen, and it is definitely useful to have some error checking. You can do this by adding another event to URLLoader:
xmlLoader.addEventListener(IOErrorEvent.IO_ERROR,xmlLoadError);
And then, you can get the error message from the event returned to xmlLoadError:
![]()
However, I would not tell the end user the error message verbatim. For instance, if you just remove the file and try to run the movie, you get this error, followed by the filename:
Error #2032: Stream Error. URL: file:
Not an error message you want to show a player. Probably “Unable to load game file” is a better option.
Now you know how to retrieve larger XML documents, like the kind you will need to build trivia games.
Trivia Quiz
Source Files
A3GPU210_TriviaGame.zip
Trivia first became a form of entertainment in the 1950s with the advent of television. Quiz shows became popular and, if anything, have grown more popular over the years.
In the 1980s, board games like Trivial Pursuit became popular, allowing people to play trivia games (in addition to watching them). Soon they became available on computers and the Internet.
Trivia games are a good way to address any subject in game form. Have a website about pirates? Make a pirate trivia game. Building a CD-ROM for a conference in Cleveland? Add a trivia game with interesting facts about the city.
Let’s build a simple quiz game first, and then go on to make a game with more bells and whistles later.
Designing a Simple Quiz Game
A basic trivia game is just a series of questions. The player reads one question, and then chooses an answer from several selections. Players get a point, or some sort of credit, if they get it right. Then, the game moves on to the next question.
We’ll build this game like all of the rest: with three frames, the action taking placing in the middle frame.
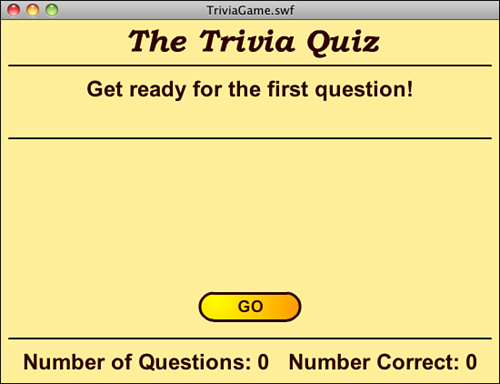
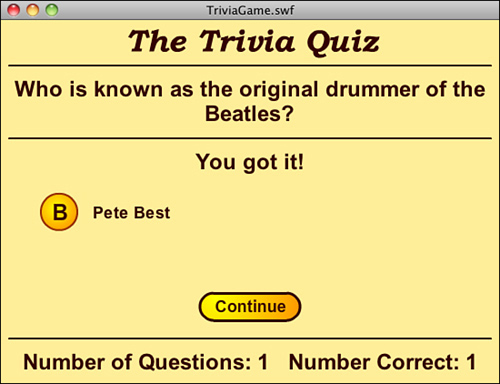
The action, in this case, is a series of text and buttons. We’ll start off by asking players if they are ready to go. They’ll click a button to start (see Figure 10.1).
Figure 10.1 At the start of the game, players are presented with a button they must click before the first question.
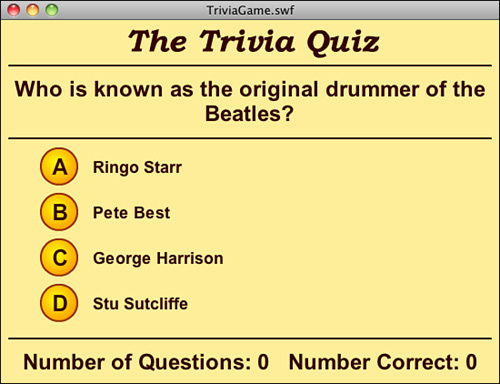
Next, they’ll be presented with a question and four answers. The player must choose one answer. If the player gets it right, she will be told “You Got It!” If she is wrong, she will be told “Incorrect.”
Either way, players get another button that they must press to advance to the next question.
Check out TriviaGame.fla and try playing to get a feel for how it goes. Now, let’s build the game.
Setting Up the Movie
The movie file uses only two frames rather than the three we’ve been using. We’ll need one new element in our movie library to make the quiz game. This will be a circle with a letter in it, which will display next to an answer. Figure 10.2 shows the movie clip.
Figure 10.2 The Circle movie clip contains a dynamic text field and a background circle.
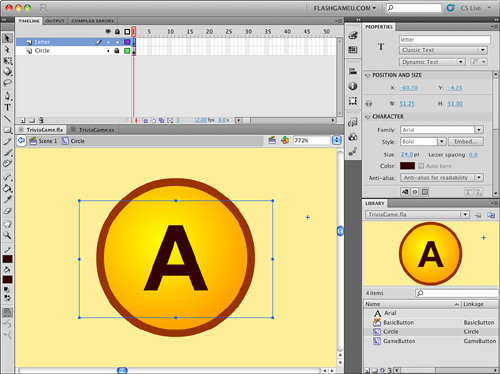
The text field in the Circle movie clip is named letter. We’ll be creating four of these, one for each answer, and placing it next to the answer text. The letter in each will be different: A, B, C, or D.
Note
If you look closely at Figure 10.2, you can see the registration point for the movie clip off to the upper right. This will match the 0,0 location of the text field that will go next to it. This way, we can set the Circle and the answer text field to the same location, and they will appear next to each other rather than on top of one another.
The same technique of a background graphic and a text field will be used in the GameButton movie clip. This will allow us to use the same button movie clip for various buttons throughout the game.
The movie also contains some background graphics, notably a title and some horizontal lines (shown previously in Figure 10.1). Also, remember to embed the font we are using. In this case, it is Arial Bold. You can see it in the library in Figure 10.2.
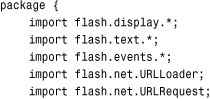
Setting Up the Class
Because this game loads the quiz data from an external file, we need some parts of the flash.net library to use the URLLoader and URLRequest functions:
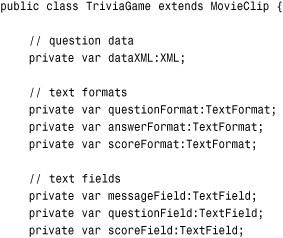
The game will use a variety of variables. We’ll be putting the data loaded from the file into dataXML. We’ve also got several different text formats and some references to dynamic text fields that we’ll be creating:
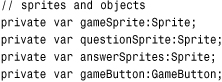
The plan for sprites is to have one gameSprite that contains everything. Inside of that, we’ll have a questionSprite that holds all the elements of a single quiz question: a text field for the question and other sprites for the answers. The answerSprites will contain the text fields and Circle movie clips for each answer, which will be stored in their own sprites. We don’t need a class variable to reference those, however, because they will be neatly stored in the answerSprites sprite.
There is also a reference for the GameButton, so that when we create a button, we can use this reference to remove it:
To keep track of game state, we need questionNum, which tracks the question we are on; numCorrect, which is essentially the player’s score; and numQuestionsAsked, which is another aspect of the player’s score.
To keep track of the question being asked, we’ll put all four answers in random order into the answers array. Before we shuffle them, however, we’ll take note of the original first answer, which should be the correct one, in the correctAnswer variable:
The constructor function will create the gameSprite and then set all three TextFormat objects up:
Note
There is no way to duplicate a TextFormat object. If you simply set answerFormat = questionFormat and then make a change to one, it changes them both. So, it is important to make new TextFormat objects for each variable.
However, you can set a temporary variable, like myFont to a value like "Arial", and then use myFont in place of "Arial" in every TextFormat declaration. Then, you can alter the font used in the game with a single change in one place.
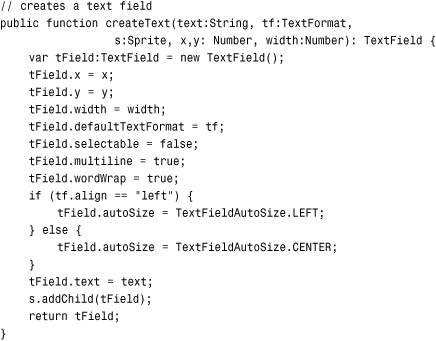
When the game starts, the scoreField and messageField are created. Instead of creating a TextField, adding it with addChild, and setting each of its properties for every piece of text we need, we’ll make a utility function called createText that does this all for us in one line of code. For instance, the messageField will contain the text “Loading Questions...” using the format questionFormat. It places it in the gameSprite at 0,50 with a width of 550. We’ll look at createText later on:

After the game state is set, showGameScore is called to place the score text at the bottom of the screen. We’ll look at that later, too.
Then xmlImport is called to retrieve the quiz data:
The text Loading Questions... will appear on the screen and remain there until the XML document has been read. While testing, this might be less than a second. After the game is on a server, it should appear for a little longer, depending on the responsiveness of the player’s connection.
Loading the Quiz Data
Questions are loaded using functions similar to the example at the beginning of this chapter. No error checking is done, to keep things simple. The file trivia1.xml contains 10 items:

After the loading is complete, the data is placed in dataXML. Then, the text message, which had been showing Loading Questions..., is removed. It is replaced with a new message: Get ready for the first question!
Another utility function is called to create a GameButton. In this case, the button label GO! is placed inside the button. We’ll look at showGameButton a little later in this chapter:
The game now waits for the player to click the button.
Message Text and Game Button
Several utility functions are needed in this game to create text fields and buttons. These cut down the amount of code needed quite a bit. We don’t have to repeat the same new TextField, addChild, and x and y settings every time we create a text field.
What createText does is take a series of parameters and make a new TextField. It sets the x, y, width, and TextFormat values to the values passed in as parameters. It also sets some constant parameters, such as multiline and wordWrap, which will be the same for everything created in the game.
The alignment of the text in the field will vary between centered and left justified. This is included in the TextFormat. However, we want to set the autoSize property of the field to the appropriate value, so a test is performed, and autoSize is set to either TextFieldAutoSize.LEFT or TextFieldAutoSize.RIGHT.
Finally, the text of the field is set, and the field is added to the sprite passed in as another parameter. The TextField is returned by the function, so we can set a variable to reference it for later removal:
One field that won’t be created, destroyed, and then created again during the game is the scoreField. This field is created once and placed at the bottom of the screen. Then, we’ll use showGameScore to update the text in the field:

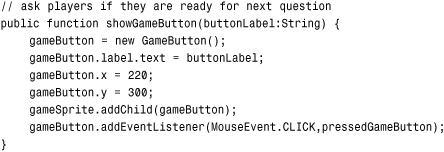
In the same way that createText enables us to create different types of text fields with one function, showGameButton allows us to create different buttons. It takes buttonLabel as a parameter and sets the text of the label inside the button to match. Then, it places the button on the screen.
The gameButton variable is already a class property, so it will be available for removeChild later on. We’ll add an event listener to this button so that it calls pressGameButton when pressed. This will be used to advance the game:
Note
With top-down programming, you want to test each bit of code as you write it. Unfortunately, the preceding code sample generates an error because pressedGameButton does not yet exist. At this point, I usually create a dummy pressedGameButton function that contains no code. That way I can test the placement of the button first, before needing to program what happens when the player clicks the button.
Moving the Game Forward
When the player clicks a button, the game should move forward one step. Most of the time, this means presenting the new question. However, if there are no more questions, the game ends.
First, we’ll remove the previous question. If this is the first question, questionSprite has not yet been created. So, we’ll check for the existence of questionSprite and only remove it if it is there:
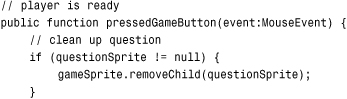
Other things must be removed, too. The message and button left over from the pause before or between questions is removed:
![]()
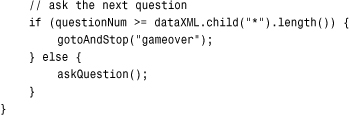
Now we must determine whether all the questions have been exhausted. If so, jump to the gameover frame at this point. The screen is already blank, from having the previous question, message, and button removed.
If this is not the end, call askQuestion to display the next question:
Displaying the Questions and Answers
The askQuestion function takes the next question from the quiz data and displays it. It puts everything it creates into the questionSprite sprite, which makes it easy to dispose of later on. Figure 10.3 shows the screen after a question has been displayed.
Figure 10.3 The question and four answers are displayed in the questionSprite, which covers most of the middle of the screen.
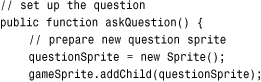
The question itself will appear in a single field near the top of the screen:
![]()
Before we place the answers, we need to shuffle them. The first answer in the original data is the correct one, so we’ll store a copy of it in correctAnswer. Then, we’ll call shuffleAnswers to get an array of all the answers, but in a random order:
![]()
The answers are in a subsprite of questionSprite called answerSprites. Both a TextField and a Circle are created for each answer. The Circle objects are all assigned different letters, from A to D. They are both placed at the same location, but the Circle has been designed to appear to the left of its location, whereas the text will appear to the right.
Both the text and Circle will be bundled together in a single new sprite, and this sprite will get a CLICK listener assigned to it so that it can react like a button:
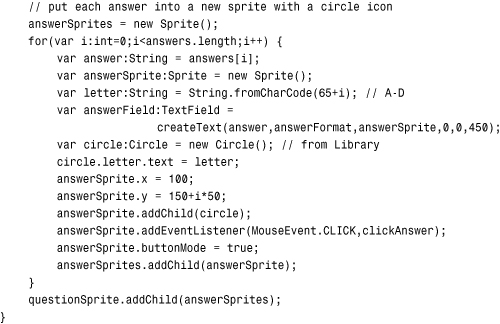
Note
To convert from a number to a letter, String.fromCharCode(65+i) is used. It will get character 65 for A, character 66 for B, and so on.
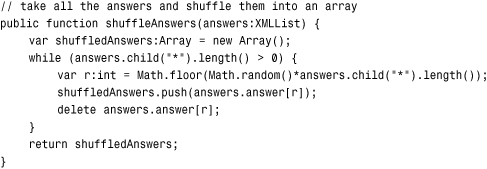
The shuffleAnswers function takes an XMLList, which is the data type returned by asking for dataXML.item[questionNum].answers. It loops, removing one random item from the list at a time and placing it in an array. It then returns this randomly sorted array of answers:
Judging the Answers
All the functions so far have just been setting up the game. Now, finally, the player is presented with the question, as shown previously in Figure 10.3.
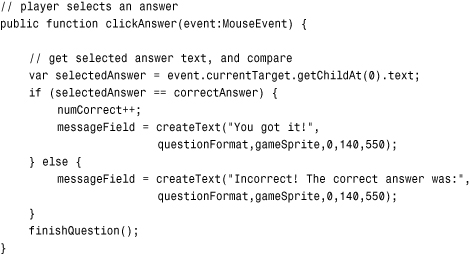
When the player clicks any one of the four answers, clickAnswer is called. The first thing this function does is to get the text of the selected answer. The TextField is the first child of the currentTarget, so the value of the text property if grabbed and placed into selectedAnswer.
Then, this is compared with the correctAnswer that we stored when the question was displayed. If the player got it right, numCorrect is incremented. A new text message is displayed in either case:
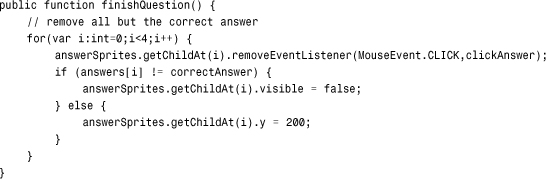
Then all the answers are examined. The function finishQuestion loops through each sprite. The correct one is moved to a y position that places it in the middle. All event listeners are removed, too. The others are turned invisible. Figure 10.4 shows how the screen looks now.
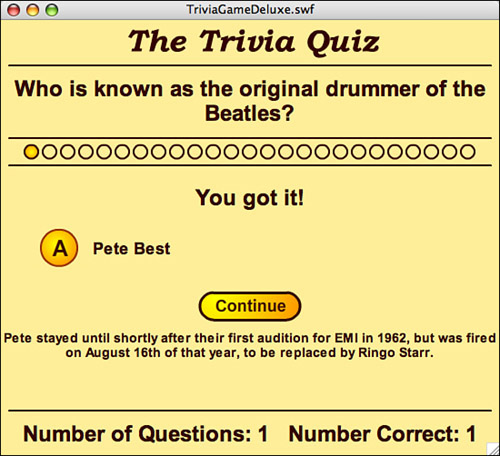
Figure 10.4 The correct answer is moved to the middle and a message displayed.
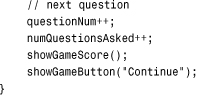
The score also needs to be updated, as well as the questionNum pointer. Finally, a new button is created with the label Continue. You can see it in Figure 10.4, too:
The button created by clickAnswer is the link back to the next question. When the player clicks it, pressGameButton is called, which triggers the next question, or the gameover screen.
Ending the Game
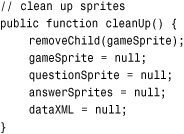
The gameover frame has a Play Again button that will jump the player back to the game. But first, it needs to call cleanUp to remove the remnants of the game:
Now the game is ready to be started all over again.
This simple quiz game is good enough for special interest websites or products that need something very basic. For a full-featured trivia game, however, we need to add a lot more.
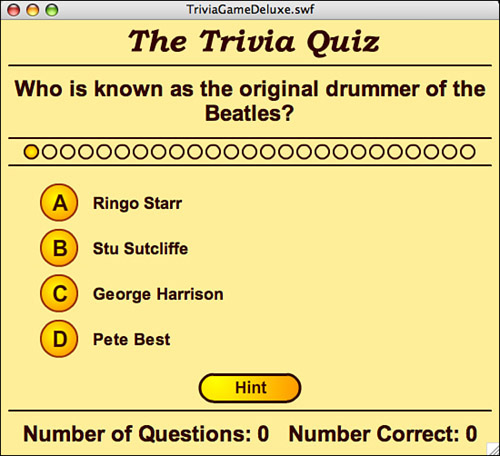
Deluxe Trivia Quiz
Source Files
A3GPU210_TriviaGameDeluxe.zip
To improve upon what we already have, we’ll add some features to make the game more exciting, challenging, and fun.
First, the player should have a time limit for answering questions. Most game shows and quizzes do this.
Second, we’ll add a hint button to the quiz so that the player can get a little extra help. There are two types of hints, and we’ll look at adding them both.
Next, we’ll make the game more informative by placing a piece of extra information after every question. This will make the game more educational. The information will expand upon what the player just learned by answering the question.
Finally, we’ll revamp the scoring system. This must take into account the time it takes to answer a question and whether the player requested a hint.
As an extra bonus, we’ll make the quiz read in a large number of questions, but pick ten at random to use. This way the quiz differs each time it is played.
Adding a Time Limit
To add a time limit to the game, we need a visual representation of the time the player has to answer a question. We can make this a separate movie clip object. This Clock object can be any device for telling time: a clock face, some text, or something else.
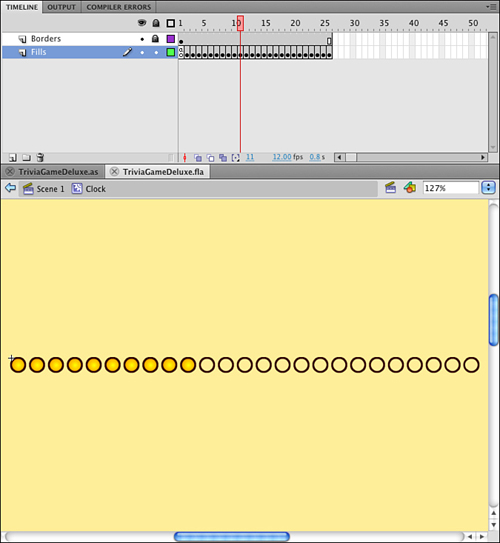
For this example, I’ve set up a 26-frame movie clip. All frames contain 25 circles. Starting with frame 2, one of the circles is filled in with a solid shape. So on the first frame, all 25 circles are empty. On the 26th frame, all are filled. Figure 10.5 shows this Clock movie clip.
Figure 10.5 The 15th frame of the Clock movie clip shows 14 filled-in circles.
We’ll use a Timer to count the seconds. We need to add that to the import statements:
import flash.utils.Timer;
Next, we add a Clock to the sprites being used:
private var clock:Clock;
And a Timer:
private var questionTimer:Timer;
In the askQuestion function, we need to add the Clock and start the Timer:
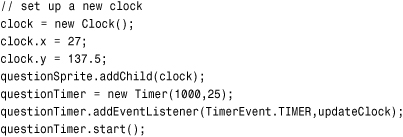
The Clock will be positioned just under the question on the screen. In fact, we need to expand the height of the game a bit and move the elements down some to accommodate the Clock and some of the other elements we’ll be adding soon. Figure 10.6 shows the new layout.
Figure 10.6 The Clock has been added, and there is room for more features below.
Note
The use of 25 dots as a clock is completely arbitrary. You could make any 26-frame sequence as a movie clip and use that (a stopwatch or a progress bar, for example). You don’t even need to use 25 separate elements. You could easily substitute five changes and spread the frames along the timeline.
Every second, the updateClock function is called. The Clock movie clip moves over one more frame. When the time is up, a message is displayed and finishQuestion is called just like it is when the player clicks an answer:
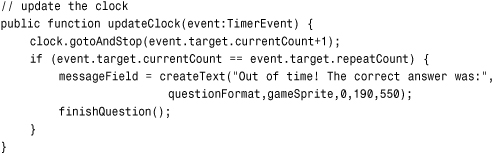
Now the player has two ways to get a question wrong: clicking a wrong answer or letting the time expire.
Adding Hints
You might have noticed that the XML sample files include both a hint and an extra fact for all questions. We’ll finally make use of one of them now.
To add simple hints to the game, we just include a Hint button next to each question. When the player clicks it, the button is replaced with the text hint.
Implementing this requires a few new things. First, we’ll add a hintFormat to the class’s definitions, along with the text variable definitions:
private var hintFormat:TextFormat;
Then, we’ll set this format in the construction function:
hintFormat = new TextFormat("Arial",14,0x330000,true,false,false,null,null,"center");
We’ll also add a hintButton to the list of class’s variables, along with the sprites and objects definitions:
private var hintButton:GameButton;
In the askQuestion function, we’ll create the new Hint button and position it under the last answer, as shown in Figure 10.7:
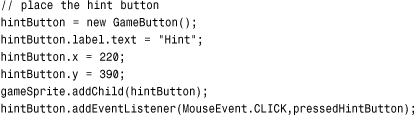
Figure 10.7 The Hint button appears near the bottom.
When the player clicks the button, it is removed. In its place will be a new text field, set to the small text format of hintFormat:
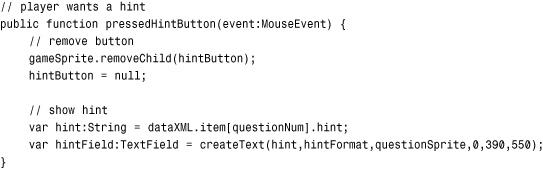
We also want to use the removeChild statement inside the finishQuestion function, checking first that the hintButton exists in case it was removed when the player clicked it:
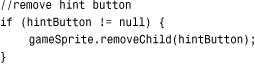
This prevents the player from clicking the button after the question has already been answered.
That’s all that we need to do to show the hint. Because the hintField is part of the questionSprite, it gets cleaned up when we remove that sprite when the player has finished. Figure 10.8 shows how the hint appears after the player clicks the button.
Figure 10.8 The hint appears in place of the button.
Note
What makes a good hint? Writing hints can be harder than writing the question and the answers. You don’t want to give away the answer, but at the same time you want to help the player. Often the best way to go is to give a hint that points to the answer, but in a different context. For instance, if the question is about state capitals and the answer is Carson City, a hint might be “Also the name of a long-time host of the Tonight Show.”
Adding a Factoid
Adding an extra fact, sometimes called a factoid, to the end of a question is relatively simple. It is similar to the hint functionality, but a factoid will automatically show up when the question has been answered.
No new variables are need for this. In fact, all that is needed is for a text field to be created and populated when the question is finished. This code is added to finishQuestion:
![]()
Because the new TextField is part of questionSprite, it is disposed of at the same time. We are also using the hintFormat instead of creating a separate format for the factoid. Figure 10.9 shows the result.
Figure 10.9 The factoid displays when the player has answered the question.
When deciding on the location of the factoid, I took care to make sure the hint and the factoid can coexist. If the player chooses to see the hint, it will remain on screen after the player answers the question, and is displayed right below the factoid.
Adding Complex Scoring
The problem with the hint function, as well as with the clock, is that the player gets very little penalty when using the hint, or letting the time run long.
What makes the game more challenging is to have a score penalty for using the hint. In addition, we can have the total points scored dependent on how fast the player answers a question.
To make these changes, let’s introduce two new variables. They can be placed anywhere in the variable definitions, though they fit best along with the existing game state variable definitions. These will keep track of the number of points the current question is worth and the total number of points the player has scored in the game so far:
private var questionPoints:int;
private var gameScore:int;
In the startTriviaGame function, we’ll initialize the gameScore to 0, just before calling showGameScore:
gameScore = 0;
The showGameScore function will be replaced by a new version. This will show the number of points the question is worth and the player’s current score:
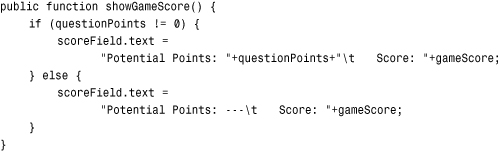
Note
The in the value for scoreField.text represents a tab character. By placing a tab between the two parts of the field, we make it possible for the text to remain in the same general space, even while the length of the numbers change. It is not a perfect solution, but is much simpler than creating two separate fields in this case. You might want to have two separate fields if you need more control over the placement of these numbers.
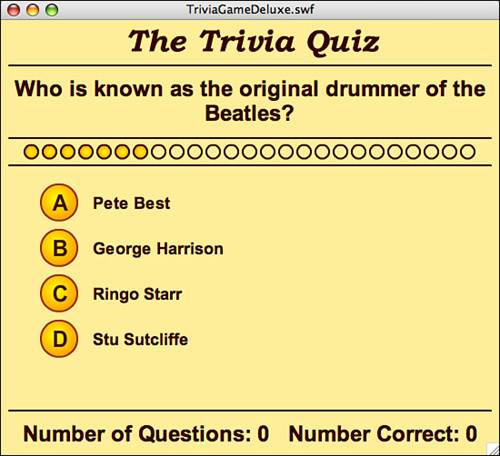
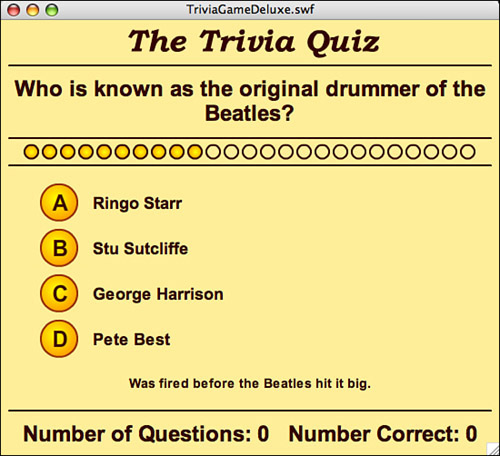
Figure 10.10 shows the new way the score is displayed at the bottom of the screen.
Figure 10.10 The number of questions asked and number correct has been replaced with the number of potential points for this question and the player’s score.

With the showGameScore function now working to update the potential points as well as the total score, we need to call it more often. Every time the questionScore changes, we need to call showGameScore to let the player know the new value.
If the questionScore is 0, we’ll display --- rather than 0. This will make it clearer that the potential points don’t mean anything between questions.
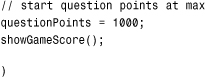
In askQuestion, we’ll set potential score for the question to 1,000:
Then, for every second that goes by, we’ll decrease the score. This happens in the updateClock function. Each time a new circle is filled in, 25 points are removed from the potential score:
![]()
Also, the potential points decrease when player requests a hint. That will cost them 300 points:
![]()
Of course, the only way the user gets any points is by guessing the right answer. So, this will be added in the appropriate place in clickAnswer:
gameScore += questionPoints;
No need to call showGameScore here because it will be called immediately after in the finishQuestion function. In fact, here’s where we’ll be setting questionPoints to 0, too:
questionPoints = 0;
showGameScore();
You can also opt to keep the original score text field at the bottom and display the potential points and score in a separate field. Then, players can see all the statistics on how they are doing.
The movies TriviaGameDeluxe.fla and TriviaGameDeluxe.as leave in the numCorrect and numQuestionsAsked for this purpose, even though they don’t use them.
Randomizing the Questions
You may or may not want your trivia quiz game to present the same questions each time someone plays. It depends on how you are using the game.
If you want to present different questions each time, and your game is a web-based game, it is ideal to have a server-based application that creates a random XML document of trivia questions from a large database.
However, if your needs are simpler, but you still want a number of random questions chosen from a relatively small total number of questions, there is a way to do it completely within ActionScript.
After the XML document is read in, this raw data can be processed into a smaller XML document with a set number of random questions.
The new beginning of the xmlLoaded function would look like this:
![]()
The selectQuestions function takes the complete data set, plus a number of questions to return. This function picks random item nodes from the original XML document and creates a new XML object:
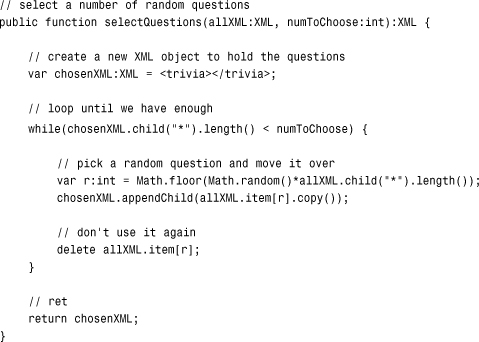
This random selection and shuffle of questions is very handy for creating a quick solution. However, if you have more than 100 questions, for example, it is important that you don’t require the movie to read in such a large XML document each time. I recommend a server-side solution. If you don’t have server-side programming experience, you probably want to team up with, or hire someone, who does.
Picture Quiz
Source Files
A3GPU210_PictureTriviaGame.zip
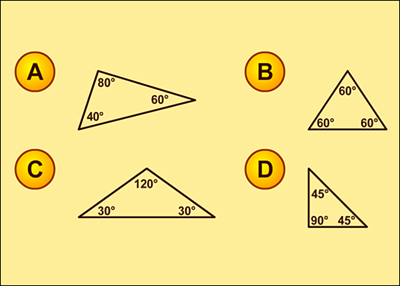
Not all question and answer games work well with just text. Sometimes a picture represents an idea better. For instance, if you want to test someone’s geometry knowledge, text questions and answers are not always going to be able to convey the idea you want to test.
Converting our simple trivia game engine to something that uses images is actually not that hard. We just need to rearrange the screen a bit, and then allow for the loading of some external image files. The main part of the quiz engine can remain the same.
Better Answer Arrangement
Before we can load images, we need a better arrangement for the answers on the screen. Figure 10.11 shows the answers in a 2×2 formation, rather than four lines.
Figure 10.11 The answers are now stacked in two columns and two rows.
This provides a better space for images of approximately 250 pixels wide by 100 pixels high, at most. Probably best to stick with 200 by 80 so that the loaded images don’t intrude on the other buttons.
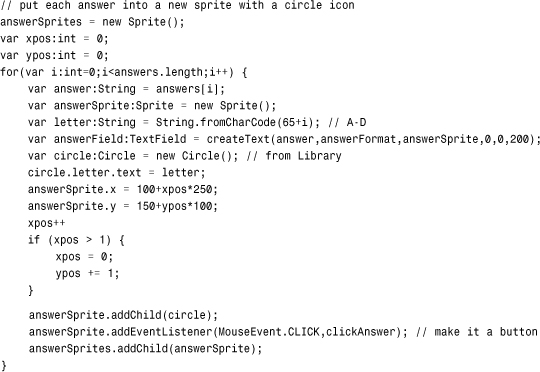
Getting this arrangement is just a matter of a change to the middle of askQuestion. The variables xpos and ypos keep track of the current position and start at 0 and 0. Then, 1 is added to xpos to move over to the right. After that, xpos is set back to 0, and ypos is increased. This places the four answers at positions 0,0, 1,0, 0,1, and 1,1. This corresponds to screen locations 100,150, 350,150, 100,250, and 350,250:
Note
We’ll be making more changes to this section of code in a bit, so the following code will not match the final PictureTriviaGame.as yet, in case you are following along.
This is already a useful modification because it presents the answers is a more interesting way than just four straight down.
Recognizing Two Types of Answers
The goal here is not to create a quiz that only takes images as answers, but one that allows you to mix up text and images. So, we need to be able to specify in the XML file what type an answer is. We can do this by adding an attribute to the answer in the XML:
To determine whether an answer should be displayed as text, or an external file loaded, we just look at the type property. Next, we’ll modify our code to do this.
Creating Loader Objects
In shuffleAnswers, we build a randomly sorted array of answers from the ones in the XML object. The text of these answers is stored in an array. However, now we need to store both the text and the type of these answers. So, the line where we add a new answer to the array changes to this:
shuffledAnswers.push({type: answers.answer[r].@type, value: answers.answer[r]});
Now, when we create each answer, we need to determine whether the answer is text or an image. If it is an image, we’ll create a Loader object. This is like a movie clip taken from the library, except that you use a URLRequest and the load command to retrieve the movie clip contents from an external file:
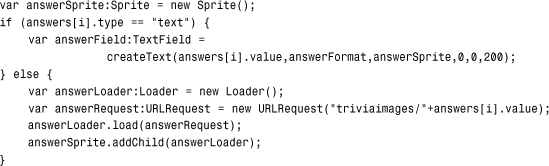
The code assumes that all the images are inside a folder named triviaimages.
Loader objects can act autonomously. After you set them into action with the load command, they get the file from the server and appear at their designated position when they are ready. You don’t need to track them or do anything when the loading is complete.
Note
If you are combining this example with the Clock function of the previous movie, you’ll want to do some extra work. Is it fair for the clock to be counting down if some of the answers have not yet appeared? So, you want to listen for the Event.COMPLETE for each Loader and only start the clock after all the answers have displayed.
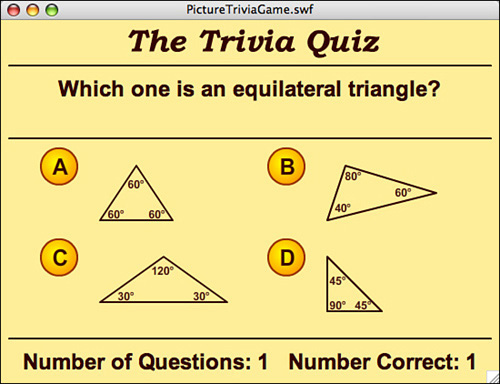
Figure 10.12 shows the quiz with four external movies loaded into the answers.
Figure 10.12 External movies have replaced text in each answer.
Determining the Right Answer
We previously relied on the text property of the answer field to determine whether the player got the answer right. We can’t do that anymore because the Loader object movie clip does not have a text property like a TextField does. So, instead, we’ll take advantage of the fact that the second object in the answerSprite is the dynamically created Circle. We can attach an answer property to that and store the answer there:
circle.answer = answers[i].value;
Then, in the clickAnswer function, we’ll look at this new answer property to determine whether the player clicked the right sprite:
var selectedAnswer = event.currentTarget.getChildAt(1).answer;
Note that the Circle is child number 1 in the answerSprite. Previously, we were looking at child number 0, which was the TextField.
Another change that is needed is to properly set the position of the correct answer when the player has made his or her choice. Previously, the answers were all in a single-file column, with the same x value. So when we wanted to center the correct answer, we just set the y value of the correct answerSprite. But now that the answer can be on the left or the right, we want to set the x value, too. Here is the new code for the finishQuestion function:
answerSprites.getChildAt(i).x = 100;
answerSprites.getChildAt(i).y = 200;
Expanding the Click Area
One last item before we are done with the answers. If the answer is text, players can click either the Circle or the TextField to register their answer. However, with loaded movies as answers, they may not have much to click on. In Figure 10.12, the answers are just some narrow lines that make up a triangle.
So to click the answer, players must either click the Circle or click some part of the graphic. However, they should be able to click any reasonable part of the answer.
A quick way to fix this is to place a solid rectangle inside of each answer sprite. They can be done by just drawing with a solid color, but a 0 setting for the alpha channel to make it invisible:
![]()
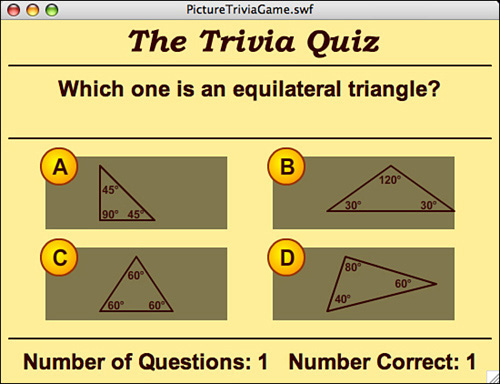
Figure 10.13 shows the answer sprites with a graphic behind each one. Instead of an alpha value of 0, I’ve change the alpha to .5 so that you can see the rectangle.
Figure 10.13 A rectangle has been drawn behind each answer.
Now players can click in the general area of each answer.
Images for Questions
In addition to using images in the answers, you might want to use images for the question itself. We’ll do this in the same way, by using a type attribute in the XML:

Adding this to our ActionScript code is easier this time because the question is not an active element. We just need to use a Loader object rather than a TextField. Here is the change to askQuestion:
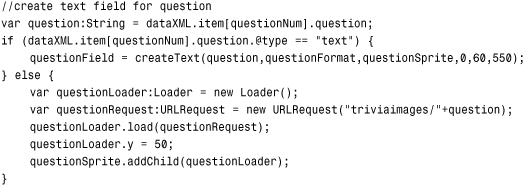
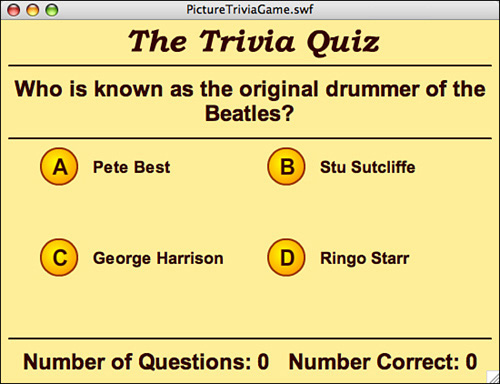
Figure 10.14 shows a question that uses an external image as a question and four text answers. You could, of course, have a question and all four answers that are external files.
Figure 10.14 The question is an external Flash movie, but the four answers are just text.

Figure 10.14 also demonstrates how using external files for questions and answers doesn’t mean they have to be drawings or pictures. They can also include text. This could come in handy for a math quiz that needs to use complex notation such as fractions, exponentials, or symbols.
Modifying the Game
Trivia games are only as good as the questions and answers in them, no matter how well designed the program and interface are. If you plan on making a game for entertainment, you need to have questions that are engaging and answers that are as well. If you are making a game for educational purposes, you need to make sure the questions and answers are clear and fair.
You can modify this game to have fewer or more answers relatively easy. If you want, you can have just two answers, such as True and False. Rarely are more than four answers seen, although you sometimes see “All of the above” or “None of the above.” No special programming is needed for these, except possibly an exception to keep these as the fifth/sixth answer in the list.
Beyond the questions and answers and how they are displayed, one modification is to have a game metaphor. This would be a visual representation of how a player is doing in the game. It can also modify how the game plays.
For instance, the player can have a character that is climbing a rope. For every answer they get right, the character moves up the rope. When the player gets one question wrong, the character falls down to the bottom. The object is to get to the top by correctly answering a number of questions consecutively.
Game metaphors can be used to tie the game closer to the website or product it’s part of. For instance, a wildlife conservation site could have a trivia game with questions about animals.