
14. 3D Games: Target Practice, Racing Game, and Dungeon Adventure
Three-dimensional (3D) graphics have been the holy grail of game developers on every platform. First PC gaming moved to 3D, then console gaming, and now web-based games.
Flash CS5 does have the ability to move your games into the third dimension, but only in a very limited sense. Even so, you can improve your games with a touch of 3D.
PC and console games use a combination of hardware and software drivers to create 3D environments. This is very different from what you can do in Flash. You can’t use models, for instance. You can’t use cameras, lighting, advanced textures, shadows, or just about any big feature of a real 3D graphics engine.
What you can do is to place your 2D display objects onto a 3D stage. You can place a movie clip farther back into the screen by setting its depth as well as its horizontal and vertical position. You can also rotate objects along three axes, making them fall back or forward, or turn to the side.
That doesn’t sound like much, but it is actually a lot of additional functionality that we can explore for making games. We start by looking at some basics and then go on to create basic engines for racing and adventure games.
Flash 3D Basics
Source Files
A3GPU214_Demos.zip
Let’s look at the basic ActionScript 3.0 properties you need to know to work with 3D.
Setting 3D Positions
Before this chapter, we’ve used x and y to position a display object on the screen. To start using 3D, all we need is to add z.
For instance, here is a bit of code that creates an instance of a sprite from the library and places it at 100, 200:
Now, what if we also set the z property of the sprite?
square1.z = 100;
This puts the square “back” 100 pixels into the screen. The result is that it basically gets smaller, as it gets further from the viewer.
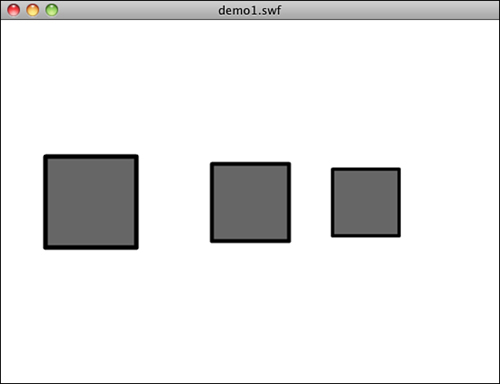
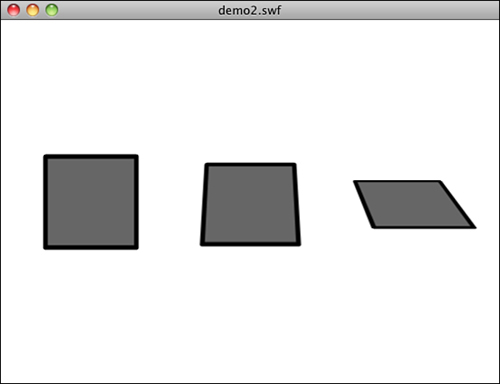
Figure 14.1 shows three different squares at 0, 100, and 200 z. Not only do the squares get smaller, but they also move toward the center of the screen as the result of the view being in perspective.
Figure 14.1 These squares have z properties set to 0, 100, and 200.
So, you can push objects back in the screen by setting z values. Think of x as the horizontal position of an object, y as the vertical position, and z as the depth of the object.
Rotating Objects
You can also rotate objects around three axes. Previously we’ve only done rotation with the rotation property. This spins it around center in 2D space. It is the equivalent of rotating around the z-axis. Imagine sticking a pin in the center of a piece of paper stuck to a wall. Then you can spin the paper around the pin. The pin is the z-axis, and the rotation of the paper is around that z-axis.
With 3D, we can also rotate around the x- and y-axes. For instance, this code will create an object and spin it around the x-axis by −30 degrees. It will appear to “fall back” into the screen:
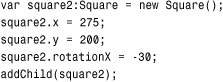
Figure 14.2 shows three squares. The first has no rotationX value set. The second has a rotationX of −30, and the third has a rotationX of −60.
Figure 14.2 Three squares with x-axis rotations of 0, −30, and −60.
So what if you rotate the object −90 degrees? Then it is lying flat. Because these objects are right in the center of the screen, at a y of 200 out of 400, the flat object is invisible—like looking at the edge of a piece of paper.
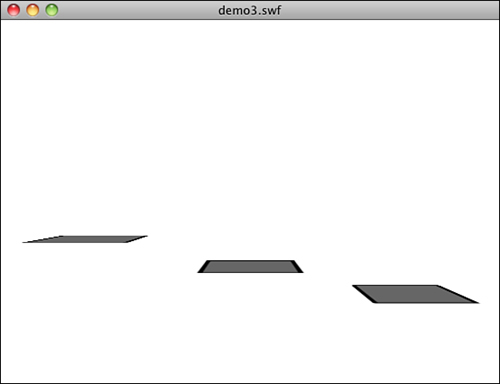
But, if you move that flat object down, below the eye line, you can see it again. Figure 14.3 shows three squares, all set to −90 degree rotation on their x-axes. But each is a little more below the eye line of 200 pixels.
Figure 14.3 These three squares are at 240, 270, and 300 y, below the middle of the screen.
Rotating a sprite along the x-axis by 90 degrees and lowering it below the eye line is a great way to create a “ground” object for use in your 3D games. In that case, the sprite should be fairly large so that it covers plenty of area and an “edge of the world” isn’t visible.
So what if we were to rotate the objects along the y-axis? Then they would appear to turn to the left or right. And you can combine rotations along all three axes to make even more complex transformations of the objects.
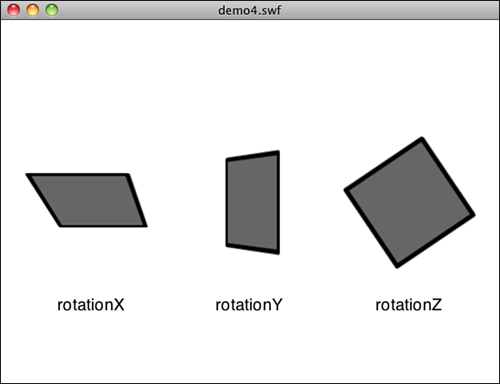
Getting your mind around 3D object rotation can be a little tough. In the sample file demo4.fla, I’ve put three squares, and each rotates 1 degree along one axis for each frame. Testing this movie in Flash is a great way to observe 3D rotation and understand it.
Figure 14.4 shows this movie after running for a short time. You can see the first square has rotated slightly along its x-axis, the second along the y-axis, and the third has spun around the z-axis.
Figure 14.4 This demo movie rotates each square along an axis continuously.
So there are the basics of working with 3D in ActionScript 3.0. That’s all we need to build a simple game.
Target Practice
Source Files
A3GPU214_TargetPractice.zip
Because we are already familiar with the idea of shooting a ball in games like Air Raid and Balloon Pop, let’s take it into the 3D space with a very simple Target Practice game.
Game Elements
The idea is to create a 3D game space and perform a simple game action.
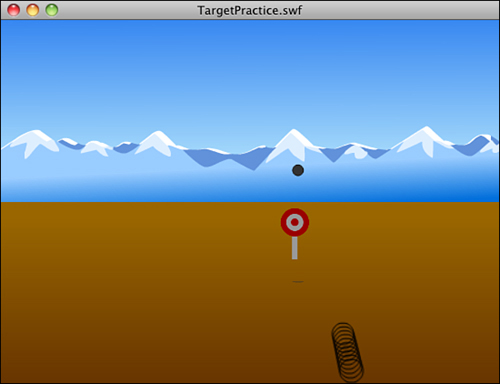
Take a look at Figure 14.5 to see where we are going. The game features a background, a target, a cannonball (flying in the air), and a cannon made from a series of rings. If you look closely, you can also see a cannonball shadow.
Figure 14.5 The cannonball is in mid-flight toward the target.
You might be surprised to read that the background is no 3D at all. It is just a 2D graphic, similar to the one used in the Air Raid game. It serves as the background to the entire game, but does not interact with the player in any way.
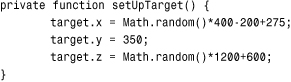
The target is placed at the ground level, which we’ve set as a y of 350 for this game. Then it is positioned horizontally by setting x, and placed back into the scene by setting z.
Note

Why 350 for the ground and −100 for the front of the scene? Just because they seem to work well for our needs here. There’s nothing magic about them. For some games 400, or even more, may be the “ground” and you may not need to place anything up front at all. I came to these numbers through simple experimentation to see what looked good.
The cannonball starts at a z value of −100, and then flies back into the scene with an increasing z value. At the same time it flies up with a decreasing y value, until gravity starts to bring it down with an increasing y value. It stops when it hits a y value of 350—when it hits the ground.
So what about those rings? The cannon is made up of a series of 10 circles. Because we can’t use 3D models in Flash, we have to improvise. To show a 3D cannon would be impossible—or at least very difficult. So we leave the cannon out and show the rings instead. Each exists as a 2D sprite in the 3D space in the same direction in which the cannonball will fire.
The way the game works is this: The target is placed randomly. The player can move the cannon to the left or right with the arrow keys. He or she can also change the elevation of the cannon angle with the up and down keys. Then the spacebar fires a cannonball at the elevation of the cannon with the starting position of the cannon. When it lands, if the cannonball is close enough to the target, the target is relocated.
Setting Up the Class
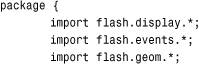
Believe it or not, no special imports are needed for 3D. It is built in to the flash.display class library:
![]()
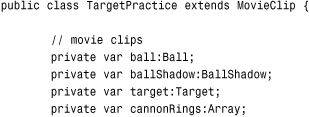
We need to keep track of the ball, its shadow (more on that later), the target in the field, and the cannon rings:
We store the position and angle of the cannon in these two properties. Note that the position is the same as the x property of the cannon. The y property is fixed (it is on the ground) and the z property is also fixed for the purposes of this game—you can’t move the cannon closer or farther than the target:
![]()
When the cannon fires a cannonball, it is launched with a vertical thrust (up) and forward thrust, depending on the angle of elevation of the cannon. We store those in dy and dz:
![]()
Starting the Game
In an effort to keep this example as short as possible, it has no start or gameover frames. The game simply starts as soon as the movie launches. I keep all the examples in this chapter focused on the action so that you can study the 3D aspects of ActionScript 3.0.
The constructor function creates the target, ball, and shadow. Then it rotates the shadow −90 degrees and puts it vertically at 350 so that it is lying flat on the ground as shadows do:
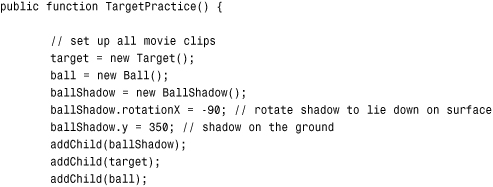
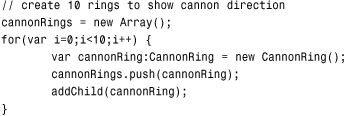
The cannon rings is stored in an array of sprites taken from the library and placed on the screen:
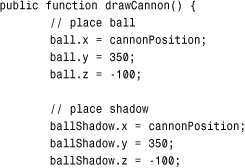
Before we can position the rings on the screen, we need to set the cannon angle and position. Because we’ll be repositioning the cannon often, that code is in the function drawCannon:

Another function we’ll use over and over again is setUpTarget. This places the target at a random spot:
![]()
Finally, we need to listen for key presses. To keep the game simple, we use key-down events. These are handy for simple games because you can hold down a key for repeated events:
![]()
Drawing the Cannon and Target
Drawing the cannon is a matter of placing the 10 rings. But in addition to that, we’ll also place the ball and shadow at the base of the cannon, so they are ready to go.
The base is at the horizontal location indicated by cannonPosition. This can be changed by the user by pressing left and right. The cannon is on the ground, which is 350. Then the z value of −100 is used to put the cannon right up at the front of the 3D space:
Each ring is positioned at the same horizontal value. But the vertical and depth value are determined by using Math.sin and Math.cos to turn the angle of elevation into coordinates. You first learned about them in Chapter 7, “Direction and Movement: Air Raid II, Space Rocks, and Balloon Pop,” in the section titled “Using Math to Rotate and Move Objects.” In this case, we set y and z rather than x and z. Each ring gets farther from the cannon’s base by a multiple of 5: 0, 5, 10, 15, and so on:

Note
Because the 3D rotation properties are measured in degrees (0 to 360), we use them in our cannonAngle property. But the math functions require radians (0 to 2*PI). To convert degrees to radians, just multiply them by Math.PI/180.
Drawing the target is much easier. We don’t even need to rotate the target, just place it in the scene. The y value is 350 so that the target is on the ground. The other two values are randomly chosen each time so that the target appears somewhere in the scene toward the middle:
Moving the Cannon
When players move the cannon, they are just changing the cannonPosition property and then calling drawCannon to redraw the circles. Same for changing the cameraAngle:
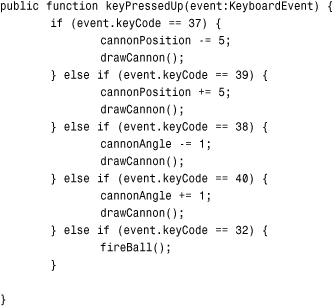
If the player presses the spacebar, the fireBall function is called. You can probably guess what that function does.
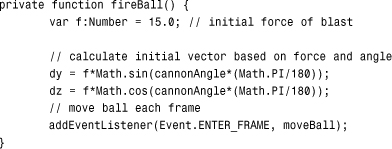
Firing the Cannonball
We’ve already seen the use of Math.sin and Math.cos to translate the angle of elevation to something we can use to move the ball step by step. Here, we do it again and put the values in dy and dz. We multiply these values by 15 to give the ball some thrust, moving it roughly 15 pixels through 3D space per frame. Then we start listening for ENTER_FRAME events and using them to move the ball each step:
Add that is left is the moveBall function. This advanced the y and z properties of the ball by dy and dz. It also increases dy by .1. This simulates gravity.
The shadow of the ball is already at the correct x, and the y is always 350 because the shadow is on the ground. The only thing that is needed is to set the z property of the shadow to make it travel along the ground under the cannonball.
Then it checks to see whether the y property of the ball has exceeded 350. If so, it has hit the ground:
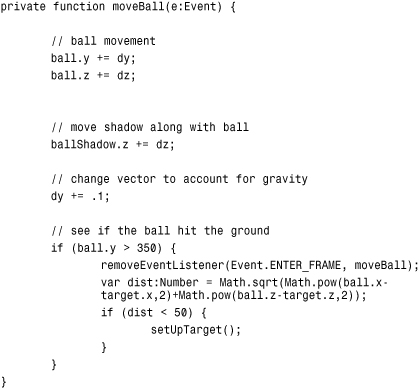
If the ball has hit the ground, the distance is calculated using the basic distance formula: the square root of the sum of the two squares. This gives you the distance, in pixels, from the point on the ground where the ball hit to the target location.
If that is less than 50, we just call setUpTarget again to move the target to a new location.
Modifying the Game
So, where do you go from here? Target Practice is just a start. To make this a real game, you need to come up with some goals. Perhaps the player gets 25 cannonballs and needs to hit as many targets as possible.
Also, more information would make this game better. For instance, when the cannonball lands, and you calculate the distance, why not display that to users in a text field? That way they can see how close they came and adjust.
You can also enable players to adjust the force of the shot. Right now it is hard-coded at 15. But perhaps you can just the player adjust it in .1 increments and assign the A and Z keys increasing and decreasing the force.
More graphics would be nice, too. You could have the target explode on impact, for instance. Then, it can turn into a crater. You can start with 10 targets rather than 1 and then play the game until all 10 are craters!
3D Racing Game
Source Files
A3GPU214_Racing3D.zip
Our first example showed a few objects moving deeper into the screen. In this next example, we change the view of the user as they move around in a scene.
Actually you can’t do that in Flash because there is no “camera” to move around. So we need to do the opposite, and move the scene instead of moving the viewpoint.
A simple example is to take the racing game from Chapter 12, “Game Worlds: Driving and Racing Games,” and tilt it back into the screen. Just setting the rotationX value of the game sprite would lay the ground back like a falling domino and give us some depth. But we can then return some height to the scene by planting vertical trees along the track and using a vertical drawing of a car, such as in Figure 14.6.
Figure 14.6 The racetrack lies at a 90-degree angle, while trees and the car stand straight up.
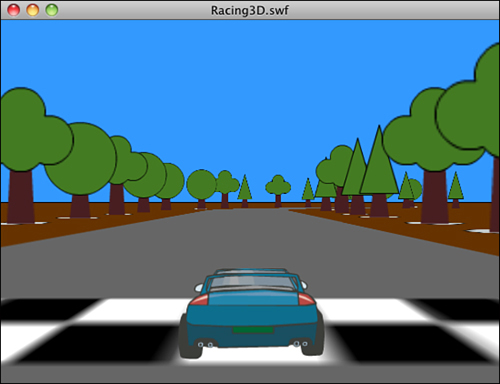
So when the car moves we’ll have to reposition everything in the game world so that the view appears to be right behind the car at all times. If the car moves forward, the entire world must move backward the same amount. If the car moves left, the entire world must move right.
Game Elements
To focus on the 3D aspects of Flash games, we keep this example short and to the point, as well. There will be no start and end screen, just one frame. The main game element is the Ground movie clip, shown in Figure 14.7.
Figure 14.7 The Ground movie clip with tree placements.
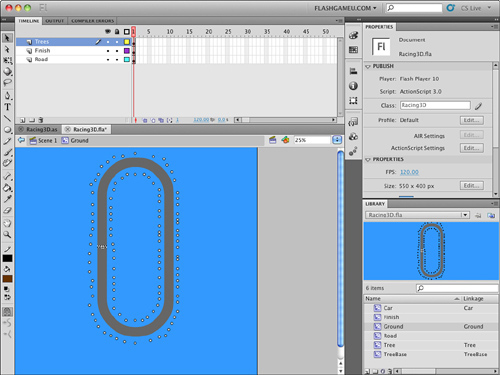
The track in the middle of the Ground movie clip is a copy of the Road library symbol. We use it the same way we did in Chapter 12 to determine whether the car is on or off the road.
In addition, you can see all the dots in Figure 14.7. These are copies of the simple TreeBase movie clip, which are placeholders for trees.
Setting Up the Movie
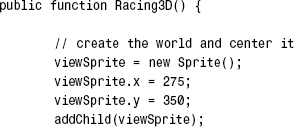
After the basic imports, we set up a pair of sprites. The first holds everything and we call it the viewSprite. But it actually only holds one thing, the worldSprite, which in turn holds the road, trees, and car:

The reason for this is that we need to move worldSprite so the car is already right in front on the screen. So worldSprite moves when the car moves. Meanwhile, viewSprite stays in the same location, centered on the screen.
Next, we’ve got references to objects so we can use them in our program:
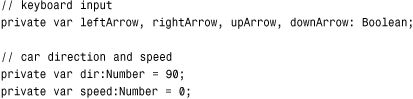
We need the same keyboard Booleans that we’ve used in many other games, and then the direction and speed of the car:
The constructor functions (or game start functions depending on how you build the game) for 3D games are usually bigger than what we are used to. This is because they need to set up a lot of the details of the 3D world.
This constructor function starts by setting up the viewSprite. This sprite is centered on the screen at 275, 350—just a little down toward the bottom so that we can look down slightly at the ground:
Next, we add the worldSprite. This one is tilted back 90 degrees so that the ground lays flat. It makes the y-axis for the worldSprite align with front to back, and lets us lay the ground straight down on it:

The ground needs to cover a lot of area. So even though the Library symbol is big, we make it even bigger by scaling up 20 times:

So now we have the viewSprite on the screen, the worldSprite inside of that, tilted back, and the Ground symbol inside of that. Therefore, the screen would show a flat plane extending back into it if we were to stop now.
But on that plane, in the Ground movie clip is a set of TreeBase movie clips. These little circles tell the game where trees should go. So, we loop through all the children of the Ground, and look for movie clip instances there that are of the type TreeBase. When we find one, we create a new Tree movie clip and add it to the worldSprite at the exact location of the TreeBase.
The only difference is that we stand the tree up vertically by rotating it 90 degrees: At 0 degrees, the default, the trees is laying flat on the ground. At 90 degrees, we’ve raised the trees up so they are perpendicular to the ground and appear to rise out of it.

Note
Notice that the tree movie clip is told to go to frame 1, 2, or 3 randomly. In this sample movie, there are three tree variations, one on each frame. You could easily add more to give some variety. They don’t even need to be trees. You could use rocks, bushes, traffic cones, road signs, and so on.
Note that we’ve got this array worldObjects that we are also adding each tree to. This array has the tree and the car, and we use it for something special later on.
Next we have to add the car. This is just a rear-end view of a car that stands up right at the 0,0 location in the worldSprite:
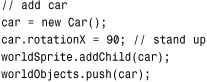
The direction of the car, in degrees, is stored in dir, and the speed in speed. We set those to starting values here:
![]()
Next we call zSort, which is a special function that we discuss at the end of this section:
![]()
Then the constructor function ends with some familiar lines. These set up the keyboard listeners, and a listener that will call a function each frame. The latter function is the main routine for the game:
User Control
For completeness, I include the two key event handlers, which are the same ones used in Chapter 12:
Now that the four Boolean values are set, the main function examines each frame and sees what, if anything, it should do.
The first check is on the left and right keys. If either is held down, a value of .3 is placed in turn. This is used to determine whether the car turns left or right, naturally:
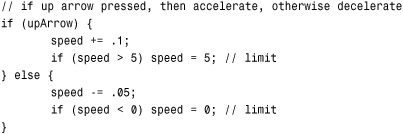
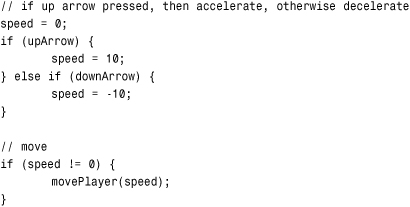
The up and down arrows do it a little differently. The up arrow increases the speed by .1 each frame. It is an “accelerator” after all, not a speed on/off switch. Limits are placed on the maximum speed.
In addition, if the accelerator (up arrow) is not pressed, the speed decreases by a small amount each frame:
Another way that speed will decrease is if the car runs off the road. As in Chapter 12, we use a hitTestPoint test to see whether the car is over the Road movie clip. If it isn’t, we decrease the speed by 5% per frame:

Note
So how does hitTestPoint work in 3D space? Well, no different than in 2D space. In fact, it really is working in 2D space. To determine whether an object is at a point on the screen, it is looking at the 2D projection—the final result of all of the drawing—of everything on the screen just like our eyes are. So by asking about point 275,350, we are asking whether the road is visible under that point on the screen. That works just fine for this game.
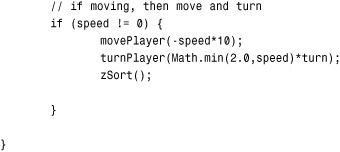
So we only need to move and turn the car if there is some value for speed. We call those two functions here. Through trial and error, I’ve figured out that a multiplier of −10 works well to make the movement realistic.
For turning, we want more speed to equal more of a turn. So we multiply turn by speed (limited to a maximum of 2.0) to get the amount to turn. This isn’t necessarily a realistic physics simulation, so some liberty is allowed. It is a game, after all:
Player Movement
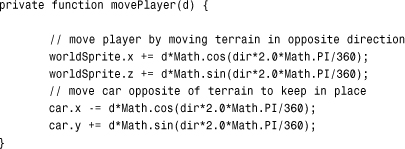
Moving the player is a matter of moving the world (in the opposite direction, in fact).
So the following two changes are the opposites of each other. First the world is moved. Then the car is moved. This keeps the car in the exact same spot on the screen, because the two moves cancel themselves out as far as the car is concerned. Note that the car moves in the x and y directions while the world moves in x and z. This is because the world has been rotated 90 degrees:
Turning is a little simpler. All that is needed is to change dir, and then set the rotationY of the viewSprite based on dir:
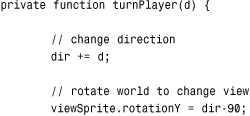
At the end of turnPlayer, we do something clever. Remember those trees? Well, they are as flat as pancakes, being 2D. So, sometimes the player views them straight on, and sometimes from the side. In this case, they look like cardboard cutouts of trees.
So here is what we do: We rotate the trees along with the view. This keeps the trees always facing us. No matter which way the car turns, the trees always look the same. And because trees are roundish in real life, the illusion is pretty good:
Note
This technique of using 2D graphics in a 3D world, and then turning the graphics to always face the user, was common in 1990s 3D games. It allows the use of very pretty graphics in 3D games without using massive models that take up processor power.
It works best when the objects are ones that look similar from all directions, like trees or columns. It also works in situations when living creatures, like monsters, will most likely turn to face the player anyway. In some cases, multiple 2D images can be supplied representing the object from different angles, like every 45 degrees. When done well, it is hard to tell this 2D sprite from a 3D model.
Z-Index Sorting
So that’s the game, except for one nasty problem. Flash displays objects according to the order in the display list. First item is at the back, next item in front of that, and so on.
This holds true even for objects that are shown in 3D. So even if one tree is closer to us than another, they are drawn in the order in which they appear in the display list.
But we of course want trees at the back to be drawn first, and then trees closest to us drawn in front of them. To force Flash to do this, we need to reorder the display list.
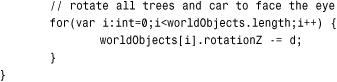
The zSort function is called in the constructor function, and then also right after we move and turn the car each time. It starts off by examining each object in worldObjects and uses getRelativeMatrix3D to compute the distance between the object and the front of the screen. It stores list in an array of distances and index values. So if the first object is 100 pixels away, it is {z:100, n:0}. If the second object is 50 pixels away, it is {z:50, n:1} (and so on).
Then it uses sortOn to sort the list by the “z” values, in descending order. The result being a list of objects sorted by their distance.
Finally, it uses addChild to remove and repopulate the display list for worldSprite one by one, in the proper order:
Still a little confused by what zSort does? Just run the example with the two calls to zSort commented out. Race around the track and observe the trees.
Modifying the Game
This example was kept simple to highlight the 3D aspects. But to make this into a real game, revisit the racing game in Chapter 12 and reincorporate some of the aspects from that game. Most notably, you want to add the waypoint system there so laps around the track can be observed.
Then, of course, you want to add indicators for speed and time. You can then add start and end frames to polish the game and have a real game ending when the player completes a lap (or three).
Another improvement you can make is to work on the car graphic. Right now it is just a static image. But what if the tires look different when the left or right arrow is pressed to show the car is turning?
3D Dungeon Adventure
Source Files
A3GPU214_Dungeon3D.zip
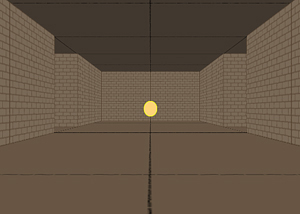
We now move on to a game example that epitomizes what people think of when they think of 3D games. This first-person game puts walls up in front of players and enables them to run around inside small, enclosed spaces.
This is how 3D gaming got its start, with first-person shooters like Doom and Marathon. We don’t add the shooting here, but we take on the first-person perspective display and movement.
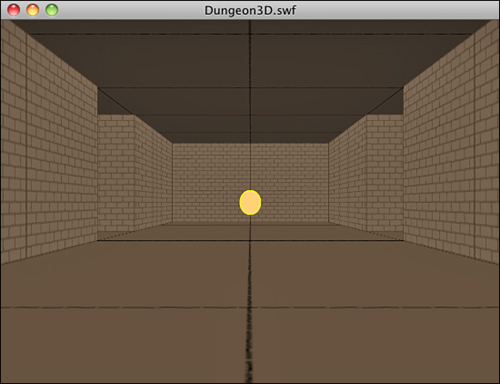
Figure 14.8 shows the basic idea. There are walls on both sides, a floor, and a ceiling. The player isn’t there. It is a first-person view, so you are seeing out of the character’s eyes.
Figure 14.8 Time to explore the dungeon!
There are two challenges to this game. The first is to place the walls. The second is to check for collisions so that as players walk around they can’t simply walk through those walls.
Game Elements
It is interesting to note that after 14 chapters of game examples, this last example is really only pulling elements from previous games. You’ve got a lot of building blocks at this point, and it is just a matter of bringing together different elements to make new games.
The 3D Dungeon game takes many things from the previous 3D Racing game, and many from the Top-Down Driving game in Chapter 12. We use the collision detection method from Chapter 12 to prevent players from passing through walls.
Figure 14.9 shows the Map movie clip from the game. Each gray square is like one of the blocks in the Top-Down Driving game. We use it to block the layer from passing that way. In addition, we use them to determine where to place wall, just as we used TreeBase in the 3D Racing game to place trees.
Figure 14.9 The layout of the dungeon is in the Map movie clip. The grid has been turned on to make it easier to place the squares.
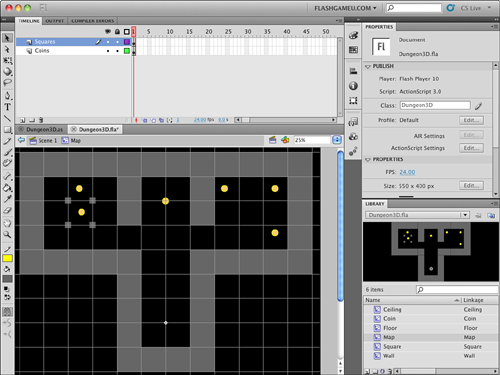
This sort of arrangement makes it easy to build and reconfigure the map. Just drag and drop more Square movie clips to build more walls. Move the ones already there to change things.
You’ll also notice the round objects on the map. These are coins that appear in the game. As we loop through the objects in the Map movie clip, we can detect those and place a coin in that spot. Actually, we just move the coin from the map into our 3D scene.
The rest of the library is filled with supporting graphics: walls, floor tiles, ceiling tiles, and the coins.
Setting Up the Game
Like the Top-Down Driving game, we use Rectangle objects to determine collisions. So we need access to the ActionScript 3.0 geometry library:
As in the 3D Racing game, we use a viewSprite and a worldSprite:
To store and conveniently access objects, we use the following variables. The map and squares variables are used to place the walls, and then for collision detection. The worldObjects array is used whenever we need to access walls and coins for display list sorting and coin collection:

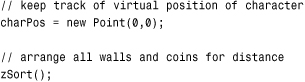
Because the view in this 3D game is first person, there is no character or car or other object that represents the player. But it is handy to know the player’s location on the map. For that we use the variable charPos:
private var charPos:Point; // player location
As in the 3D Racing game and many others, we use Booleans for the arrow keys, and also direction and speed variables. We set their initial values here:
Constructing the Dungeon
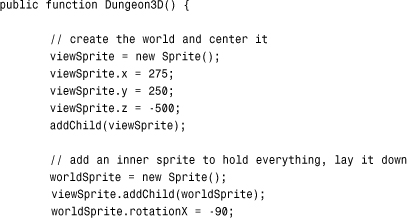
This 3D world is a little more complex than in the previous game. We must examine the map and place a lot of walls. But first, let’s create the viewSprite. Experimentation has shown the following position creates a good-looking view of as the player walks around the dungeon. Then we create a worldSprite to hold all the objects:
Before we look at the map and place walls, let’s put floor and ceiling tiles in place. We loop over only the space we need and place a grid of 200×200 tiles above and below the dungeon:
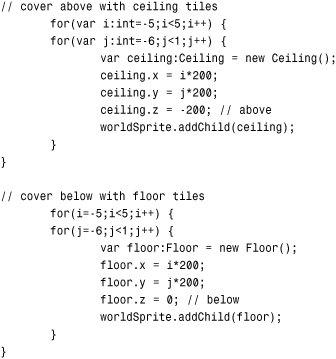
Now it is time to examine the map and add walls. We create a new instance of the Map movie clip from the library. But we never add that to any display list. This movie clip is for reference only and won’t be seen:
![]()
The following code loops through all the children on the map and acts on ones that are of type Square or Coin. We store both of these objects in worldObjects, and the Square objects are also stored in the squares array. Both arrays come in handy later on:

As we loop through the children on the map, we store each one in the temporary variable object:
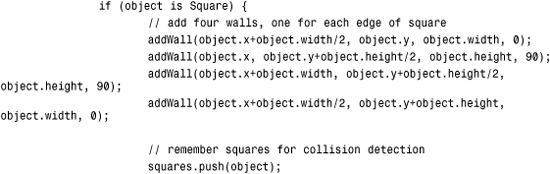
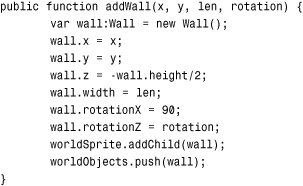
So if the object is a square, we build four walls around the square. Effectively, we are raising the square into a cube. Adding a wall requires several steps, so we farm those out to a function called addWall. This function takes a position, a wall length, and a rotation and turns this data into a new element in the 3D world. We examine it shortly. But note that the function also adds each wall to worldObjects.
Note
This method of building a 3D world from a 2D sprite is by no means the only way to do it. You could create the world completely in code, adding each object by creating instances and placing them. You could come up with a list of objects and positions and store them in text or XML and then read them in and re-create the scene. You could also represent each wall and other objects completely in 2D and set vertical positions and rotations according to their instance names. There are lots of ways to do it, so once you understand this example, go ahead and begin to come up with your own.
In addition, all the squares are placed in a squares array that we use for collision detection:
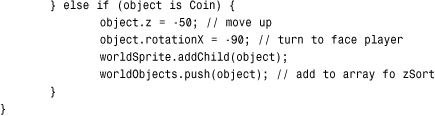
If the object is a coin, we take that as an indication that there should be a coin at that location. In fact, we won’t create a coin, but steal the one from the map and place it in worldSprite. At the same time, we elevate it to a z of −50 and rotate it so that it stands up. It gets added to worldObjects like the walls:
I’ve mentioned charPos and how we use it. Here we set it to a starting position. Then we call zSort to sort the display list in order of distance from the front, just as we did in the previous game:
At the end of the constructor function, we have the setup of the three listeners (two for the keyboard input and one for the main game function):

Here is the addWall function. A new wall is created from the Wall class. It is set in position, width equal to the length assigned, and rotates to stand up and rotate into position:
Main Game Function
Because the two keyboard event listener functions are identical to the ones in the previous game, let’s skip over them. In addition, the turnPlayer function is the same as in 3D Racing, except the last three lines that turned all the trees to face the front aren’t used here.
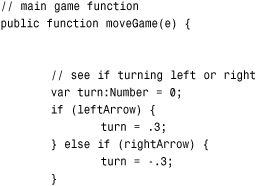
So that brings us to the moveGame function. Because the turning in a game like this is independent of the speed of movement, we set turn to a higher value when the left or right arrow key is pressed. We can also go ahead and perform the turn without checking the forward movement:
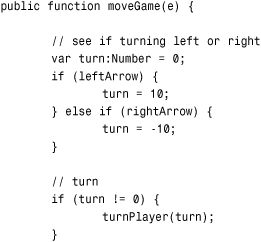
Movement works in the same way as turning. We look at the movePlayer function later:
We only need to re-sort the display list if some movement has occurred:
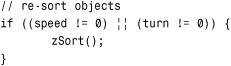
And last, we call checkCoins, which checks whether the player has collided with any coins.:
![]()
Player Movement
This next function is similar to the moveCar function from the Top-Down Driving game in Chapter 12.
The basic idea is to create a rectangle that represents the space the player uses and then to duplicate that rectangle and adjust it to represent the space that the player occupies if the move is allowed.
Then with these two rectangles, look at all the squares and determine whether there are any collisions between the player and the squares. If so, the player needs to be pushed back to avoid the collision:
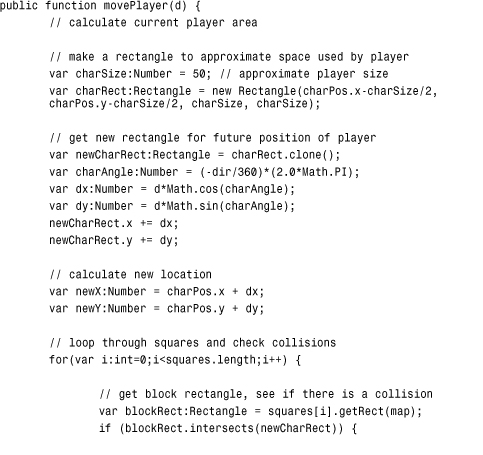
So, this is exactly the same mechanic we used in Chapter 12. Review the text there for a refresher if you are not quite sure how it works to avoid collisions.
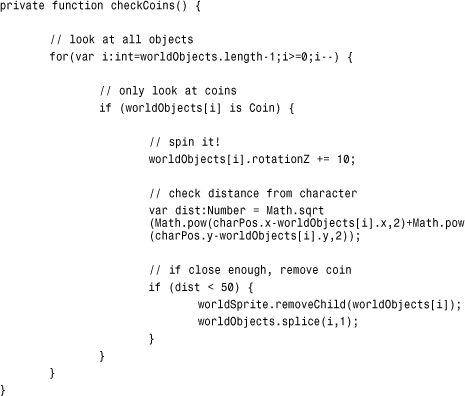
Collecting Coins
Coins are just small circles from the map that we have taken out of the map and moved into our 3D world. They hover there in the air and spin around, as you have no doubt already seen when trying the demo movie.
The following function loops through all the worldObjects and looks for any that are of type Coin. Then it spins them by increasing their rotationZ each time.
In addition, the distance formula is used to see how close the character is to the coin. If close enough (50 in this case), the coin is removed from both the display list and the worldObjects array:
One last function is zSort. Because this is identical to the zSort function in the 3D Racing game, there’s no need to reproduce it here.
Game Limitations
What we’ve created here is a small 3D game engine. You can easily modify the map to create all sorts of layouts. You can also add and remove coins.
But there are limitations in this simple system. One is that we are relying on the simple z-index sorting method to put objects in front of or behind other objects. The reason this seems to work is that all the walls are simple small squares laid out on a nice grid. If we start to put walls too close to each other, the z-index sorting won’t always get things right.
In addition, if we try to have larger objects, or objects that pass through other objects, they can’t be shown properly because part of one object would be closer than part of another object—but one must be drawn first, and then other after it.
So, keep the objects nicely spaced and small and this will work fine.
Also, we have to recognize that all of this 3D takes some processor power. Start to add even more walls and things may slow down.
The game does little optimization. In fact, there is a lot of waste. Is there a need to draw all four walls of all squares? No. Many of the walls are never seen. So perhaps in addition to the squares acting as collision-detection objects, we should have lines for each and every wall. This way there is one wall per line, and we only draw the walls we need.
The same goes for ceiling and floor tiles. Perhaps new layers of the map movie clip can contain objects that represent the ceiling and floor and they are only in spaces where one is needed.
Both of these techniques cut back on the number of objects being drawn and tracked in the game.
Extending the Game
There are so many places you could go from here. Your first stop might be to create some sort of challenge. Perhaps some of the coins could be keys. And some of the walls could be doors. Get the key first, and then go near the door to open it (make it disappear).
Of course, a lot of people will want to add monsters to this sort of game. That can get complex very quickly. Or, they could be done simply like a combination of coins and squares. You “kill” the monster by picking up a dagger item and then running into a stationary monster, wasting the dagger on it. The monster and dagger in your inventory then disappear, as does the square under the monster that was blocking your path.
You could also fire bullets (or arrows) at monsters, checking for collisions as the bullets move and then collide with the monsters. There are lots of ways to do it.
Simpler additions may be to provide a variety of wall graphics instead of just one. For instance, a wall could be a control panel; this could be a dungeon on Mars in the 22nd century. The controls could even blink and change if you make the wall sprite a movie clip with several frames.
And if the walls are sprites, they can have buttons on them. So you could walk up to a wall and then use the mouse to click buttons. You could even put little mini-games in these walls, although this might really tax the processor. Imagine walking up to a wall and then playing the sliding puzzle from Chapter 6, “Picture Puzzles: Sliding and Jigsaw,” to unlock the door!
With this 3D Dungeon game, we can see how far we have come. We started with a matching game in Chapter 3, “Basic Game Framework: A Matching Game,” a turn-based puzzle game using mouse clicks as input and memory as the skill being tested. We ended by taking many of the skills we have learned along the way and applied them to simple 3D games.
This demonstrates the wide variety of games that can be created with Flash. And, if you have been learning from each chapter in this book, it also shows the wide variety of games that you can now build.
The next step is up to you. Modify the games you’ve created with this book or start making your own games from your own design. Either way, come see what is new at http://flashgameu.com if you want to learn more.