
8. Casual Games: Match Three and Collapsing Blocks
• Reusable Class: Point Bursts
In the beginning, video games were simple and fun. Little action puzzle games such as Tetris were the most popular. Then, 3D graphics pushed the edge of gaming into the virtual worlds of first-person shooters and online role-playing games.
However, puzzle games regained popularity in the early part of the last decade as online free and downloadable games. These are usually called casual games.
Note

There is a lot of confusion over the term casual game. Wikipedia defines it as “a category of electronic or computer games targeted at a mass audience.” This is a pretty broad definition. A narrow one is simply “Match Three games,” because most websites that sold “casual games” sold mostly Match Three games.
However, many of the games in this book fit the wider definition. In fact, many picture-puzzle and word-puzzle games are sold alongside Match Three.
Most casual games are action puzzle games, meaning they combine a puzzle game with some sort of movement or a time limit to elevate the level of excitement.
This chapter starts by taking a look at point bursts, a popular special effect used in casual games. Then, we go on to build a typical Match Three game, and then another popular puzzle game genre in Collapsing Blocks.
Reusable Class: Point Bursts
Source Files
A3GPU208_PointBurst.zip
In the old days of arcade games, you were awarded points when you did something right. That hasn’t changed. But, what has changed is the standard way of indicating it.
In the old arcade games, you would simply see your score change in a corner of the screen. Chances are you weren’t watching this corner of the screen at the time, and wouldn’t look at it until the action was over. So, it makes sense that games evolved to show you how many points you received right at the location of the screen where your action took place.
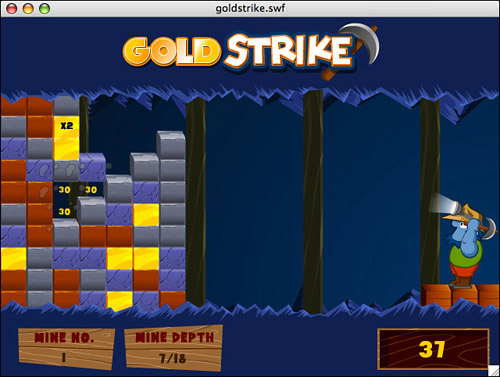
Check almost any well-built casual game and you’ll see this. Figure 8.1 shows my game Gold Strike right at the moment that the player clicks some gold blocks to score points. You can see the “30” text in the location where the gold blocks used to be. These numbers grow from small to large in an instant and then disappear. They are there just long enough to show players how many points they have scored.
Figure 8.1 The number of points scored shows up right at the spot where the action occurred.
I call this special effect a point burst. It is so common, and I use it so frequently, that it is an ideal candidate for a special class that can be built and then reused in many games.
Developing the Point Burst Class
The PointBurst.as class should be as self-contained as possible. In fact, our goal is to be able to use a point burst with only one line of code in the game. So, the class itself needs to take care of creating the text and sprite, animating it, and removing itself completely when done.
Note
Not only will our PointBurst class need just one line of code to use, but it will not require any items in the main movie’s library other than a font to use in the point burst.
Figure 8.2 shows a time-lapse version of what we are going for. The point burst should start small, and then grow in size. It should also start at 100 percent opacity and fade away to become transparent. And, it should do this in less than a second.
Figure 8.2 This time-lapse image shows the start of the point burst at the left, and then each stage of the animation from left to right.
![]()
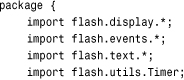
The Class Definition
For such a small class, we still need four imports. We’ll be using the timer to control the animation of the point burst, although another option is to make it time based using ENTER_FRAME events:
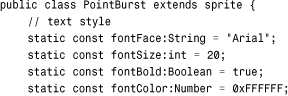
Even though the PointBurst class is performing animation, it is still a sprite, because it doesn’t require multiple frames. Instead, we’ll be scaling and setting the alpha of the sprite in each time step.
We will use static constants to decide the font type, size, and color:
We also have several constants associated with the animation. The animSteps and animStepTime determine the length and smoothness of the animation. For instance, at 10 steps, with 50 milliseconds between steps, it takes 500 milliseconds to animate; 20 steps at 25 milliseconds between steps also takes 500 milliseconds, but includes twice as many steps for smoother animation:
![]()
The scale of the movie changes during the animation. These two constants set the starting point and ending point of the change in scale:
![]()
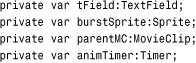
After the constants, we have several variables to hold references to the items in the point burst. One holds the text field, and another the Sprite that will encapsulate the text field. A third holds a reference to the stage or movie clip where we want to place the point burst. The last holds a reference to the Timer object:
The PointBurst Function
The one line of code we use to create a PointBurst is to create a new PointBurst object. This in turn calls the PointBurst function, which accepts parameters. These parameters are our only way to communicate to the PointBurst object some key information, such as the location of the point burst and what text to display.
Note
The pts parameter is an Object because we want to be able to accept any kind of variable type: int, Number, or String. We’ll convert whatever it is to a String later, because that is what the text property of a TextField requires.
The first parameter of PointBurst is a movie clip, mc. This will be a reference to the stage or another movie clip or sprite where the point burst will be added with addChild:
public function PointBurst(mc:MovieClip, pts:Object, x,y:Number) {
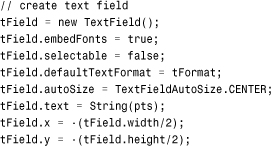
The first thing the function must do is to create a TextFormat object to assign to the TextField we’ll create later. This will include use of the formatting constants we defined earlier. It will also set the alignment of the field to "center":

Next, we create the TextField itself. In addition to turning selectable to false, we also need to tell the field to use embedded fonts rather than system fonts. This is because we want to set the transparency of the text, something that can only be done when the text uses embedded fonts.
To get the text to be centered in the sprite we’ll create next, we set the autoSize of the field to TextFieldAutoSize.CENTER. Then, we set the x and y properties to negative half of the width and height. This puts the center of the text at point 0,0:
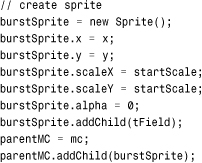
Now we create a sprite to hold the text and act as the main display object for the animation. We set the location of this sprite to the x and y values passed into the function. We set the scale of the sprite to the startScale constant. We set the alpha to zero. Then, we add the sprite to the mc movie clip, which is the sprite passed in to the function:
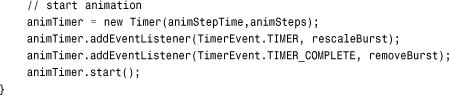
Now that the PointBurst object has manifested itself as a sprite, we just need to start a timer to control the animation over the next 500 milliseconds. This timer calls rescaleBurst several times, and then calls removeBurst when it is done:
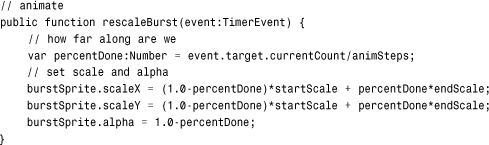
Animating the Point Burst
When the Timer calls rescaleBurst, we need to set the scale properties and the alpha of the sprite. First, we calculate percentDone based on how many Timer steps have gone by and the total number of animSteps. Then, we apply this value to the startScale and endScale constants to get the current scale. We can use percentDone to set the alpha, but we want to invert the value so that the alpha goes from 1.0 to 0.0.
Note
The alpha property sets the transparency of a sprite or movie clip. At 1.0, the object behaves as normal, filling in solid colors at 100 percent opacity. This still means that unfilled areas, like those outside the shape of the characters, are transparent. At .5, or 50 percent transparency, the areas that are usually opaque, like the lines and fills of the characters, share the pixels with the colors behind them.
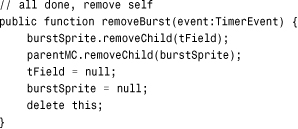
When the Timer is done, it will call removeBurst. This takes care of everything needed for the PointBurst to get rid of itself, without any action on the part of the main movie or the movie’s class.
After removing the tField from the burstSprite, the burstSprite is removed from the parentMC. Then, both are set to null to clear them from memory. Finally, delete is used to clear the PointBurst object away completely.
Note
It is unclear whether you need all the lines in removeBurst. You are supposed to clear away all references to an object to delete it. But, the delete statement removes the PointBurst, which in turn should also remove the two variables. Removing the burstSprite may also serve to remove the tField. There is no way to test this, and at the time of this writing, there doesn’t seem to be any technical document that tells us what the Flash player does in this case, specifically. So, it is best to use a function that ensures all of this is cleared.
Using Point Bursts in a Movie
You need to do two things before creating a new PointBurst object in a movie. The first is to create a Font object in the movie’s library. The second is to tell Flash where to look to find your PointBurst.as file.
Adding a Font to a Movie
The reason a Font is needed is because we are using alpha to adjust the transparency of the text. This can only be done with an embedded Font in the library.
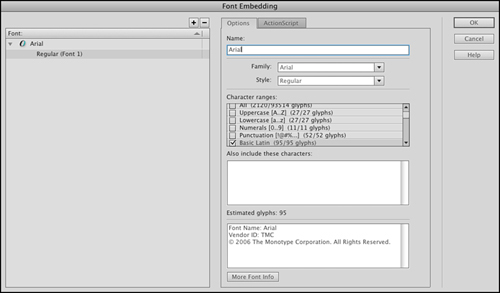
To create an embedded Font, you need to use the Library panel’s drop-down menu and choose New Font. Then, add the font, making sure to add the font “Arial” on the left side, and then select “Basic Latin” to include the 95 basic characters. Figure 8.3 shows the Font Embedding dialog box, which can be tricky to work with. Now would be a good time to play with the dialog and fight with the controls to add the font.
Figure 8.3 The Font Embedding dialog you choose a font to add to the library.
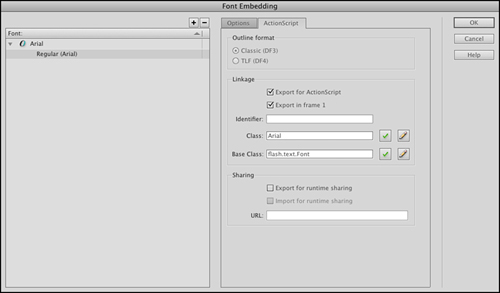
But, this is only step one. Step two, which is not obvious at all, is to make sure this font is included for ActionScript use. To do this, you can simply click the ActionScript tab in the same Font Embedding dialog and then check off Export for ActionScript and name the class, as shown in figure 8.4. Or, you could skip that step and give the font a Linkage name in the Library panel just like you would for a movie clip or sound that you planned to use in your code.
Figure 8.4 Within the Font Embedding dialog, you can specify a class for a font in the library.
Class Locations
For our examples, we don’t need to do anything to tell Flash where to look to find out PointBurst.as class file. This is because it is in the same location as the Flash movie.
But, if you want to use the same PointBurst.as class file in multiple projects, you need to locate it somewhere where all the project movies can get to it, and then tell them where to find it.
There are two ways to do this. The first is to add a class path to the Flash preferences. You might want to create a folder to hold all the classes you regularly use. Then, go to the Flash Preferences, ActionScript section. There, you can click the ActionScript 3.0 Settings button and add a folder to the place where Flash looks for class files.
Note
Alternatively, you could just use the default location for library classes, the Flash Classes folder, which is in your Flash folder in the Program Files or Applications folder. I don’t like doing this because I try to keep any of the documents I create out of the Applications folder, leaving only the default install of my applications there.
A second way to tell a movie to find a class file not in the same directory as the movie is to go to File, Publish Settings and click the Settings button next to the ActionScript version selection. Then, you can add a new class path for only this one movie.
To summarize, here are the four ways a Flash movie can access a class file:
1. Place the class file in the same folder as the movie.
2. Add the class location in the Flash Preferences.
3. Place the class file in the Flash application Class folder.
4. Add the class location in the movie’s Publish Settings.
Creating a Point Burst
After you have the font in the library, and the movie has access to the class, it just takes one line to make a point burst. Here is an example:
var pb:PointBurst = new PointBurst(this,100,50,75);
This creates a point burst with the number 100 displayed. The burst will appear at location 50,75.
The example movie PointBurstExample.fla and its accompanying PointBurstExample.as class present a slightly more advanced example. It creates a point burst wherever you click:
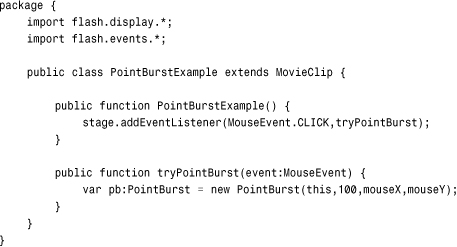
Now that we have an independent piece of code that takes care of this somewhat complex special effect, we can move on to our next game knowing that it can include the point burst with almost no additional programming effort.
Match Three
Source Files
A3GPU208_MatchThree.zip
Although Match Three is the most common and popular casual game, it didn’t get that way because it was easy to program. In fact, many aspects of Match Three require some very tricky techniques. We’ll look at the game piece by piece.
Playing Match Three
In case you have been successful in avoiding Match Three games over the past few years, here is how they are played.
An eight-by-eight board holds a random arrangement of six or seven game pieces. You can click any two horizontally or vertically adjacent pieces two try to swap them. If the swap results in a horizontal or vertical lineup of three or more of the same types of pieces, the swap is allowed. The pieces that line up are then removed, with pieces above them dropping down. More pieces drop from above to fill the gap left by the match.
That’s it. It is the simplicity of the game that is part of what makes it popular. The game continues until the board reaches a state where no more moves are possible.
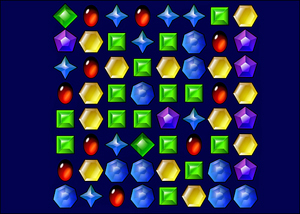
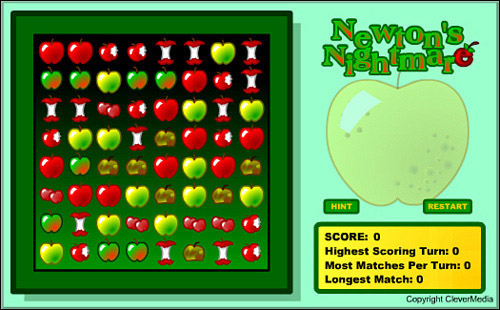
Figure 8.5 shows my game Newton’s Nightmare, a fairly typical Match Three game.
Figure 8.5 Newton’s Nightmare features apples as the playing pieces in a Match Three game.
Note
The game Bejeweled, also named Diamond Mine, is credited with kicking off the Match Three craze.
Game Functionality Overview
The sequence of events in the game follows 12 steps. Each step presents a different programming challenge.
1. Create a Random Board
An eight-by-eight board with a random arrangement of seven different items is created to start the game.
2. Check for Matches
There are some restrictions on what the initial board can hold. The first is that the board can include no three-in-a-row matches. It must be up to the player to find the first match.
3. Check for Moves
The second restriction on the initial board is that there must be at least one valid move. That means the player must be able to swap two pieces and create a match.
4. Player Selects Two Pieces
The pieces must be adjacent to each other horizontally or vertically, and the swap must result in a match.
5. The Pieces Are Swapped
Usually an animation shows the two pieces moving into each others’ places.
6. Look for Matches
After a swap is made, the board should be searched for new matches of three in a row or more. If no match is found, the swap needs to be reversed.
7. Award Points
If a match is found, points should be awarded.
8. Remove Matches
The pieces involved in a match should be removed from the board.
9. Drop Down
The pieces above the ones removed need to drop down to fill the space.
10. Add New
New pieces need to drop down from above the board to fill in empty spaces.
11. Look for Matches Again
After all pieces have dropped and new ones have filled in the gaps, another search for matches is needed. Back to step 6.
12. Check for No More Moves
Before giving control back to the player, a check is made to see whether any moves are possible at all. If not, the game is over.
The Movie and MatchThree Class
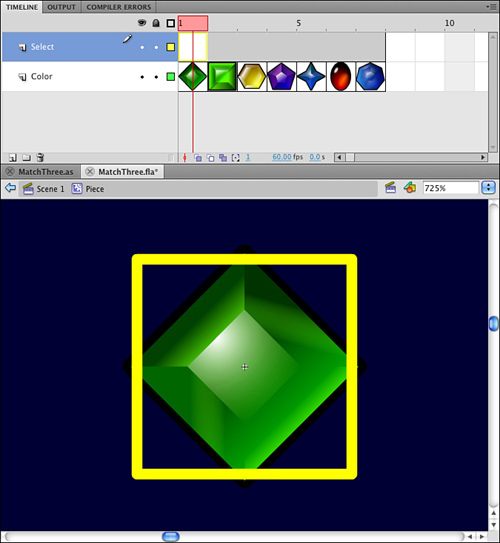
The MatchThree.fla movie is pretty simple. Besides the Arial font in the library, the only game-related elements are a movie clip for the game pieces, and another clip that acts as a selection indicator.
Figure 8.6 shows the Piece movie clip. There are seven frames, each with a different piece. There is also the select movie clip on the top layer, across all seven frames. This can be turned on or off using the visible property.
Figure 8.6 The Piece movie clip contains seven variations and a selection box.
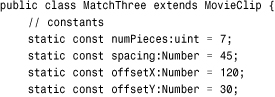
Let’s get the class definitions out of the way before looking at the game logic. Surprisingly, there isn’t too much to define. Only the most basic imports are needed:

As for constants, we just have some for the number of variations for the Piece, and three constants that have to do with screen display position:
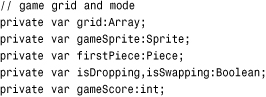
The game state will be stored in five different variables. The first, grid, contains references to all the Pieces. It is actually an array of arrays. So, each item in grid is actually another array containing eight Piece movie clip references. So, it is an eight-by-eight nested array. Then, we can look at any Piece by simply using grid[x][y].
The gameSprite is a sprite that holds all the sprites and movie clips we’ll be creating. This keeps them separate from any other graphics already on the stage.
The firstPiece variable holds a reference to the first Piece clicked, much like the matching game did in Chapter 3, “Basic Game Framework: A Matching Game.”
The two Boolean variables, isDropping and isSwapping, keep track of whether any Pieces are animating at the moment. The gameScore variable holds the player’s score:
Setting Up the Grid
The first functions will set the game variables, including setting up the game grid.
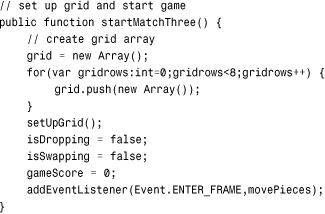
Setting the Game Variables
To start the game, we need to set all the game state variables. We start by creating the grid array of arrays. Then, we call setUpGrid to populate it.
Note
There is no need to fill the internal arrays of grid with empty slots. Just by setting a location in an array, the slot in the array is created, and any earlier slots are filled with undefined. For instance, if a new array is created, and then item three is set to "My String", the array will have a length of 3, and items 0 and 1 will have a value of undefined.
Then, we set the isDropping, isSwapping, and gameScore variables. Also, we set up an ENTER_FRAME listener to run all the movement in the game:
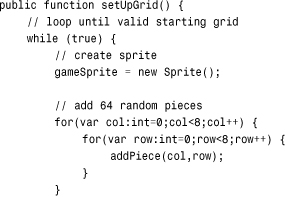
Setting Up the Grid
To set up the grid, we begin an endless loop using a while(true) statement. Then, we create the items in the grid. We plan on the very first attempt creating a valid board.
A new gameSprite is created to hold the movie clips for the game Pieces. Then, 64 random Pieces are created through the addPiece function. We look at this function next, but for now you should know that it will add a Piece to the grid array and also to the gameSprite:
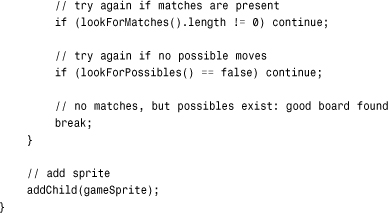
Next, we’ve got to check two things to determine whether the grid that is created is a valid starting point. The lookForMatches function returns an array of matches found. We’ll look at it later in this chapter. At this point, it needs to return zero, which means that there are no matches on the screen. A continue command skips the rest of the while loop and starts again by creating a new grid.
After that, we call lookForPossibles, which checks for any matches that are just one move away. If it returns false, this isn’t a good starting point because the game is already over.
If neither of these conditions are met, the break command allows the program to leave the while loop. Then, we add the gameSprite to the stage:
Adding Game Pieces
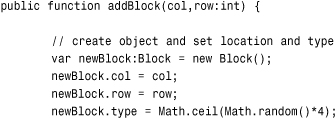
The addPiece function creates a random Piece at a column and row location. It creates the movie clip and set its location:
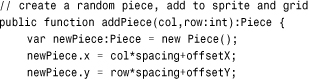
Each Piece needs to keep track of its own location of the board. Two dynamic properties, col and row, will be set to this purpose. Also, type holds the number corresponding to the type of Piece, which also corresponds to the frame in the movie clip being shown:
The select movie clip inside the Piece movie clip is the outline that appears when the user clicks a Piece. We’ll set that to not be visible at the start. Then, the Piece will be added to the gameSprite.
To put the Piece into the grid array, we use a double-bracket method of addressing the nested array: grid[col][row] = newPiece.
Each Piece is given its own click listener. Then, the reference to the Piece is returned. We won’t be using it in the setUpGrid function above, but we will be using it later on when creating new Pieces to replace matched ones:
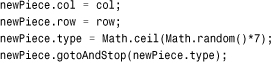
Figure 8.7 shows a complete random valid grid.
Figure 8.7 Just one of a nearly infinite number of randomly generated game grids.
Player Interaction
When the player clicks a Piece, what happens depends on whether it is the first Piece clicked, or the second. If it is the first Piece, the Piece is selected, and nothing else happens.
If the player clicks the same Piece twice, it is deselected and the player is back to square one:
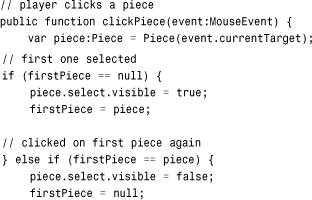
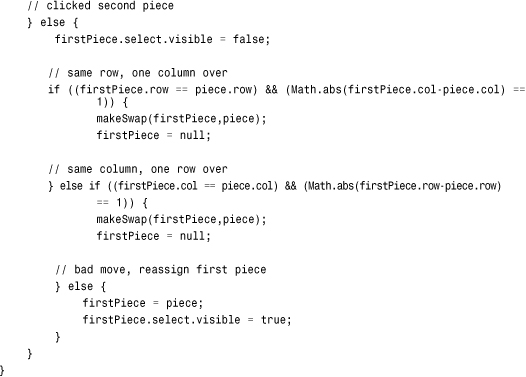
If the player has clicked a second Piece, we need to determine whether there can be a swap. First, we turn off the selection highlight on the first Piece.
The first test is to determine whether the two Pieces are on the same row, and next to each other. Alternatively, the Pieces can be on the same column, and above or below the other.
In either case, makeSwap is called. This takes care of checking to see whether a swap is valid—that it will result in a match. If it is, or if it isn’t, the firstPiece variable is set to null to get ready for the next player selection.
On the other hand, if the player has selected a Piece farther away from the first, it is assumed that the player wants to abandon his first selection and start selecting a second pair:
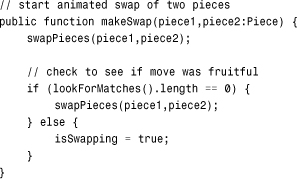
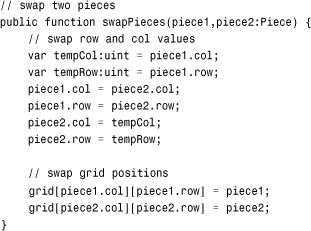
The makeSwap function swaps the two Pieces, and then checks to see whether a match is available. If not, it swaps the Pieces back. Otherwise, the isSwapping variable is set to true so that the animation can play:
To actually do the swapping, we need to store the location of the first Piece in a temporary variable. Then, we’ll set the location of the first Piece to the location of the second. Figure 8.8 shows a diagram of how a swap like this works.
Figure 8.8 When swapping two values, it is necessary to create a temporary variable that stores one value during the swap.
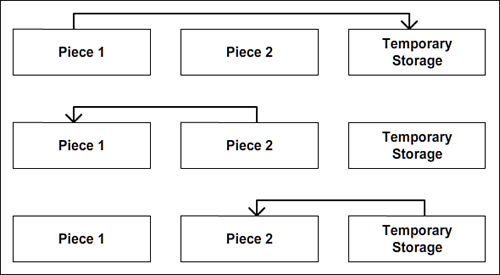
When the locations of the Pieces are exchanged, the grid needs to be updated. Because each Piece now has the correct row and col value, we just set the grid to point to each Piece at the correct position inside of grid:
The swap is completely reversible, which is important because it will often need to be reversed. In fact, we don’t know whether the swap leads to a match until after the swap is performed. So, we often need to swap the Pieces, check for a match, and then swap back if no match is found.
Animating Piece Movement
We’re going to be using an interesting, but non-obvious, method of animating Piece movement. Each Piece knows what row and col it is in because it has a row and col dynamic property. It also knows what location it is in on the screen thanks to its x and y property.
These two should match, with help from the spacing, and offsetX and offsetY variables. So, a Piece in column 3 should be at an x location of 3*spacing+offsetX.
But, what if a Piece moves to a new column? If we set the col value of the Piece to 4, it should be at 4*spacing+offsetX, which is spacing (45) pixels to the right. In that case, we can ask the Piece to move a bit to the right, to get closer to its new location. If we do this each frame, the Piece eventually gets to its new destination, and stops moving (because it will again have a matching col and x value).
Using this technique, we can have any Piece animate as it moves to a new location. And we don’t even need to set up this animation on a per-Piece level. All we need to do is change a col or row property of a Piece, and then the following function will take care of the rest.
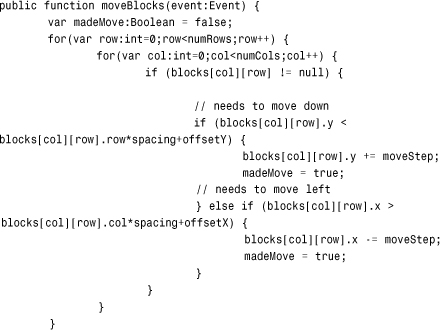
The movePieces function is called every ENTER_FRAME as we set it up with a listener at the start of the class. It loops through the Pieces and checks all the col and row values to see whether the x and y values need adjusting to match.
Note
We’re using a distance of 5 in movePieces each frame. For the col and row to line up with an x and y value, we need to stick to multiples of 5 for spacing. In the example movie, spacing is set to 45, so this works. If you were to change spacing to, say 48, you need to choose a new movement amount that divides evenly into 48, like 4, 6, or 8.
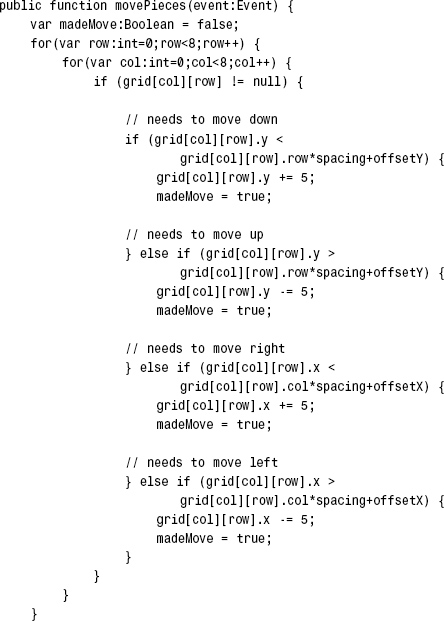
At the start of movePieces, we set the Boolean madeMove to false. Then, if any animation is required, we set it to true. In other words, if movePieces does nothing, madeMove is false.
Then, this value is compared to the class properties isDropping and isSwapping. If isDropping is true and madeMove is false, it must mean that all the Pieces that were dropping have just finished. It is time to look for more matches.
Also, if isSwapping is true and madeMove is false, it must mean that two Pieces just finished swapping. In this case, it is also time to look for matches:
Finding Matches
There are two very challenging parts to the Match Three program. The first is finding any matches in a board. This is an excellent example of the “break it into smaller problems” programming technique that I wrote about in Chapter 1, “Using Flash and ActionScript 3.0.”
The problem of finding matches of three or more consecutive Pieces in the game grid is certainly nontrivial. It cannot be solved in a simple step. So, you cannot think of it as a single problem to solve.
Breaking the Task into Smaller Steps
Instead, we need to break it down into smaller problems, and keep breaking it down until we have simple enough problems that can be solved easily.
So, the findAndRemoveMatches first breaks the task into two Pieces: finding matches, and removing them. Removing Pieces is actually a pretty simple task. It just involves removing the Piece objects from the gameSprite, setting the grid location to null, and giving the player some points.
Note
The number of points awarded depends on the number of Pieces in the match. Three Pieces means (3-1)*50 or 100 points per Piece for a total of 300 points. Four Pieces would be (4-1)*50 or 150 points per Piece for a title of 600 points.
However, the absence of some Pieces means that the ones above it will need to be told they are hanging in mid air and need to drop. This is a nontrivial task, too.
So, we have two nontrivial tasks: looking for matches and telling the Pieces above any Pieces that have been removed that they need to drop. We’ll delegate these two tasks to other functions: lookForMatches and affectAbove. The rest of the simple tasks we’ll perform right here in the findAndRemoveMatches function.
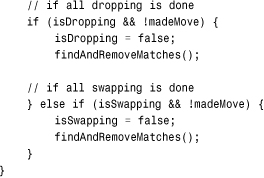
The findAndRemoveMatches Function
We loop grab the matches found and put them into the array matches. Then, we award points for each match. Next, we loop through all the Pieces to be removed and remove them.
Tip
When you take difficult tasks and delegate them to new functions—functions you haven’t created yet—it is called top-down programming. Instead of worrying about how we’ll find matches, we simply envision a lookForMatches function that will perform the task. We are building the program from the top down, taking care of the big picture first, and worrying about the functions that handle the smaller details later.
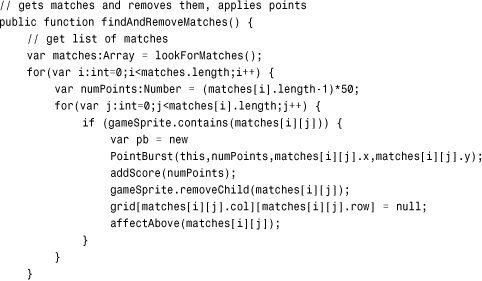
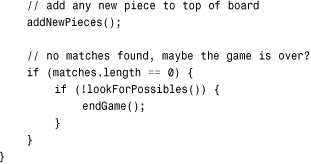
The findAndRemoveMatches function has two more tasks to perform. First, it calls addNewPieces to replace any missing Pieces in a column. Then, it calls lookForPossibles to make sure there are still more moves remaining. It only needs to do this if no matches were found. This would only happen if findAndRemoveMatches was called after new Pieces finished dropping and no current matches were found:
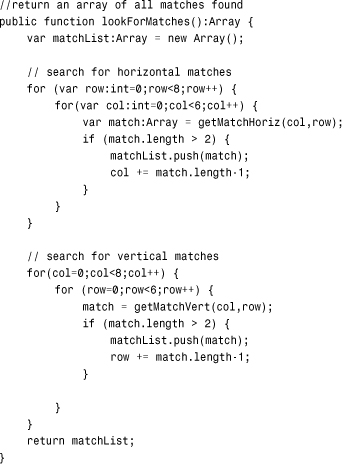
The lookForMatches Function
The lookForMatches function still has a pretty formidable task to perform. It must create an array of all the matches found. It must look for both horizontal and vertical matches of more than two Pieces. It does this by looping through the rows first, and then the columns. It only needs to check the first six spaces in each row and column, because a match starting in the seventh space can only be two in length, and the eighth space doesn’t have anything following it at all.
The getMatchHoriz and getMatchVert functions take the delegated task of determining how long a match is starting at a location in the grid. For instance, if spot 3,6 is Piece type 4, and 4,6 is also type 4, but 5,6 is type 1, calling getMatchHoriz(3,6) should return 2, because the spot 3,6 starts a run of 2 matching Piece types.
If a run is found, we also want to push the loop forward a few steps. So, if there is a four-in-a-row match at 2,1, 2,2, 2,3, and 2,4, we just check 2,1 and get a result of 4, and then skip 2,2 2,3 and 2,4 to start looking again at 2.5.
Every time a match is found by getMatchHoriz or getMatchVert, they return an array containing each Piece in the match. These arrays are then added to the matches array in lookForMatches, which is in turn returned to whatever called lookForMatches:
The getMatchHoriz and getMatchVert Functions
The getMatchHoriz function now has a specialized step to perform. Given a column and a row, it checks the next Piece over to see whether the Piece types match. If it does, it gets added to an array. It keeps moving horizontally until it finds one that doesn’t match. Then, it returns the array it compiled. This array may only end up holding one Piece, the one at the original column and row, if the next one over doesn’t match. But, for example, if it does match, and the next one does, too, it returns a run of three Pieces:

The getMatchVert function is almost identical to the getMatchHoriz function, except that it searches along columns rather than rows:

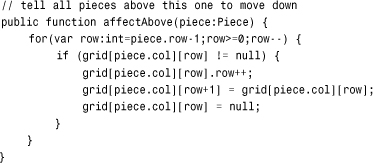
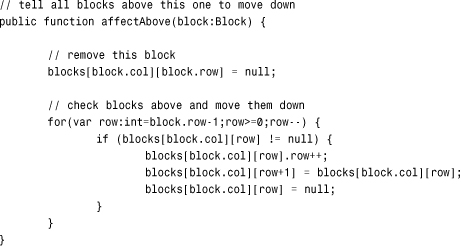
The affectAbove Function
We’ll continue to work to build findAndRemoveMatches all the functions it needs. Next on the list is affectAbove. We pass a Piece into this, and then expect it to tell all Pieces above it to move down on step. In effect, it is a Piece saying, “I’m going away now, so all you guys drop down to fill in the gap.”
A loop looks at the Pieces in the column that are above the current one. So, if the current one is 5,6, it looks at 5,5, 5,4, 5,3, 5,2, 5,1, and 5,0 in that order. The row of these Pieces will be incremented by one. Also, the Piece will tell the grid that it is in a new location.
Remember that with movePieces, we don’t need to worry about how a Piece will animate to get to a new location, we just change the col or row and it will take care of itself:
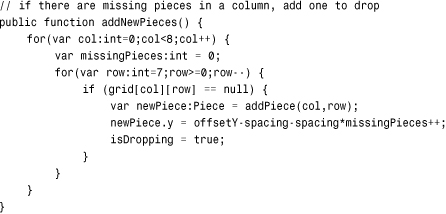
The addNewPieces Function
The next function we need to build is addNewPieces. This looks at each column, and then at each spot in the grid for each column, and counts the number of spots set to null. For each one, a new Piece is added. Although its col and row value is set to match its final destination, the y value is set to be above the top row, so it appears to fall down from above. Also, the isDropping Boolean is turned to true to indicate animation in progress:
Finding Possible Moves
As tricky as finding matches is, it is easier than finding possible matches. These aren’t three-in-a-row matches, but rather the possible three-in-a-row matches.
The simplest answer is to scan the entire board, making every swap: 0,0 with 1,0, then 1,0 with 2,0, and so on. With each swap, check for matches. As soon as a swap that leads to a valid match is made, we can stop looking and return true.
This brute-force approach would work, but it could be awfully slow, especially on older machines. There is a better way.
If you think about what it takes to make a match, some patterns form. Typically, you have two Pieces of the same type in a row. The spot next to these Pieces is of a different type, but can be swapped in three directions to bring in another Piece that may match. Alternatively, you could have two Pieces spaced one apart from each other, and a swap could bring a matching Piece between them.
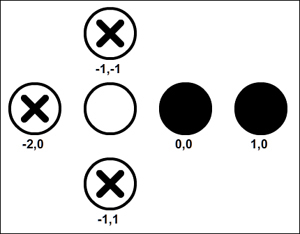
Figure 8.9 shows these two patterns, broken further into six possible patterns. Horizontally, the missing Piece in the match can come at the left or right, whereas vertically, it can come at the top or bottom.
Figure 8.9 The filled circles represent the Pieces that will stay put. The empty circle represents the space that must be filled with the matching Piece. The circles with the X in them are possible locations for this matching Piece.

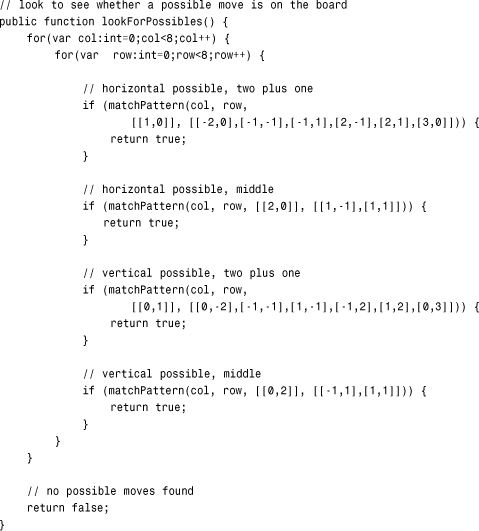
Knowing that there are only a few patterns that we need to look for, we can write a function that takes a list of locations and determines whether the pattern matches. With top-down programming, we can first write lookForPossibles and worry about writing the pattern-matching function later.
So, looking at the first pattern in Figure 8.9, we’ve got two spots that need to contain a match, and three spots where if any one of them contains the same as the matching type, we’ve got a positive result. Using the leftmost filled circle as point 0,0, we can say that the one next to it (1,0) must match. Then, there needs to be at least one other matching Piece at locations −1,−1, −2,0, or −1,1. Alternatively, the match can be on the right side of the initial pair. These would be positions 2,−1, 2,1, and 3,0.
So, there is a starting Piece. Then, a single position that must match the starting Piece. Then, six other positions where at least one must match. Figure 8.10 shows this as a diagram.
Figure 8.10 Position 1,0 needs to match 0,0. At least one of the six X spots also needs to match 0,0.
The function call would pass in an array of positions that must match, and a second array of positions where at least one must match. It would look like this:
matchPattern(col, row, [[1,0]], [[-2,0],[-1,-1],[-1,1],[2,-1],[2,1],[3,0]]))
We need a similar function call to deal with the “Horizontal, Middle” situation shown in Figure 8.9. Then, both the vertical patterns, too. The lookForPossibles searches for all of them, at all positions in the grid:
The matchPattern function, although it has a large task to perform, is not a very large function. It needs to get the type of the Piece at the column and row position specified. Then, it looks through the mustHave list and checks the Piece in the relative position. If it doesn’t match, there is no point continuing, and the function returns false.
Otherwise, each of the Pieces in needOne is checked. If any of them match, the function returns true. If none match, the function ends up returning false:
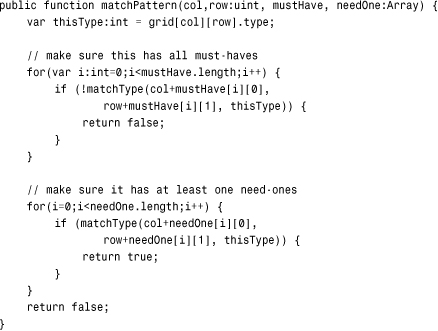
All the comparisons in matchPattern are made through calls to matchType. The reason for this is that we are often trying to look at Pieces that are not in the grid. For instance, if the column and row passed into matchPattern are 5,0, and the Piece that is offset by −1,−1 is examined, we are looking up grid[4,-1], which is undefined, because there is no such thing as item −1 of an array.
The matchType function checks for grid location values outside of what we have set up, and returns a false instantly if that happens. Otherwise, the grid value is examined, and true is returned if the types match:

Score Keeping and Game Over
Way back in findAndRemoveMatches, we called addScore to award the player some points. This simple function adds points to the player’s score, and relays the change to the text field on the screen:

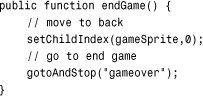
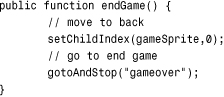
When no possible matches are left, the endGame function takes the main timeline to the gameover screen. It also uses swapChildIndex to put the gameSprite at the very back, and so the sprites on the gameover frame will be above the game grid.
We need this because we won’t be deleting the game grid at the end of the game. Instead, we’ll leave it there for the player to examine:
We get rid of the grid and the gameSprite when the player is ready to move on. For that purpose, the cleanUp function takes care of it:

In the main timeline, the function tied to the Play Again button calls cleanUp just before jumping back to the previous frame to start a new game.
Modifying the Game
One important decision to make is whether you want six or seven piece variations in the game. Most Match Three games seem to use six. I’ve used seven in the past, and that has worked, too. Using seven brings the game to an end sooner.
Bonus points are another improvement that can be made. An additional graphics layer can be added to the Pieces, similar to the selection border. It can be made visible on random Pieces to indicate bonus points. A bonus property can be added to the Piece, too, and it could trigger a second call to addScore when that Piece is removed.
Hints are a way to make the game more enjoyable for the player. When lookForPossibles is called, it calls matchType a number of times. If a possible match is found in the second loop inside matchType, a true is returned. The very position that matchType is examining at this point is a Piece that can be used in a swap to make a match. This can be placed in a new variable called something like hintLocation, and then that location used to highlight a Piece when the player clicks a hint button.
Collapsing Blocks
Source Files
A3GPU208_CollapsingBlocks.zip
Another popular casual game typeis called Collapsing Blocks. Like Match Three, you are presented with a grid of game pieces. Also like Match Three, you start by selecting a single piece with the hope of eliminating some of the pieces from the grid.
The main difference is in how the pieces interact. In Collapsing Blocks, you look for groups of blocks. For a block to be part of a group, it must be the same color as another block that is directly to the left, right, above, or below.
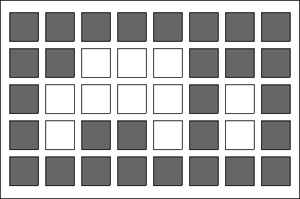
Figure 8.11 shows the start of a game with four different types of blocks.
Figure 8.11 The game features a 16×10 grid of blocks using four different colors.

Figure 8.12 shows a group of nine white blocks surrounded by gray blocks. Each white block in the group is directly to the left, right, above, or below another white block in the group. There is a second group of only two white blocks on the right. These two groups are separate and not connected.
Figure 8.12 There are two distinct groups of white blocks.
In Collapsing Blocks, the blocks themselves are never replaced. When you select a group of three blocks, that leaves a hole of three spaces in the middle of the grid. Like Match Three, the pieces fall down to fill the spaces, and they aren’t replaced by new blocks from above.
Therefore, it is possible to clear an entire column of blocks. When that happens, the blocks must “fall” from the right to the left so as not to leave a gap. As the player chooses groups of blocks, the entire grid slowly collapses from top to bottom and from right to left. Most games end with a few blocks remaining at the bottom left corner.
The game might seem somewhat mindless, but there are two strategic goals for the player. The first is to choose groups of blocks in such a way that the fewest possible blocks are left at the end of the game. There is often the option to completely clear the board if the player chooses wisely.
More importantly, there is a scoring strategy. Points scored depend on the number of blocks in the group. The progression is exponential. A group of two blocks scores 2 [ts] 2 = 4. A group of three blocks scores 3 [ts] 3 = 9. A group of four scores 4 [ts] 4 = 16. So, it is better to remove a group of four blocks than two groups of two. If the player can choose the groups wisely, he or she can score far more points by stringing together large groups of blocks. A group of 20 blocks scores 400. If the player can connect another nine blocks to that same group, then 29 blocks scores 841.
Setting Up the Graphics
The only graphic element in the game is the blocks. We set that up just the like pieces in the Match Three game. There are four frames, each with a block of a different color. No need for a selection border, as clicking on a block in a group instantly removes that group.
The rest of the game is set up like Match Three, with a start frame, an end frame, and a score at the upper right.
Setting Up the Class
After importing the libraries, we start with some constants. We have one for the distance between blocks. In this case, we have each block spaced 32 pixels apart. The blocks themselves are 30×30, which leaves a gap between them.
We also have constants for the left and top offset for the blocks. The number of columns and rows in the grid are also constants. So, you can adjust these numbers and come up with a different-sized grid and reposition it on the screen.
The last constant is moveStep, which is the number of pixels per frame that the blocks fall. We’ve purposely made that a number that evenly divides into the spacing constant so the blocks fall into the next position perfectly:

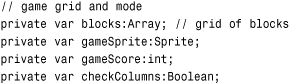
There are only four game variables. As it turns out, we don’t need to keep track of much. There needs to be the equivalent to grid from the Match Three game, but in this case. we call it blocks. It is still a two-dimensional array containing each game piece.
The blocks appear on the screen, of course, but we put them in a sprite called gameSprite. Then, we use gameScore to keep track of the score. Finally, we have a Boolean named checkColumns. You learn how to use that later.
Starting the Game
Setting up the grid, or blocks, in the game is similar to setting up the game pieces in Match Three. However, we don’t need to confirm that the result is a valid start to the game. Any random arrangement of four different-colored blocks is a valid grid with moves, as long as the grid is 3×3 or larger.
We start by setting up the blocks array with empty columns, and then looping through each column and adding blocks for each row in each column by calling addBlock. That function is going to take care of adding the blocks to the game sprite. Here, we just need to create the game sprite and add it to the stage:
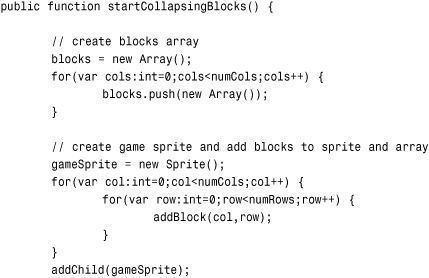
The starting values of checkColumns are false, and the score is set to 0. Like the Match Three game, we need a listener that enables blocks to fall down to fill spaces. So, we add that listener here:
The addBlock function creates a new block from the library and sets three dynamic properties: col, row, and type. The first two let each block keep track of its own position. The last is the number of the color of each block. It is handy to refer to this type property later in the game code:
The position of the block on the screen is col and row value, multiplied by the spacing constant. In addition, the offsets are used to center the entire grid of blocks on the screen. Then, we jump to the frame that matches the block type. We also add the block to the game sprite:
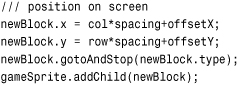
This next part adds the block to the blocks array at the proper column and row position:
// add to array
blocks[col][row] = newBlock;
Each block needs its own mouse listener so it can react to being clicked:
![]()
Recursion
If you have been looking ahead, you might have noticed that there isn’t as much code to Collapsing Blocks as there was for Match Three. Because of that, you might be thinking that this is an easier game to code.
The reason there is less code is that we use a programming technique called recursion. This technique doesn’t require many lines of code, but it does require a deeper understanding of programming—one that nonprogrammers usually have great difficulty with.
Note
Recursion is used throughout computer science for many purposes. Two of the most common are sorting functions and search algorithms. Another is path finding, which is used in games when you tell your game pieces to go to a location and it finds its way around obstacles to get to that location.
A recursive function is one that calls itself. Why would you do that? Well, as it turns out, the Collapsing Blocks game is a good example of basic recursion. Let’s learn by walking through an example. Take a look at Figure 8.13, where each of the white blocks is part of a group that the player has selected to remove.
Figure 8.13 The player clicks on block M, and all the blocks in the white group are removed.
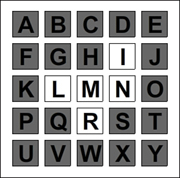
The player clicks on M. M is the first block of the group to be removed, but how do we find all the other blocks in the group, while not including any of the gray blocks?
The first few steps seem simple enough. The function should look above, below, to the left, and to the right. Any block that is the same color as the first one should be added to the group. L, N, and R are added, but how do we continue to find block I?
Here’s another way the code can operate. The function can check one block to see if it matches the color. If it does, then it continues. If not, then it returns a “Sorry, no matches here.”
If it continues, however, it starts a list. It adds itself to the list. Then, it asks its four neighbors to do the same thing.
So, the function is called for the first time, and it is fed the parameters block M and the color white. The function figures out that M is white, so it starts a list with M on it.
Then, it asks the neighboring four blocks if they are also white, and if so, they return a list of all the white blocks connected to them.
The function goes like this:
• Start an empty list of white blocks.
• Am I a white block? If so, add me to the list. If not, then return an empty list.
• Now that I know I am a white block, look in all four directions and ask those blocks for lists of white blocks connected to them. Add those lists to my list.
• Return the list of white blocks.
In the example, the function is first called with M. We call the function testBlock. The function has an empty list of white blocks, but M itself is white, so it adds itself to the list and continues.
The function then calls testBlock with H as the target block. H isn’t white, so an empty list is returned. The original function adds this empty list to its list, which still just contains M.
Then, it calls testBlock again with the target L. This time, the function returns a list with L. It asks for lists from G, K, and Q by calling testBlock with the targets of G, K, and Q. None of these are white, so these testBlock calls return an empty list.
The same thing happens for R. The function returns only R, after calls to testBlock targeting Q, W, and S return empty lists.
When the original function calls testBlock with the target of N, something different happens. N is added to the list, and then testBlock is called again targeting I, O, and S. In this case, the first call returns a list with I. I is added to the list with N, and the original function call gets back a list with N and I.
The original function starts its list with M, and then adds nothing from above, L from the left, R from below, and then N and I from the right. The result is: M, L, R, N, I.
Note
Doesn’t this technique just end up checking the same blocks over and over again? When M is checked, it looks at H, L, R, and N. Then, when L is checked, it looks at G, K, Q, and M. M gets looked at again! That would cause an infinite loop with M and L being checked and rechecked forever. So, we need to mark M as being added to the list already. We do that by setting its type to 0. Then, we skip adding any blocks with type 0 to the list. This prevents that type of looping.
Confused? Recursion is a difficult concept for many people. Perhaps after you see the game code and observe it in action, you might get it. Or, you might have to take it on faith that the function testBlock starts by observing a single block, and then reaches out and examines all neighbors until it finds all the matches in a connected group.
Recursive Block Removal
The first part of the block removal code is the function that handles a mouse click on a block. This is simple enough. It calls findAndRemoveMatches with the block clicked and stores the number of points scored. The only use for this number is to determine if a PointBurst should occur and how many points to show. The actual scoring of points takes place inside findAndRemoveMatches:

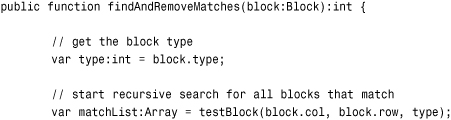
The function that handles most of everything to do with removing groups of blocks, except for identifying which blocks to remove, is findAndRemoveMatches.
The findAndRemoveMatches function starts by getting the color, or type, of the block clicked. Then, it calls the magic testBlock function, which we look at later. From that, it has a list of all blocks in the group:
Now we only want to remove a group if there is a group. If a block is by itself, we don’t do anything. If there are two or more in the group, then we remove those blocks from the game sprite and call affectAbove, which tells the blocks above this one to drop down, just like in Match Three:
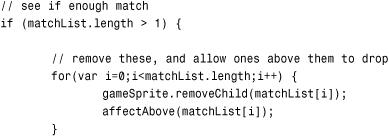
Next, the function sets the checkColumns Boolean flag. This sets a reminder for our code that after all blocks have dropped down that we need to also check to see if there are any empty columns:
![]()
Here is where we add the points to the score and also break out of the function completely, returning the number of points scored:

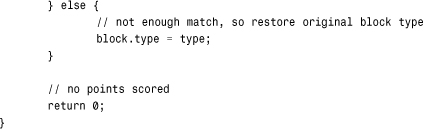
What happens if not enough blocks are found in the group? The first order of business is to return the type property of the clicked block to its original value.
Then, at the end of the function, a 0 is returned because no points have been scored:
Now, here is the recursive function. Notice how small it is: only 10 lines of actual code. Recursive functions, while performing huge tasks, usually have little code.
The testBlock function starts by accepting the column, row, and type of a block. It then sets up an empty array. It calls getBlockType to see if the type is 0, which signifies either that the block has already been identified as part of the group or the block doesn’t exist because it had previously been removed or is not a valid location past the edges of the grid.
Then, it checks to see if the type matches the color we are looking for. If so, it adds itself to the list, and then recursively calls testBlock for each of the four directions:
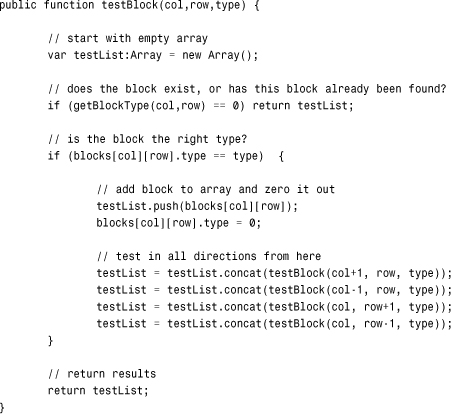
At the end of the recursive function, it needs to return the array of matching blocks found.
Note
You might notice that blocks are often looked at more than once. For instance, in Figure 8.13, block Q is looked at as the one under L, and then again as the one to the left of R. In this game, such duplicate efforts don’t slow the game enough to notice. In more complex recursive searches, it might be necessary to mark each item “looked at” in addition to each item added to the group. Then, you can avoid checking anything twice.
And, there is the recursive function. A single call to testBlock with the column, row, and type returns a complete list of all blocks connected to that one with the same type.
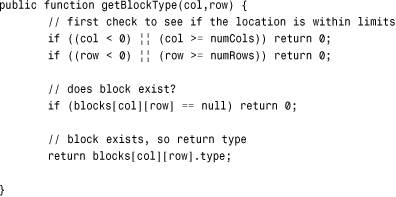
One loose end is the getBlockType function. The idea here is to return a 0 if the block is missing, or the location is off the edge of the grid. Otherwise, return the actual type value:
Falling Blocks
The way blocks fall is the exact same way it works in Match Three. However, it can be simplified a little as blocks can only move down and to the left. In addition, we use the moveStep constant to polish up these functions a bit, rather than hard-coding values:
One difference here is that we need to check for empty columns when the movement has all stopped:

The affectAbove function is what sets the blocks in motion, by looking at all the blocks above a newly removed block and setting them to fall down to the next space on the grid:
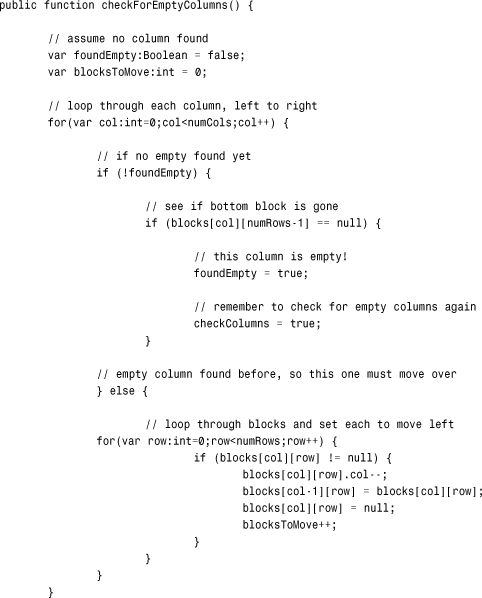
Checking for Empty Columns
Here’s the function that looks at columns after the blocks have stopped falling.
It is a fairly complex procedure. It starts on the left and looks at each column. If it notices that the bottom block is gone, it sets the flag foundEmpty to true.
From that point on, instead of looking at the columns for more empty ones, it simply sets all the blocks in the remaining columns to “fall” over to the left:
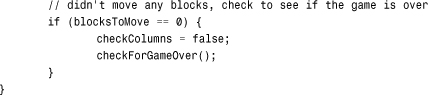
At the end of the function, we know whether any columns need to be moved. If not, then this is a good place to check to see whether the game is over:
The movement of the blocks “falling” to the left is handled by the moveBlocks function, which is called every frame. That function doesn’t really care whether the blocks are falling down or to the left—it handles both.
Game Over
One of my favorite programming tasks in puzzle games is trying to write a function to determine if a game is over. In the case of Collapsing Blocks, your first instinct might be to test each block to see if it would result in a group of blocks if clicked—and that would certainly work.
However, there are often trickier and more efficient ways to handle it, as is the case here.
We can simply loop through all the columns and rows and examine each block that is still present. If it matches a single block to the right or below, then there is a group of at least two blocks in the grid. Therefore, the game still has valid moves remaining.
If no such situation is found, then the game is over:

When the game is over, as with Match Three, we send the gameSprite to the back and jump to another frame:
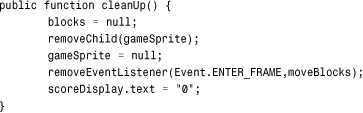
There is also a cleanUp function to dispose of all game elements when the user wants to play again:
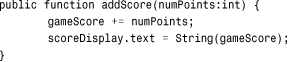
And, just to be complete, here is the addScore function:
Modifying the Game
Like most puzzle games, Collapsing Blocks is easy to customize for a theme. You can use any sort of icon for the four different block types. You can add a background to enhance the theme. In one version of this game, I made the blocks shopping carts to give it a supermarket checkout line theme.
You can also add bonuses. A simple bonus would be to mark some of the blocks with multipliers. Or, you could create the ultimate bonus and give players extra points if they eliminate all the blocks in their final move.
You can also easily vary the number of blocks in the grid and even try it with five block types, although this makes the game much harder to play.