
6. Using Acrobat with Microsoft Office Files (Windows)
Lesson overview
In this lesson, you’ll do the following:
• Convert a Microsoft Word file to Adobe PDF.
• Convert Word headings and styles to PDF bookmarks and Word comments to PDF notes.
• Change the Adobe PDF conversion settings.
• Convert a Microsoft PowerPoint presentation to Adobe PDF.
• Convert a Microsoft Excel file to Adobe PDF and send it for review.
This lesson will take approximately 45 minutes to complete. Copy the Lesson06 folder onto your hard drive if you haven’t already done so.
Using Acrobat PDFMaker, you can easily convert Microsoft Office documents to PDF. PDFMaker settings let you convert Word headings to bookmarks, include comments, and start email-based reviews.
Getting started
This lesson is designed for Windows users who have Microsoft Office applications such as Microsoft Word, Microsoft PowerPoint, and Microsoft Excel installed on their computers. You need to have one or more of these applications installed on your system to complete the exercises. If you do not use these Microsoft Office applications, skip this lesson. Visit the Adobe website (www.adobe.com) to see which versions of Microsoft Office are supported.
This lesson assumes you are using Microsoft Office 2010, but the steps are the same in Office 2007.
For information on converting Microsoft Outlook files to PDF, see Lesson 2.
About Acrobat PDFMaker
Acrobat PDFMaker makes it easy to convert Microsoft Office documents to PDF. When you install Acrobat in Windows, it automatically installs PDFMaker for supported Microsoft Office applications it finds on the system. In Microsoft Office 2007 and 2010 applications, PDFMaker options are available on the Acrobat ribbon. In earlier versions of Office, Acrobat adds a PDFMaker toolbar and an Adobe PDF menu to the application. You can control the settings used in the PDF conversion, automatically email the PDF file, and set up an email review process without ever leaving the Microsoft application. PDFMaker can also attach your Office source file to the PDF file.
PDF files are often substantially smaller than their source files. You can also create PDF/A-compliant files from Office files.

For Office 2007 and 2010 applications, if you don’t see the Acrobat ribbon, choose Add-Ins from the Options dialog box, and select Acrobat PDFMaker Office COM Addin. For Office 2003 and earlier, choose Help > About [application name], click Disabled Items, select Adobe PDF from the list, and click Enable. Then close and restart your Microsoft application.
Acrobat installs essentially the same buttons and commands in Word, PowerPoint, and Excel. There are, however, some application-specific differences.
Converting Microsoft Word files to Adobe PDF
Word is a popular authoring program that makes it easy to create a variety of types of documents. Word documents often include text styles and hyperlinks, and they may contain comments added during a review process. When you create an Adobe PDF document from your Word document, you can convert text using specific Word styles, such as headings, to Acrobat bookmarks, and you can convert comments to Acrobat notes. Hyperlinks in a Word document are preserved when it is converted to PDF. Your Adobe PDF file will look just like your Word file and retain the same functionality, but it will be equally accessible to readers on all platforms, regardless of whether they have the Word application. PDF files created from Word files can also be tagged, making the content easy to repurpose, and improving accessibility.
Converting Word headings and styles to PDF bookmarks
If your Word document contains headings and styles that you want to convert to linked bookmarks in Adobe PDF, you must identify these headings and styles in the Acrobat PDFMaker dialog box. (Word Heading 1 through Heading 9 styles are converted automatically.) You’ll convert a statement of work document that was formatted using custom styles. You’ll need to make sure that the styles used are converted to linked bookmarks when you create the Adobe PDF file.
1. Start Microsoft Word.
2. In Word, choose File > Open. Navigate to the Lesson06 folder, select the SOW draft.doc file, and click Open. Choose File > Save As, rename the file SOW draft_final.doc, and save it in the Lesson06 folder.
First, you’ll change the PDF settings to create bookmarks based on the styles used in the document.
3. In Word 2007 or 2010, click Preferences in the Acrobat ribbon. In earlier versions of Word, choose Adobe PDF > Change Conversion Settings.

The Acrobat PDFMaker dialog box contains the settings that control the PDF conversion. There are different tabs available, depending on the application. In Word, the dialog box includes a Word tab and a Bookmarks tab.
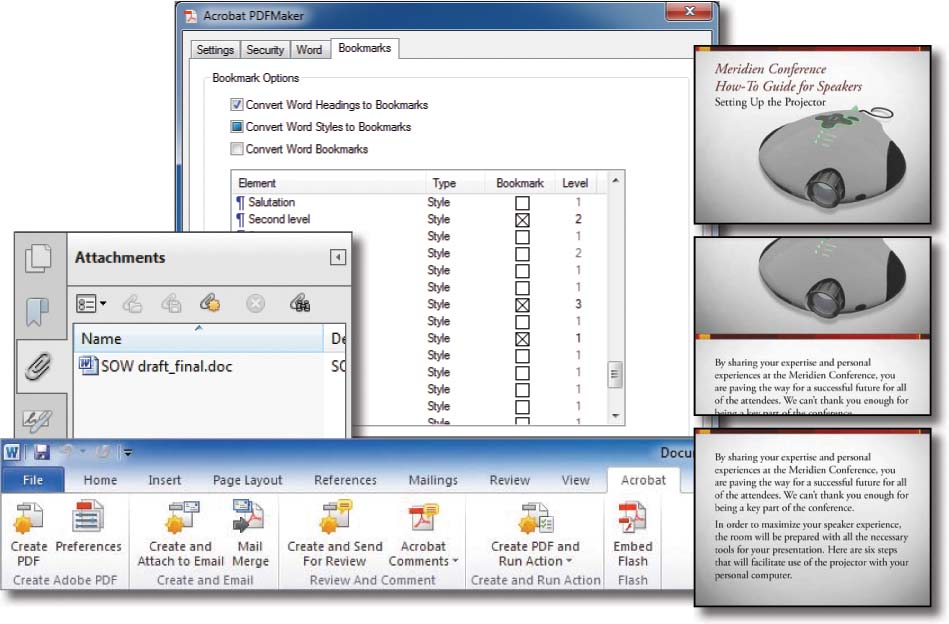
4. Click the Bookmarks tab to select which styles are used to create bookmarks.
5. Scroll down the list and select the Bookmark option for each of the following styles: Second Level, Third Level, Title, and Top Level. These are the styles you want to use to create bookmarks.

Notice that the level for Title and Top Level is automatically set to 1, Second Level is set to 2, and Third Level is set to 3. These are the hierarchical levels of PDF bookmarks. To change the level setting for a style, click its level number, and then choose a new level from the pop-up menu.
Any settings that you make in the Bookmarks tab apply only to the conversion of Word documents.
Converting Word comments to PDF notes
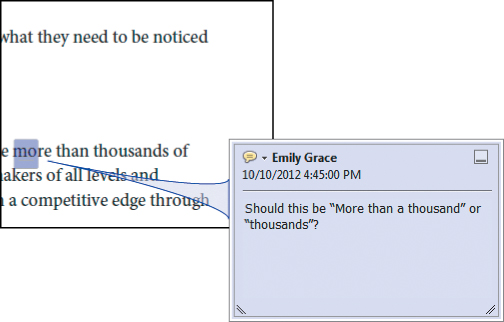
You needn’t lose any comments that have been added to your Word document when you convert the document to Adobe PDF: You can convert them to PDF notes. There are two comments in this document that need to remain available in the PDF.
1. Click the Word tab in the Acrobat PDFMaker dialog box, and select Convert Displayed Comments To Notes In Adobe PDF.
The Comments area displays information about the comments that will be included. Make sure that the box in the Include column is selected.
2. To change the color of the note in the Adobe PDF document, click repeatedly on the icon in the Color column to cycle through the available color choices. We chose blue.
3. To have the note automatically open in the PDF document, select the Notes Open option. You can always close the note in the PDF document later if you wish.

Any settings that you make in the Word tab apply only to the conversion of Word documents.
Specifying the conversion settings
In every Office application, PDFMaker includes the Settings tab, which is where you can select the conversion settings that determine how the PDF file is created. For most purposes, the predefined settings files (or presets) work well. However, if you need to customize the conversion settings, click Advanced Settings, and then make the changes appropriate for your file.
You’ll convert this document using the Standard settings file.
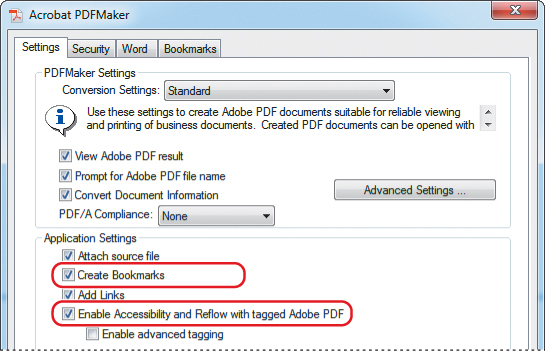
1. Click the Settings tab.
2. From the Conversion Settings menu, choose Standard.
3. Verify that View Adobe PDF Result is selected. When this option is selected, Acrobat automatically displays the Adobe PDF file you create as soon as the conversion is complete.
4. Make sure that Create Bookmarks is selected.
5. Make sure that Enable Accessibility And Reflow With Tagged Adobe PDF is selected. Creating tagged PDF makes your files more accessible.
For more information on making your PDF files accessible, see Lesson 3, “Reading and Working with PDF Files.”
6. Select Attach Source File to attach the Word document to the PDF file. This option can be useful if you want the viewer to have access to the original for editing purposes.
7. Click OK to apply your settings.
8. Choose File > Save to save your work so far.
Acrobat PDFMaker will use these conversion settings for converting Word documents until you change them.
Converting your Word file
Now that you’ve defined the settings to be used for the conversion, you’re ready to convert your Word file to Adobe PDF.
1. In Word 2007 or 2010, click the Create PDF button (![]() ) on the Acrobat ribbon. In earlier versions of Word, click the Convert To Adobe PDF button (
) on the Acrobat ribbon. In earlier versions of Word, click the Convert To Adobe PDF button (![]() ) on the Acrobat PDFMaker toolbar.
) on the Acrobat PDFMaker toolbar.
2. In the Save Adobe PDF As dialog box, name the file SOW draft.pdf, and save it in the Lesson06 folder.
PDFMaker converts the Word document to Adobe PDF. The status of the conversion is shown in the Acrobat PDFMaker message box.
Because you selected View Adobe PDF Result, Acrobat automatically displays your converted file. Notice that the Word comment has been converted to an open Adobe PDF note.
3. Scroll if necessary to see the first note. After you have read the sticky note, click the close box on the sticky note.
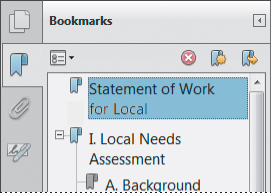
4. Click the Bookmarks button (![]() )in the navigation pane, and view the bookmarks that were created automatically.
)in the navigation pane, and view the bookmarks that were created automatically.
In Acrobat XI, you can edit headers and footers in PDF files created from Office 2007 and 2010 files.
In Acrobat XI, when you select a bookmark in the navigation pane, the link takes you directly to the heading, not the top of the page that contains the heading.
5. Click the Attachments button (![]() ) in the navigation pane to verify that your original Word file is attached.
) in the navigation pane to verify that your original Word file is attached.
6. When you have finished reviewing the file, close it.
7. Choose File > Exit to quit Acrobat.
8. Quit Microsoft Word.

If you simply want to convert your Microsoft Office file to Adobe PDF using the current PDFMaker conversion settings, drag the Office file onto the Acrobat XI icon on your desktop or into an empty document pane in the Acrobat work area.
Converting Excel documents and starting a review
When you convert Excel documents to PDF, you can easily select and order the worksheets to include, as well as retaining all links and creating bookmarks.
You’ll create an Adobe PDF file from an Excel document, and then start a formal review process in which the PDF file is emailed to selected reviewers. In addition to managing the email process, Acrobat also offers powerful file-management and comment-management tools to facilitate the review.
Converting the entire workbook
You can choose to convert an entire workbook, a selection, or selected sheets to PDF. In this exercise, you’ll convert an entire workbook.
1. Start Microsoft Excel.
2. Choose File > Open, navigate to the Lesson06 folder, select the Financials.xls file, and click Open. Then choose File > Save As, rename the file Financials_final.xls, and save it in the Lesson06 folder.
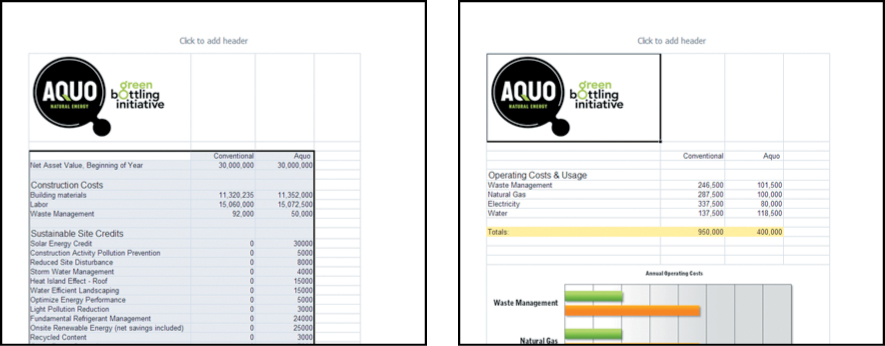
This Excel file includes two worksheets. The first lists construction costs, and the second shows operating costs. You’ll need to convert both of these sheets to include them in the PDF. You’ll start by changing the PDF conversion settings.
3. Click Preferences in the Acrobat ribbon. If you’re using Excel 2003 or earlier, choose Adobe PDF > Change Conversion Settings.
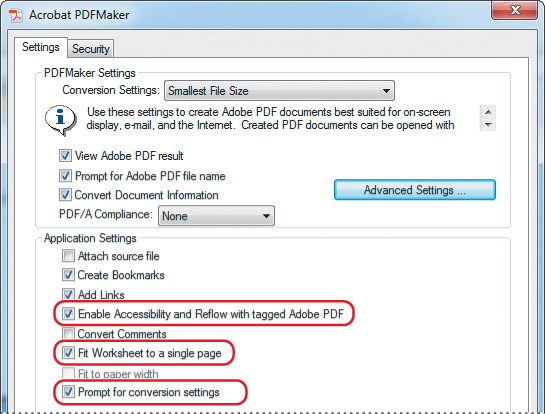
4. In the Settings tab of the Acrobat PDFMaker dialog box, choose Smallest File Size from the Conversion Settings menu, because you’re going to be emailing the PDF file.
5. Select the Fit Worksheet To A Single Page option.
6. Make sure that the Enable Accessibility And Reflow With Tagged Adobe PDF option is selected. When you create tagged PDF, you can more easily copy tabular data from PDF files back into spreadsheet applications. Creating tagged PDF also makes your files more accessible.
7. Select the Prompt For Conversion Settings option to open a dialog box at the beginning of the file conversion process, which will allow you to specify which sheets to include and in what order.
PDFMaker will use these conversion settings when converting Excel documents to PDF until you change the settings.
8. Click OK to apply your settings.
In Acrobat, you can convert an oversized worksheet to a PDF that is one sheet wide and several sheets long. In the Settings tab of the Acrobat PDFMaker dialog box, the Fit Worksheet To A Single Page option adjusts the size of each worksheet so that all the entries on that worksheet appear on the same page of the PDF. The Fit To Paper Width option adjusts the width of each worksheet so that all the columns on that worksheet appear on one page in the PDF.
Starting an email-based review
You can email a file for review using the Create And Send For Review button on the Acrobat ribbon (Excel 2007 or 2010) or the Convert To Adobe PDF And Send For Review button (earlier versions). The recipient will receive an email with instructions for how to participate in the review and return comments using Acrobat.com.
You can also use the Tracker feature in Acrobat to invite additional reviewers to join the process or to send reminders to reviewers. For more information on using Acrobat in review processes, see Lesson 9, “Using Acrobat in a Review Cycle.”
1. In Excel 2007 or 2010, click the Create And Send For Review button (![]() ) in the Acrobat ribbon. In Office 2003 or earlier, choose Adobe PDF > Convert To Adobe PDF And Send For Review.
) in the Acrobat ribbon. In Office 2003 or earlier, choose Adobe PDF > Convert To Adobe PDF And Send For Review.
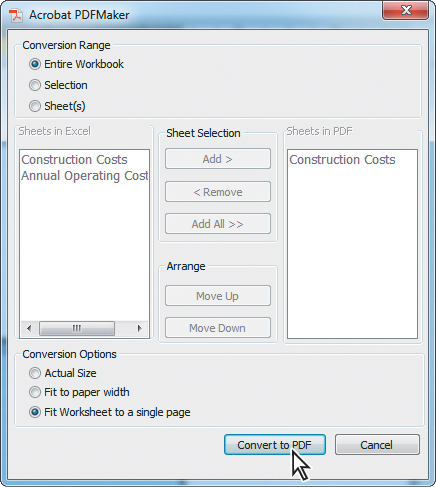
2. In the Acrobat PDFMaker dialog box, select Entire Workbook.
This is the dialog box where you’d select specific material or worksheets, if you wanted to.
3. Click Convert To PDF.
4. In the Save Adobe PDF File As dialog box, click Save to save the file as Financials_final.pdf in the Lesson06 folder.
The Send For Shared Review dialog box opens to guide you through the process.
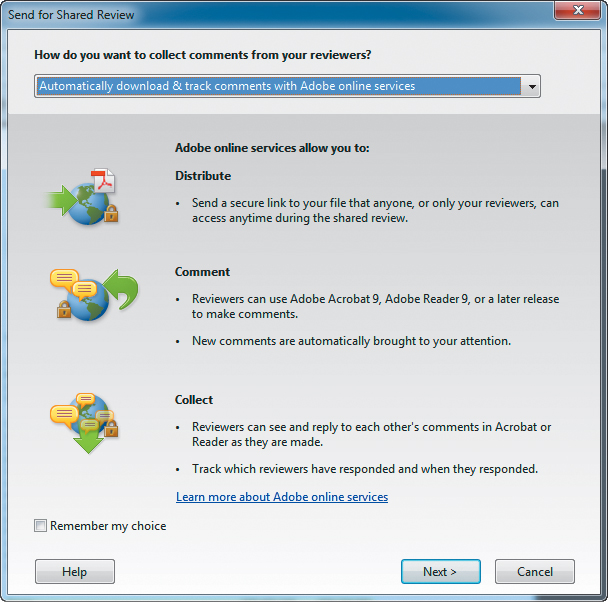
5. From the pop-up menu, choose whether to use Adobe online services or your own internal server for the review process. Click Next.
The steps vary depending on how you choose to collect data from your reviewers.
6. Follow the steps in the wizard. When you have completed the steps and emailed your file, close the PDF file and quit Microsoft Excel.
Though you can walk through the steps alone using multiple email addresses for yourself, you cannot fully experience the email review feature without the help of at least one other participant. We encourage you to experiment with this feature when you have a document to review with colleagues.
Using the spreadsheet split view
When you work with spreadsheets, it is often useful to be able to keep the column or row names in view while scrolling up and down columns or across rows. The Spreadsheet Split command in Acrobat lets you do this.
1. In Acrobat, choose File > Open. Navigate to the Lesson06 folder, and open the GE_Schedule.pdf file.
This schedule is difficult to read onscreen because the type size is small if you have the view set to Fit Page. You’ll use the Spreadsheet Split command to look more closely at some of the data. First you’ll change the view of the page.
2. Choose Window > Spreadsheet Split to divide the document pane into four quadrants.
You can drag the splitter bars up, down, left, or right to resize the panes.
In Spreadsheet Split view, changing the zoom level changes the magnification in all the quadrants. (In Split Window view, you can have a different zoom level in each of the two windows.)
3. Drag the vertical splitter bar to the left so that the categories fill the left pane.
4. Drag the horizontal splitter bar up so that it is directly below the column headings.
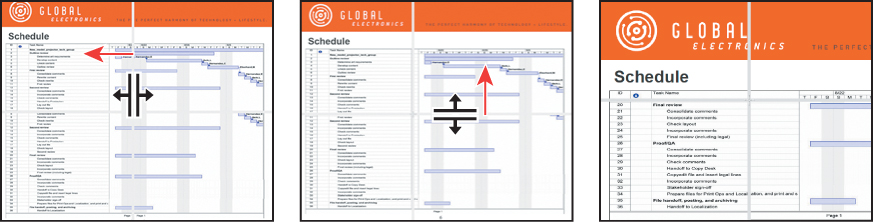
5. Use the vertical scroll bar to scroll down through the categories. Because the column headers remain visible, it is easy to evaluate the schedule for each task.
6. When you are finished exploring the Spreadsheet Split view, close the GE_Schedule.pdf file without saving your work.
Converting PowerPoint presentations
You can convert Microsoft PowerPoint presentations to PDF in the same way that you convert Microsoft Word documents. However, there are additional options available to help you preserve the look and feel of the presentation. You’ll convert a simple presentation and preserve its slide transitions.
1. Start PowerPoint. Choose File > Open, navigate to the Lesson06 folder, and select the Projector Setup.ppt file. Click Open.
A Push transition has been applied to the slides in this file.
2. Click Preferences in the Acrobat ribbon (PowerPoint 2007 or 2010) or choose Adobe PDF > Change Conversion Settings (earlier versions).
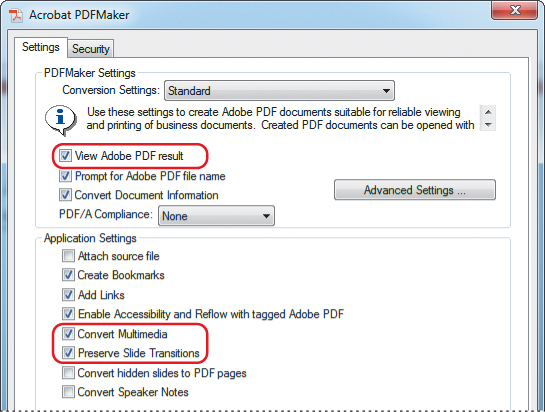
3. Select the Settings tab, and then select Convert Multimedia and Preserve Slide Transitions. Make sure View Adobe PDF Result is selected, too.
4. Click OK.
You can include speaker’s notes and hidden slides, and specify other settings.
5. Click Create PDF in the Acrobat ribbon (PowerPoint 2007 or 2010) or choose Adobe PDF > Convert to Adobe PDF (earlier versions). Then click Save in the Save Adobe PDF dialog box. Acrobat opens the PDF file after conversion.
6. In Acrobat, choose View > Full Screen Mode. Then press the arrow keys to move through the presentation. The Push slide transitions remain in the PDF file. Close the PDF file and PowerPoint.

Converting web pages from Internet Explorer
Acrobat XI adds a button and a menu to the toolbar of Internet Explorer 7 or later that both let you convert the currently displayed web page or portion of a web page to an Adobe PDF file, convert and print it, or convert and email it in one easy operation. When you print a web page that you have converted to an Adobe PDF file, the page is reformatted to a standard printer page size, and logical page breaks are added. You can be sure that your printed copy will have all the information on the web page that you see onscreen.

For more information on converting web pages from within Internet Explorer, see Lesson 2, “Creating Adobe PDF Files.”
Review questions
1. How can you be sure that Word styles and headings are converted to Acrobat bookmarks when you convert Word documents to Adobe PDF using PDFMaker?
2. How can you scroll through a spreadsheet in Acrobat without losing sight of the column headings?
3. Can you retain slide transitions when you save a PowerPoint presentation to PDF?
Review answers
1. If you want Word headings and styles to be converted to bookmarks in Acrobat, select them for conversion in the Acrobat PDFMaker dialog box. In Microsoft Word, click Preferences in the Acrobat ribbon (choose Adobe PDF > Change Conversion Settings in earlier versions of Word), and click the Bookmarks tab. Make sure that the required headings and styles are selected.
2. To see column headings while you review the content of a spreadsheet, choose Window > Spreadsheet Split, which divides the document pane into four quadrants. Move the divider bars where you want them, and then scroll through the rows.
3. Yes. To retain slide transitions, click Preferences in the Acrobat ribbon (or choose Adobe PDF > Change Conversion Settings in earlier versions of PowerPoint), and then make sure Preserve Slide Transitions is selected. PDFMaker uses those settings until you change them.