
9. Using Acrobat in a Review Cycle
Lesson overview
In this lesson, you’ll do the following:
• Discover multiple ways to use Acrobat in a document review process.
• Annotate a PDF file with the Acrobat commenting and markup tools.
• View, reply to, search, and summarize document comments.
• Import comments.
• Initiate a shared review.
This lesson will take approximately 60 minutes to complete. Copy the Lesson09 folder onto your hard drive if you haven’t already done so.
Robust commenting tools and collaboration features in Acrobat keep review cycles efficient and make it easy for stakeholders to give feedback.
About the review process
There are several ways to use Acrobat in a document review process. No matter which method you use, the workflow contains some core elements: the review initiator invites participants and makes the document available to them, reviewers comment, and the initiator gathers and works with those comments.
You can share any PDF document by email, on a network server, or on a website, and ask individuals to comment on it using Adobe Reader, Acrobat Standard, or Acrobat Pro. If you post the document or email it manually, you’ll need to keep track of returned comments and merge them on your own. If you’re requesting feedback from only one or two other people, this might be the most efficient way for you to work. For most reviews, however, you can gather comments more efficiently using a managed review process. Additionally, in a shared review, reviewers can see and respond to each others’ comments.
When you initiate an email-based review in Acrobat, a wizard helps you send the PDF file as an email attachment, track responses, and manage the comments you receive. Anyone with Acrobat or Reader can add comments to the PDF file.
When you initiate a shared review in Acrobat, a wizard helps you post the PDF file to a network folder, WebDAV folder, SharePoint workspace, or Acrobat.com, a secure web-based service. Through the wizard, you email invitations to reviewers, who then access the shared document, add comments, and read others’ comments using Acrobat or Reader. You can set a deadline for the review, after which no reviewers can publish additional comments.
Getting started
In this lesson, you’ll add comments to a PDF document, view and manage comments, and initiate a shared review. By definition, collaboration requires you to work with other people. Therefore, many of the exercises in this lesson will be more meaningful if you work through them with one or more colleagues or friends. However, if you are working independently, you can complete the exercises using alternative email addresses, available through web services such as Gmail and Yahoo! Mail. (See the legal agreements on their websites for information on how you may use their email accounts).
First, open the document you’ll work with.
1. In Acrobat, choose File > Open.
2. Navigate to the Lesson09 folder, and double-click the Profile.pdf file.
Adding comments to a PDF document
You can add comments to any PDF file, unless security has been applied to the document to prohibit commenting. In most cases, you’ll use the commenting features to provide feedback to a document’s author, but you may also find them useful to write notes to yourself as you’re reading documents. Acrobat includes several commenting tools. You’ll recognize some of them from the physical world. For example, the Sticky Note and Highlight Text tools are electronic versions of physical tools you may have on your desk.
In this exercise, you’ll use some of the commenting tools to provide feedback on an article about a fashion designer.
About the commenting tools
Acrobat provides several commenting and markup tools, designed for different commenting tasks. Most comments include two parts: the markup or icon that appears on the page, and a text message that appears in a pop-up note when you select the comment.
The commenting and markup tools are in the Annotations and Drawing Markups panels in the Comment pane. For detailed information about using each tool, see Adobe Acrobat XI Help.
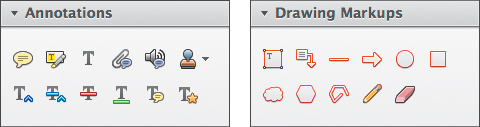
• Sticky Note tool (![]() ) – Create sticky notes, just as you would in the physical world. Click wherever you want the note to appear. Sticky notes are useful when you want to make overall comments about a document or a section of a document, rather than commenting on a particular phrase or sentence.
) – Create sticky notes, just as you would in the physical world. Click wherever you want the note to appear. Sticky notes are useful when you want to make overall comments about a document or a section of a document, rather than commenting on a particular phrase or sentence.
• Highlight Text tool (![]() ) – Highlight the text you want to comment on, and then type your comment.
) – Highlight the text you want to comment on, and then type your comment.
• Add Text tool (![]() ) – Type text that appears directly on the page; like other comments, it won’t change the document itself. You can move it, but unlike a pop-up note, you can’t hide it.
) – Type text that appears directly on the page; like other comments, it won’t change the document itself. You can move it, but unlike a pop-up note, you can’t hide it.
• Attach File tool (![]() ) – Attach a file, in any format, to the PDF document.
) – Attach a file, in any format, to the PDF document.
• Record Audio tool (![]() ) – Clarify your feedback in an audio recording. To record audio, you must have a built-in or removable microphone on your system.
) – Clarify your feedback in an audio recording. To record audio, you must have a built-in or removable microphone on your system.
• Stamp tool (![]() ) – Use a virtual rubber stamp to approve a document, mark it confidential, or perform several other common stamping tasks. You can also create custom stamps for your own purposes.
) – Use a virtual rubber stamp to approve a document, mark it confidential, or perform several other common stamping tasks. You can also create custom stamps for your own purposes.
To create a custom stamp, click the Stamp tool and choose Custom Stamps > Create Custom Stamp. Then select the image file you want to use.
• Insert Text tool (![]() ) – Add text at the insertion point. As with all the text commenting tools, your comments don’t affect the text in the PDF document, but they make your intention clear.
) – Add text at the insertion point. As with all the text commenting tools, your comments don’t affect the text in the PDF document, but they make your intention clear.
• Replace Text tool (![]() ) – Indicate which text should be removed, and type the text that should replace it.
) – Indicate which text should be removed, and type the text that should replace it.
• Strikethrough tool (![]() ) – Indicate which text should be deleted.
) – Indicate which text should be deleted.
• Underline tool (![]() ) – Indicate which text should be underlined.
) – Indicate which text should be underlined.
• Add Note To Text tool (![]() ) – Highlight text, and add a note regarding the highlighted content.
) – Highlight text, and add a note regarding the highlighted content.
• Text Correction Markup tool (![]() ) – Mark up text for insertion, replacement, or deletion. This tool combines the Insert Text, Replace Text, and Strikethrough tools.
) – Mark up text for insertion, replacement, or deletion. This tool combines the Insert Text, Replace Text, and Strikethrough tools.
• Text Box tool (![]() ) – Create a box that contains text, positioned anywhere on the page, and at any size. It remains visible on the page.
) – Create a box that contains text, positioned anywhere on the page, and at any size. It remains visible on the page.
• Callout tool (![]() ) – Specify the area you’re commenting on without obscuring it. Callout markups have three parts: a text box, a knee line, and an end-point line. Drag handles to resize each part and position it exactly where you want it.
) – Specify the area you’re commenting on without obscuring it. Callout markups have three parts: a text box, a knee line, and an end-point line. Drag handles to resize each part and position it exactly where you want it.
• Line (![]() ), Arrow (
), Arrow (![]() ), Oval (
), Oval (![]() ), Rectangle (
), Rectangle (![]() ), Cloud (
), Cloud (![]() ), Polygon (
), Polygon (![]() ), Connected Lines (
), Connected Lines (![]() ), Pencil(
), Pencil(![]() ), and Eraser (
), and Eraser (![]() ) tools – Use the drawing tools to emphasize areas on the page or communicate your thoughts visually, especially when reviewing graphical documents.
) tools – Use the drawing tools to emphasize areas on the page or communicate your thoughts visually, especially when reviewing graphical documents.
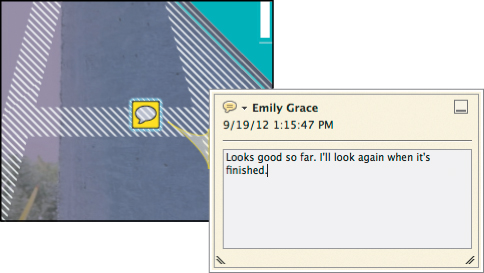
Adding sticky notes
You can attach a sticky note anywhere in a document. Because notes can easily be moved, they are best suited to comments about the overall content or layout of a document, rather than specific phrasing. You’ll add a sticky note on the first page of this document.
1. Click Comment to open the Comment pane.
2. Click Annotations if the Annotations panel isn’t already open, and then select the Sticky Note tool.
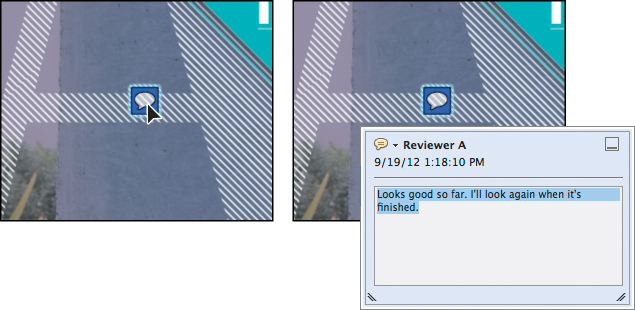
3. Click anywhere on the page.
A sticky note opens. The name in the Identity panel of the Acrobat Preferences dialog box automatically appears on the note, as well as the date and time.
4. Type Looks good so far. I’ll look again when it’s finished.
5. Click the arrow that appears before the name in the Sticky Note dialog box, and choose Properties from the pop-up menu.
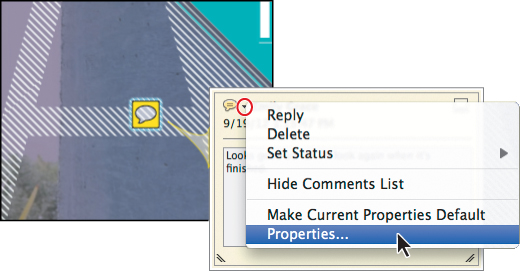
6. Click the Appearance tab, and then click the Color swatch.
7. Select a blue swatch. The sticky note changes color automatically.
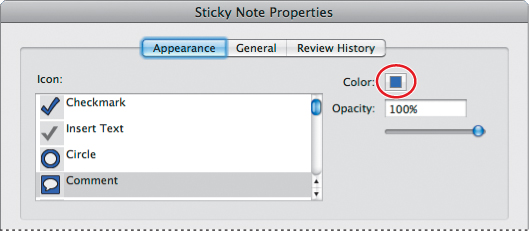
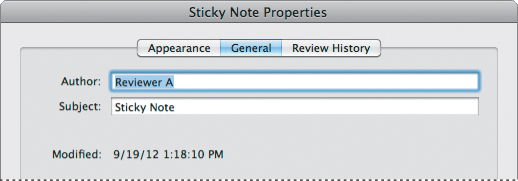
8. Click the General tab.
9. In the Author box, type Reviewer A.
You can change the name attached to a comment. You may want to do that, for example, if you are using someone else’s computer.
10. Click OK.
The blue sticky note is closed on the page. To reopen it, just double-click the sticky note icon.
Emphasizing text
Use the Highlight Text tool to emphasize specific text in a document. After highlighting the text, you can also add a message. You’ll make a comment using the Highlight Text tool in this document.
1. Scroll to page 3 in the document.
2. Select the Highlight Text tool (![]() ) in the Quick Tools toolbar.
) in the Quick Tools toolbar.
You can select the Sticky Note tool and the Highlight Text tool in the Annotations panel in the Comment pane or in the Quick Tools toolbar. You can add other commenting and markup tools to the Quick Tools toolbar by clicking the Customize Quick Tools button in the toolbar.
3. Drag the pointer over “ital” at the bottom of the second paragraph on the page. The text is highlighted in yellow.
4. Double-click the highlighted text. A comment message box opens.
5. Type bad line break.

6. Click the close button (![]() ) in the upper right corner of the comment box to close it. Alternatively, you can press the Escape key to close the comment box.
) in the upper right corner of the comment box to close it. Alternatively, you can press the Escape key to close the comment box.
Marking text edits
You can clearly communicate which text should be deleted, inserted, or replaced using the text-editing tools. You’ll suggest some text changes to the profile article.
1. Scroll to page 2 of the document.
2. Select the Replace Text tool (![]() ) in the Annotations panel in the Comment pane.
) in the Annotations panel in the Comment pane.
3. Select the words “Self reinvention” at the top of the page.
4. Type Self-reinvention to replace it.
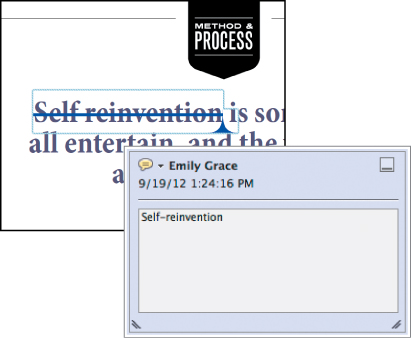
A comment box appears with the text “Self-reinvention” in it, and the original text is crossed out. An insertion point appears in the original text.
5. Click the close button in the comment box.
6. Select the Insert Text tool (![]() ) in the Annotations panel. Then click an insertion point after “dress” in the last paragraph in the right column.
) in the Annotations panel. Then click an insertion point after “dress” in the last paragraph in the right column.
7. Type a dash (-) to indicate that a hyphen should be inserted in the text.

The comment box opens with “-” in it. An insertion point icon appears in the original text.
8. Click the close button in the comment box.
9. Select the Strikethrough tool (![]() ) in the Annotations panel.
) in the Annotations panel.
10. Select the words “Which raises a really good question:” in the second paragraph in the right column.
A red line appears through the text, indicating deletion.

11. Go to page 5, select the Text Correction Markup tool (![]() )in the Annotations panel, and click OK in the informational dialog box that appears.
)in the Annotations panel, and click OK in the informational dialog box that appears.
12. Select the word “Emmanuelle” at the bottom of the left column, and then type “Emmanuelle” to indicate that quotation marks should be added to the text.

The Text Correction Markup tool gives you flexibility; it’s handy to use if you’re not sure which kind of correction you’re going to make.
13. Choose File > Save As, and name the file Profile_review.pdf. Save it in the Lesson09 folder.
Working with comments
You can view comments on the page, in a list, or in a summary. You can import, export, search, and print comments. You can also reply to comments if you’re participating in a shared review or will be returning the PDF file to a reviewer in an email-based review. In this exercise, you’ll import comments from reviewers, sort comments, show and hide comments, search for comments, and change their status.
Importing comments
If you use a managed shared review process, comments are imported automatically. However, if you’re using an email-based review process or collecting comments informally, you can import comments manually. You’ll import comments from three reviewers into the draft of the designer profile.
1. With the Profile_review.pdf file open, expand the Comments List in the Comment pane if comments aren’t already displayed. The only comments in the document are the ones you added.
2. From the options menu in the Comments List panel, choose Import Data File.
3. Navigate to the Lesson09/Comments folder.
4. Shift-click to select the following files:
• Profile_Art_Director.pdf
• Profile_Linda.pdf
• Profile_Stan.fdf
5. Click Open (Windows) or Select (Mac OS).
Two of the documents are PDF files with comments included; the FDF file is a data file that contains comments that a reviewer exported.
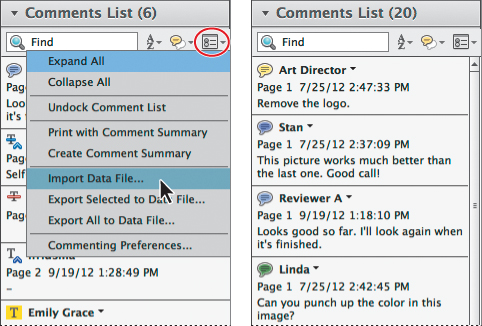
If you see a message that comments were made on a different version of the document, click OK or Yes to import them anyway.
Acrobat imports the comments and displays them in the comments list.
As a reviewer, you can export comments to a data file (named with an .fdf extension) to reduce file size, especially if you’re submitting comments by email. To export comments, choose Export All To Data File or Export Selected To Data File from the options menu in the Comments List panel.
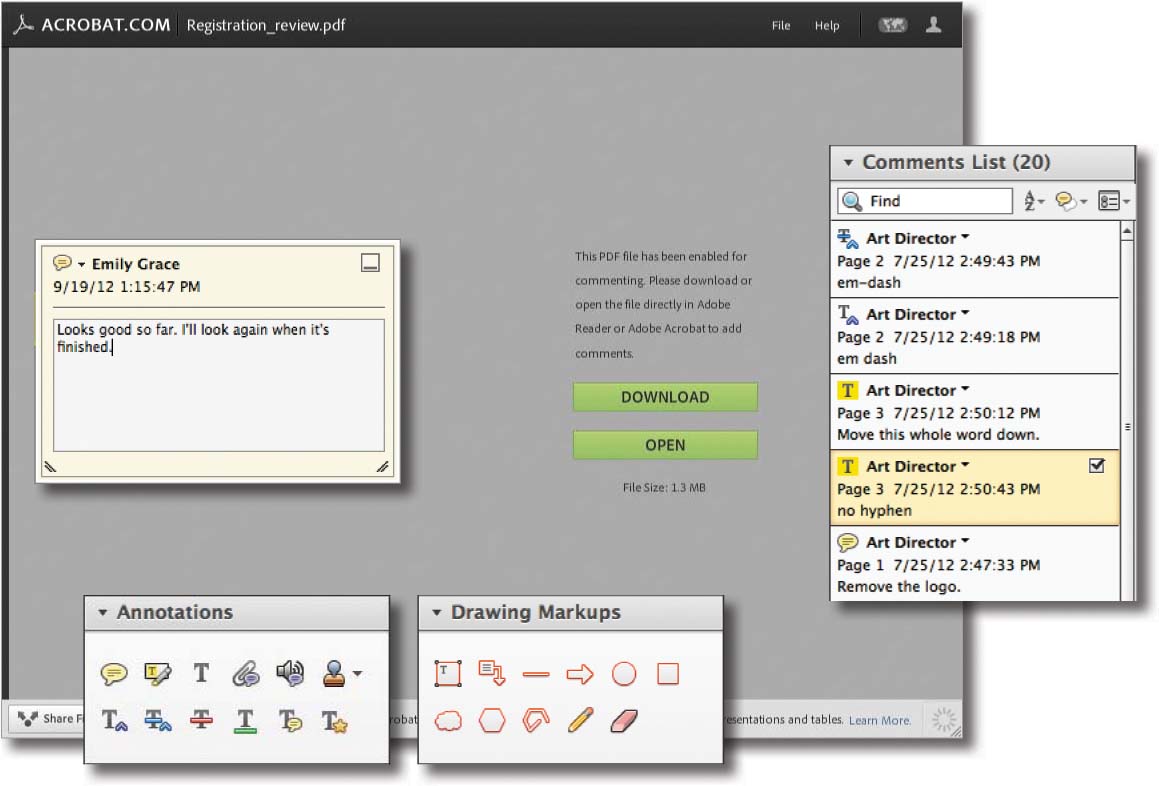
Viewing comments
The comments list appears in the Comment pane when you import comments. The comments list includes every comment in the document, with the comment author’s name, the type of comment, and the comment itself.
1. Scroll through the comments list. By default, comments are listed in the order they appear in the document.
2. In the Comments List toolbar, click the Sort Comments button (![]() ), and then choose Author.
), and then choose Author.
Acrobat rearranges the comments so that they are categorized by author name, with authors appearing in alphabetical order.
3. Click the Art Director’s comment about a hyphen. When you click it, Acrobat moves the page to the comment location so that you can see it in context.
4. Click the check box next to the comment so that it has a check mark in it.
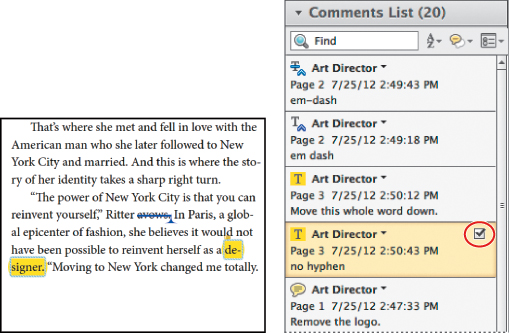
You can add check marks to indicate that you’ve read a comment, replied to it, discussed it with someone, or anything else that is meaningful to you.
5. Click the Filter Comments button (![]() ) in the Comments List toolbar, and choose Checked > Unchecked.
) in the Comments List toolbar, and choose Checked > Unchecked.
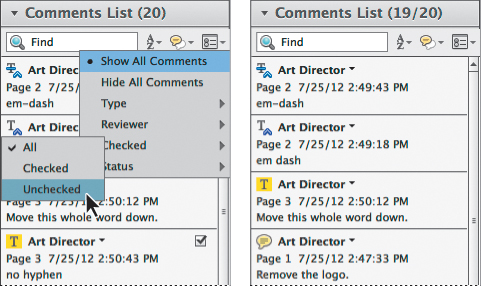
The comment you checked is no longer listed, but it remains in the document. You can use the filter options to declutter the comments list and focus on the comments you want to work with, whether you want to see only text edits, comments by a particular reviewer, or comments that meet other criteria.
6. Click the Filter Comments button again, and choose Show All Comments.
All the comments are listed again.
7. In the Comments List toolbar, type logo in the Find box.
Only one comment appears in the list, the only comment that includes the word “logo.” You can use the Find box to search for any text in comments.
8. Select the comment, and then click the arrow in the comment, and choose Reply. A reply box opens in the comments list, with your name next to it.
9. Type Legal says the logo is required, per Janet.
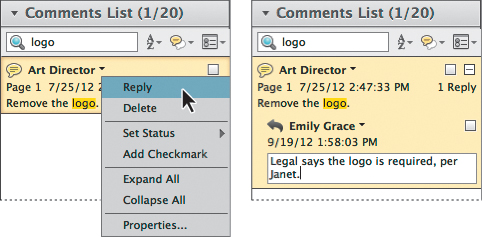
The reviewer will see your reply only if you are using a shared review process or if you email a saved copy of the PDF file to the reviewer.
10. With the last comment still selected, click the arrow in the comment again, and choose Set Status > Completed.
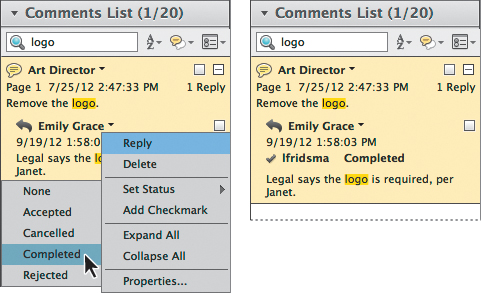
You can set the status of each comment for your own records and to show reviewers how their comments were handled.
11. Close the document; save the changes if you like.
Initiating a shared review
In a shared review, all participants can view and respond to each others’ comments. Using a shared review is an effective way to let reviewers resolve conflicting opinions, identify areas for research, and develop creative solutions during the review process. You can host a shared review on a network folder, WebDAV folder, SharePoint workspace, or Acrobat.com. For this exercise, you’ll use Acrobat.com to host a shared review. You’ll need to invite at least one other person to participate. If you are working on your own, you may want to create an alternative email address using a free web service such as Gmail or Yahoo.
Inviting reviewers
You’ll use the Send For Shared Review wizard to invite reviewers to participate in a shared review of a document.
1. Decide who you will invite to participate in a shared review, and make sure you have their email addresses. If you are working on this lesson alone, create an alternative email address that you can send an invitation to.
2. Choose File > Open.
3. Navigate to the Lesson09 folder, and double-click the Registration.pdf file.
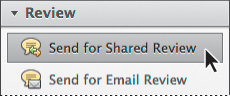
4. In the Comment pane, open the Review panel. Then select Send For Shared Review.
5. Select Automatically Download & Track Comments With Adobe Online Services from the pop-up menu at the top of the Send For Shared Review dialog box.
6. Click Next.
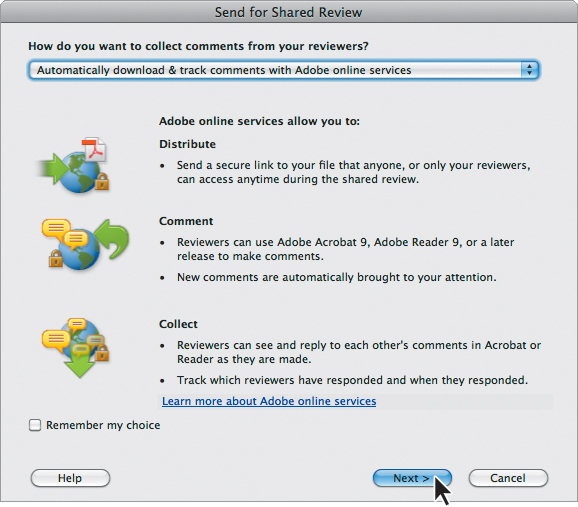
7. If you are prompted for your Adobe ID and password, enter them, click Sign In, and proceed to step 8. If you don’t have an Adobe ID, click Create Adobe ID, and then complete the form online. Read the services agreement, and then select I Have Read And Agreed To the Following. Then click Next. Click Agree if the Acrobat.com Services Agreement dialog box appears.
Adobe online services authenticates your Adobe ID if you signed in or have previously signed in, or creates your Adobe ID if you required a new one.
8. Enter the email addresses for people you want to invite to the shared review.
9. Customize the message that will be sent to participants, or accept the default message.
When you create an Adobe ID, you’ll receive an email confirmation. Reply to that email within three days to verify your Adobe ID. You do not need to interrupt the shared review workflow to confirm the Adobe ID, though.
10. Select Open Access from the Access Level menu, so that anyone who has the URL can participate.
The Limit Access option restricts access to the participants you invite.
11. Click Send.
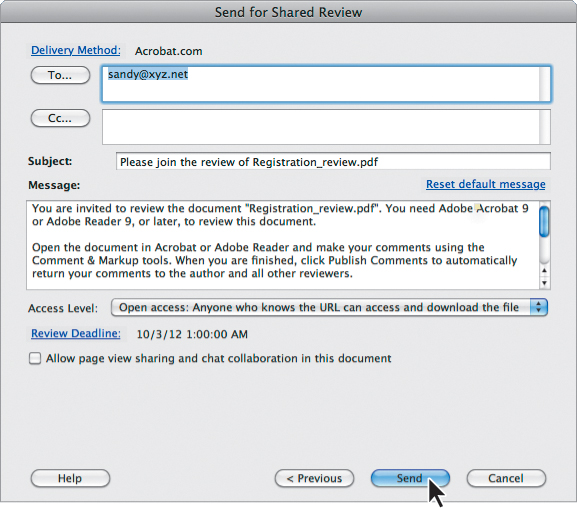
If you see a message warning you that the email addresses are not in your address book, click OK.
The Acrobat.com server sends invitation email messages with a link to the document on Acrobat.com. Acrobat saves your document to Acrobat.com and to your local hard drive. Depending on your email application and security settings, your email application may open.
12. Close the document.
Participating in a shared review
You or your colleague will participate in the shared review, adding comments for others to view.
1. If you’re working alone, open the email invitation you sent to an alternative email address. If you’re working with a colleague or friend, ask them to open the email invitation you sent and to follow the steps below.
2. Click the link to the PDF file in the invitation to go to Acrobat.com.
3. If prompted, log in to Acrobat.com with an Adobe ID.
4. Click Download. If prompted, click Pick A Location, and then select a location for the file on your computer.

5. Open or double-click the downloaded file to open the PDF file in Acrobat.
6. If a Shared Review dialog box appears, click Connect, and then enter your Adobe ID if prompted.
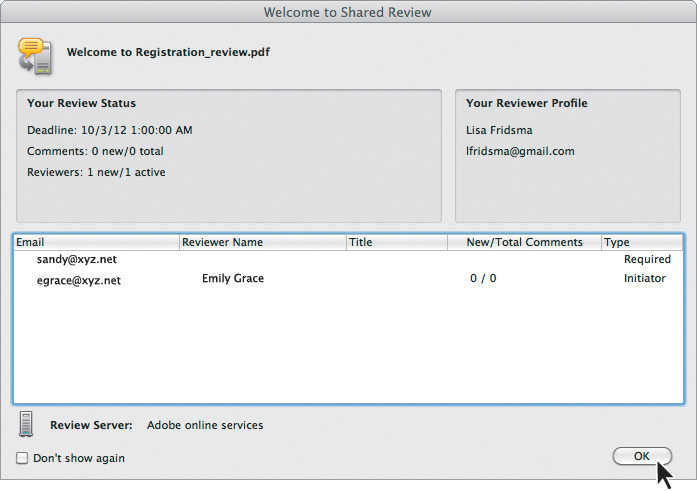
7. In the Welcome To Shared Review dialog box, click OK.
8. Add several comments to the PDF file using the commenting tools.
9. Click Publish Comments in the document message bar to save comments to the server.

10. Close the document. You do not need to save your changes.
Because this is a shared review, you can see comments from other reviewers as well. Click Check For New comments to download and view those comments.
Tracking review comments
You can keep track of reviewers’ comments and reply to comments yourself from within Acrobat. You’ll open the review PDF file and check for new comments.
1. In Acrobat, choose File > Open.
2. Navigate to the Lesson09 folder, and double-click the Registration_review.pdf file to open it.
3. Click Connect in the Shared Review dialog box if one appears, and OK in the Welcome Back To Shared Review window.
Acrobat saves a review version of your document when you send it for shared review, and it automatically downloads any new comments that have been added.
4. In the document message bar, click Check For New Comments.

Acrobat reports and displays any additional comments.
5. Select a comment, click the arrow in the comment, and choose Reply.
6. Type a reply to the reviewer.
7. Click Publish Comments in the document message bar.
Acrobat publishes your reply to the server.
8. In the Review panel, select Track Reviews.
Tracker opens.
9. Select the Registration_review.pdf file on the left. Tracker displays the list of reviewers you invited to participate and how many comments each reviewer has made. It also lists the deadline for the review, and lets you send email reminders to reviewers or add more participants. You can also change the deadline.
10. Close Tracker, and then close the document.
In Acrobat Pro, you can see what’s changed between two versions of a PDF document. Choose View > Compare Documents, specify the document, and select the type of document. Acrobat highlights changes.
Review questions
1. How do you add comments to a PDF document?
2. How can you consolidate comments made by several reviewers?
3. What is the difference between an email-based review process and a shared review process?
Review answers
1. You can add comments to a PDF using any of the commenting and markup tools in Acrobat. Open the Comment pane to see all the tools available in the Annotations and Drawing Markups panels. To use a tool, select it, click on the page, and then select the text you want to edit, or draw your markup.
2. To consolidate review comments, open the original PDF file that you sent out for review, and then choose Import Data File from the Comments List panel menu. Select the PDF or FDF files that reviewers returned to you, and click Select. Acrobat imports all the comments into the original document.
3. In an email-based review process, each reviewer receives the PDF document through email, makes comments, and returns the PDF document through email; reviewers do not see each others’ comments.
In a shared review process, you post the PDF document to a central server or folder, and then invite reviewers to make their comments. When reviewers publish comments, they can be seen by all other reviewers, so everyone can respond to each other. You can also enforce a deadline more easily with a shared review process, as commenting tools are no longer available to reviewers after the deadline.