
Animation is all about making changes over time—changes to an object or image’s position, opacity, scale, and other properties. In this lesson, you will get more practice animating the layers of a Photoshop file, including dynamically remapping time.
In this lesson, you’ll learn how to do the following:
<objective>Animate a layered Photoshop file.
</objective> <objective>Duplicate an animation using the pick whip.
</objective> <objective>Apply a track matte to control the visibility of layers.
</objective> <objective>Animate a layer using the Corner Pin effect.
</objective> <objective>Apply the Lens Flare effect to a solid layer.
</objective> <objective>Use time remapping and the Layer panel to dynamically retime footage.
</objective> <objective>Edit Time Remap keyframes in the Graph Editor.
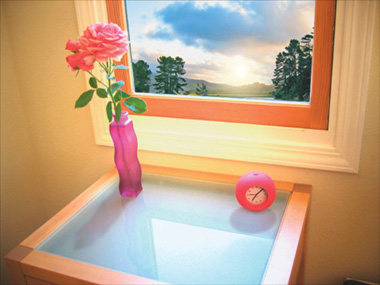
</objective>After Effects provides several tools and effects that allow you to simulate motion video using a layered Photoshop file. In this lesson, you will import a layered Photoshop file of the sun appearing through a window, and then you will animate it to simulate the motion of the sun rising through the panes of glass. This is a stylized animation in which the motion is first accelerated, and then slows down as clouds and birds move through the window’s frame at the end.
</feature>Make sure the following files are in the AE7_CIB > Lessons > Lesson05 folder on your hard disk, or copy them from the Adobe After Effects 7.0 Classroom in a Book DVD now.
In the Assets folder: clock.mov, sunrise.psd
In the Sample_Movies folder: Lesson05_regular.mov, Lesson05_retimed.mov
Open and play the two sample movies to see what you will create in this lesson. The first sample movie, Lesson05_regular.mov, is the straightforward time-lapse animation that you will create in this lesson. The second sample movie, Lesson05_retime.mov, is the same animation after time has been remapped in it, which you will also do in this lesson. When you’re done, quit the QuickTime player. You may delete the sample movies from your hard disk if you have limited storage space.
When you begin the lesson, restore the default application settings for After Effects. See “Restoring default preferences,” page 5.
Press Ctrl+Alt+Shift (Windows) or Command+Option+Shift (Mac OS) while starting After Effects. When asked whether you want to delete your preferences file, click OK.
After Effects opens to display an empty, untitled project.
Choose File > Save As.
In the Save Project As dialog box, navigate to the AE7_CIB > Lessons > Lesson05 > Finished_Project folder.
Name the project Lesson05_Finished.aep, and then click Save.
You need to import one footage item for this lesson.
Double-click an empty area of the Project panel to open the Import File dialog box.
Navigate to the AE7_CIB > Lessons > Lesson05 > Assets folder on your hard disk and select the sunrise.psd file.
Choose Import As > Composition – Cropped Layers. This makes the dimensions of each layer match the layer’s content.
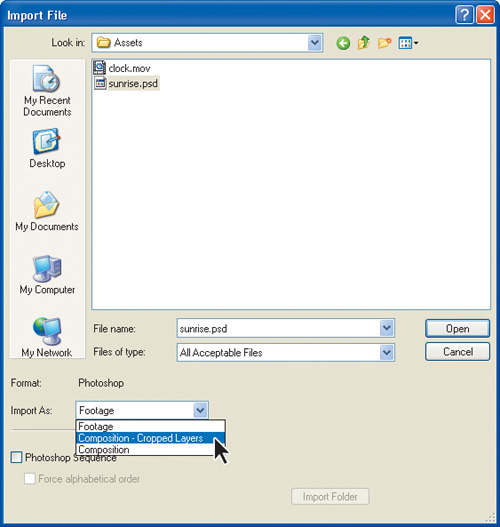
Click Open.
Before continuing, take a moment to study the layers of the file you just imported.
In the Project panel, expand the Sunrise Layers folder to see the Photoshop layers. Resize the Name column to make it wider and easier to read, if necessary.
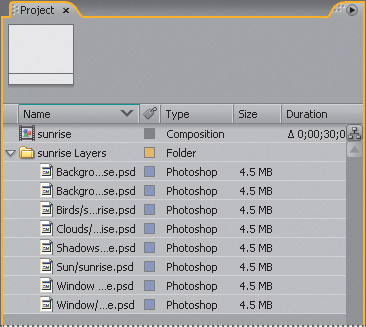
Each of the elements that will be animated in After Effect—the shadows, birds, clouds, and sun—is on a separate layer. In addition, there is one layer representing the initial, predawn lighting conditions in the room (Background), and a second layer that represents the final, bright daylight conditions in the room (Background Lit). Similarly, there are two layers for the two lighting conditions outside the window: Window and Window Lit.
After Effects preserves the layer order and transparency data from the source Photoshop document. It also preserves other features, such as adjustment layers and type, which you don’t happen to be using in this project.
For this lesson, you’ll use the imported Photoshop file as the basis of the composition.
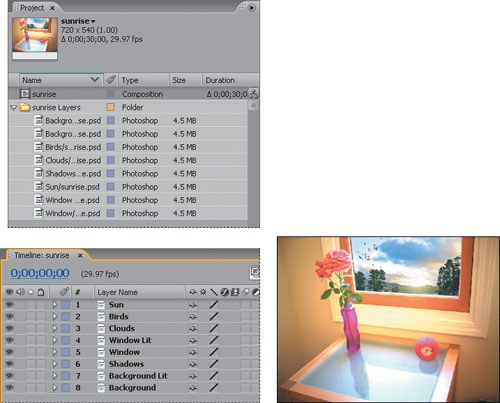
The first part of the animation involves lightening the dark room. You’ll animate this lighting condition by using Opacity keyframes.
In the Timeline panel, click the Solo boxes (
 ) in the Switches column for the Background Lit and Background layers. This isolates the layers to speed animating, previewing, and rendering.
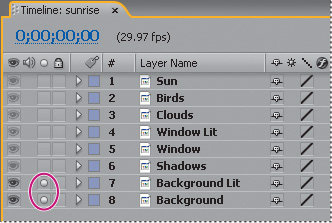
Currently, the lit background is on top of the regular (darker) background, obscuring it and making the initial frame of the animation light. However, you want the animation to start dark, and then lighten. To accomplish this, you will make the Background Lit layer initially transparent, and have it “fade in” and appear to lighten the background over time.
Go to 5:00.
Select the Background Lit layer in the Timeline panel and press T to reveal its Opacity property.
Click the stopwatch icon (
 ) to set an Opacity keyframe. Note that the Opacity value is 100%.
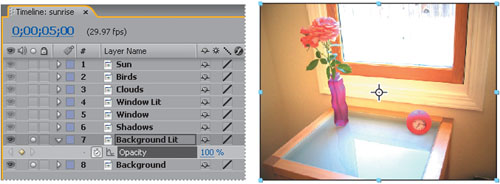
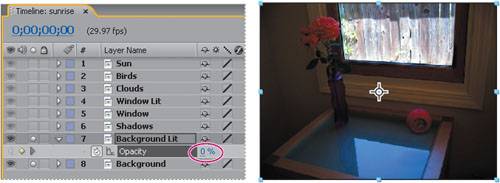
Press the Home key to go to 0:00, and then set the Opacity for the Background Lit layer to 0%. After Effects adds a keyframe. Now, when the animation begins, the Background Lit layer is transparent, which allows the dark Background layer to show through.
That’s it. Watch a preview of the dark-to-light animation.
Click the Play/Pause button (
 )in the Time Controls panel, or press the spacebar. The interior of the room transitions gently from dimly to brightly lit.
Press the spacebar to stop playback anytime after 5:00.
Choose File > Save.
Now, you need to lighten the view through the window. You’ll do this by using the pick whip to duplicate the animation you just created. You can use the pick whip to create expressions that link the values of one property or effect to another. To use the pick whip, you simply drag it from one layer to another, and the property that you set or animated in the first layer is copied into the second layer.
Press the Home key to go to the beginning of the time ruler.
Click the Solo icons (
)for the Background Lit and Background layers to restore the view of the other layers, including Window and Window Lit. Make sure to leave the Opacity property for the Background Lit layer visible.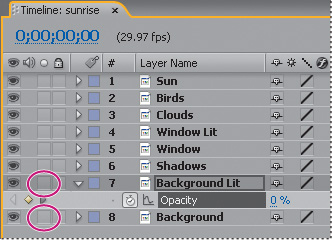
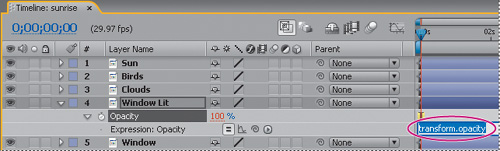
Select the Window Lit layer and press T to reveal its Opacity property.
Alt-click (Windows) or Option-click (Mac OS) the Opacity stopwatch for the Window Lit layer to add an expression for the default Opacity value, 100%. The words transform.opacity appear in the time ruler for the Window Lit layer.
With the transform.opacity expression selected in the time ruler, click the pick whip icon (
 )on the Window Lit Expression: Opacity line and drag to the Opacity property name in the Background Lit layer. When you release, the pick whip snaps, and the expression in the Window Lit layer time ruler now reads “thisComp.layer(“Background Lit”).transform.opacity.” This means that the Opacity value for the Background Lit layer (0%) replaces the previous Opacity value (100%) for the Window Lit layer.
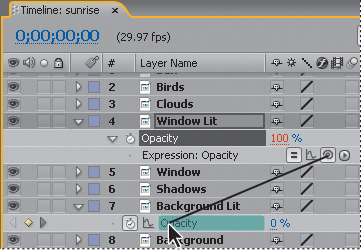
Drag the current-time indicator from 0:00 to 5:00, and notice that the Opacity values for the two layers match.
Press the Home key and then the spacebar to preview the animation again, and notice that the sky outside the window lightens as the room inside the window does.
Press spacebar to stop playback.
Select the Window Lit and Background Lit layers in turn, and press U to hide their properties and tidy up the Timeline panel for your next task.
Choose File > Save to save your project.
Now that the lighting is under control, it’s time to animate the movement of the sun, the birds, and the clouds.
The scenery outside the window is unrealistically static. For one thing, the sun needs to actually rise. In addition, the clouds need to shift and the birds need to fly to bring this scene to life. You’ll start by making the sun rise in the sky by setting keyframes for its Position, Scale, and Opacity properties.
In the Timeline panel, select the Sun layer and click the triangle in the Label column to reveal the Transform property name, and then click the next triangle to see all of the Transform properties.
Go to 4:07 and click the stopwatch icons (
)to set keyframes for the Position, Scale, and Opacity properties at their default values.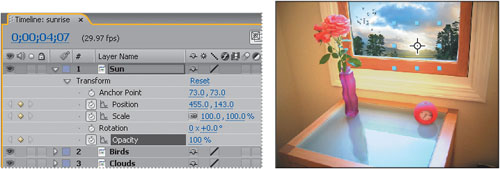
Go to 3:13.
Still working with the Sun layer, set its Scale to 33.3, 33.3% and its Opacity to 10%. After Effects adds a keyframe for each property.
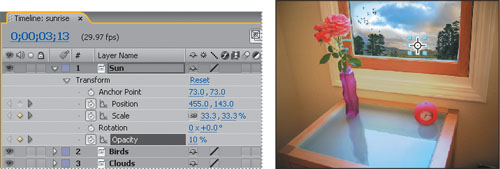
For the Position property of the Sun layer, set the y value to 18.0, and then set the Scale values to 150.0, 150.0%. After Effects adds two keyframes.
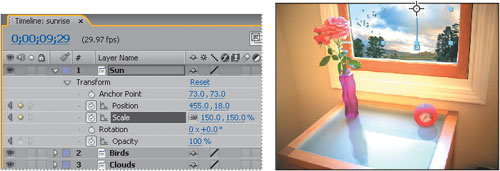
You’ve just set keyframes that instruct the sun to move up and across the sky, and become slightly larger and brighter as it rises. Next, animate the birds and the clouds, and then watch a preview of all the animations at once.
Select the Sun layer and then press UU to hide its Transform properties so that you have more space in the Timeline panel.
Next, you’ll animate the motion of the birds flying by.
Select the Birds layer in the Timeline panel and press P to reveal its Position property.
Go to 4:20 and set the Position values for the Birds layer to 200.0, 49.0. Then, click the stopwatch (
)to add a Position keyframe.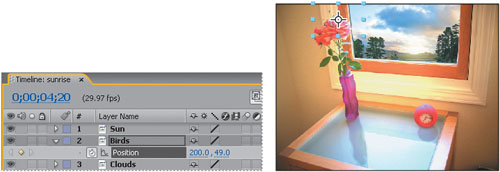
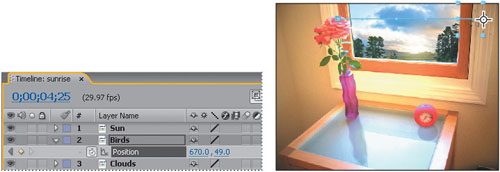
Go to 4:25 and set the Position values of the Birds layer to 670.0, 49.0. After Effects adds a keyframe.
Select the Birds layer and press U to hide its Position property.
Next, animate the shifting and drifting of the clouds in the sky.
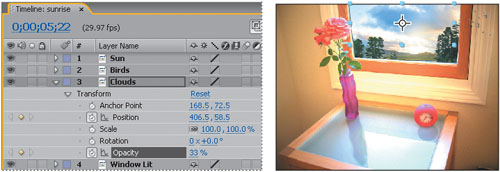
Select the Clouds layer in the Timeline panel and expand its Transform properties.
Go to 5:22 and click the stopwatch icon (
)for the Position property to set a Position keyframe at the current value (406.5, 58.5).Still at 5:22, set the Opacity for the Clouds layer to 33%, and click the stopwatch icon to set an Opacity keyframe.
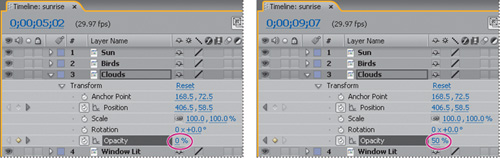
Go to 5:02 and set the Clouds layer Opacity value to 0%. After Effects adds a keyframe.
Go to 9:07 and set the Clouds layer Opacity value to 50%. After Effects adds a keyframe.
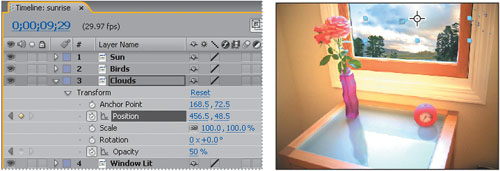
Go to the last frame of the composition by pressing the End key.
Set the Position of the Clouds layer to 456.5, 48.5. After Effects adds a keyframe.
Now, preview the animation.
Press the Home key to go to 0:00, click on the pasteboard of the Composition panel to deselect the paths in the image, and then press the spacebar to preview the animation. The sun rises in the sky, the birds fly by (very quickly), and the clouds drift. However, there’s a fundamental problem: These elements all overlap the window frame—the birds even appear to be flying inside the room. You’ll solve this next.
Press the spacebar to stop playback, select the Clouds layer in the Timeline panel, click the triangle to hide its properties, and then choose File > Save.
To solve the problem of the sun, birds, and clouds overlapping the window frame, you must first adjust the hierarchy of the layers within the composition, and then you will use an alpha track matte to allow the outside scenery to show through the window, but not appear to be inside the room.
You’ll start by precomposing the Sun, Birds, and Clouds layers into one composition.
Shift-click to select the Sun, Birds, and Clouds layers in the Timeline panel.
Choose Layer > Pre-Compose.
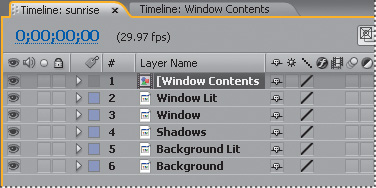
In the Pre-Compose dialog box, name the new composition Window Contents. Make sure the Move All Attributes Into The New Composition option is selected, and check the Open New Composition box. Then, click OK.

A new Timeline panel named Window Contents appears. It contains the Sun, Birds, and Clouds layers you selected in step 1 of this exercise.
Click the Sunrise Timeline panel to see the contents of the main composition. Notice that the Sun, Birds, and Clouds layers have been replaced by the layer Window Contents, which is actually a composition.
Now, you will create the track matte to hide the outside scenery behind all areas of the image except the window pane. To do that, you’ll duplicate the Window Lit layer and use its alpha channel.
When you want one layer to show through a hole in another layer, set up a track matte. You’ll need two layer—one to act as a matte, and another to fill the hole in the matte. You can animate either the track matte layer or the fill layer. When you animate the track matte layer, you create a traveling matte. If you want to animate the track matte and fill layers using identical settings, you can precompose them.
You define transparency in a track matte using values from either its alpha channel or the luminance of its pixels. Using luminance is useful when you want to create a track matte using a layer without an alpha channel, or a layer imported from a program that can’t create an alpha channel. In both alpha-channel mattes and luminance mattes, pixels with higher values are more transparent. In most cases, you use a high-contrast matte so that areas are either completely transparent or completely opaque. Intermediate shades should appear only where you want partial or gradual transparency, such as along a soft edge.
After Effects preserves the order of a layer and its track matte after you duplicate or split the layer. Within the duplicated or split layers, the track matte layer remains on top of the fill layer. For example, if your project contains Layers A and B, where A is the track matte and B the fill layer, duplicating or splitting both of these layers results in the layer order ABAB.
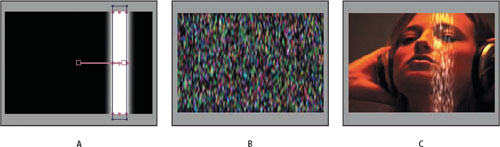
Traveling matte
A. Track matte layer: a solid with a rectangular mask, set to Luma Matte. The mask is animated to travel across the screen. B. Fill layer: a solid with a pattern effect. C. Result: The pattern is seen in the track matte’s shape and added to the image layer, which is below the track matte layer.
Note
You’ll learn more about track mattes in Lesson 8, “Performing Color Correction.”
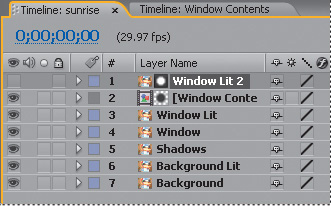
In the Sunrise Timeline panel, select the Window Lit layer.
Choose Edit > Duplicate.
Drag the duplicate layer, Window Lit 2, up in the layer stack so that it’s above the Window Contents layer.
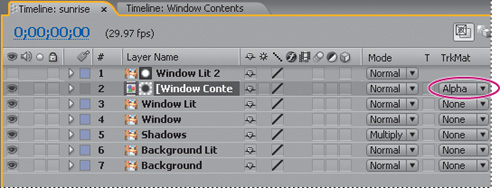
Choose Columns > Modes from the Timeline panel menu.
Now, you can apply the track matte.
Select the Window Contents layer and choose Alpha Matte “Window Lit 2” from the TrkMat pop-up menu. The alpha channel of the layer above (Window Lit 2) is used to set transparency for the Window Contents layer, allowing the scenery outside the window to show through the transparent areas of the window pane.
Press the Home key and then preview the animation by pressing the spacebar. Press the spacebar again when you’re done.
The birds will look more authentic if they include motion blur. You’ll add that quickly before animating the shadows.
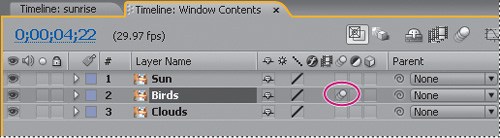
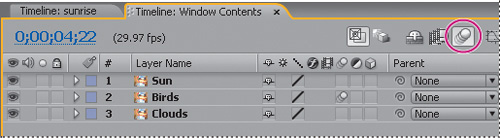
Switch to the Window Contents Timeline panel.
Go to 4:22—the middle of the birds animation—and, with the Birds layer selected, choose Layer > Switches > Motion Blur to turn on the motion blur for the Birds layer.
Now, enable motion blur prevewing in the Composition panel.
Click the Enable Motion Blur button (
 )at the top of the Timeline panel to display the motion blur for the Birds layer in the Composition panel.
Now you can set the shutter angle and phase, which control the intensity of the motion blur.
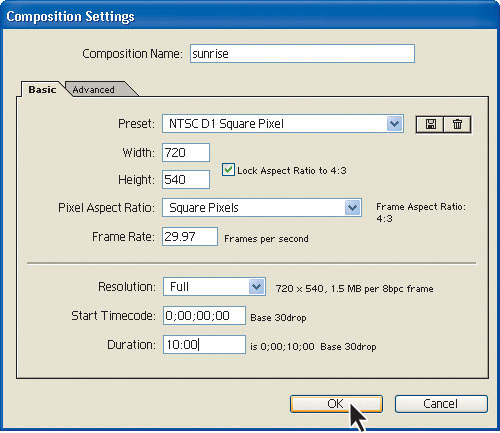
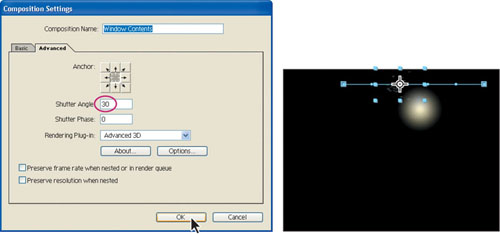
Choose Composition > Composition Settings.
In the Composition Settings dialog box, click the Advanced tab and reduce the Shutter Angle to 30°. This setting imitates the effect of adjusting a shutter angle on a real camera, which controls how long the camera aperture is open, gathering light.
Leave Shutter Phase at 0, and then click OK.
It’s time to turn your attention to the shadows being cast on the table by the clock and the vase. In a realistic time-lapse image, they would shorten as the sun rises.
There are a few ways to create and animate shadows in After Effects. For example, you could use 3D layers and lights. In this project, however, you will use the Corner Pin effect to distort the Shadows layer of the imported Photoshop image. Using the Corner Pin effect is like animating with the Photoshop Free Transform tool. The effect distorts an image by repositioning each of its four corners. You can use it to stretch, shrink, skew, or twist an image, or to simulate perspective or movement that pivots from the edge of a layer, such as a door opening.
Switch to the Sunrise Timeline panel and press the Home key to make sure you’re at the beginning of the time ruler.
Select the Shadows layer in the Timeline panel and then choose Effect > Distort > Corner Pin. Small circles appear around the corner points of the shadow layer in the Composition panel.
Note
If you don’t see the controls, choose View Options from the Composition panel menu. In the View Options dialog box that opens, check the Handles and Effect Controls boxes and then click OK.
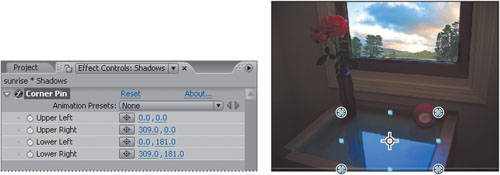
You’ll start by setting the four corners of the Shadows layer to correspond to the four corners of the glass tabletop. You’ll start about midway into the animation, when the sun is high enough to start affecting the shadow.
Go to 6:00 and then drag each of the four corner-pin handles to the respective corner of the glass table top. Notice that the x, y coordinates update in the Effect Controls panel.
If you have trouble getting the shadows to look right, you can enter the values manually, as shown in the following figure.
Set a keyframe for each corner at 6:00 by clicking the stopwatch icon (
) for each position in the Effect Controls panel.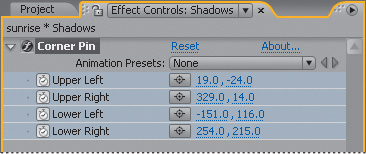
Now, go to the end of the animation and adjust the position of the shadow.
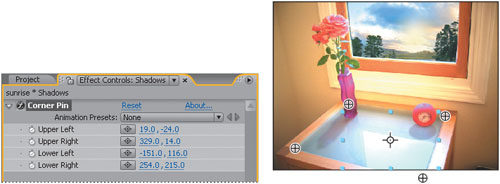
Press the End key to go to the last frame of the composition.
Using the Selection tool (
 ), drag the two lower corner-pin handles to shorten the shadows: Drag them about 25% closer to the back edge of the tabletop. You may also need to move the two upper corners in slightly so that the bases of the shadows still align properly with the vase and clock. Your corner-pin values should be similar to those in the following figure; you can enter the values directly if you prefer not to drag the corners. After Effects adds keyframes.
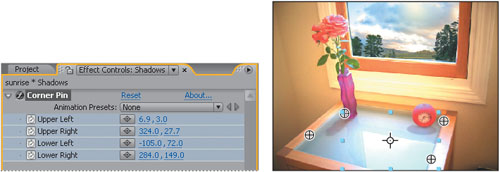
If necessary, select the Hand tool (
 )and drag the composition down to center it vertically in the Composition panel. Then, switch back to the Selection tool ()and click on the pasteboard of the Composition panel to deselect the layer.
Press the Home key to go to 0:00, and then press the spacebar to preview the entire animation, including the corner-pin effect. When you’re done, press the spacebar again.
Choose File > Save to save your project.
In photography, when bright light (such as sunlight) reflects off the lens of a camera, it causes a flare effect. Lens flares can be bright, colorful circles and halos, depending on the type of lens in the camera. After Effects offers a few lens flare effects. You’ll add one now to enhance the realism of this time-lapse photography composition.
Go to 5:10, where the sun is brightly shining into the lens of the camera.
Choose Layer > New > Solid.
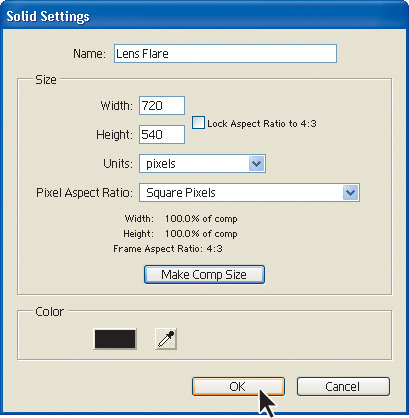
In the Solid Settings dialog box, name the layer Lens Flare and click the Make Comp Size button. Then, set the Color to black by clicking the swatch and setting the RGB values to 0 in the Color Picker dialog box. Click OK to close the Color Picker and return to the Solid Settings dialog box.
Click OK to create the Lens Flare layer.
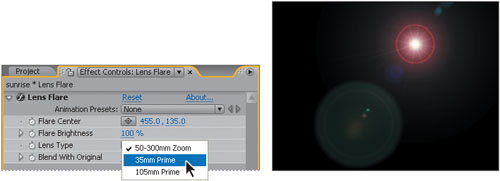
With the Lens Flare layer selected in the Sunrise Timeline panel, choose Effect > Generate > Lens Flare. The Composition panel and the Effect Controls panel display the visual and numeric default Lens Flare settings, respectively; let’s customize the effect for this composition.
Drag the Flare Center cross-hair icon (
 )in the Composition panel to the center of the sun. You cannot see the sun in the Composition panel; the x, y coordinates, which you can read in the Effect Controls or Info panel, are approximately 455, 135.
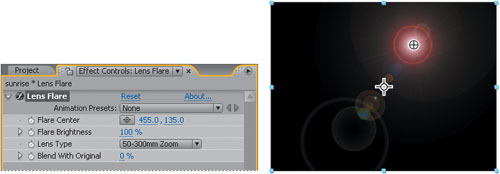
In the Effect Controls panel, change the Lens Type to 35mm Prime, a more diffuse flare effect.
Make sure you’re still at 5:10 and, in the Effect Controls panel, click the stopwatch icon (
)for the Flare Brightness property to set a keyframe at the default value of 100%.Now, adjust the brightness of the lens flare to peak when the sun is highest.
Go to 3:27 and set the Flare Brightness value to 0%.
Go to 6:27 and set the Flare Brightness value to 0%, also.
Go to 6:00 and set the Flare Brightness to 100%.
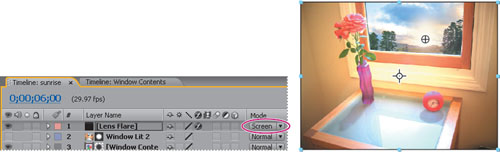
Finally, with the Lens Flare layer selected in the Timeline panel, choose Layer > Blending Mode > Screen to change the blend mode to screen.
Press the Home key and then the spacebar to preview the lens flare effect. When you’re done, press the spacebar again.
Choose File > Save to save your project.
The animation now looks very much like a time-lapse photo—except the clock isn’t working yet! The hands of the clock should be spinning quickly to show the progress of time. To show this, you will add an animation that was created specifically for this scene. The animation was created in After Effects as a set of 3D layers that are lit, textured, and masked to blend into the scene.
Note
You’ll learn more about 3D layers in Lessons 9 and 10, “Building and Animating a 3D Object” and “Using 3D Effects,” respectively.
Bring the Project panel forward and double-click an empty area in it to open the Import File dialog box.
In the AE7_CIB > Lessons > Lesson05 > Assets folder, select the clock.mov file and click Open.
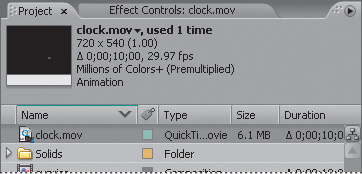
The QuickTime movie clock.mov appears at the top of the Project panel.
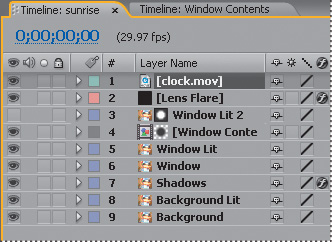
Click in the Sunrise Timeline panel to make it active and then press the Home key to go to the beginning of the time ruler. Then, drag the Clock movie from the Project panel to the top of the layer stack in the Timeline panel.
Preview the animation by pressing the spacebar. Press the spacebar to stop playback when you’re done.
Choose File > Save to save the project.
To prepare for the next task, retiming the composition, you need to render the Sunrise composition.
Select the Sunrise composition in the Project panel and then choose Composition > Add to Render Queue.
The Render Queue panel opens. Resize it to make it larger, if necessary.
Accept the default Render Settings in the Render Queue panel, and then click the blue, underlined words Not Yet Specified next to the Output To pop-up menu.
Navigate to the AE7_CIB > Lessons > Lesson05 > Assets folder for your destination and name the file Lesson05_retime.mov(Mac OS) or Lesson05_retime.avi (Windows). Then, click Save.
Click the Render button in the Render Queue panel.

After Effects displays a progress bar as it renders the composition, and it plays an audio alert when it is finished.
When After Effects finishes rendering the composition, close the Render Queue panel.
So far, you have created a straightforward time-lapse simulation. That’s fine, but After Effects offers more ways to play with time using the time-remapping feature. Time remapping allows you to dynamically speed up, slow down, stop, or reverse footage. You can also use it to do things like create a freeze-frame effect. The Graph Editor and the Layer panel are a big help when remapping time, as you’ll see in the following exercise, when you retime the project so that the time-lapse speed changes dynamically.
For this exercise, you’ll use the movie that you just rendered as the basis of a new composition, which will be easier to remap.
Double-click an empty area of the Project panel to open the Import File dialog box.
In the AE7_CIB > Lessons > Lesson05 > Assets folder, select the Lesson05_retime.mov (Mac OS) or Lesson05_retime.avi (Windows) file that you just rendered, and click Open.
Drag the Lesson05_retime movie onto the Create A New Composition button (
 )at the bottom of the Project panel. After Effects creates a new composition named Lesson05_retime, and displays it in the Timeline and Composition panels.
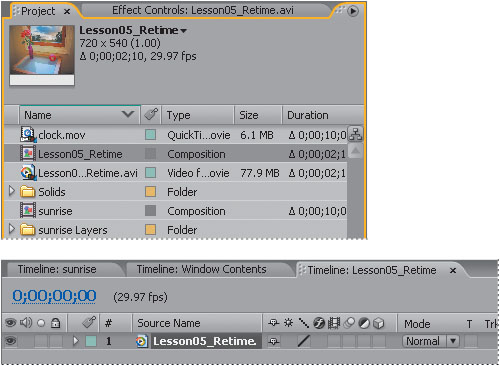
Now, you can remap all of the elements of the project at once.
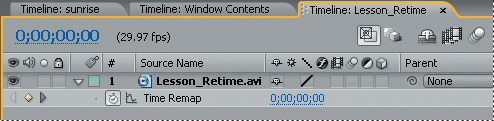
With the Lesson05_retime layer selected in the Timeline panel, choose Layer > Time > Enable Time Remapping. After Effects adds two keyframes, at the first and last frames of the layer. You can see the keyframes in the time ruler. A Time Remap property also appears under the layer name in the Timeline panel; this property lets you control which frame is displayed at a given point in time.
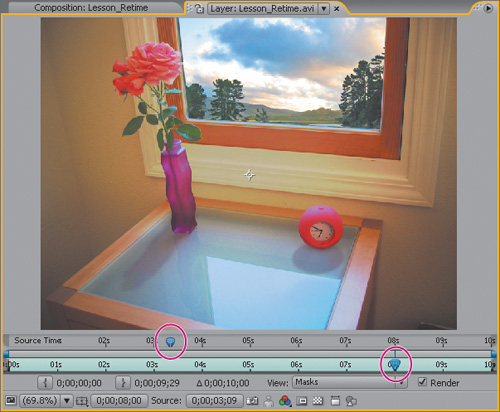
Double-click the Lesson05_retime layer name in the Timeline panel to open it in the Layer panel. The Layer panel provides a visual reference of the frames you change when you remap time. It displays two time rulers: The time ruler at the bottom of the panel displays the current time. The Source Time ruler above that has a remap-time marker, which indicates what frame is playing at the current time.
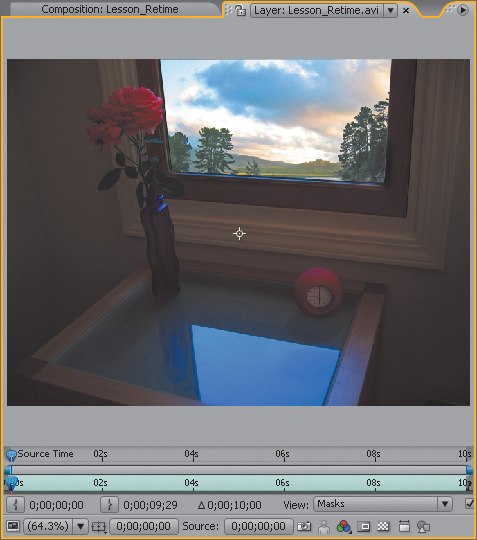
Drag the current-time indicator across the time ruler in the Timeline panel, and notice that the source-time and current-time markers in the two Layer panel rulers are synchronized. That will change as you remap time.
Go to 4:00 and change the Time Remap value to 2:00. This remaps time so that frame 2:00 plays at 4:00. In other words, the composition now plays back at half-speed for the first 4 seconds of the composition.
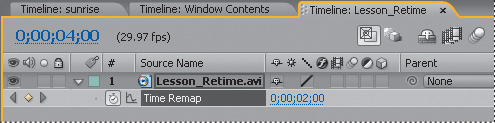
Press the spacebar to preview the animation. The composition now runs at half-speed until 4:00, and at a regular speed thereafter.
The Graph Editor lets you view and manipulate all aspects of effects and animations, including effect property values, keyframes, and interpolation. It represents changes in effects and animations as a two-dimensional graph, with playback time represented horizontally (from left to right). In layer bar mode, in contrast, the time ruler represents only the horizontal time element, without showing a visual representation of changing values. Let’s see what the time-remap change looks like in the Graph Editor.
Make sure the Time Remap property is selected for the Lesson05_retime layer in the Timeline panel, and then click the Graph Editor button (
 ) to display the Graph Editor.
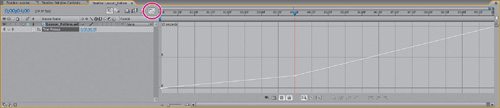
The Graph Editor displays a time-remap graph that shows a white line connecting the keyframes at 0:00, 4:00, and 10:00. The angle of the line is shallow up to 4:00, and then it becomes steeper. The steeper the line, the faster the playback time.
When remapping time, you can use the values in the time-remap graph to determine and control which frame of the movie plays at which point in time. Each Time Remap keyframe has a time value associated with it that corresponds to a specific frame in the layer; this value is represented vertically on the time-remap graph. When you enable time remapping for a layer, After Effects adds a Time Remap keyframe at the start and end points of the layer. These initial Time Remap keyframes have vertical time values equal to their horizontal position.
By setting additional Time Remap keyframes, you can create complex motion effects. Every time you add a Time Remap keyframe, you create another point at which you can change the playback speed or direction. As you move the keyframe up or down in the time-remap graph, you adjust which frame of the video is set to play at the current time.
Let’s have some fun with the timing of this project.
In the time-remap graph, drag the middle keyframe from 4:00 up to 10 seconds.
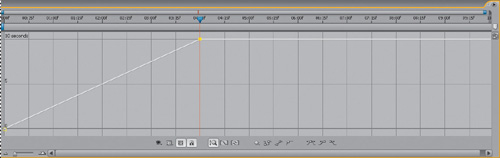
Drag the last keyframe down to 0 seconds.
Now the animation progresses rapidly over the first four seconds of the composition and then plays in reverse, and at a faster speed, for the rest of the composition.
Press the Home key to go to 0:00 and then press the spacebar to preview the results. Watch the time ruler and source time ruler in the Layer panel to see what frames are playing at any given point in time.
Having fun yet? Let’s keep going.
Press the spacebar to stop the preview.
Command-click (Mac OS) or Ctrl-click (Windows) the last keyframe to delete it. The composition still is in fast-forward mode for the first four seconds, but now it holds on a single frame (the last frame) for the rest of the composition.
Press the Home key and then the spacebar to preview the animation. Press the spacebar again when you’re done.
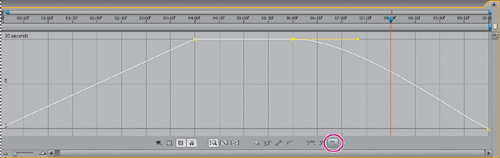
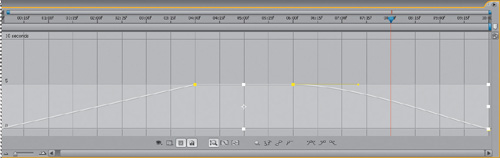
Command-click (Mac OS) or Ctrl-click (Windows) the dotted line at 6:00 to add a keyframe at 6:00 with the same value as the keyframe at 4:00.
Command-click (Mac OS) or Ctrl-click (Windows) at 10:00 to add another keyframe, and then drag it down to 0 seconds. Now the animation progresses rapidly, holds for two seconds on the last frame, and then runs in reverse.
Press the Home key and then the spacebar to preview the change. Press the spacebar again when you’re done.
Let’s soften the shift in time that occurs six seconds into the animation by adding an Easy Ease Out.
Finally, use the Graph Editor to scale the entire animation in time.
Click the Time Remap property name in the Timeline panel to select all of the Time Remap keyframes.
Make sure the Show Transform Box button (
 )at the bottom of the Graph Editor is on; a free transform selection box should be visible around all of the keyframes.
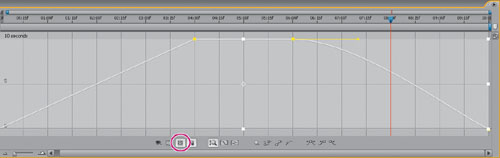
Drag one of the upper transform handles from 10 seconds to 5 seconds to reduce the top keyframe values and slow the playback.
Press the Home key and then the spacebar to preview the change. Press the spacebar again when you’re done.
Choose File > Save.
Congratulations. You’ve completed a complex animation, complete with shifts in time. You can render the time-remap project if you’d like. Follow the instructions on page 190 of this lesson, or see Lesson 12, “Rendering and Outputting,” for detailed instructions on rendering.