
Not every shot you receive will be a pristine masterpiece. Most shots will require some degree of color correction. With After Effects, you can transform a dull, lifeless shot into a bright, sharp clip in no time.
In this lesson, you’ll learn how to do the following:
<objective>Use masks to isolate areas of an image for color correction.
</objective> <objective>Use the Color Balance effect to enhance areas of a shot.
</objective> <objective>Use the Auto Levels effect to introduce a color shift.
</objective> <objective>Use a track matte to isolate an area of an image.
</objective> <objective>Apply the Hue/Saturation and Brightness & Contrast effects to convert a color image to a high-contrast, black-and-white image.
</objective> <objective>Correct a range of colors using Synthetic Aperture Color Finesse.
</objective> <objective>Apply the Photo Filter effect to warm portions of an image.
</objective> <objective>Remove unwanted elements of a scene with the Clone Stamp tool.
</objective>As the name implies, color correction is a way of altering or adapting the color of the captured image. Color correction is performed to optimize source material, to focus attention on a key element in a shot, to correct errors in white balance and exposure, to ensure color consistency from one shot to another, or to create a color palette for a specific visual look desired by a director.
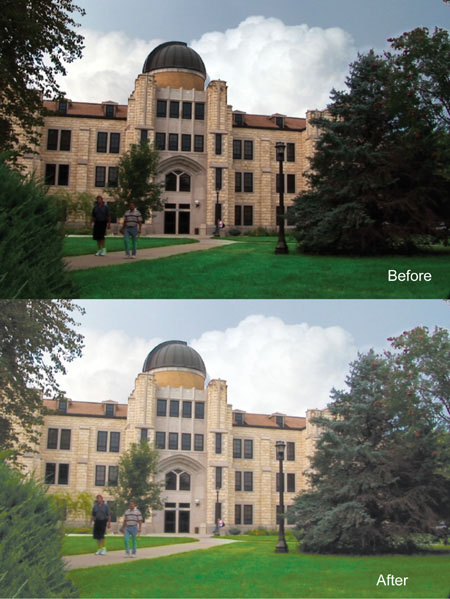
In this lesson, you will improve the color and saturation of a video clip that was shot on a partly cloudy day. You will begin by using masks to isolate sections of the shot. Then, you’ll apply a variety of color-correction effects to clean up and enhance the image. Finally, you will remove an unwanted portion of the shot with the Clone Stamp tool.
This lesson will take approximately 1 hour to complete.
</feature>Make sure the following files are in the AE7_CIB > Lessons > Lesson08 folder on your hard disk, or copy them from the Adobe After Effects 7.0 Classroom in a Book DVD now.
In the Assets folder: campus_before.mov, storm_clouds.jpg
In the Sample_Movie folder: Lesson08.mov
Open and play the Lesson08.mov file to see what you will create in this lesson. When you’re done, quit the QuickTime player. You may delete the sample movie from your hard disk if you have limited storage space.
When you begin this lesson, restore the default application settings for After Effects. See “Restoring default preferences,” page 5.
Press Ctrl+Alt+Shift (Windows) or Command+Option+Shift (Mac OS) while starting After Effects. When asked whether you want to delete your preferences file, click OK.
After Effects opens to display an empty, untitled project.
Choose File > Save As.
In the Save Project As dialog box, navigate to the AE7_CIB > Lessons > Lesson08 > Finished_Project folder.
Name the project Lesson08_Finished.aep, and then click Save.
You need to import two footage items for this lesson.
Choose File > Import > File.
Navigate to the AE7_CIB > Lessons > Lesson08 > Assets folder, Shift-click to select the campus_before.mov and storm_clouds.jpg files, and then click Open. Organize the footage items before continuing.
Choose File > New > New Folder to create a new folder in the Project panel, or click the Create A New Folder button (
 ) at the bottom of the panel.
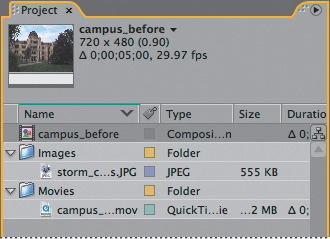
Type Movies to name the folder, press Enter (Windows) or Return (Mac OS) to accept the name, and then drag the Campus_before.mov file into the Movies folder.
Create another new folder and name it Images. Then, drag the Storm_clouds.jpg file into the Images folder.
Click the triangles to open the folders so that you can see their contents.

Now, you will create a new composition based on the Campus_before.mov movie.
Drag the Campus_before.mov file onto the Create A New Composition button (
 ) at the bottom of the Project panel. After Effects creates a new composition named for the source file and displays it in the Composition and Timeline panels.
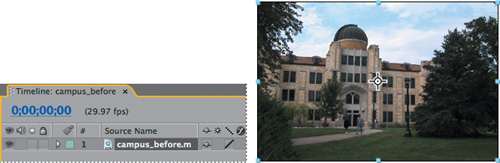
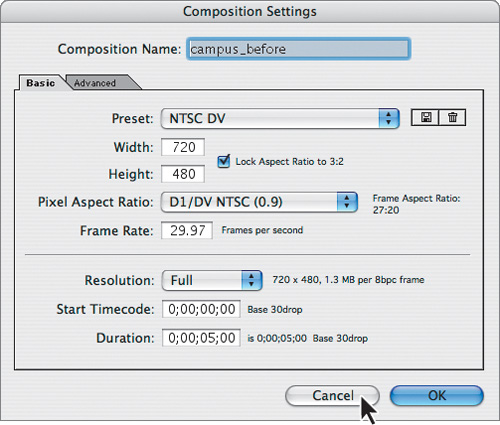
(Optional) Check the composition’s aspect ratio and duration by choosing Composition > Composition Settings. This is a NTSC DV composition that is 5 seconds long. Click Cancel to close the Composition Settings dialog box.
Drag the Campus_before composition to an empty area of the Project panel to move it out of the Movies folder.
If possible, perform color correction on a video monitor instead of a computer monitor. The gamma differences between a computer monitor and a broadcast monitor vary greatly. What may look good on a computer screen may be too bright and washed out on a broadcast monitor.
After Effects allows you to view compositions on a broadcast monitor via the IEEE 1394 (FireWire) port on your computer. One way to accomplish this is to use a video tape recorder that accepts FireWire. You can loop the signal from your computer to the video tape recorder and then run a cable to your video monitor via the monitor/video output on the video tape recorder.
With a video monitor connected to your computer system, start After Effects 7.0.
Do one of the following, depending on your platform:
For Output Mode (Windows and Mac OS), choose the appropriate format for your system, which is NTSC in North America.
To view the composition you are working on, check the Previews, Mirror On Computer Monitor, Interactions, and Renders boxes. By selecting all of these options, you will be able to see every update and change you make to the composition on the video monitor.
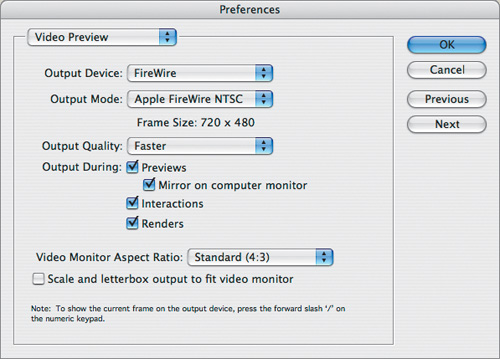
Click OK to close the Preferences dialog box.
Always be sure your video or computer monitor is properly calibrated before performing color correction. For instructions on calibrating a computer monitor, see After Effects Help.
Now, you’re ready to get down to business. Start by previewing the source footage to see what you need to do.
First, isolate the grass so that you don’t brighten the whole image and blow out other, well-exposed areas, such as the sky.
Press the Home key to make sure the current-time indicator is at the beginning of the time ruler.
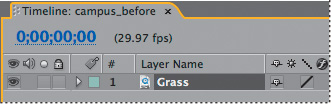
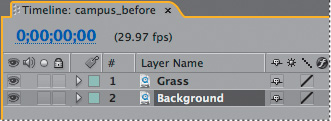
Select the Campus_before layer in the Timeline panel.
Rename the layer by pressing the Enter (Windows) or Return (Mac OS), typing Grass, and pressing Enter or Return again.
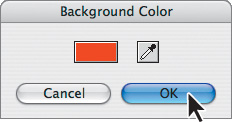
As you learned in Lesson 6, “Working with Masks,” it helps to change the background color of the layer when you’re creating or editing masks.
Choose Composition > Background Color and select a color of your choice. For this exercise, we selected red (RGB=255, 0, 0). Click OK to close the Background Color dialog box.
Now, you will isolate the grass on this layer by creating a mask with the Pen tool.
Using the Pen tool (
 ), isolate the triangular area of grass between the sidewalk and the building: Set the three vertices, and then click the first vertex again to close the mask.
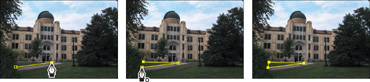
When you close the mask, the rest of the image disappears—that’s not good. You want the rest of the image to be part of the scene. You could reveal it by changing the mask mode from Add to None, but then you’d have to do this for every mask you create on this layer—and you’re going to create additional masks to isolate other areas of grass. A better alternative is to add a reference layer.
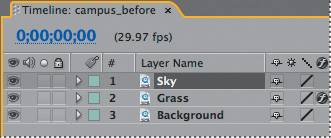
Drag another instance of the Campus_before.mov movie from the Project panel to the Timeline panel, placing it below the Grass layer.
Rename this layer Background.
Select the Grass layer again in the Timeline panel and continue to use the Pen tool to mask all of the grassy areas of the shot.
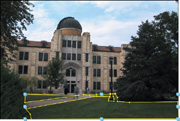
You may use as many masks as you like to isolate the grass, but you should be able to get everything with three masks. You can click the Pen tool on the pasteboard of the Composition panel to be sure you include all the grass at the bottom of the image, right up to the edge.
With the Grass layer selected in the Timeline panel, press the F key to reveal the Mask Feather property for each mask in the layer.
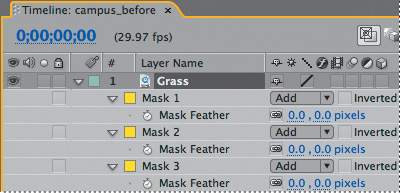
Increase the Mask Feather amount to 10.0, 10.0 pixels for all three masks in the Grass layer. This will soften the edges of the masks and prevent noticeable artifacts when you apply the Color Balance effect in the next exercise.

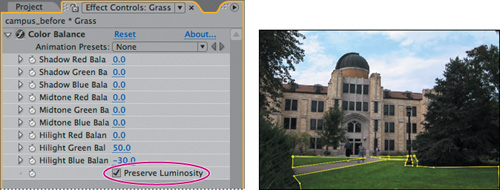
As discussed earlier, the highlights, or bright areas, of the grass need to be pumped up. You’ll do that now using the Color Balance effect. The Color Balance effect allows you to increase or decrease the saturation of one of the red, green, or blue channels over the three different intensity ranges (shadows, midtones, and highlights). Instead of affecting all colors in the shot, you will focus on just the greens.
With the Grass layer selected in the Timeline panel, choose Effect > Color Correction > Color Balance.
In the Effect Controls panel, increase the Hilight Green Balance value to 50.0. The masked green areas of the image brighten considerably.
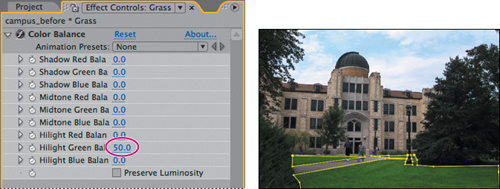
Unless you want the grass to look like mature bluegrass, decrease the Hilight Blue Balance to –30.0. This reduces the overall blue cast of the grass.
Check the Preserve Luminosity box. This preserves the average brightness of the image, which helps maintains the overall tonal balance and keeps the colors from getting too out of control. In other words, it keeps the colors from becoming unnaturally green while keeping shading consistent.
Select the Grass layer in the Timeline panel and press U to hide its properties and keep the Timeline panel neat.
Choose File > Save to save your work.
You’re going to change gears now and add some dramatic clouds to the sky.
Press the Home key to make sure the current-time indicator is at the beginning of the time ruler.
Bring the Project panel forward. Then, drag another instance of the Campus_before.mov movie from the Project panel to the Timeline panel, placing it at the top of the layer stack.
Rename the Campus_before layer Sky.
Now, add the clouds to the scene.
Drag the Storm_clouds.jpg file from the Project panel to the Timeline panel, placing it between the Sky and the Grass layers.
Turn off the visibility for the Sky layer by clicking the Video switch (
 ). Now, you can fully see the storm clouds layer. You need to scale and reposition the clouds to fit the sky area of the image.
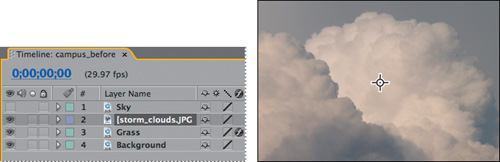
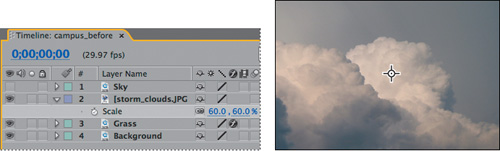
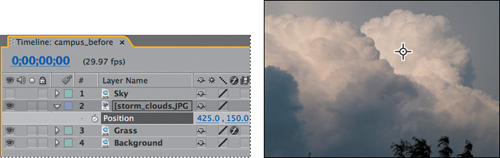
With the Storm_clouds layer selected in the Timeline panel, press the S key to display its Scale property.
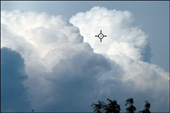
Decrease the Scale values to 60.0, 60.0%.
Make sure the Storm_clouds layer is selected in the Timeline panel and press the P key to display its Position property.
Change the Position values to 425.0, 150.0.
Make sure the Storm_clouds layer is selected in the Timeline panel and press U to hide its properties.
Although the storm clouds are dramatic, the contrast of the image is limited. You don’t want the clouds to look so dark and flat.
With the Storm_clouds layer selected in the Timeline panel, choose Effect > Color Correction > Auto Levels.
The Auto Levels effect automatically sets highlights and shadows by defining the lightest and darkest pixels in each color channel as white and black, and then it redistributes intermediate pixel values proportionately. Because Auto Levels adjusts each color channel individually, it may remove or introduce a color cast. In this case, with the default settings applied, Auto Levels introduces a blue color cast that makes the clouds more intense.
Next, you need to remove the original sky from the image so that the storm clouds are visible. There are different ways to accomplish this, including drawing a detailed mask or using a track matte. You’ll do the latter.
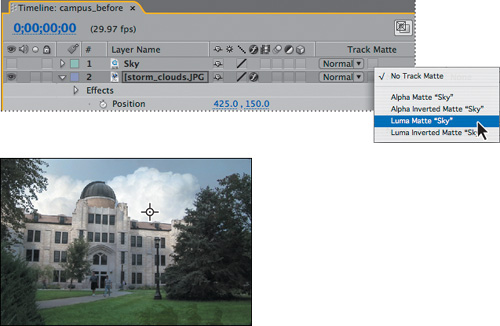
The Luma track matte did a good job, but there are some holes in the brighter portions of the layer, such as the windows of the building. The best way to fix these holes is to convert the Sky layer into a high-contrast, black-and-white image. But what effect or effects should you use to accomplish that? First you will use the Hue/Saturation effect, and then the Brightness & Contrast effect.
Temporarily turn on the Sky layer by clicking the Video switch (
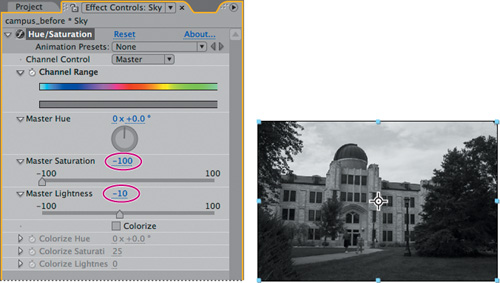
) for the layer in the Timeline panel.Select the Sky layer in the Timeline panel and choose Effect > Color Correction > Hue/Saturation.
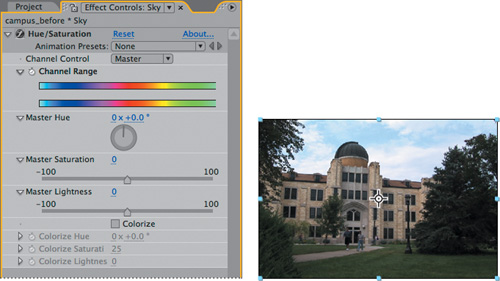
In the Effect Controls panel, decrease the Master Saturation to –100 and decrease the Master Lightness to –10.
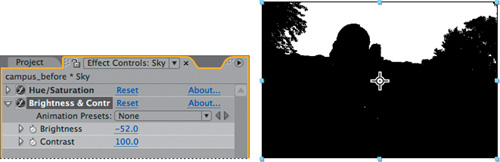
Close the properties for the Hue/Saturation effect in the Effect Controls panel so that you can more easily see the Brightness & Contrast effect properties.
Reduce the Brightness to –52.0 and increase the Contrast to 100.0.
Much better. However, there are a few stray pixels around the white light fixture by the door of the building. You can correct this with a simple mask.
With the Sky layer still selected in the Timeline panel, use the Rectangular Mask tool (
 ) to draw a selection around the two most pronounced white pixels on the building near the middle of the Composition panel.
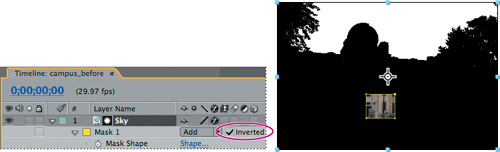
As you drag with the Rectangle Mask tool, the full-color image appears outside of the selected area. This is because the default mask mode is Add, which keeps the information inside the mask intact and removes (or masks) the area outside the region. Because you still have the Background layer visible, you see that layer. In order to keep everything visible outside of the mask but remove the content inside the mask, you need to invert it.
Select the Sky layer in the Timeline panel and press the M key to reveal its Mask property. Then, check the Inverted box to invert the mask.
Now, turn off the visibility for the Sky layer by clicking on the Video switch (
). Then, switch to the Selection tool ( ) and click the pasteboard of the Composition panel.
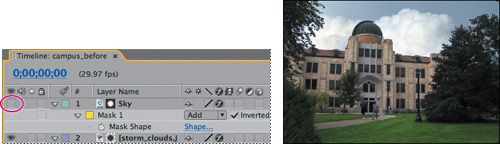
Ta da. That was certainly much easier than manually drawing a mask around the building and the trees.
Select the Sky layer in the Timeline panel and press U to close its properties click an empty area of the Timeline panel to deselect all layers; and then choose File > Save to save your work.
The image is looking better, and while the neighbors would certainly compliment you on the quality of the lawn, the foreground shrub and the large evergreen tree are still dark and underexposed. You’ll fix that next.
As you did for the grass, you will first isolate the shrub and tree, and then you will correct the color.
Press the Home key to make sure the current-time indicator is at the beginning of the time ruler.
Bring the Project panel forward and then drag another instance of the Campus_before.mov movie from the Project panel to the Timeline panel, placing it at the top of the layer stack.
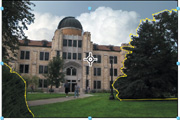
Rename the Campus_before layer Tree and Shrub.
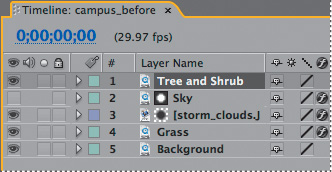
Using the Pen tool (
), isolate the foreground shrub on the left side of the image and the evergreen tree on the right side of the image.
With the Tree and Shrub layer selected in the Timeline panel, press the F key to display the Mask Feather property for the two masks on the layer.
Increase the Mask Feather value for each mask to 10.0, 10.0 pixels.

Select the Tree and Shrub layer in the Timeline panel and press U to hide its properties.
Once again, the sky is your nemesis when trying to correct the color in this shot. In order to completely remove the original sky, you need to mask it from behind the tree. You also need to lighten the tree and shrub. But instead of doing the work all over again, you can speed the process by copying effects, and then apply the track matte.
Select the Tree and Shrub layer in the Timeline panel, press Ctrl+D (Windows) or Command+D (Mac OS) to duplicate it, and then rename the duplicated layer (Tree and Shrub 2) Tree Matte.
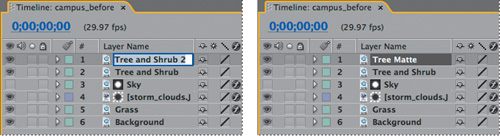
The Hue/Saturation and Brightness & Contrast effects that you applied to the Sky layer would be a good first step to lightening the shrub and the tree.
Select the Sky layer in the Timeline panel and press the E key to display the layer’s Effects properties: Hue/Saturation and Brightness & Contrast.
Shift-click to select both the Hue/Saturation and Brightness & Contrast effect names in the Sky layer and then choose Edit > Copy or press Ctrl+C (Windows) or Command+C (Mac OS).
Select the Tree Matte layer in the Timeline panel and then choose Edit > Paste or press Ctrl+V (Windows) or Command+V (Mac OS).
Now that you’ve copied the effects, create the matte.
Select the Tree and Shrub layer in the Timeline and choose TrkMat > Luma Inverted Matte “Tree Matte.”
Excellent. You can now correct the color in the Tree and Shrub layer.
Close the properties for the Sky layer in the Timeline panel and then choose File > Save to save your work.
Even though you isolated the tree and shrub from the shot, simply applying a levels effect would quickly reveal the edges of the mask. What you need is a way to select a specific color range, and correct just that area as a type of secondary color correction. For this, you will use the Synthetic Aperture Color Finesse effect, a third-party effect that comes bundled with After Effects and offers the capability to isolate a color range and adjust only those colors.
Note
The following exercise requires Synthetic Aperture’s Color Finesse plug-in to be installed on your system. The installation files can be found on your After Effects disc.
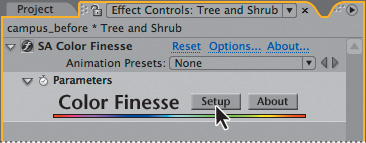
With the Tree and Shrub layer selected in the Timeline panel, choose Effect > Synthetic Aperture > SA Color Finesse.
In the SA Color Finesse area of the Effect Controls panel, click the Setup button.
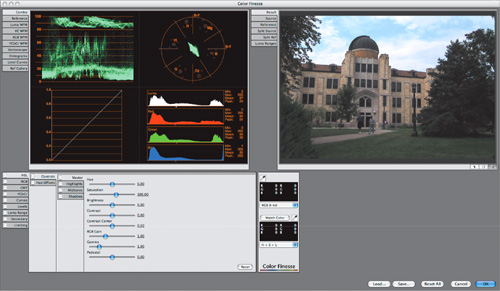
SA Color Finesse opens in a floating window.
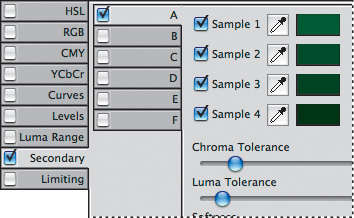
Check the box in the Secondary tab to activate secondary color correction, and then click the tab to open the Secondary color-correction controls.
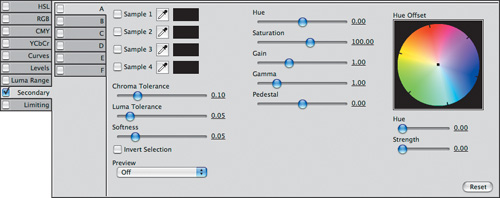
SA Color Finesse allows you perform up to six different secondary color-correction operations. You’ll just perform one, however.
Check the box in the A tab to perform your color-correction operation.
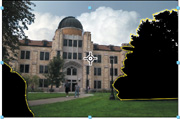
Using the four Sample eyedroppers, make four color selections in the evergreen tree. Try to sample various shades of green from light to dark; zoom in if necessary to help you select a range of hues.
Even though four samples don’t encompass the entire contrast range of the tree, SA Color Finesse has controls to refine the color selection.
Still in the A tab, choose Preview > Mask. Now you can see the areas that are selected and those that are masked (shaded in red).
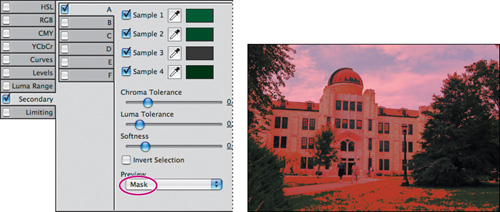
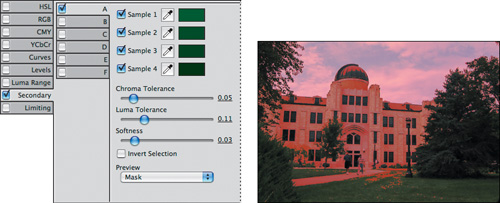
Adjust the Chroma Tolerance, Luma Tolerance, and Softness sliders until everything but the tree and shrub and most of the grass is selected. There are no set values here, as the adjustments will depend on your sampled colors. However, our values are shown in the following image, and the selection should resemble the following image.
Choose Preview > Off, then click OK to apply the correction and to close the SA Color Finesse window.
Thanks to the Gain adjustment you just performed, the tree and the shrub are much brighter in the image.
Choose File > Save to save your work.
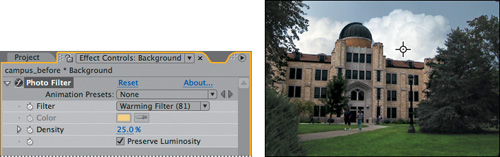
Finally, warm up the building and make it more inviting with the Photo Filter effect.
The Photo Filter effect mimics the technique of using a colored filter on a camera lens to adjust the color balance and color temperature of the light transmitted through the lens and exposing the film. You can choose a color preset to apply a hue adjustment to an image, or you can specify a custom color using the Color Picker or the eyedropper.
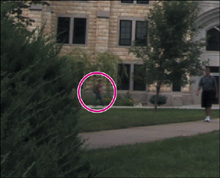
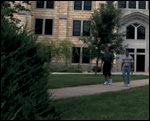
The color is looking great, but you’re not quite done. The director wants you to remove the student in the red shirt walking in the background, because he is visually distracting. You’ll use the Clone Stamp tool to paint out this unwanted element of the scene on a frame-by-frame basis. This type of hand painting is not a glamorous job, but sometimes it has to be done.
Note
The following exercise is good practice, but it is quite time-consuming. Therefore, it is optional.
The Clone Stamp tool samples the pixels on a source layer and applies the sampled pixels to a target layer; the target layer can be the same layer or a different layer in the same composition.
Now, configure the workspace with the panels you need for painting.
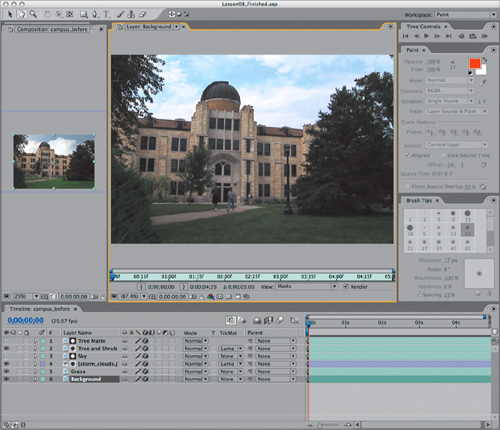
Choose Window > Workspace > Paint. After Effects opens the Layer panel, which is where you’ll do the painting, and also displays the Paint and Brush Tips panels.
Double-click the Background layer in the Timeline panel to open it in the Layer panel. This is the layer on which you’ll paint.
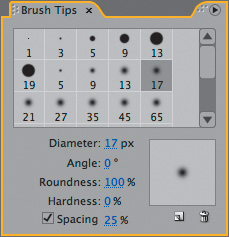
In the Brush Tips panel, choose a soft, round 17-pixel brush.
If you’ve done any work in Photoshop, the concept of cloning is probably familiar to you. However, in After Effects you can clone across time, not just clone a static location in a 2D image.
Press the Home key to make sure the current-time indicator is at the beginning of the time ruler.
Zoom in to the student walking in the background on the left side of the image, and then choose the Clone Stamp tool again if necessary.
By default, any paint or clone procedure remains constant for the entire length of the composition. However, this will cause problems later in this scene when the student moves into the painted space, so you need to change the duration of the clone operation.
In the Paint panel, choose Duration > Single Frame. This will only keep the cloned area on-screen for a single frame.

Now, you need to instruct the Clone Stamp tool to take information from a future point in time—a point when the two subjects in the foreground are off-screen.
Slowly drag the Source Time Shift value in the Paint panel to 30 frames. As you drag the Source Time Shift value, you will see a ghost overlay of the frames being shifted. The Source Shift Time setting allows you to sample the layer from a different point in time.
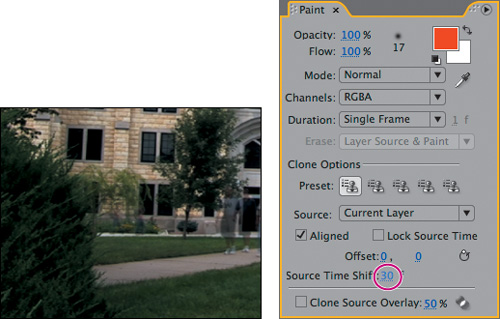
In the Layer panel, paint out the student in the background using the Clone Stamp tool. The key here is to use small, essential strokes. Make sure your clone area is not too big, or you may pick up traces of the subject from the shifted time frame.
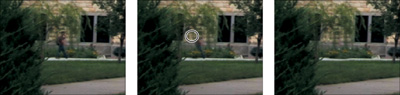
Now that you’ve painted out the student in the first frame, you need to advance to the next frame and repeat the procedure.
Repeat steps 5 and 6 for each frame of the shot until the end. As the student gets closer to the two men in the foreground—around 2:15—you will need to reduce the size of your brush. You will also need to change the Source Time Shift value either forward or backward as you progress. For example, at 2:00, change the Time Shift to –54 for a clear area to continue cloning. At other points in time ruler you will need to make your own determination as to the Time Shift value. The key is to find a frame where the foreground subjects do not interfere with the area you are cloning.
When you are finished, make a RAM preview and make sure the student doesn’t “ghost” in and out of the shot.
Click the RAM Preview button (
 ) in the Time Controls panel.
If you notice an arm or a leg appearing in the shot, go to the offending frame and touch up the area. If you have removed the subject completely, there should be no trace of him in any frame.
When you’re done, choose File > Save to save the finished project.
If you’d like to render the composition, see Lesson 12, “Rendering and Outputting,” for details.
Congratulations. You’ve done an excellent job of color-correcting this fine composition. And as you learned, painting out an unwanted subject from a shot is tedious work, but it’s an important skill, and now you know how to do it.