After Effects projects typically use a variety of imported footage, arranged in a composition, which is edited and animated using the Timeline panel. In this lesson, you’ll get more familiar with animation fundamentals as you build a multimedia presentation.
In this lesson you’ll learn how to do the following:
<objective></objective> <objective>Adjust the duration of a layer.
</objective> <objective>Clip live motion video into a vector mask.
</objective> <objective>Animate with Position, Scale, and Rotation keyframes.
</objective> <objective>Animate a precomposed layer.
</objective> <objective>Apply the Radio Waves effect to a solid layer.
</objective> <objective>Add audio to a project.
</objective> <objective>Loop an audio track using Time Remapping.
</objective>In this lesson, you will work on a more complex animation project. Along the way, you’ll learn to mix media, including motion video and Photoshop art; to work with audio; and to become more adept at using the Timeline panel to perform keyframe animations. The project in this lesson is an animated portfolio for a professional illustrator that can be delivered on a CD or on the web, and it is meant to be a useful, real-world self-promotion.
This lesson will take 1½ to 2 hours to complete.
</feature>Make sure the following files are in the AE7_CIB > Lessons > Lesson04 folder on your hard disk, or copy them from the Adobe After Effects 7.0 Classroom in a Book DVD now.
Open and play the Lesson04.mov sample movie to see what you will create in this lesson. When you’re done, quit the QuickTime player. You may delete the sample movie from your hard disk if you have limited storage space.
For this project, professional illustrator Gordon Studer has created a Photoshop file of a city scene with several objects on separate layers that you will animate in After Effects. In fact, he has prepared an After Effects project that already contains this layered Photoshop file, as well as the video and audio clips that you will need later in the lesson.
When you begin this lesson, restore the default application settings for After Effects. See “Restoring default preferences,” page 5.
Press Ctrl+Alt+Shift (Windows) or Command+Option+Shift (Mac OS) while starting After Effects. When asked whether you want to delete your preferences file, click OK.
Choose File > Open Project or press Ctrl+O (Windows) or Command+O (Mac OS).
Navigate to the AE7_CIB > Lessons > Lesson04 > Start_Project_File folder, select Lesson04_Start.aep, and click Open.
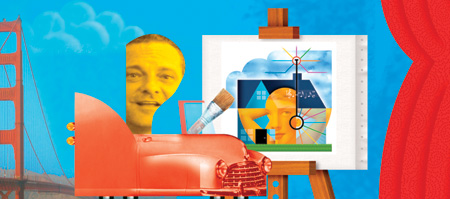
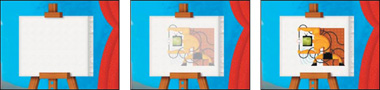
In this project, you will animate an illustration of the artist driving a car on a city street. The animation will end with an easel that displays a slide show of samples of the artist’s work. This is a complex animation. You will start by animating the background and some objects in the scenery so that the virtual camera appears to moving from left to right across the scene. Then, you will animate the car driving down the road, including masking a photograph of the illustrator’s face into the driver’s seat. Next, you will animate some passing traffic and buildings to add interest to the background. Finally, you will animate the slide show of the artwork on the easel.
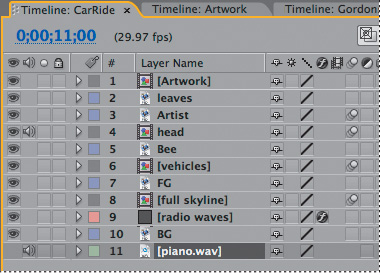
If necessary, double-click the CarRide composition in the Project panel to open it in the Composition and Timeline panels.
Choose File > Save As.
In the Save As dialog box, navigate to the AE7_CIB > Lessons > Lesson04 > Finished_Project folder.
Name the project Lesson04_Finished.aep, and then click Save.
To animate to various elements of the scenery efficiently with the background, you’re going to use parenting. As you learned in Lesson 3, “Animating Text,” creating a parenting relationship between layers synchronizes the changes in the parent layer with the corresponding transformation values of the child layers. In Lesson 3, you used parenting to quickly apply one layer’s scale transformation to another layer. Now, you will use it to synchronize the movement of the objects in three layers—the Leaves, Full Skyline, and the FG (foreground) layers—with the BG (background) layer of the animation.
First, set up the parent-child relationship between the relevant layers in the Timeline panel.
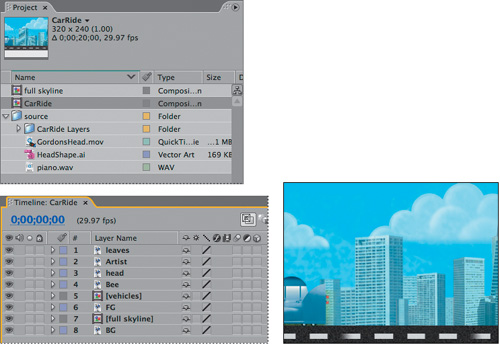
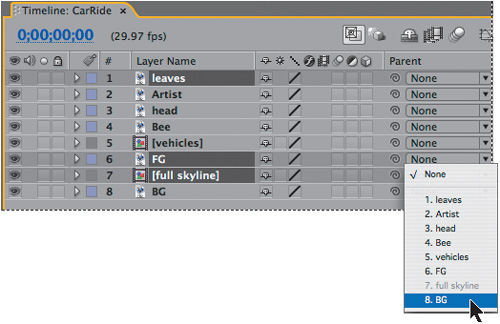
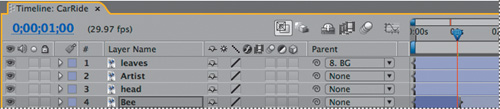
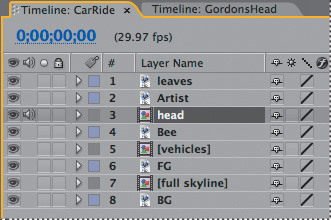
In the Timeline panel, Ctrl-click (Windows) or Command-click (Mac OS) to select the Leaves, FG, and Full Skyline layers.
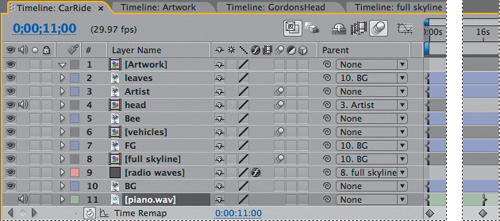
In the Parent column for any one of the selected layers, choose 8.BG from the pop-up menu. This establishes all three selected layers as child layers to the parent layer, which is layer 8, BG (the background).
Now, you’ll animate the position of the background layer—the parent layer—so that it moves horizontally. This, in turn, will make the child layers animate in the same way.
Press the Home key to make sure the current-time indicator is at the beginning of the time ruler.
Select the BG layer in the Timeline panel and press the P key to reveal its Position property.
Set the BG layer’s Position values to 1029.0, 120.0, and click the stopwatch icon (
 ) to create a Position keyframe. This moves the background layer off to the left side of the scene, as if the camera had been moved.
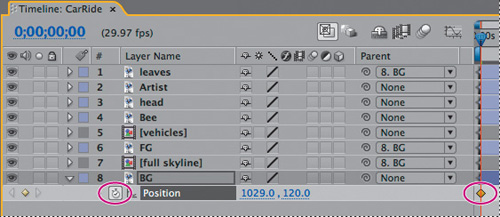
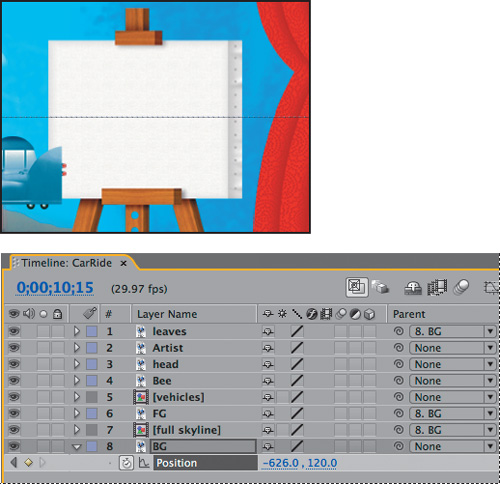
Go to 10:15.
Set the BG layer’s Position values to –626.0, 120.0. After Effects automatically sets a second keyframe and shows you the motion path of the animation in the Composition panel. The background now moves across the composition, and because the Leaves, Full Skyline, and FG layers are child layers to the BG (parent) layer, they all move horizontally as well, from the same starting position.
Select the BG layer and press U to hide its properties and keep the Timeline panel neat.
Another element of the composition that moves across the scene at the beginning of the animation is the bee. You will animate it next.
Press the Home key to go to 0:00.
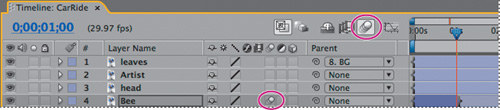
Select the Bee layer in the Timeline panel and press the P key to reveal its Position property. (The bee is not visible at 0:00 in the Composition panel.)
Set the Position values of the Bee layer to 825.0, 120.0, which puts the bee off-screen to the left at the beginning of the animation. Then, click the stopwatch icon (
) to create a Position keyframe.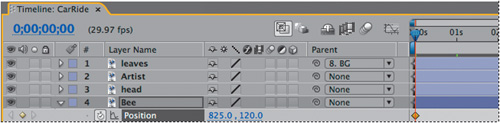
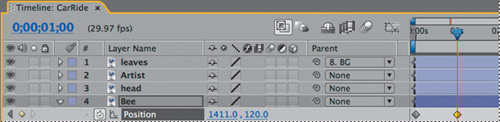
Go to 1:00 and set the Bee layer’s Position values to 1411.0, 120.0, which puts the bee off-screen to the right. After Effects adds a keyframe.
Select the Bee layer and press the U key to hide its Position property in the Timeline panel.
Since you don’t want the bee to appear in the composition after 1:00, you need to trim the layer. Trimming (hiding) footage at the beginning or end of a layer lets you change which frames are first or last in the composition. The first frame to appear is called the In point, and the last frame is called the Out point. You can trim by changing the In and Out points in the Layer panel or the Timeline panel, depending on what you want to change. For this exercise, you’ll change the Out point of the Bee layer in the Timeline panel.
To finish up with the bee’s animation, you will apply a motion blur so that its movement is more realistic.
Perform a quick manual preview to see the various elements in the scenery animate.
Drag the current-time indicator from 0:00 to 10:15. The animation of the background, leaves, bee, foreground objects, and the objects in the skyline makes it appear as if a camera is panning across the scene.
After you preview, return the current-time indicator to 0:00 and then choose File > Save to save your work.
The background is moving; now it’s time to animate the artist in his red car as he drives across the composition. To begin that process, you must first move the anchor point of the layer that contains the red car, without moving the layer’s relative position in the composition. The layer with the red car is called Artist. To edit the anchor point of the Artist layer, you need to work on the Artist layer in the Layer panel.
Double-click the Artist layer in the Timeline panel to open it in the Layer panel.
At the bottom of the Layer panel, choose View > Anchor Point Path to display the layer’s anchor point, which by default is at the center of the layer.

Select the Pan Behind tool (
 ) in the Tools panel (or press Y to select it).
Choose Fit Up To 100% from the Magnification Ratio pop-up menu if necessary to see the entire layer, and then drag the anchor point to the lower-left corner of the car.

Click the Composition panel name to view the CarRide composition.
Select the Artist layer in the Timeline panel and press P to reveal its Position property.
Set the Position values for the Artist layer to 50.0, 207.0 so that the car is in the center of the frame, and then click the stopwatch icon (
) to set a Position keyframe. This is a temporary position that lets you see the car on-screen while you mask the driver into place, which is your next task. Then, you will animate the car so that it drives across the composition.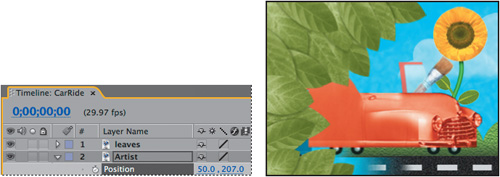
Select the Artist layer and press U to hide its properties, and then choose File > Save to save your work.
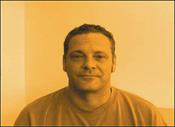
With the car positioned on-screen, you can give it a driver. To do this, you will mask a video head shot of the illustrator into a vector mask in the composition. This shape clips a frontal head shot into a side-view profile shape, which is a “Picasso-esque” signature style of the artist’s work.
For this task, you will create a new composition for the vector shape and the video clip.
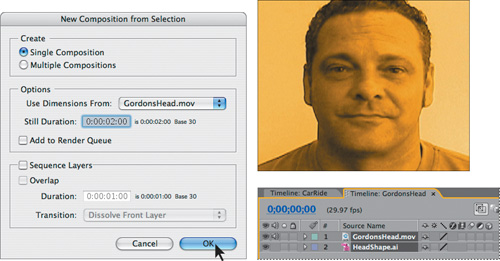
Ctrl-click (Windows) or Command-click (Mac OS) to select both GordonsHead. mov and HeadShape.ai in the Project panel, and drag them onto the Create A New Composition button (
 ) at the bottom of the panel.
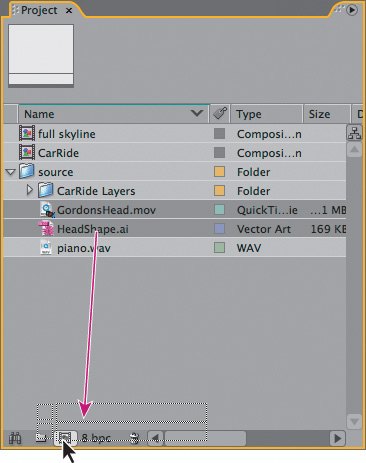
In the New Composition From Selection dialog box, choose Use Dimensions From > GordonsHead.mov, and then click OK. After Effects creates a new composition named GordonsHead based on the settings of the movie, and it opens the new composition in the Timeline and Composition panels.
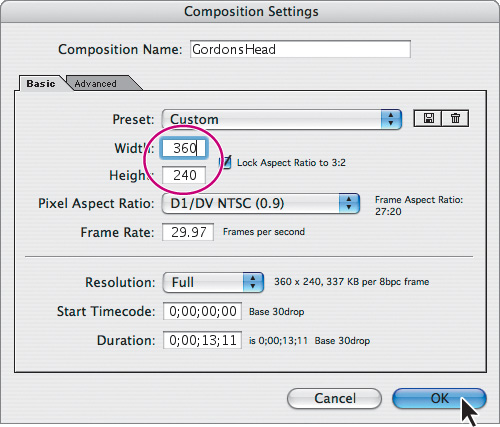
Unfortunately, the GordonsHead movie is a different resolution from the CarRide composition, so you need to fix that now.
Choose Composition > Composition Settings and set the Width to 360 pixels. After Effects automatically changes the Height to 240 pixels. Click OK.
Now, scale the layers to fit the composition.
Shift-click to select both the GordonsHead and HeadShape layers in the Timeline panel and choose Layer > Transform > Fit To Comp or press Ctrl+Alt+F (Windows) or Command+Option+F (Mac OS).
Make sure HeadShape is above GordonsHead in the layer stack. Drag to reposition the layers if necessary.
Drag the right side of the HeadShape layer duration bar to the end of the time ruler so that it is the same length as the GordonsHead layer (13:10).

There are a few ways to make masks in After Effects. You can, for example, clip a video or artwork to a vector shape that is drawn in After Effects, or you can use a shape that is imported from Illustrator. To be true to this artist’s style, you will use a vector profile for the head that Gordon Studer has created himself in Illustrator, which makes a nice, hard-edge mask for this stylized design.
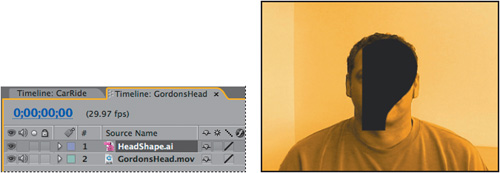
Click the Transfer Controls button at the bottom of the Timeline panel to view the Mode column.
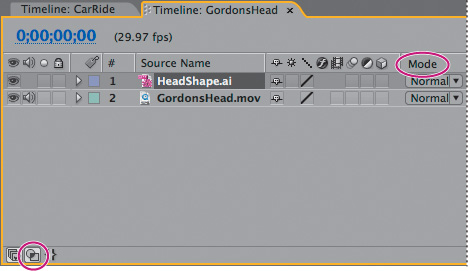
For the GordonsHead layer, choose TrkMat > Alpha Matte “HeadShape.ai.” In the Composition panel, notice that the movie is now constrained by the Illustrator shape.

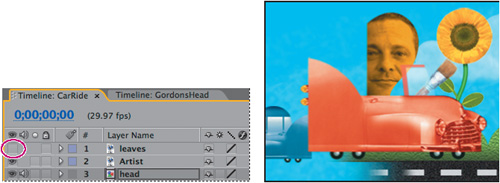
Now that Gordon Studer’s mug is masked to the vector shape, you need to attach it to the car. To do that, you’ll return to the main CarRide composition and swap the GordonsHead composition into the Head layer, which is currently a solid layer that serves as a placeholder.
Click the CarRide Timeline panel to bring it forward.
Select the Head layer in the Timeline panel and then do one of the following:
Select the GordonsHead composition in the Project panel and press Ctrl+Alt+/ (Windows) or Command+Option+/ (Mac OS).
Option-drag (Mac) or Alt-drag (Windows) the GordonsHead composition from the Project panel to the Head layer in the Timeline panel.
Using the Selection tool (
 ), drag the Head layer in the Composition panel so that Gordon Studer is sitting properly in the car.
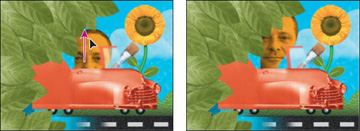
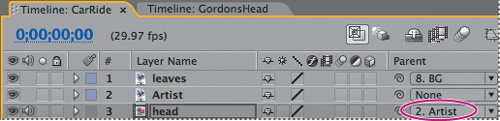
Now, use parenting again so that Gordon Studer’s head will animate with the car.
In the Head layer in the Timeline panel, choose Parent > 2. Artist.
Choose File > Save to save your work.
Finally, you’re ready to animate the car so that it drives on-screen at the beginning of the composition, scales larger during the middle of the composition—as if it’s approaching the camera—and then pops a wheelie and drives off-screen. You’ll start by keyframing the car’s position to get it on-screen.
Press the Home key to make sure the current-time indicator is at the beginning of the time ruler.
Click the Video switch in the Timeline panel to turn off visibility of Leaves layer so that you can clearly see the Artist layer below it.
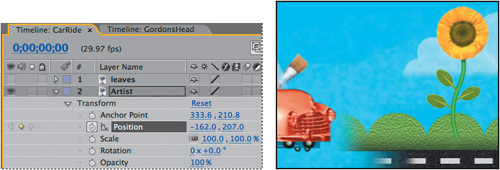
Select the Artist layer in the Timeline panel and expand all of its Transform properties.
Position the Artist layer off-screen to the left (behind the leaves) by changing its Position values to –162.0, 207.0.
Go to 2:20 and change the Position values for the Artist layer to 54.5, 207.0. After Effects adds a keyframe.
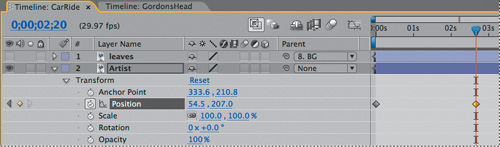
Go to 6:00 and click the Add/Remove Keyframe button (in the Switches column) for the Artist layer to add a Position keyframe for the Artist layer at the same values (54.5, 207.0).
When you animate the Position property, After Effects displays the movement as a motion path. You can create a motion path for the position of the layer or for the anchor point of a layer. A position motion path appears in the Composition panel; an anchor-point motion path appears in the Layer panel. The motion path appears as a sequence of dots in which each dot marks the position of the layer at each frame. An X in the path marks the position of a keyframe. The density of dots between the Xs in a motion path indicates the layer’s relative speed. Dots close together indicate a slower speed; dots farther apart indicate a faster speed.
The car is zooming on-screen; now, you’ll make it appear as if the car is getting closer to the camera by scaling it larger. Then you’ll make it pop a wheelie by keyframing the Rotation property.
Go to 7:15 and set the Scale values for the Artist layer to 80.0, 80.0%. Then, click the stopwatch (
) to set a Scale keyframe.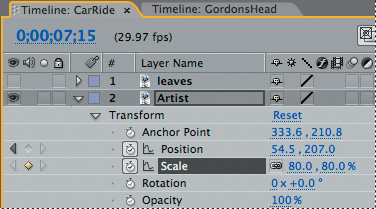
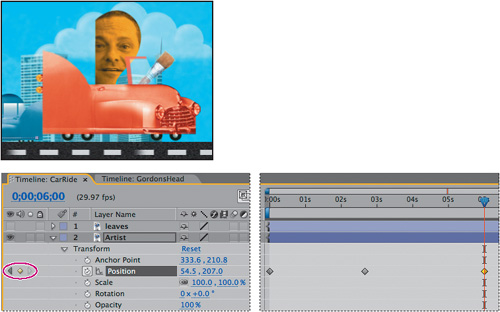
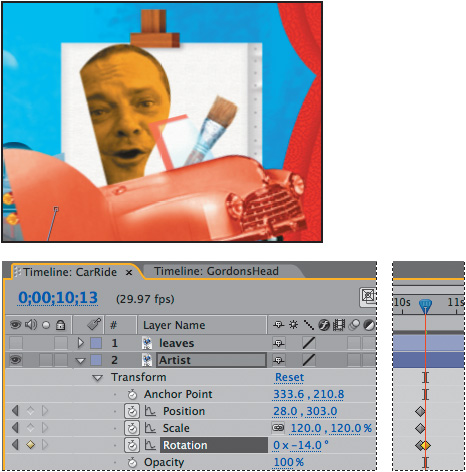
Go to 10:10 and set the Position values for the Artist layer to 28.0, 303.0. After Effects adds a keyframe.

Still at 10:10, change the Scale values to 120.0, 120.0%. After Effects adds a keyframe.
Still at 10:10, click the stopwatch icon (
) for the Rotation property to set a Rotation keyframe at the default value, 0.0°.Go to 10:13 and change the Rotation value to –14.0°. After Effects adds a keyframe, and now the car pops a wheelie.
Now, animate the car driving off-screen.
Go to 10:24 and set the Position values for the Artist layer to 369.0, 258.0. After Effects adds a keyframe.

Finally, apply a motion blur to smooth out the driving sequence.
Turn on Motion Blur switch (
 ) for the Artist and Head layers.
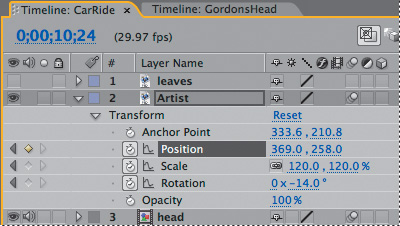
The blur will be visible as the car drives off-screen, and it will be visible for the flying bee as well, because you turned on motion blur for that layer earlier in the lesson. You’ll see all of this in a minute.
Select the Artist layer in the Timeline panel and press UU to hide its Transform properties.
To continue practicing creating keyframe animations, you will now animate the passing traffic and the buildings in the background.
Perhaps you noticed in the preview you just watched: The blue car is tailgating the artist in his red hot rod. The blue car is actually on a precomposed layer that also contains a yellow car. Next, make the scene more dynamic by animating the blue and yellow cars so that they drive past the artist’s car in the background.
Note
Remember, a precomposed layer is simply a layer with nested layers in it. In this example, the precomposed Vehicles layer contains one nested layer with a blue car and one nested layer with a yellow car.
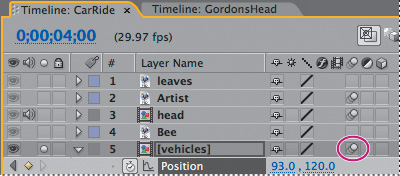
Select the Vehicles layer in the Timeline panel and click the Solo switch (
 ) to isolate it as you work. Then, press the P key to reveal the layer’s Position property.
Go to 3:00.
Using the Selection tool (
), drag the Vehicles layer in the Composition panel so that both cars are off-screen to the right. Press Shift after you start to drag to constrain the movement vertically. Or, simply set the Vehicles layer’s Position values to 684.0, 120.).Click the stopwatch icon (
) to create a Position keyframe for the Vehicles layer.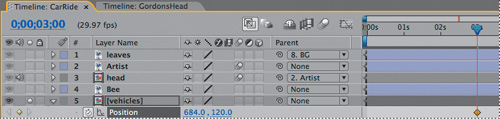
Go to 4:00 and drag the Vehicles layer in the Composition panel so that both cars are off-screen to the left. Or, simply set the layer’s Position values to 93.0, 120.0. After Effects adds a keyframe.
Turn on motion blur for the Vehicles layer.
Select the Vehicles layer in the Timeline panel and press U to hide its properties.
Unsolo the Vehicles layer, and then manually preview the passing traffic by dragging the current-time indicator from about 2:25 to 4:06.
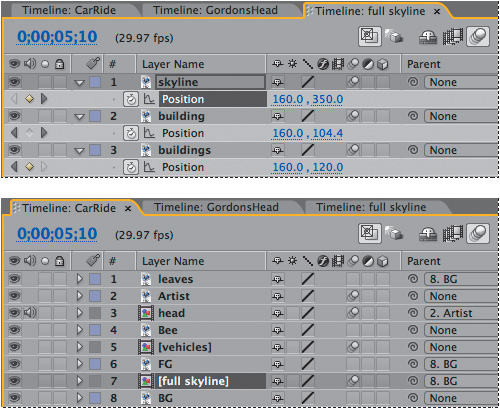
Animated buildings? You bet. You’ll animate a couple of buildings rising and “jumping” in the background as the artist cruises through downtown San Francisco. Once again, you’ll be working with a precomposed layer (Full Skyline), but by opening it up, you can individually animate its nested layers.
Alt-double-click (Windows) or Option-double-click (Mac OS) the full Skyline layer in the Timeline panel to open it in its own Timeline and Composition panels. Notice that this composition has three layers: Skyline, Building, and Buildings. You’ll start with the Buildings layer.
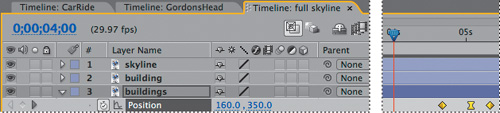
Go to 5:10, select the Buildings layer in the Full Skyline Timeline panel, and press P to reveal its Position property.
Click the stopwatch icon (
) to set a Position keyframe for the Buildings layer at the default values (160.0, 120.0).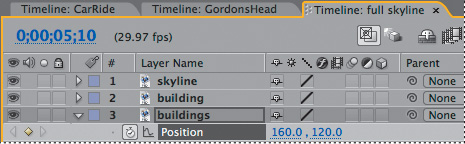
Go to 4:20 and in the Composition panel, use the Selection tool (
) to drag the Buildings layer off the bottom of the composition until its y Position value is 350.0. Press Shift after you start to drag to constrain the horizontal axis. After Effects adds a keyframe.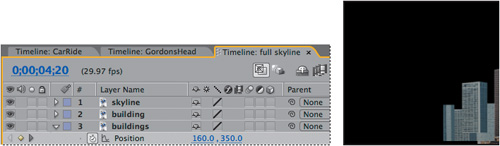
Go to 5:02 and drag the Buildings layer up in the Composition panel until its y Position value is 90.0. After Effects adds a keyframe.
Great. You’ve got your first animated building. Next, you’ll finesse the movement at the high point of the jump to make it more natural. (Naturally jumping buildings? Aw, come on. This is fun.)
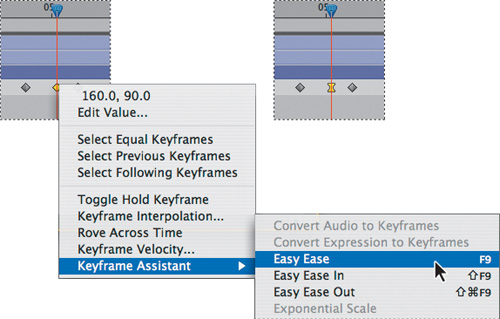
Finesse the movement at the high point of the jump by adding an easy ease.
Right-click (Windows) or Control-click (Mac OS) the keyframe at 5:02 and choose Keyframe Assistant > Easy Ease. This adjusts the speed of change as the motion approaches and retreats from the keyframe.
Drag the current-time indicator from 4:20 to 5:10 if you’d like to watch a manual preview of the jumping building.
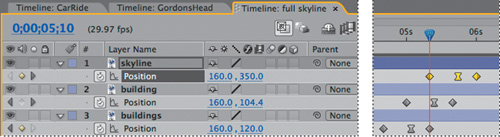
To animate the other layers in the Full Skyline composition, you’ll copy and paste the Buildings layer’s keyframes to those other layers—but at different times—so that the elements jump in sequence.
Click the Position property name for the Buildings layer to select all of the property’s keyframes, and then choose Edit > Copy or press Ctrl+C (Windows) or Command+C (Mac OS).
Go to 5:00 and select the Building layer in the Timeline panel. Choose Edit > Paste or press Ctrl+V (Windows) or Command+V (Mac OS) to paste the keyframes to this layer.
Go to 5:10 and select the Skyline layer. Choose Edit > Paste or press Ctrl+V (Windows) or Command+V (Mac OS) again to paste the keyframes to this layer, too.
Select the Building layer name and press the P key to see the copied keyframes. Repeat for the Skyline layer.
Turn on motion blur for all three layers, and then switch to the CarRide Timeline panel and turn on motion blur for the Full Skyline precomposed layer. This applies motion blur to all of the nested layers.
You’ve done a lot of work. Let’s see how the animation looks from the beginning.
Press the 0 key on the numeric keypad to watch a RAM preview.
Choose File > Save to save your work.
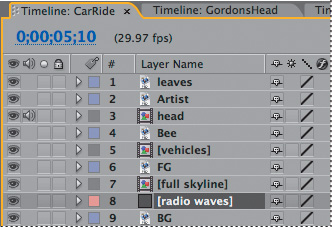
You’ve created several keyframed animations in this project. You’ll switch gears now and apply an effect in this next exercise. The effect will animate some radio waves emitting from the Transamerica Pyramid building.
You need to apply the radio wave effect on its own layer, which will be a solid-color layer.
Make sure you’re in the CarRide Timeline panel.
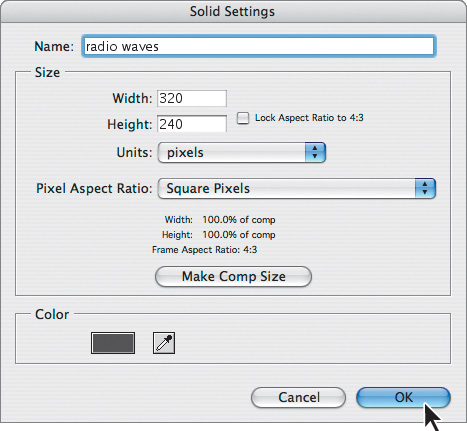
Choose Layer > New > Solid. In the Solid Settings dialog box that appears, name the new layer radio waves, and then click the Make Comp Size button. Then click OK to create the layer.
Drag the Radio Waves layer in the Timeline panel so that it sits above the BG layer.
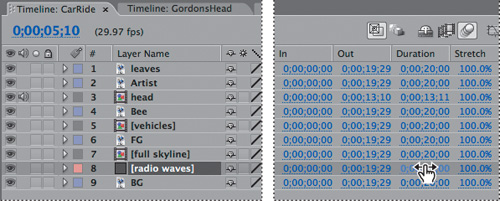
By default, the Radio Waves layer lasts the duration of the composition. However, you need it to be only a few seconds long, to last the length of the effect. So you need to change the layer’s duration.
Click the Expand Or Collapse The In/Out/Duration/Stretch Panes button (
 ) in the lower-left corner of the Timeline panel to view those four columns.
Click the blue, underlined Duration value for the Radio Waves layer.
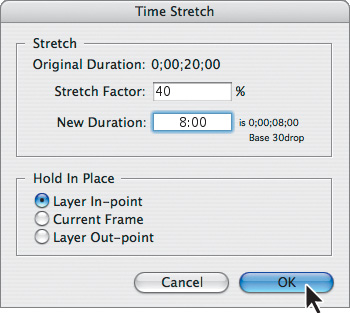
In the Time Stretch dialog box, set the New Duration to 8:00. Then, click OK.
In the time ruler, drag the Radio Waves layer duration bar (from the center) so that it starts at 6:00. Watch the In value for the layer to see when it’s at 6:00.
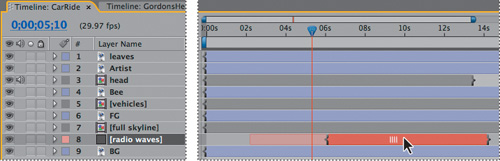
Go to 6:00, the first frame of the radio waves effect.
Now, you’re ready to apply the radio waves effect to the solid layer.
With the Radio Waves layer selected in the Timeline panel, choose Effect > Generate > Radio Waves. Nothing changes in the Composition panel, because the first wave hasn’t emitted yet.
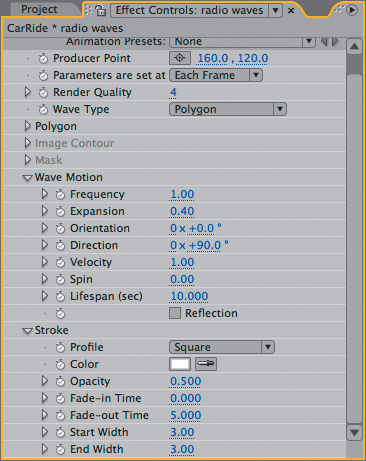
In the Effect Controls panel, expand the Wave Motion and Stroke properties. Then, do the following:
Choose Parameters Are Set At > Each Frame.
Set the Expansion rate to 0.40.
Set the Velocity to 1.00.
Set the Opacity to 0.500.
Set the Color to white (RGB=255, 255, 255).
Set both the Start Width and End Width to 3.00.
Still in the Effect Controls panel, click the cross-hair icon for the Producer Point setting near the top of the panel, and then in the Composition panel, click to set the producer point at the top of the pyramid.
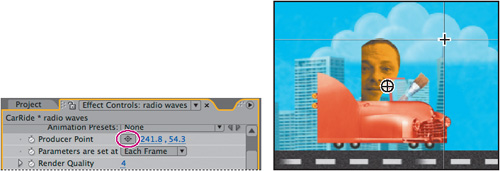
Radio waves with the settings you specified will now emit from the top of the pyramid building. You just need to parent the Radio Waves layer to the Full Skyline layer so that the waves travel with the building across the composition.
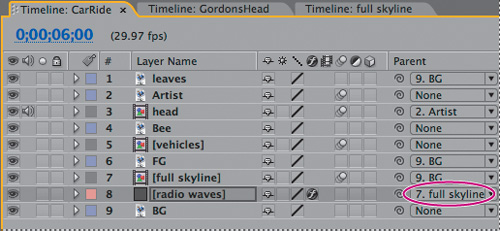
In the Parent column of the Radio Waves layer, choose 7. Full Skyline from the pop-up menu.
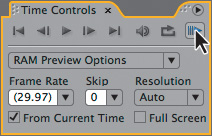
Go to 5:28, just before the radio waves effect begins, and in the Time Controls panel, check the From Current Time box. Then click the RAM Preview button to watch a RAM preview of just the radio waves effect.
After watching the preview, tidy up the Timeline panel.
Click the Expand Or Collapse The In/Out/Duration/Stretch Panes button (
) to hide those columns, and then press the Home key to go to the beginning of the time ruler.
Now that you’ve completed this complex animation of the artist driving through a stylized cityscape, it’s time to add samples of his work to the easel—this is, after all, the point: to show off the artist’s work to potential new clients. However, this slide-show technique could easily be adapted to other uses, such as presenting family photos or making a business presentation.
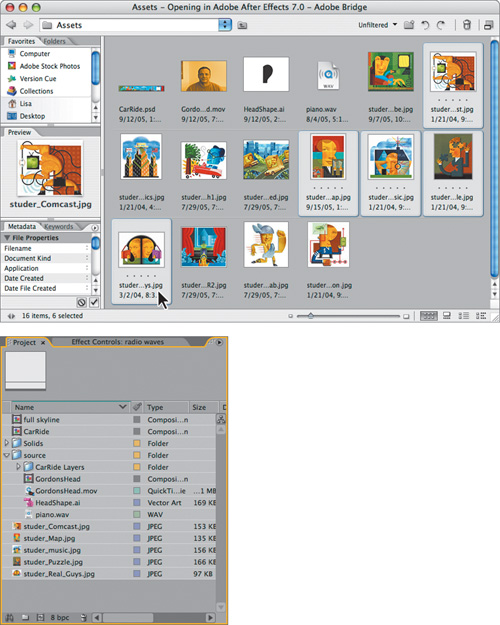
The artist has provided a folder of sample artwork, but you’re not going to use all of the images. To help you choose, use Bridge to preview them.
Choose File > Browse to jump to Bridge.
In the Folders panel, navigate to the AE7_CIB > Lessons > Lesson04 > Assets folder on your hard disk.
Click the various “studer_” images and study them in the Preview panel.
Ctrl-click (Windows) or Command-click (Mac OS) to select your five favorite images, and then double-click to add them to the After Effects Project panel. We chose studer_Comcast.jpg, studer_map.jpg, studer_music.jpg, studer_Puzzle.jpg, and studer_Real_Guys.jpg.
Leave Bridge open in the background.
You’ll put these images in their own composition, which will make it easier to turn them into a slide show complete with transition effects between slides.
In After Effects, Shift-click to select the five Studer images in the Project panel, and drag them onto the Create A New Composition button (
) at the bottom of the panel.In the New Composition From Selection dialog box, do the following:
In the Create area, select Single Composition.
In the Options area, set the Still Duration to 2:00.
Check the Sequence Layers and Overlap boxes.
Set the Duration to 0:10.
Choose Transition > Cross Dissolve Front And Back Layers.
Click OK.
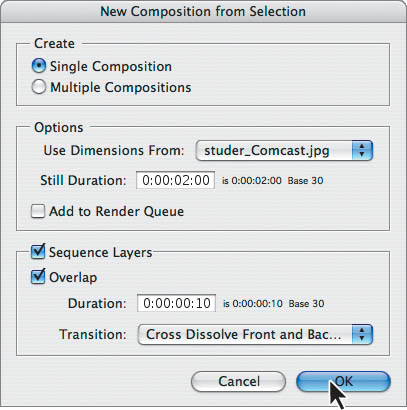
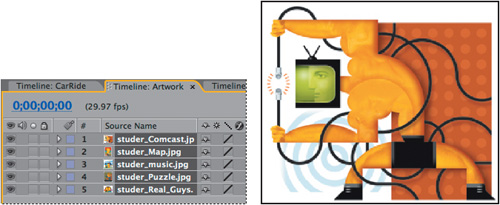
The transition option creates a sequence of still images that dissolve one to the next. When you click OK, After Effects opens the new composition, named for the Studer image at the top of the list in the Project panel, in the Composition and Timeline panels. Before continuing, rename the composition something more intuitive.
Choose Composition > Composition Settings and rename the composition Artwork. Then, click OK.
Wasn’t it easy to make the slide show? Now, you have to position the slide show on the canvas of the easel. The slides are actually larger than the canvas, but since they’re in a composition, you can size them as a unit.
Switch to the CarRide Timeline panel and go to 11:00, which is when the canvas is centered in the composition.
Drag the Artwork composition from the Project panel into the CarRide Timeline panel, placing it at the top of the layer stack.

Currently, the Artwork layer is set to start at 0:00. You need to adjust the timing of the layer so that it appears at 11:00.
Drag the layer duration bar (from the center) for the Artwork layer in the time ruler so that its In point is at 11:00.

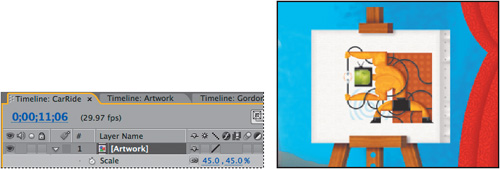
Now, scale the slides to fit the canvas.
With the Artwork layer selected in the Timeline panel, press S to reveal its Scale property.
Set the Scale values to 45.0, 45.0%.
Select the Artwork layer in the Timeline panel and choose Layer > Blending Mode > Darken. This drops out the pure white in each image and replaces it with the softer white of the canvas.
Click the RAM Preview button (
 ) in the Time Controls panel to watch a RAM preview of the slide show. (Make sure the From Current Time box is checked to start the RAM preview at 11:00.)
As it stands, the first slide instantly appears in the easel at 11:00. Let’s animate the Artwork layer’s opacity so that the first slide fades in.
Select the Artwork layer in the Timeline panel and press T to reveal its Opacity property.
Go to 11:00.
Set the Artwork layer’s Opacity to 0%, and click the stopwatch icon (
) to set an Opacity keyframe.Go to 11:03 and set the Artwork layer’s Opacity to 100%. After Effects adds a keyframe. That should do the trick.
Manually preview the animation from 11:00 to 11:03 to see the first slide fade in.
Select the Artwork layer in the Timeline panel and press U to hide its Opacity property. Then, choose File > Save to save your work.
Give yourself a hand. You’ve done a lot of animating in this project. You’re not done yet, though. Although Gordon Studer speaks to the viewer while he drives the car across the composition, you’ll add some polish by dropping in a background audio track.
Choose File > Browse to jump to Bridge.
In the content area, click to select the piano.wav thumbnail preview. Bridge lets you preview audio.
Click the Play button (
 ) in the Preview panel to hear the track. Click the Pause button (
 ) to stop.
Double-click the piano.wav file to import it into the After Effects Project panel.
Drag piano.wav from the Project panel into the CarRide Timeline panel, placing it at the bottom of the layer stack.
Notice the duration bar for the Piano layer: It doesn’t last for the entire length of the composition. You can have it play continuously for the entire composition, however, by looping it.
Luckily, this music track has been composed to loop cleanly; you just have to know how to create a loop. You’re going to do it using the Time Remapping feature. You’ll learn to use Time Remapping in more depth in Lesson 5, “Animating Layers.” For now, you’re simply going to use it to loop the audio in this project.
Select the Piano layer in the Timeline panel.
Choose Layer > Time > Enable Time Remapping. A Time Remap property appears for the layer in the Timeline panel, and two Time Remap keyframes appear for the layer in the time ruler.
Alt-click (Windows) or Option-click (Mac OS) the stopwatch icon (
) for the layer’s Time Remap property. This sets the default expression for time remapping; it has no immediate effect in the Composition panel.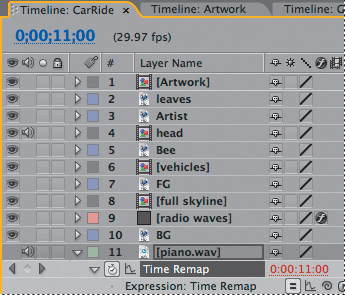
In the Expression: Time Remap property for the Piano layer, click the Expression Language pop-up menu and choose Property > loopOut(type = “cycle”, numKeyframes = 0).
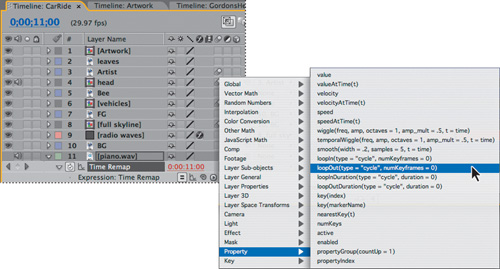
The audio is now set to loop in a cycle, repeating the clip endlessly. All you need to do is extend the Out point of the layer to the end of the composition.
Select the Piano layer in the Timeline panel and press the End key to go to the end of the time ruler. Then, press Alt+] (Windows) or Option+] (Mac OS) to extend the layer to the end of the composition.
You’ll preview the entire composition in a minute.
Select the Piano layer in the Timeline panel and press U to hide its properties, then choose File > Save to save your work.
Everything is looking good, but zooming in for a final close-up of the slide show will really focus the viewer’s attention on the artwork.
In the Project panel, drag the CarRide composition onto the Create A New Composition button (
) at the bottom of the panel. After Effects creates a new composition, named CarRide 2, and opens it in the Timeline and Composition panels. Rename the composition to avoid confusion.With the CarRide 2 composition selected in the Project panel, press Enter (Windows) or Return (Mac OS), and type Lesson04. Then, press Enter or Return again to accept the new name.
In the Lesson04 Timeline panel, go to 10:24, the first frame where the car clears the right side of the composition.
Select the CarRide layer in the Lesson04 Timeline panel and press S to reveal its Scale property.
Click the stopwatch icon (
) to set a Scale keyframe at the default values, 100.0, 100.0%.Go to 11:00 and change the Scale values to 110.0, 110.0%. After Effects adds a keyframe, and for the rest of the composition, the slide show will be prominent and eye-catching.
Select the CarRide layer and press U to hide its Scale property.
It’s time to watch the whole shebang.
In the Time Controls panel, uncheck the From Current Time box and then click the RAM Preview button (
) to watch a RAM preview of the entire composition.Press the spacebar to stop playback when you’re done.
Choose File > Save.
Congratulations. You’ve just created a complex animation, practicing all kinds of After Effects techniques and capabilities along the way, from parenting to audio looping. Although you’re not going to render it out right now, this project is used for Lesson 12, “Rendering and Outputting.” You can skip to that lesson now if you’d like to learn how to output this project for a few different media, or you can proceed sequentially through the book and render it later.