Whether you use After Effects to animate a simple DVD title sequence or to create complex special effects, you generally follow the same basic workflow. The After Effects interface facilitates your work and adapts to each stage of production.
In this lesson you’ll learn how to do the following:
<objective>Create a project and import footage.
</objective> <objective>Create compositions and arrange layers.
</objective> <objective>Navigate the After Effects interface.
</objective> <objective>Use the Project, Composition, and Timeline panels.
</objective> <objective>Apply basic keyframes and effects.
</objective> <objective>Preview your work using standard and RAM previews.
</objective> <objective>Customize the workspace.
</objective> <objective>Adjust preferences related to the workspace.
</objective> <objective>Find topics in After Effects Help.
</objective>The basic After Effects workflow adheres to the following five steps: import and organize footage; create compositions and arrange layers; animate elements and add effects; preview your work; and render and output the final composition so that it can be viewed by others. In this lesson, you will create a simple animated video using this workflow, and along the way, you’ll learn your way around the After Effects interface.
This lesson will take about 1 hour to complete.
</feature>Make sure the following files are in the AE7_CIB > Lessons > Lesson01 folder on your hard disk, or copy them from the Adobe After Effects 7.0 Classroom in a Book DVD now.
In the Assets folder: DJ.mov, kaleidoscope_waveforms.mov, pulsating_radial_waves. mov, bgwtext.psd, gc_adobe_dj.mp3
In the Sample_Movie folder: Lesson01.mov
When you begin each lesson of this book, it’s a good idea to restore the default preferences for After Effects. (See “Restoring default preferences,” page 5.) You can do this with a simple keyboard shortcut.
Press Ctrl+Alt+Shift (Windows) or Option+Command+Shift (Mac OS) while starting After Effects to restore default preferences settings. When prompted whether you want to delete your preferences file, click OK.
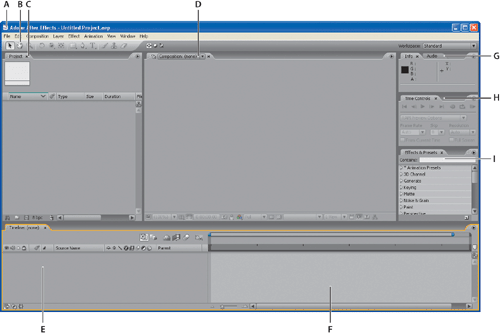
After Effects opens to display an empty, untitled project.
An After Effects project is a single file that stores references to all the footage you use in that project. It also contains compositions, which are the individual containers used to combine footage, apply effects, and, ultimately, drive the output.
When you begin a project, the first thing to do is add footage to it.
Choose File > Import > File or press Ctrl+I (Windows) or Command+I (Mac OS).
Navigate to the Assets folder in your AE7_CIB > Lessons > Lesson01 folder. Shift-click to select all of the files in the folder, and then click Open.
A footage item is the basic unit in an After Effects project. You can import many types of footage items, including moving image files, still-image files, still-image sequences, audio files, layered files from Adobe Photoshop and Adobe Illustrator, other After Effects projects, and projects created in Adobe Premiere Pro. As you build a project, you can import footage items at any time.
Because one of the footage items for this project is a multilayer Photoshop file, After Effects asks how you want to import it.
In the Bgwtext.psd dialog box that appears, choose Import Kind > Composition to import the layered Photoshop file as a composition. Then click OK. Your footage items appear in the Project panel.

In the Project panel, deselect all footage items and then click to select any of the them. Notice that a thumbnail preview appears at the top of the Project panel. Also notice that you can see the file type and size, as well as other information about each item, in the Project panel columns.
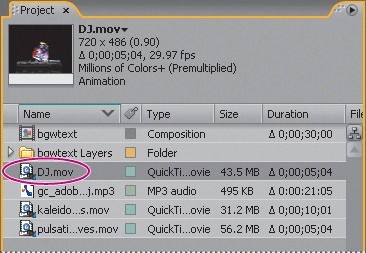
When you import files, After Effects does not copy the footage item itself into your project, but rather creates a reference link in the Project panel to the footage item. This saves disk space. If you use another application to modify footage that is used in a project, the changes appear in After Effects the next time you open the project.
To save time and minimize the size and complexity of a project, import a footage item once and then use it multiple times in a composition. You may need to import a footage item more than once, however, such as if you want to use it at two different frame rates.
Enough about importing footage. Now is a good time to save the project.
Choose File > Save or press Ctrl+S (Windows) or Command+S (Mac OS). In the Save As dialog box, navigate to the AE7_CIB > Lessons > Lesson01 > Finished_Project folder. Name the project Lesson01_Finished.aep, and then click Save.
The next part of the workflow is to create a composition. A composition is where you create all animation, layering, and effects. An After Effects composition has both spatial dimensions and a temporal dimension, called a duration, or length in time.
Compositions include one or more footage items—video, audio, still images—arranged in the Composition panel and in the Timeline panel. Simple projects may include only one composition, while elaborate projects may include several compositions to organize large amounts of footage or intricate effects sequences.
You will now create a composition by selecting your footage items and dragging them into the Timeline panel.
In the Project panel, Ctrl-click (Windows) or Command-click (Mac OS) to select the Bgwtext composition as well as the DJ, Gc_adobe_dj, Kaleidoscope_waveforms, and Pulsating_radial_waves footage items.
Drag the selected footage items into the Timeline panel. The New Composition From Selection dialog box appears.
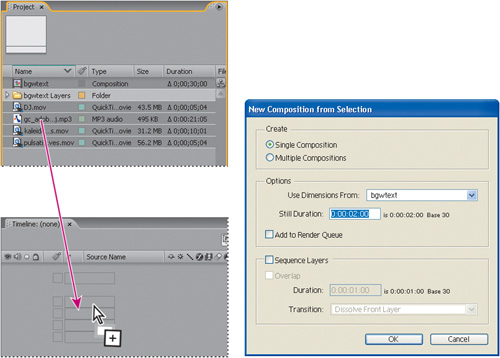
After Effects bases the size of the new composition on the selected footage. In this example, all of the footage is sized identically, so you can accept the default settings.
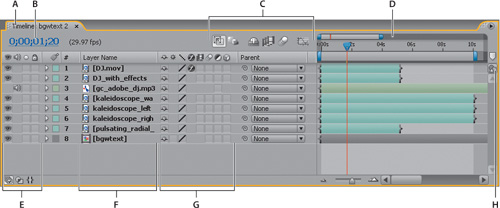
Click OK to create the new composition. The footage items appear as layers in the Timeline panel, and a visual display of the composition, named Bgwtext 2, appears in the Composition panel.
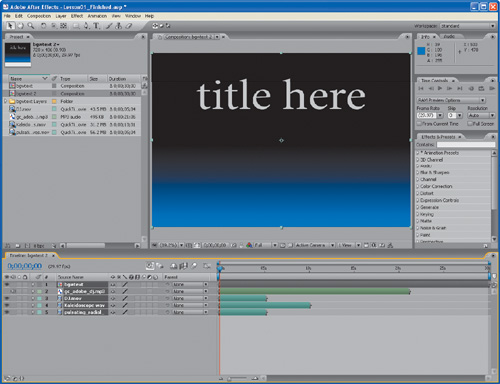
When you add a footage item to a composition, the footage becomes the source for a new layer. A composition can have any number of layers, and you can also include a composition as a layer in another composition, which is called nesting.
In this composition, there are five footage items and therefore five layers in the Timeline panel. Depending on the order in which the elements were selected when you imported them, your layer stack may differ from the one shown in the preceding figure. The layers need to be in a specific order as you add effects and animations, however, so let’s take care of that now.
Drag Bgwtext to the bottom of the layer stack if it is not already there. Drag the other four layers so that they’re in the order shown in the following figure.
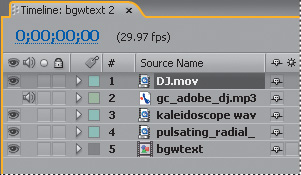
From this point forward in the workflow, you should be thinking about layers, not footage items. To that end:
Click the Source Name column title in the Timeline panel to change it to Layer Name.
Choose File > Save to save your project so far.
Now that your composition is set up, you can start having fun—applying effects, making transformations, and adding animation. You can add any combination of effects and modify any of a layer’s properties, such as size, placement, and opacity. Using effects, you can alter a layer’s appearance or sound, and even generate visual elements from scratch. The easiest way to start is to apply any of the hundreds of effects included with After Effects.
Note
This exercise is just the tip of the iceberg. You will learn more about effects and presets in Lesson 2, “Creating a Basic Animation Using Effects and Presets,” and throughout the rest of this book.
You’ll apply the effects to duplicates of selected layers—the DJ layer and the Kaleidoscope_waveforms layer. This is a good practice because it leaves the original layers intact in case you need them later.
Select layer 1, DJ.mov, in the Timeline panel and then choose Edit > Duplicate. A new layer with the same name appears at the top of the stack, so layers 1 and 2 are now both DJ.mov.
Select layer 2 and rename it to avoid confusion: Press Enter (Windows) or Return (Mac OS) to make the name editable and type DJ_with_effects. Then press Enter or Return again to accept the new name.
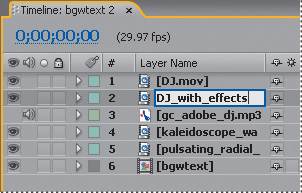
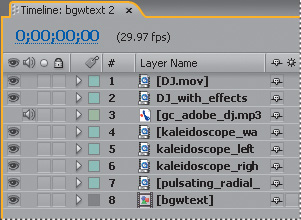
Select the Kaleidoscope_waveforms layer and make two duplicates. Then, rename the duplicates kaleidoscope_left and kaleidoscope_right.
Drag if necessary to rearrange the layers in the Timeline panel so that they’re in the following order:
Now you will add an effect—a radial blur—to the DJ. The Radial Blur effect creates blurs around a specific point in a layer, simulating the effects of a zooming or rotating camera.
Select the DJ_with_effects layer in the Timeline panel. Notice that layer handles appear around the layer in the Composition panel.
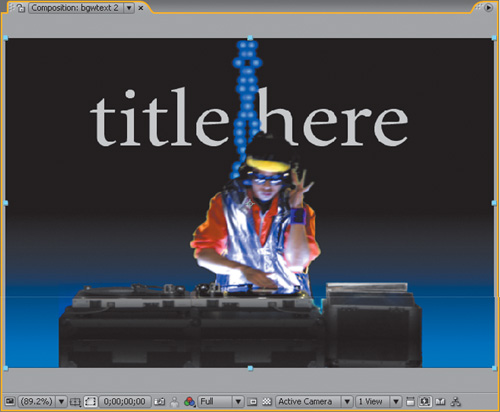
In the Effects & Presets panel at the right side of the application window, type radial blur in the Contains field. After Effects searches for effects and presets that contain the letters you type, and displays the results interactively. When you type the B, the Radial Blur effect, located in the Blur & Sharpen category, appears in the panel.

Drag the Radial Blur effect onto the selected layer in the Timeline panel. After Effects applies the effect and automatically opens the Effect Controls panel in the upper-left area of the workspace.
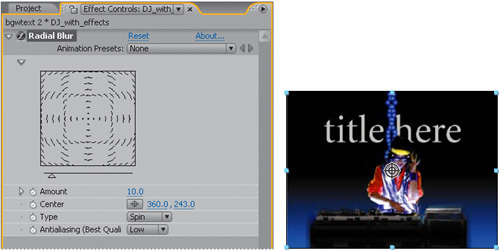
Now, customize the settings.
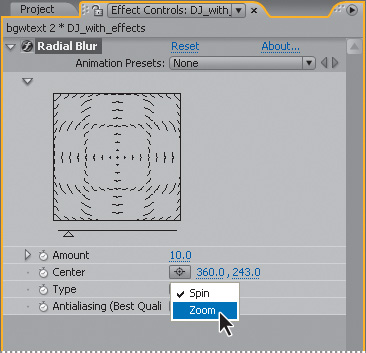
In the Effect Controls panel, choose Type > Zoom.
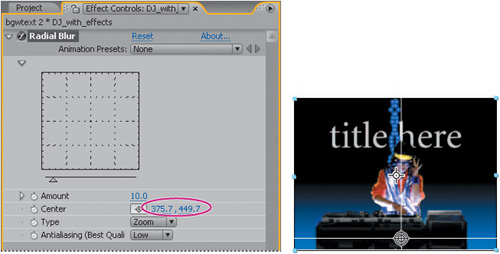
Move the center point of the blur lower by dragging the center cross hair (
 ) down in the Composition panel until it’s over the keyboard. Notice that as you drag, the Center value updates in the Effect Controls panel. The left and right values are x and y coordinates, respectively. Center the blur at approximately 375, 450.
Finally, increase the Amount to 200.0.

To punch up the brightness of this layer, you will apply the Exposure color-correction effect. This effect lets you make tonal adjustments to footage and simulates the result of modifying the exposure setting (in f-stops) of the camera that captured the image.
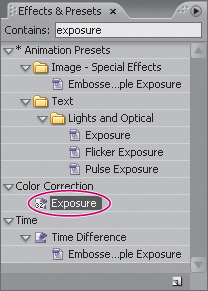
Locate the Exposure effect in the Effect & Presets panel by doing one of the following:
Drag the Color Correction Exposure effect onto the DJ_with_effects layer name in the Timeline panel. After Effects adds the Exposure settings to the Effect Controls panel under the Radial Blur effect.
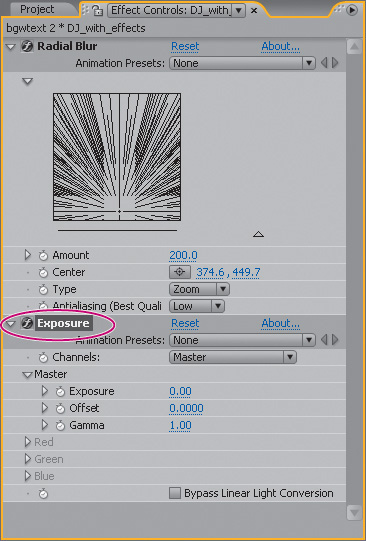
In the Effect Controls panel, click the downward-pointing triangle next to the Radial Blur effect to hide those settings so that you have a better view of the Exposure settings.
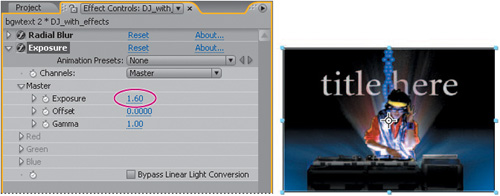
For Master Exposure, enter 1.60. This will boost the highlights in the layer to simulate an overexposed image.
The DJ looks smashing, so now let’s turn our attention to the kaleidoscope waveforms that are part of the background. You will reposition the copies you created earlier to create an edgy effect.
Select the Kaleidoscope_left layer (layer 5) in the Timeline panel.
Click the right-pointing triangle to the left of the layer number, and then click the next right-pointing triangle to open the layer’s Transform properties: Anchor Point, Position, Scale, Rotation, and Opacity.
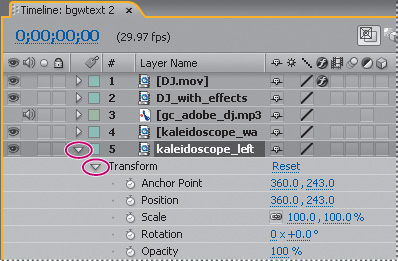
If you can’t see the properties, scroll down the Timeline panel using the scroll bar at the right side of the panel. Better yet, select the Kaleidoscope_left layer name again and press P. This reveals only the Position property, which is the only property you want to change for this exercise.
Let’s move this layer to the left about 200 pixels.
Change the x coordinate for the Position property to 160.0. Leave the y coordinate at 243.0.

Select layer 6, Kaleidoscope_right, and press P to reveal its Position property. You will move this layer to the right.
Change the x coordinate for the Kaleidoscope_right Position property to 560.0. Leave the y coordinate at 243.0. Now you can see the three waveforms—left, center, and right—in the Composition panel, hanging like a beaded light curtain.

To contrast the left and right waveforms with the center waveform, reduce their opacity.
Select the Kaleidoscope_left layer in the Timeline panel and press T to reveal its Opacity property. Set it to 30%.

Select the Kaleidoscope_right layer in the Timeline panel, press T to reveal its Opacity property, and set it to 30%.

Choose File > Save to save your work so far.
So far, you’ve started a project, created a composition, imported footage, and applied some effects. It all looks great, but how about some movement? After all, After Effects is all about motion graphics. So far, you’ve only applied static effects.
In After Effects, you can make any combination of a layer’s properties change over time using conventional keyframing, expressions, or keyframe assistants. You’ll explore many of these methods throughout the lessons of this book. For this exercise, you will animate the Position property of a text layer using keyframes, and then use a preset animation so that the letters “rain down” on-screen.
For this exercise, you will work in a separate composition.
Click the Project panel to bring it forward and then double-click the Bgwtext composition in the Project panel to open it as a composition in its own Timeline panel.

This composition is the imported, layered Photoshop file. The layers, Background and Title Here, appear in the Timeline panel. The Title Here layer contains placeholder text that was created in Photoshop. You must first make the layer editable.
Select the Title Here layer (layer 1) in the Timeline panel and then choose Layer > Convert to Editable Text.

A T icon appears next to the layer name in the Timeline panel, indicating that it is now an editable text layer. The layer is also selected in the Composition panel, ready for you to edit.
You’ll start by replacing the placeholder text with real text. Then, you’ll animate it.
Select the Horizontal Type tool (
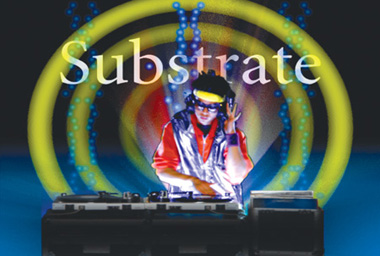
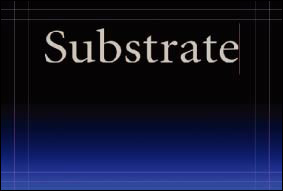
 ) in the Tools panel, and then drag over the placeholder text in the Composition panel to select it. Then, type Substrate.
Note
After Effects offers robust character and paragraph formatting controls, but the default settings—whatever typeface appeared when you typed—should be fine for this project. You’ll learn more about type in Lesson 3, “Animating Text.”
Now, you’re ready to roll.
With the Title Here layer still selected in the Timeline panel, press P to reveal its Position property.
Make sure you’re at the first frame of the animation by doing one of the following:
Drag the current-time indicator all the way to the left of the time ruler, to 0:00.
Press the Home key.
Using the Selection tool (
 ), drag the text layer down and off the bottom of the Composition panel, out of the viewing area. Press Shift after you start dragging to constrain the operation to the vertical axis.
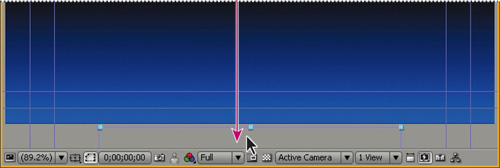
Click the stopwatch icon (
 ) for the layer’s Position property to create a Position keyframe. Notice that an orange diamond appears in the Position bar for the layer in the time ruler, indicating this new keyframe.
Keyframes are used to create and control animation, effects, audio properties, and many other kinds of change that occur over time. A keyframe marks the point in time where you specify a value, such as spatial position, opacity, or audio volume. Values between keyframes are interpolated. When you use keyframes to create a change over time, you must use at least two keyframes—one for the state at the beginning of the change, and one for the state at the end of the change.
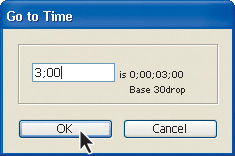
Go to 3:00 by doing one of the following:
Drag the current-time indicator to the right in the time ruler so that it’s positioned at 3:00.
Click the Current Time field in the Timeline panel or Composition panel, type 300 (for 3 seconds) in the Go To Time dialog box, and press Enter (Windows) or Return (Mac OS).
Now you can drag the Substrate title to its final on-screen position, but since you dragged it off-screen in step 3, you need to zoom out to grab it.
With the Title Here layer still selected in the Timeline panel, select the Zoom tool (
 ) and Alt-click (Windows) or Option-click (Mac OS) to zoom out so that you can see the text layer on the pasteboard of the Composition panel.
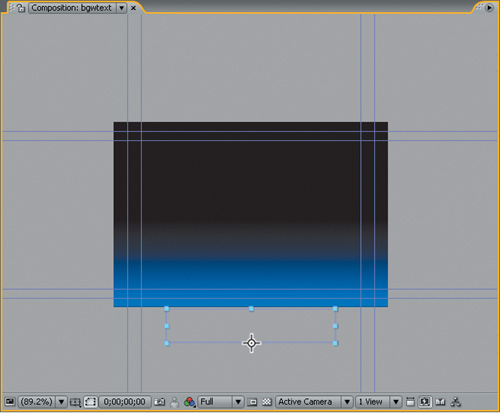
Switch back to the Selection tool (
 ) and drag the text layer up in the Composition panel, to the top quarter of the viewing area. Press Shift to constrain the drag operation to the vertical axis. Your final Position values should be approximately 359, 158.
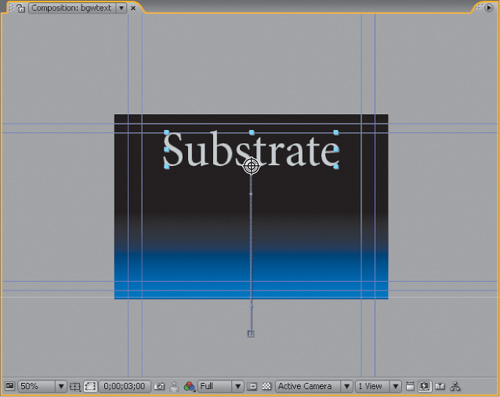
After Effects automatically creates a second keyframe at this position.
Zoom back in to the composition by choosing Fit Up To 100% from the Magnification Ratio pop-up menu in the lower-left corner of the Composition panel. If you’re wondering about the blue lines at the top, bottom, and sides of the Composition panel, these indicate title-safe and action-safe zones. Television sets enlarge a video image and allow some portion of its outer edges to be cut off by the edge of the screen. This is known as overscan. The amount of overscan is not consistent between television sets, so you should keep important parts of a video image, such as action or titles, within margins called safe zones. Keep your text inside the inner blue guides to ensure that it is in the title-safe zone, and keep important scene elements inside the outer blue guides to ensure that they are in the action-safe zone.
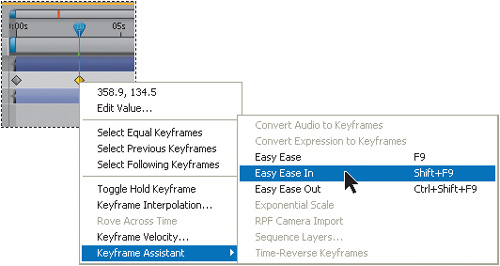
Even though this is a simple animation, you’ll learn good animation practices right away by adding ease-in controls using the Easy Ease feature. Easing into (and out of) animations keeps the motion from being too sudden or robotic.
So far, the text is moving on-screen. After it arrives, you don’t want it to just sit there, so now apply an animation preset to bring it to life.
With the Title Here layer still selected in the Timeline panel, go to 2:10, the point at which the text is almost at its final position. Remember, you can go to the time by dragging the current-time indicator or by clicking the Current Time field in the Timeline panel or Composition panel.
In the Effects & Presets panel, type raining in the Contains field to quickly locate the Raining Characters animation presets.
Drag the Raining Characters Out effect onto the word Substrate in the Composition panel to apply it to the text layer.
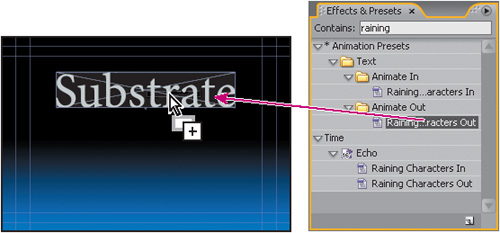
The Effect Controls panel opens for you to customize the effect, but the default settings are fine for this project.
Choose File > Save to save your work so far.
You’re probably eager to see the results of your work. After Effects provides several methods for previewing compositions, including standard preview, RAM preview, and manual preview (for a list of manual preview controls, see After Effects Help). All three methods are accessible through the Time Controls panel, which appears on the right side of the application window in the standard workspace.
Standard preview (commonly called a spacebar preview) plays the composition from the current-time indicator to the end of the composition. Standard previews usually play more slowly than real time. They are useful when your composition is simple or in its early stages and doesn’t require additional memory for displaying complex animations, effects, 3D layers, cameras, and lights. Let’s use it now to preview the text animation.
In the Bgwtext Timeline panel, make sure that the video switch (
 ) is selected for the layers that you want to preview—the Title Here and Background layers, in this case.
Press the Home key to go to the beginning of the time ruler.
Do one of the following:
Click the Play/Pause button (
 ) in the Time Controls panel.
Press the spacebar.
To stop the standard preview, do one of the following:
Click the Play/Pause button in the Time Controls panel.
Press the spacebar.
RAM preview allocates enough RAM to play the preview (with audio) as fast as the system allows, up to the frame rate of the composition. Use RAM preview to play footage in the Timeline, Layer, or Footage panel. The number of frames played depends on the amount of RAM available to the application.
In the Timeline panel, RAM preview plays either the span of time you specify as the work area, or from the beginning of the time ruler. In the Layer and Footage panels, RAM preview plays only untrimmed footage. Before you preview, check which frames are designated as the work area.
Let’s preview the entire composition—the animated text plus graphic effects—using a RAM preview.
Click the Bgwtext 2 Timeline panel to bring it forward.
Make sure that the video switch (
 ) is turned on for all of the layers in the composition, and deselect all layers.
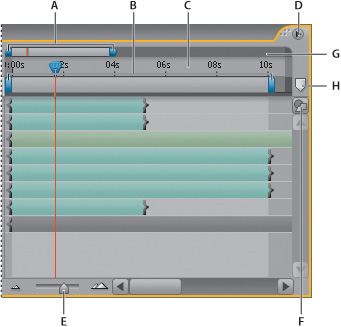
Set the work area to the time span you want to preview: The work area start bracket should be at 0:00, and the work area end bracket should be at 10:00.

Drag the current-time indicator to the beginning of the time ruler, or press the Home key.
Click the RAM Preview button (
 ) in the Time Controls panel or choose Composition > Preview > RAM Preview.
A green progress bar indicates as frames are cached to RAM. When all of the frames in the work area are cached, the RAM preview plays back in real time.
To stop the RAM preview, press the spacebar.
The more detail and precision you want to see, the more RAM is required for RAM preview. You can control the amount of detail shown in either the standard or RAM preview by changing the resolution, magnification, and preview quality of your composition. You can also limit the number of layers previewed by turning off the video switch for certain layers, or limit the number of frames previewed by adjusting the composition’s work area.
When you’re finished with your masterpiece—as you are now—you can render it at the quality settings you choose and create movies in the formats that you specify. You will learn more about exporting compositions in subsequent lessons, especially in Lesson 12, “Rendering and Outputting.” If you’d like to skip ahead to Lesson 12 and render this project, you’re welcome to do so. Otherwise, you can just save it, and we’ll continue getting acquainted with the After Effects workspace.
Perhaps in the course of this project, you resized or repositioned some panels, or opened new ones. As you modify the workspace, After Effects saves those modifications, so the next time you open the project, the most recent version of the workspace is used. However, you can choose to restore the original workspace at any time by choosing Window > Workspace > Reset “Standard.”
Alternatively, if you find yourself frequently using panels that aren’t part of the Standard workspace, or if you like to resize or group panels for different types of projects, you can save time by customizing the workspace to suit your needs. You can save any workspace configuration, or use any of the preset workspaces that come with After Effects. These predefined workspaces are suitable for different types of workflows, such as animation or effects work.
Let’s take a minute to explore the predefined workspaces in After Effects.
Note
If you closed the Lesson01_Finished.aep project at the end of the previous exercise, open it—or any other project—to complete the following exercise.
Choose Window > Workspace > Animation. After Effects opens the following panels at the right side of the application window: Info and Audio (grouped), Time Controls, The Smoother, The Wiggler, Motion Sketch, and Effects & Presets.
Choose Window > Workspace > Paint. The Paint and Brush Tips panels open and the Composition panel is replaced by the Layer panel, for easy access to the tools and controls you need to paint in your compositions.
You can save any workspace, at any time, as a custom workspace. Once saved, new and edited workspaces appear in the Window > Workspace submenu. If a project with a custom workspace is opened on a system other than the one on which it was created, After Effects looks for a workspace with a matching name. If After Effects finds a match (and the monitor configuration matches), it uses that workspace; if it can’t find a match (or the monitor configuration doesn’t match), it opens the project using the current local workspace.
Close the Paint and Brush Tips panels by clicking the small x next to their panel names.
Choose Window > Effects & Presets to open that panel, and then drag it into a group with the Time Controls panel.
Choose Window > Workspace > New Workspace. Enter a name for the workspace and click OK to save it, or click Cancel if you don’t want to save it.
You can brighten or darken the After Effects user interface. Changing the brightness preference affects panels, windows, and dialog boxes.
Choose Edit > Preferences > User Interface Colors (Windows) or After Effects > Preferences > User Interface Colors (Mac OS).
Drag the User Interface Brightness slider to the left or right and watch the change on-screen.
Click Default to restore the default brightness level.
Click OK to save the new brightness setting or Cancel to leave your preferences unchanged.
For complete information about using After Effects panels, tools, and other application features, refer to After Effects Help. After Effects Help includes all the topics in the printed user guide, and more. Help topics are updated periodically, so you can always be sure to have the most recent information available.
Note
A PDF version of the complete Help content, optimized for printing, is also provided on the DVD in the product box.
After Effects Help is easy to use, because you can look for topics in several ways:
Scanning the table of contents.
Jumping to related topics using text links.
Searching for keywords.
Using the index.
First you’ll look for a topic using the Contents palette.
Choose Help > After Effects Help.
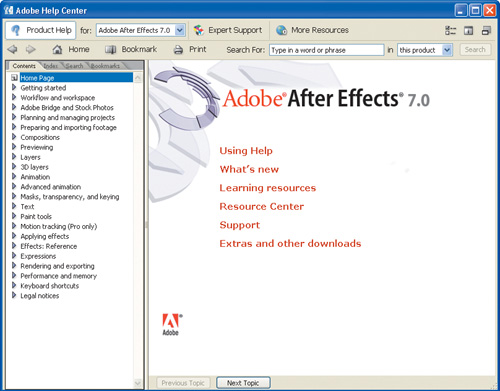
The Adobe Help Center opens, with a navigation pane on the left side of the floating window.
The Contents tab of the navigation pane of the Adobe Help Center window lists the contents by topic, like the table of contents of a book.
Click the right-pointing triangle to expand the topics 3D Layers > 3D Layers Overview.
Select About 3D Layers to read about 3D layers in After Effects.
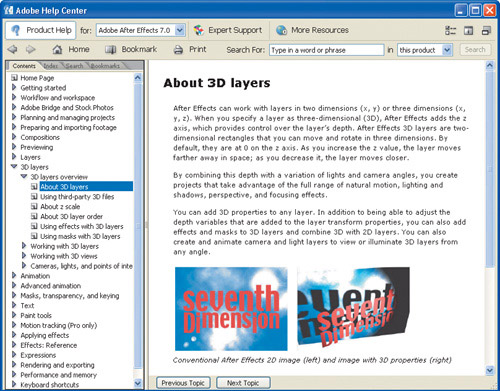
Some Adobe Help Center topics include links to related topics. Links appear as red, underlined text. The mouse pointer changes to a pointing-finger icon (
 ) when positioned over a link. You can click any text link to jump to that related topic.
Scroll down to the bottom of the About 3D Layers topic, and then click the About Layers text link.

Click the Next Topic button a couple of times to see more information about creating layers.

You can also search Help topics using words or phrases. In fact, you can search Help for one product or for all Adobe products that are installed on your system. If you find a topic that you may want to view again, you can bookmark it for quick retrieval.
At the top of the Adobe Help Center window, type one or more words in the Search For box. For example, type preset effects. Leave the In box set to This Product—meaning After Effects. Then, click Search. Topics matching the search words appear in the Search tab of the navigation pane at left, listed in order of relevance.

To view a topic, click its title.
If this is a topic you think you’ll need to return to again, click the Bookmark button (
 ) at the top of the window.
In the New Bookmark dialog box, accept the default name, and then click OK.
Click the Bookmarks tab in the navigation pane to see your bookmark listed there. You can also search for a topic using the index.


Click the Index tab of the navigation pane to view an alphabetical list of letters.
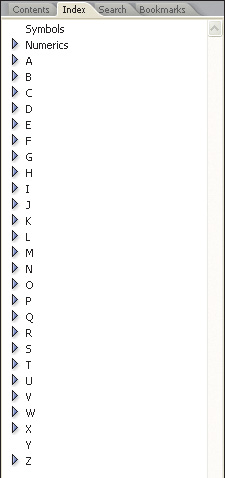
Click a letter, such as P, to display index entries for that letter.
Index entries appear alphabetically by topic and subtopic, like the index of a book. You can scroll down the list to see all the entries that begin with the letter P.
Click any entry to open the topic about it. If there is more than one entry for a topic, click the triangle to expand visibility for all of the entries, and then click the entry that you want to read.
Adobe periodically provides updates to software and to topics in Adobe Help Center. You can easily obtain these updates through Adobe Help Center, as long as you have an active Internet connection.
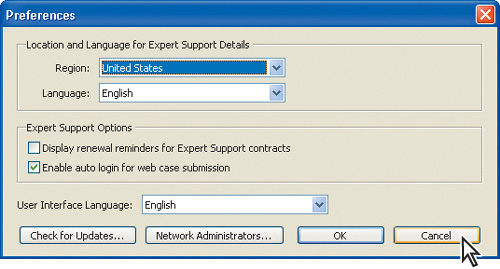
Click the Open Preferences Dialog button (
 ) in the upper-right corner of the Adobe Help Center.
In the Preferences dialog box, notice the Check For Updates button. To check for updates, you would click this button and then follow the on-screen directions to download and save them. For now, however, click Cancel. Then, click Cancel again to close the Preferences dialog box.
Choose Adobe Help Center > Close (Windows) or Adobe Help Center > Quit Adobe Help Center (Mac OS).
Another way to get information about After Effects and to stay abreast of updates is to use Adobe online services. If you have an Internet connect and a web browser installed on your system, you can access the Adobe Systems website (www.adobe.com) for information about After Effects and other Adobe products.
In After Effects, choose Help > Online Support.
Your default web browser launches and displays the Adobe After Effects Support page on the U.S. Adobe Systems website. You can explore the site and find such information as tips and techniques, galleries of artwork by Adobe designers and artists around the world, the latest product information, and troubleshooting and technical information.
Close your browser.
Congratulations. You’ve finished Lesson 1. Now that you’re acquainted with the After Effects workspace, you can go to Lesson 2 to learn how to create and animate compositions using effects and preset animations, or you can proceed to another lesson in this book.
