Chapter Six. Working with GoLive
I’m not ashamed to admit that I built many of my first Web sites back in the ’90s using an earlier version of GoLive. Even then the application took the concept of page layout and successfully brought it over to visual Web page design. If you’re new to Web design or just new to GoLive, you’ll appreciate GoLive’s approach to designing Web pages.
Given its ease of use and Adobe’s trademark user interface, GoLive is likely the favorite Web page design application of most designers. One of the main aspects that makes GoLive so easy to learn and start working with is that it acts and behaves more like a page layout application and less like a Web coding tool. This isn’t to say you can’t use it to hand code if you’re so inclined, but GoLive really shines when you’re laying out a Web page like you would a page in InDesign.
With this latest release of GoLive, Adobe has added innovative features for visually designing Web pages with Cascading Stylesheets (CSS). It boasts tighter integration with the other applications in the suite and tools for designing pages for mobile devices. GoLive CS2 is packaged with the Premium version of the Creative Suite, making it available to a new set of Adobe users who might have once shied away from Web site design. So let’s look at what this distinctive Web page design application can now do.
#51 Exploring the Tools
In earlier versions of GoLive, what looked like a toolbox was really just the Objects palette, which allowed you to drag precoded objects onto your page. GoLive CS2 introduces a much welcomed, dedicated Tools palette (Figure 51).
Figure 51. The introduction of true tools (including Adobe standard tools) to the new Tools palette in GoLive CS2 is a welcome addition.

The Objects palette is now grouped with the tools but you can separate them if you’d like (see #5). Let’s explore these new tools and see just how they’re used.
![]() Standard Editing tool: Perform common tasks such as moving and resizing objects and editing text. This is essentially the tool that was implied in earlier versions of GoLive.
Standard Editing tool: Perform common tasks such as moving and resizing objects and editing text. This is essentially the tool that was implied in earlier versions of GoLive.
![]() Object Selection tool: Select and move any object except text, much like the Selection tool found in Illustrator and InDesign. Double-click a layer with this tool to switch to the Standard Editing tool and edit its contents, such as text.
Object Selection tool: Select and move any object except text, much like the Selection tool found in Illustrator and InDesign. Double-click a layer with this tool to switch to the Standard Editing tool and edit its contents, such as text.
![]() Layer tool: Draw and position layers on a page as you would draw frames in InDesign. Hold down Command (Mac) or Control (Windows) as you drag on the edge of a layer to reposition it.
Layer tool: Draw and position layers on a page as you would draw frames in InDesign. Hold down Command (Mac) or Control (Windows) as you drag on the edge of a layer to reposition it.
![]() Grid Text Box tool: Draw and position text boxes on a layout grid. The Grid Text Box tool hides underneath the Layer tool.
Grid Text Box tool: Draw and position text boxes on a layout grid. The Grid Text Box tool hides underneath the Layer tool.
![]() Eyedropper tool: Sample a color from text or an object on a page and apply it elsewhere using this Adobe standard tool. Click and then drag to actively sample a color from anywhere on your screen.
Eyedropper tool: Sample a color from text or an object on a page and apply it elsewhere using this Adobe standard tool. Click and then drag to actively sample a color from anywhere on your screen.
![]() Hand tool: Pan around your document quickly using this Adobe standard tool.
Hand tool: Pan around your document quickly using this Adobe standard tool.
![]() Zoom tool: Magnify a document up to 1600%. Drag a marquee around the area you want to focus on. Hold down Option/Alt and click to zoom out. Double-click the Zoom tool to revert to 100% view.
Zoom tool: Magnify a document up to 1600%. Drag a marquee around the area you want to focus on. Hold down Option/Alt and click to zoom out. Double-click the Zoom tool to revert to 100% view.
#52 Designing with Layers
For years, designing your Web pages using layers was a lot like trying to use hydrogen in your gasoline-propelled car. Web layout applications would write a bunch of excess code for browsers that barely supported layers. Well, times have certainly changed. These days most modern browsers include superior support for layers, and visual layout tools such as GoLive CS2 can now write the minimal amount of code required to render them.
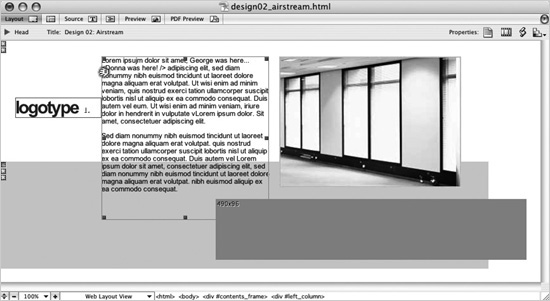
Layers in GoLive are essentially HTML-based DIV tags accompanied by the requisite CSS needed to position them anywhere on the page. GoLive enables you to draw layers, resize and position layers, and not worry about the underlying source code (Figure 52). GoLive dynamically recodes the page with every change you make to the layer while keeping the source code as lean as if you coded it by hand. It’s the truest sense of a visual layout Web editor.
Figure 52. Layers in GoLive behave much like frames do in InDesign. You can drag and position them anywhere on your page. Layers can even overlap each other. You can finally lay out your pages however you want without being constrained by table cells.
If you want to add a layer in GoLive, you have a few options available to you:
• Use the Layer tool (see #51) to draw a layer box on your page.
• Drag the Layer icon ![]() from the Basic Objects set in the Tools palette and drop it directly onto a page (or within an element on the page).
from the Basic Objects set in the Tools palette and drop it directly onto a page (or within an element on the page).
• Choose an insertion point by clicking a location on your page (for example, in another layer). Then click the Create New Layer button in the Layers palette (Window > Layers).
Once you add a layer to your page, a small yellow marker ![]() appears representing the insertion point of the layer. To embed a layer within another layer, drag this marker into the other layer box. One of the key benefits of using layers is that you can easily resize or position them using the Object Selection tool. You can also assign a background color or an image to a selected layer using the Inspector palette. To add content to a layer, drag an object or asset into it or start typing into it using the Standard Editing tool. When you preview your page, the layer and its contents should appear exactly as you laid them out.
appears representing the insertion point of the layer. To embed a layer within another layer, drag this marker into the other layer box. One of the key benefits of using layers is that you can easily resize or position them using the Object Selection tool. You can also assign a background color or an image to a selected layer using the Inspector palette. To add content to a layer, drag an object or asset into it or start typing into it using the Standard Editing tool. When you preview your page, the layer and its contents should appear exactly as you laid them out.
#53 Working with CSS Layout Objects
Using CSS to lay out your Web pages offers many more benefits than traditional HTML-based layouts. The underlying code is leaner, maintenance is easier, and sites become more accessible. But laying out pages from scratch with CSS involves learning the complexities and somewhat esoteric rules related to the language. Fortunately, GoLive CS2 introduces CSS layout objects that make laying out pages with CSS as easy as dragging boxes onto a page.
If you’re finding it difficult to select certain CSS layout objects you’ve nested in other objects, try using the Select tab of the Table & Boxes palette. Click the Select Parent Table button ![]() to navigate up to the parent object. A gray box represents a nested object that you can navigate down to by clicking on it.
to navigate up to the parent object. A gray box represents a nested object that you can navigate down to by clicking on it.
CSS layout objects are prebuilt bits of CSS that GoLive works with intelligently. You simply drag a layout object onto a page and adjust its parameters via the Inspector palette. Layout objects are liquid designs, meaning parts of them stretch to accommodate the full width of the viewer’s browser window. They are also modular, like interlocking toy building blocks. You can drag a layout object into another to quickly build up what would otherwise be a complex layout you would have to code by hand.
To start using CSS layout objects in your pages, follow these instructions:
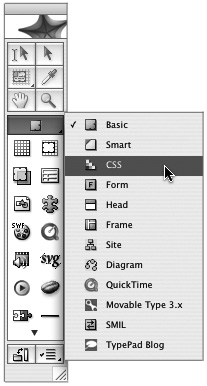
1. From the Objects palette (which is now also the Tools palette), select the CSS set from the menu (Figure 53a).
Figure 53a. Switch to the CSS set from the Tools/Objects palette to access the CSS layout objects.
2. Choose one of the CSS layout objects. Their icons suggest the type of layout they provide, but you can also hover over an icon with your pointer to get a tool tip containing a more informative description.
3. Drag the CSS layout object icon onto your page. You can also double-click the icon to automatically insert it to wherever your insertion point is on the page.
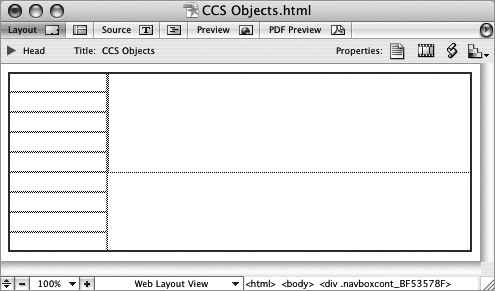
4. Nest CSS layout objects by dragging them into other objects such as separate layers (see #52) or even other CSS layout objects. For example, you can drag a Navigation Rows object into a Two Columns: Fixed Left object (Figure 53b).
Figure 53b. CSS layout objects make it easy to build up a CSS-based layout by nesting the objects in one another.
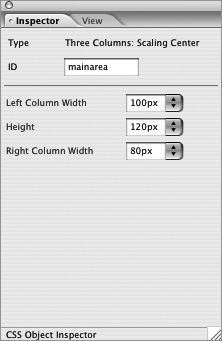
5. Edit the parameters of a selected CSS layout object you’ve placed on a page by opening the Inspector palette. Here you can adjust a layout object’s column width, row height, padding, or overall height depending on the layout object selected (Figure 53c).
Figure 53c. Once you place a CSS layout object on your page, you can edit its parameters via the Inspector palette.
6. Drag images or other site assets into your CSS layout objects just as you would any other container object in GoLive. Enter text by clicking into a layout object box using the Standard Editing tool.
#54 Exploring the CSS Editor
Just as GoLive offers both visual and source-code editing tools to design your Web pages, the enhanced CSS Editor in GoLive CS2 gives you a choice of editing your stylesheets using a graphical user interface or switching over to the CSS code. You can even preview your stylesheet definitions directly from the editor without having to open a page and apply them.
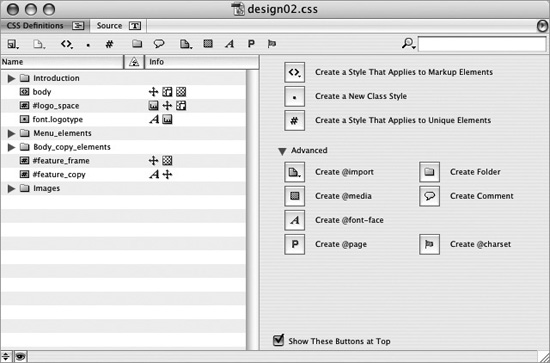
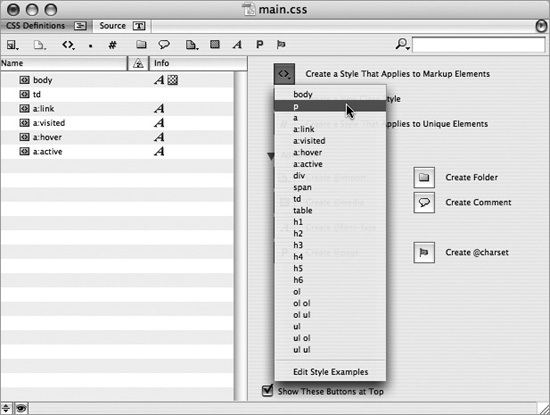
To open the CSS Editor click the Open CSS Editor button ![]() in the upper-right corner of a page in Layout mode. Once the CSS Editor is open, you’ll notice that the right panel offers buttons with helpful explanations of the different types of items you can add to your stylesheet (Figure 54a). Miniature versions of these buttons will always display at the top of the editor if you select the Show These Buttons at Top option.
in the upper-right corner of a page in Layout mode. Once the CSS Editor is open, you’ll notice that the right panel offers buttons with helpful explanations of the different types of items you can add to your stylesheet (Figure 54a). Miniature versions of these buttons will always display at the top of the editor if you select the Show These Buttons at Top option.
Figure 54a. The right panel of the CSS Editor provides buttons for all the items you can create in your stylesheet.
If you create a new style definition or select an existing style, the right panel changes to show a set of icon-based tabs sorted into various categories of available styling properties. Use these tabs to find and add the properties you want to create your style.
After you’ve added a property to a style definition, a representative icon for the property section appears in the Info column to the right of that style so you can see at a glance what’s been defined. Click an icon to jump to its corresponding property tab.
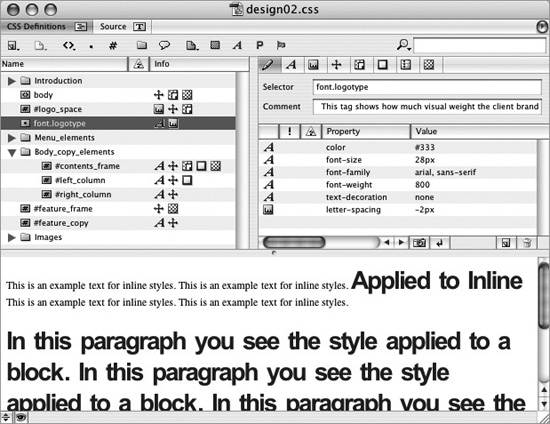
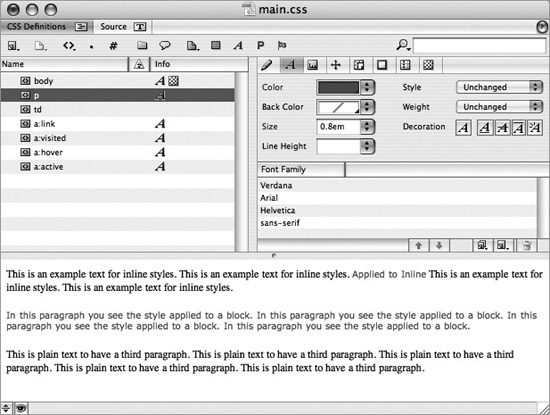
You can preview styles while you’re defining them by clicking the Show/Hide Style Preview button ![]() located in the bottom-left corner of the editor. This view gives you a good idea of the appearance of your style before you apply it to a page element and load it in a browser (Figure 54b). What a huge timesaver.
located in the bottom-left corner of the editor. This view gives you a good idea of the appearance of your style before you apply it to a page element and load it in a browser (Figure 54b). What a huge timesaver.
Figure 54b. The Style Preview pane shows you an example of the selected style before you apply it to one of your pages.
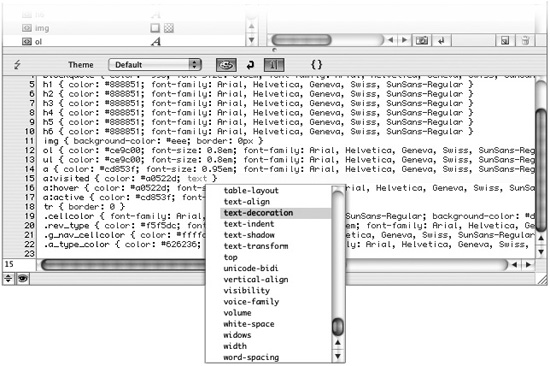
In addition, if you’re a code junkie or aspiring to become one, click the Show/Hide Split Source button ![]() to view or edit the underlying code. You can also click the Source tab at the top of the editor window to switch entirely to code editing mode. Like all source views in GoLive, code completion is available, making it almost as much fun to define a style by hand (Figure 54c).
to view or edit the underlying code. You can also click the Source tab at the top of the editor window to switch entirely to code editing mode. Like all source views in GoLive, code completion is available, making it almost as much fun to define a style by hand (Figure 54c).
Figure 54c. GoLive’s code completion feature handles CSS as well as HTML.
#55 Applying CSS to Markup Elements
When designing with Web standards in mind, it’s always best to use semantically correct HTML tags before you start creating a bunch of unnecessary classes or ID selectors. This means that, among other things, you should wrap paragraph text in P tags and use H1 tags (or other header tags) for header text. You can then define a style that reformats the default appearance of the markup elements however you want. Not only does this result in cleaner, leaner code, but it makes your pages more accessible to viewer’s who can’t use your stylesheets for one reason or another.
Follow these steps to apply CSS to a markup element:
1. Open the CSS Editor (see #54) for your Web page or open your external CSS file.
2. Click and hold the New Markup Element Style button ![]() . Select an element from the menu that appears (Figure 55a). For example, you could select the P tag for paragraph text. The new element style is added to your list of style definitions on the left, and the property section tabs appear on the right.
. Select an element from the menu that appears (Figure 55a). For example, you could select the P tag for paragraph text. The new element style is added to your list of style definitions on the left, and the property section tabs appear on the right.
Figure 55a. GoLive offers a great starter set of markup elements that you’ll more than likely want to use and reformat.
If you don’t see the element you want to apply CSS to in the element style examples menu, release the menu, click the New Markup Element Style button, and enter the element’s name once it’s created.
3. Now assign any properties to your element style by clicking through the property section tabs and finding the properties you’d like to add. For instance, you could click the Font Properties tab and assign a different color, size, and font family set to your element style (Figure 55b). Click the Show/Hide Style Preview button to see your edits in action.
Figure 55b. You can reformat any markup element you choose and then use the markup elements on your pages. This prevents you from creating an undue number of class styles.
4. Switch back to your Web page and try out your new element style. Add the HTML element for which you’ve created an element style. You can apply paragraph and header tags to selected text by using the Paragraph Format menu located on the far left of the Main toolbar. Once you add the element to your page, it should assume the appearance you’ve defined in its style.
#56 Using the Markup Tree Bar
Although GoLive offers an assortment of tools and palettes for selecting elements on a page and applying styles to them, none quite match the simple elegance and convenience of the Markup Tree bar. It’s one of those tools that once you start using it, you’ll wonder how you ever got along without it.
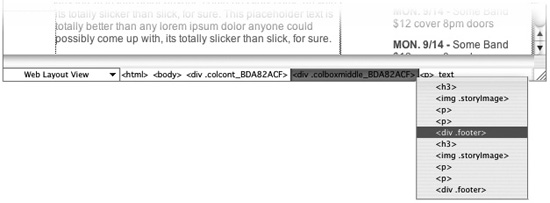
The Markup Tree bar is at the bottom of a document window in the Layout, Frame, and Outline editors. As you select an object within a page, notice how the Markup Tree displays the path of HTML tags, starting from the document’s root tag to the element you have selected. This is great way to get a sense of where the element lives within the document hierarchy. But that’s not all. You can click any of the tags along the path to quickly and precisely select the start and end tags along with their contents. You can also click and hold a tag in the bar to display a menu of the next lower level elements in the HTML hierarchy to select from (Figure 56a).
Figure 56a. Click and hold a tag in the Markup Tree bar to display a menu of the next level of elements you can quickly select. Once selected, you can be confident that you’re affecting the entire element when performing actions such as moving or deleting it.
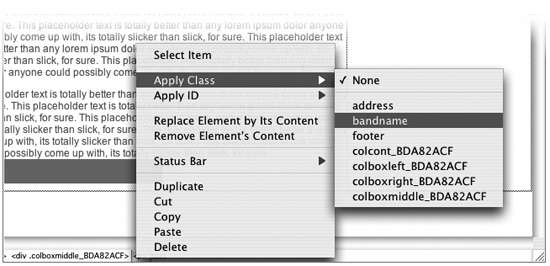
You can use the Markup Tree bar for more than just selecting elements. If you Control-click (Mac) or right-click (Windows) a tag within the bar, a contextual menu pops up with a complete set of useful commands. From this menu, you can apply a CSS class or ID to a tag in one fell swoop (Figure 56b). This menu also offers handy commands for duplicating, deleting, and moving elements.
Figure 56b. You can quickly apply a style to an element via the Markup Tree bar’s contextual menu.
#57 Working with the Outline Editor
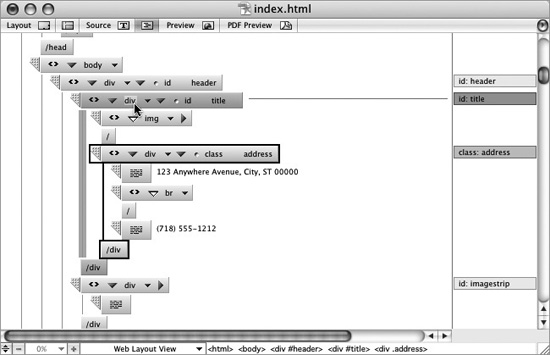
Unique to GoLive, the Outline Editor serves as a powerful yet easy-to-understand view into your Web page designs. The Outline Editor tab ![]() is situated between the Source Code Editor tab and the Preview tab. Within the Outline Editor you can see the HTML elements that make up your page in a hierarchical, structured view. Easily navigate through this structure by expanding and collapsing tags (Figure 57a).
is situated between the Source Code Editor tab and the Preview tab. Within the Outline Editor you can see the HTML elements that make up your page in a hierarchical, structured view. Easily navigate through this structure by expanding and collapsing tags (Figure 57a).
Figure 57a. The Outline Editor provides a nicely structured view into your Web pages that can be less daunting than peering into the source code.
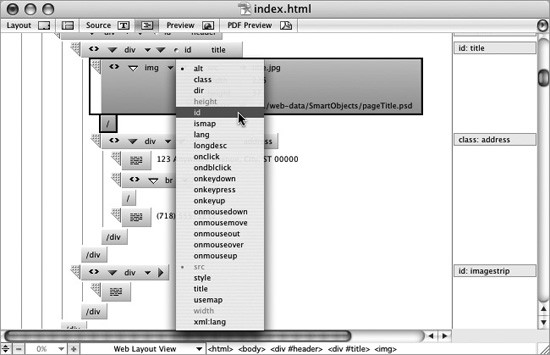
Attributes assigned to an element are displayed on their own level within the structure, making it easy to distinguish an attribute from an element. Finding available attributes and adding them to an element is just as easy. Simply expand a tag and select an attribute from the attribute menu by clicking the smallest down arrow directly to the right of the tag name (Figure 57b). This is useful when you don’t exactly know which attributes are available for a particular tag or what they’re referred to as.
Figure 57b. The attributes menu displays all the available attributes for a given tag, taking the guesswork out of which attributes you can choose.
You add elements to the Outline Editor just as you would in the Layout Editor. Drag elements from the Tools/Objects palette into a position in the structure to add them within the Outline Editor. Drag the gripper handle of a tag ![]() to move it to another location in the outline.
to move it to another location in the outline.
The Outline Editor is also effective at weeding out bugs in your pages since any broken links or syntax errors are highlighted in red, making them easy to notice and fix within one cohesive view (see #60). Be sure to click the Show Link Warnings button ![]() in the Main toolbar to have broken links highlighted.
in the Main toolbar to have broken links highlighted.
#58 Using Live Rendering
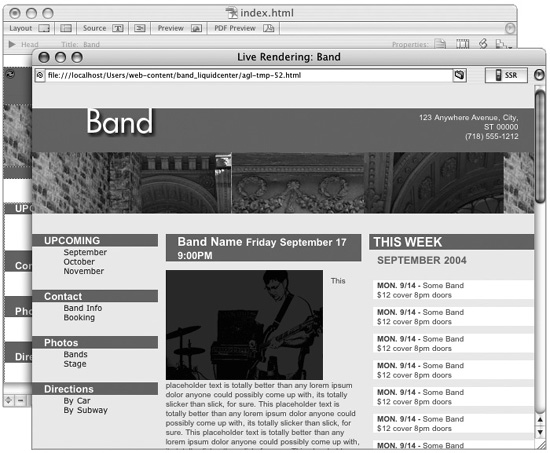
One of the more tedious processes to go through when building your Web site is having to stop every so often after making a change to preview your results. Sure, sometimes you have to launch an actual Web browser to truly test your pages’ compatibility, but at times switching to Preview mode in GoLive will suffice. But even switching to Preview can disrupt your normal workflow a bit. This is where Live Rendering comes in handy. Think of the Live Rendering window as a stand-alone Preview window that allows you to constantly preview your work while in any of the editors.
To open a page in a Live Rendering window, choose File > Preview In > Live Rendering. You can also use the keyboard shortcut Command+T (Mac) or Control+T (Windows). Once your page is loaded in the Live Rendering window, you can test aspects of your page such as CSS rendering, rollovers, and links, just as you can in Preview mode (Figure 58a).
Figure 58a. The Live Rendering window allows you to keep an eye on what your changes will look like without switching to Preview or an actual browser.
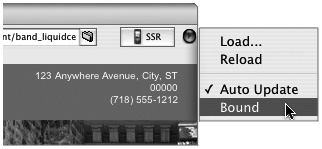
Live Rendering goes beyond Preview mode in some ways. Whenever you make a change to the underlying page, Live Rendering automatically updates to reflect that change. This feature is on by default, but you can verify that it is by clicking the Live Rendering window menu located in the top-right corner of the window and ensuring that the Auto Update option is indeed checked. You can also have multiple Live Rendering windows open at once. By default they will all update to display the currently active document (the frontmost window). But you can have a Live Rendering window bind to one document: select the document you want to lock the preview to and then choose Bound from the Live Rendering window menu (Figure 58b).
Figure 58b. You can bind a Live Rendering window to a specific page by choosing Bound from the Live Rendering window’s menu.
Adobe has also incorporated many features into GoLive CS2 with consideration to building pages that work as well on mobile devices as they do on computers. The Live Rendering window includes one of these features. You can click the Small Screen Rendering button ![]() to preview what your page will look like on a handheld mobile device, such as a cell phone or PDA.
to preview what your page will look like on a handheld mobile device, such as a cell phone or PDA.
#59 Adding a Favorite Icon to a Page
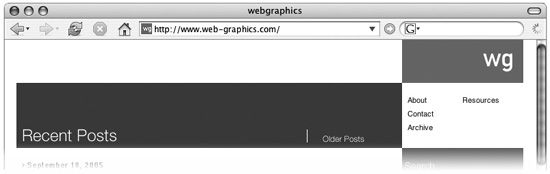
Favorite icons (or favicons) are the little custom icons that appear next to the address of a Web site or in the bookmarks or Favorites of your browser (Figure 59a). Although favorite icons are prevalent throughout the Web, they’ve been complicated to create and add to your Web pages. You had to track down specialized software to produce the uncommon image format (.ico) and then unearth the proper code required to integrate the icon into your page. GoLive CS2 simplifies this process with its introduction of Smart Favorite Icons.
Figure 59a. Favorite icons are located next to a Web site’s address in many modern browsers. They’re often used to reinforce the branding of the site and help as a visual cue after you bookmark a page.
Follow these steps to add a favorite icon to a page:
1. Create your icon in Photoshop or Illustrator at 16 × 16 pixels. GoLive doesn’t resize the image icon when it’s created so it’s best to work in the typical size of favorite icons in Photoshop. Opt for simple, clear shapes for your icon since their small nature make subtle details hard to distinguish.
2. When you’ve finished creating your icon, click the Extras tab of the Site window and save the file in the SmartObjects folder.
3. In GoLive, open the page you want to add the favicon to and drag the Smart Favorite icon ![]() from the Smart Objects set in the Tools/Objects palette to the page. GoLive recognizes that this belongs in the header of the page so it conveniently places the icon there for you.
from the Smart Objects set in the Tools/Objects palette to the page. GoLive recognizes that this belongs in the header of the page so it conveniently places the icon there for you.
4. With the Smart Favorite icon selected in the page header area, go to the Inspector palette. Drag the Fetch URL (aka the pick whip) ![]() and point it at your new icon in the SmartObjects folder in the Site window.
and point it at your new icon in the SmartObjects folder in the Site window.
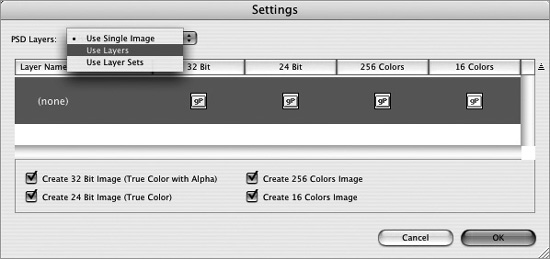
5. The Settings dialog opens (Figure 59b). Here you can save various versions of the icon at different bit depths. If you’ve designed your icon in Photoshop, you can choose to use individual layers or layer sets (now known as layer groups in Photoshop CS2). Click OK to continue.
Figure 59b. The Smart Favorite Icon Settings dialog lets you choose to use a single image, layers, or layer sets (layer groups) from a Photoshop file as your icon.
6. GoLive keeps the name of your icon file but appends the required .ico file extension. Choose a location to save the exported .ico file and then click Save. The icon is now represented in the Smart Favorite icon in the page header.
7. Now all you have to do is upload your Web page and favicon file to your server. You can also try to temporarily preview the page in a browser as you normally would: choose File > Preview In > your favorite browser. Firefox shows the favicon in action but other browsers may not display the icon until you’ve posted it to your site and browsed to it from there.
#60 Checking the Syntax of Source Code
Whether you take advantage of GoLive’s visual layout tools or feel comfortable editing in source code mode, mistakes can still occur in the code. These unfortunate accidents can result in visitors to your site not being able to view a page, having the page render in a weird way, or causing page functionality to break. Just as it’s crucial to preflight your InDesign document before handing it over to a printer, it’s as important to check for syntax errors throughout your site before going live with it. But don’t worry; you’re not on your own with all this. GoLive can locate these issues, inform you of what’s going wrong, and help you to quickly fix these errors.
To check the syntax of an open page, do the following:
1. Choose Edit > Check Syntax or click the Check Syntax button ![]() if you happen to be in the Source Code Editor or Split Source Code mode.
if you happen to be in the Source Code Editor or Split Source Code mode.
2. In the Check Syntax dialog that appears (Figure 60a), decide which document type or types to comply with. Leaving !DOCTYPE assigned selected is usually a safe bet, especially if you’ve created your site in GoLive CS2, which now by default creates pages as XHTML Transitional. This document type is what many consider the standard these days. Click OK to start the syntax check.
Figure 60a. You can select the document type (or types) the Syntax Checker should comply with from this dialog.

3. The Check Syntax Results window will appear if the Syntax Checker finds any issues on your page. From this window you can see the number of issues found and where they’re located (element, line number, and column). Although you can see the errors and fix them in any editor, I suggest switching to the Outline Editor (see #57) for viewing and fixing problems in a unified view.
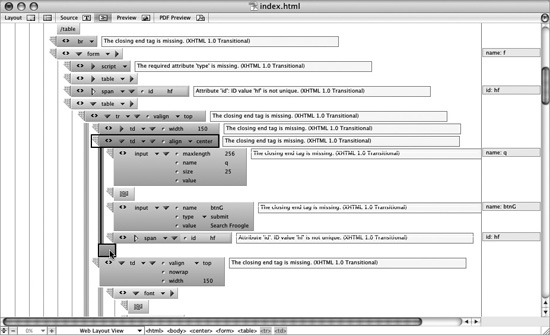
4. In the Outline Editor you can scroll through the page and see all issues highlighted in orange with a bright yellow box containing the explanation of the error beside it (Figure 60b). You can also select an issue in the Check Syntax Results window, if you still have it up, and go directly to its location on the page.
Figure 60b. The Outline Editor is ideal for displaying syntax errors and correcting them.
5. Once you’ve attempted to fix all the issues on the page, go to the View palette (usually grouped with the Inspector palette) and click the Highlight tab. Click the Rescan button to rebuild the highlighted results to make sure you haven’t missed any errors.
To check the syntax of an entire site, choose Edit > Check Syntax with no pages open or selected in the Site window. If you want to check the syntax of certain pages in your site, select them in the Site window and then choose the Check Syntax command.