Chapter Nine. Automating Routine Tasks
I’m still waiting for the day when my computer will do practically everything I ask of it with no complaints. Even though technology has advanced by leaps and bounds these last couple of decades, we are still slaves to our systems. Sure, it’s gotten much better than it once was, but we still have to nudge, click, and enter commands into our computers for them to understand what we want from them. That’s why I’m excited when I discover a way to get my computer to take over a rather tedious or monotonous task for me. This is as it should be, since computers handle routine tasks rather well, whereas it turns out, we humans do not.
The Creative Suite happens to offer a variety of features designed to automate tasks and eliminate tedium. If you find yourself trapped in a vicious cycle of performing the same actions over and over again in a CS2 application, saying, “There’s got to be a better way,” well, most likely there is. With a suite of applications this mature and versatile, you can often find a command or feature that will do the mind-numbing work for you. The challenge is to know where to look for them and understand how to use them.
In this chapter, I’ve compiled a collection of features and techniques that offload the heavy lifting onto the applications: these tasks include processing hundreds of files, creating galleries and contact sheets, automatically setting up rollovers, and more. As a result, you regain your free time so you can get back to what’s most important—being creative.
#81 Crop and Straighten Photos in Photoshop
Although digital photography has become increasingly popular these days, you may still find yourself scanning in some old photo prints on your flatbed scanner. But having to crop and straighten each print afterwards has always been a pain. Well, we can put all this tedium behind us now and let Photoshop’s amazing Crop and Straighten Photos command do the work for us. This remarkable command not only automates the process of cropping and straightening your photos for you, it can do so to multiple images within a single scan.
Follow the steps below to use the Crop and Straighten Photos command:
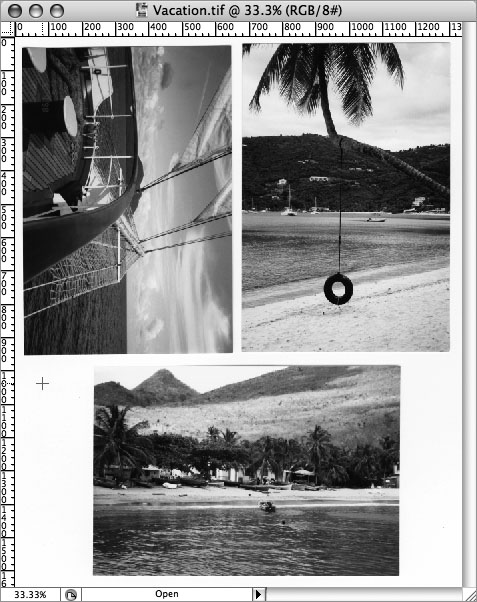
1. Place your prints on your flatbed scanner and scan them all in at once (Figure 81a). To get the best results, arrange your prints on the scanner bed so they are at least 1/8 of an inch apart from one another. It’s also a good idea to disable any automatic adjustment settings your scanner software may offer since they often take into account the entire scanned image. You can always adjust the individual images in Photoshop once they’ve been cropped (and straightened) from the scanned file.
Figure 81a. With the Crop and Straighten command, you can save time by scanning in several photos at once.
2. Open the scanned file in Photoshop. If you want to apply the Crop and Straighten Photos command to specific images in the scan, make a selection around them.
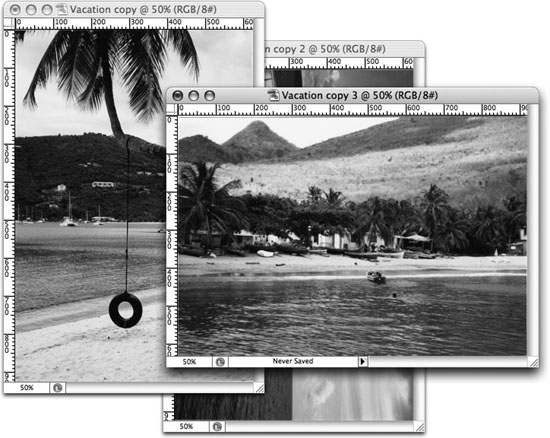
3. Choose File > Automate > Crop and Straighten Photos. Photoshop processes the scanned file, detecting the edges of each image, and then crops, straightens, and separates them into individual files (Figure 81b).
Figure 81b. Once the Crop and Straighten command has worked its magic, you’ll end up with a separate document window for each image.
4. With each image conveniently cropped and straightened for you, you can then make any adjustments to them (see #27) and save them as individual files.
#82 Using the Image Processor in Photoshop
These days our computer hard drives are inundated with an overabundance of images we offload from our digital cameras, download from stock photography services, or create ourselves. Processing all these images into different file formats or image dimensions can be daunting at best. Fortunately, Photoshop CS2 introduces the Image Processor, which processes multiple files. It performs many common image-related tasks so you don’t have to create an action and use it within a Batch command.
Here’s how to use the Image Processor:
1. In Photoshop, choose File > Scripts > Image Processor. The Image Processor window appears (Figure 82).
Figure 82. The Image Processor is well suited for common image handling needs where creating a Batch action would be overkill.
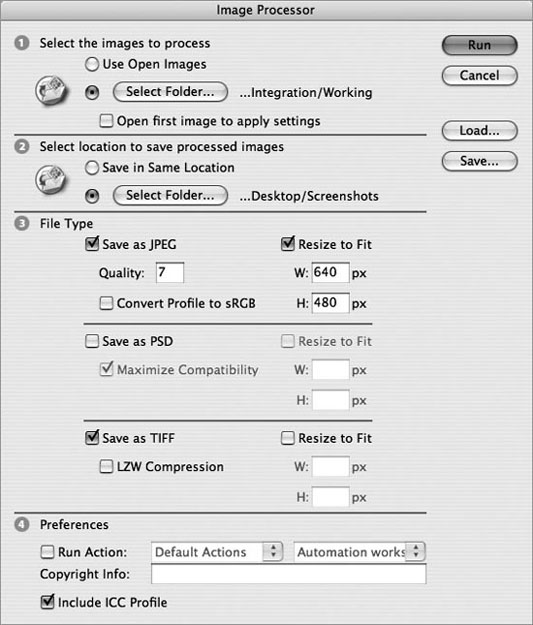
2. Select the image files you want to process. If you already have the images that you want to process open in Photoshop, select the Use Open Images option. Otherwise, click the Select Folder button and choose the folder that includes the images ready for processing.
3. Select the location where you want to save the processed files. You can save the files to the same location or choose a different folder.
4. Select the file types along with the options that you want the Image Processor to save (e.g., JPEG, PSD, TIFF). You can opt to convert your files into one of these formats or any combination at the same time. Selecting multiple formats at once will result in each type being saved when your images are processed. Selecting the Resize To Fit option will resize the images to best fit within the dimensions you enter while retaining their original proportions.
5. You can optionally set any of the other processing options. You can select a Photoshop action (see #84) to run or decide to include copyright information or a color profile within each image processed.
6. Click the Run button and the Image Processor will start working its magic. Your images will be saved to the destination you specified within folders named using the file formats you selected.
#83 Creating a Web Photo Gallery in Photoshop
Photoshop can automatically generate a completely interactive Web photo gallery from your images that you can then share with others via your Web site. Photoshop offers a variety of gallery styles to choose from; a couple are even Flash-based.
You can create a Web photo gallery either from Photoshop or Bridge. But by choosing Bridge to select your images, you can preview the images you’re selecting as well as decide on the order in which they will appear in your gallery. Drag your images around in the Bridge window to change their order in the gallery.
With your images selected (and ordered) in Bridge, continue with the following steps:
1. Choose Tools > Photoshop > Web Photo Gallery. Photoshop opens and the Web Photo Gallery dialog appears (Figure 83a).
Figure 83a. The Web Photo Gallery dialog is where you choose the gallery style along with other details, such as thumbnail size and gallery title.
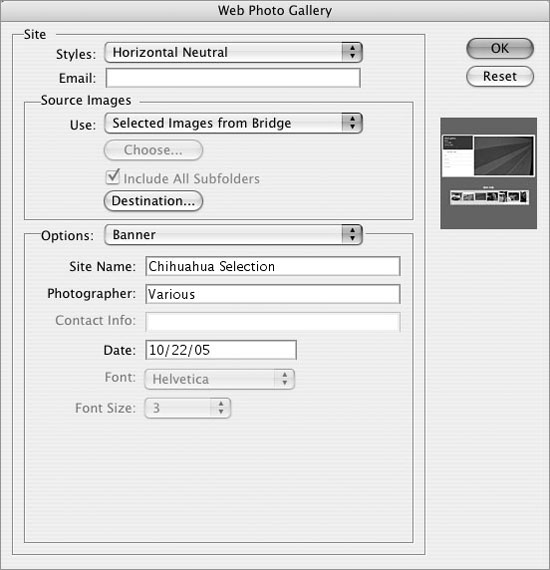
2. Decide on a style for your gallery using the Styles pop-up menu. The thumbnail preview will update with the style you’ve selected. You can optionally add your email address, but keep in mind that doing so can result in unwelcome emails from spammers.
3. Since you selected your images from Bridge, you can skip the Use pop-up menu and go right to the destination for your gallery. Click the Destination button and select a location for the gallery to be saved.
4. Cycle through all the formatting options for your selected gallery style on the Options pop-up menu. With these options you can customize your gallery by adding a site name for your gallery, adjusting the size of the large images and thumbnails, and choosing any additional information about your photos that you want displayed.
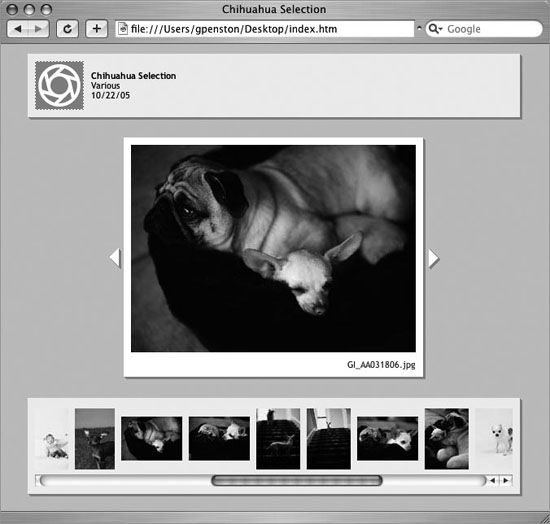
5. Once you’ve selected the formatting options, click OK and Photoshop commences with the construction of your Web photo gallery. When Photoshop is done creating the gallery, the home page of the gallery will load into your browser so you can preview the results (Figure 83b).
Figure 83b. When Photoshop is done generating your new gallery, the gallery will open in your browser so you can preview it.
6. You may want to repeat the creation of the gallery a few times to try different gallery styles and see them in action. The thumbnail preview is a bit too small and isn’t as helpful as viewing the galleries in your browser. When you’re happy with the gallery style you’ve selected, you can post your gallery to your Web site using GoLive or your favorite FTP application.
#84 Using Actions in Photoshop and Illustrator
If you find yourself performing the same task over and over again in Photoshop or Illustrator, it’s probably high time you take a couple of minutes and create an action to handle the task for you. Actions are a sequence of commands that you can record and repeatedly play back on a file or a batch of files.
To start working with actions, open the Actions palette (Window > Actions) (Figure 84a). A set of default actions is available in both Photoshop and Illustrator for you to start experimenting with. If the Default Actions folder set is collapsed, click the triangle to expand it and reveal the actions it contains. You can expand each action to expose its steps. You can load other sample actions from the Actions palette menu. Deconstructing the sample actions is a great way to learn just what’s possible with actions.
Figure 84a. The Actions palette houses just about everything you need to create and manage actions.
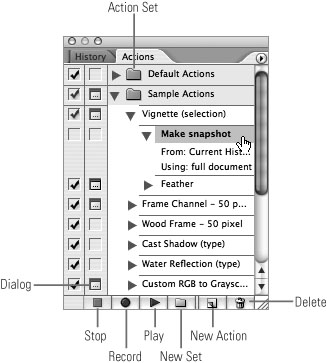
To play an action, select it and click the Play Selection button at the bottom of the Actions palette. If any of the steps in the action has a dialog icon ![]() next to it, you’ll be greeted with a dialog. This allows you to enter custom values each time the action is run. You can click a dialog icon to toggle it off. A red dialog icon indicates one or more of the steps in the action have dialogs enabled, whereas a dark gray dialog means all the steps have dialogs turned on. You can also omit steps of an action by drilling into them and unchecking the check mark icon beside the step you want to skip. Actions can be represented in the palette by buttons by choosing Button Mode in the palette’s menu. You can then click the button of the action to play it.
next to it, you’ll be greeted with a dialog. This allows you to enter custom values each time the action is run. You can click a dialog icon to toggle it off. A red dialog icon indicates one or more of the steps in the action have dialogs enabled, whereas a dark gray dialog means all the steps have dialogs turned on. You can also omit steps of an action by drilling into them and unchecking the check mark icon beside the step you want to skip. Actions can be represented in the palette by buttons by choosing Button Mode in the palette’s menu. You can then click the button of the action to play it.
To create an action:
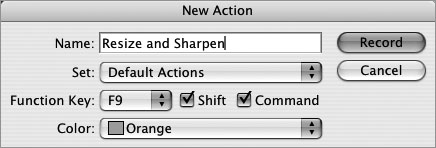
1. Click the New Action button at the bottom of the palette.
2. In the New Action dialog box (Figure 84b), name your action and optionally specify a keyboard shortcut and color highlight for it. Then click OK. Notice that the Record button is now active, letting you know that the application is watching. In this recording state, all the steps you perform (that are recordable) will be recorded and will start appearing under your new action in the palette.
Figure 84b. When creating a new action, you can choose an action set for it to be saved in, assign a function key combination, and select a highlight color for the action when it’s in Button mode.
3. When you’re finished adding steps to your action, click the Stop button at the bottom of the palette. With your action created, you can now run it on any open file or a batch of files (see #85).
#85 Batch Process Files in Photoshop and Illustrator
It’s fairly easy in Photoshop or Illustrator to set up an action and perform it on a batch of files. Before you know it, hundreds of files will be processed without you even breaking a sweat.
If you’re continually applying the same Batch commands to your files, consider creating droplets for them. Droplets are simple applications you can create in Photoshop or ImageReady to batch process files that are dragged onto their droplet application icon. To create a droplet, choose File > Automate > Create Droplet in Photoshop or from the Actions palette in ImageReady. You can also click the Create Droplet button ![]() located in ImageReady’s Optimize palette.
located in ImageReady’s Optimize palette.
To batch process a set of files, follow these steps:
1. In Photoshop, choose File > Automate > Batch. In Illustrator, choose Batch from the Actions palette menu.
2. In the Batch dialog (Figure 85a), select the action you want to use from the Set and Action menus to process your batch of files. The action along with the set it was saved in must be loaded into the Actions palette for it to be available in the Batch dialog.
Figure 85a. The Batch dialog might seem daunting at first, but it really isn’t that bad if you break it down option by option. Just think of all the time it will save you.
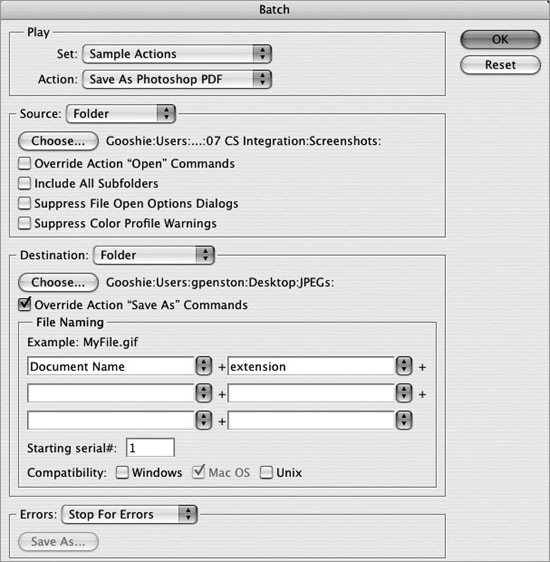
3. For Source, click the Choose button to specify the folder location of the files to be processed. Photoshop offers a few other options besides Folder location that you can select from the Source menu. If you have a scanner or digital camera import plug-in, you can select the Import option as a source. Select the Opened Files option to process all the files you have open, or if you have files selected in Bridge you’d like to process, select the Bridge option.
4. You can set some additional processing options in the Source area of the dialog. Select the Override Action “Open” Commands option if the action you selected includes an Open command that you’d like to replace with your selection of source files. Select the Include All Subfolders option if you want the Batch command to process any files that exist in other folders within your source folder. Photoshop offers two more options for skipping open options dialogs and color profile warnings.
5. From the Destination menu, select what the Batch command should do with the files after processing: None, Save and Close, or Folder. Selecting None keeps the files open for you to save afterwards. Save and Close saves any changes to the processed files as if you performed a Save (File > Save) and then closed them. Selecting the Folder option enables the Choose button so you can specify a location for your processed files to be saved. Photoshop lets you define your file naming convention when saving to a folder.
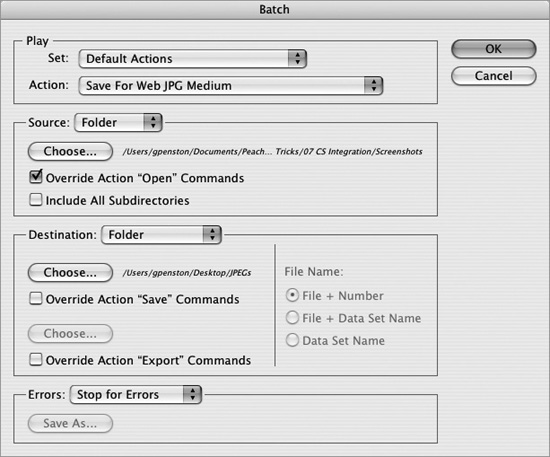
6. Again, if your action includes a Save As command, be sure to select the Override Action “Save As” Commands option so that the command in the action will be ignored and your chosen destination folder will be used instead. Illustrator also provides an override option for Export commands in your action (Figure 85b).
Figure 85b. Illustrator’s Batch dialog is a kissing cousin to Photoshop’s. They both include the same core set of options.
7. On the Errors menu, you can choose how the Batch command should handle any errors that occur; choose to either stop processing the files or continue processing and just log the errors.
8. Click OK and the Batch command goes to work, processing your files as fast as your system can manage it while you sit back and relax. Now that’s automation.
#86 Batch Rename Files in Bridge
Many of the images we retrieve from our digital cameras are named with incredibly descriptive titles such as IMG_1899.JPG. And yes, you could argue that filenames really aren’t as important as they once were since we can now rely on Bridge to actually show us the image files to select from. But still, you may want to better name your image files for those situations where Bridge may not be available to you or others dealing with your files. Funny enough, Bridge can actually help you batch rename multiple files for those times when Bridge isn’t available.
Here’s how to quickly batch rename files in Bridge:
1. Select the files you want to rename from the main area or by using the Folders pane. Selecting folders from within the Folders pane inherently selects the folder’s contents.
2. Choose Tools > Batch Rename or use the keyboard shortcut: Shift+Command+R (Mac) or Shift+Control+R (Windows).
3. In the Batch Rename dialog (Figure 86), select the destination of your renamed files. You can choose to keep the renamed files in the same folder or copy or move them to a different folder. Click the Browse button and choose a destination if you opt to copy or move your renamed files to a different folder.
Figure 86. Bridge’s Batch Rename command makes quick work of your file naming needs. It offers a set of useful options to help specify how your files should be named.
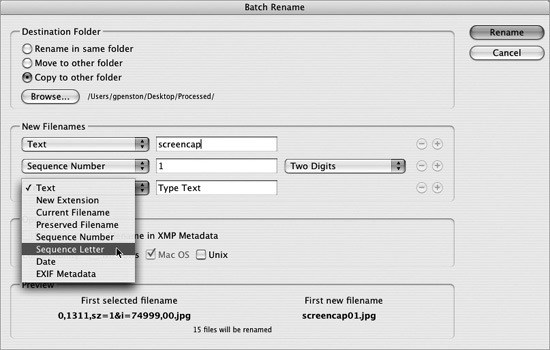
4. In the New Filenames area of the dialog, select options from the element menus or enter text to construct your file-renaming scheme. Click the plus or minus buttons to add or subtract elements to your file naming scheme. You can then glance at the Preview area to see how the files will actually be renamed.
5. You have a couple of additional options to choose from the aptly named Options area of the dialog. Select any additional operating systems you’d like your filenames to be compatible with. Your current operating system is checked by default and can’t be unchecked. If you’d like Bridge to preserve the original filename in the metadata, be sure to select the Preserve current filename in XMP Metadata option.
6. Click the Rename button to let Bridge loose on your inadequately named files. Next thing you know, you’ll have all your files renamed just as you specified.
#87 Creating a Contact Sheet in InDesign via Bridge
Sure, it’s been possible for quite some time to create a contact sheet of your images in Photoshop. But with CS2, you can create a contact sheet in InDesign via Bridge. Choosing Bridge to generate your contact sheets in InDesign offers some compelling benefits over using Photoshop. For one, you can select an InDesign template, which could include your company’s logo and contact information as the basis of the contact sheet. Since it’s InDesign, your contact sheet can spill over to multiple pages as opposed to separate documents in Photoshop. Also, the generated contact sheet in InDesign links to the images instead of flattening them into a layer, letting you edit an image and have it update within the contact sheet.
Here’s how to create a contact sheet in InDesign from Bridge:
1. In Bridge, select the images you want to include in your contact sheet. Note that the automated script that produces the contact sheet, is smart enough to create a new page when one fills up, so select as many images as you’d like.
2. Still in Bridge, choose Tools > InDesign > Create InDesign Contact Sheet. The Contact Sheet dialog opens (Figure 87a).
Figure 87a. Bridge’s contact sheet automation script for InDesign really shows off the scripting capabilities of Adobe CS2.
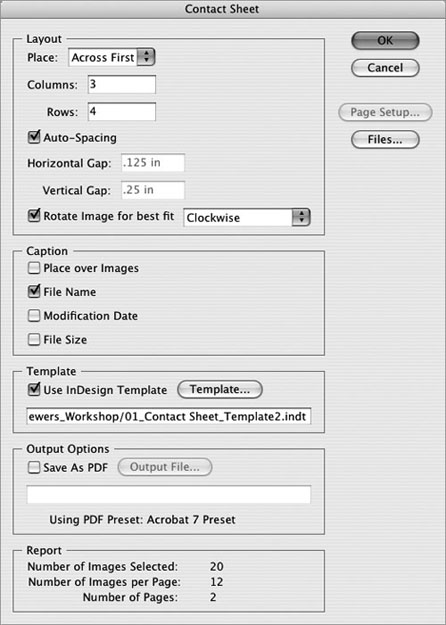
3. From the Contact Sheet dialog, you can adjust the layout options, select the information that will appear in the caption under each image, and decide whether to use an InDesign Template (see the sidebar “Using a Template for Your Contact Sheet”). You can also choose to have the automated script save the contact sheet as a PDF once it’s generated.
4. If you decide not to use an InDesign template, click the available Page Setup button to specify the page size and margins of your contact sheet.
5. You can optionally click the Files button to reorder your images or filter by file type those images that will be included in the contact sheet.
6. When you’ve finished adjusting the options, click OK and Bridge will automatically hand off the instructions to InDesign to start laying out your selected images into a multipage contact sheet (Figure 87b).
Figure 87b. After the contact sheet is complete, you can continue to work with the InDesign file just as any other. Contact sheets in InDesign have a leg up on the ones in Photoshop since you can use a template as your basis.
#88 Exploring Scripts in InDesign
InDesign is a page layout application laden with powerful features and tools. But if there happens to be a task you wish InDesign could help with, look no further than scripts. Scripts in InDesign are plain text files that can be written in AppleScript for Mac, VBScript for Windows, or JavaScript for cross-platform support to extend InDesign’s base functionality to accomplish particular tasks faster or more efficiently.
Fortunately, you don’t have to learn to code to reap the benefits of InDesign scripts. You can install scripts into InDesign that others have been so kind to develop and start running them with a simple double-click. Many sample scripts are available to you on the CS2 install disc. If you own Adobe Creative Suite 2 Premium, look on the Resources and extras disc (not Disk 2) and follow this path: Technical Information/InDesign CS2/Scripting/Adobe Sample Scripts/JavaScript. To install these sample scripts into InDesign, select all the scripts and copy them into your InDesign’s Scripts folder (Adobe InDesign/Presets/Scripts). You should also copy the Read Me PDF found in the Adobe Sample Scripts folder to learn what each script does. Then quit InDesign if you happen to have it running. Launch InDesign and choose Window > Automation > Scripts to open the Scripts palette. The sample scripts you installed should now be available to you from this palette (Figure 88). To run a script, simply double-click it. Many of the scripts require you to have an object selected first, but they display a message window informing you of such.
Figure 88. Once you’ve loaded the sample scripts into InDesign, you’ll have unleashed a whole new set of features and functionality that was lurking underneath the power of scripting.
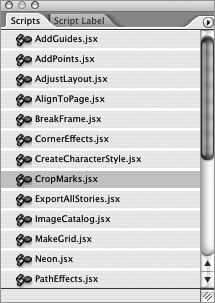
Be sure to try each script to become familiar with its capabilities. For even more scripts, go to Adobe’s Resource Center Studio Exchange at http://share.studio.adobe.com. Here you’ll not only find scripts for InDesign and other CS2 applications, but other helpful tools such as templates and plug-ins. When I last checked, there were close to 200 scripts available for InDesign.
#89 Detecting Rollover Images in GoLive
One of the timesaving features in GoLive is its ability to detect rollover images by looking for commonly used suffixes to filenames such as “-out, -over, -down” when you add the main graphic to a page. For instance, if you created a graphic named “about.gif” and named the over and down states “about-over.gif” and “about-down.gif,” GoLive will automatically associate the images to the main graphic in the Rollovers palette and produce the necessary code to string all the rollover states together, including efficient preloader code.
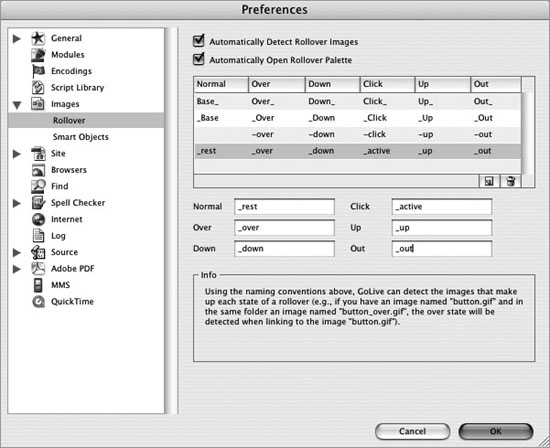
GoLive’s Detect Rollover Images feature is on by default. So to take advantage of it, you just need to make sure GoLive is aware of your file naming conventions and that you save all your images in the same folder. To review GoLive detection settings, open the Rollovers palette (Window > Rollovers) and choose Rollover Detection Settings from the palette’s menu. This actually brings up the Rollover settings in GoLive’s Preferences dialog (Figure 89a). You can choose to follow any of the naming conventions shown or add your own naming scheme by clicking the New Item button ![]() . Click OK when you’ve finished reviewing the detection settings.
. Click OK when you’ve finished reviewing the detection settings.
Figure 89a. Use the Rollovers Preferences to see which naming conventions GoLive is set to detect, or add your own.
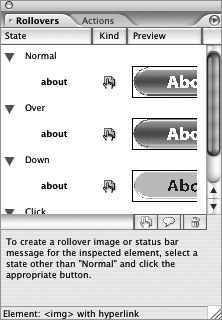
Now create and save all your rollover graphics to a folder within your GoLive site, using a naming convention GoLive is aware of. Drag your main graphic of the rollover set into a GoLive page. A small rollover icon ![]() appears in the lower-left corner of your graphic, letting you know that GoLive has detected your rollover states. Go to the Rollovers palette, and you’ll see that all your rollover states have been automatically created (Figure 89b). Switch to Preview mode to see your rollovers in action.
appears in the lower-left corner of your graphic, letting you know that GoLive has detected your rollover states. Go to the Rollovers palette, and you’ll see that all your rollover states have been automatically created (Figure 89b). Switch to Preview mode to see your rollovers in action.
Figure 89b. Once you’ve added your main graphic, GoLive intelligently detects the other rollover images in the set and then builds the entire rollover interaction for you in the Rollovers palette.
#90 Converting Multiple Documents in GoLive
If you have an old site with hundreds of pages that you want to convert to XHTML, you may be discouraged thinking it will be a long tiresome job. GoLive actually automates the process of converting documents of this nature so that it’s relatively quick and painless.
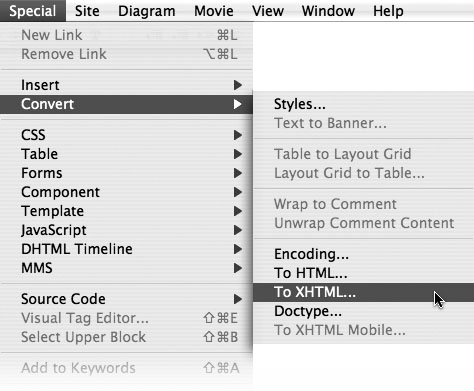
You can find a handful of document conversion options in GoLive by choosing Special > Convert (Figure 90a):
• Encoding: Changes the selected character set (charset) within your documents.
• To HTML: Converts your XHTML documents to HTML.
• To XHTML: Converts your HTML documents to XHTML.
• Doctype: Allows you to choose a different DOCTYPE for your documents. The DOCTYPE of your document informs browsers of how compliant your code is (transitional vs. strict). If you want to convert from HTML Transitional to XHTML Transitional, you’ll need to use the To XHTML option.
• To XHTML Mobile: Converts the document or documents you’ve selected in your site so they’re ready for XHTML Mobile.
Figure 90a. The Convert option is your ticket to all the document conversion options GoLive offers.
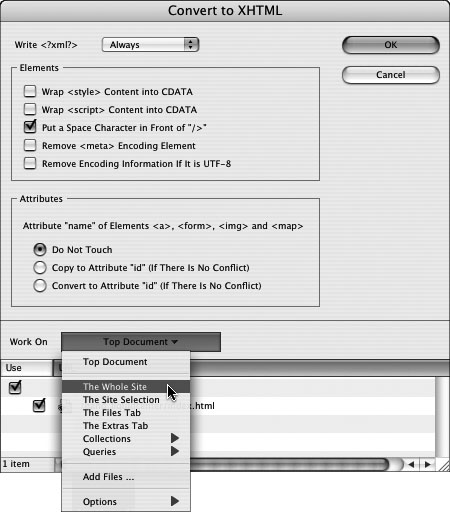
Each conversion option opens its own dialog. Here you adjust any settings and decide which documents to run the conversion on. Except for XHTML Mobile, you can specify which documents in your site to perform the conversion on by clicking the Work On pop-up menu (Figure 90b). You can choose to convert only the document you’re working on (top document), a selection of documents, all the documents within your site, or a set of documents based on a query.
Figure 90b. Use the Work On pop-up menu to specify which files you want GoLive to convert. Your selection list appears directly below the menu.
When you’re ready to convert your selection of documents, click OK. Depending on the number of documents you’ve selected and the speed of your computer, the conversion process may take a while. This may be an opportune time for a cup of coffee. But when you return, your documents should all be converted, saving you countless hours of coding.