5. Finding and Using 3D Models
Lesson overview
In this lesson, you’ll import models from various sources and learn the following:
Why the starter assets included with Dimension are a good place to begin when learning Dimension.
How to use Adobe Stock to find 3D objects.
How to download a model from Adobe Stock and use it in a scene.
How to import 3D models in other industry-standard file formats into Dimension.
How to assemble models into a realistic scene.

This lesson will take about 45 minutes to complete. To get the lesson files used in this chapter, download them from the web page for this book at www.adobepress.com/DimensionCIB2020. For more information, see “Accessing the lesson files and Web Edition” in the Getting Started section at the beginning of this book.

3D models from a variety of sources, including Adobe Stock, can be downloaded and then imported into your scene.
Using starter assets
As you saw in an earlier lesson, Dimension includes dozens of 3D models, materials, lights, and background images you can use to get started creating 3D scenes. The 3D models included with Dimension as starter assets are excellent for getting started with 3D scene building. They are carefully optimized for use with Dimension—they will import into a scene at a reliable size, arrive at consistent coordinates in the scene, and feature clearly named surfaces and materials.
Once you begin looking elsewhere for 3D models, you’ll soon discover that model quality varies widely. You’ll find that some models consist of a low number of polygons, so curved surfaces appear as a sequence of straight lines. You might find that a model of a bottle is made up of only a single unit, with the bottle cap not created as a separate object. A model creator can do any number of things that make it difficult to work with a model in Dimension or any other program.
Even well-designed, high-quality models are sometimes saved in such a way that, when placed in Dimension, they appear upside down, rotated, huge, or tiny, or behave in some other unpredictable fashion.
For these reasons, until you become comfortable working in Dimension, it’s easiest to work with the starter assets.
Examining a starter asset
Some of the starter assets are simple objects that consist of just a single model. But other assets are carefully constructed of multiple models grouped together and clearly labeled to make it easy to work with them. Let’s examine one such starter asset and see how it is assembled.
Choose File > New to create a new document. If you currently have another document open, it will close. If that document isn’t saved, you’ll be prompted to save it before closing.
Click the Add And Import Content icon
 at the top of the Tools panel, and choose Starter Assets. This displays the Content panel on the left side of the screen and displays the starter content in the panel.
If any of the “Filter By” icons are selected, click once on each selected icon to deselect it.
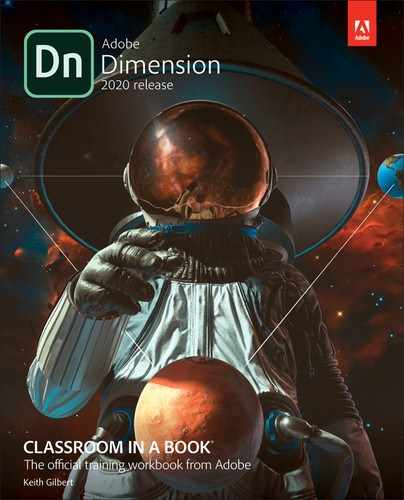
Type laptop into the Search field at the top of the Content panel.
Click the 16:10 Laptop model to place the model in the scene. Note that the laptop neatly lands in the center of the scene.
 Tip
TipThe keyboard shortcut for Camera > Frame Selection is F. As a bonus, if nothing is selected, the F shortcut acts just like Camera > Frame All, changing the camera view so that you can see all the models in the scene.
Choose Camera > Frame Selection so that you can see the entire laptop model on the screen.
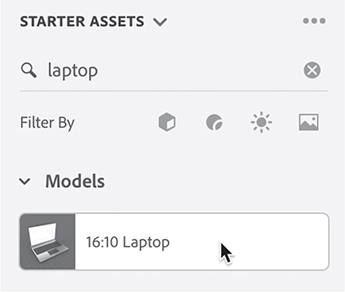
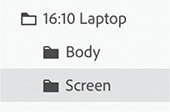
In the Scene panel, note that the laptop model is a group of eight models, each clearly labeled.
In the Scene panel, the white folder icon
 indicates a group that is open, and the black folder icon
  indicates a group that is closed. You can click these icons to open or close the group.
Hover over the Laptop Body model in the Scene panel, and click the right-pointing arrow icon
 displayed to the right of the words “Laptop Body.” This displays a new view in the Scene panel that shows you the material that is applied to the Laptop Body model.
With Frame Material selected, examine the Properties panel, and note that the surface properties are set up for a realistic-looking gray metallic finish on the laptop body. (You could of course change this surface to any material you wish.)

Click the back arrow
 in the Scene panel to return to viewing the models in the panel.
Hover over the Glass model in the Scene panel, and click the right-pointing arrow icon
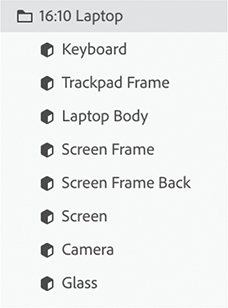
displayed to the right of the word “Glass.” This displays a new view in the Scene panel that shows you the material that is applied to the Glass model.Examine the Properties panel, and note that the Translucence properties are set up for a glass appearance on the screen.
 Tip
TipWhen you are viewing a material in the Scene panel, press the Esc key to return to the list of models.
Click the back arrow icon
in the Scene panel to return to viewing the models in the panel.
The starter assets have easily identifiable and clearly named groups, models, and pre-applied materials, making the assets easy to work with.
Modifying a starter asset
One big advantage of a model that is made up of a group of clearly labeled sub-models is that the submodels can be transformed just like you would transform the group. This makes it easy to rotate the screen in the laptop model, “opening” or “closing” it.
In the Scene panel, select the Keyboard model.
Hold down the Shift key and then click the Laptop Body model to select the Keyboard, Trackpad Frame, and Laptop Body models.
 Tip
TipJust as with most other Adobe design applications, Command+G (macOS) or Ctrl+G (Windows) is the keyboard shortcut for Group, and Shift+Command+G (macOS) or Shift+Ctrl+G (Windows) is the keyboard shortcut for Ungroup.
Choose Object > Group to group the three models into a single group.
Double-click the name of the group to edit it, and name it Body.

In the Scene panel, select the Screen Frame model.
Hold down the Shift key and then click the Glass model to select the Screen Frame, Screen Frame Back, Screen, Camera, and Glass models.

Choose Object > Group to group the five models into a single group.
Double-click the name of the group to edit it, and name it Screen.
Select the Select tool (keyboard shortcut: V).
Click the Screen group in the Scene panel to select the models that make up the laptop screen.
In the Properties panel, select Bottom Center for the Pivot.

 Note
NoteSome 3D modeling programs allow the user to create “rigged” models. These models contain “knowledge” of how the model parts fit together. A rigged model of a laptop, for example, would allow the user to hinge the laptop screen open and closed, but not detach it from the laptop base or slide it forward or back. Dimension ignores any rigging instructions that may be present in a 3D model.
Drag the red circle on the Select tool widget until about 70° is displayed for the X rotation value.

Using Adobe Stock assets
Adobe Stock is a huge collection of royalty-free images, video, artwork, templates, and 3D assets, including models, materials, and lights. These assets can be accessed through a web browser at stock.adobe.com or from within most Creative Cloud applications. The assets can be purchased via a subscription plan. See stock.adobe.com/plans for pricing information.
Finding a model on Adobe Stock
Several hundred of the 3D models on Adobe Stock are free, so you can use them even without an Adobe Stock subscription.
![]() Note
Note
Just like the models that come with Dimension as starter assets, all the 3D assets available on Adobe Stock are carefully optimized for use with Dimension—they will import into a scene at a reliable size, arrive at consistent coordinates in the scene, and feature clearly named models, groups, and materials.
Click the Add And Import Content icon
at the top of the Tools panel.Select Adobe Stock.
Select Browse all Adobe Stock 3D.
Your default browser launches, and you are brought to a page on stock.adobe.com.
In your browser on the Adobe Stock page, type 182469767 into the search field at the top of the screen and then press Return/Enter.

This is the ID number of a specific desk model used in this lesson. This model is free.
Click the License For Free button. If you aren’t signed in to Adobe Stock with your Adobe ID, you’ll be prompted for your Adobe ID and password. The asset will be licensed, and downloaded to your browser’s download location.
Importing a downloaded Adobe Stock asset
Models that you license from Adobe Stock are downloaded to your browser’s default download location on your computer. From there, you can import them into your Dimension scenes.
In Dimension, choose File > Import > 3D Model.
TipUse the ` keyboard shortcut to show and hide the Content panel as needed to make more room on the screen for the canvas.
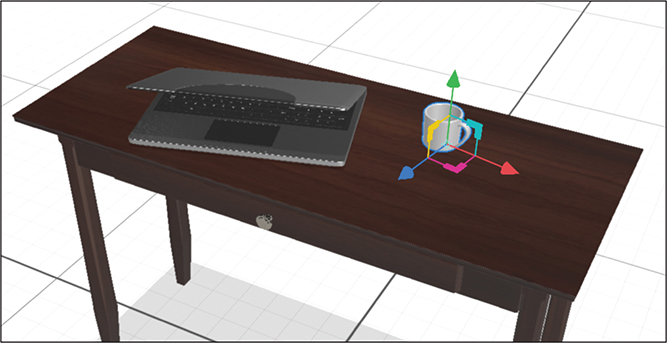
Navigate to your browser’s default download location, open the folder named AdobeStock_182469767, select the file named a_desk_1_163.obj, and click Open. The model will be placed in the center of the scene.
Choose Camera > Frame All to position the camera so that you can see the entire desk on the canvas.

Click the Camera Bookmarks icon
 at the top of the screen.
Click the plus icon
 to create a new bookmark.
To rename the bookmark, type Starting view and press Return/Enter.

Modifying the scene
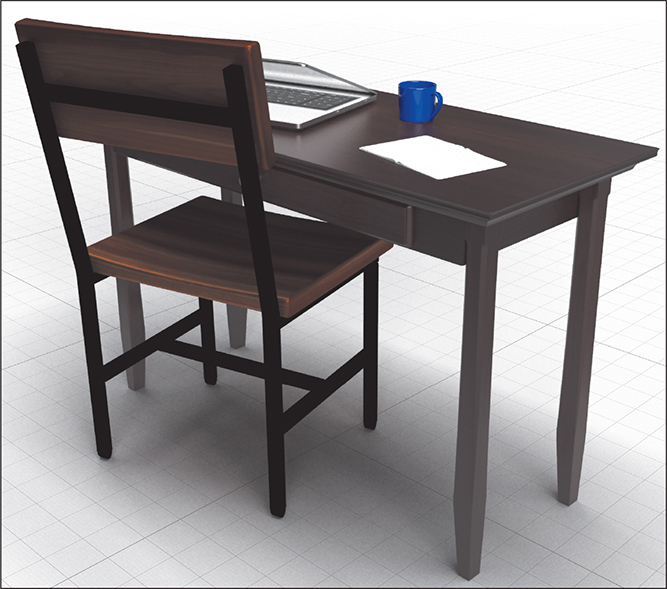
All the 3D models in the Adobe Stock library are optimized for use with Dimension, much like the starter assets. Note that the desk arrived accurately in the scene, just as the laptop did. It is centered on the scene, sized proportionally to the laptop, and sitting on the ground plane.
Select the Select tool (keyboard shortcut: V).
Click 16:10 Laptop in the Scene panel to select the laptop model.
Drag the green arrow up until the laptop model is floating above the top surface of the desk.
Select the Orbit tool (keyboard shortcut: 1) and drag down a bit on the screen so you can see more of the top of the desk.
Choose Camera > Frame All to position the camera so that you can see the desk and the laptop.
With the Select tool, drag the “Pivot Handle” (the black and white circle located on the Select tool widget on the laptop model) down to the desktop. Dragging the pivot handle snaps the model you are dragging onto the surface of any model it comes in contact with. Drag the laptop around on the surface of the desk, and position it somewhere on the left side.

Drag the green circle on the Select tool widget to the right so that the laptop is turned a bit on the surface of the desk.

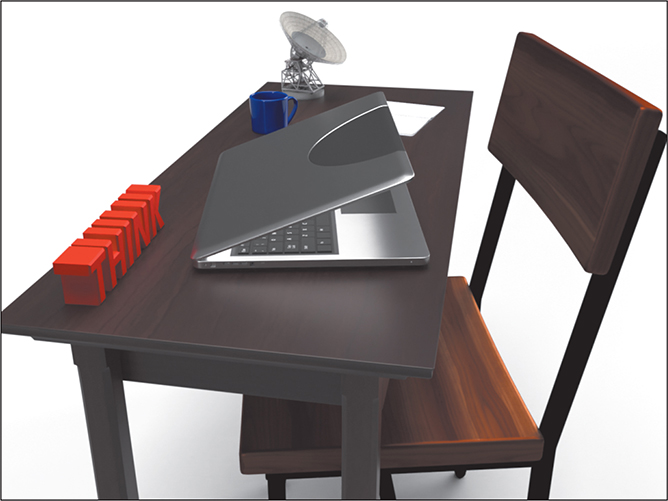
Adding more objects to the scene
In this lesson you’ll add three more free models from Adobe Stock to your scene.
Click the Add And Import Content icon
at the top of the Tools panel.Select Adobe Stock, and then select Browse All Adobe Stock 3D.
In your browser on the Adobe Stock page, type 172516470 into the search field at the top of the screen and then press Return/Enter.
This is the ID number of a specific coffee cup model used in this lesson. This model is free.
Click the License For Free button. The asset will be licensed, and downloaded to your browser’s download location.
In Dimension, choose File > Import > 3D Model.
Navigate to your browser’s default download location, open the folder named AdobeStock_172516470, select the file named coffee_cup_116c.obj, and click Open. The model will be added to the center of the scene, and positioned on the ground plane, which in this scene is the floor beneath the desk.
TipTwo camera commands that you might find useful while positioning this small object in the larger scene are Camera > Frame Selection, which will fill the screen with the selected object, and Camera > Frame All, which will fill the screen with all the objects in the scene.
With the Select tool, drag the “Pivot Handle” (the black and white circle located on the Select tool widget on the coffee cup) to snap the cup to the top surface of the desk. Position it anywhere you wish on the desktop,
With the Select tool, double-click on the coffee cup model on the canvas. This will select the cup’s material.
In the Properties panel, click the color swatch next to Base Color.
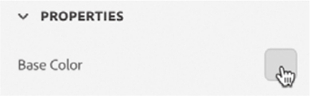
Select a blue color for the coffee cup, and then press the Esc key to close the color picker.
 Tip
TipYou can also drag and drop models directly from the Finder (macOS) or File Explorer (Windows) into your scene.
Repeat steps 1–6, this time with Adobe Stock asset 213242110. This is the ID number of a specific composition notebook model. This model is free.
With the Select tool, drag the “Pivot Handle” (the black and white circle located on the Select tool widget on the composition notebook) to snap the notebook to the top surface of the desk. Position it anywhere you wish on the desktop.
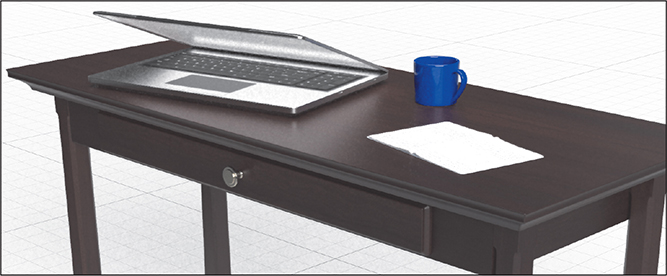
Repeat steps 1–6 again, this time with Adobe Stock asset 184479705. This is the ID number of a wood chair model. This model is free.
Drag the green circle on the Select tool widget clockwise to rotate the chair so it faces the front of the desk.
Grab the chair, and drag it into position. Dragging a model by the body of the model, not on the Select tool widget, allows you to move the model in both directions along the ground plane, which in this case is like sliding the chair around on the floor.
Importing 3D models from other sources
In addition to working with starter assets and content from Adobe Stock, Dimension will import 3D models in the following formats:
FBX (Filmbox)
glTF (GL Transmission Format)
GLB (Single-file binary version of the glTF format)
OBJ (Wavefront)
SKP (SketchUp)
STL (Stereolithography)
Depending on the skill of the person who created the model and the software used, 3D models can be large and complex. In addition, different 3D modeling programs save their 3D objects into these “standard” file formats in various ways. How successful you’ll be importing a model in one of these formats, and how useable the resulting model will be, depends on these variables:
How well the modeler has created the model. For example, if the model is of a wine bottle, did the modeler create the cork in the bottle as a separate object, so that you can apply a different surface to the cork than to the rest of the bottle, or is the entire bottle a single object? Is the model constructed of enough polygons so that the curve of the bottle appears smooth, but not so many polygons that the model is overly complex?
The model geometry. Dimension only supports polygon geometry. Alternatives to polygon modeling such as NURBs or curves aren’t supported and can’t be imported.
How complex the model is relative to the processing power and memory available on your computer. For best results, a model should use the lowest number of polygons to achieve the desired appearance. The import of a model with a high polygon count may be perfectly accurate, but slow. Because the model is so complex, Dimension may subsequently be slow and unresponsive.
How well Adobe has written the translation routine being used to translate the file format into Dimension’s file format.
How accurately, consistently, and reliably the modeling software being used writes its data into the given file format.
Unfortunately, it is nearly impossible to predict how successfully a particular model will import into Dimension. You will need to try importing it to find out! If you have a model in one of Dimension’s supported formats that doesn’t import properly, report the issue via the Adobe Dimension feedback website, at https://feedback.adobedimension.com.
Importing a GLB model
Most people have some personal effects, tchotchkes, or toys on their desks. You’ll add a toy model of a radar antenna to the surface of the desktop.
![]() Tip
Tip
The keyboard shortcut for File > Import > 3D Model is Command+I (macOS) and Ctrl+I (Windows).
In Dimension, choose File > Import > 3D Model.
Select the file named DSN_34M_BWG.glb, which is in the Lessons > Lesson05 folder that you copied onto your hard disk.
NoteThe antenna model is from the repository of free 3D models available from NASA at https://solarsystem.nasa.gov/resources.
When it comes into the scene, the model is enormous compared to the desk model. It is obviously at an entirely different scale than expected. No worries. The first step is to choose Camera > Frame Selection so that you can see the entire model.
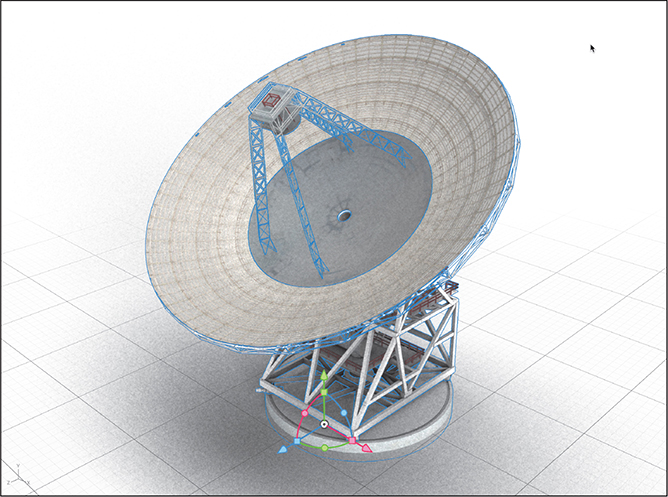
To make the model smaller, you’ll use the Size fields in the Properties panel. If the lock icon next to Size appears unlocked
 , click the icon to lock the X, Y, and Z fields together so you can scale the model proportionally.
Enter 20 cm for the X value, and press Return/Enter.

Choose Camera > Frame All so that you can see all the models in the scene.
Now the antenna model is positioned below the ground plane. Choose Object > Move To Ground to correct this.
Drag the blue arrow on the Select tool widget to move the antenna closer to the desk.
Choose Camera > Frame All.
Use the Pivot Handle on the Select tool widget to position the Antenna model on the desktop as desired.

Using 3D models from Photoshop in Dimension
Photoshop can extrude text and other vector shapes into 3D space. If you want to try this for yourself, see “Creating extruded text in Photoshop” on the next page. Otherwise, I’ve created a PSD file ready for you to export.
In Adobe Photoshop, open the file named 3D text.psd, which is in the Lessons > Lesson05 folder that you copied onto your hard disk.
Choose 3D > Export 3D Layer.
Choose Wavefront|OBJ for the 3D File Format and then click OK.

Type 3D text.obj for the file name and save it somewhere you’ll remember.
In Dimension, choose File > Import > 3D Model.
Navigate to where you saved the 3D text, select the file named 3D text.obj, and click Open. The model will be added to the scene, but it will be huge compared to the desk.
Choose Camera > Frame All.
To make the model smaller, you’ll use the Size fields in the Properties panel. If the lock icon next to Size appears unlocked
, click the icon to lock the X, Y, and Z fields together so you can scale the model proportionally.Enter 30 cm for the X value, and press Return/Enter.

Choose Camera > Frame All.
With the Select tool, drag the “Pivot Handle” (the black and white circle located on the Select tool widget on the text model) to snap the text model to the top surface of the desk. Position it anywhere you wish on the desktop,
Use the Camera tools (Orbit, Pan, Dolly, and Horizon) to position the camera however you want on the scene.
Click the Render tab, and render the scene if you wish. If you’d rather examine the render of my completed scene, open the Lesson_05_end_render.psd file in Photoshop.
Other sources for 3D content
There are dozens of websites that sell stock 3D content. Because of the complexity of 3D models and file formats, it’s important that you purchase models from reputable vendors that will stand behind their product if the models won’t import into Dimension.
Here is a sampling of some stock 3D sources:
CGTrader: cgtrader.com
Sketchfab: sketchfab.com/store
Turbosquid: www.turbosquid.com
There are also various repositories of free 3D content on the web. Here are a few:
3D Warehouse: 3dwarehouse.sketchup.com
Google Poly: poly.google.com
GrabCAD: grabcad.com
National Institutes of Health: 3dprint.nih.gov
Smithsonian: 3d.si.edu
Traceparts: traceparts.com
Identifying potential problems when importing 3D models
Models that you place in your scene from the starter assets or from Adobe Stock should import into Dimension in a reliable, consistent manner. But models you obtain from other sources may sometimes behave unpredictably when imported into Dimension. Here are some of the potential problems, as well as a few solutions.
Model appears out of scale
The creator of a model doesn’t have any idea of the size at which you want to use the model, so it may come into Dimension enormous or really tiny. If the problem isn’t too extreme, you can scale the object with the Select tool. Or use the Dolly tool (keyboard shortcut: 3) to enlarge or reduce your view of the object.
Sometimes, an object will arrive so large that just a single small surface on the object fills the entire screen, so it is difficult to scale the object or zoom in or out. In this case, the Camera > Frame Selection command (keyboard shortcut: F) will scale your view so that the entire object fits on the screen.
Object positioned outside the viewable area
Sometimes an object won’t appear anywhere within the Dimension window. This is caused by the XYZ positioning of the object being out of scale with Dimension’s coordinate system. Thankfully, when this happens, a blue dot icon ![]() will appear at the edge of the screen. Clicking this icon will position the screen so that you can see the imported object.
will appear at the edge of the screen. Clicking this icon will position the screen so that you can see the imported object.
Object positioned below the ground plane
Sometimes an object won’t appear on the screen because it is entirely below the ground plane. Choosing Object > Move to Ground will quickly move the object above the ground plane so that it is within view.
Review questions
1. Which of these file formats can be imported as a 3D model into a Dimension scene?
PSD
OBJ
MTL
CAN
2. Are 3D models in the Adobe Stock library free or paid?
3. What does the Object > Move To Ground command do, and when might you need to use it?
4. If an imported model is much larger than the canvas, what is one easy way to quickly position the camera so that you can see the entire model?
Review answers
1. OBJ is an industry-standard 3D file format that can be exported from many different 3D modeling programs and placed into a Dimension scene.
2. The 3D models available in the Adobe Stock library can be purchased via a monthly subscription. However, several hundred of the 3D models on Adobe Stock are free.
3. The Object > Move To Ground command will move the selected object so that it is positioned above the ground plane. This command is sometimes necessary when an imported model doesn’t appear within view because it is positioned “underground,” beneath the ground plane.
4. The Camera > Frame Selection command (keyboard shortcut: F) will quickly position the camera so that the entire model is within view.