
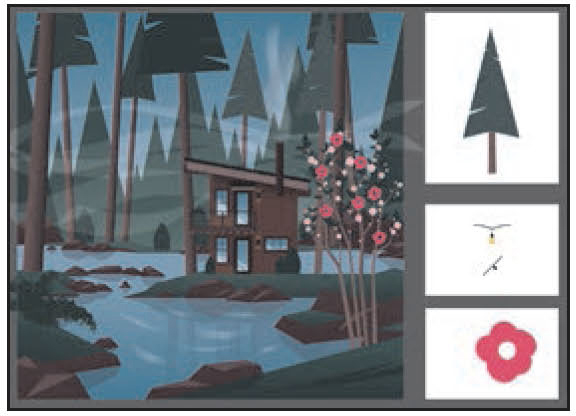
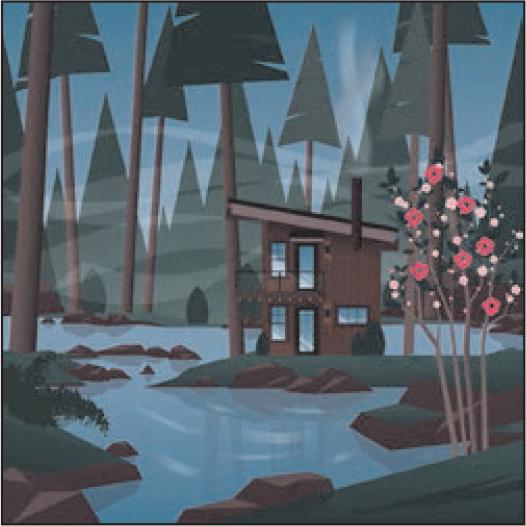
11 Using Brushes to Create a Poster

The variety of brush types in Adobe Illustrator CC lets you create a myriad of effects simply by painting or drawing with the Paintbrush tool or the drawing tools. You can work with the Blob Brush tool; choose from the Art, Calligraphic, Pattern, Bristle, or Scatter brushes; or create new brushes based on your artwork.
Lesson overview
In this lesson, you’ll learn how to do the following:
Use four brush types: Calligraphic, Art, Bristle, and Pattern.
Apply brushes to paths.
Paint and edit paths with the Paintbrush tool.
Change brush color and adjust brush settings.
Create new brushes from Adobe Illustrator artwork.
Work with the Blob Brush tool and the Eraser tool.
This lesson will take about 60 minutes to complete. Please log in to your account on peachpit.com to download the files for this lesson, or go to the “Getting Started” section at the beginning of this book and follow the instructions under “Accessing the lesson files and Web Edition.” Store the files on your computer in a convenient location.
Your Account page is also where you’ll find any updates to the lessons or to the lesson files. Look on the Lesson & Update Files tab to access the most current content.
Starting the lesson
In this lesson, you will learn how to work with the different brush types in the Brushes panel and how to change brush options and create your own brushes. Before you begin, you’ll restore the default preferences for Adobe Illustrator CC. Then you’ll open the finished art file for the lesson to see the finished artwork.
To ensure that the tools function and the defaults are set exactly as described in this lesson, delete or deactivate (by renaming) the Adobe Illustrator CC preferences file. See “Restoring default preferences” in the “Getting Started” section at the beginning of the book.
 Note
NoteIf you have not already downloaded the project files for this lesson to your computer from your Account page, make sure to do so now. See the “Getting Started” section at the beginning of the book.
Start Adobe Illustrator CC.
Choose File > Open. In the Open dialog box, navigate to the Lessons > Lessonll folder, and select the L11_end.ai file on your hard disk. Click Open to open the file.
If you want, choose View > Zoom Out to make the finished artwork smaller and then adjust the window size and leave the artwork on your screen as you work. (Use the Hand tool [
 ] to move the artwork to where you want it in the Document window.) If you don’t want to leave the artwork open, choose File > Close.
To begin working, you’ll open an existing art file.
Choose File > Open. In the Open dialog box, navigate to the Lessons > Lessonll folder, and select the L11_start.ai file on your hard disk. Click Open to open the file.

Choose View > Fit All In Window.
Choose File > Save As. In the Save As dialog box, name the file VacationPoster.ai, and select the Lesson11 folder. Leave Adobe Illustrator (ai) chosen from the Format menu (macOS) or Adobe Illustrator (*.AI) chosen from the Save As Type menu (Windows) and then click Save.
NoteIf you don’t see Reset Essentials in the workspace switcher menu, choose Window > Workspace > Essentials before choosing Window > Workspace > Reset Essentials.
In the Illustrator Options dialog box, leave the Illustrator options at their default settings and then click OK.
Choose Reset Essentials from the workspace switcher in the Application bar to reset the workspace.
Working with brushes
Using brushes you can decorate paths with patterns, figures, brush strokes, textures, or angled strokes. You can modify the brushes provided with Illustrator and create your own brushes.
You can apply brush strokes to existing paths, or you can use the Paintbrush tool to draw a path and apply a brush stroke simultaneously. You can change the color, size, and other features of a brush, and you can edit paths after brushes are applied (including adding a fill).
Types of brushes

Calligraphic brush
Art brush
Bristle brush
Pattern brush
Scatter brush
There are five types of brushes that appear in the Brushes panel (Window > Brushes): Calligraphic, Art, Bristle, Pattern, and Scatter. In this lesson, you will discover how to work with all of these except for the Scatter brush.
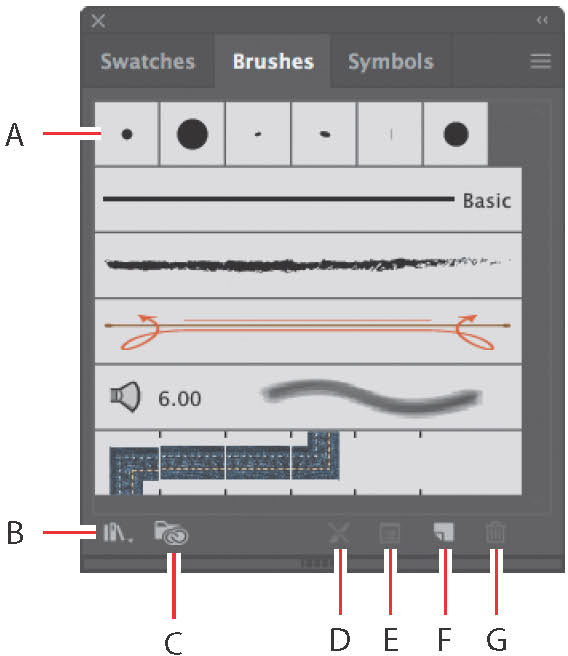
Brushes
Brush Libraries menu
Libraries panel
Remove Brush Stroke
Options of selected object
New Brush
Delete Brush
![]() Note
Note
The Brushes panel you see will most likely look different than the figure. The figure shows the default Brushes panel for a new document.
![]() Tip
Tip
To learn more about Scatter brushes, search for "Scatter brushes” in Illustrator Help (Help > Illustrator Help).
Using Calligraphic brushes
The first type of brush you’ll learn about is a Calligraphic brush. Calligraphic brushes resemble strokes drawn with the angled point of a calligraphic pen. Calligraphic brushes are defined by an elliptical shape whose center follows the path, and you can use these brushes to create the appearance of hand-drawn strokes made with a flat, angled pen tip.

Applying a Calligraphic brush to artwork
To get started, you’ll filter the type of brushes shown in the Brushes panel so that it shows only Calligraphic brushes.
Choose Window > Brushes to show the Brushes panel. Click the Brushes panel menu icon (
 ), and choose List View.
Click the Brushes panel menu icon (
) again, and deselect Show Art Brushes, Show Bristle Brushes, and Show Pattern Brushes, leaving only the Calligraphic brushes visible in the Brushes panel. You can’t deselect them all at once, so you’ll have to keep clicking the menu icon () to access the menu.
NoteA checkmark next to the brush type in the Brushes panel menu indicates that the brush type is visible in the panel.
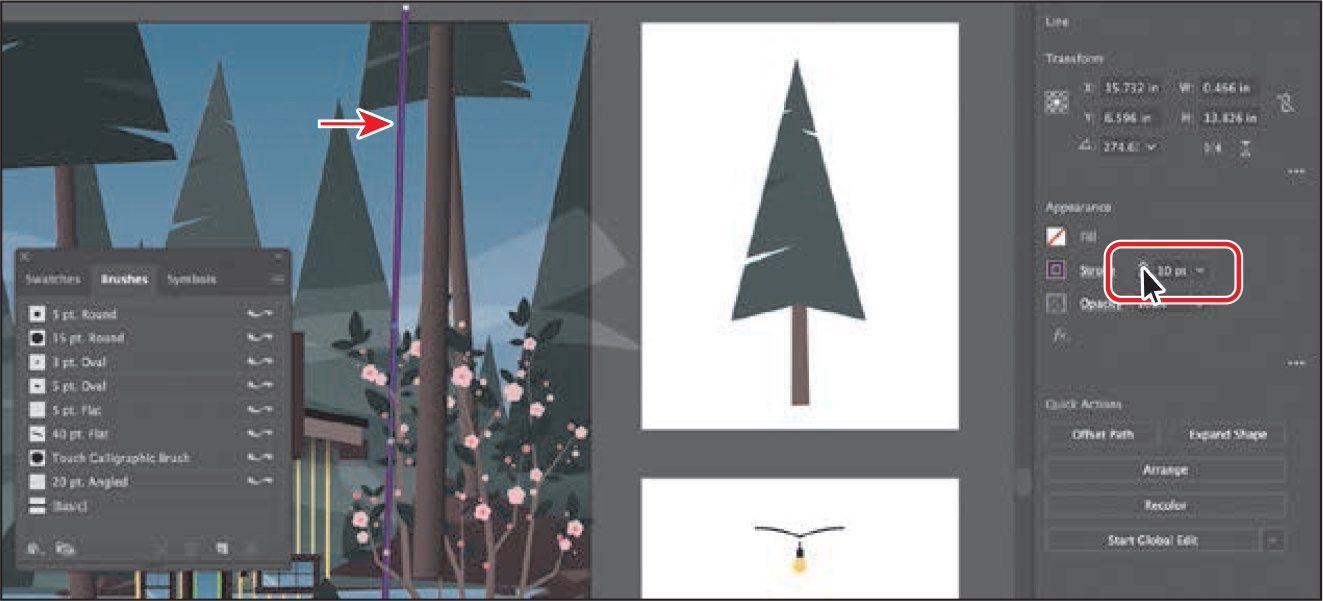
Select the Selection tool (
 )in the Tools panel, and click one of the curved pink paths to select it. To select the rest, choose Select > Same > Stroke Color.
Select the 40 pt. Flat brush in the Brushes panel to apply it to the pink paths.

NoteLike drawing with an actual calligraphic pen, when you apply a Calligraphic brush, such as the 40 pt. Flat brush, the more vertically the path is drawn, the thinner the path’s stroke appears.
Change the Stroke weight to 3 pt in the Properties panel.
Click the Stroke color in the Properties panel, make sure the Swatches option (
 ) is selected, and select White. Press the Escape key to hide the Swatches panel, if necessary.
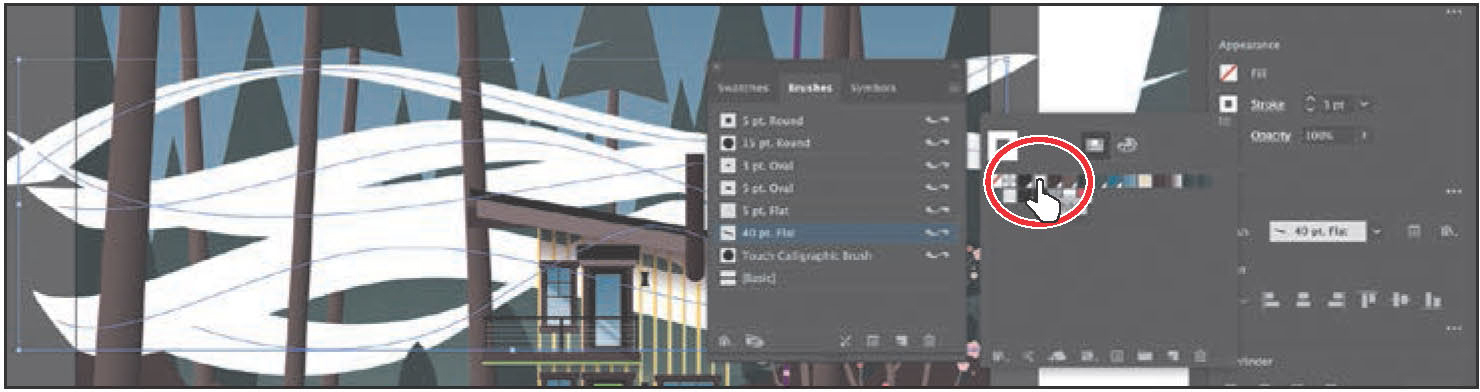
Change Opacity to 20% in the Properties panel by clicking the arrow to the right of the value and dragging the Opacity slider.
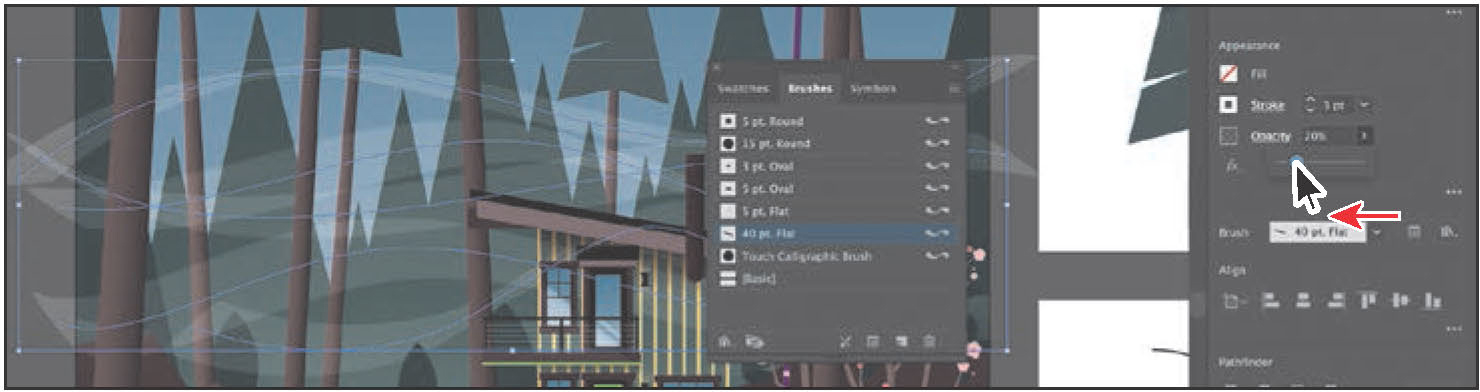
Choose Select > Deselect and then choose File > Save.
Drawing with the Paintbrush tool
As mentioned earlier, the Paintbrush tool allows you to apply a brush as you paint. Painting with the Paintbrush tool creates vector paths that you can edit with the Paintbrush tool or other drawing tools. Next, you’ll use the Paintbrush tool to paint waves in the water with a calligraphic brush from a brush library. Your waves won’t look identical to what you see in the lesson, and that’s okay—just have some fun.
Select the Paintbrush tool (
 ) in the Tools panel.
Click the Brush Libraries Menu button (
 ) at the bottom of the Brushes panel, and choose Artistic > Artistic_Calligraphic. A brush library panel with various brushes appears.
Illustrator comes with a host of brush libraries that you can use in your artwork. Each brush type, including those discussed previously, has a series of libraries to choose from.

Click the ArtisticCalligraphic panel menu icon (
), and choose List View. Click the brush named “15 pt. Flat” to add it to the Brushes panel.
Close the Artistic_Calligraphic brush library.
Selecting a brush from a brush library, such as the Artistic_Calligraphic library, adds that brush to the Brushes panel for the active document only.
Make sure the fill color is None (
 ), change the stroke color to the Water swatch, and change the stroke weight to 1 pt in the Properties panel.
Change the Opacity to 100% in the Properties panel.
With the pointer in the Document window, notice that the Paintbrush pointer has an asterisk next to it (
 ), indicating that you are about to paint a new path.
Move the pointer over the water in the lake. Paint a short curving path from left to right. You can see the figure for how I painted it.
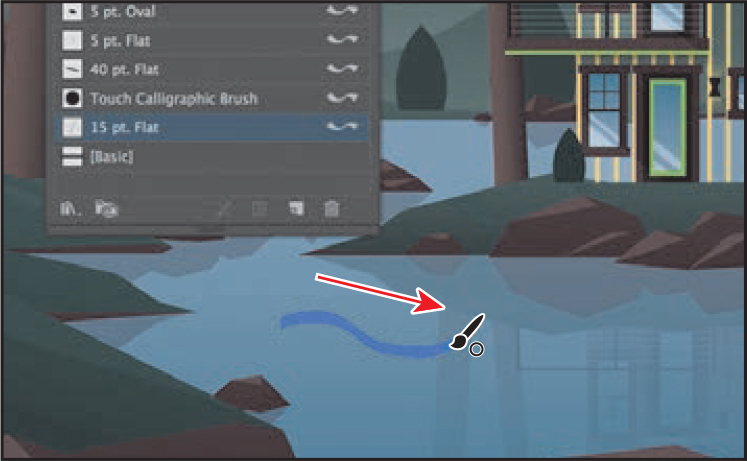
NoteThis Calligraphic brush creates random angles on the paths, so yours may not look like what you see in the figures, and that’s okay.
Try creating a few more paths, painting from left to right.

Choose Select > Deselect (if necessary) and then choose File > Save.
Editing paths with the Paintbrush tool
Now you’ll use the Paintbrush tool to edit one of the paths you painted.
Select the Selection tool (
) in the Tools panel, and click to select one of the paths you drew on the water.Select the Paintbrush tool (
) in the Tools panel. Move the pointer over the selected path. An asterisk will not appear next to the pointer when it’s positioned over a selected path. Drag to redraw the path. The selected path is edited from the point where you began drawing.
Press and hold the Command (macOS) or Ctrl (Windows) key to toggle to the Selection tool, and click to select another one of the curved paths you drew with the Paintbrush tool. After clicking, release the key to return to the Paintbrush tool.
With the Paintbrush tool, move the pointer over some part of the selected path. When the asterisk disappears next to the pointer, drag to the right to redraw the path.
Choose Select > Deselect (if necessary) and then choose File > Save.
Next, you’ll edit the Paintbrush tool options to change how it paints.
Double-click the Paintbrush tool (
 ) in the Tools panel to display the Paintbrush Tool Options dialog box, and make the following changes:
Fidelity: Drag the slider all the way to Smooth (to the right).
Keep Selected: Selected.
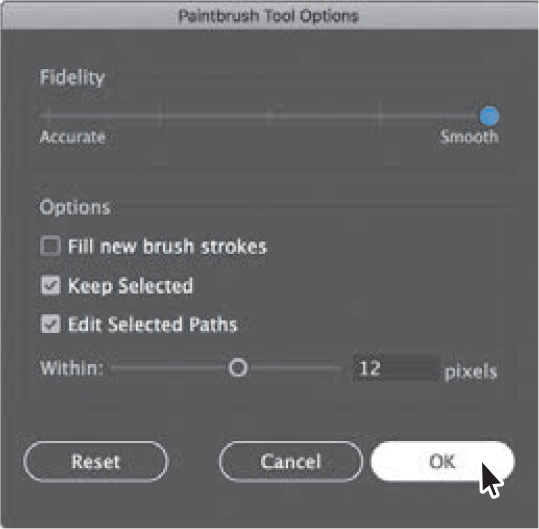
Click OK.
The Paintbrush Tool Options dialog box changes the way the Paintbrush tool functions. For the Fidelity option, the closer to Smooth you drag the slider, the smoother the path will be, and with fewer points. Also, because you selected Keep Selected, the paths remain selected after you finish drawing them.
Change the stroke weight to 2 pt in the Properties panel.
With the Paintbrush tool selected, paint several more paths from either left to right or right to left across the water.

Notice that after painting each path, the path is still selected, so you could edit it if you needed.
Double-click the Paintbrush tool in the Tools panel. In the Paintbrush Tool Options dialog box, deselect the Keep Selected option and then click OK.
Now the paths will not remain selected after you finish drawing them, and you can draw overlapping paths without altering previously drawn paths.
NoteWhen the Keep Selected option is deselected, you can edit a path by selecting it with the Selection tool (
) or by selecting a segment or point on the path with the Direct Selection tool ( ) and then redrawing part of the path with the Paintbrush tool, as you saw previously.
Choose Select > Deselect and then choose File > Save.
Editing a brush
To change the options for a brush, you can double-click the brush in the Brushes panel. When you edit a brush, you can also choose whether to change artwork to which the brush has been applied. Next, you’ll change the appearance of the 15 pt. Flat brush you’ve been painting with.
In the Brushes panel, double-click the brush thumbnail to the left of the text “15 pt. Flat” or to the right of the name in the Brushes panel to open the Calligraphic Brush Options dialog box.

NoteThe edits you make will change the brush for this document only.
In the dialog box, make the following changes:
Name: 20 pt. Angled
Angle: 20°
Choose Fixed from the menu to the right of Angle. (When Random is chosen, a random variation of brush angles is created every time you draw.)
Roundness: 0% (the default setting)
Size: 20 pt

 Tip
TipThe Preview window in the dialog box (below the Name field) shows the changes that you make to the brush.
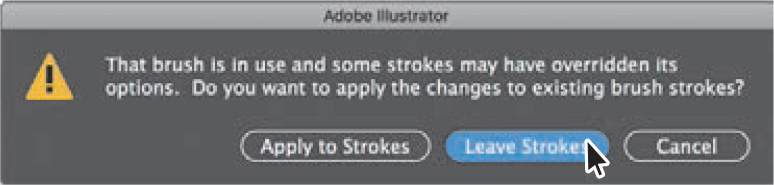
Click OK.
In the dialog box that appears, click Leave Strokes so as not to apply the brush change to the existing waves that have the brush applied.
Choose Select > Deselect, if necessary, and then choose File > Save.
NoteThe artwork should be deselected already, and, if it is, the Select > Deselect command will be dimmed (you can’t select it).
Removing a brush stroke
You can easily remove a brush stroke applied to artwork where you don’t want it. Now you’ll remove the brush stroke from the stroke of a path.
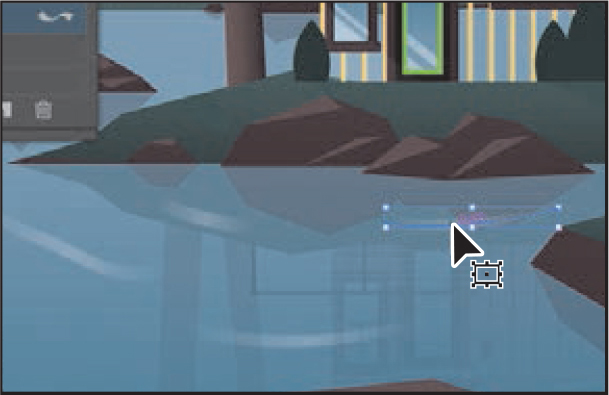
Select the Selection tool (
), and click the purple path with the purple stroke applied (see the following figure).When creating the artwork, I was trying out different brushes on the artwork. The brush applied to the stroke of the selected path needs to be removed.
Click the Remove Brush Stroke button (
 ) at the bottom of the Brushes panel.
Removing a brush stroke doesn’t remove the stroke color and weight; it just removes the brush applied.
TipYou can also select the [Basic] Brush in the Brushes panel to remove a brush applied to a path.
Change the stroke weight to 10 pt in the Properties panel.
Choose Select > Deselect and then choose File > Save.
Using Art brushes
Art brushes stretch artwork or an embedded raster image evenly along the length of a path. As with other brushes, you can edit the brush options to affect how the brush is applied to artwork.

Applying an existing Art brush
Next you’ll apply an existing Art brush to create a fern plant on the lake shore.
In the Brushes panel, click the Brushes panel menu icon (
), and deselect Show Calligraphic Brushes. Then choose Show Art Brushes from the same panel menu to make the Art brushes visible in the Brushes panel.Click the Brush Libraries Menu button (
) at the bottom of the Brushes panel, and choose Artistic > Artistic_ChalkCharcoalPencil.Click the ArtisticChalkCharcoalPencil panel menu icon (
), and choose List View. Click the brush named “Charcoal” in the list to add the brush to the Brushes panel for this document. Close the Artistic_ChalkCharcoalPencil panel group.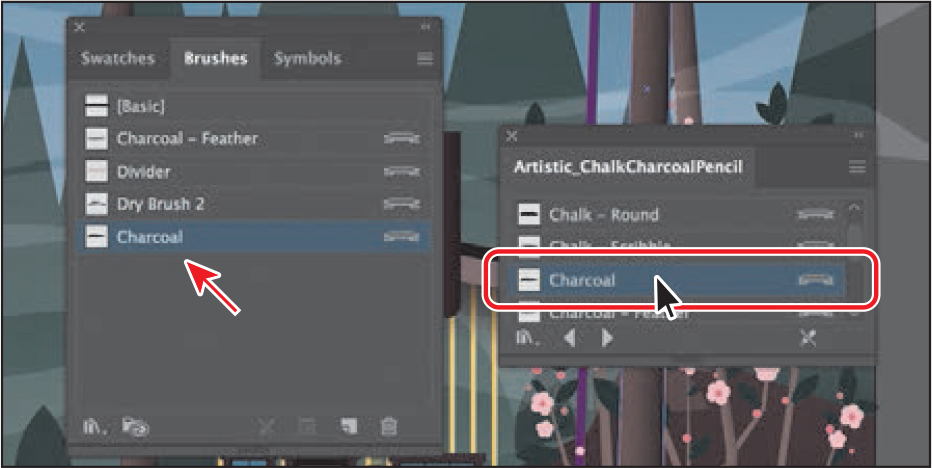
Select the Paintbrush tool (
) in the Tools panel.Ensure that the fill color is None (
), change the stroke color to the Fern green swatch, and change the stroke weight to 10 pt in the Properties panel.Move the Paintbrush pointer (
) on the left side of the lake (marked with an X in the following figure). Drag to create the plant path. See the figure to see how it was painted, and don’t worry about being exact. You can always choose Edit > Undo Art Stroke and repaint the path.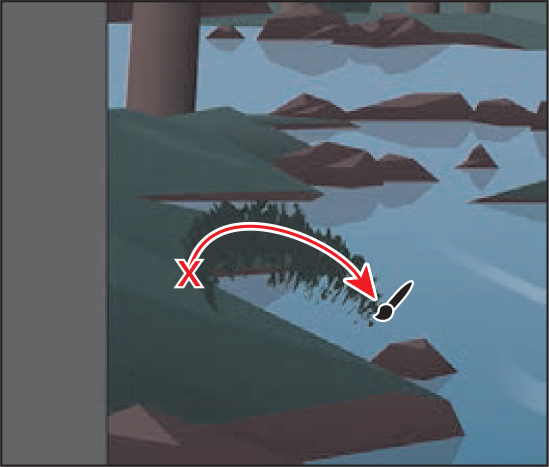
TipWith the Paintbrush pointer selected, press the Caps Lock key to see a precise cursor (X). In certain situations, this can help you paint with more precision.
Try adding a few more painted paths, always starting from the same point as the original path you painted to add more fronds (leaves).

Select the Selection tool, and click to select one of the paths. To select the rest of the paths that make up the fern, choose Select > Same > Stroke Color.
Click the Group button in the Properties panel to keep them together.
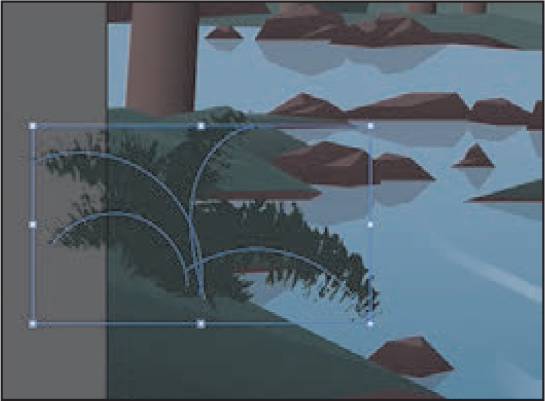
Choose Select > Deselect and then choose File > Save.
Creating an art brush
In this section, you’ll create a new Art brush from existing artwork.
![]() Note
Note
To learn about guidelines for creating brushes, see "Create or modify brushes” in Illustrator Help (Help > Illustrator Help).
Choose 2 from the Active Artboard menu in the Properties panel to navigate to the second artboard with the tree artwork on it.

With the Selection tool (
 ) selected, click the tree artwork to select it.
TipYou can create an Art brush from a raster image. The image you use to create the brush must be embedded in the Illustrator document.
Next you’ll make an Art brush from the selected artwork. You can make an Art brush from vector artwork or from embedded raster images, but that artwork must not contain gradients, blends, other brush strokes, mesh objects, graphs, linked files, masks, or text that has not been converted to outlines.
Choose Window > Brushes to open the Brushes panel, if it isn’t open already. With the tree artwork still selected, click the New Brush button (
 ) at the bottom of the Brushes panel.
This begins the process of creating a new brush from the selected artwork.
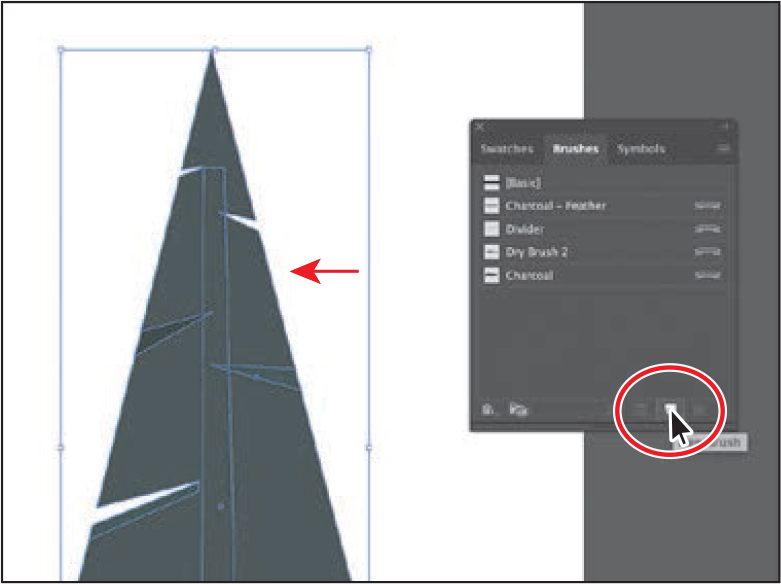
In the New Brush dialog box, select Art Brush and then click OK.

TipYou can also create an Art brush by dragging artwork into the Brushes panel, and choosing Art brush in the New Brush dialog box that appears.
In the Art Brush Options dialog box that appears, change the name to Tree. Click OK.

Choose Select > Deselect.
Choose 1 from the Active Artboard menu in the Properties panel to navigate to the first artboard with the main scene.
With the Selection tool selected, click to select the purple line to the right of the cabin artwork.
Click the brush named “Tree” in the Brushes panel to apply it.
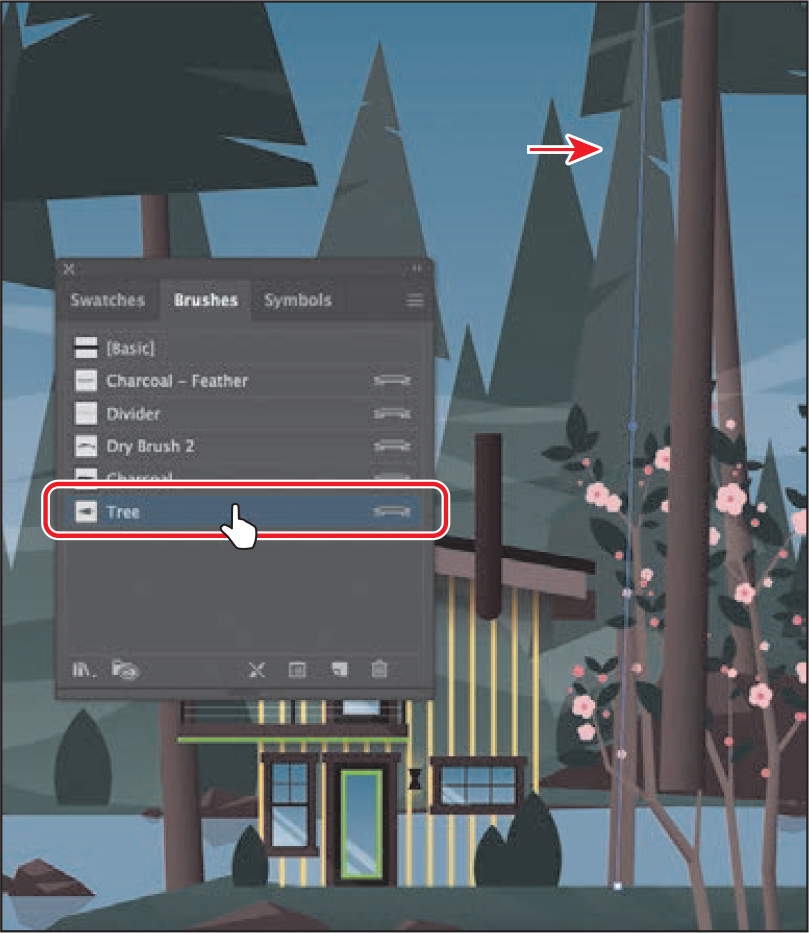
Notice that the original tree artwork is stretched along the path. This is the default behavior of an Art brush.
Editing an Art brush
Next you’ll edit the tree art brush you applied to the path and update the appearance of the tree on the artboard.
With the path still selected on the artboard, in the Brushes panel, double-click the brush thumbnail to the left of the text “Tree” or to the right of the name in the Brushes panel to open the Art Brush Options dialog box.

TipTo learn more about the Art Brush Options dialog box, see "Art brush options” in Illustrator Help (Help > Illustrator Help).
In the Art Brush Options dialog box, select Preview to see the changes as you make them, and move the dialog box so you can see the line with the brush applied. Make the following changes:

Stretch Between Guides: Selected
Start: 5.875 in
End: 7.5414 in (the default setting)
Click OK.
In the dialog box that appears, click Apply To Strokes to apply the change to the path that has the Tree brush applied.

Choose Select > Deselect and then choose File > Save.
Using Bristle brushes
Bristle brushes allow you to create strokes with the appearance of a natural brush with bristles. Painting with a Bristle brush using the Paintbrush tool creates vector paths with the Bristle brush applied.
In this section, you’ll start by adjusting options for a brush to change how it appears in the artwork and then paint with the Paintbrush tool and a Bristle brush to create smoke.
Changing Bristle brush options
As you’ve seen, you can change the appearance of a brush by adjusting its settings in the Brush Options dialog box, either before or after brushes have been applied to artwork. In the case of Bristle brushes, it’s usually best to adjust the brush settings prior to painting since it can take some time to update the brush strokes.
![]() Note
Note
To learn more about the Bristle Brush Options dialog box and its settings, see "Using the Bristle brush" in Illustrator Help (Help > Illustrator Help).
In the Brushes panel, click the panel menu icon (
), choose Show Bristle Brushes, and then deselect Show Art Brushes.Double-click the thumbnail for the default Mop brush or double-click directly to the right of the brush name in the Brushes panel to change the options for that brush. In the Bristle Brush Options dialog box, make the following changes:
TipIllustrator comes with a series of default Bristle brushes. Click the Brush Libraries Menu button (
 ) at the bottom of the Brushes panel, and choose Bristle Brush > Bristle Brush Library.
Shape: Flat Fan
Size: 3 mm (The brush size is the diameter of the brush.)
Bristle Length: 150% (This is the default setting. The bristle length starts from the point where the bristles meet the handle of the bristle tip.)
Bristle Density: 33%(This is the default setting. The bristle density is the number of bristles in a specified area of the brush neck.)
Bristle Thickness: 50%(The bristle thickness can vary from fine to coarse [between 1% and 100%].)
Paint Opacity: 75% (This is the default setting. This option lets you set the opacity of the paint being used.)
Stiffness: 50% (This is the default setting. Stiffness refers to the rigidness of the bristles.)
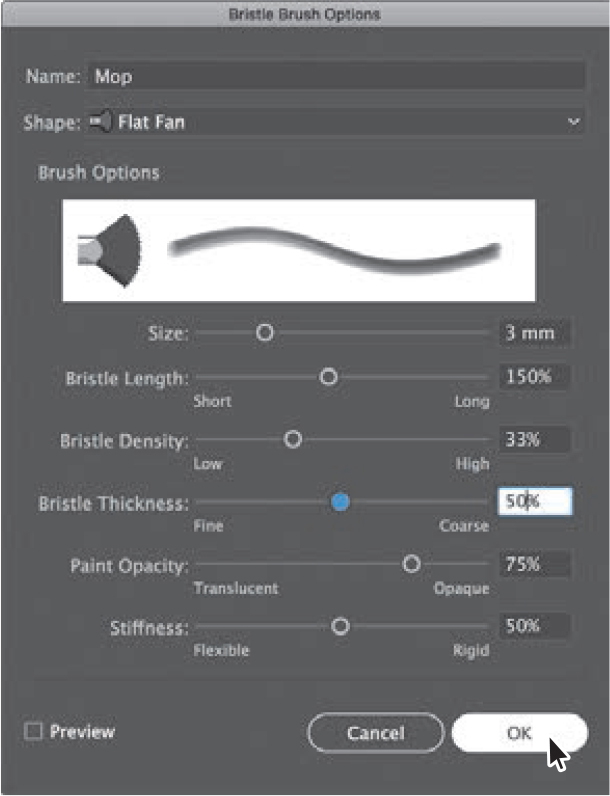
Click OK.
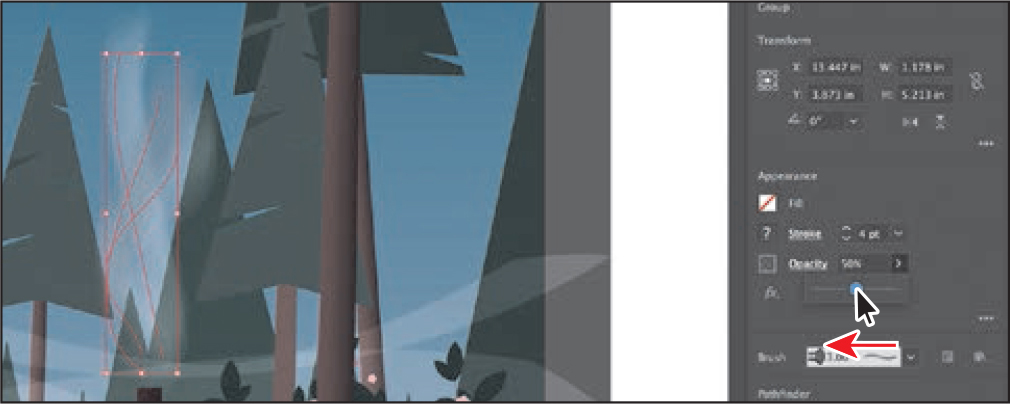
Painting with a Bristle brush
Now you’ll use the Mop brush to draw some smoke above the chimney of the cabin. Painting with a Bristle brush can create an organic, fluid path.
Select the Zoom tool (
 ) in the Tools panel, and click a few times, slowly, on the chimney on the top of the cabin to zoom in on it.
Select the Selection tool (
) in the Tools panel, and click to select the chimney.This selects the layer that the shape is on so that any artwork you paint will be on the same layer.
Choose Select > Deselect.
Select the Paintbrush tool (
) in the Tools panel. Choose the Mop brush from the Brush menu in the Properties panel, if it’s not already chosen.
TipIf you want to edit paths as you draw, you can select the Keep Selected option in the Paintbrush Tool Options for the Paintbrush tool or you can select paths with the Selection tool.
Make sure that the fill color is None (
) and the stroke color is White in the Properties panel. Press the Escape key to hide the Swatches panel. Change the stroke weight to 4 pt in the Properties panel.Move the pointer over the top of the chimney. Drag up in an S shape. Release the mouse button when you reach the end of the path you want to draw.

Use the Paintbrush tool to paint more paths, using the Mop brush. Try drawing from where you started the first path, at the top of the chimney. The idea is to create smoke coming from the fireplace in the cabin.

Cleaning up the shapes
Next, you’ll change the stroke color of a few of the paths you drew.
Choose View > Outline to see all of the paths you just created when painting.
Select the Selection tool (
) in the Tools panel, and click to select one of the paths.Change the stroke color in the Properties panel to the swatch named “Light gray!’

Choose View > Preview (or GPU Preview).
Next you’ll select all of the bristle brush paths you painted and group them together.
Choose Select > Object > Bristle Brush Strokes to select all of the paths created with the Paintbrush tool using the Mop brush.
Click the Group button in the Properties panel to group them together.
Change Opacity to 50% in the Properties panel.
Choose Select > Deselect and then choose File > Save.
Using Pattern brushes
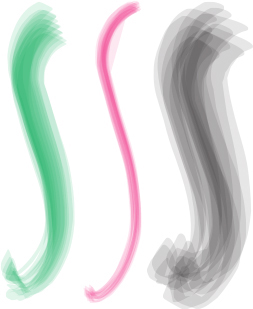
Pattern brushes paint a pattern made up of separate sections, or tiles. When you apply a Pattern brush to artwork, different tiles of the pattern are applied to different sections of the path, depending on where the section falls on the path—the end, middle, or corner. There are hundreds of interesting Pattern brushes that you can choose from when creating your own projects, from grass to cityscapes. Next, you’ll apply an existing Pattern brush to paths to give the side of the cabin the appearance of wood.
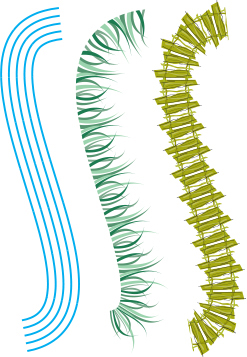
Pattern brush examples
Choose View > Fit Artboard In Window.
In the Brushes panel, click the panel menu icon (
), choose Show Pattern Brushes, and then deselect Show Bristle Brushes.
TipJust like other brush types, there is a series of default Pattern brush libraries that come with Illustrator. To access them, click the Brush Libraries Menu button (
), and choose a library from one of the menus (the Borders menu, for example).With the Selection tool (
) selected, double-click the yellow paths on the cabin group to enter Isolation mode; then click to select one of the yellow paths to select the group.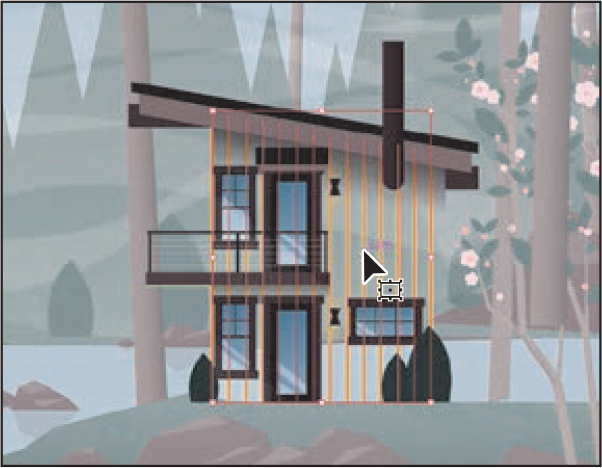
Click the Brush Libraries Menu button (
) at the bottom of the Brushes panel, and choose Borders > Borders_Frames.Click the brush named “Mahogany” in the list to apply it to the paths and add the brush to the Brushes panel for this document. Close the BordersFrames panel group.
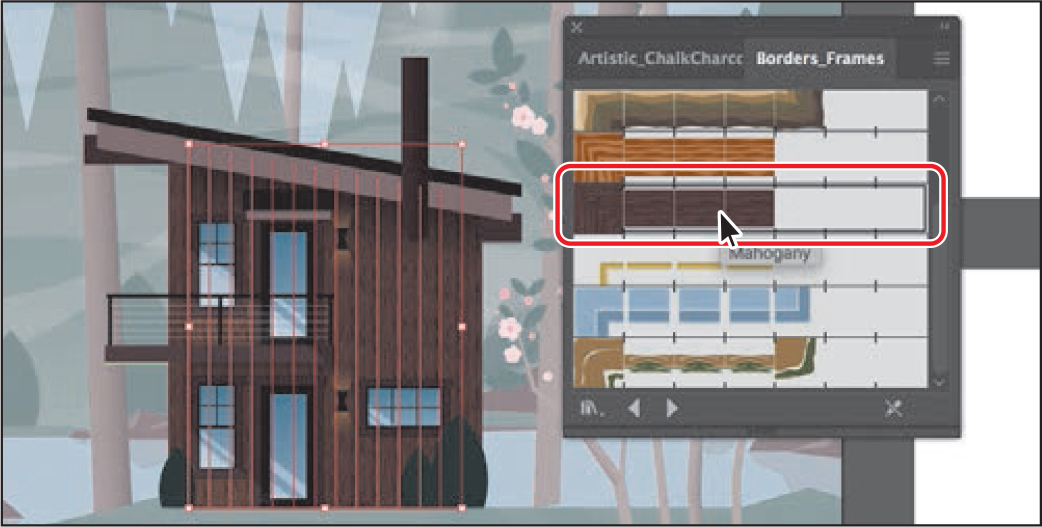
Click the Options Of Selected Object button (
 ) in the Properties panel to edit the brush options for only the selected paths on the artboard.
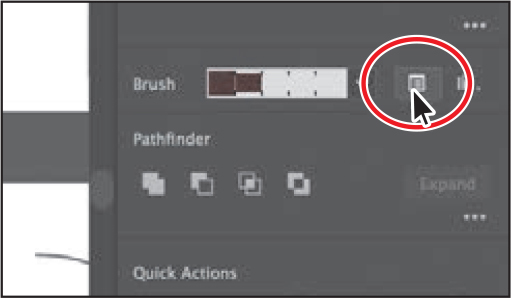
Select Preview in the Stroke Options (Pattern Brush) dialog box. Change the Scale to 70% either by dragging the Scale slider or by typing in the value. Click OK.
TipYou’ll also see the Options Of Selected Object button (
) at the bottom of the Brushes panel.
When you edit the brush options of the selected object, you only see some of the brush options. The Stroke Options (Pattern Brush) dialog box is used to edit the properties of the brushed path without updating the corresponding brush.
Press the Escape key to exit Isolation mode.
Choose Select > Deselect and then choose File > Save.
Creating a Pattern brush
You can create a Pattern brush in several ways. For a simple pattern applied to a straight line, for instance, you can select the content that you’re using for the pattern and click the New Brush button (![]() ) at the bottom of the Brushes panel.
) at the bottom of the Brushes panel.
To create a more complex pattern to apply to objects with curves and corners, you can select artwork in the Document window to be used in a pattern brush, create swatches in the Swatches panel from the artwork that you are using in the Pattern brush, and even have Illustrator autogenerate the Pattern brush corners. In Illustrator, only a side tile needs to be defined. Illustrator automatically generates four different types of corners based on the art used for the side tile. These four autogenerated options fit the corners perfectly. Next you’ll create a Pattern brush for some lights on the cabin.
Choose 3 from the Active Artboard menu in the Properties panel to navigate to the third artboard with the light bulb artwork on it.
With the Selection tool (
) selected, click to select the yellow light bulb group.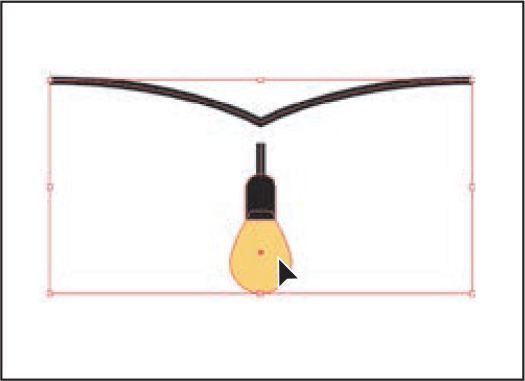
Click the panel menu icon (
 ) in the Brushes panel, and choose Thumbnail View.
Notice that Pattern brushes in the Brushes panel are segmented in Thumbnail view. Each segment corresponds to a pattern tile.
In the Brushes panel, click the New Brush button (
) to create a pattern out of the rope.
In the New Brush dialog box, select Pattern Brush. Click OK.
A new Pattern brush can be made regardless of whether artwork is selected. If you create a Pattern brush without artwork selected, it is assumed that you will add artwork by dragging it into the Brushes panel later or by selecting the artwork from a pattern swatch you create as you edit the brush. You will see the latter method later in this section.
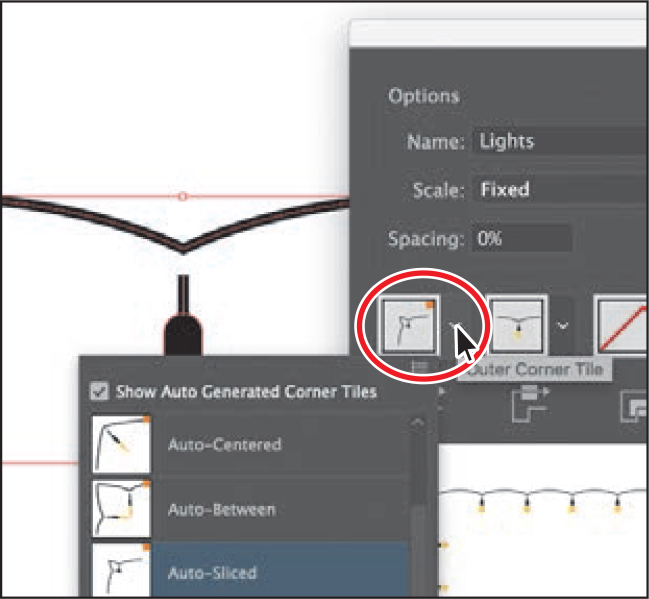
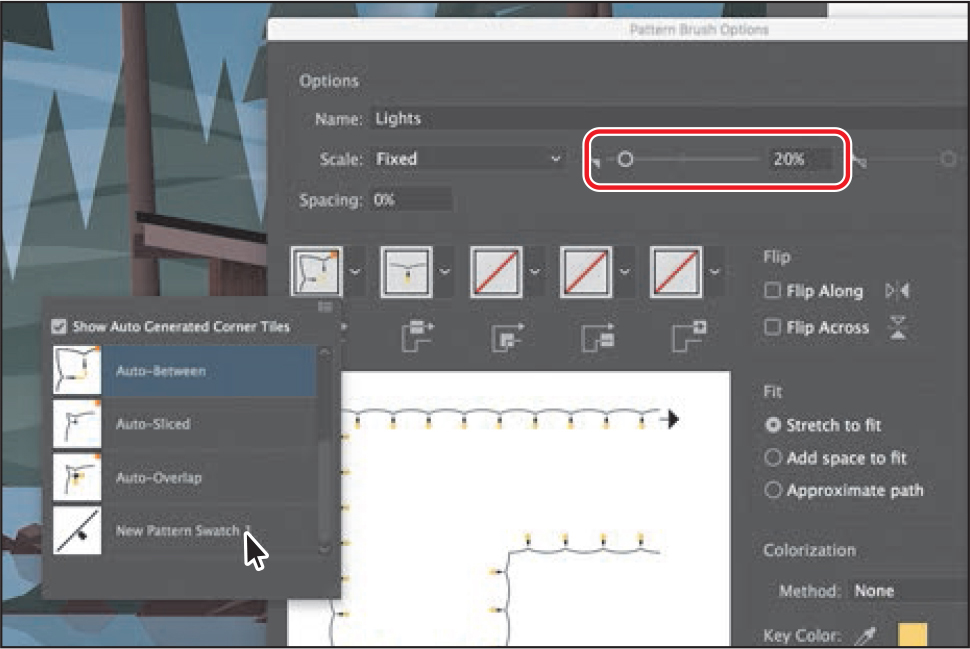
In the Pattern Brush Options dialog box, name the brush Lights.
Pattern brushes can have up to five tiles—the side, start, and end tiles, plus an outer-corner tile and an inner-corner tile to paint sharp corners on a path.
You can see all five tiles as buttons below the Spacing option in the dialog box. The tile buttons let you apply different artwork to different parts of the path. You can click a tile button for the tile you want to define, and then you select an autogenerated selection (if available) or a pattern swatch from the menu that appears.

NoteSome brushes don’t require corner tiles because they’re designed for curved paths.
Under the Spacing option, click the Side Tile box (the second tile from the left). The artwork that was originally selected is in the menu that appears, along with None and any pattern swatches found in the Swatches panel.

TipMove the pointer over the tile squares in the Pattern Brush Options dialog box to see a tool tip indicating which tile it is.
TipSelected artwork becomes the side tile, by default, when creating a Pattern brush.
Click the Outer Corner Tile box to reveal the menu.
TipTo save a brush and reuse it in another file, you can create a brush library with the brushes you want to use. For more information, see "Work with brush libraries” in Illustrator Help.
The outer-corner tile has been generated automatically by Illustrator, based on the original rope artwork. In the menu, you can choose from four types of corners that are generated automatically:
Auto-Centered. The side tile is stretched around the corner and centered on it.
Auto-Between. Copies of the side tile extend all the way into the corner, with one copy on each side. Folding elimination is used to stretch them into shape.
Auto-Sliced. The side tile is sliced diagonally, and the pieces come together, similar to a miter joint in a wooden picture frame.
Auto-Overlap. Copies of the tiles overlap at the corner.
Choose Auto-Between from the menu. This generates the outer corner of any path that the Pattern brush will be applied to from the light bulb artwork.
Click OK. The Lights brush appears in the Brushes panel.

Choose Select > Deselect.
Applying a Pattern brush
In this section, you’ll apply the Border Pattern brush to a path on the cabin. As you’ve seen, when you use drawing tools to apply brushes to artwork, you first draw the path with the drawing tool and then select the brush in the Brushes panel to apply the brush to the path.
Choose 1 from the Active Artboard menu in the Properties panel to navigate to the first artboard with the main scene artwork on it.
With the Selection tool (
) selected, click the straight green path on the cabin.Choose View > Zoom In a few times to zoom in.
In the Tools panel, click the Fill box, and make sure that None (
 ) is selected, and then click the Stroke box and select None ().
With the path selected, click the Lights brush in the Brushes panel to apply it.
Choose Select > Deselect.
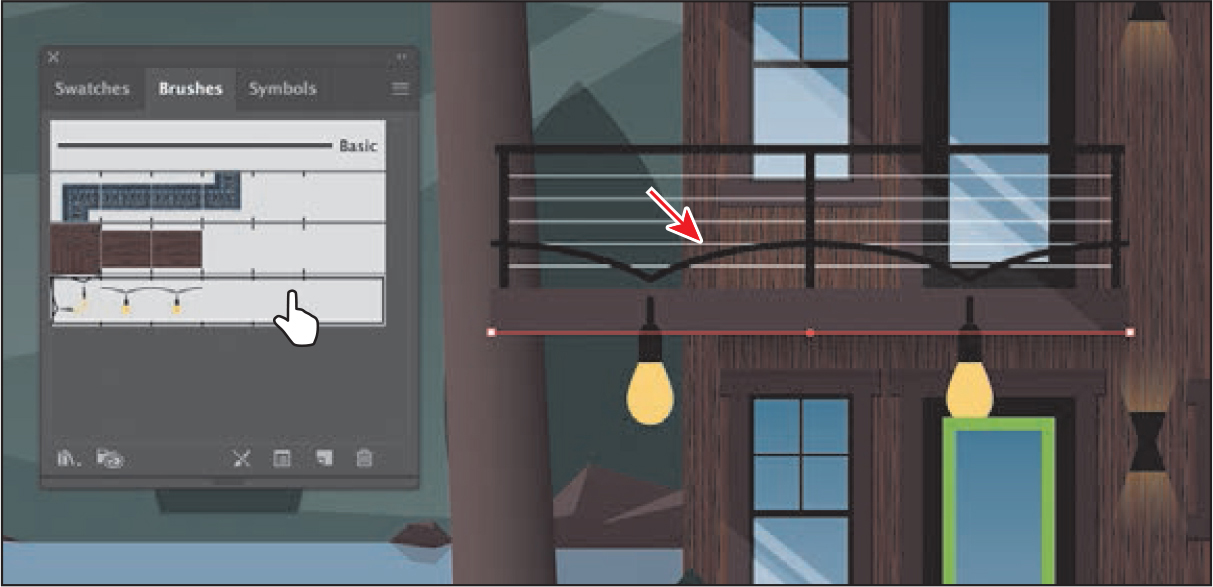
The path is painted with the Lights brush. Because the path does not include sharp corners, outer-corner and inner-corner tiles are not applied to the path.
Editing the Pattern brush
Now you’ll edit the Lights Pattern brush using a pattern swatch that you create.
![]() Tip
Tip
For more information on creating pattern swatches, see "About patterns” in Illustrator Help.
Choose 3 from the Active Artboard menu in the Properties panel to navigate to the third artboard with the light bulb artwork on it.
Choose Window > Swatches to open the Swatches panel.
With the Selection tool (
 ), drag the artwork with the white light bulb into the Swatches panel.
The artwork is saved as a new pattern swatch in the Swatches panel. After you create a pattern brush, you can delete the pattern swatches from the Swatches panel, if you don’t plan to use them for additional artwork.

Choose Select > Deselect.
Choose 1 from the Active Artboard menu in the Properties panel to navigate to the first artboard with the main scene artwork on it.
In the Brushes panel (Window > Brushes), double-click the Lights pattern brush to open the Pattern Brush Options dialog box.
Change Scale to 20%. Click the Outer Corner Tile box, and choose the pattern swatch named New Pattern Swatch 1, you just created, from the menu that appears (you’ll need to scroll). Click OK.
TipYou can also change the pattern tiles in a Pattern brush by pressing the Option (macOS) or Alt (Windows) key and dragging artwork from the artboard onto the tile of the Pattern brush you want to change in the Brushes panel.
In the dialog box that appears, click Apply To Strokes to update the lights on the cabin.
With the Selection tool selected, click to select the green rectangle path on the door of the cabin. You may want to zoom in.
Click the Lights brush in the Brushes panel to apply it.

Notice that the white light bulbs are applied to the path. The path is painted with the side tile from the Lights brush and the outer corner tile.
Choose Select > Deselect and then choose File > Save.
Working with the Blob Brush tool
You can use the Blob Brush tool (![]() ) to paint filled shapes that intersect and merge with other shapes of the same color. With the Blob Brush tool, you can draw with Paintbrush tool artistry. Unlike the Paintbrush tool, which lets you create open paths, the Blob Brush tool lets you create a closed shape with a fill only (no stroke) that you can then easily edit with the Eraser or Blob Brush tool. Shapes that have a stroke cannot be edited with the Blob Brush tool.
) to paint filled shapes that intersect and merge with other shapes of the same color. With the Blob Brush tool, you can draw with Paintbrush tool artistry. Unlike the Paintbrush tool, which lets you create open paths, the Blob Brush tool lets you create a closed shape with a fill only (no stroke) that you can then easily edit with the Eraser or Blob Brush tool. Shapes that have a stroke cannot be edited with the Blob Brush tool.

Drawing with the Blob Brush tool
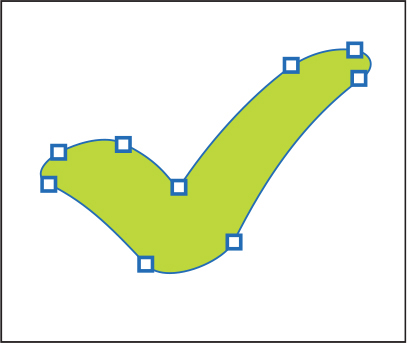
Next you’ll use the Blob Brush tool to create a flower.
Choose 4 from the Active Artboard menu in the Properties panel to navigate to the fourth artboard, which is empty.
In the Swatches panel, select the Fill color box and then select the swatch named “Flower.” Select the Stroke color box, and select None (
) to remove the stroke.
When drawing with the Blob Brush tool, if a fill and stroke are set before drawing, the stroke color becomes the fill color of the shape made by the Blob Brush tool. If only a fill is set before drawing, it ultimately becomes the fill of the shape created.
Press and hold down on the Paintbrush tool (
) in the Tools panel, and select the Blob Brush tool ( ) Double-click the Blob Brush tool in the Tools panel. In the Blob Brush Tool Options dialog box, change the following:
Keep Selected: Selected
Size: 70 pt
Click OK.
Press and drag to create a flower shape.

When you draw with the Blob Brush tool, you create filled, closed shapes. Those shapes can contain several types of fill, including gradients, solid colors, patterns, and more. Notice that the Blob Brush pointer has a circle around it before you begin painting. That circle indicates the size of the brush (70 pt, which you set in the previous step).
NoteYou can release the mouse and then continue painting with the Blob brush, as long as the new artwork is overlapping the existing flower artwork, it will merge.
TipYou can also change the Blob Brush size by pressing the right bracket key ( ] ) or left bracket key ( [ ) several times to increase or decrease the size of the brush.
Merging paths with the Blob Brush tool
In addition to drawing new shapes with the Blob Brush tool, you can use it to intersect and merge shapes of the same color. Objects merged with the Blob Brush tool need to have the same appearance attributes, have no stroke, be on the same layer or group, and be adjacent to each other in the stacking order.
If you find that the shapes are not merging, it may be that they have different strokes and fills. You can select both shapes with the Selection tool (![]() ) and ensure that the fill color is the same and the stroke is None in the Properties panel. Then you can select the Blob Brush tool and try dragging from one shape to the other.
) and ensure that the fill color is the same and the stroke is None in the Properties panel. Then you can select the Blob Brush tool and try dragging from one shape to the other.
Editing with the Eraser tool
As you draw and merge shapes with the Blob Brush tool, you may draw too much and want to edit what you’ve done. You can use the Eraser tool (![]() ) in combination with the Blob Brush tool to mold the shape and to correct any changes you don’t like.
) in combination with the Blob Brush tool to mold the shape and to correct any changes you don’t like.
![]() Tip
Tip
As you draw with the Blob Brush and Eraser tools, it is recommended that you use shorter strokes and release the mouse button often. You can undo the edits that you make, but if you draw in one long stroke without releasing the mouse button, an undo removes the entire stroke.
With the Selection tool (
), click to select the flower shape.Selecting the shape(s) before erasing limits the Eraser tool to erasing only the selected shape(s).
Double-click the Eraser tool (
 ) in the Tools panel. In the Eraser Tool Options dialog box, change Size to 40 pt, and click OK.
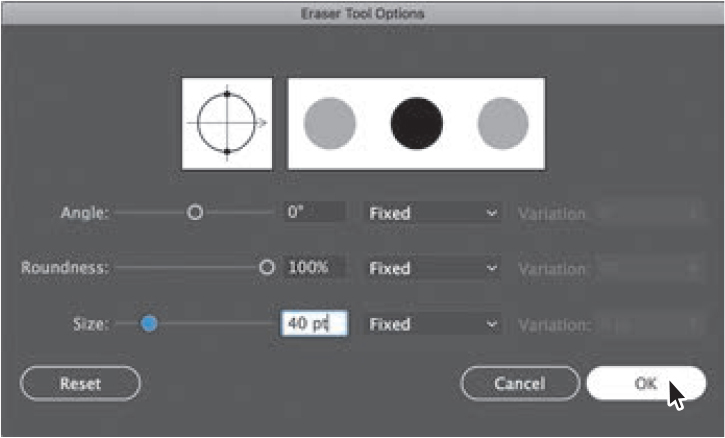
NoteThe Blob brush may be under the Scissors tool in the Tools panel.
Move the pointer over the center of the flower shape and, with the Eraser tool selected, press and drag to remove some of the center. Try switching between the Blob Brush tool and the Eraser tool to edit the flower.

The Blob Brush and Eraser tools both have pointers that include a circle, indicating the diameter of the brush.
Choose Select > Deselect.
Select the flower shape with the Selection tool.
Choose Edit > Copy.
Choose 1 Lake scene from the Active Navigation menu in the Status bar to navigate to the first artboard with the scene artwork on it.
Click the bush with flowers on the right side of the artboard, and press Command and + (macOS) or Ctrl and + (Windows) a few times to zoom in.
Click the Arrange button in the Properties panel, and choose Bring to Front.
Choose Edit > Paste to paste the flower. Pressing the Shift key, drag a corner to make the flower smaller. Release the mouse button and then the key.
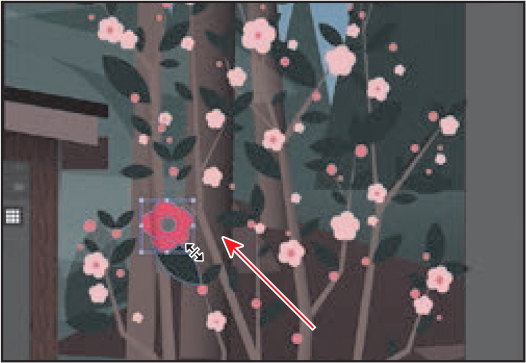
Option-drag (macOS) or Alt-drag (Windows) the flower shape onto another part of the bush. Release the mouse button and then the key to place a new copy.

Repeat this several times to create flowers on the bush.
Choose Select > Deselect and then choose View > Fit Artboard In Window.
Choose File > Save, and close all open files.
Review questions
1. What is the difference between applying a brush to artwork using the Paintbrush tool (
 ) and applying a brush to artwork using one of the drawing tools?
2. Describe how artwork in an Art brush is applied to content.
3. Describe how to edit paths with the Paintbrush tool as you draw. How does the Keep Selected option affect the Paintbrush tool?
4. For which brush types must you have artwork selected on the artboard before you can create a brush?
5. What does the Blob Brush tool (
 ) allow you to create?
Review answers
1. When painting with the Paintbrush tool (
 ), if a brush is chosen in the Brushes panel and you draw on the artboard, the brush is applied directly to the paths as you draw. To apply brushes using a drawing tool, you select the tool and draw in the artwork. Then you select the path in the artwork and choose a brush in the Brushes panel. The brush is applied to the selected path.
2. An Art brush is made from artwork (vector or embedded raster). When you apply an Art brush to the stroke of an object, the artwork in the Art brush, by default, is stretched along the selected object stroke.
3. To edit a path with the Paintbrush tool, drag over a selected path to redraw it. The Keep Selected option keeps the last path selected as you draw with the Paintbrush tool. Leave the Keep Selected option selected when you want to easily edit the previous path as you draw. Deselect the Keep Selected option when you want to draw layered paths with the paintbrush without altering previous paths. When Keep Selected is deselected, you can use the Selection tool (
 ) to select a path and then edit it.
4. For Art (and Scatter) brushes, you need to have artwork selected in order to create a brush using the New Brush button (
 ) in the Brushes panel.
5. Use the Blob Brush tool (
 ) to edit filled shapes that you can intersect and merge with other shapes of the same color or to create artwork from scratch.