
6. Editing Text
Lesson Overview
In this lesson, you’ll learn how to do the following:
• Handle a missing font.
• Enter and import text.
• Find and change text and formatting.
• Check the spelling in a document.
• Edit a spelling dictionary.
• Automatically correct misspelled words.
• Move text by dragging and dropping.
• Use the Story Editor.
• Track text changes.
This lesson will take about 1 hour to complete.
Download the project files for this lesson from the Lesson & Update Files tab on your Account page at www.peachpit.com and store them on your computer in a convenient location, as described in the “Getting Started” section of this book.
Your Account page is also where you’ll find any updates to the chapters or to the lesson files. Look on the Lesson & Update Files tab to access the most current content.

InDesign offers many of the text-editing features you find in dedicated word-processing software, including the ability to search and replace text and formatting, check spelling, automatically correct spelling as you type, and track changes as you edit.
Getting started
In this lesson, you will be performing editorial tasks commonly expected of a graphic designer. These include importing a new story and using the editorial features in InDesign to search and replace text and formatting, check spelling, enter and track text changes, and more.
1. To ensure that the preference and default settings of your Adobe InDesign program match those used in this lesson, move the InDesign Defaults file to a different folder following the procedure in “Saving and restoring the InDesign Defaults file” on page 3.
![]() Note
Note
If you have not already downloaded the project files for this lesson to your computer from your Account page, make sure to do so now. See “Getting Started” at the beginning of the book.
2. Start Adobe InDesign. To ensure that the panels and menu commands match those used in this lesson, choose Window > Workspace > [Advanced], and then choose Window > Workspace > Reset Advanced.
3. Choose File > Open, and open the 06_Start.indd file in the Lesson06 folder, located inside the Lessons folder within the InDesignCIB folder on your hard disk.
![]() Note
Note
If Corbel Bold happens to be active on your system, this alert will not display. You can review the steps on replacing a missing font, then move on to the next section.
4. When the Missing Fonts alert displays, click Sync Fonts.
The Adobe Typekit online service will locate, download, and activate the missing Chaparral Pro fonts. The Corbel Bold font is not available through Adobe Typekit and will remain missing for now.
You will fix the problem of the missing Corbel Bold font in the next section by replacing it with a font that is installed on your system.

5. To display the document at a higher resolution, choose View > Display Performance > High Quality Display.
6. Choose File > Save As, rename the file 06_Text.indd, and save it in the Lesson06 folder.
7. If you want to see what the finished document looks like, open the 06_End.indd file in the same folder. You can leave this document open to act as a guide as you work.

![]() Tip
Tip
In general, it is not necessary to display images at full resolution when working with text. If you are working on a slower computer, you can leave the display at Typical Display or even gray out the images with Fast Display.
8. When you’re ready to resume working on the lesson document, display it by clicking its tab in the upper-left corner of the document window.
Finding and changing a missing font
When you opened the document in the previous exercise, the Corbel Bold font may have been listed as missing. If this font is active on your computer, you did not receive an alert message, but you can still follow the steps for future reference. You will now search for text that is formatted with the Corbel Bold font and replace it with the similar Chaparral Pro Bold font.
1. Notice that the pull quote on the left-facing page of the opening spread is highlighted in pink, indicating that the font is missing.
2. Choose Type > Find Font. The Find Font dialog box lists the fonts used in the document. An alert icon (![]() ) appears next to any missing fonts.
) appears next to any missing fonts.
3. Select Corbel Bold in the Fonts In Document list.
4. For the Replace With option at the bottom of the dialog box, choose Chaparral Pro from the Font Family menu.
5. Type the word Bold in the Font Style field or choose Bold from the menu.
![]() Tip
Tip
If you select Redefine Style When Changing All in the Find Font dialog box, any character styles or paragraph styles that specify the missing font will be updated to include the Replace With font as well. This can be handy for quickly updating documents and templates—as long as you’re sure the font change is appropriate.
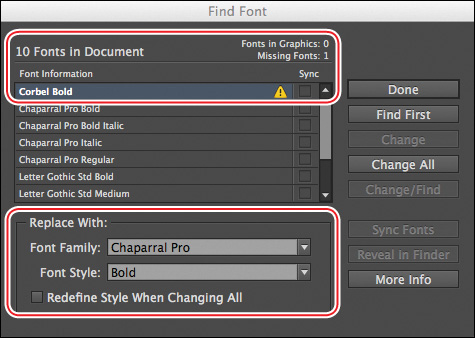
7. Click Done to close the dialog box and see the replaced font in the document.
8. Choose File > Save.
Entering and importing text
You can enter text directly into your InDesign documents, or you can import text prepared in other applications, such as word-processing software. To type text, you need to use the Type tool and select a text frame or text path. To import text, you can drag files from the desktop, drag files from the Mini Bridge panel (Window menu), “load” the cursor with multiple text files to import, or import text into a selected text frame.
Entering text
While graphic designers are not generally responsible for the text in all their layouts, they are often asked to enter edits from a marked-up hard copy or Adobe PDF. In this exercise, you will use the Type tool to make an addition to existing text.
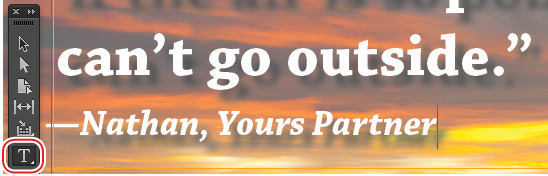
1. Position the document onscreen so you can see the large pull quote on the left-facing page.
2. Choose View > Extras > Show Frame Edges. The text frames are outlined in gold so you can see them.
3. Choose View > Grids & Guides > Show Guides. Margin, column, and ruler guides display to help with object placement.
4. Using the Type tool (![]() ), click after the word “Nathan” under the pull quote.
), click after the word “Nathan” under the pull quote.
5. Type a comma, then Yours Partner.
6. Choose File > Save.
Importing text
When working with a template for a project such as a magazine, designers generally import article text into existing text frames. In this exercise, you will import a Microsoft Word file and apply body-copy formatting to it.
1. Choose Layout > Next Spread to display the second spread in the document window. Each page contains a text frame, ready to contain a story.
2. Using the Type tool (![]() ), click in the far-left column of the text frame on the left-facing page.
), click in the far-left column of the text frame on the left-facing page.

![]() Tip
Tip
In the Place dialog box, you can Shift-click to select multiple text files. When you do this, the cursor is “loaded” with those files. You can then click in text frames or on the page to import the text from each file. This works well with content such as long captions that are saved in different text files.
3. Choose File > Place. In the Place dialog box, make sure Show Import Options is not selected.
4. Navigate to and select the Biking_Feature_JuneJuly2014.docx file in the Lesson06 folder, located inside the Lessons folder within the InDesignCIB folder on your hard disk.
5. Click Open.
The text flows from column to column, filling both text frames.
6. Choose Edit > Select All to select all the text in the story.
7. Click the Paragraph Styles panel icon at the right to display the panel.
8. Click the triangle next to the Body Copy style group to display those styles.
9. Click the Paragraph Indent style to apply it to the selected paragraphs.
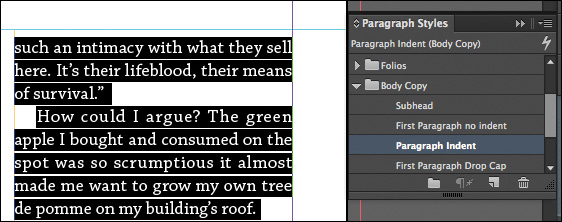
10. Choose Edit > Deselect All to deselect the text.
Now that you have changed the formatting, the story no longer fits. In the lower-right corner of the text frame on the second page of the spread, you will see a red plus sign (+) indicating overset text (additional text). Later, you will use the Story Editor to resolve this.
11. Choose View > Extras > Hide Frame Edges.
12. Choose File > Save.
Finding and changing text and formatting
Like most popular word-processing software, InDesign lets you search and replace text and formatting. Often, while graphic designers are working on layouts, the copy is still being revised. When editors request global changes, Find/Change helps ensure accurate and consistent changes.
Finding and changing text
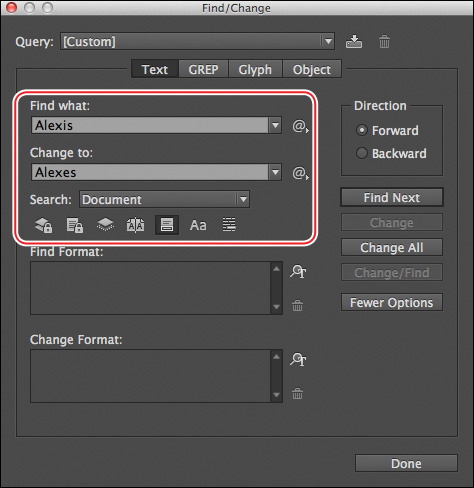
For this article, the fact checker discovered that the tour guide’s name is not spelled “Alexis”—it’s “Alexes.” You will change all instances of her name in the document.
1. Using the Type tool (![]() ), click at the beginning of the story before “When I asked” (on the left-facing page in the far left column).
), click at the beginning of the story before “When I asked” (on the left-facing page in the far left column).
2. Choose Edit > Find/Change. If necessary, click the Text tab at the top of the Find/Change dialog box to display the text search options.
![]() Tip
Tip
You can toggle the search Direction by pressing Ctrl-Alt-Enter (Windows) or Command-Option-Return (Mac OS).
3. Click Forward for the search Direction.
4. Type Alexis in the Find What box.
5. Press Tab to navigate to the Change To box. Type Alexes.
The Search menu defines the scope of this search. Since you realize that “Alexis” may be used elsewhere in the document, such as in the table of contents or a caption, you need to search the entire document.
![]() Tip
Tip
Using the Search menu in the Find/Change dialog box, you can choose to search All Documents, Document, Story, To End Of Story, or Selection.
6. Select Document from the Search menu.
When using the Find/Change dialog box, it’s always a good idea to test your settings. Find one instance of the search criterion, replace it, and review the text before you make global changes. (Alternatively, you may opt to look at each instance with Find as you make the changes, so you can see how each change affects surrounding copy and line breaks.)
![]() Tip
Tip
When the Find/Change dialog box is open, you can still click in the text and make edits with the Type tool. The Find/Change dialog box remains open so you can resume your search after editing the text.
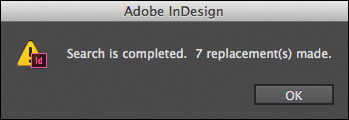
7. Click Find Next. When the first instance of “Alexis” is highlighted, click Change.
8. Click Find Next, then click Change All. When the alert indicates that seven replacements were made, click OK. (If only six replacements were made, you may have forgotten to select Document from the Search menu.)
9. Leave the Find/Change dialog box open for the next exercise.
Finding and changing formatting
The editors request one more global edit to this article—this one formatting rather than spelling. The city’s HUB bike program prefers to see its name in small caps rather than all caps. In this article, “HUB” was typed with three capital letters rather than being formatted with the All Caps type style. Because the Small Caps type style only works on lowercase letters, you will also need to change “HUB” to “hub,” making this a case-sensitive change.
![]() Tip
Tip
For acronyms and abbreviations, designers often prefer to use Small Caps style (abbreviated versions of capital letters) rather than All Caps style (all capital letters). The small caps are generally the same height as lowercase characters, and they blend into body copy better.
1. Type HUB in the Find What box.
2. Press Tab to navigate to the Change To box. Type hub.
3. Below the Search menu, click the Case Sensitive icon (![]() ).
).
4. Point at each icon in the row below the Search menu to view its tool tip and see how it affects the Find/Change operation. For example, clicking the Whole Word icon (![]() ) ensures that instances of the Find What text within another word will not be found or changed. Do not change any of the settings.
) ensures that instances of the Find What text within another word will not be found or changed. Do not change any of the settings.
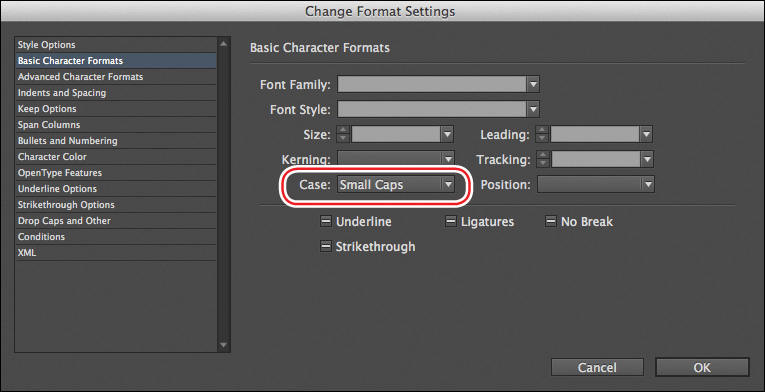
5. If necessary, click the More Options button to display formatting options for the found text. In the Change Format section at the bottom of the dialog box, click the Specify Attributes To Change icon (![]() ).
).
6. On the left side of the Change Format Settings dialog box, select Basic Character Formats. Then, in the main part of the dialog box, choose Small Caps from the Case menu.
If you are unhappy with the results of Find/Change, you can choose Edit > Undo to undo the last “change” operation, whether it was Change, Change All, or Change/Find.
7. Leave the other options blank, then click OK to return to the Find/Change dialog box.
Notice the alert icon (![]() ) that appears above the Change To box. This icon indicates that InDesign will change text to the specified formatting.
) that appears above the Change To box. This icon indicates that InDesign will change text to the specified formatting.

8. Test your settings by clicking Find Next, then Change. Once you confirm that “HUB” changes to “HUB,” click Change All.
9. When the alert indicates how many changes were made, click OK. Click Done to close the Find/Change dialog box.
10. Choose File > Save.
Checking spelling
InDesign has features for checking spelling that are similar to the options in word-processing programs. You can check the spelling in selected text, an entire story, all the stories in a document, or all the stories in several open documents at once. To customize which words are flagged as possible misspellings, you can add words to your document’s dictionary. In addition, you can have InDesign flag possible spelling issues and correct spelling as you type.
![]() Tip
Tip
Be sure to discuss with your client or editor whether you should be the one checking spelling in InDesign. Many editors strongly prefer to check spelling themselves.
Checking spelling in the document
Before a document is ready for print or electronic distribution, it’s a good idea to check spelling. In this case, we suspect the newly imported story may be a little sloppy, so you will check the spelling now before you start designing the layout.
1. If necessary, choose View > Fit Spread In Window to view both pages of the second spread in the document.
2. Using the Type tool (![]() ), click before the first word of the article you’ve been working on: “When.”
), click before the first word of the article you’ve been working on: “When.”
3. Choose Edit > Spelling > Check Spelling. Select Story from the Search menu, and click Start.
![]() Tip
Tip
Using the Search menu in the Check Spelling dialog box, you can choose to check All Documents, Document, Story, To End Of Story, or Selection.
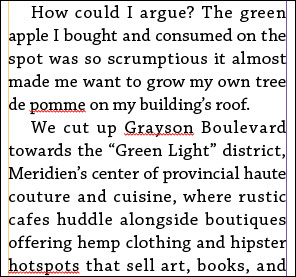
4. InDesign highlights the first occurrence of “Alexes.” Click Ignore All.
5. Click Ignore All when “Meridien’s” is flagged.
6. When the word “Musuem” is flagged, scan the choices in the Suggested Corrections list. Select “Museum” and click Change.
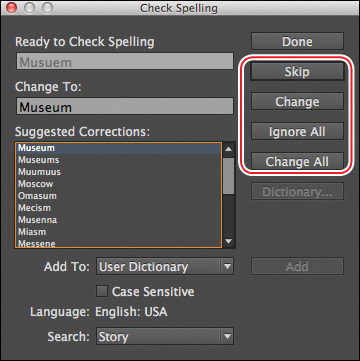
The check-spelling features will check the overset text in addition to the text that fits in the text frames.
7. Handle the remaining possible spelling issues as follows:
• 6am: Click in the Change To field and type 6 a.m. and click Change.
• brutalist: Click Skip.
• transporation: Type transportation in the Change To box and click Change.
• homogenous: Select “homogeneous” in the Suggested Corrections list and click Change.
• For any other words that are flagged, click Skip.
![]() Note
Note
Depending on the state of your InDesign Preferences file, different words may be flagged. Simply experiment with the various Check Spelling options to get familiar with them.
8. Click Done.
9. Choose File > Save.
Adding words to a document-specific dictionary
With InDesign, you can add words to your user dictionary or to a documentspecific dictionary. If you work with multiple clients who may have different spelling preferences, for example, it is better to add words to a document-specific dictionary. In this case, you will add “Meridien” to the document’s dictionary.
![]() Tip
Tip
If a word is not specific to one language—such as a person’s name—you can choose All Languages to add the word to every language’s spelling dictionary.
1. Choose Edit > Spelling > User Dictionary to display the User Dictionary dialog box.
2. Select 06_Text.indd from the Target menu.
3. Type Meridien in the Word box.
4. Select Case Sensitive to add only “Meridien” to the dictionary. This ensures that a lowercase use of “meridien” is still flagged when you check spelling.
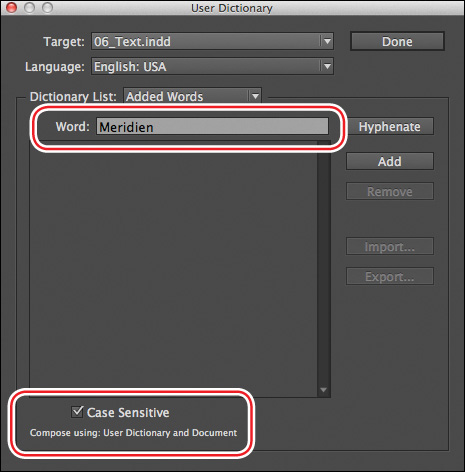
5. Click Add, then click Done.
Checking spelling dynamically
It’s not necessary for you to wait until a document is finished before checking the spelling. Enabling dynamic spelling allows you to see misspelled words in text.
1. Choose Edit > Preferences > Spelling (Windows) or InDesign > Preferences > Spelling (Mac OS) to display Spelling preferences.
2. In the Find section, select the possible errors you want highlighted.
![]() Tip
Tip
In the Find section of Spelling preferences, you can customize what the Check Spelling dialog box flags as possible errors: Misspelled Words, Repeated Words, Uncapitalized Words, Uncapitalized Sentences. For example, if you’re working on a directory with hundreds of names, you might want to select Uncapitalized Words but not Misspelled Words.
3. Select Enable Dynamic Spelling.
4. In the Underline Color section, use the menus to customize how possible errors are signified.
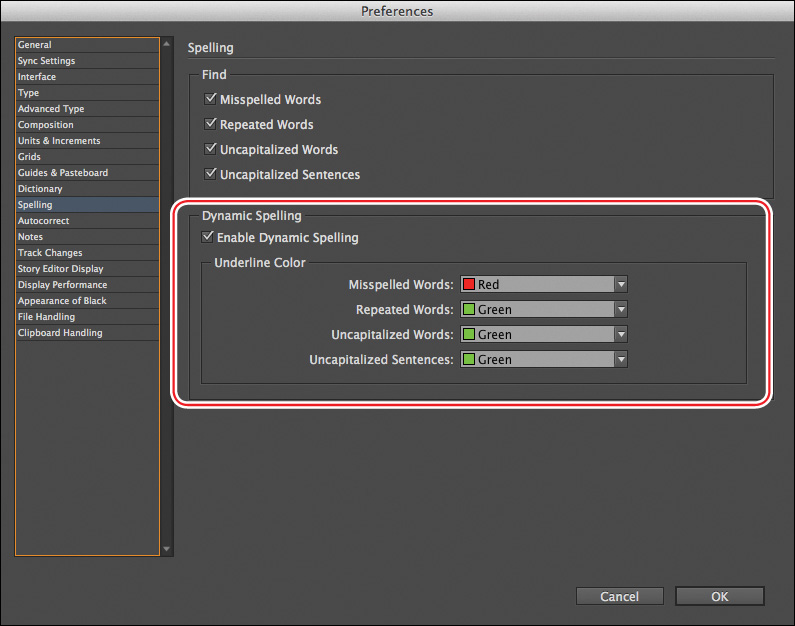
5. Click OK to close the Preferences dialog box and return to your document.
![]() Tip
Tip
Right-click (Windows) or Control-click (Mac OS) a word flagged by dynamic spelling to display a contextual menu from which you can select an option to change the spelling.
Words that may be misspelled words (according to the default user dictionary) are now underlined.
6. Using the Type tool (![]() ), click in the text and type a word incorrectly to see the underline. To remove the word, choose Edit > Undo.
), click in the text and type a word incorrectly to see the underline. To remove the word, choose Edit > Undo.
7. Choose File > Save.
Automatically correcting misspelled words
Autocorrect takes the concept of dynamically checking spelling to the next level. With Autocorrect activated, InDesign automatically corrects misspelled words as you type them. Changes are made based on an internal list of commonly misspelled words. You can add other commonly misspelled words, including words in other languages, to this list if you like.
1. Choose Edit > Preferences > Autocorrect (Windows) or InDesign > Preferences > Autocorrect (Mac OS) to display Autocorrect preferences.
2. Select the Enable Autocorrect option.
By default, the list of commonly misspelled words is for English: USA.
3. Change the language to French and note the commonly misspelled words in that language.
4. Try other languages, if you’d like. Change the language back to English: USA before proceeding.
The editors have realized that the name of their city, “Meridien,” is frequently typed as “Meredien,” with an “e” in the middle rather than an “i.” You will prevent this mistake by adding the misspelling and correct spelling to the Autocorrect list.
5. Click Add. In the Add To Autocorrect List dialog box, type Meredien in the Misspelled Word box and Meridien in the Correction box.
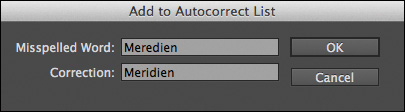
6. Click OK to add the word, and then click OK again to close the Preferences dialog box.
7. Using the Type tool (![]() ), type the word Meredien followed by a space anywhere in the text.
), type the word Meredien followed by a space anywhere in the text.
8. Notice that Autocorrect changes the spelling from “Meredien” to “Meridien,” then choose Edit > Undo until the word you added is deleted.
9. Choose File > Save.
Editing text by dragging and dropping
To quickly cut and paste words in your document, InDesign allows you to drag and drop text within the same story, between frames, and between documents. You’ll now use drag and drop to move text from one paragraph to another in the magazine layout.
![]() Tip
Tip
When you drag and drop text, by default InDesign automatically adds and deletes spaces before and after words as necessary. If you need to turn off this feature, deselect Adjust Spacing Automatically When Cutting And Pasting Words in Type preferences.
1. Choose Edit > Preferences > Type (Windows) or InDesign > Preferences > Type (Mac OS) to display Type preferences.
2. In the Drag And Drop Text Editing section, select Enable In Layout View. This option lets you drag and drop text in Layout view rather than just in the Story Editor. Click OK.
3. Choose Type > Show Hidden Characters to see the spaces.
4. In the document window, scroll to the first spread in the document. Adjust the view scale as necessary so you can read the far-right column in the table of contents on the right-facing page.
Next to P22/Product Protection, the common phrase “using, abusing” is transposed as “abusing, using.” You will quickly reverse this with drag and drop.
5. Using the Type tool (![]() ), drag to select “using” along with the comma and space after it.
), drag to select “using” along with the comma and space after it.
6. Position the I-bar pointer over the selected word until the pointer changes to the drag and drop icon (![]() ).
).
![]() Tip
Tip
If you want to copy a selected word instead of moving it, hold down the Alt (Windows) or Option (Mac OS) key after you start dragging.
7. Drag the word to its correct location before the word “abusing.”

8. Choose File > Save.
Using the Story Editor
If you need to enter many text edits, rewrite a story, or cut a story, you can isolate the text with the Story Editor. The Story Editor window works as follows:
• It shows plain text with no formatting applied. Any graphics and other nontext elements are omitted to make editing easier.
• The column to the left of the text displays a vertical depth ruler and the name of the paragraph style that is applied to each paragraph.
• Dynamic spelling (if enabled) highlights misspelled words, just like in the document window.
• If the Enable In Story Editor option is selected in Type preferences, you can also drag and drop text in the Story Editor, just as you did in the previous exercise.
• In Story Editor Display preferences, you can customize the font, size, background color, and more for the Story Editor window.
The article on the second spread does not fit into the two text frames available. To fix this, you will edit the text with the Story Editor.
1. Choose View > Fit Spread In Window.
2. Scroll down to the second spread in the document. Using the Type tool (![]() ), click in the last paragraph of the story.
), click in the last paragraph of the story.
![]() Note
Note
If the Story Editor window goes behind the document window, you can bring it to the front by choosing its name from the bottom of the Window menu.
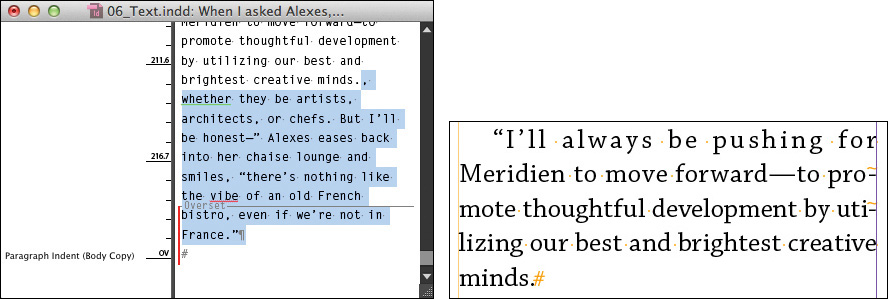
3. Choose Edit > Edit In Story Editor. Position the Story Editor window next to the far-right column on the spread.
4. Drag the vertical scroll bar in the Story Editor to the end of the story. Note the line that indicates the overset text.

5. In the last paragraph, click after “creative minds” and type a period.
If necessary, delete the final paragraph return after the word “France” so the text is no longer overset.
6. Select the remainder of the text, including the final paragraph return. Press Backspace or Delete.
Notice the effect on the layout—the story is no longer overset.
7. Click the Story Editor window’s close box.
8. Choose File > Save.
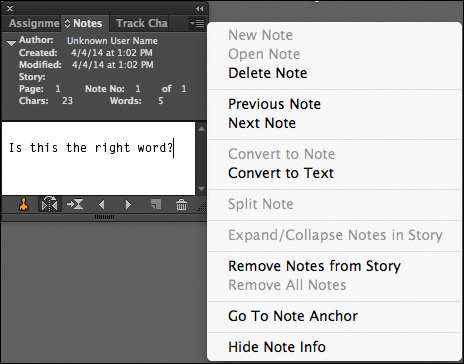
Inserting notes and tracking changes
Tracking changes
For some projects, it’s important to see what changes are made to the text throughout the design and review process. In addition, reviewers may suggest changes that another user can accept or reject. As with a word-processing program, you can track text that is added, deleted, or moved using the Story Editor.
In this document, we will make a suggestion for a change to the table of contents, then accept that change so it’s no longer tracked.
1. Scroll up to the first spread in the document. Using the Type tool (![]() ), click in the first table of contents entry: “P48/2 Wheels Good.”
), click in the first table of contents entry: “P48/2 Wheels Good.”
2. Choose Edit > Edit In Story Editor. Position the Story Editor window next to the table of contents.
![]() Tip
Tip
In Track Changes preferences, you can customize which changes are tracked and how the changes display in the Story Editor.
3. Choose Type > Track Changes > Track Changes In Current Story.
4. In the Story Editor window, select the first sentence: “Sometimes the best way to see the city is by bicycle.” Include the space after the period in the selection.
5. Cut and paste or drag and drop the selected sentence to after the second sentence: “Alexes K., director of Meridien’s Urban Museum, takes us on a personal tour.”
Notice how the changes are marked in the Story Editor window.

6. With the Story Editor window still open, choose Type > Track Changes and review the options for accepting and rejecting changes.
7. Once you have reviewed the possibilities, choose Accept All Changes > In This Story.
8. When the alert dialog box displays, click OK.
9. Click the Story Editor window’s close box.
10. Choose File > Save.
Congratulations. You have finished the lesson.
Exploring on your own
Now that you have tried the basic text-editing tools in InDesign, experiment with them more to edit and format this document.
1. Using the Type tool (![]() ), create a new text frame above the story on the second spread. Type in a headline and format it with the Control panel.
), create a new text frame above the story on the second spread. Type in a headline and format it with the Control panel.
2. If you have additional text files on your system, try dragging them from the desktop to the layout to see how they’re imported. Choose Edit > Undo if you don’t want to keep them in the document.
3. Review all the styles available in the Paragraph Styles panel. Experiment with applying them to text in the story.
4. Add subheads to the story and apply the Subhead paragraph style to them.
5. Use the Find/Change dialog box to find all em dashes in the story and replace them with an em dash with a space on either side of it.
6. Edit the story using the Story Editor and Track Changes. See how the different changes are marked, and experiment with accepting and rejecting the changes.
7. Experiment with changing Spelling, Autocorrect, Track Changes, and Story Editor Display preferences.
Review questions
1. Which tool lets you edit text?
2. Where are most of the commands for editing text?
3. What is the search-and-replace feature called?
4. While checking the spelling in a document, InDesign flags words that are not in the dictionary—but they may not actually be misspelled. How can you fix this?
5. If you seem to continually type a word incorrectly, what can you do?
Review answers
1. The Type tool.
2. The Edit menu and the Type menu.
3. Find/Change (Edit menu).
4. Add those words to the document’s or InDesign’s default spelling dictionary for the language or languages of your choice (Edit > Spelling > User Dictionary).
5. Add the word to your Autocorrect preferences.