
16. Creating an iPad Publication
Lesson Overview
In this lesson, you’ll learn how to do the following:
• Create a new digital publishing document.
• Add interactive elements, including hyperlinks, movies, panoramas, and pan-and-zoom graphics.
• Preview interactivity.
• Create an alternate layout.
• Create and preview a folio.
This lesson will take approximately 60 minutes.
Download the project files for this lesson from the Lesson & Update Files tab on your Account page at www.peachpit.com and store them on your computer in a convenient location, as described in the Getting Started section of this book.
Your Account page is also where you’ll find any updates to the chapters or to the lesson files. Look on the Lesson & Update Files tab to access the most current content.
The digital publishing features in InDesign let you create and preview digital magazines, newspapers, and catalogs that include engaging elements such as 360-degree object rotation and image panoramas and can be displayed on a wide variety of tablets.
Getting started
In this lesson, you’ll create a new digital publishing document. After you’ve set up the new document, you’ll open a partially completed version of the publication, add several interactive elements, and then save and preview a folio that can be transferred to and viewed on an iPad.
![]() Note
Note
If you have not already downloaded the project files for this lesson to your computer from your Account page, make sure to do so now. See “Getting Started” at the beginning of the book.
Important: To work on this lesson, you must first install the DPS Desktop Tools for InDesign CC (2014 Release).
1. To ensure that the preference and default settings of your Adobe InDesign program match those used in this lesson, move the InDesign Defaults file to a different folder following the procedure in “Saving and restoring the InDesign Defaults file” on page 3.
![]() Note
Note
A folio is a collection of digital publishing articles. It gets its name from the .folio file extension used for this type of digital publishing file.
2. Start Adobe InDesign. To ensure that the panels and menu commands match those used in this lesson, choose Window > Workspace > [Digital Publishing], and then choose Window > Workspace > Reset Digital Publishing. This optimizes the panel arrangement for the work you’ll be doing in this lesson and provides quick access to several of the controls you’ll use.
3. To see what the finished document looks like, open the 16_End.indd file in the Lesson16 folder. (If the Adobe Typekit dialog box displays, click Sync Fonts.)
4. Navigate through the pages of the finished document to view the cover page and the four pages that follow. If you open the Pages panel, you’ll see that this document contains two five-page layouts: one in landscape orientation and one in portrait orientation.
5. Close the 16_End.indd file after you have finished examining it, or you can leave this document open for reference.
Creating a new digital publication
Because digital publications, such as the DPS Single Edition app for iPad that you’ll work on in this lesson, are viewed on tablet devices and can include interactive elements (for example, slideshows and pan-and-zoom graphics) that can’t be included in print documents, creating a digital publishing document is slightly different from creating a print document. That said, all of the typographic and page-layout features covered in this book are available and work the same when creating digital publications. To begin, you’ll create a new digital publishing document.
![]() Note
Note
Setting a new document’s Intent to Digital Publishing (or Web) deselects the Facing Pages option, sets the default page orientation to Landscape, and changes the unit of measurement to pixels. It also sets the Transparency Blend Space (Edit > Transparency Blend Space) to RGB and the default color swatches in the Swatches panel to Process RGB for the new document.
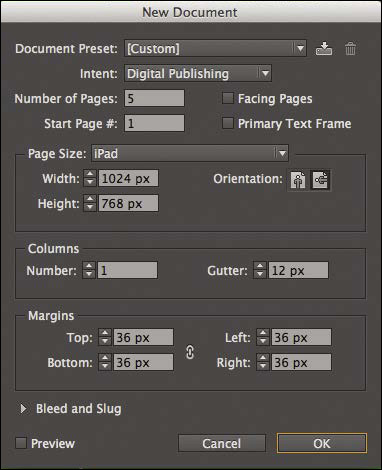
1. Choose File > New > Document.
2. In the New Document dialog box, choose Digital Publishing from the Intent menu and iPad from the Page Size menu. Also specify the following:
In the Number of Pages box, type 5 and deselect Primary Text Frame. Leave all other settings unchanged and click OK.
3. Choose File > Save As, name the file 16_Setup.indd, navigate to the Lesson16 folder, and click Save.
Rather than create the remainder of the document from scratch, you’ll continue this lesson by opening a partially completed document that already contains most of the required objects. You can keep the 16_Setup.indd document open or close it and continue.
Adding interactive elements
Interactive elements in a digital publication include such things as slideshows of multiple images, buttons that show and hide page elements, hyperlinks, graphics that a viewer can pan and zoom, and movies and sounds. Much as you can modify a graphics frame by adding a stroke, a special effect like a drop shadow, or rotation, you can control the appearance and function of interactive elements.
Rather than creating the entire digital publication from scratch, you’ll continue this lesson by opening a partially completed version of the publication and adding the finishing touches by creating several interactive elements.
Creating a hyperlink
Hyperlinks let viewers jump to other locations in a document, as well as to other documents or to websites. A hyperlink includes a source (text, a text frame, or a graphics frame) and a destination, which is the URL, file, email address, page text anchor, or shared destination to which the hyperlink jumps. Next, you’ll create a hyperlink to a website using an empty graphics frame.
1. Choose File > Open, and then open the 16_iPadGuidePartial file in the Lesson16 folder.
2. Choose File > Save As, name the file 16_iPadGuide.indd, and save it in the Lesson16 folder.
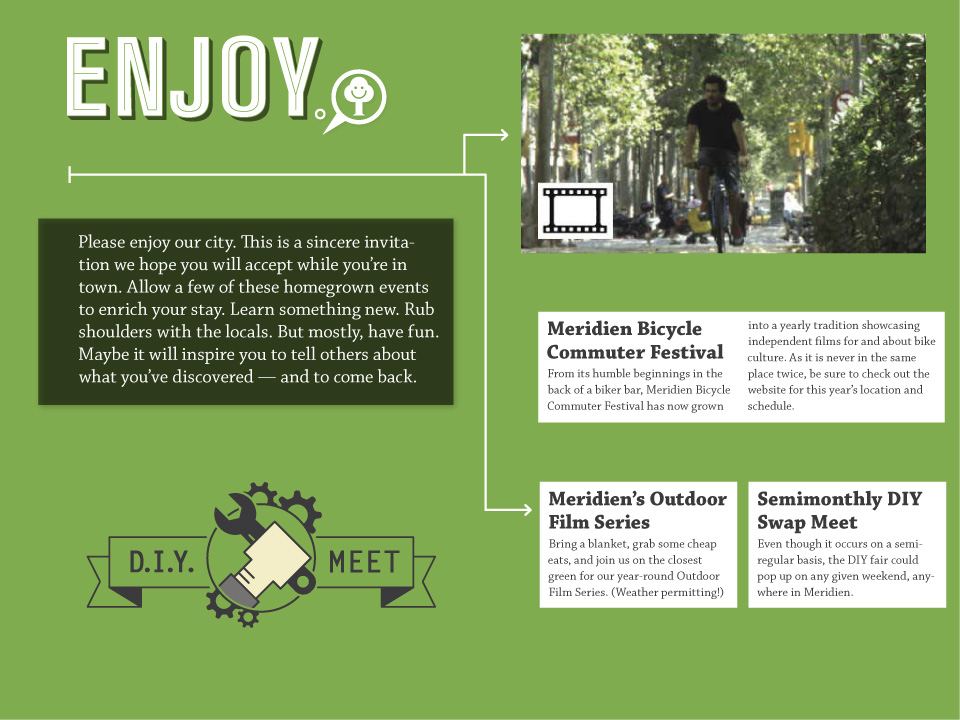
3. Select the Rectangle Frame tool (![]() ), and then drag a rectangle over the entire “D.I.Y. MEET” logo on page 1.
), and then drag a rectangle over the entire “D.I.Y. MEET” logo on page 1.
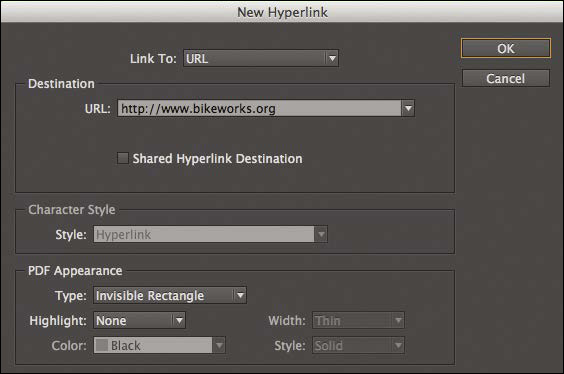
4. Choose Window > Interactive > Hyperlinks, or click the Hyperlinks icon to display the Hyperlinks panel.
5. Choose New Hyperlink from the Hyperlinks panel menu.
6. Select URL from the Link To menu, and type a URL in the URL field (the sample document uses http://www.bikeworks.org). Deselect Shared Hyperlink Destination. Under Appearance, leave Invisible Rectangle and None selected. Click OK.
7. Choose Window > Folio Overlays or click the Folio Overlays icon to display the Folio Overlays panel.
![]() Note
Note
The Folio Overlays panel lets you add interactivity to InDesign layouts designed for viewing on tablet devices, such as the iPad. This interactivity can include pan-and-zoom graphics, slideshows, video, audio, and more.
8. In the Folio Overlays panel, make sure that Open In Folio is selected. When a viewer taps the hyperlink area defined by the frame, the web page is displayed within an in-app viewer rather than switching to a browser.
![]() Note
Note
The Folio Overlays panel lets you change the behavior of a hyperlink. If you choose Open In Folio, the specified web page opens without leaving the digital publication. If you choose Open In Device Browser, the web page opens in a separate web browser application on the tablet device, for example in Safari on an iPad.
9. Choose File > Save.
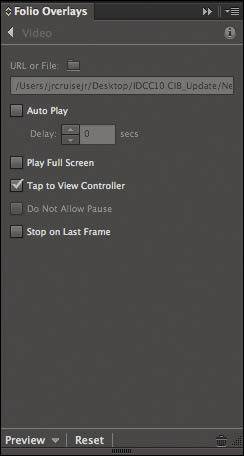
Adding a movie
Adding a movie to a digital publishing document is similar to adding a photo or illustration to a print document. Next, you’ll import a movie into the document and use the Media panel to choose a graphic to use as the poster image for the movie. Then you’ll use the Folio Overlays panel to control how the movie plays.
1. Use the Selection tool (![]() ) to select the empty rectangular graphics frame in the upper-right corner of page 1.
) to select the empty rectangular graphics frame in the upper-right corner of page 1.
2. Choose File > Place and select the Cycling.mp4 video file in the Links folder in the Lesson16 folder. Make sure Replace Selected Item is selected in the Place dialog box, and then click Open.
3. Choose Window > Interactive > Media, or click the Media icon to display the Media panel. If you want, use the controls below the movie image to preview the movie.
![]() Note
Note
A poster image is the static image that’s displayed within the frame that contains the placed video when the video is not playing.
4. From the Poster pop-up menu in the Media panel, choose Choose Image. Select Cyclist.jpg in the Links folder in the Lesson16 folder, and then click Open.
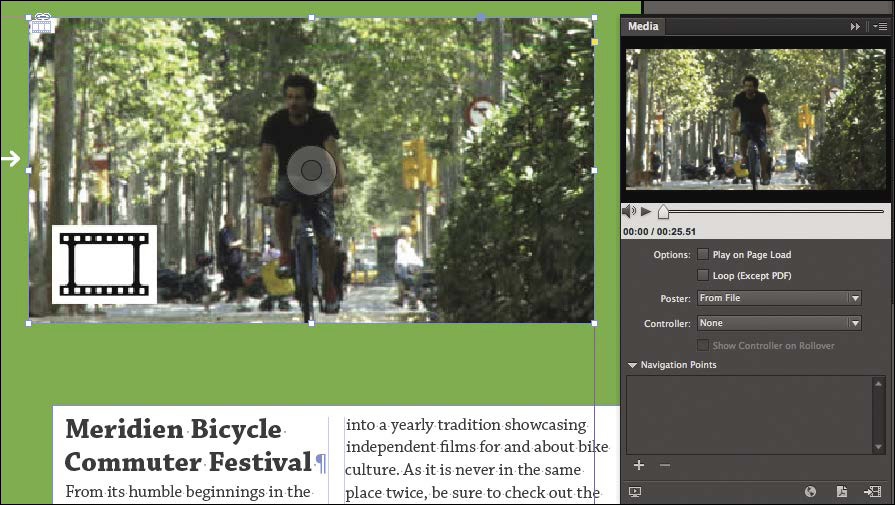
5. With the movie object still selected, make sure that Auto Play and Play Full Screen are not selected in the Folio Overlays panel and that Tap To View Controller is selected.
![]() Tip
Tip
When Auto Play is selected, a video starts playing as soon as it’s loaded on an iPad. Selecting Play Full Screen plays the video in full-screen mode instead of within the frame area.
6. Choose File > Save.
Creating a slideshow
A slideshow is a sequence of images displayed one at a time as a viewer swipes or taps an image or taps separately added Previous and Next buttons. The sample document for this lesson already includes the graphics you need to create an interactive slideshow. You’ll arrange these graphics in a stack, convert them into a multi-state object, and then create buttons that enable a viewer to navigate through the slides.
1. Use the Pages panel (Window > Pages) to navigate to page 2, or press Ctrl+J (Windows) or Command+J (Mac OS), enter 2 in the Page box, and then click OK.
2. Select the Selection tool (![]() ), and then select the frontmost of the seven overlapping graphics frames.
), and then select the frontmost of the seven overlapping graphics frames.
3. Press Shift, and then select each of the other six overlapping graphics frames in succession from front to back. Release the Shift key after you’ve selected all seven frames.
4. Click the Align Left Edges button (![]() ) in the Control panel, and then click the Align Top Edges button (
) in the Control panel, and then click the Align Top Edges button (![]() ).
).
5. With the graphics frames still selected, choose Window > Interactive > Object States or click the Object States icon to display the Object States panel, and then click the Convert Selection To Multi-State Object button at the bottom of the panel. If necessary, lengthen the panel to display the names of all objects.
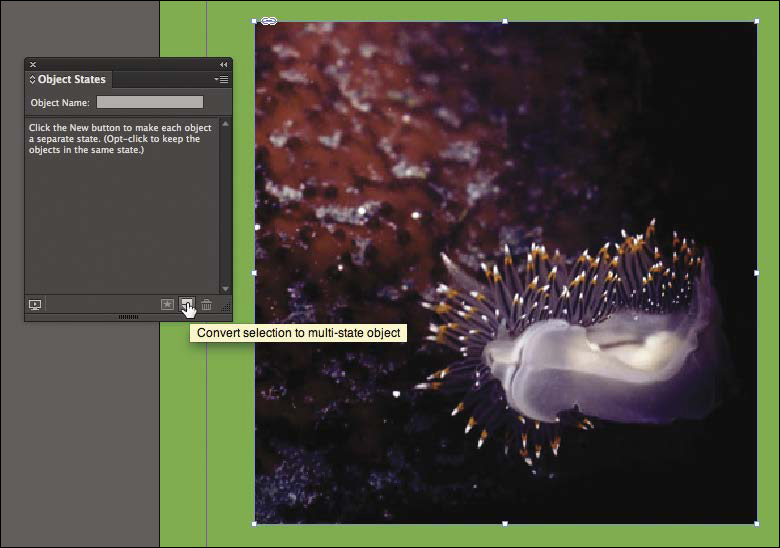
Multiple objects selected and aligned.
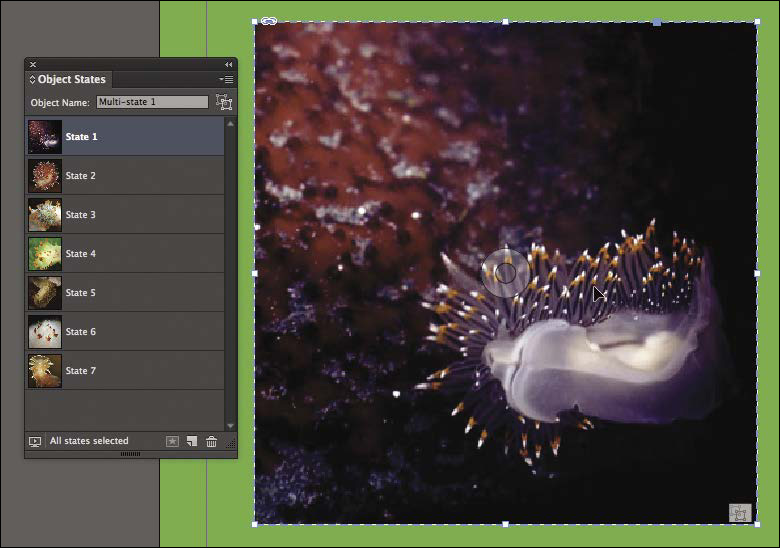
Graphics frames combined into a multi-state object. Each image appears as a separate state in the Object States panel.
6. In the Object States panel, enter Sea Slugs in the Object Name box, and then press Enter or Return.
Now that you’ve created a multi-state object, you’ll provide a way to let viewers scroll through the images.
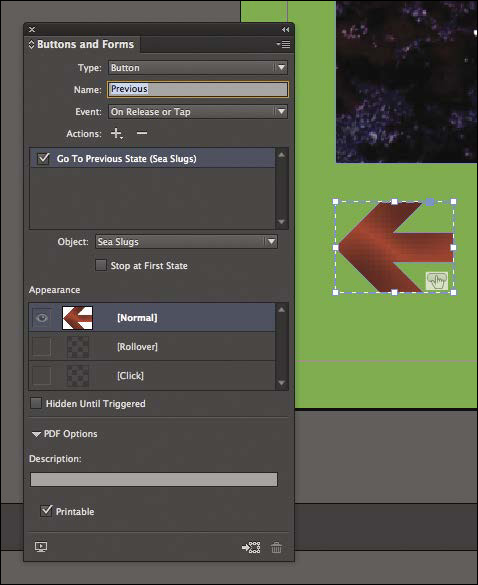
7. Use the Selection tool to select the red arrow in the lower-left corner of the page.
![]() Tip
Tip
InDesign automatically selects the Sea Slugs multi-state object because it’s the only one on the page. When there are multiple multi-state objects on a page, you may need to choose the correct multi-state object from the Object menu in the Buttons And Forms panel.
8. Choose Window > Interactive > Buttons And Forms or click the Buttons And Forms icon to display the Buttons And Forms panel.
9. In the Buttons And Forms panel, click Convert To Button at the bottom of the panel, and then enter Previous in the Name box.
10. Click the Add New Action For Selected Event (![]() ) button next to Actions, and choose Go To Previous State from the menu.
) button next to Actions, and choose Go To Previous State from the menu.
![]() Tip
Tip
The “[Click]” appearance will be visible when the viewer positions a finger on the button and doesn’t release immediately. The Click appearance will not be visible when a viewer taps the buttons.
Now you’ll cause the button’s appearance to change slightly when a viewer presses it.
11. With the red arrow still selected, click [Click] in the Appearance area of the Buttons And Forms panel, and then click the Drop Shadow button (![]() ) in the Control panel.
) in the Control panel.
12. Repeat steps 7–11 to select the red arrow on the right, convert it to a button, name it “Next,” apply the Go To Next State action (instead of the Go To Previous State action, as you did in step 10), and give its [Click] appearance a drop shadow.
![]() Tip
Tip
In addition to creating Previous and Next buttons to navigate through the images in a multi-state object, you can use the Folio Overlays panel to configure a multi-state object so that a viewer can tap the image to automatically play the slideshow.
Viewers can tap the arrow buttons to move from image to image, but you can also configure the multi-state object so that viewers can swipe the images to advance through slides.
13. Use the Selection tool to select the multi-state object you created earlier. In the Folio Overlays panel, select Swipe To Change Image.
14. Choose File > Save.
Creating a panorama
A panorama is a graphic that provides a 360-degree view of a scene. A panorama requires six images, with each image representing a side within a cube. A viewer of a panorama can swipe the image in any direction to get a complete view of a scene.
1. Use the Pages panel (Window > Pages) to navigate to page 3, or press Ctrl+J (Windows) or Command+J (Mac OS), enter 3 in the Page box, and then click OK.
2. Use the Selection tool (![]() ) to select the empty graphics frame on the left side of the page.
) to select the empty graphics frame on the left side of the page.
3. In the Folio Overlays panel, select Panorama.
4. Click the Select Panorama Assets Folder button (![]() ), and then select the CourtyardPano folder in the Links folder in the Lesson16 folder. Click Open.
), and then select the CourtyardPano folder in the Links folder in the Lesson16 folder. Click Open.
The placeholder rectangle has assumed the dimensions of the panorama images, but you need to make the click area smaller to fit it on the page.
5. In the Control panel, make sure the upper-left square is selected in the Reference Point Locator at the left end of the panel, enter 40% in the Scale X Percentage or Scale Y Percentage box, and then press Enter or Return. Because the Constrain Proportions For Scaling button is selected for the Scale X Percentage and Scale Y Percentage boxes, changing either value automatically changes the other.
![]() Note
Note
Selecting the Limit Vertical Pan or Horizontal Pan option limits the amount of tilting to the top and bottom or left and right that can occur when the viewer swipes in those directions.

6. With the panorama image still selected, make sure the Limit Vertical Pan and Limit Horizontal Pan options are selected in the Folio Overlays panel.

7. Choose File > Save.
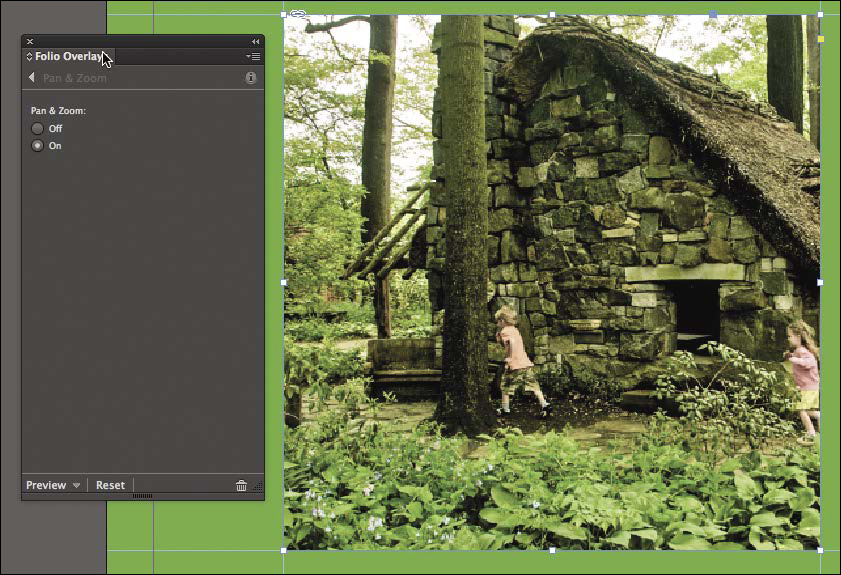
Creating a pan-and-zoom graphic
You can display a portion of a graphic within a rectangular graphics frame and then configure the frame to allow a viewer to pan and zoom the image within the rectangle.
![]() Tip
Tip
For best results when creating pan-and-zoom images, use JPEG files. Make sure that the image has the exact dimensions you want to use. For example, if you want viewers to be able to pan a 1024-by-1024-pixel image within a 200-by-200-pixel view area, create a 1024-by-1024-pixel image.
1. Use the Pages panel (Window > Pages) to navigate to page 4, or press Ctrl+J (Windows) or Command+J (Mac OS), enter 4 in the Page box, and then click OK.
2. Use the Selection tool to select the empty graphics frame on the left side of the page.
3. Choose File > Place.
4. In the Place dialog box, select the Park.jpg graphic in the Links folder in the Lesson16 folder, select Replace Selected Item, and then click Open.
5. Move the pointer within the content grabber in the middle of the graphic, and then click to select the graphic. Notice that the graphic’s right edge is outside the frame edge. Also in the Links panel, note the dimensions in pixels of the image. These will allow a user to pinch and zoom as well as pan horizontally and vertically.
6. Double-click within the graphics frame to select the frame instead of the graphic.
![]() Tip
Tip
To remove Pan & Zoom from a graphics frame, select the frame and choose Off in the Folio Overlays panel.
7. In the Folio Overlays panel, click Pan & Zoom, and then select On.
8. Choose File > Save.
Creating a scrollable text frame
In addition to creating pan-and-zoom graphics, you can create scrollable frames that viewers can swipe to view additional content. For example, say you created a list of upcoming events that’s too long to fit into its allotted space. Rather than continuing the list on another page and forcing the viewer to navigate through the document, you can create a scrollable frame that a viewer can swipe to see the additional text.
The sample document already contains the two objects you need to create a scrollable text frame—an empty graphics frame that will function as a container frame and a text frame.
![]() Tip
Tip
For best results, make the width of the container frame slightly wider than the content frame to allow space for swiping along the right edge of the container frame. The content frame should not include overset text.
1. Use the Selection tool to select the text frame on the pasteboard outside the right edge of the page (page 4).
2. Choose Edit > Cut.
3. Select the empty graphics frame with a black fill in the upper-right corner of the page.
4. Choose Edit > Paste Into to place the text frame into the graphics frame. The Paste Into command aligns the center of the two frames.
![]() Tip
Tip
If you position the text frame over the empty graphics frame so that the upper-left corners of the frames are aligned before you choose Edit > Cut, the Paste Into command will remember the text frame position so you don’t need to reposition it after you choose Paste Into.
5. Select the Direct Selection tool (![]() ), and then move the pointer within the text frame. Notice that the top and bottom edges of the text frame are outside the container frame, while the left and right edges are inside.
), and then move the pointer within the text frame. Notice that the top and bottom edges of the text frame are outside the container frame, while the left and right edges are inside.
6. Drag the text frame down and to the left until the upper-left corners of the two frames are aligned. Notice the thin vertical strip of the container frame outside the right edge of the text frame. This area will allow a viewer to swipe the text without obstructing the view.
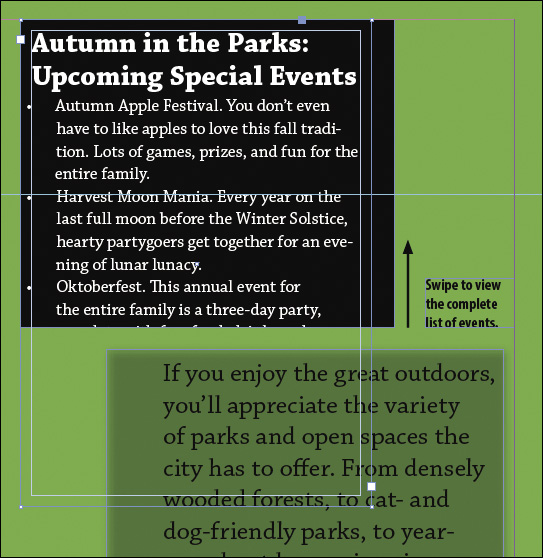
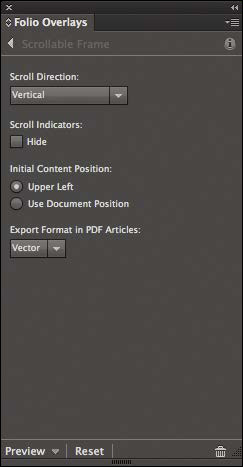
7. Use the Selection tool to select the container frame, and then click Scrollable Frame in the Folio Overlays panel.
![]() Tip
Tip
To include multiple objects, such as graphics, as part of the scrollable content in a Scrollable Frame, first group all of the objects by selecting them and choosing Object > Group, and then choose Edit > Paste Into.
![]() Tip
Tip
When working with a scrollable frame, select Upper Left for Initial Content Position in the Folio Overlays panel to ensure that the scrollable content always starts in the upper-left corner, regardless of the content’s position in the document. To retain the position in the document itself as the starting point for the scrollable frame, select Use Document Position.
8. Choose Vertical from the Scroll Direction menu.
9. Choose File > Save.
Creating a web content overlay
The web content overlay lets you display a web page within a view area. Viewers can see the web page content in the view area rather than switching to a browser, as can be the case with URL-based hyperlink overlays. (The hyperlink you created earlier in this lesson was configured to open within an in-app viewer rather than a browser.)
When you create a web content overlay, you can specify a URL or a local HTML file. If you choose a local HTML file, make sure that the HTML file and all its associated files and folders, such as images and scripts, are stored in the same folder.
1. Use the Pages panel (Window > Pages) to navigate to page 5, or press Ctrl+J (Windows) or Command+J (Mac OS), enter 5 in the Page box, and then click OK.
2. Use the Selection tool to select the large graphics frame that contains the bicycle graphic.
3. Choose Web Content in the Folio Overlays panel.
4. Type a URL in the URL Or File box (the sample document uses http://www.bicyclinginfo.org), and then select Auto Play and enter 3 in the Delay box to automatically display the specified web page 3 seconds after a viewer opens the page. Select Scale Content To Fit and leave the other settings unchanged.
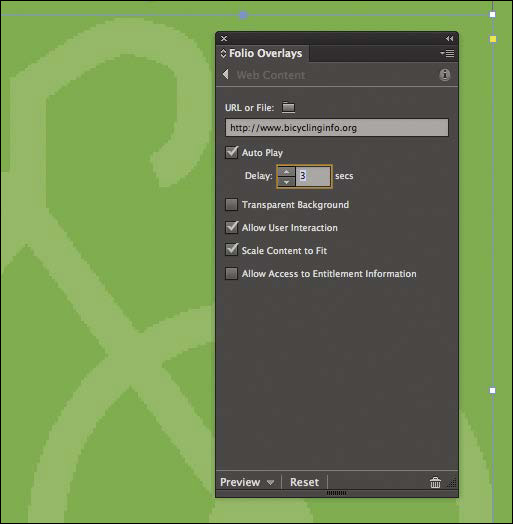
5. Choose File > Save.
Previewing and testing overlays
The interactive elements that you create using the Folio Overlays panel cannot be previewed in InDesign. That is, you can see them and modify them, but you can’t interact with them as an iPad viewer can. Instead, you can preview and test interactivity using the Adobe Content Viewer application. Next, you’ll preview the page you just worked on and, optionally, test some of the interactive elements you’ve created.
![]() Tip
Tip
If you’ve installed and opened the Adobe Viewer app on your iPad and your iPad is connected to your computer, the Preview menu in the Folio Overlays panel provides an additional option that lets you preview the document on your iPad.
1. Click Preview in the lower-left corner of the Folio Overlays panel, and then choose Preview On Desktop. If it’s installed on your computer, Adobe Content Viewer opens and displays the page that’s currently displayed in InDesign. Because Allow User Interaction was selected by default in the Folio Overlays panel for the web content overlay you created, the hyperlinks on the web page are functional, and you can click them to navigate to other web pages.
2. While you’re in Adobe Content Viewer, you can navigate to the other pages in the publication by dragging. For example, drag page 5 downward to display page 4. If you want, you can test the other interactive elements that you created earlier in this lesson.
3. When you’ve finished previewing the publication, quit Adobe Content Viewer and return to InDesign.
Creating an alternate layout and applying liquid layout rules
Tablet devices can display pages in either portrait or landscape orientation. To take advantage of this capability, InDesign lets you create alternate layouts within the same InDesign document.
The Alternate Layout feature duplicates the content of the existing layout, placing it on new pages with an alternate page size. The ability to include both the portrait and landscape layouts for a tablet application in one InDesign document simplifies the task of designing for tablets and helps ensure that text, linked images, and interactivity are consistent across multiple layouts. Alternate layouts are intended to make the design process faster, but most layouts still require human judgment and manual adjustments.
Next, you’ll create an alternate vertical layout and assign a liquid page rule to determine how the objects on a page are adapted in the alternate layout. You’ll then modify the layout of one of the pages in the alternate layout to accommodate the change in orientation.
1. Use the Pages panel (Window > Pages) to navigate to page 2, or press Ctrl+J (Windows) or Command+J (Mac OS), enter 2 in the Page box, and then click OK.
2. If the Pages panel is not open, choose Window > Pages or click the Pages icon to open it.
3. Choose Create Alternate Layout from the Pages panel menu.
![]() Tip
Tip
In addition to assigning global liquid layout rules when you create an alternate layout, you can assign any of the four liquid layout rules—Re-center, Scale, Object-based, or Guide-based—to individual pages, and you can assign object-based constraints to individual objects using the Liquid Layout panel (Window > Interactive > Liquid Layout). For example, you can “pin” an object to the edge of a page.
4. In the Create Alternate Layout dialog box, choose Re-center from the Liquid Page Rule menu. Leave all other settings unchanged. Notice that the new layout is assigned the name iPad V (a portrait orientation) and that iPad H, the layout you’ve been working on, is the source. Click OK to close the dialog box.
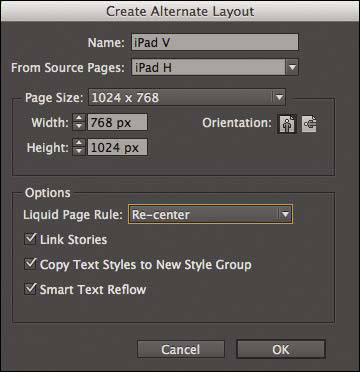
5. Notice how the pages of the new layout are displayed in the panel. If necessary, drag the horizontal bar that separates the master page thumbnails from the document page icons so that you can see the B-Master iPad V master page thumbnail. This master page was generated when you created an alternate layout.
You need to make a modification to the B-Master iPad V master page, after which you’ll modify page 2 in the alternate layout by adjusting the position of the objects on the page.
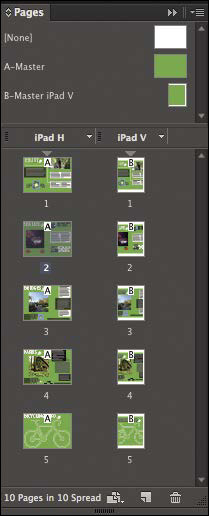
6. Double-click the B-Master iPad V master page thumbnail in the Pages panel to display it, and then choose View > Fit Page In Window.
7. Use the Selection tool (![]() ) to resize the green frame so that its edges align with the edges of the page.
) to resize the green frame so that its edges align with the edges of the page.
8. Double-click page 2 of the iPad V layout in the Pages panel to display it. Notice that the page contains all of the objects in the source layout and that the objects are unchanged.
9. Use the Selection tool to reposition the objects on the page so that they resemble the following image. The text frame with the “Sea Slugs ...” headline is the only object that requires resizing.

Rather than adjust the objects on the remaining pages, you’ll continue by opening a document that already includes these changes, and then you’ll complete the lesson by creating and previewing a .folio file.
10. Choose File > Save.
Creating and previewing a .folio file
To prepare a document for publication through Adobe Digital Publishing Suite, you need to build a .folio file. You can preview your .folio file on your computer or tablet with Adobe Content Viewer, and you can share it with colleagues or clients who have Adobe Content Viewer.
1. Choose File > Open, and then open the InDesign document named 16_iPadGuideComplete.indd in the Lesson16 folder.
2. Choose Window > Folio Builder, or click the Folio Builder icon in the stack of docked panels.
3. Choose New Folio from the Folio Builder panel menu, or click the Create New Folio button at the bottom of the Folio Builder panel. If the Creative Cloud Sign In dialog box appears, sign in with your Creative Cloud Adobe ID and password or click Cancel.
![]() Note
Note
When you’re signed in to your Adobe account, you have the option to create new folios that are not offline. You can share online folios with others, for example, customers who need to review folios. If you’re not signed in, you can create only local folios, which are available only on your computer and cannot be shared.
4. In the New Folio dialog box, enter City Guide in the Folio Name field. Make sure that the Portrait And Landscape Folio icon is selected for Orientation. If you’re signed in to your Adobe account, select Create Offline Folio. (If you’re not signed in, an offline folio is automatically created.) Click OK to close the dialog box.
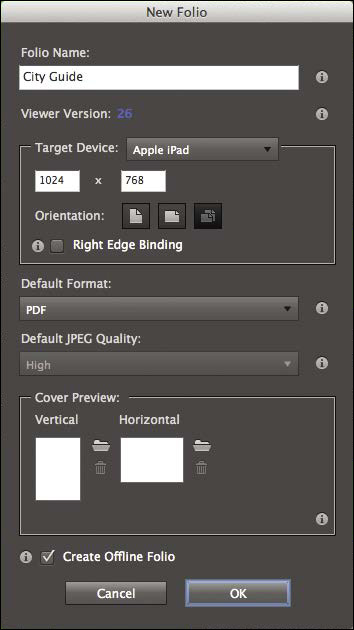
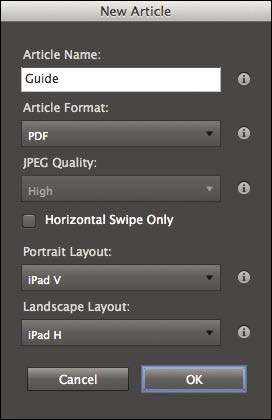
5. Click the Add Article button at the bottom of the Folio Builder panel and choose Add Open InDesign Document to add the current document.
![]() Note
Note
You can add multiple articles to a Folio. By default, when navigating through a folio with multiple articles you swipe left and right to move between articles and up and down to move within an article. Selecting Horizontal Swipe Only in the New Article dialog box changes this default behavior.
6. In the New Article dialog box, enter Guide in the Article Name field. Leave all other settings unchanged, and then click OK to close the dialog box. If an alert is displayed, click Save to save your changes.
7. With the Guide article selected in the Folio Builder panel, choose Article Properties from the Folio Builder panel menu, enter Meridien Bicycle Festival in the Title field, and enter A new year brings a new format for a popular event in the Description field. Leave all other options unchanged. Click OK.
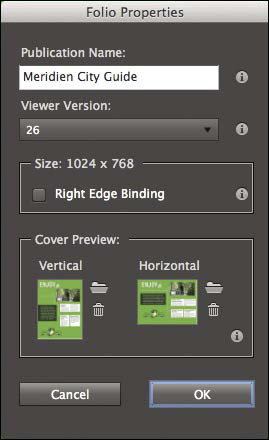
8. Click the Back To All Folios button at the top left of the Folio Builder panel, and select the City Guide folio. Choose Folio Properties from the Folio Builder panel menu. Type Meridien City Guide as the Publication Name.
![]() Tip
Tip
The Cover Preview settings determine the preview for the folio that’s displayed in the iPad viewer’s library. You can create preview images as JPEG or PNG files and specify the size of the folio, for example 1024 × 768 pixels for the iPad.
9. Click the folder next to the Vertical preview rectangle in the Cover Preview area, and then select and open the graphic file named cover_vertical.jpg in the Links folder within the Lesson16 folder. Click the folder next to the Horizontal preview rectangle in the Cover Preview area, and then select and open the cover_horizontal.jpg graphic in the Links folder inside the Lesson16 folder. Click OK to close the Folio Properties dialog box.
10. To preview the folio, select the folio in the Folio Builder panel, click the Preview button at the bottom of the panel, and then choose Preview On Desktop.
The document opens in landscape view in Adobe Content Viewer. You can use the Up Arrow and Down Arrow keys to navigate between pages, and you can test all of the interactive elements as you did earlier. Choose View > Portrait to display the vertical layout. When you’ve finished previewing the document, quit Adobe Content Viewer and return to InDesign.
11. Choose File > Save.
Congratulations! You’ve created an iPad publication with interactivity and horizontal and vertical layouts.
Exploring on your own
For extra practice, you can create additional alternate layouts and experiment with the liquid layout rules that you didn’t use earlier in the lesson.
1. If it’s not still open, open the 16_iPadGuide.indd document that you worked on earlier in this lesson and navigate to page 1 of the iPad H layout. Choose View > Fit Page In Window.
2. Choose Create Alternate Layout from the Pages panel menu.
3. In the Create Alternate Layout dialog box, enter iPad V#2 in the Name field, choose Scale from the Liquid Page Rule menu, and then click OK.
4. Enlarge the Pages panel so that you can see all of the page icons for the three layouts in the document. Double-click page 1 of the iPad V#2 layout to display it, choose View > Fit Page In Window, and then choose Window > Arrange > Split Window.
5. Click within the window on the right, and then double-click page 1 of the iPad V layout to display it in the window. Choose View > Fit Page In Window.
![]() Tip
Tip
When deciding on liquid layout rules, Scale works best when you’re adapting a page for a layout that has the same aspect ratio and orientation. Re-center is appropriate when you’re repurposing content for a similar device and orientation with a larger size. Guide-based is useful for simpler pages that include mostly text and a few images. Object-based lets you customize the way each object will be adjusted for the new page.
Notice the differences between the page on the right—the iPad V layout, which was created using the Re-center liquid layout rule—and the page on the left, which was created using the Scale rule. All of the objects in the iPad V layout retained their original size in the alternate layout, while all of the objects in the iPad V #2 layout were scaled down so that the entire page fits within the dimensions of the alternate layout.
6. Choose Window > Arrange > Unsplit Window.
7. In the Pages panel, double-click page 1 of the iPad H layout to display it. Create another alternate layout and name it iPad V#3, but this time choose Guide-based from the Liquid Page Rule menu in the Create Alternate Layout dialog box. Compare pages across the three alternate layouts to see how the liquid layout rule you chose affected the resulting layouts.
8. Create another alternate layout and name it iPad V#4, and choose Object-based from the Liquid Page Rule menu. Again, compare pages across the alternate layouts to see how the liquid layout rules affect the resulting layouts.
9. Close the document without saving changes.
One type of overlay you didn’t create in this lesson is an image sequence. An image sequence is similar to a multi-state object in that it allows a viewer to see a series of images. When you create an image sequence, you can configure the sequence to play when the user swipes the image or to play automatically when the viewer taps the image.
1. Create a new document. In the New Document dialog box, select Digital Publishing from the Intent menu and leave all other settings unchanged.
2. Use the Rectangle Frame tool (![]() ) to create a placeholder frame for the image sequence anywhere on the page. Any size frame will work for the placeholder.
) to create a placeholder frame for the image sequence anywhere on the page. Any size frame will work for the placeholder.
3. In the Folio Overlays panel, click Image Sequence.
4. Click the folder button next to Load Images, and then locate and select the folder named Mug_3D in the Links folder within the Lesson16 folder. Click Open.

5. Click the Preview button at the bottom of the Folio Overlays panel and choose Preview On Desktop to view the file in Adobe Content Viewer. (In Adobe Content Viewer, drag horizontally in either direction to play the sequence.)
6. Return to InDesign and change some of the settings in the Folio Overlays panel. For example, select Auto Play. Then preview the page again. Continue to experiment with other controls.
7. When you’re finished experimenting, close the document without saving changes.
Review questions
1. If you intend to create a publication for an iPad or other tablet device, what Intent must you choose in the New Document dialog box?
2. What panel contains the controls required to create interactive elements such as hyperlinks, slideshows, and panoramas for iPad publications?
3. How can you preview interactivity that you’ve added to an iPad publication?
4. If you specified a horizontal layout (landscape orientation) when you first created an iPad publication, what must you do if you want to allow viewers to see vertical page layouts as well?
5. What panel do you use to create a .folio file that can be viewed on an iPad?
Review answers
1. Choose Digital Publishing from the Intent menu in the New Document dialog box if you want to create a publication for an iPad or other tablet device.
2. The Folio Overlays panel lets you create interactive elements for iPad publications.
3. To preview interactivity, click the Preview button at the bottom of the Folio Overlays panel, and then choose Preview On Desktop. InDesign generates a .folio file and opens it automatically in Adobe Content Viewer. If an iPad is connected to your computer and the Adobe Viewer app is open, the Preview button lets you preview interactivity on the iPad.
4. To allow viewers to see both landscape and portrait versions of pages, you must create an alternate layout with a vertical orientation.
5. The Folio Builder panel lets you create .folio files.