
14. Creating Adobe PDF Files with Form Fields
Lesson Overview
In this lesson, you’ll learn to do the following:
• Add different types of PDF form fields to a page.
• Use prebuilt form fields.
• Add a description to a form field.
• Set the tab order of form fields.
• Add a Submit button to a form.
• Export and test an Adobe PDF (Interactive) file with form fields.
This lesson will take approximately 45 minutes.
Download the project files for this lesson from the Lesson & Update Files tab on your Account page at www.peachpit.com and store them on your computer in a convenient location, as described in the Getting Started section of this book.
Your Account page is also where you’ll find any updates to the chapters or to the lesson files. Look on the Lesson & Update Files tab to access the most current content.

Adobe InDesign CC provides all the tools you need to create simple PDF forms, and you have the option to use Adobe Acrobat to add features and functionality that aren’t available in InDesign.
Getting started
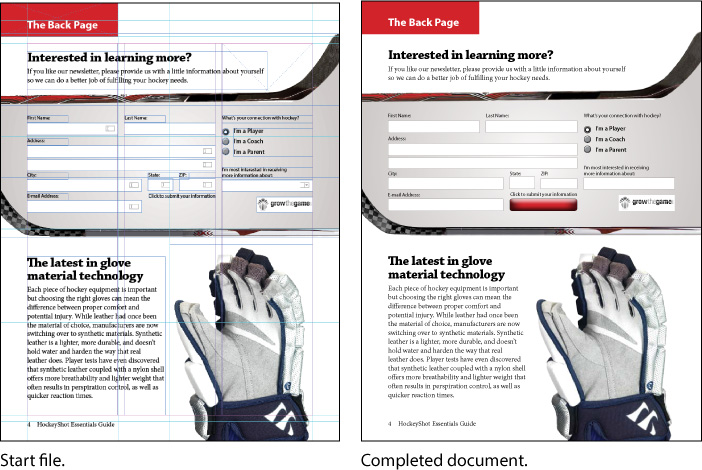
In this lesson, you’ll add several different types of form fields to a newsletter, export an Adobe PDF (Interactive) file, and then open the exported file and test the fields you created in InDesign.
![]() Note
Note
If you have not already downloaded the project files for this lesson to your computer from your Account page, make sure to do so now. See “Getting Started” at the beginning of the book.
1. To ensure that the preference and default settings of your Adobe InDesign program match those used in this lesson, move the InDesign Defaults file to a different folder following the procedure in “Saving and restoring the InDesign Defaults file” on page 3.
2. Start Adobe InDesign. To ensure that the panels and menu commands match those used in this lesson, choose Window > Workspace > [Advanced], and then choose Window > Workspace > Reset Advanced. To begin working, you’ll open an InDesign document that is already partially completed.
3. Choose File > Open, and open the 14_Start.indd file, in the Lesson14 folder, located inside the Lessons folder within the InDesignCIB folder on your hard drive. This document includes the back page of a newsletter. (The other pages have been deleted to make navigation simpler.) (If the Adobe Typekit dialog box displays, click Sync Fonts.)
4. To see what the finished document looks like, open the 14_End.indd file, in the Lesson14 folder.
5. Close the 14_End.indd file after you have finished examining it, or you can leave this document open for reference.
6. Choose File > Save As, rename the document 14_PDF_Form.indd, and save it in the Lesson14 folder.
Adding form fields
Some setup work on the form fields has already been done. You’ll complete the form by adding some more fields, and then modifying some of them.
Adding text fields
In a PDF form, a text field is a container into which the person who fills out the form can enter text. All but two of the text frames have already been converted into text fields. You’ll convert these two text frames into text fields.
1. Choose Window > Workspace > Interactive For PDF. This optimizes the panel arrangement for the work you’ll be doing in this lesson and provides quick access to many of the controls you’ll use.
2. Use the Zoom tool (![]() ) to zoom in on the area in the top half of the page that contains the form objects. That’s where all of your work in this lesson will be done.
) to zoom in on the area in the top half of the page that contains the form objects. That’s where all of your work in this lesson will be done.
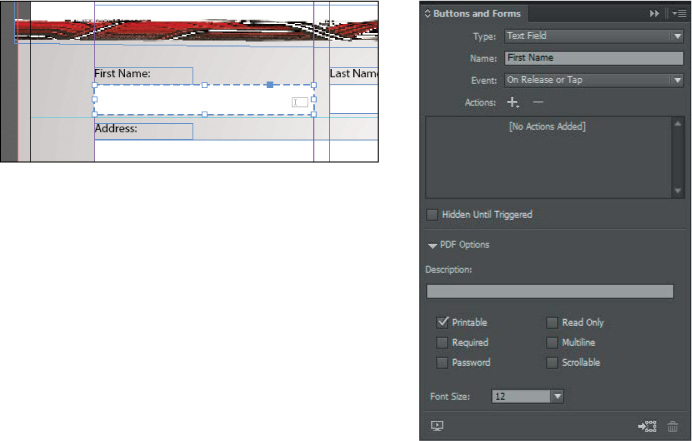
3. Select the Selection tool (![]() ), and then move the pointer over the text field below “First Name.” Notice that a blue dotted line is displayed around the object and a small graphic of a text field is displayed on the right side. The dotted line indicates that the object is a PDF form element; the icon of the text frame indicates that the element is a text field. Select the object.
), and then move the pointer over the text field below “First Name.” Notice that a blue dotted line is displayed around the object and a small graphic of a text field is displayed on the right side. The dotted line indicates that the object is a PDF form element; the icon of the text frame indicates that the element is a text field. Select the object.
4. Choose Window > Interactive > Buttons And Forms, or click the Buttons And Forms panel icon to display the Buttons And Forms panel. Notice the settings for the text field. Text Field is selected in the Type menu, and the name of the element is First Name.
![]() Note
Note
When adjusting the appearance of a combo box, list box, text field, or signature field, keep in mind that only a solid stroke and fill are retained when you export as Adobe PDF. These attributes are visible in an exported PDF file when Highlight Existing Fields is not selected in Adobe Reader or Adobe Acrobat when the form is opened.
5. Select the text frame below “Last Name.” In the Buttons And Forms panel, choose Text Field from the Type menu, and then assign a name to the field by entering Last Name in the Name field. Press Enter or Return to apply the name change, and then deselect Scrollable.
6. Select the text frame under “E-mail Address.” In the Buttons And Forms panel, configure it the same as you did the Last Name field and assign it the name E-mail Address.
7. Choose File > Save.
Adding radio buttons
Radio buttons present the person filling out the form with two or more choices, but only one of the choices can be selected at a time, unlike check boxes, which do allow multiple choices to be selected. Radio buttons are often simple circles; however, you can design your own, more elaborate buttons or choose from several sample buttons included with InDesign. In this lesson, you’ll use one of the sample radio buttons.
1. Choose View > Fit Page In Window, and then zoom in to the “What’s your connection with hockey?” portion of the form.
2. Choose Sample Buttons And Forms from the Buttons And Forms panel menu or click the Sample Buttons And Forms panel icon (![]() ) located to the left of the Pages panel icon to display the Sample Buttons And Forms panel. If necessary, reposition and resize the panel so that you can see the “What’s your connection with hockey?” portion of the form.
) located to the left of the Pages panel icon to display the Sample Buttons And Forms panel. If necessary, reposition and resize the panel so that you can see the “What’s your connection with hockey?” portion of the form.
![]() Tip
Tip
When the Scrollable option is selected for a text field, more text can be entered in the field than is visible onscreen. This can result in only part of the text appearing on a printed copy of the page.
3. Drag the radio button named “019” in the Sample Buttons And Forms panel and position it below the text frame with the text “What’s your connection with hockey?” Align the top of the topmost radio button with the top of the line of text to the right. Refer to the screen capture on the next page for the correct position.
4. In the Control panel, make sure that the upper-left reference point is selected in the reference point locator (![]() ), enter 40% in the Scale X Percentage box, and then press Enter or Return.
), enter 40% in the Scale X Percentage box, and then press Enter or Return.

5. With all three buttons still selected, in the in the Buttons And Forms panel, enter Hockey Connection in the Name box, and then press Enter or Return.
6. Choose Edit > Deselect All or click an empty area of the page or pasteboard.
![]() Tip
Tip
The “I’m a Player” button is selected by default when the exported PDF form is opened in Adobe Reader or Acrobat. If you uncheck Selected By Default in the Buttons And Forms panel for this element, nothing is selected by default in Reader.
7. Use the Selection tool (![]() ) to select the first radio button (to the left of “I’m a Player”).
) to select the first radio button (to the left of “I’m a Player”).
8. In the Buttons And Forms panel, enter Player in the Button Value field at the bottom of the panel, and then press Enter or Return.
9. Repeat steps 7 and 8 to name the middle button Coach and the bottom button Parent.
10. Choose File > Save.
Adding a combo box
A combo box is a drop-down menu that lists multiple predefined choices. A viewer of the form can select only one of the choices. Next, you’ll create a combo box that offers four choices.
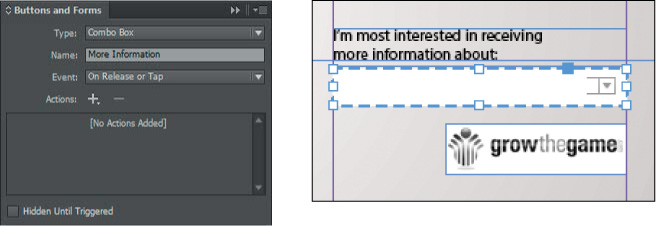
1. Use the Selection tool (![]() ) to select the text frame below the heading “I’m most interested in receiving more information about:”.
) to select the text frame below the heading “I’m most interested in receiving more information about:”.
2. In the Buttons And Forms panel, choose Combo Box from the Type menu, and then enter More Information in the Name field.
![]() Note
Note
List boxes are similar to combo boxes in that you add list items; however, combo boxes allow you to select only one item from a list in the PDF form. If you select Multiple Selection for a list box, a viewer of the PDF can select more than one choice.
To provide the viewer of the PDF form with different choices, you’ll add four list items.
3. In the lower half of the Buttons And Forms panel, enter Hockey Camps in the List Items box, and then click the plus sign to the right of the box. Notice that the text you entered is now displayed in the list below the box.
4. Repeat the previous step to add Hockey Equipment, Hockey Videos/DVDs, and Personalized Coaching to the list.
![]() Tip
Tip
To sort list items alphabetically, select Sort Items in the Buttons And Forms panel. You can also modify the order of list items by dragging them up or down in the list.
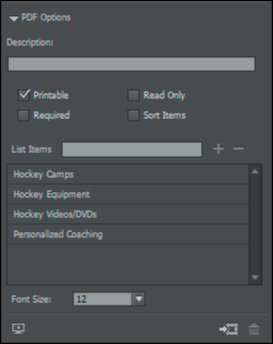
5. Click Hockey Camps in the list of items to make it the default selection. When a viewer opens the exported PDF file, Hockey Camps will already be selected.
6. Choose File > Save.
Adding a description to a form field
You can provide additional guidance to viewers who fill out a form by adding descriptions to form fields. A description is displayed when the pointer rolls over a field that includes one. Next, you’ll add a description to one of the text fields.
![]() Tip
Tip
Adding descriptions to form fields is recommended, as it assists in making PDF forms accessible. For more information, go to http://www.adobe.com/accessibility.edu.html.
1. Use the Selection tool (![]() ) to select the text field below the text frame with the heading “ZIP.”
) to select the text field below the text frame with the heading “ZIP.”
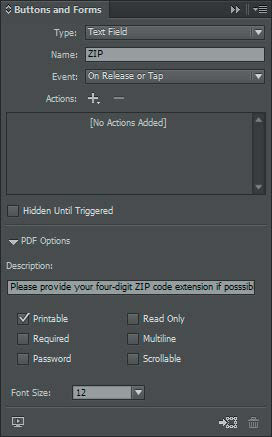
2. In the Buttons And Forms panel, enter Please provide your four-digit ZIP code extension if possible. in the Description box, and then press Enter or Return.
3. Choose File > Save.
Setting the tab order of the fields
The tab order you establish for a PDF form determines the order in which fields are selected as a viewer of the form presses the Tab key. Next, you’ll set the tab order for the fields on the page.
![]() Tip
Tip
You can also change the tab order by dragging list items up or down in the Tab Order dialog box.
1. From the Object menu, choose Interactive > Set Tab Order.
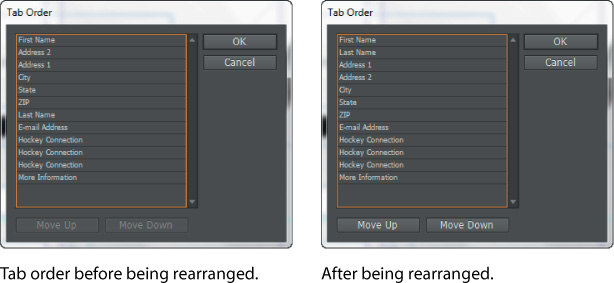
2. In the Tab Order dialog box, click Last Name (the name of the text field you created that holds the family name of the person filling out the form), and then click Move Up until it appears below First Name near the top of the list. Use the Move Up and Move Down buttons or drag field names up or down to rearrange them so that they match the order on the page. Click OK to close the dialog box.
3. Choose File > Save.
Adding a button to submit the form
If you distribute a PDF form, you’re going to want to include a way for anybody who fills out the form to return it to you. To accomplish this, you’ll create a button that sends the filled-out PDF form to your email address.
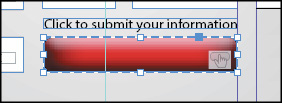
1. Drag the red button named “126” in the Sample Buttons And Forms panel and position it below “Click to submit your information.” Align the left edge of the button with the left edge of the State field; align the bottom with the bottom of the E-mail Address field.
2. Use the Selection tool (![]() ) to widen the button by dragging the midpoint handle on its right edge so that the edge aligns with the column guide.
) to widen the button by dragging the midpoint handle on its right edge so that the edge aligns with the column guide.
3. Shorten the button by dragging the midpoint handle on its top edge down until it’s the same height as the E-mail Address field. A Smart Guide is displayed when the edges align and the heights are the same.
4. In the Buttons And Forms panel, enter Submit Form in the Name field, and then press Enter or Return.

5. Make sure that Go To URL is selected below Actions, and then, click the Delete Selected Action button (![]() ), and then click OK to confirm the deletion.
), and then click OK to confirm the deletion.
6. Click the Add New Action For Selected Event (![]() ) button, and then choose Submit Form from the menu.
) button, and then choose Submit Form from the menu.
7. In the URL field, enter mailto:. Make sure you enter a colon after “mailto”. Do not enter a space or a period before or after the colon.
8. Enter your email address after mailto: (for example, [email protected]). This will return the completed form to you.
9. Press Enter or Return to apply the changes, and then choose File > Save.
Exporting an interactive Adobe PDF file
Now that you’ve finished work on the form fields, you’re ready to export an interactive Adobe PDF file, and then test the exported file.
1. Choose File > Export.
2. In the Export dialog box, choose Adobe PDF (Interactive) from the Save As Type menu (Windows) or Format menu (Mac OS). Name the file 14_PDF_Form.pdf and save it to the Lesson14 folder, located inside the Lessons folder within the InDesignCIB folder on your hard drive. Click Save.
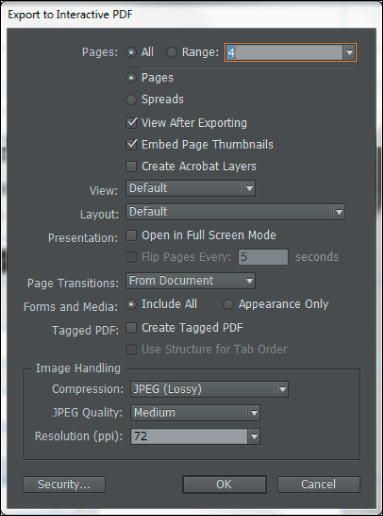
3. In the Export To Interactive PDF dialog box, select Pages and make sure that Include All is selected for Forms And Media and that View After Exporting is selected. Leave all other settings unchanged. Click OK.
If either Adobe Acrobat or Adobe Reader is installed on your computer, the exported PDF file will open automatically, and you can test the fields you created earlier. When you’re done, click the button that emails the filled-out form to you. If you want, modify the settings in the Send Form dialog box and then click Continue to submit the form information, or click Cancel. Return to InDesign.
4. Choose File > Save.
Congratulations! You’ve created a PDF form.
Exploring on your own
Now that you’ve created a simple PDF form, you can explore a little further by creating other kinds of fields and by creating your own custom-designed buttons.
![]() Tip
Tip
To enable the signature field for users of Adobe Reader, the PDF must be Reader Extended using Adobe Acrobat.
1. Open a new document, create a text frame, and then use the Buttons And Forms panel to convert it to a signature field. A signature field in a PDF form lets the user apply a digital signature to the PDF file. Assign the field a name, and then export an Adobe PDF (Interactive) file. You can use Adobe Acrobat to test the signature field by clicking it and then following the onscreen instructions.
2. Use the Ellipse tool (![]() ) to create a small circular frame. Use the Gradient panel to fill the circle with a radial gradient. If you want, use the Swatches panel to change the colors of the gradient. Use the Buttons And Forms panel to convert the frame into a button. Assign the button the Go To URL action and enter a complete URL in the URL field (for example, http://www.adobe.com). To test this button, export an Adobe PDF (Interactive) file and click the button.
) to create a small circular frame. Use the Gradient panel to fill the circle with a radial gradient. If you want, use the Swatches panel to change the colors of the gradient. Use the Buttons And Forms panel to convert the frame into a button. Assign the button the Go To URL action and enter a complete URL in the URL field (for example, http://www.adobe.com). To test this button, export an Adobe PDF (Interactive) file and click the button.
3. Try one of the other prebuilt form fields in the Sample Buttons And Forms panel. Drag one onto the page, and then view its properties in the Buttons And Forms panel. You can use the element as is, or you can modify its appearance, change some of its properties, or both. Export and test the result.
Review questions
1. What panel lets you convert an object into a PDF form field and specify settings for form fields?
2. What action can you assign to a button that enables a viewer of the exported PDF form to send a copy of the filled-out form to an email address?
3. What programs can be used to open and fill out an Adobe PDF form?
Review answers
1. The Buttons And Forms panel (Window > Interactive > Buttons And Forms) lets you convert objects into PDF form fields and specify settings for them.
2. To enable the viewer of a PDF form to return a filled-out form, use the Buttons And Forms panel to assign the Submit Form action to the button. After you assign the Submit Form action, enter mailto: followed by an email address (for example, mailto:[email protected]) in the URL field.
3. You can open and fill out PDF forms using Adobe Acrobat or Adobe Reader. Adobe Acrobat also offers additional features for working with PDF form fields.