
8. Applying Effects, Graphic Styles, and Inserting HTML
No changes need to be made to complete Lesson 8 in the Adobe Muse third-quarter update. However, an efficiency has been added to working with graphic styles, as has a new workflow that allows you to integrate Adobe Edge Animate content.
Adobe Edge Animate Integration
The Adobe Muse update includes the ability to place, using the File > Place command, content that was exported from Adobe Edge Animate. This is a great way to incorporate motion and interactive content to your Muse site using HTML5, CSS, and JavaScript that is exported from Adobe Edge Animate.
Adobe Edge Animate is a program that is currently in public beta, which, much like Adobe Muse, allows you to create content visually, rather than by writing code. Whereas Muse creates websites, Edge can be used to create content used in a website, such as an interactive slideshow or an interactive product showcase.
The first thing necessary to place Edge content in Muse is to create, and then export, that content from Adobe Edge Animate. In order to complete this section, you will either need to download and install Adobe Edge Animate or have content exported from Edge in the .oam file format (currently).
If you would like to download a trial of Adobe Edge Animate, you can currently visit the Adobe Edge Animate product page: http://www.adobe.com/products/edge.html.
1. In Adobe Edge Animate, open your own Edge file or choose File > Open and navigate to the banner.edge file in the Lessons > Update > Lesson08 folder. Click Open.
2. Choose File > Publish Settings. In the Publish Settings dialog box, deselect Web and select InDesign/DPS (currently). Make sure that the InDesign/DPS option is selected to see the settings. You can set publish options such as directory, name, and a poster (initial) image from your assets, if that option exists. Click the Choose Target Directory folder and select the images folder in the Lessons folder. Click the Publish button in the lower-left corner of the dialog box. You can also click Save and choose File > Publish later.
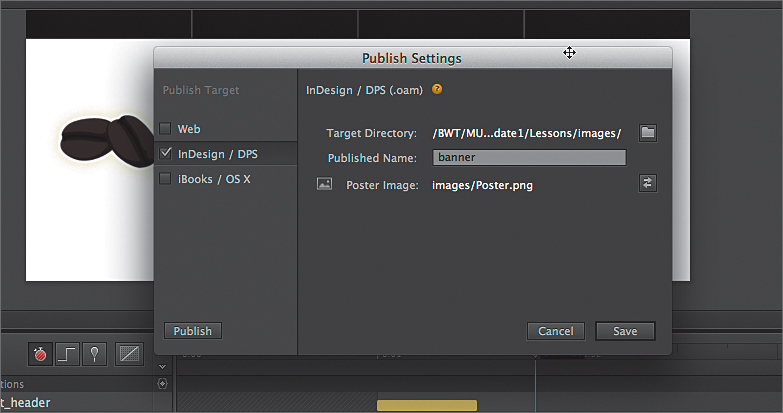
If, in future versions of the Adobe Edge Animate application, there is a Muse option that you can select in the Publish Settings dialog box, select that.
This creates an .oam file that contains the necessary content.
3. Back in Adobe Muse, go to Plan mode and double-click the PRODUCTS page thumbnail to open the page in Design mode.
4. Choose File > Place. In the Import dialog box, locate the banner.oam file in the images folder in the Lessons folder (or wherever you saved it from Adobe Edge Animate), and click Open.
5. With the Place Gun showing, click in a blank area of the page to place the Edge content.

6. With the content selected on the page, open the Align panel (Window > Align or click the word Align in the Control panel), and choose Align To Content Area from the Align To menu. Click the Align Horizontal Centers button (![]() ) to align it horizontally to the page area.
) to align it horizontally to the page area.
7. Click the Preview mode link to see the resulting animation. Click on a product to open Adobe.com. Click the Design mode link to return to editing the page.
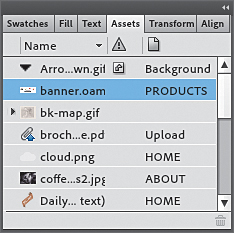
8. Open the Assets panel (Window > Assets) and notice that the .oam file that you placed (ours was named banner.oam) is listed.
If you need to make a change to the Edge content, return to Adobe Edge Animate and make a change to the file. Republish the file, following the steps above, overwriting the initial .oam file. Back in Muse, update the link to the .oam file in the Assets panel by right-clicking and choosing Update Asset.
9. Choose File > Save Site.
Graphic Styles Enhancements
There is a new enhancement to Graphic Styles that is worth mentioning. Graphic styles, swatches, paragraph styles, and character styles can be dropped on content to apply them. This enhancement does not affect the steps in Lesson 8 but can be a useful efficiency.
While working with the Lesson 8 project, try creating a graphic style, such as a rectangle, and applying it to content by dragging the name of the graphic style on top of the rectangle.