
5. Working with Shapes and Color
No changes need to be made to complete Lesson 5 in the third-quarter 2012 update of Adobe Muse. You can, however, now work with guides, which you can use to align content in your pages, as in other Adobe applications. You can also drag a Swatch onto a page item, page, or browser area of a page to apply background fill. You can also drag a Color (via dragging the color preview area just above the RGB edit boxes) onto a page item, page, or browser area of a page to apply background fill. You can also drag a color to the Swatches palette to create a swatch of it.
Ruler Guides
In the section “Drawing with the Rectangle tool,” you align the rectangle to a vertical measurement using the Transform panel. To more easily align content, you can use the new Align panel, but in this case, working with the new guides feature will work best.
On page 123, step 4, after returning from previewing the page, follow the next steps in place of step 5:
1. With the rulers showing (View > Show Rulers), click and drag from the horizontal ruler down below the page area. When the measurement label shows a value of approximately 700, release the mouse. As soon as you release the mouse, the guide is deselected and turns aqua in color.
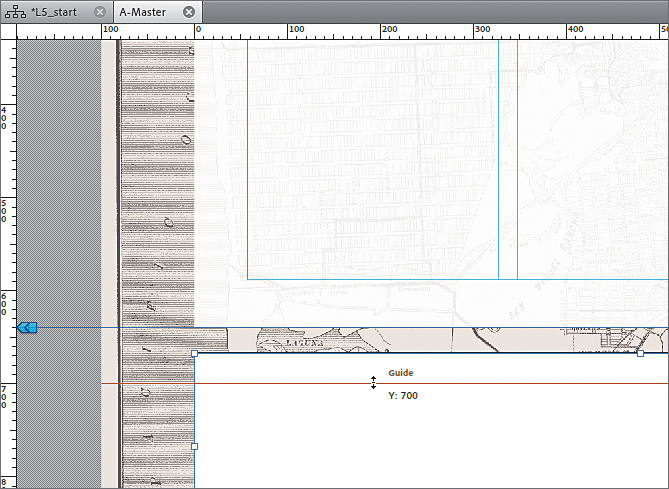
Muse allows you to draw horizontal and vertical guides. Horizontal guides are dragged from the horizontal ruler, and vertical guides are dragged into the page area from the vertical ruler.
You can also create a horizontal guide by double-clicking the vertical ruler, or create a vertical guide by double-clicking the horizontal ruler.
2. Position the pointer over the guide and a tooltip will show the word “Guide.” Click to select it. In the Transform panel (Window > Transform or click the link “Transform” in the Control panel), change the Y value to 685. The guide will be blue when it is selected.
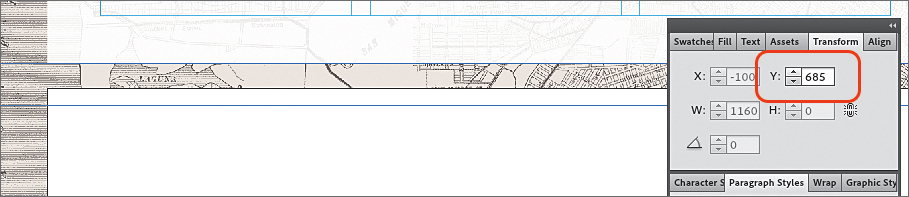
Guides can be positioned two ways: by dragging, or numerically, by changing the Y or X value, depending on the orientation of the guide, in the Transform panel.
3. Choose View > Lock Guides so that you don’t accidentally delete or move it.
You can also hide the guides by choosing View > Hide Guides. Also, if you right-click (Windows) or Ctrl-click (Mac OS) either of the rulers, you can choose to lock, hide, or delete all guides.
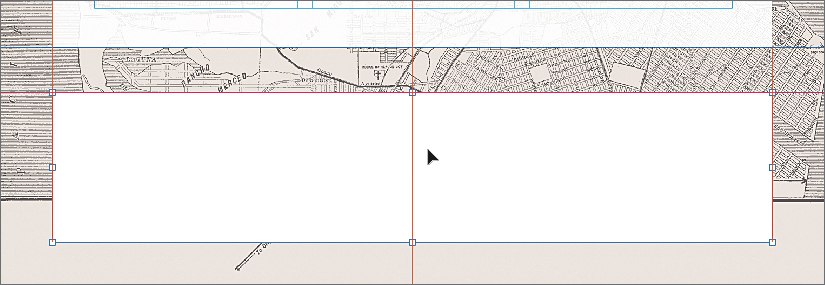
4. Click to select the white rectangle and drag it so that the top edge is snapped (aligned) to the guide. The guide will turn red in color when the rectangle is snapped to it.
Drag-and-Drop Color
Like dragging Paragraph or Character styles onto text frames to apply the style, you can also drag a Swatch onto a page item, page, or browser area of a page to apply background fill. You can also drag a Color (via dragging the color preview area just above the RGB edit boxes) onto a page item, page, or browser area of a page to apply background fill. You can also drag a color to the Swatches palette to create a swatch of it.
While the lesson doesn’t lend itself to inserting this new functionality, replace step 5 on page 132 with the following steps:
1. Click and drag the color preview area (just to the left of the Hex value) into the page area.
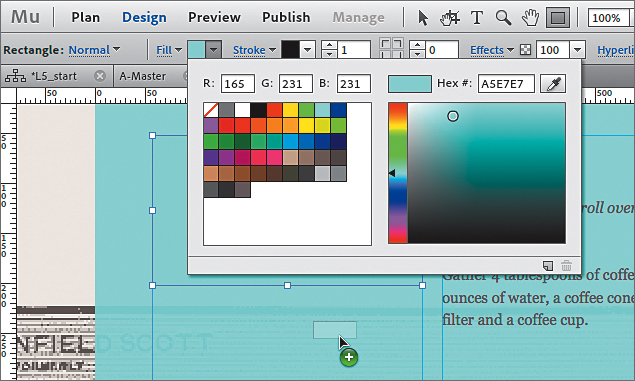
Notice that the color applies to the fill of the page area. When you drag and drop a color or a swatch, the pointer will show a plus (+) next to it when you are about to apply the color to an object. At this time, you can’t apply color or swatches to the stroke of an object or to text.
2. Press the Escape key to hide the Color Picker panel.
3. Choose Edit > Undo Set Fill Color.
4. Select the rectangle with the Selection tool.