8. Handling Advanced User Input
Users interact with Android devices in many ways, including using keyboards, touchscreen gestures, and even voice. Different devices support different input methods and have different hardware. For example, certain devices have hardware keyboards, and others rely only on software keyboards. In this chapter, you will learn about the different input methods available to developers and how you can use them to great effect within your applications.
Working with Textual Input Methods
The Android SDK includes input method framework classes that enable interested developers to use powerful input methods and create their own input methods, such as custom software keyboards and other Input Method Editors (IMEs). Users can download custom IMEs to use on their devices. For example, there’s nothing stopping a developer from creating a custom keyboard with Lord of the Rings–style Elvish characters, smiley faces, or Greek symbols.
![]() Tip
Tip
Most device settings related to input methods are available under the Settings, Language & input menu. Here, users can select the language, configure the custom user dictionary, and make changes to how their keyboards function.
The Android SDK also includes a number of other text input utilities that might benefit application users, such as text prediction, dictionaries, and the clipboard framework, which can be used to enable sophisticated cut-and-paste features in your application for text and much more.
Working with Software Keyboards
Because text input methods are locale-based (different countries use different alphabets and keyboards) and situational (numeric versus alphabetic versus special keys), the Android platform has trended toward software keyboards as opposed to relying on hardware manufacturers to deliver specialized hardware keyboards.
Choosing the Appropriate Software Keyboard
The Android platform has a number of software keyboards available for use. One of the easiest ways to enable your users to enter data efficiently is to specify the type of input expected in each text input field.
![]() Tip
Tip
Many of the code examples provided in this section are taken from the SimpleTextInputTypes application. The source code for this application is provided for download on the book’s website.
For example, to specify an EditText that should take only capitalized textual input, you can set the inputType attribute as follows:
<EditText
android:layout_height="wrap_content"
android:layout_width="match_parent"
android:inputType="text|textCapCharacters">
</EditText>
Figure 8.1 shows a number of EditText controls with different inputType configurations.
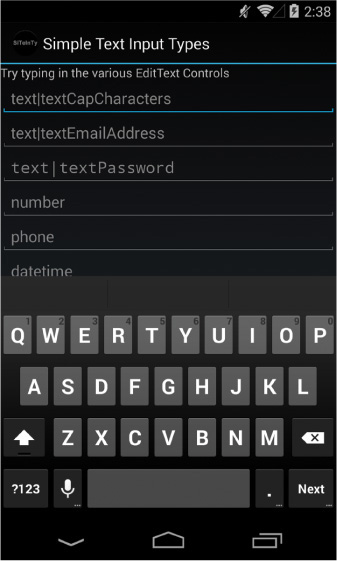
The input type dictates which software keyboard is used by default, and it enforces appropriate rules, such as limiting input to certain characters. Figure 8.2 (left) illustrates what the software keyboard looks like for an EditText control with its inputType attribute set to all capitalized text input. Note that the software keyboard keys are all capitalized. If you were to set the inputType to textCapWords instead, the keyboard would switch to lowercase after the first letter of each word and then back to uppercase after a space. Figure 8.2 (middle) illustrates what the software keyboard looks like for an EditText control with its inputType attribute set to number. Figure 8.2 (right) illustrates what the software keyboard looks like for an EditText control with its inputType attribute set to textual input, where each sentence begins with a capital letter and the text can be multiple lines.
Depending on the user’s keyboard settings (specifically, if the user has enabled the Show correction suggestions and Auto-correction options in the Android Keyboard settings of the device), the user might also see suggested words or spelling fixes while typing. For a complete list of inputType attribute values and their uses, see http://developer.android.com/reference/android/R.attr.html#inputType.
![]() Tip
Tip
You can also have your Activity react to the display of software keyboards (to adjust where fields are displayed, for example) by requesting the WindowManager as a system Service and modifying the layout parameters associated with the softInputMode field.
For more fine-tuned control over input methods, see the android.view.inputmethod.InputMethodManager class.
Providing Custom Software Keyboards
If you are interested in developing your own software keyboards, we highly recommend the following references:
![]() IMEs are implemented as an Android
IMEs are implemented as an Android Service. Begin by reviewing the Android packages called android.inputmethodservice and android.view.inputmethod, which can be used to implement custom input methods.
![]() The SoftKeyboard legacy sample application in the Android SDK provides an implementation of a software keyboard.
The SoftKeyboard legacy sample application in the Android SDK provides an implementation of a software keyboard.
![]() The Android Developers Blog has articles on on-screen input methods (http://android-developers.blogspot.com/2009/04/updating-applications-for-on-screen.html) and creating an input method (http://android-developers.blogspot.com/2009/04/creating-input-method.html). Don’t forget to add voice typing to your input method (http://android-developers.blogspot.com/2011/12/add-voice-typing-to-your-ime.html).
The Android Developers Blog has articles on on-screen input methods (http://android-developers.blogspot.com/2009/04/updating-applications-for-on-screen.html) and creating an input method (http://android-developers.blogspot.com/2009/04/creating-input-method.html). Don’t forget to add voice typing to your input method (http://android-developers.blogspot.com/2011/12/add-voice-typing-to-your-ime.html).
Working with Text Prediction and User Dictionaries
Text prediction is a powerful and flexible feature that is available on Android devices. We’ve already talked about many of these technologies in other parts of this book, but they merit mentioning in this context as well:
![]() In Introduction to Android Application Development: Android Essentials, Fourth Edition, you learned how to use
In Introduction to Android Application Development: Android Essentials, Fourth Edition, you learned how to use AutoCompleteTextView and MultiAutoCompleteTextView controls to help users input common words and strings.
![]() In Chapter 3, “Leveraging SQLite Application Databases,” you learned how to tie an
In Chapter 3, “Leveraging SQLite Application Databases,” you learned how to tie an AutoCompleteTextView control to an underlying SQLite database table.
![]() In Introduction to Android Application Development: Android Essentials, Fourth Edition, you learned about the
In Introduction to Android Application Development: Android Essentials, Fourth Edition, you learned about the UserDictionary content provider (android.provider.UserDictionary), which can be used to add words to the user’s custom dictionary of commonly used words.
Using the Clipboard Framework
On Android devices running Android 3.0 and higher (API Level 11), developers can access the clipboard to perform copy and paste actions. Previous to this, the clipboard had no public API. To leverage the clipboard in your applications, you need to use the clipboard framework of the Android SDK. You can copy and paste different data structures—everything from text to references to files to application shortcuts—as Intent objects. The clipboard holds only a single set of clipped data at a time, and the clipboard is shared across all applications, so you can easily copy and paste content between applications.
Copying Data to the System Clipboard
To save data to the system clipboard, call getSystemService() and request the clipboard Service’s ClipboardManager (android.content.ClipboardManager). Then, create a ClipData (android.content.ClipData) object and populate it with the data you want to save to the clipboard. Finally, commit the clip using the ClipboardManager class method setPrimaryClip().
Pasting Data from the System Clipboard
To retrieve data from the system clipboard, call getSystemService() and request the clipboard Service’s ClipboardManager (android.content.ClipboardManager). You can determine whether the clipboard contains data by using the hasPrimaryClip() method. After you have determined whether there is valid data in the system clipboard, you can inspect its description and type and ultimately retrieve the ClipData object using the getPrimaryClip() method.
Handling User Events
You’ve seen how to do basic event handling in some of the previous control examples. For instance, you know how to handle when a user clicks on a button. There are a number of other events generated by various actions the user might take. This section briefly introduces you to some of these events. First, though, we need to talk about the input states in Android.
Listening for Touch Mode Changes
The Android screen can be in one of two states. The state determines how the focus on View controls is handled. When touch mode is on, typically only objects such as EditText get focus when selected. Other objects, because they can be selected directly by the user tapping on the screen, won’t take focus but instead trigger their action, if any. When not in touch mode, however, the user can change focus among even more object types. These include buttons and other views that normally need only a click to trigger their action.
Knowing what mode the screen is in is useful if you want to handle certain events. If, for instance, your application relies on the focus or lack of focus on a particular control, your application might need to know whether the device is in touch mode because the focus behavior is likely different.
Your application can register to find out when the touch mode changes by using the addOnTouchModeChangeListener() method in the android.view.ViewTreeObserver class. Your application needs to implement the ViewTreeObserver.OnTouchModeChangeListener class to listen for these events. Here is a sample implementation:
View all = findViewById(R.id.events_screen);
ViewTreeObserver vto = all.getViewTreeObserver();
vto.addOnTouchModeChangeListener(
new ViewTreeObserver.OnTouchModeChangeListener() {
public void onTouchModeChanged(
boolean isInTouchMode) {
events.setText("Touch mode: " + isInTouchMode);
}
});
In this example, the top-level View in the layout is retrieved. A ViewTreeObserver listens to a View and all its child View objects. Using the top-level View of the layout means the ViewTreeObserver listens to events in the entire layout. An implementation of the onTouchModeChanged() method provides the ViewTreeObserver with a method to call when the touch mode changes. It merely passes in which mode the View is now in.
In this example, the mode is written to a TextView named events. We use this same TextView in further event handling examples to show on the screen which events our application has been told about. The ViewTreeObserver can enable applications to listen to a few other events on an entire screen.
By running this sample code, we can demonstrate the touch mode changing to true immediately when the user taps on the touchscreen. Conversely, when the user chooses to use any other input method, the application reports that touch mode is false immediately after the input event, such as a key being pressed.
Listening for Events on the Entire Screen
You saw in the last section how your application can watch for changes to the touch mode state of the screen using the ViewTreeObserver class. The ViewTreeObserver also provides other events that can be watched for on a full screen or an entire View and all of its children. Some of these are:
![]()
Draw or PreDraw: Get notified before the View and its children are drawn.
![]()
GlobalLayout: Get notified when the layout of the View and its children might change, including visibility changes.
![]()
GlobalFocusChange: Get notified when the focus in the View and its children changes.
Your application might want to perform some actions before the screen is drawn. You can do this by calling the method addOnPreDrawListener() with an implementation of the ViewTreeObserver.OnPreDrawListener class interface or by calling the method addOnDrawListener() with an implementation of the ViewTreeObserver.OnDrawListener class interface.
Similarly, your application can find out when the layout or visibility of a View has changed. This might be useful if your application dynamically changes the display contents of a View and you want to check to see whether a View still fits on the screen. Your application needs to provide an implementation of the ViewTreeObserver.OnGlobalLayoutListener class interface to the addGlobalLayoutListener() method of the ViewTreeObserver object.
Finally, your application can register to find out when the focus changes between a View control and any of its child View controls. Your application might want to do this to monitor how a user moves about on the screen. When in touch mode, though, there might be fewer focus changes than when touch mode is not set. In this case, your application needs to provide an implementation of the ViewTreeObserver.OnGlobalFocusChangeListener class interface to the addGlobalFocusChangeListener() method. Here is a sample implementation of this:
vto.addOnGlobalFocusChangeListener(new
ViewTreeObserver.OnGlobalFocusChangeListener() {
public void onGlobalFocusChanged(
View oldFocus, View newFocus) {
if (oldFocus != null && newFocus != null) {
events.setText("Focus
from: " +
oldFocus.toString() + "
to: " +
newFocus.toString());
}
}
});
This example uses the same ViewTreeObserver, vto, and TextView events as the previous example. It shows that both the currently focused View object and the previously focused View object are passed to the listener as method parameters. From here, your application can perform needed actions.
If your application merely wants to check values after the user has modified a particular View object, though, you might need to register to listen for focus changes only of that particular View object. This is discussed later in this chapter.
Listening for Long Clicks
You can add a context menu or a contextual action bar to a View that is activated when the user performs a long click on that View. A long click is typically when a user presses on the touchscreen and holds a finger there until an action is performed. However, a long press event can also be triggered if the user navigates there with a non-touch method, such as via a keyboard or a button. This action is also often called a press-and-hold action.
Although the context menu is a great typical use case for the long-click event, you can listen for the long-click event and perform any action you want. However, this is the same event that triggers the context menu. If you’ve already added a context menu to a View, you might not want to listen for the long-click event as other actions or side effects might confuse the user or even prevent the context menu or contextual action bar from showing. As always with good user interface design, try to be consistent for usability’s sake.
![]() Tip
Tip
Usually a long click is an alternative action to a standard click. If a left-click on a computer is the standard click, a long click can be compared to a right-click.
Your application can listen to the long-click event on any View. The following example demonstrates how to listen for a long-click event on a Button control:
Button long_press = (Button) findViewById(R.id.long_press);
long_press.setOnLongClickListener(new View.OnLongClickListener() {
public boolean onLongClick(View v) {
events.setText("Long click: " + v.toString());
return true;
}
});
First, the Button object is requested by providing its identifier. Then the setOnLongClickListener() method is called with our implementation of the View.OnLongClickListener class interface. The View on which the user long-clicked is passed in to the onLongClick() event handler. Here again we use the same TextView as before to display text saying that a long click occurred.
Listening for Focus Changes
We have already discussed listening for focus changes on an entire screen. All View objects, though, can also trigger a call to listeners when their particular focus state changes. You do this by providing an implementation of the View.OnFocusChangeListener class to the setOnFocusChangeListener() method. The following is an example of how to listen for focus change events with an EditText control:
TextView focus = (TextView) findViewById(R.id.text_focus_change);
focus.setOnFocusChangeListener(new View.OnFocusChangeListener() {
public void onFocusChange(View v, boolean hasFocus) {
if (hasFocus) {
if (mSaveText != null) {
((TextView)v).setText(mSaveText);
}
} else {
mSaveText = ((TextView)v).getText().toString();
((TextView)v).setText("");
}
}
In this implementation, we also use a private member variable of type String for mSaveText. After retrieving the EditText control as a TextView, we do one of two things. If the user moves focus away from the control, we store the text in mSaveText and set the text to empty. If the user changes focus to the control, though, we restore this text. This has the amusing effect of hiding the text the user entered when the control is not active. This can be useful on a form on which a user needs to make multiple, lengthy text entries but you want to provide an easy way for the user to see which one to edit. It is also useful for demonstrating a purpose for the focus listeners on a text entry. Other uses might include validating text a user enters after the user navigates away or prefilling the text entry the first time the user navigates to it with something else entered.
Working with Gestures
Android devices often rely on touchscreens for user input. Users are now quite comfortable using common finger gestures to operate their devices. Android applications can detect and react to one-finger (single-touch) and two-finger (multitouch) gestures. Users can also use gestures with the drag-and-drop framework to enable the arrangement of View controls on a device screen.
![]() Note
Note
Even early Android devices supported simple single-touch gestures. Support for multitouch gestures was added in the Android 2.2 SDK and is available only on devices with capacitive touchscreen hardware. Some capacitive hardware is capable of tracking up to ten different points at once.
One of the reasons that gestures can be a bit tricky is that a gesture can be made of multiple touch events or motions. Different sequences of motion add up to different gestures. For example, a fling gesture involves the user pressing a finger down on the screen, swiping across the screen, and lifting the finger up off the screen while the swipe is still in motion (that is, without slowing down to stop before lifting the finger). Each of these steps can trigger motion events to which applications can react.
Detecting User Motions within a View
By now you’ve come to understand that Android application user interfaces are built using different types of View controls. Developers can handle gestures much as they do click events within a View control using the setOnClickListener() and setOnLongClickListener() methods. Instead, the onTouchEvent() callback method is used to detect that some motion has occurred within the View region.
The onTouchEvent() callback method has a single parameter, a MotionEvent object. The MotionEvent object contains all sorts of details about what kind of motion occurs in the View, enabling the developer to determine what sort of gesture is happening by collecting and analyzing many consecutive MotionEvent objects. You can use all of the MotionEvent data to recognize and detect every kind of gesture you can possibly imagine. Alternatively, you can use built-in gesture detectors provided in the Android SDK to detect common user motions in a consistent fashion. Android currently has two different classes that can detect navigational gestures:
![]() The
The GestureDetector class can be used to detect common single-touch gestures.
![]() The
The ScaleGestureDetector can be used to detect multitouch scale gestures.
It is likely that more gesture detectors will be added in future versions of the Android SDK. You can also implement your own gesture detectors to detect any gestures not supported by the built-in ones. For example, you might want to create a two-fingered rotate gesture to, say, rotate an image, or a three-fingered swipe gesture that brings up an options menu.
In addition to common navigational gestures, you can use the android.gesture package with the GestureOverlayView to recognize commandlike gestures. For instance, you can create an S-shaped gesture that brings up a search or a zigzag gesture that clears the screen on a drawing app. Tools are available for recording and creating libraries of this style of gesture. As it uses an overlay for detection, it isn’t well suited for all types of applications. This package was introduced in API Level 4.
![]() Warning
Warning
The type and sensitivity of the touchscreen can vary by device. Different devices can detect different numbers of touch points simultaneously, which affects the complexity of gestures you can support.
Handling Common Single-Touch Gestures
Introduced in API Level 1, the GestureDetector class can be used to detect gestures made by a single finger. Some common single-finger gestures supported by the GestureDetector class include:
![]()
onDown: Called when the user first presses the touchscreen.
![]()
onShowPress: Called after the user first presses the touchscreen but before lifting the finger or moving it around on the screen; used to visually or audibly indicate that the press has been detected.
![]()
onSingleTapUp: Called when the user lifts up (using the up MotionEvent) from the touchscreen as part of a single-tap event.
![]()
onSingleTapConfirmed: Called when a single-tap event occurs.
![]()
onDoubleTap: Called when a double-tap event occurs.
![]()
onDoubleTapEvent: Called when an event within a double-tap gesture occurs, including any down, move, or up MotionEvent.
![]()
onLongPress: Similar to onSingleTapUp, but called if the user holds down a finger long enough to not be a standard click but also without any movement.
![]()
onScroll: Called after the user presses and then moves a finger in a steady motion before lifting the finger. This is commonly called dragging.
![]()
onFling: Called after the user presses and then moves a finger in an accelerating motion before lifting it. This is commonly called a flick gesture and usually results in some motion continuing after the user lifts the finger.
You can use the interfaces available with the GestureDetector class to listen for specific gestures such as single and double taps (see GestureDetector.OnDoubleTapListener), as well as scrolls and flings (see the documentation for GestureDetector.OnGestureListener). The scrolling gesture involves touching the screen and moving a finger around on it. The fling gesture, on the other hand, causes (though not automatically) the object to continue to move even after the finger has been lifted from the screen. This gives the user the impression of throwing or flicking the object around on the screen.
![]() Tip
Tip
You can use the GestureDetector.SimpleOnGestureListener class to listen to any and all of the gestures recognized by the GestureDetector.
Let’s look at a simple example. Let’s assume you have a game screen that enables the user to perform gestures to interact with a graphic on the screen. We can create a custom View class called GameAreaView that can dictate how a bitmap graphic moves around within the game area based upon each gesture. The GameAreaView class can use the onTouchEvent() method to pass along MotionEvent objects to a GestureDetector. In this way, the GameAreaView can react to simple gestures, interpret them, and make the appropriate changes to the bitmap, including moving it from one location to another on the screen.
![]() Tip
Tip
How the gestures are interpreted and what actions they cause are completely up to the developer. You can, for example, interpret a fling gesture and make the bitmap graphic disappear . . . but does that make sense? Not really. It’s important to always make the gesture jibe well with the resulting operation in the application so that users are not confused. Users are now accustomed to specific screen behavior based on certain gestures, so it’s best to use the expected convention, too.
In this case, the GameAreaView class interprets gestures as follows:
![]() A double-tap gesture causes the bitmap graphic to return to its initial position.
A double-tap gesture causes the bitmap graphic to return to its initial position.
![]() A scroll gesture causes the bitmap graphic to “follow” the motion of the finger.
A scroll gesture causes the bitmap graphic to “follow” the motion of the finger.
![]() A fling gesture causes the bitmap graphic to “fly” in the direction of the fling.
A fling gesture causes the bitmap graphic to “fly” in the direction of the fling.
![]() Tip
Tip
Many of the code examples provided in this section are taken from the SimpleGestures application. The source code for this application is provided for download on the book’s website.
To make these gestures work, the GameAreaView class needs to include the appropriate gesture detector, which triggers any operations upon the bitmap graphic. Based upon the specific gestures detected, the GameAreaView class must perform all translation animations and other graphical operations applied to the bitmap. To wire up the GameAreaView class for gesture support, we need to implement several important methods:
![]() The class constructor must initialize any gesture detectors and bitmap graphics.
The class constructor must initialize any gesture detectors and bitmap graphics.
![]() The
The onTouchEvent() method must be overridden to pass the MotionEvent data to the gesture detector for processing.
![]() The
The onDraw() method must be overridden to draw the bitmap graphic in the appropriate position at any time.
![]() Various methods are needed to perform the graphics operations required to make a bitmap move around on the screen, fly across the screen, and reset its location based upon the data provided by the specific gesture.
Various methods are needed to perform the graphics operations required to make a bitmap move around on the screen, fly across the screen, and reset its location based upon the data provided by the specific gesture.
All these tasks are handled by our GameAreaView class definition:
public class GameAreaView extends View {
private static final String DEBUG_TAG =
"SimpleGestures->GameAreaView";
private GestureDetector gestures;
private Matrix translate;
private Bitmap droid;
private Matrix animateStart;
private Interpolator animateInterpolator;
private long startTime;
private long endTime;
private float totalAnimDx;
private float totalAnimDy;
public GameAreaView(Context context, int iGraphicResourceId) {
super(context);
translate = new Matrix();
GestureListener listener = new GestureListener(this);
gestures = new GestureDetector(context, listener, null, true);
droid = BitmapFactory.decodeResource(getResources(),
iGraphicResourceId);
}
@Override
public boolean onTouchEvent(MotionEvent event) {
boolean retVal = false;
retVal = gestures.onTouchEvent(event);
return retVal;
}
@Override
protected void onDraw(Canvas canvas) {
Log.v(DEBUG_TAG, "onDraw");
canvas.drawBitmap(droid, translate, null);
}
public void onResetLocation() {
translate.reset();
invalidate();
}
public void onMove(float dx, float dy) {
translate.postTranslate(dx, dy);
invalidate();
}
public void onAnimateMove(float dx, float dy, long duration) {
animateStart = new Matrix(translate);
animateInterpolator = new OvershootInterpolator();
startTime = android.os.SystemClock.elapsedRealtime();
endTime = startTime + duration;
totalAnimDx = dx;
totalAnimDy = dy;
post(new Runnable() {
@Override
public void run() {
onAnimateStep();
}
});
}
private void onAnimateStep() {
long curTime = android.os.SystemClock.elapsedRealtime();
float percentTime = (float) (curTime - startTime) /
(float) (endTime - startTime);
float percentDistance = animateInterpolator
.getInterpolation(percentTime);
float curDx = percentDistance * totalAnimDx;
float curDy = percentDistance * totalAnimDy;
translate.set(animateStart);
onMove(curDx, curDy);
if (percentTime < 1.0f) {
post(new Runnable() {
@Override
public void run() {
onAnimateStep();
}
});
}
}
}
As you can see, the GameAreaView class keeps track of where the bitmap graphic should be drawn at any time. The onTouchEvent() method is used to capture motion events and pass them along to a gesture detector whose GestureListener we must implement as well (more on this in a moment). Typically, each method of the GameAreaView applies some operation to the bitmap graphic and then calls the invalidate() method, forcing the View to be redrawn.
Now we turn our attention to the methods required to implement specific gestures:
![]() For double-tap gestures, we implement a method called
For double-tap gestures, we implement a method called onResetLocation() to draw the bitmap graphic in its original location.
![]() For scroll gestures, we implement a method called
For scroll gestures, we implement a method called onMove() to draw the bitmap graphic in a new location. Note that scrolling can occur in any direction—it simply refers to a finger swipe on the screen.
![]() For fling gestures, things get a little tricky. To animate motion on the screen smoothly, we used a chain of asynchronous calls and a built-in Android interpolator to calculate the location in which to draw the graphic based upon how long it has been since the animation started. See the
For fling gestures, things get a little tricky. To animate motion on the screen smoothly, we used a chain of asynchronous calls and a built-in Android interpolator to calculate the location in which to draw the graphic based upon how long it has been since the animation started. See the onAnimateMove() and onAnimateStep() methods for the full implementation of fling animation.
Now we need to implement our GestureListener class to interpret the appropriate gestures and call the GameAreaView methods we just implemented. Here’s an implementation of the GestureListener class that our GameAreaView class can use:
private class GestureListener extends
GestureDetector.SimpleOnGestureListener {
GameAreaView view;
public GestureListener(GameAreaView view) {
this.view = view;
}
@Override
public boolean onDown(MotionEvent e) {
return true;
}
@Override
public boolean onFling(MotionEvent e1, MotionEvent e2,
final float velocityX, final float velocityY) {
final float distanceTimeFactor = 0.4f;
final float totalDx = (distanceTimeFactor * velocityX / 2);
final float totalDy = (distanceTimeFactor * velocityY / 2);
view.onAnimateMove(totalDx, totalDy,
(long) (1000 * distanceTimeFactor));
return true;
}
@Override
public boolean onDoubleTap(MotionEvent e) {
view.onResetLocation();
return true;
}
@Override
public boolean onScroll(MotionEvent e1, MotionEvent e2,
float distanceX, float distanceY) {
view.onMove(-distanceX, -distanceY);
return true;
}
}
Note that you must return true for any gesture or motion event that you want to detect. Therefore, you must return true in the onDown() method as it happens at the beginning of a scroll-type gesture. Most of the implementation of the GestureListener class methods involves our interpretation of the data for each gesture. For example:
![]() We react to double taps by resetting the bitmap to its original location using the
We react to double taps by resetting the bitmap to its original location using the onResetLocation() method of our GameAreaView class.
![]() We use the distance data provided in the
We use the distance data provided in the onScroll() method to determine the direction to use in the movement to pass in to the onMove() method of the GameAreaView class.
![]() We use the velocity data provided in the
We use the velocity data provided in the onFling() method to determine the direction and speed to use in the movement animation of the bitmap. The timeDistanceFactor variable with a value of 0.4 is subjective; it gives the resulting slide-to-a-stop animation enough time to be visible but is short enough to be controllable and responsive. You can think of it as a high-friction surface. This information is used by the animation sequence implemented in the onAnimateMove() method of the GameAreaView class.
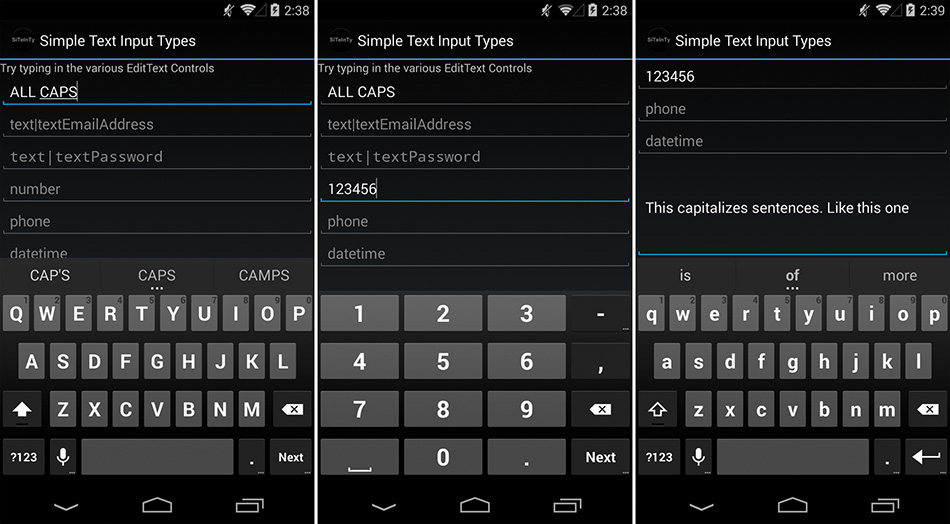
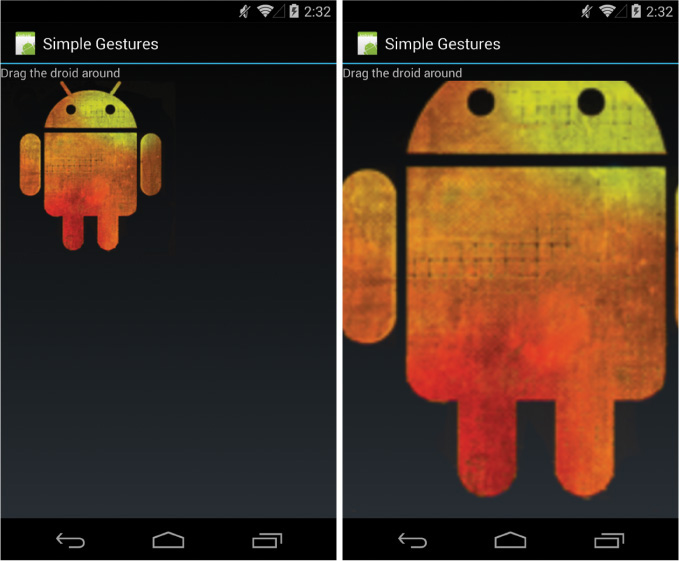
Now that we have implemented the GameAreaView class in its entirety, you can display it on a screen. For example, you might create an Activity that has a user interface with a FrameLayout control and add an instance of a GameAreaView using the addView() method. Figure 8.3 shows a gesture example of dragging a droid around a screen.
![]() Tip
Tip
To support the broadest range of devices, we recommend supporting simple, one-fingered gestures and providing alternative navigational items for devices that don’t support multitouch gestures. However, users are beginning to expect support for multitouch gestures now, so use them where you can and where they make sense. Resistive touchscreens remain uncommon, typically appearing only on lower-end devices.
Handling Common Multitouch Gestures
Introduced in API Level 8 (Android 2.2), the ScaleGestureDetector class can be used to detect two-fingered scale gestures. The scale gesture enables the user to move two fingers toward and away from each other. Moving the fingers apart is considered scaling up; moving the fingers together is considered scaling down. This is the “pinch-to-zoom” style often employed by map and photo applications.
![]() Tip
Tip
You can use the ScaleGestureDetector.SimpleOnScaleGestureListener class to detect scale gestures detected by the ScaleGestureDetector.
Let’s look at another example. Again, we use the custom View class called GameAreaView, but this time we handle the multitouch scale event. In this way, the GameAreaView can react to scale gestures, interpret them, and make the appropriate changes to the bitmap, including growing or shrinking it on the screen.
![]() Tip
Tip
Many of the code examples provided in this section are taken from the SimpleMultiTouchGesture application. The source code for this application is provided for download on the book’s website.
To handle scale gestures, the GameAreaView class needs to include the appropriate gesture detector, a ScaleGestureDetector. The GameAreaView class needs to be wired up for scale gesture support similarly to the single-touch gestures implemented earlier, including initializing the gesture detector in the class constructor, overriding the onTouchEvent() method to pass the MotionEvent objects to the gesture detector, and overriding the onDraw() method to draw the View appropriately as necessary. We also need to update the GameAreaView class to keep track of the bitmap graphic size (using a Matrix) and provide a helper method for growing or shrinking the graphic. Here is the new implementation of the GameAreaView class with scale gesture support:
public class GameAreaView extends View {
private ScaleGestureDetector multiGestures;
private Matrix scale;
private Bitmap droid;
public GameAreaView(Context context, int iGraphicResourceId) {
super(context);
scale = new Matrix();
GestureListener listener = new GestureListener(this);
multiGestures = new ScaleGestureDetector(context, listener);
droid = BitmapFactory.decodeResource(getResources(),
iGraphicResourceId);
}
public void onScale(float factor) {
scale.preScale(factor, factor);
invalidate();
}
@Override
protected void onDraw(Canvas canvas) {
Matrix transform = new Matrix(scale);
float width = droid.getWidth() / 2;
float height = droid.getHeight() / 2;
transform.postTranslate(-width, -height);
transform.postConcat(scale);
transform.postTranslate(width, height);
canvas.drawBitmap(droid, transform, null);
}
@Override
public boolean onTouchEvent(MotionEvent event) {
boolean retVal = false;
retVal = multiGestures.onTouchEvent(event);
return retVal;
}
}
As you can see, the GameAreaView class keeps track of what size the bitmap should be at any time using the Matrix variable called scale. The onTouchEvent() method is used to capture motion events and pass them along to a ScaleGestureDetector gesture detector. As before, the onScale() helper method of the GameAreaView applies some scaling to the bitmap graphic and then calls the invalidate() method, forcing the View to be redrawn.
Now let’s take a look at the GestureListener class implementation necessary to interpret the scale gestures and call the GameAreaView methods we just implemented. Here’s the implementation of the GestureListener class:
private class GestureListener implements
ScaleGestureDetector.OnScaleGestureListener {
GameAreaView view;
public GestureListener(GameAreaView view) {
this.view = view;
}
@Override
public boolean onScale(ScaleGestureDetector detector) {
float scale = detector.getScaleFactor();
view.onScale(scale);
return true;
}
@Override
public boolean onScaleBegin(ScaleGestureDetector detector) {
return true;
}
@Override
public void onScaleEnd(ScaleGestureDetector detector) {
}
}
Remember that you must return true for any gesture or motion event that you want to detect. Therefore, you must return true in the onScaleBegin() method as it happens at the beginning of a scale-type gesture. Most of the implementation of the GestureListener methods involves our interpretation of the data for the scale gesture. Specifically, we use the scale factor (provided by the getScaleFactor() method) to calculate whether we should shrink or grow the bitmap graphic, and by how much. We pass this information to the onScale() helper method we just implemented in the GameAreaView class.
Now, if you were to use the GameAreaView class in your application, scale gestures might look something like Figure 8.4.
![]() Note
Note
The Android emulator does not currently support multitouch input, although there is experimental support in the works. You will have to run and test multitouch input such as the scale gesture using a device running Android 2.2 or higher.
Making Gestures Look Natural
Gestures can enhance your Android application user interfaces in new, interesting, and intuitive ways. Closely mapping the operations being performed on the screen to the user’s finger motion makes a gesture feel natural and intuitive. Making application operations look natural requires some experimentation on the part of the developer. Keep in mind that devices vary in processing power, and this might be a factor in making things seem natural. Minimal processing, even on fast devices, will help keep gestures and the reaction to them smooth and responsive, and thus natural-feeling.
Using the Drag-and-Drop Framework
On Android devices running Android 3.0 and higher (API Level 11), developers can access the drag-and-drop framework to perform drag-and-drop actions. You can drag and drop View controls within the scope of a screen or Activity class.
The drag-and-drop process basically works like this:
![]() The user triggers a drag operation. How this is done depends on the application, but long clicks are a reasonable option for selecting a
The user triggers a drag operation. How this is done depends on the application, but long clicks are a reasonable option for selecting a View for a drag under the appropriate conditions.
![]() The data for the selected
The data for the selected View control is packaged in a ClipData object (also used by the clipboard framework), and the View.DragShadowBuilder class is used to generate a little visual representation of the item being dragged. For example, if you were dragging a filename into a directory bucket, you might include a little icon of a file.
![]() You call the
You call the startDrag() method on the View control to be dragged. This starts a drag event. The system signals a drag event with ACTION_DRAG_STARTED, which listeners can catch.
![]() There are a number of events that occur during a drag that your application can react to. The
There are a number of events that occur during a drag that your application can react to. The ACTION_DRAG_ENTERED event can be used to adjust the screen controls to highlight other View controls that the dragged View control might want to be dragged over to. The ACTION_DRAG_LOCATION event can be used to determine where the dragged View is on the screen. The ACTION_DRAG_EXITED event can be used to reset any screen controls that were adjusted in the ACTION_DRAG_ENTERED event.
![]() When the user ends the drag operation by releasing the shadow item over a specific target
When the user ends the drag operation by releasing the shadow item over a specific target View on the screen, the system signals a drop event with ACTION_DROP, which listeners can catch. Any data can be retrieved using the getClipData() method.
For more information about the drag-and-drop framework, see the Android SDK documentation. There you can also find a great example of using the drag-and-drop framework called DragAndDropDemo.java.
Handling Screen Orientation Changes
Android devices have both landscape and portrait modes and can seamlessly transition between these orientations. The Android operating system automatically handles these changes for your application, if you so choose. You can also provide alternative resources, such as different layouts, for portrait and landscape modes. Also, you can directly access device sensors such as the accelerometer, which we talk about in Chapter 15, “Accessing Android’s Hardware Sensors,” to capture device orientation along three axes.
However, if you want to listen for simple screen orientation changes programmatically and have your application react to them, you can use the OrientationEventListener class to do this within your Activity.
![]() Tip
Tip
Many of the code examples provided in this section are taken from the SimpleOrientation application. The source code for this application is provided for download on the book’s website.
![]() Warning
Warning
Orientation changes are best tested on real devices, not with the emulator.
Implementing orientation event handling in your Activity is simple. Simply instantiate an OrientationEventListener and provide its implementation. For example, the following Activity class called SimpleOrientationActivity logs orientation information to LogCat:
public class SimpleOrientationActivity extends Activity {
OrientationEventListener mOrientationListener;
@Override
public void onCreate(Bundle savedInstanceState) {
super.onCreate(savedInstanceState);
setContentView(R.layout.main);
mOrientationListener = new OrientationEventListener(this,
SensorManager.SENSOR_DELAY_NORMAL) {
@Override
public void onOrientationChanged(int orientation) {
Log.v(DEBUG_TAG,
"Orientation changed to " + orientation);
}
};
if (mOrientationListener.canDetectOrientation() == true) {
Log.v(DEBUG_TAG, "Can detect orientation");
mOrientationListener.enable();
} else {
Log.v(DEBUG_TAG, "Cannot detect orientation");
mOrientationListener.disable();
}
}
@Override
protected void onDestroy() {
super.onDestroy();
mOrientationListener.disable();
}
}
You can set the rate to check for orientation changes to a variety of different values. There are other rate values appropriate for game use and other purposes. The default rate, SENSOR_DELAY_NORMAL, is most appropriate for simple orientation changes. Other values, such as SENSOR_DELAY_UI and SENSOR_DELAY_GAME, might make sense for your application.
After you have a valid OrientationEventListener object, you can check if it can detect orientation changes using the canDetectOrientation() method, and enable and disable the listener using its enable() and disable() methods.
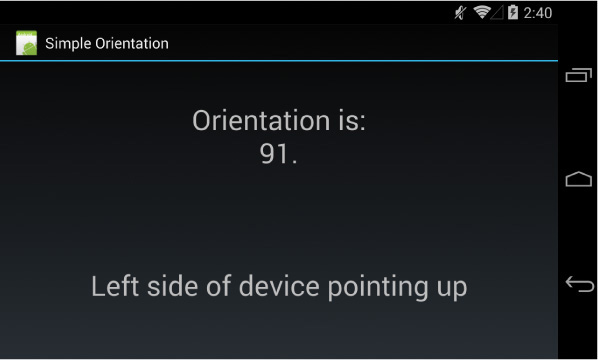
The OrientationEventListener has a single callback method, which enables you to listen for orientation transitions, the onOrientationChanged() method. This method has a single parameter, an integer. This integer normally represents the device tilt as a number between 0 and 359:
![]() A result of
A result of ORIENTATION_UNKNOWN (-1) means the device is flat (perhaps on a table) and the orientation is unknown.
![]() A result of
A result of 0 means the device is in its “normal” orientation, with the top of the device facing in the up direction. (“Normal” is defined by the device manufacturer. You need to test on each device to find out for sure what “normal” means.)
![]() A result of
A result of 90 means the device is tilted 90 degrees, with the left side of the device facing in the up direction.
![]() A result of
A result of 180 means the device is tilted 180 degrees, with the bottom side of the device facing in the up direction (upside down).
![]() A result of
A result of 270 means the device is tilted 270 degrees, with the right side of the device facing in the up direction.
Figure 8.5 shows an example of how the device orientation might read when the device is tilted to the right by 91 degrees.
Summary
The Android platform enables great flexibility when it comes to ways that users can provide input to the device. Developers benefit from the fact that many powerful input methods are built into the View controls themselves, just waiting to be leveraged. Applications can take advantage of built-in input methods, such as software keyboards, or can customize them for special purposes. The Android framework also includes powerful features, such as a clipboard Service, gesture support, and a drag-and-drop framework, that your applications can use. It is important to support a variety of input methods in your applications, as users often have distinct preferences and not all methods are available on all devices.
Quiz Questions
1. True or false: IME stands for Input Method Editor.
2. Name the observer discussed in this chapter that listens to a View and all its child View objects.
3. What are two classes that are able to detect navigational gestures?
4. What method is called for a dragging single-finger gesture?
5. True or false: The MultiGestureDetector class can be used to detect two-fingered scale gestures.
Exercises
1. Use the online documentation to create a list of the core gestures supported by Android.
2. Modify the SimpleGestures application so that it makes use of the double-touch drag gesture design pattern.
3. Use the online documentation to create a list of the different inputType constants and their associated constant values.
References and More Information
Android API Guides: “Copy and Paste”:
Android SDK Reference regarding the ClipboardManager:
http://d.android.com/reference/android/content/ClipboardManager.html
Android SDK Reference regarding the ClipData class:
http://d.android.com/reference/android/content/ClipData.html
Android API Guides: “Drag and Drop”:
http://d.android.com/guide/topics/ui/drag-drop.html
Android SDK Reference regarding the android.gesture package:
http://d.android.com/reference/android/gesture/package-summary.html
Android Design: “Gestures”: