
15. Accessing Android’s Hardware Sensors
The Android SDK provides a variety of APIs for accessing low-level hardware features on the device. In addition to the camera, Android devices might have a number of other sensors and hardware. Some popular device sensors include the magnetic and orientation sensors, light sensors, and temperature sensors. Applications can also access battery state information. In this chapter, you will explore the optional hardware APIs provided as part of the Android SDK.
Interacting with Device Hardware
The Android platform allows unprecedented access to the device’s underlying hardware in a secure and robust manner. Because not all Android devices support or contain all hardware options, it is important to follow these guidelines when accessing underlying device hardware:
![]() Make no assumptions about the existence or availability of underlying hardware in code or otherwise.
Make no assumptions about the existence or availability of underlying hardware in code or otherwise.
![]() Always check and verify optional features before trying to access hardware programmatically.
Always check and verify optional features before trying to access hardware programmatically.
![]() Pay special attention to exception handling and error and return value checking when working with hardware APIs.
Pay special attention to exception handling and error and return value checking when working with hardware APIs.
![]() Understand that hardware features are device resources. Acquire them late, and release them as soon as you’re done. In other words, play nice with the other apps. Don’t hog the hardware or drain the device battery by misusing hardware resources.
Understand that hardware features are device resources. Acquire them late, and release them as soon as you’re done. In other words, play nice with the other apps. Don’t hog the hardware or drain the device battery by misusing hardware resources.
![]() Warning
Warning
The Android emulator has limited to no support for simulating hardware sensors and the device battery. These are cases when testing on real devices is crucial. Much of the code and APIs discussed in this chapter work only on Android hardware and do little or nothing in the Android emulator.
The optional hardware features of different Android devices are key market differentiators to consumers. For example, some might want a device that can act as a Wi-Fi hotspot. Others might require Bluetooth, which we talk about in Chapter 16, “Using Android’s Optional Hardware APIs.” Still others might be interested in the data that can be collected from various sensors on the device. Finally, applications can access data about the battery and the power management state. We talk about other hardware-related features, such as the camera and location-based services, in Chapter 13, “Using Android Multimedia APIs,” and Chapter 17, “Using Location and Map APIs.”
![]() Tip
Tip
Many of the code examples provided in this chapter are taken from the SimpleHardware application. The source code for this application is provided for download on the book’s website.
Using the Device Sensors
The Android SDK provides access to raw data from sensors on the device. The sensors, and their precision and features, vary from device to device. Some of the sensors that applications can interact with include the magnetic sensor, which can be used as a compass, and the accelerometer sensor, which can detect motion.
You can access the device sensors through the SensorManager object (android.hardware.SensorManager). The SensorManager object listens for data from the sensors. It is a system Service, and you can retrieve an instance with the getSystemService() method, as shown here:
SensorManager sensors =
(SensorManager) getSystemService(Context.SENSOR_SERVICE);
Working with Different Sensors
The Sensor class (android.hardware.Sensor) defines a number of identifiers for the various sensors that you might find on a device. Not all sensors are available on each device. Some interesting sensors are listed here:
![]()
TYPE_ACCELEROMETER: Measures acceleration in three directions (values are in SI units (m/s2))
![]()
TYPE_AMBIENT_TEMPERATURE: Measures temperature
![]()
TYPE_GYROSCOPE: Measures angular orientation in three directions (values are angles in degrees)
![]()
TYPE_LIGHT: Measures ambient light (values are in SI lux units)
![]()
TYPE_MAGNETIC_FIELD: Measures magnetism in three directions; the compass (values are in micro-Teslas (μT))
![]()
TYPE_PRESSURE: Measures barometric pressure
![]()
TYPE_PROXIMITY: Measures the distance to an object (values are in centimeters, or “near” versus “far”)
![]()
TYPE_RELATIVE_HUMIDITY: Measures the relative humidity
![]()
TYPE_STEP_COUNTER: Measures the total number of steps recorded since Service creation (API Level 19)
![]()
TYPE_STEP_DETECTOR: Measures each step by recording a timestamp and a value of 1.0 (API Level 19)
The SensorManager class also has a number of constants that can be useful with certain sensors. For instance, you can use the STANDARD_GRAVITY constant with the accelerometer and the LIGHT_SUNLIGHT constant with the light sensor.
![]() Tip
Tip
Not all sensors are available on all devices. For instance, the Galaxy Nexus Android device has a gravity sensor, linear acceleration sensor, magnetic sensor, pressure sensor, proximity sensor, and more, but no temperature sensor or humidity sensor.
Unfortunately, the emulator does not provide any sensor data. All sensor testing must be done on a physical device. Alternatively, OpenIntents.org also provides a handy Sensor Simulator (http://code.google.com/p/openintents/wiki/SensorSimulator). This tool simulates accelerometer, compass, and temperature sensors, and it transmits data to the emulator.
Configuring the Android Manifest File for Sensors
The <uses-feature> tag in the Android manifest file is used to indicate which sensors your application requires. For example, to declare that your application requires the barometer but can optionally use the gyroscope, you would add the following to your application’s manifest file:
<uses-feature android:name="android.hardware.sensor.barometer" />
<uses-feature
android:name="android.hardware.sensor.gyroscope"
android:required="false" />
A full list of sensor declarations can be found in the Android SDK documentation at http://d.android.com/guide/topics/manifest/uses-feature-element.html#hw-features.
Acquiring a Reference to a Sensor
You can acquire a reference to a specific sensor using the SensorManager class method called getDefaultSensor(). This method takes a sensor type parameter. For example, you can acquire the default accelerometer sensor as follows:
Sensor accelSensor = sensors.getDefaultSensor(Sensor.TYPE_ACCELEROMETER);
Reading Sensor Data
After you have a valid Sensor object, you can read the sensor data periodically. Sensor values are sent back to an application using a SensorEventListener object that the application must implement and register using the registerListener() method:
boolean isAvailable = sensors.registerListener(SensorsActivity.this,
accelSensor, SensorManager.SENSOR_DELAY_NORMAL);
In this case, the accelerometer sensor is watched. The onSensorChanged() method is called at particular intervals defined by the delay value in registerListener(), which is the default value in this case.
The SensorEventListener interface has two required methods that you must implement: onAccuracyChanged() and onSensorChanged(). The onAccuracyChanged() method is called whenever the accuracy of a given sensor changes. The onSensorChanged() method is called whenever the value of a sensor changes. The onSensorChanged() method is generally used to inspect sensor information.
Here is a sample implementation of onSensorChanged() that works for displaying various types of sensor data (not just the accelerometer):
@Override
public void onSensorChanged(SensorEvent event) {
StringBuilder sensorMessage =
new StringBuilder(event.sensor.getName()).append(" new values: ");
for (float value : event.values) {
sensorMessage.append("[").append(value).append("]");
}
sensorMessage.append(" with accuracy ").append(event.accuracy);
sensorMessage.append(" at timestamp ").append(event.timestamp);
sensorMessage.append(".");
Log.i(DEBUG_TAG, sensorMessage);
}
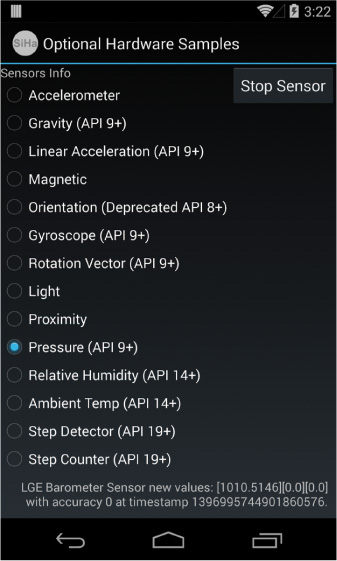
The onSensorChanged() method has a single parameter, a SensorEvent object. The SensorEvent class contains all the data about the sensor, including which sensor caused the event, the accuracy of the sensor, the sensor’s current readings, and a timestamp. For details about what data to expect for each type of sensor, see the SensorEvent class documentation provided with the Android SDK.
The accelerometer sensor provides three values corresponding to the acceleration currently felt by the device on the x, y, and z axes. The barometer provides the atmospheric pressure in millibars and fills only one of the value fields, as shown in Figure 15.1.
![]() Warning
Warning
Depending on the sensor in use, the rate of sensor data might be high. Be aware that your application should do as little as possible in the onSensorChanged() method. Do not make blocking calls. If you must process the data, pass the data to a different thread, as described in Chapter 1, “Threading and Asynchronous Processing.” Some devices modify the rate in other ways, such as slowing the rate down if the information is not changing quickly. Do not rely on the flow of sensor data for performing unrelated processing.
Calibrating Sensors
The sensor values won’t be useful to the application until they are calibrated. One way to calibrate is to ask the user to click a button to calibrate the sensor. The application can then store the current values, and new values can be compared against the original values to see how they have changed (delta). Although the phone sensors have a specific orientation, this enables the user to use the app in either portrait or landscape mode, regardless of how the user holds the device.
When registering a sensor, the registerListener() method returns true if the sensor is available and can be activated. It returns false if the sensor isn’t available or cannot be activated.
The sensor values are typically quite sensitive. For most uses, an application probably wants to provide some smoothing of the values to reduce the effects of any noise or shaking. How this is done depends on the purpose of the application. For instance, a simulated bubble level might need less smoothing than a game where too much sensitivity can be frustrating. The orientation values might be appropriate in cases where only the device’s orientation is needed but not the rate at which it is changed (accelerometer) or the specific direction it’s pointing (compass).
Determining Device Orientation
You can use the SensorManager class to determine the orientation of the device. Although the Sensor.TYPE_ORIENTATION sensor value is deprecated, it is still valid on most popular devices. However, the recommended way is to use the getOrientation() method of the SensorManager class instead.
The getOrientation() method takes two parameters: a rotation matrix and an array of three float values (azimuth [z], pitch [x], and roll [y]).
Finding True North
In addition to the SensorManager, there is a helpful class called GeomagneticField available in the android.hardware package. The GeomagneticField class uses the World Magnetic Model to estimate the magnetic field anywhere on the planet, which is typically used to determine magnetic variation between compass north and true north. This model, developed by the United States National Geospatial-Intelligence Agency (NGA), is updated for precision every five years. The current model expires in 2015, although results are accurate enough for most purposes for some time after that date, at which point the Android GeomagneticField class is likely to be updated to the latest model.
Sensor Event Batching
Android KitKat 4.4 (API Level 19) introduced ways to manage the battery usage of the device by batching sensor updates intended for an application’s SensorEventListener. This means that Sensor updates are collected by the Android system and sent to your application as a batch at designated time intervals, only while the CPU is awake. API Level 19 introduced two new versions of the registerListener() method that reduce the number of Android system calls, allowing the device to operate in a low-power state.
If the CPU is not awake, you must take additional steps to ensure that your application’s sensor memory does not reach capacity, as new sensor events will cause older ones to be removed if not executed as a batch before memory runs out.
![]() Note
Note
Not all Android devices are equipped with hardware sensors, but the new versions of registerListener() take this into account and degrade automatically to the older versions of registerListener() if only software sensors are supported.
Monitoring the Battery
Mobile devices operate with the use of the battery. Although many applications do not need to know the state of the battery, some types of applications might want to change their behavior based on the battery level, charging state, or power management settings. For instance, a monitoring application can reduce the monitoring frequency when the battery is low and can increase it if the device is powered by an external power source. The battery levels can also help indicate the efficiency of an application, allowing developers to find areas where behavior can be modified to improve battery life, which users will appreciate.
To monitor the battery, the application must have the BATTERY_STATS permission. The following XML added to the AndroidManifest.xml file is sufficient:
<uses-permission
android:name="android.permission.BATTERY_STATS" />
Then the application needs to register for a particular BroadcastIntent. In this case, it must be Intent.ACTION_BATTERY_CHANGED. The following code demonstrates this:
registerReceiver(batteryRcv,
new IntentFilter(Intent.ACTION_BATTERY_CHANGED));
Next, the application needs to provide an implementation of the BroadcastReceiver. The following is an example of a battery-monitoring BroadcastReceiver:
batteryRcv = new BroadcastReceiver() {
public void onReceive(Context context, Intent intent) {
int level =
intent.getIntExtra(BatteryManager.EXTRA_LEVEL, -1);
int maxValue =
intent.getIntExtra(BatteryManager.EXTRA_SCALE, -1);
int batteryStatus =
intent.getIntExtra(BatteryManager.EXTRA_STATUS, -1);
int batteryHealth =
intent.getIntExtra(BatteryManager.EXTRA_HEALTH, -1);
int batteryPlugged =
intent.getIntExtra(BatteryManager.EXTRA_PLUGGED, -1);
String batteryTech =
intent.getStringExtra(BatteryManager.EXTRA_TECHNOLOGY);
int batteryIcon =
intent.getIntExtra(BatteryManager.EXTRA_ICON_SMALL, -1);
float batteryVoltage =
(float) intent.getIntExtra(BatteryManager.EXTRA_VOLTAGE,
-1) / 1000;
boolean battery =
intent.getBooleanExtra(BatteryManager.EXTRA_PRESENT,
false);
float batteryTemp =
(float) intent.getIntExtra(
BatteryManager.EXTRA_TEMPERATURE, -1) / 10;
int chargedPct = (level * 100)/maxValue ;
String batteryInfo = "Battery Info:
Health=" +
(String)healthValueMap.get(batteryHealth)+"
" +
"Status="+(String)statusValueMap.get(batteryStatus)+"
" +
"Charged % = "+chargedPct+"%
"+
"Plugged = " + pluggedValueMap.get(batteryPlugged) + "
" +
"Type = " + batteryTech + "
" +
"Voltage = " + batteryVoltage + " volts
" +
"Temperature = " + batteryTemp + "°C
"+
"Battery present = " + battery + "
";
status.setText(batteryInfo);
icon.setImageResource(batteryIcon);
Toast.makeText(Battery.this, "Battery state changed",
Toast.LENGTH_LONG).show();
}
};
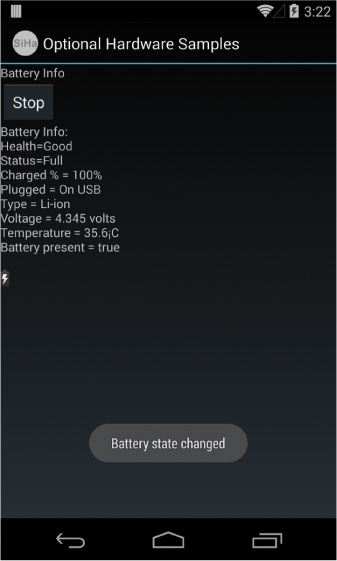
There are a couple of interesting items here. First, notice that the battery level isn’t used directly. Instead, it’s used with the scale, or maximum value, to find the percentage charged. The raw value wouldn’t have much meaning to the user. The next property is the status. The values and what they mean are defined in the android.os.BatteryManager object. This is typically the charging state of the battery. Next, the health of the battery, also defined in the android.os.BatteryManager object, is an indication of how worn out the battery is. It can also indicate other issues, such as overheating. Additionally, the plugged value indicates whether the device is plugged in and, if it is, whether it uses AC or USB power. For more information about broadcast receivers, see Chapter 5, “Broadcasting and Receiving Intents.”
![]() Warning
Warning
On specific devices, not all this information is available or accurate. For instance, even though we see good data for most fields, we have noted in several instances that some devices return false for the present field or don’t include it at all. Proper testing might be required before relying on battery data for a particular device.
Some other information is returned as well, including an icon identifier that can visually display the state of the battery and some technical details, such as the type of battery, current voltage, and temperature. All displayed, this information looks something like what is shown in Figure 15.2.
Summary
Unlike many other mobile platforms, Android allows complete access to the underlying hardware on the device, including the capability to read raw device sensor data and monitor battery usage. It is important to remember that different devices have different underlying hardware and sensors. Newer API features now allow you to batch sensor calls to conserve battery usage. Always verify the functionality available on each target phone platform during the planning stage of your Android project.
Quiz Questions
1. True or false: The Android emulator supports simulating hardware sensors.
2. What method, including parameters, should you use to gain access to the device sensor service?
3. How would you acquire a reference to the TYPE_STEP_COUNTER sensor?
4. What method is called when the value of a sensor changes?
5. True or false: The TrueNorth class is used to determine the magnetic variation between compass north and true north.
Exercises
1. Use the Android documentation to determine the equation used to calculate the dew point temperature when using the humidity sensor.
2. Use the Android documentation to determine the Sensor constant that uses a magnetometer for calculating a rotation vector.
3. Create an application that is capable of batching sensor events.
References and More Information
Android API Guides: “Sensors Overview”:
http://d.android.com/guide/topics/sensors/sensors_overview.html
Android API Guides: “Motion Sensors”:
http://d.android.com/guide/topics/sensors/sensors_motion.html
Android API Guides: “Position Sensors”:
http://d.android.com/guide/topics/sensors/sensors_position.html
Android API Guides: “Environment Sensors”:
http://d.android.com/guide/topics/sensors/sensors_environment.html
Android SDK Reference documentation on the Sensor class:
http://d.android.com/reference/android/hardware/Sensor.html
Android SDK Reference documentation on the SensorEvent class:
http://d.android.com/reference/android/hardware/SensorEvent.html
Android SDK Reference documentation on the SensorEventListener class:
http://d.android.com/reference/android/hardware/SensorEventListener.html
Android SDK Reference documentation on the SensorManager class:
http://d.android.com/reference/android/hardware/SensorManager.html
Android SDK Reference documentation: SensorEvent values:
http://d.android.com/reference/android/hardware/SensorEvent.html#values
NOAA: “World Magnetic Model”: