Chapter 2
Gaming Tricks for Phones or Tablets
This chapter contains a lot of goodies to get your feet wet with native development in Android.
We begin by showing you how easy it is to build a simple Android app that loads a native library and executes methods written in C within Java. But it also shows how you can call back Java methods within C, so the communication goes both ways between the languages.
Next we look at how we can cascade Audio, Video, Key, and Touch events from Java to C by using thin Java wrappers that simply pass event information to the native library.
And then we tackle multitouch, which is a useful subject for advanced games such as shooters and others. Multitouch can be a tricky subject so check it out.
Finally we end up with Bluetooth controllers. Some games that require complex and precision movement can be frustrating to play on a touch screen. Here is where a Bluetooth controller such as a Zeemote comes handy. You will learn how to enable this neat joystick device in your game. The beauty of this is that everything contained within this chapter is fully compatible with Android 4.
Compiling Native Code in Android
For the pure Java developer, writing apps that talk to C code can be daunting in the beginning. I felt that way the first time I tried to write a Java/C hybrid (with painful success I may add). It turns out to be surprisingly simple if you understand the way these languages interface together. My goal in this section is to show you how simple it can be to call a C function from Java.
TIP: Java/C Communication goes both ways. Which means you can call C functions from Java or you can call Java Classes, methods, or Exceptions from C.
Consider the arbitrary Java classMyApp in Listing 2-1. For the sake of simplicity let's say we wish to call a native game startup function (GameMain) written in C from this class. All we need are a Java class and a C file implementation. Let's take a closer look at MyApp:
Listing 2–1. Java class to call a native function
package myapp;

public class MyApp {

    // load C lib

    System.loadLibrary(“myapp”);


    // C function

    native void GameMain(String[] args);


    static void main(Sttring args[] ) {

      MyApp app = new MyApp();

      app.GameMain(args);

 }

}
In Listing 2–1, the first thing we need to do is to load the native library containing the function GameMain by calling System.loadLibrary. Note that the name of the library is important (myapp). Behind the scenes, this name gets translated to libmyapp.so in Android/Linux (in windows it would be myapp.dll but that's another story). Next we tell Java the native library has a function GameMain that takes an array of strings as arguments. The native keyword in Java is used to declare native functions. Finally we simply call the native function from the Java main subroutine.
NOTE: libmyapp.so must be in the system class path; otherwise the System.loadLibray call will throw an UnsatisfiedLinkError which can be very annoying. This is done by running the program with the java.library.path VM argument such as: java –Djava.library.path=[PATH_TO_THE_LIB] myapp.MyApp
Now, for the native side implementation of GameMain. Be careful with the syntax of the function in C. We can't just write a C function called GameMain. It must follow a strict JNI syntax. Thus the C implementation file is shown in Listing 2–2:
Listing 2–2. Native implementation for the native code in Listing 2–1
// myapp.c

#include<stdio.h>

#include <jni.h>


JNIEXPORT void JNICALL Java_myapp_GameMain

  (JNIEnv * env, jclass class, jobjectArray jargv)

{
    // extract string args

    // call main (int argc, const char ** argv)

}
Note in Listing 2–2 that the native implementation name is not GameMain but Java_myapp_GameMain. The syntax must follow the convention:
Java_{package_name}_{function_name}(JNI arguments);
If the package name has multiple namespaces such as com.acme.myapp, dots must be replaced by underscores. Also, notice the syntax of the arguments:
- JNIEnv * env: This is a reference to the JNI environment, which is very helpful in doing lots of things, such as extracting the real string arguments from the object array jargv.
- jclass class: This is a reference to the Java class that called the native function. It could be used to call back a Java method or to throw an Exception if something happens.
- jobjectArrayjargv: This is a reference to the array of strings sent as arguments from the Java side packed as a JNI jobjectArray. We need to massage this reference to extract the real strings and send them to the native main function.
So far so good; it looks very simple but the tricky part comes when you need to extract complex arguments, such as strings or objects, from the JNI arguments. In the next section you will put these concepts to the test by creating an Android native app step by step. Let's continue.
Creating the Android Project with Native Support
Here we will create a simple Android project to apply the concepts we learned in the previous section. The project will consist of the following components:
- An Android activity: This is the main entry point for the application. Its job is to load a native library and call a C function within sending an array of strings as arguments.
- A native library: This library implements a simple C log function to extract a string argument from the Java activity and print the message to the Android log console.
Now, let's create the project for this section, as follows:
- In Eclipse, click the New Android Project icon on the main toolbaror press CTRL-N and select
Android
Android project. This opens the New Android Project dialog box. - In the dialog box, enter a project name (
ch02.Projectin this example). - Enter an application name (
Ch02.Projectin this example). - Enter a package name (
ch02.projectin this example). - Enter an activity name (Ch02.Project
Activityin this example). - Specify a minimum SDK version 4 API 14 in this example. Figure 2–1 shows the completed New Android Project dialog box for this example.
- Click Finish.

Figure 2–1. New Android Project dialog box for this chapter's example
Now that we have our project skeleton let's look at how this application is architected. We'll start with a basic layout (architecture) of the components of the app including the Java main activity, a native interface (also written in Java), and the C implementation. Next we'll see how to compile the native code, and finally we'll test on the emulator. Let's get started.
Application Architecture
Let's consider what we wish to accomplish with this application:
- We want to create the basic Android application. When run in the emulator, the app will create a default view with the text “Hello Chapter2!”.
- Within the project, we will create a native folder with files to accomplish the following:
- Create a native library with a main subroutine that will be called from the Android main activity using JNI.
- The main library subroutine will invoke a Java method (using JNI) within the Android project, sending a text message back to the Android Java layer.
- The library will be loaded at runtime within Java using a
System.load(path).
Figure 2–2 shows the file system layout of the project.
TIP: It would be helpful to import the project source (ch02.Project) into your workspace to go along with this chapter.
The following Java files describe the project:
ch02.project.MainActivity.java: This file is created by the wizard and should already exist in the project.jni.Natives.java: This is a new file that contains native methods to be invoked within the native library and callbacks that the C library will perform within Java.

The jni folder contains the native code including (see Figure 2–2):
lib.c: This is the main library code. It contains all the necessary JNI system calls to cascade information back and forth between Android and C.- Android.mk: This is the Android makefile used to build the native library which will be stored in libs/armeabi/libch02.so.
Let's look at the files in more detail to understand what they do. We'll start from the top with the Java main activity and its companion native interface. These two work together with the native library. Finally we will glue all the pieces at compilation time. Let's carry on.
Main Activity
Thefile ch02.project.MainActivity.java is created by the wizard, and it is the entry point to the phone application. Listing 2–3 shows the code for this file. There are some remarkable things to note about this file.
As you should know, when the application starts, the method onCreate(Bundle savedInstanceState) will be invoked by Android. This method performs three critical steps:
- It loads the native library using
System.loadLibrary(name). - It runs the main library sub by invoking the native method
Natives.LibMain(String[] argv).
Listing 2–3 shows the implementation of the Activity.
Listing 2–3. Main Activity for This Chapter's Example
package ch02.project;


import java.io.IOException;

import java.io.InputStream;

import java.io.OutputStream;


import jni.Natives;


import android.app.Activity;

import android.os.Bundle;


public class MainActivity extends Activity {

   {

     // load lib

     System.loadLibrary("ch02");

    }


    /** Called when the activity is first created. */

    @Override

    public void onCreate(Bundle savedInstanceState) {

        super.onCreate(savedInstanceState);

        setContentView(R.layout.main);


        try {

            // Run native method

            String[] argv = { "MyLib", "arg1", "arg2" };


            Natives.LibMain(argv);


        } catch (Exception e) {

            e.printStackTrace();

        }

    }
The main activity is the first piece of our puzzle, note that Listing 2–3 makes a call to Natives.LibMain. This is what I call a native interface (the second piece). Natives.LibMain is defined in the class Natives.java described in the next section.
Native Interface
The native interface defined in jni.Natives.java has two important methods that deal with the C library (see Listing 2–4):
static native intLibMain(String[] argv): This is the native library main subroutine. It will be called within the Android main activity with an array of strings as arguments. Notice the keywordnative, which tells the Java compiler it is implemented natively.private static void OnMessage(String text, int level): This method is meant to be called from the C library, with a string message and integer value (level). This method will simply print the message to the console.
NOTE: As you should know, with JNI, you can invoke subroutines both ways: from Java to C (using the native keyword) or from C to Java, as you'll see once we get to the native stuff.
Listing 2–4. Native Interface Class
package jni;


public class Natives

{


    /**

     * Native Main Loop

     *

     * @param argv

     * @return

     */

    public static native int LibMain(String[] argv);


    /**

     * This fires on messages from the C layer

     *

     * @param text

     */

    @SuppressWarnings("unused")

    private static void OnMessage(String text, int level) {

        System.out.println("OnMessage text:" + text + " level=" + level);

    }


}
Thus the native interface effectively defines a two-way pipeline between Java and C. In one hand, LibMain sends information to the C library. On the other hand, OnMessage receives informationfrom it, and simply prints the message to standard output. Now let's take a look at the final piece: the nativelibrary.
Native Library
Here is where all the work takes place. The implementation is provided in lib.c (see Listing 2–5). This file lives under the jnifolder within the project.
NOTE: Native libraries in Linux (also known as shared objects) are the equivalents of dynamic link libraries (DLLs) in Windows. By convention, shared objects are named as lib<NAME><VERSION>.so.
Listing 2–5. Native Library Implementation (lib.c)
#include <stdio.h>

#include <stdlib.h>


/* JNI Includes */

#include <jni.h>


#include "include/jni_Natives.h"


#define CB_CLASS "jni/Natives"


/**

 * OnMessage callback

 */

#define CB_CLASS_MSG_CB  "OnMessage"

#define CB_CLASS_MSG_SIG  "(Ljava/lang/String;I)V"


// prototypes


// Lib main Sub

int lib_main(int argc, char **argv) ;


// Used to get the len of a Java Array

const int getArrayLen(JNIEnv * env, jobjectArray jarray);


// printf str messages back to java

void jni_printf(char *format, ...);


// Global env ref (for callbacks)

static JavaVM *g_VM;


// Global Reference to the native Java class jni.Natives.java

static jclass jNativesCls;


/*

 * Class:     jni_Natives

 * Method:    LibMain

 * Signature: ([Ljava/lang/String;)V

 */

JNIEXPORT jint JNICALL Java_jni_Natives_LibMain
  (JNIEnv * env, jclass class, jobjectArray jargv)

{

    // Obtain a global ref to the caller jclass

    (*env)->GetJavaVM(env, &g_VM);


    // Extract char ** args from Java array

    jsize clen =  getArrayLen(env, jargv);


    char * args[(int)clen];


    int i;

    jstring jrow;

    for (i = 0; i < clen; i++)

    {

        // Get C string from Java String[i]

        jrow = (jstring)(*env)->GetObjectArrayElement(env, jargv, i);

        const char *row  = (*env)->GetStringUTFChars(env, jrow, 0);


        args[i] = malloc( strlen(row) + 1);

        strcpy (args[i], row);


        // Print args

        jni_printf("Main argv[%d]=%s", i, args[i]);


        // Free Java string jrow

        (*env)->ReleaseStringUTFChars(env, jrow, row);

    }


    /*

     * Load the jni.Natives class

     */

    jNativesCls = (*env)->FindClass(env, CB_CLASS);


    if ( jNativesCls == 0 ) {

        jni_printf("Unable to find class: %s", CB_CLASS);

        return -1;

    }


    // Invoke the Lib main sub.

    // Program args come from Java

    lib_main (clen, args);

    return 0;

}


/**

 * Send a string back to Java

 */

jmethodID mSendStr;


static void jni_send_str( const char * text, int level) {

    JNIEnv *env;


    if ( !g_VM) {

        printf("I_JNI-NOVM: %s
", text);

        return;

    }
    (*g_VM)->AttachCurrentThread (g_VM, (void **) &env, NULL);


    // Load jni.Natives if missing

    if ( !jNativesCls ) {

        jNativesCls = (*env)->FindClass(env, CB_CLASS);


        if ( jNativesCls == 0 ) {

                printf("Unable to find class: %s", CB_CLASS);

                return;

        }

    }


    // Call jni.Natives.OnMessage(String, int)

    if (! mSendStr ) {

        // Get  aref to the static method: jni.Natives.OnMessage

        mSendStr = (*env)->GetStaticMethodID(env, jNativesCls

            , CB_CLASS_MSG_CB

            , CB_CLASS_MSG_SIG);

    }

    if (mSendStr) {

        // Call method

        (*env)->CallStaticVoidMethod(env, jNativesCls

                , mSendStr

                , (*env)->NewStringUTF(env, text)

                , (jint) level );

    }

    else {

        printf("Unable to find method: %s, signature: %s
"

                , CB_CLASS_MSG_CB, CB_CLASS_MSG_SIG );

    }

}


/**

 * Printf into the Java layer

 * does a varargs printf into a temp buffer

 * and calls jni_sebd_str

 */

void jni_printf(char *format, ...)

{

    va_list         argptr;

    static char             string[1024];


    va_start (argptr, format);

    vsprintf (string, format,argptr);

    va_end (argptr);


    jni_send_str (string, 0);

}


/**

 * Get Java array length

 */

const int getArrayLen(JNIEnv * env, jobjectArray jarray)

{

    return (*env)->GetArrayLength(env, jarray);

}
/**

 * Library main sub

 */

int lib_main(int argc, char **argv)

{

    int i;


    jni_printf("Entering LIB MAIN");


    for ( i = 0 ; i < argc ; i++ ) {

        jni_printf("Lib Main argv[%d]=%s", i, argv[i]);

    }

    return 0;

}
Let's dissect this file to understand what it does. Any C/C++ program that does JNI calls must include the header file:
#include <jni.h>
This header file has the prototypes for all the JNI system calls to be used by your library. It can be found in your system's Java home under JAVA_HOME/include, with extra Linux dependencies under JAVA_HOME/include/linux. At compile time, Android will take care of finding this file for us. Next, it includes the jni_Natives header file:
#include "include/jni_Natives.h"
This file contains the user-defined JNI prototypes for all native methods defined in the jni.Natives class. It is machine-generated and must not be edited by the user. To generate this file manually, the following command can be used:
javah -cp ../bin -d include jni.Natives
Here, javah is the Java Virtual Machine (JVM) command to generate native header files from Java classes, -cp defines the class path search path, -d include tells javah to save the file in the include folder (creating it if required), and jni.Natives is the Java class name from which you wish to extract the headers. Next, the following constants are defined:
#define CB_CLASS "jni/Natives"

#define CB_CLASS_MSG_CB  "OnMessage"

#define CB_CLASS_MSG_SIG  "(Ljava/lang/String;I)V"
CB_CLASS is the name of the Java class that will be invoked within C (note that the period separating path names is replaced by /). CB_CLASS_MSG_CB is the name of the Java method (OnMessage) that will be invoked (see Listing 2–2). CB_CLASS_MSG_SIG is a critical constant that defines the Java signature of the OnMessage Java method. Let's take a closer look at this signature:
(Ljava/lang/String;I)V
A Java method signature has the format (ARGUMENTS)RETURN_TYPE, where the arguments can be encoded as follows:
I = Integer
B = Byte
S = Short
C = Char
LJava_Class; = For Java classes enclosed by : L and ;
In our case, the first argument is a Java string (Ljava/lang/String;), and the second is an integer (I). Note that all arguments are defined by a single character (except for classes that are enclosed by L;), and there are no separators between them. Finally, V is the return type defined as void.
CAUTION: Method signatures are a major pain when coding in JNI. Any mistake in this string, and the library will not be able to find the method at runtime.
Next, the file defines the prototypes for the functions within the library:
intlib_main(intargc, char **argv): This is the entry point to the library. It receives the number of arguments (argc) and a list of arguments (argv), similar to the standard Cmain()function.intgetArrayLen(JNIEnv * env, jobjectArray jarray): This function is used to get the length of a Java array, which will be translated into a C array for use by the library.voidjni_printf(char *format, ...): This function is used by the library to send a text message back to Java. Note that...indicates that the function will receive a vector of arguments.
Finally, we need two global references:
static JavaVM *g_VM;

static jclass jNativesCls;
g_VM is a reference to the JVM, and it will be used make JNI system calls. jNativesCls is a reference to the jni.Natives Java class used to invoke the Java method OnMessage. Note that the static keyword tells the compiler that these variables should be visible only within code in lib.c. Now let's look at some of the functions defined in Listing 2–5. In the next sections I describe some of the key tasks performed by these functions including:
- Converting a Java array of strings into a C array, performed by Java_jni_Natives_LibMain (the native implementation of Java's LibMain). This function also illustrates how to get the size of a Java Array within C.
- Invoking a Java static void method: This technique is illustrated by the jni_send_str function, and shows how you can efficiently call back a Java method from C.
- If you are a core C developer at heart you will appreciate how to define a variable-arguments function (defined in jni_printf). It can be a life-saver when logging text.
Converting a Java Array of Strings into a C Array
Converting a Java string array to a C char array is a very useful tool to send arguments to a native library. As you can see from Listing 2–6, this can be a tricky situation. The following are the key steps:
- Get the size of the Java array, and for each element of the array:
- Get the Java
String[i]element usingGetObjectArrayElement(JNIEnv * env, jobjectArrayjarray, intpos). - Convert the retrieved element into a C string (
char *) usingGetStringUTFChars(JNIEnv * env, jstringjrow, 0).
- Get the Java
- Allocate space for the C array using
malloc(length of string + 1). Note that an extra space is allocated for the terminator character. - Copy the characters using
strcpy (char ** target , char * source). - Release Java
String[i]usingReleaseStringUTFChars(JNIEnv * env, jstringjrow, char * row).
Listing 2–6. Converting a Java String Array into a C Char Array
// Extract char ** args from Java array

jsize clen =  getArrayLen(env, jargv);


char * args[(int)clen];


int i;

jstring jrow;


// Loop thru Java array

for (i = 0; i < clen; i++)

{

    // Get String[i]

    jrow = (jstring)(*env)->GetObjectArrayElement(env, jargv, i);


    // Convert String[i] to char *

    const char *row  = (*env)->GetStringUTFChars(env, jrow, 0);


    // Allocate space

    args[i] = malloc( strlen(row) + 1);
    // Copy

    strcpy (args[i], row);


    // Free java string jrow

    (*env)->ReleaseStringUTFChars(env, jrow, row);

}
Getting the Size of a Java Array
To get the size of a Java array, use the JNI function (*env)->GetArrayLength(env, jobjectArrayjarray), where env is a pointer to the JNI environment, and jarray is a reference to the Java array. For example, to get the size of the array jargs using environment env, use the following:
(*env)->GetArrayLength(env, jargs)
Invoking a Java Static Void Method
To invoke the static void jni.Natives.OnMessage method, you must perform the following steps:
- Load the
jni.Nativesclass with the following:(*env)->FindClass(env, "jni/Natives") - Get the ID of the method to be invoked using a reference to the
jni.Nativesclass, the name of the method (OnMessage), and the signature(Ljava/lang/String;I)V.jmethodID mSendStr = (*env)->GetStaticMethodID(env
, jNativesCls
, "OnMessage"
, "(Ljava/lang/String;I)V"); - Call the static void method, passing the class, method ID, and the method arguments: a Java string and integer in this case.
(*env)->CallStaticVoidMethod(env, jNativesCls

            , mSendStr

            , (*env)->NewStringUTF(env, text)

            , (jint) level );
Defining a Variable-Arguments Function in C
The final piece of the puzzle is a function to perform the actual invocation of the Java method described in the previous section, as shown in Listing 2–7. This function is meant to be called anywhere within the library after jni.Natives.LibMain() is invoked. It is called jni_printf and works pretty much as printf does, using the very useful variable-arguments technique.
Listing 2–7. Sending a String to Java Using Variable Arguments
void jni_printf(char *format, ...)

{

    va_list         argptr;

    static char    string[1024];


    va_start (argptr, format);

    vsprintf (string, format, argptr);

    va_end (argptr);

    jni_send_str (string, 0);

}
va_list, va_start, and va_end are used to build an output string using a C string format and a sequence of arguments. This allows the developer to mimic a printf-style function for a specific need. Thus, for example, to print an arbitrary message to the Java console within the library, use the following command:
jni_printf("This is a message %d, %p, %x, %s", 10, somePointer, 0xFF, "Hello Java")
“This is a message %d, %p, %x, %s” is called a character format. The rest are variable arguments sent to the function. Also note that you should add the header #include <stdarg.h> to use variable arguments. We have described the native library and the key tasks that perform within the app. Now we can finally compile it and see how all the pieces fit together by running our project in the emulator as seen in the following section.
Compiling the Shared Library
Before we can run our native Android app we need to compile the native library. For that, the file Android.mk must be created in the jni folder of the project (see Figure 2–2). This file describes the module name and the source files of the library as shown in Listing 2–8.
Listing 2–8. Compilation file for the project's native library
LOCAL_PATH := $(call my-dir)

include $(CLEAR_VARS)

LOCAL_MODULE    := ch02

LOCAL_CFLAGS := -O2

LOCAL_SRC_FILES :=lib.c

include $(BUILD_SHARED_LIBRARY)
To build the library, open your cygwin console and change to the folder containing the project files:
$cd [PATH_TO]/ch02.Project
Then call the helpful NDK build script ndk-build (see Figure 2–3):
$ ndk-build
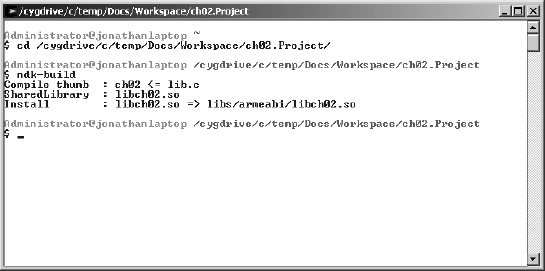
Figure 2–3. Native library compilation with cygwin
NOTE: The path to the NDK install directory must be included in you system Path variable; otherwise cygwin won't be able to locate the ndk-build command.
Now, start your emulator and let's test the library.
Testing the App on a Device
To run our app on the device we must create a Run configuration and fire up the emulator. Here is how:
- Select Run Configurations from the main menu.
- In the Run Configurations dialog box, right-click Android Application in the left tree and choose New.
- Enter a configuration name (
ch02.Project) and select a project (ch02.Project), as shown in Figure 2–4. Then click Run.
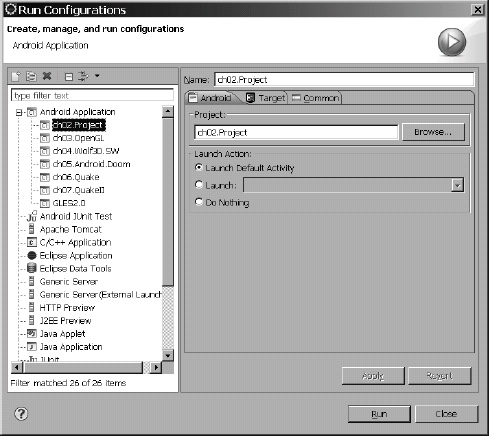
Figure 2–4. Run Configurations dialog box for the project
The application will run in the emulator and display the text “Hello Chapter2!”. There is nothing out of the ordinary here. We must look at the logcat view to see the messages from the native layer. Figure 2–5 shows the output of the device log.
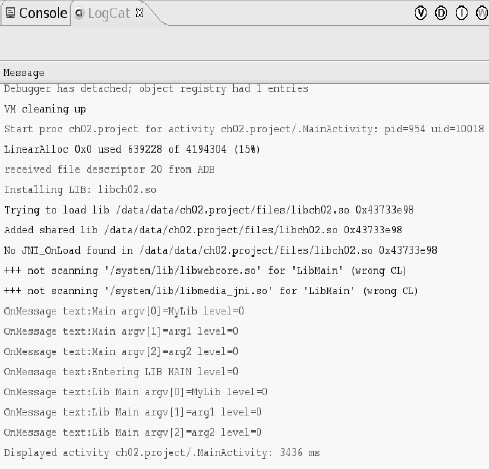
Figure 2–5. logcat output for the project
In the output, notice the following lines:
Trying to load lib /data/data/ch02.project/files/libch02.so ...

Added shared lib /data/data/ch02.project/files/libch02.so ...
These are JNI messages that tell us the library loaded successfully and the native methods can now be invoked within Java. The lines in green represent the callbacks performed by the native library calling the jni.Natives.OnMessage() method. Success!
We have got our feet wet with this section but there is so much more we can do with native apps. We have learned the basics of Java/C interaction which serve as the foundation to the next section, where we build upon previous knowledge to learn more advanced techniques such as how to cascade audio, video, and other types of events into the native side. We'll start with the concept of thin Java Wrappers and how they can help with efficient event handling. Audio is the simplest and therefore our starting point. Next, things get tough with video events where you'll learn about software, hybrid, and hardware renderers. Then we finish with input events via keyboard or touch screen. Let's get started.
Java Wrappers for C/C++ Event Handling
As a game developer in your organization you probably have to build your code to support multiple platforms. Java is an elegant object-oriented language but when it comes to max performance it simply stinks. Many people would disagree with this statement, claiming that the Just in Time (JIT) a.k.a dynamic compilation nature of the Java language puts it at par with C performance wise. That is simply not true. Any game developer that has worked in both languages and is concerned with squeezing every single bit of speed in to a device will tell you that Java code is at least six times slower than raw native C. Specially if you work in advanced OpenGL graphics. As a matter of fact if you take a look at the underpinnings of the Android source you'll find out that most of the Java APIs are simply JNI wrappers to a bunch of C libraries, especially when it comes to Audio/Video. All in all, because of the multiplatform nature of today's mobile landscape: iPhone, Android, Blackberry, Symbian, and others, most game developers build their engines in portable C. Then they simply build wrappers to target a specific platform: be that Objective-C for the iPhone or Java in Android. Keeping that in mind, in this section you will learn how to cascade the most important events for gaming: Audio, Video, Key, and Touch by using thin Java wrappers. We'll start with audio.
Handling Audio Independently
Google has made it difficult in Android to handle audio directly on the native side. Before version 2.x of the SDK it was simply not worth it to try to implement audio handling natively. Google used a very obscure audio implementation in the early days (Enhanced Audio System – EAS). Although, slowly but surely they have been turning into open standards such as OpenAL (Audio Library). Nevertheless, I still find it simpler just to read the native audio buffer and play it using the standard Android AudioTrack API.
TIP: The MediaTrack API gives you the power of handling audio independent of the format. Behind the scenes, the API will detect the binary format and call the apropriate audio driver for any format supported by the platform: WAV, MP3, OGG, etc.
The process of handling audio directly on the native side can be summarized as follows:
- The game engine loads audio assets typically from game files. Audio assets are simply audio files such as waves (wav) and OggVorbis (ogg).
- The game engine will typically initialize the audio hardware and define the overall audio properties such as frequency (in Hz), audio resolution (16 vs. 32 bit), and number of channels (2 for stereo 1 for mono).
- Whenever an audio event occurs in the game, such as the player fires a gun or jumps, the engine will play the specific raw audio assets by writing an audio buffer to the device hardware.
WARNING: Handling Audio in the native side only via OpenAL is not supported in Android versions prior to 3. Nevertheless it is the most efficient way of doing it. On the other hand, using a thin Java wrapper will work in all Android versions. It will be a bit slower however.
By using a thin Java wrapper to the Mediatrack API, we can work around Android's lack of support of popular audio standards such as OpenAL and others. With a wrapper we can read the audio buffer from the native library and render it using the AudioTrack API. Thus the steps above get slightly modified as follows:
- The native game engine loads audio assets. This step remains unchanged.
- The game engine initializes the audio hardware. This step can be used not to initialize the audio hardware but to tell the Android Java code that audio has been initialized with a specific frequency, resolution, and number of channels.
- The thin Java wrapper will use a thread to read bytes from the native audio buffer and render them to the hardware using an AudioTrack.
This may not be the best way of doing things but it works quite well, as you'll see in the chapters dealing with the 3D Quake engines later on in this book. To illustrate the steps above, let's consider a Java class dubbed NativeAudio (see Listing 2–9) which performs the following tasks:
- It defines a native audio painter
PaintAudio(ByteBufferbuf)which reads the audio buffer from the native library. - It implements the following methods for audio playback:
start(freq, channels, bits, bufferSize): Here is where the good stuff happens. This method starts a thread that reads the audio buffer from the native engine (by calling PaitnAudio). The thread will loop continuously until it is told to stop using abooleanflag. The arguments to this sub are: Sound frequency in Hertz, the number of channels (1 for mono, 2 for stereo), sound resolution in bits, and the size of the buffer.stop(): This subroutine is used to stop the audio thread from Java.OnInitAudio(freq, channels, bits): This is one of a series of magic subs called from C that tell the Java code it is time to start playing. This function will be called whenever the native library initializes the audio. It receives the frequency, number of channels, and resolution. It then calls the start method with those arguments.OnLockAudio()/OnUnlockAudio(): These methods are used to lock/unlock the audio when the user pauses the game for example. They simply tell the main thread when to read data.OnCloseAudio(): This function is fired from the native side to close the audio and cleanup resources.
Listing 2–9. A Java class to read audio data from a native library
public class NativeAudio {

    private static boolean mDone = false;

    private static boolean mAudioLocked = false;

    private static boolean mAudioRuning = false;

    private static boolean mNativeAudioInitialized = false;


    // Native audio painter

    native int PaintAudio(ByteBuffer buf);


    // Audio will start from C

    private static void start(final int freq, final int channels,

            final int bits, final int bufferSize) {

        if (isRunning()) {

            Log.w(TAG, "WARNING: Java Audio thread alredy runing!!");

            return;

        }


        // Must be direct for JNI to work!

        // Native BUFFERS MUST BE DIRECT!!! ByteBuffer

        final ByteBuffer audioBuffer = ByteBuffer.allocateDirect(bufferSize);

        final byte[] audioData8 = new byte[bufferSize];


        Thread t = new Thread(new Runnable() {

            public void run() {

                AudioTrack mTrack = new AudioTrack(

                        android.media.AudioManager.STREAM_MUSIC,

                         freq,             // frequency in Hz

                        channels == 1 ? AudioFormat.CHANNEL_CONFIGURATION_MONO

                                : AudioFormat.CHANNEL_CONFIGURATION_STEREO,

                        bits == 16 ? AudioFormat.ENCODING_PCM_16BIT

                                : AudioFormat.ENCODING_PCM_8BIT,

                        4 * (freq / 5),

                       AudioTrack.MODE_STREAM);


                Log.d(TAG, "Audio thread start. Freq=" + freq + " Channels="

                        + channels + " Bits=" + bits + " Buf Size="

                        + bufferSize);


                mDone = false;

                mAudioRuning = true;


                try {

                    mTrack.play();

                } catch (Exception e) {

                    Log.e(TAG, e.toString());

                    mDone = true;

                }
                while (!mDone) {

                    if (!mAudioLocked) {

                        // Read audio buffer from C

                        PaintAudio(audioBuffer);


                        // set the buffer position

                        audioBuffer.position(0);


                        // get bytes

                        audioBuffer.get(audioData8);


                        // Write the byte array to the track

                        mTrack.write(audioData8, 0, audioData8.length);

                    } else {

                        // sleep for a while if au locked

                        sleep(50);

                    }

                }


                // Audio thread loop done.

                mAudioRuning = false;

            }

        });

        // start thread

        t.start();

    }


    public static void stop() {

        // signal stop

        mDone = true;


        // wait until au thread quits

        while (mAudioRuning) {

            Log.d(TAG, "Waiting for audio thread...");

            sleep(200);

        }

    }


    public static boolean isRunning() {

        return mAudioRuning;

    }


    /****************************************************************

     * C - CALLBACKS - Entry points

     *****************************************************************/

    private static void OnInitAudio(int freq, int channels, int bits) {

        Log.d(TAG, "NATIVE THREAD::OnInitAudio Au Start -> freq:" + freq

                + " channels:" + channels + " bits:" + bits);

        // start audio

        start(freq, channels, bits);

    }


    private static void OnLockAudio() {
        mAudioLocked = true;

    }


    private static void OnUnLockAudio() {
        mAudioLocked = false;

    }


    private static void OnCloseAudio() {

        stop();

    }

}
Now we need a C implementation of PaintAudio (see Listing 2–10). Notice the third argument: jobjectbuf which encapsulates a reference to the ByteBuffer used to store the audio data. We can access a Java bByteBuffer memory address and capacity directly from C by calling the JNI functions: GetDirectBufferAddress and GetDirectBufferCapacity respectively. The prototype paint_audio defines the C function that writes the audio data into the game audio buffer. PaintAudio calls this subroutine to fill the Java ByteBuffer with data from the native audio buffer. The final result is a Java thread that receives a sequence of audio bytes which in turn are sent to the Android AudioTrack for playback.
Listing 2–10. C companion for NativeAudio.java
// engine audio renderer

extern int paint_audio (void *unused, void * stream, int len);


JNIEXPORT jint JNICALL Java_ NativeAudio_PaintAudio

 ( JNIEnv* env, jobject thiz, jobject buf )

{

    void *stream;

    int len;


    stream = (*env)->GetDirectBufferAddress(env,  buf);

    len = (*env)->GetDirectBufferCapacity (env, buf);


    return paint_audio ( NULL, stream, len );

}


// Init audio

void jni_init_audio(int freq, int channels, int bits)

{

    JNIEnv *env;


    (*g_VM)->AttachCurrentThread ( g_VM, &env, NULL);


    jmethodID mid  = (*env)->GetStaticMethodID(env

        , jNativesCls

        , "OnInitAudio", "(III)V");


    if ( mid) {

        (*env)->CallStaticVoidMethod(env, jNativesCls, mid , freq, channels, bits);

    }

}
Listing 2–10 also shows how we can call a Java method within C to initialize the audio. The function jni_init_audio will be called by the engine on audio startup which in turn will call the Java method OnInitAudio with three arguments: frequency, number of channels, and audio resolution. Note that this function is called from a separate thread (the game thread), therefore it must attach to the current (Java) thread by calling:
Here g_VM is a global reference to the Java virtual machine which must be saved the first time you call JNI (when we call the game main function for example). jNativesCls is a class reference that points to the NativeAudio Java class obtained by doing a JNI class lookup with FindClass and NewGlobalRef in the same spot:
jclass clazz = (*env)->FindClass(env, "NativeAudio");

jNativesCls = (jclass)(*env)->NewGlobalRef(env, clazz);
Finally, jni_init_audio calls OnInitAudio in NativeAudio.java using JNI's CallStaticVoidMethod with the three arguments: frequency, channels, and bits. We have effectively created a C to Java callback:
(*env)->CallStaticVoidMethod(env, jNativesCls, mid , freq, channels, bits);
This is the technique used to play audio in the Quake and Quake II engines demonstrated in this book. More details will be explained in those chapters. Now, let's tackle video buffers.
Cascading Video Events
When it comes to handling video, game engine designers typically will decouple the rendering process from the actual drawing. This keeps the engine modularized and makes it easy to port to multiple platforms. For example, low-end devices may not support a Graphics Processing Unit (GPU) thus decoupling the drawing and rendering will allow developers to use a software renderer. On the other hand, if a device does have a GPU, a hardware renderer could be used, all these while keeping the drawing pipeline intact. With that in mind video handling could be classified in three groups, as described in the following sections.
Pure Software Renderer
Pure Software Renderer is good for low-end devices with poor quality or no GPUs. This renderer is typical on simple games that don't require a lot of horse power. The Wolfestein 3D chapter in this book used a software renderer. The process is simple; at the end of every interaction of the game loop, an image buffer is drawn with all the sprites for that state in the game. The image buffer is then sent to the Android activity which will render it in a specific view (see Figure 2–6).
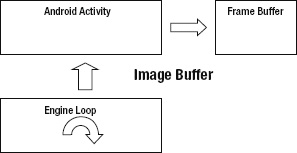
Figure 2–6. Pure software renderer
The drawback of this technique is that it is the slowest and can consume more memory of the three.
Mixed or Hybrid renderer
In a mixed renderer, the drawing of the sprites is performed in software, but the actual rendering is performed in hardware (typically by using OpenGL ES). Figure 2–7 shows the component interactions of this technique. The benefits? It is faster than the previous one (by orders of magnitude). The caveats? It requires a GPU to implement an OpenGL ES renderer.

Figure 2–7. Mixed renderer
Figure 2–7 shows that the native engine is in charge of drawing the image buffer into the hardware. Depending on how OpenGL ES is initialized the engine may have to tell the Android activity it is time to draw. Usually the Android activity will take care of initializing the OpenGL context and obtaining a display surface; in this case the engine must tell Android it is time to draw (swap buffers) whenever an image frame is rendered. This renderer is used in the chapter dealing with Doom for Android.
Pure Hardware
This is the fastest and most powerful of them all, but requires a device with a GPU. It can be painful to program for Android where there is a lot of hardware fragmentation. Many people had made a lot of fuss about version fragmentation but the real problem (for game developers at least) resides in all the different types of GPUs in today's Android devices. I can attest of these pains trying to deal with the big three GPU OEMs:
- PowerVR: By experience I can tell you this is a hell of a GPU. The best and most powerful one out there (the iPhone uses this type of GPU; there's no wonder why). Devices that use this GPU are the Motorola Droid & Samsung Galaxy S family.
- Qualcomm: Commonly used by HTC smartphones. This is probably the worst GPU I had to deal with. It really is substandard compared with PowerVR. Very limited when there are a lot of polygons and textures in your game.
- Tegra: The new kid in the block. Certainly powerful and fast.
Figure 2–8 shows the components of this renderer. The chapters dealing with the Quake I/II engines in this book use this type of rendering.
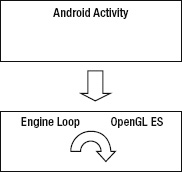
Figure 2–8. Pure hardware renderer
So you can have an idea of the difference in performance for these rendering techniques I have created a chart of the number of frames per second (FPS) rendered by the Doom engine running in a Motorola Droid 1 for each renderer (see Figure 2–9).
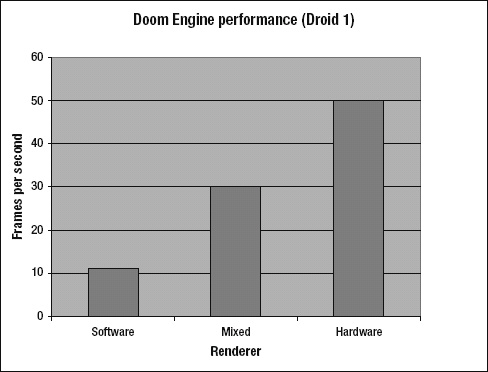
Figure 2–9. Renderer performance for the Doom engine
As you can see from Figure 2–9, the hardware renderer is orders of magnitude faster than the software or hybrid. Next we tackle key events. Let's continue.
Cascading Key Events
Cascading key events from Android to a native engine involves the following steps:
- Listening for key presses or releases from the Android activity.
- Translating the android keys to ASCII (or whatever format the engine uses to encode keys).
- Calling the native methods keyPress or keyrelease for presses and releases respectively.
Note that Android uses its own format to encode key values; thus the tricky part is to translate the Android key codes to a format understood by the engine (ASCII is the format for most portable engines). Listing 2–11 shows a simple way of doing this. We start by defining two Java native methods: keyPress and keyRelease in the Android activity. Both of these take an ASCII code as the argument. When the user presses/releases a key on the device Android will fire the events onKeyDown and onKeyUp respectively. These events receive an Android key value and a KeyEvent containing detailed information about the event. We then use the Android built-in function queueEvent to queue a runnable to be run on the GL rendering thread. This can be used to communicate with the Renderer on the rendering thread in the game engine. The function keyCodeToASCIICode is used to translate the Android key code to a portable ASCII code. Finally the native engine must implement the Java methods keyPress/keyRelease as Java _keyPress and Java _keyPress respectively. These methods will receive the ASCII code and push it to the event queue (in this case the event queue for the Quake engine).
Listing 2–11. Cascading keys from Java to C
// In Java

public static native int keyPress(int key);

public static native int keyRelease(int key);


public boolean onKeyDown(final int keyCode, final KeyEvent event)

{

    queueEvent(new Runnable() {

        public void run() {

            keyPress(keyCodeToASCIICode(keyCode));

        }

    });


    return true;

}


public boolean onKeyUp(final int keyCode, final KeyEvent event)

{

    queueEvent(new Runnable() {

        public void run() {

            keyRelease(keyCodeToASCIICode(keyCode));

        }

    });

    return true;
}


// In C

// Push key to the event queue in Quake

extern void Key_Event (int key, qboolean down);


/*

 * C Implementation of Java native int keyPress(int key);

 */

JNIEXPORT jint JNICALL Java _keyPress

  (JNIEnv * env, jclass cls, jint key)

{

    Key_Event((int)key, 1);

    return key;

}


/*

 * C Implementation of Java native int keyRelese(int key);

 */

JNIEXPORT jint JNICALL Java _keyRelease

  (JNIEnv * env, jclass cls, jint key)

{

    Key_Event((int)key, 0);

    return key;

}
Cascading Touch Events
Touch events work in a similar way as key events. When the user touches the device screen, the Java activity overrides onTouchEvent which receives a MotionEvent. The event contains the coordinates of the pointer where the top-left corner of the device represents the origin (0,0). The type of event: ACTION_DOWN, ACTION_UP or ACTION_MOVE can be obtained by calling event.getAction(). Based on this value, we save the start XY coordinates. Finally, when we drag a finger, the XY increments (dx, dy) are calculated and sent to the native layer for consumption. When the finger goes up, the start XY coordinates are reset as shown in Listing 2–12. The final effect is a sequence of delta XY increments which the native engine can use to either move a character in 3D space or look around the surroundings. This is how Quake handles movement.
Listing 2–12. Cascading touch events between Java and C
// Java: Natives to be implemented in C

public static native int mouseLook(int deltaX, int deltaY);

public static native int mouseMove(int deltaX, int deltaY);


// down corrdinaes

float startX = -1, startY = -1;


public boolean onTouchEvent(MotionEvent event)

{

    int action = event.getAction();

    if ( action == MotionEvent.ACTION_DOWN ) {

        startX = event.x;

        startY = event.y;

    }

    else if ( action == MotionEvent.ACTION_UP )  {
        startX = startY = 0;

    }

    else if ( action == MotionEvent.ACTION_MOVE)

    {

        final float dx = event.x - startX;

        final float dy = event.y - startY;


        // decide to move or look

        mouseLook(dx , dy );

        //mouseMove (dx, dy);

    }

    return true;

}


// C implementation of int mouseLook(int deltaX, int deltaY)

JNIEXPORT jint JNICALL Java_Natives_mouseMove

  (JNIEnv * env, jclass cls, jint dx, jint dy)

{

    LOGD("Mouse Move %d, %d", dx, dy);

}


// C implementation of int mouseLook(int deltaX, int deltaY)

JNIEXPORT jint JNICALL Java_Natives_mouseLook

  (JNIEnv * env, jclass cls, jint dx, jint dy)

{

    LOGD("Mouse Look %d, %d", dx, dy);

}
In the previous section we looked at single touch events which may not be adequate for some types of games such as first-person shooters where the player needs to move and aim at the same time. The next section can help: Multitouch is a technique that expands on the touch API to provide more fingers you can use around your game for more complex interactions.
Multitouch Tricks
Themultitouch capabilities of Android are an extension of MotionEvent. It has all the information you need to implement a multitouch scheme. For example, let's assume that we have a game where sweeping a finger on the left side will move a character forward or sideways in 3D space, and sweeping on the right side will look around. Using the Android MotionEvent, we can easily implement such a scheme. Consider three sample classes: MultiTouchGesture, MultiTouchScreen, and TestActivity from Listings 2–13, 2–14, and 2–15 respectively, all of which are discussed in the following sections.
MultiTouchGesture
This is a class that encapsulates a gesture type such as a character move or look (Listing 2–13). It also defines the bounds on the screen where this gesture is valid (by using the Rect Android class). When the gesture is valid it will execute some action (sending the move or look increments to the native engine for example).
Listing 2–13. Multi touch gesture
package com.touch;


import android.graphics.Point;

import android.graphics.Rect;

import android.view.MotionEvent;


public class MultiTouchGesture {

  public enum eGestureType {  MOVE, LOOK };


  Rect bounds;

  eGestureType type;


  public MultiTouchGesture(eGestureType type, Rect bounds) {

    this.type = type;

    this.bounds = bounds;

  }


  /**

   * Execute gesture

   * @param action

   *          {@link MotionEvent} action: ACTION_UP, ACTION_MOVE,...

   * @param p

   *          Finger point XY coordinates

   */

  public boolean execute(int action, Point p) {

    switch (type) {

    case MOVE:

      doMove(action, p);

      break;


    case LOOK:

      doLook(action, p);

      break;


    default:

      break;

    }

    return true;

  }


  public void reset() {

    switch (type) {

    case MOVE:


      break;

    case LOOK:

      break;


    default:

      break;

    }

  }


  private void doMove(int action, Point p) {

    // Tell the native engine to move

  }
  private void doLook(int action, Point p) {

    // Tell native engine to look

  }

}
MultiTouchGesture will execute by checking its type (in this case MOVE or LOOK). Depending on the type, a native method could be fired to send the XY coordinates to the game engine. The action argument tells the gesture what king of MotionEvent has fired. It can be one of the following:
MotionEvent.ACTION_DOWN (first finger)

MotionEvent.ACTION_UP (first finger)

MotionEvent.ACTION_MOVE (first finger)

ACTION_POINTER_1_DOWN (second)

ACTION_POINTER_1_UP (second)

ACTION_POINTER_2_DOWN (third)

ACTION_POINTER_2_UP (third)

ACTION_POINTER_3_DOWN (fourth)

ACTION_POINTER_3_UP (fourth)
TIP: Android supports up to 4 simultaneous pointers/fingers o screen.
MultiTouchScreen
This class is in charge of storing a list of gestures, checking their bounds and interacting with the main activity (Listing 2–14).
Listing 2–14. MultiTouchScreen
package com.touch;


import java.util.ArrayList;

import android.graphics.Point;

import android.view.MotionEvent;


public class MultiTouchScreen {


  private ArrayList<MultiTouchGesture> mGestures;


  /**

   * Constructor

   * @param gestures

   */

  public MultiTouchScreen(ArrayList<MultiTouchGesture> gestures) {

    mGestures = gestures;

  }


  /**

   * Touch Event. Events with bogus pressure pop up when using 1 finger

   * @param e

   */

  public void onTouchEvent(MotionEvent e) {

    final int action = e.getAction();

    int count = e.getPointerCount();
    Point[] points = new Point[count];


    // for each finger extract coords

    for (int i = 0; i < points.length; i++) {

      points[i] = new Point((int) e.getX(i), (int) e.getY(i));

    }


    // for each gesture

    for (MultiTouchGesture g : mGestures) {

      // for each finger (pointer)

      for (int j = 0; j < count; j++) {

        if (g.bounds.contains(points[j].x, points[j].y)) {

          g.execute(action, points[j]);

        }

      }

    }


    // reset when finger goes up

    if (action == MotionEvent.ACTION_UP) {

      for (MultiTouchGesture g : mGestures) {

        g.reset();

      }

    }

  }

}
The class MultiTouchScreen receives the MotionEvent from the main activity and checks each gesture to see if the XY coordinates of the finger fall within the bounds of the gesture. If so, then the gesture is executed. You can get the number of pointers from the MotionEvent by calling:
int count = e.getPointerCount();
Then, the coordinates for each pointer can be obtained by looping through the number of pointers and extracting their XY coordinates:
    Point[] points = new Point[count];


    // for each finger extract coords

    for (int i = 0; i < points.length; i++) {

      points[i] = new Point((int) e.getX(i), (int) e.getY(i));

    }
Finally we can check if the pointer falls within the gesture bounds by looping through each gesture and checking if each pointer XY coordinates falls within the gesture bounding rectangle.
    for (MultiTouchGesture g : mGestures) {

      // for each finger (pointer)

      for (int j = 0; j < count; j++) {

        if (g.bounds.contains(points[j].x, points[j].y)) {

          g.execute(action, points[j]);

        }

      }

    }
TestActivity
Last thing we need is an Activity that will initialize the multi touch screen, the gesture bounds, and listen for touch events (see Listing 2–15).
Listing 2–15. test Activity for the MultiTouchScreen class
public class TestActivity extends Activity {


  MultiTouchScreen mtScreen;


  @Override

  public void onCreate(Bundle savedInstanceState) {

    super.onCreate(savedInstanceState);

    setContentView(R.layout.main);


    // init multi touch screen

    ArrayList<MultiTouchGesture> gestures = new ArrayList<MultiTouchGesture>();


    int w = getWindow().getWindowManager().getDefaultDisplay().getWidth();

    int h = getWindow().getWindowManager().getDefaultDisplay().getHeight();


    // move: left half of the screen

    gestures.add(

     new MultiTouchGesture(eGestureType.MOVE, new Rect(0, 0, w / 2, h)));


    // look right halsf

    gestures.add(

        new MultiTouchGesture(eGestureType.LOOK, new Rect(w / 2, 0, w, h)));


    mtScreen = new MultiTouchScreen(gestures);

  }


  @Override

  public boolean onTouchEvent(MotionEvent event) {

    mtScreen.onTouchEvent(event);

    return true;

  }

}
TestActivity initializes the gestures coordinates by obtaining the display width and height (using getWindow().getWindowManager().getDefaultDisplay()). It then initializes two types of gestures: MOVE with bounds on the left half of the screen, and LOOK with bounds on the right half. The gestures are passed to the MultiTouchScreen constructor. Finally when a single or multitouch event fires, onTouchEvent in the main activity will be called and the event relayed to MultiTouchScreen for consumption. This will allow our game character to move and look simultaneously in 3D space. This technique will be put to the test in the Quake I & II chapters of this book.
A Word of Caution About Multitouch
We have seen some neat tricks for handling audio, video, and input using keyboard, single and multitouch. But if you are a hardcore gamer you will always hear complaints about how difficult is to play hardcore games (shooters for example) with a touch interface or a tiny keyboard. Try playing doom with a touch screen versus a controller. You will get frustrated very quickly with the touch screen. Some games simply require a controller. This is the reason for the next section: Bluetooth controllers. I am sure your customers will be happy that you provide Bluetooth controller support in your game.
Bluetooth Controllers (Zeemote)
Zeemote is a Bluetooth joystick controller very popular in Nokia phones. With the rising in popularity of other smartphones, its creators released an SDK for other platforms such as Android and iPhone. The Zeemote consists of a joystick and four buttons (A, B, C, and D - see Figure 2–10).
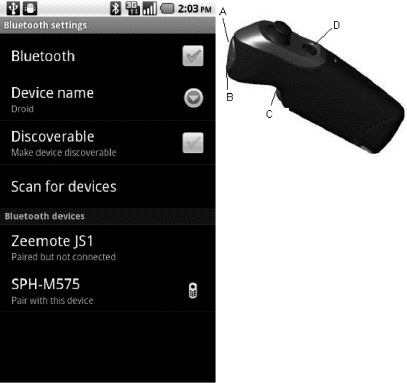
Figure 2–10. Bluetooth settings and Zemmote joystick
Before you can start using a Zeemote you need to turn it on, enable Bluetooth and pair the controller. Put two AAA batteries in the controller, press the D button for 3 seconds to turn it on, then enable Bluetooth as seen in Figure 2–10. Press scan for devices, Android should show the controller in the device list. Press Zeemote JS1 and select Pair Device. You don't need to connect; pairing is enough.
TIP: Pairing stores the Zeemote message authentication code (MAC) address in your phone. This is sort of a device ID used to communicate between both devices. You need to pair a Bluetooth device only once.
Now we can start writing code that connects to our Zeemote but first we need to download the SDK with the libraries required to enable it in our app. The latest Zeemote SDK is available online at http://www.zeemote.com or in the Book's source under ch02.Project/libs (see Figure 2–11).

Figure 2–11. Components of the Zeemote SDK
Figure 2–11 shows the required JARs for the Zeemote SDK 1.4: ZControllerLib-android-1.4.1.jar, ZControllerLib-android-ui-1.4.1.jar, ZControllerLib-common-1.4.1.jar, zc-strings-1.4.1.jar, and the native libZControllerLib_Android.so. You will need to include all these files in the app you wish to enable the Zeemote.
Listing 2–16 shows the simple class Zeemote that connects to a controller and listens for status, button, and joystick events. The steps can be summarized as follows:
- Create an instance of Controller by calling new
Controller(Controller.CONTROLLER_1). This object is used to interface with the device. - Listen for controller events by implementing any of the API interfaces:
IStatusListener: This interface fires the eventsbatteryUpdate(BatteryEvent)which gives information bout power levels; connected(ControllerEvent) which fires when the controller is successfully connected; and disconnected(DisconnectEvent) which fires when a disconnection occurs.IButtonListener: This interface fires the eventsbuttonPressed(ButtonEvent)orbuttonPressed(ButtonEvent)whenever any of the 4 buttons is presses and released.IJoystickListener: This interface fires the eventjoystickMoved(JoystickEvent)which gives the scaled XY coordinated of the joystick.
- Handle the above events accordingly.
Listing 2–16. Class to connect a Zeemote
public class Zeemote implements IStatusListener, IJoystickListener,

    IButtonListener

{

  private static final String TAG = "Zeemote";

  private Controller mZeeController;

  private Context mContext;


  public Zeemote(Context context) {

    mContext = context;

    mZeeController = new Controller(Controller.CONTROLLER_1);


    mZeeController.addStatusListener(this);

    mZeeController.addJoystickListener(this);

    mZeeController.addButtonListener(this);

  }


  public void  connect() {

    ControllerAndroidUi controllerUi = new ControllerAndroidUi(mContext,

        mZeeController);

    controllerUi.startConnectionProcess();

  }


  /************************************************

   * ZEEMOTE EVENTS

   ************************************************/

  public void batteryUpdate(BatteryEvent event) {

    int id = event.getController().getId();

    int max = event.getMaximumLevel();

    int min = event.getMinimumLevel();

    int warn = event.getWarningLevel();

    int cur = event.getCurrentLevel();

    int pctLeft = (int) (((float) (cur - min) / (float) (max - min)) * 100);


    Log.d(TAG, "Battery Update: Controller ID=" + id + " cur=" + cur + ", max="

        + max + ", min=" + min + ", warn=" + warn + " %left=" + pctLeft);


    /* battery low? */
    if (cur <= warn) {

      // do somthing

    }

  }


  public void connected(ControllerEvent event) {

    com.zeemote.zc.Configuration config = event.getController()

        .getConfiguration();


    Log.d(TAG, "Connected to controller:");

    Log.d(TAG, "Num Buttons=" + config.getButtonCount());

    Log.d(TAG, "Num Joysticks=" + config.getJoystickCount());


  }


  public void disconnected(DisconnectEvent event) {

    Log.d(TAG, "Disconnected from controller: "

        + (event.isUnexpected() ? "unexpected" : "expected"));


    if (mZeeController != null) {

      Log.d(TAG, "Removing Zee listeners.");


      mZeeController.removeStatusListener(this);

      mZeeController.removeJoystickListener(this);

      mZeeController.removeButtonListener(this);

    }

  }


  /************************************************

   * ZEEMOTE BUTTON EVENTS

   ************************************************/

  public void buttonPressed(ButtonEvent event) {

    int b = event.getButtonID();

    String label = event.getController().getConfiguration().getButtonLabel(b);


  }


  public void buttonReleased(ButtonEvent event) {

    String buttonName = event.getController().getConfiguration()

        .getButtonLabel(event.getButtonID());

  }


  /************************************************

   * ZEEMOTE JOYSTIC EVEN

   ************************************************/

  public void joystickMoved(JoystickEvent e) {

    // A joystick moved. Scale the values between -100 and 100

    int x = e.getScaledX(-100, 100);

    int y = e.getScaledY(-100, 100);


    Log.d(TAG, "X=" + x + ",Y=" + y);

  }

}
To connect to the Zeemote from your app activity call the connect method of the Zeemote class:
Zeemote zee = new Zeemote(this);

zee.connect();
When the connect method fires the Zeemote connection UI will take over and allow you to connect (if the controller is on and close to the phone). As a bonus you can check programmatically if Bluetooth is enabled using BluetoothAdapter.getDefaultAdapter(), and if not enabled use the built-in Android UI to do it (see Listing 2–17).
Listing 2–17. Enabling the Bluetooth adapter
BluetoothAdapter mBluetoothAdapter = BluetoothAdapter.getDefaultAdapter();


if (mBluetoothAdapter == null) {

  // Device does not support Bluetooth

}

// Enable it

if (!mBluetoothAdapter.isEnabled()) {

  Intent enableBtIntent = new Intent(BluetoothAdapter.ACTION_REQUEST_ENABLE);

  ctx.startActivityForResult(enableBtIntent, REQUEST_ENABLE_BT);

}
Summary
In this chapter, you have taken the first steps for building a hybrid game using JNI by learning how to createthe main Java activity and loading a native library within it. Next, you learned about Java native methods usingthe native keyword plus the C header file required to implement them. You also learned some useful C tricks, such as converting Java arrays to C arrays, getting the size of a Java array, and invoking Java methods within C.
You then learned how tocascade Audio, Video, Key, and Touch events from Java to C by using thin Java wrappers that simply pass event information to the native library.You learned about Multitouch, and how you can track multiple pointers across the screen reacting accordingly. Finally, you saw how to enable the slick Zeemote Bluetooth controller in you app.
This and the previous chapter provide the basic foundation if you are planning to port a game that has significant Linux C code to the Android platform. In Chapter 3 we tackle native OpenGL in more detail.