CHAPTER
8
Dynamic Analysis Lab
Setting up the static analysis lab gave you a good foundation that you can build on when setting up a dynamic analysis lab. Dealing with Windows errors during installation and anonymizing and isolating the lab are among the topics that will help you to set up a dynamic analysis lab.
Using a static analysis lab offers you a glimpse of the nature of malware from the data gathered with the malware at rest. Although the data might not be enough to come up with any definite information to fully determine a malware’s behavior or directive, static analysis is still a useful first step in the malware analysis process. The next step that builds upon static analysis is dynamic analysis. With dynamic analysis, you are able to observe malware in its natural environment. You are able to monitor the malware’s behavior while it is running in an environment that mimics the system the malware is designed to target. It is analogous to an organism being studied in a small, contained area that mimics its natural habitat. The only difference is that it is a controlled and simulated environment. The controlled environment where dynamic analysis is being conducted that is designed to mimic a malware’s target environment is known as the dynamic analysis lab. This is where malware behavior can be observed, monitored, and recorded.
In this chapter, I will discuss how to build an effective dynamic analysis lab by making it as close to the desired environment as possible for malware to thrive. I will also discuss how to make sure that the dynamic analysis lab is backed up and restored in case of failure so there will be minimal downtime.
Setting Up the Lab
Similar to a static analysis lab, the dynamic analysis lab can be set up in either a virtual or bare-metal environment. But unlike the static analysis lab, where there is no difference whether the environment is virtual or bare-metal, a dynamic analysis lab environment can make or break an analysis session, especially if the malware is virtual-aware. This is why it is important to take into consideration whether a virtualized environment or a bare-metal one will be used in setting up a dynamic analysis lab.
LINGO
A virtual-aware malware is malware that has the ability to detect whether it is running in a virtualized environment.
The ideal setup is to have both because both environments offer several advantages that complement each other. The virtualized environment is easy to manage, replicate, back up, and restore. But then again, virtual-aware malware can render a virtual dynamic analysis lab useless. The bare-metal system, on the other hand, solves the problem of virtual-aware malware from evading dynamic analysis. But it is not as easy to manage, replicate, back up, and restore as a virtualized environment.
Although there are lots of virtual-aware malware out there, a big chunk of malware that is seen every day in the wild does not possess this evasion technique. Therefore, a virtualized environment is still useful. But since there is no initial knowledge of whether the malware being subjected to the virtualized dynamic analysis lab is virtual-aware or not, a good rule of thumb is to have all binary samples processed in a virtualized environment, and then those that do not produce any results will be processed using a bare-metal dynamic analysis lab.
TIP
Process all samples in a virtualized dynamic analysis lab environment first and use a bare-metal dynamic analysis lab only if the virtualized environment does not yield any results.
Regardless of the environment, the steps needed to set up a dynamic analysis lab are basically the same. The only difference is how to execute each step.
To set up a dynamic analysis lab, you will be performing the following steps:
1. Choose the hardware.
2. Install the operating system.
3. Make the lab malware friendly.
4. Anonymize the lab.
5. Isolate the lab.
Choose the Hardware
Like with a static analysis lab, a researcher building a dynamic analysis lab has several choices when it comes to hardware. They are as follows:
![]() Desktop
Desktop
![]() Laptop
Laptop
Both of these choices have several advantages, as discussed in Chapter 7. It boils down to the analyst’s needs. If the need is more for mobility, a laptop is the best choice. But if the need is more for power, that is, you are hosting a handful of virtualized dynamic analysis lab with different flavors, then the best choice is a powerful desktop or a server. The most important thing when it comes to hardware choice is that it has enough space, memory, and computing power to support the dynamic analysis lab or several dynamic analysis lab images.
LINGO
A dynamic analysis lab image is another term for virtualized dynamic analysis lab environment.
Install the Operating System
In the previous chapter when discussing how to set up a static analysis lab, I did not limit the topic to Windows. I also discussed how to set up an Ubuntu system. This is because there are Linux-based file inspection tools that prove valuable in static analysis. But since dynamic analysis is the process of analyzing malware while it is in motion, you do not need any Linux-based dynamic analysis lab because it is not the malware’s target OS. Instead, I will concentrate on showing how to set up a Windows system where malware can execute and run as it is intended to run. The focus is on Windows since the scope of the discussion revolves around Windows-based files.
When it comes to a Windows dynamic analysis lab, you must have different flavors of Windows available. The following are the most commonly used in dynamic analysis labs today:
![]() Windows XP Service Pack 3 32-bit
Windows XP Service Pack 3 32-bit
![]() Windows 7 32-bit
Windows 7 32-bit
![]() Windows 7 Service Pack 1 32-bit
Windows 7 Service Pack 1 32-bit
![]() Windows 7 64-bit
Windows 7 64-bit
![]() Windows 7 Service Pack 1 64-bit
Windows 7 Service Pack 1 64-bit
![]() Windows 8
Windows 8
It is always good to have different flavors of Windows available. This makes analysis much more effective and gives the researcher a chance to see how a malware behaves in different Windows flavors. For example, if a malware successfully runs in Windows 7 but not in Windows 7 Service Pack 1, this can already be a good indicator that the malware probably is utilizing some vulnerability in Windows 7 that has been solved by Service Pack 1. This information is already useful. A researcher can simply advise affected users to install Service Pack 1 to stop the malware from spreading while more analysis and a better solution is still being worked on.
TIP
A Microsoft Developer Network (MSDN) subscription is a good way to have access to different flavors of Windows. Get one if you or the company you work for has the budget for this. If there is no budget for an MSDN subscription, buying separate Windows installers might be the cheaper alternative.
Since it is always good to have both a virtualized dynamic analysis lab and a bare-metal dynamic analysis lab, you need to familiarize yourself with the basics of installing Windows in these environments.
Installing in a Virtualized Environment
Lots of virtualized environments can be used when creating a dynamic analysis lab. The most common are the following:
![]() VMware
VMware
![]() VirtualBox by Oracle
VirtualBox by Oracle
![]() Virtual PC by Microsoft
Virtual PC by Microsoft
The most popular VMware virtualization software is VMware Workstation for Windows and Fusion for Mac. These require licenses. The free version of VMware is VMware Player. It is useful for building virtualized environments, but it does not offer as many features as those offered by the paid versions. VirtualBox and Virtual PC, on the other hand, are all free. For these purposes, I will be concentrating more on VMware Player and VirtualBox. Feel free to experiment with using Virtual PC by Microsoft.
Installing the operating system (OS) in a virtualized environment is easy. All that is needed is the ISO image of the OS installer. It is ideal if you have an MSDN subscription because the OS installers are distributed as ISO images.
Another important aspect of creating a virtualized dynamic analysis lab is the choice of the host OS. Some researchers prefer a Linux-based OS such as Ubuntu or even Mac, while others prefer Windows. This is up to you and your needs.
For me, I always prefer Ubuntu as the host OS and simply install a virtualized Windows environment. To do this, I use either VMware Player or VirtualBox. I prefer this setup as a precaution just in case malware has the capability to compromise the host OS because of a hole or vulnerability in the virtualization software. Having a host OS that the malware is not designed to execute in minimizes the risk of malware infection. By taking away the OS dependency of malware, the risk of malware infection is mitigated.
LINGO
The host OS is where the virtualization software is installed. The guest OS is the OS that is virtualized by the virtualization software.
The following labs will show you how to install and uninstall both VMware Player and VirtualBox in Ubuntu.
In this lab, you will be installing VMware Player in Ubuntu. For this purpose, you will be using the 64-bit version of Ubuntu and VMware Player for Linux.
What You Need:
![]() System running Ubuntu 14.04.01 LTS or later
System running Ubuntu 14.04.01 LTS or later
![]() VMware Player for Linux installer
VMware Player for Linux installer
Steps:
1. Register for a VMware account at https://my.vmware.com/web/vmware/login.
2. Download VMware Player for Linux at http://www.vmware.com/go/downloadplayer. For the purpose of this lab, you will be using VMware Player for Linux 64-bit. As of this writing, the latest version is 6.0.3.
3. Open a terminal window and change to the directory where VMware Player was downloaded.
4. Install the required dependencies first.
![]()
5. Install VMware Player. Take note that the VMware Player version may vary. Enter the filename you have downloaded and simply follow this pattern:
![]()
6. Follow the prompts in the VMware Player installation window, as shown in Figure 8-1, to finish installation.

Figure 8-1 VMware Player installer.
7. After successful installation, execute VMware. Figure 8-2 shows the VMware Player main window.

Figure 8-2 VMware Player main window.
TIP
Using the Ubuntu unity panel located on the upper left, type VMware to find where VMware is and double-click the icon.
In this lab, you will be uninstalling VMware Player in Ubuntu. For this purpose, you will be using the 64-bit version of Ubuntu and VMware Player for Linux.
What You Need:
![]() System running Ubuntu 14.04.01 LTS or later
System running Ubuntu 14.04.01 LTS or later
![]() VMware Player for Linux installed
VMware Player for Linux installed
1. Open a terminal window.
2. Execute the following command line to invoke the VMware Player window:
![]()
3. Follow the instructions in the VMware Player installer window to uninstall VMware Player.
In this lab, you will be installing VirtualBox in Ubuntu. For this purpose, you will be using the 64-bit version of Ubuntu and VirtualBox for Linux.
What You Need:
![]() System running Ubuntu 14.04.01 LTS or later
System running Ubuntu 14.04.01 LTS or later
![]() VirtualBox for Linux installer
VirtualBox for Linux installer
Steps:
1. Download VirtualBox Linux from https://www.virtualbox.org/wiki/Linux_Downloads.
2. Choose the flavor that is for Ubuntu 14.04 and download the 64-bit version.
3. Open a terminal window and change to the directory where VirtualBox was downloaded.
4. Install the VirtualBox dependencies.
![]()
Just to avoid confusion, take note of the L and the number 1 character in libsdl1, that is, libsd(L)(1).
5. Install VirtualBox for Linux. Take note that the filename will vary depending on the current version that is available.
![]()
6. After successful installation, execute VirtualBox. Figure 8-3 shows the main page. You can do this by clicking the Ubuntu unity panel located at the top left and typing VirtualBox.
Figure 8-3 VirtualBox main page.
LINGO
The Ubuntu unity-panel is also known as home, Big Freaking Button, BFB, and simply panel.
In this lab, you will be uninstalling VirtualBox in Ubuntu. For this purpose, you will be using the 64-bit version of Ubuntu and VirtualBox for Linux.
What You Need:
![]() System running Ubuntu 14.04.01 LTS or later
System running Ubuntu 14.04.01 LTS or later
![]() VirtualBox for Linux installed
VirtualBox for Linux installed
Steps:
1. Open a terminal window.
2. Execute the following command to uninstall VirtualBox for Linux:
![]()
If you forgot the name of the exact package, you can get a list of packages installed by issuing the following command:
![]()
This will display the packages in alphabetical order. Simply look for virtualbox, and you will know exactly what the package name is. In this specific lab, it is virtualbox-4.3.
TIP
You can save the output from a command line to a file just by typing > filename at the end of the command line.
Installing in a Bare-Metal System
Installing Windows in a bare-metal system has already been well documented. You have been installing Windows in bare-metal systems since the OS was first released, so there is no need to spend too much time on it in this book. But with new hardware today that comes with no disc drive, you have to be familiar with how to install Windows in these devices, especially if you will not be utilizing the hardware manufacturer’s OS restore functionality.
TIP
To be on the safe side, do not rely on a PC manufacturer’s OS restore functionality even if the backup OS is found on a separate partition of the local hard disk because there is always a risk of it being compromised by previously executed (accidentally or on purpose) malware. It is always good to have a separate OS installer or image backup that is separated from the dynamic analysis lab to ensure that the image or the installer is not compromised.
A good way to install the OS is by using a universal serial bus (USB) stick. In the previous chapter, I discussed how to create a bootable USB Windows installer. Follow the instructions in Chapter 7, and you will be all set.
If the hardware comes with a disc drive but the device driver is not available anymore, you will see an error message stating that a required CD/DVD device driver was not found during installation. If this happens, simply follow the steps outlined in Chapter 7.
Plus, I have already discussed how to solve issues commonly faced by users when installing Windows without the required disc device driver and installing it in systems that do not come with a disc drive. You can learn how to solve these issues in Chapter 7.
Make the Lab Malware Friendly
In a static analysis lab, one of the steps you took was to harden the lab so if the malware is accidentally executed, it will be denied the things that it needs to function or at least be impeded in executing its directive. This is to ensure that the effects of malware infection are minimized. But in a dynamic analysis lab, your main goal is the opposite. You want the malware to execute. You want to provide it with everything it needs to execute properly. Because if it executes as it is intended to do, you will have the chance to capture its behavior and understand its main directive. Therefore, you must have a dynamic analysis lab that is malware friendly.
To make a dynamic analysis lab malware friendly, you need to do the following:
1. Make the OS malware friendly.
2. Make the Internet browser malware friendly.
3. Install commonly exploited software.
4. Create enticing files.
5. Create and utilize dummy social media accounts.
Make the OS Malware Friendly
Making the OS malware friendly means having it possess the following characteristics:
![]() The default user must have administrative privileges.
The default user must have administrative privileges.
![]() Automatic updates must be disabled.
Automatic updates must be disabled.
![]() User Account Control (UAC) must be disabled.
User Account Control (UAC) must be disabled.
NOTE
Most computer systems sold to consumers that have the OS installed already have default users with admin privileges. Attackers tend to exploit this, especially if the user does not know how to set up a new user account with nonadmin privileges.
In this lab, you disable Automatic Updates in Windows 7.
What You Need:
![]() System running Windows 7
System running Windows 7
1. Choose Start | Control Panel | Windows Update.
2. In the upper-left corner, click Change Settings.
3. Under Important Updates, choose Never Check For Updates (Not Recommended).
4. Under Recommended Updates, uncheck Give Me Recommended Updates The Same Way I Receive Important Updates.
5. Under Who Can Install Updates, uncheck Allow All Users To Install Updates On This Computer.
The setting should look like Figure 8-4.
Figure 8-4 Windows Update settings.
6. Click OK and exit the Windows Update window.
In this lab, you disable User Account Control in Windows 7.
What You Need:
![]() System running Windows 7
System running Windows 7
Steps:
1. Choose Start | Control Panel | Action Center.
2. In the upper-left corner, click Change User Account Control Settings.
3. Slide the indicator down to Never Notify, as shown in Figure 8-5.

Figure 8-5 User Account Control settings.
4. Click OK.
5. After clicking OK, User Account Control will ask whether you want to allow User Account Control Settings to make changes to the computer. Click Yes.
6. Exit the Action Center window.
In some instances, UAC needs to be enabled, especially if analyzing malware that claims to have the ability to disable UAC.
Make the Internet Browser Malware Friendly
The following are the most common browsers found on a Windows system:
![]() Internet Explorer
Internet Explorer
![]() Mozilla Firefox
Mozilla Firefox
![]() Google Chrome
Google Chrome
A dynamic analysis lab must have all of them, and these browsers must have the lowest security setting; therefore, it will be easy for a malware to take advantage of and abuse these browsers. All security features that each of these browsers have must be disabled to make them malware friendly.
In this lab, you will configure Internet Explorer to be malware friendly. You will use Internet Explorer 11 for the purpose of this lab.
What You Need:
![]() System running Windows 7
System running Windows 7
![]() Internet Explorer 11 installed
Internet Explorer 11 installed
Steps:
1. Open Internet Explorer 11.
2. Click the cog icon in the upper-right corner of the Internet Explorer window. This will show a drop-down menu.
NOTE
A cog icon usually symbolizes settings or options in a software menu.
3. Choose About Internet Explorer. Figure 8-6 shows the About Internet Explorer window.
Figure 8-6 About Internet Explorer window.
4. Uncheck the option Install New Versions Automatically. This will ensure that you control what version of Internet Explorer is installed. Doing this will invoke User Account Control. Just click Yes.
5. Once you’re back to the About Internet Explorer window, click Close.
6. Click the cog icon again and choose Internet Options.
7. Click the Security tab. Figure 8-7 shows the available settings on the Security tab.

Figure 8-7 Internet Options Security tab.
8. Uncheck Enable Protected Mode.
NOTE
Internet Explorer protected mode is a security feature that makes it more difficult for malware to be installed on the system. Aside from malware installation protection, protected mode allows the installation of approved or wanted ActiveX controls and add-ons when logged in as an administrator. It is turned on by default.
9. You will notice from Figure 8-7 that there are four available zones.
![]() Internet
Internet
![]() Local intranet
Local intranet
![]() Trusted sites
Trusted sites
![]() Restricted sites
Restricted sites
10. Highlight each zone and change the security level to the lowest available one. The following are the zones and the security level allowed for each.
![]() Internet Medium to High
Internet Medium to High
![]() Local intranet Low to High
Local intranet Low to High
![]() Trusted sites Low to High
Trusted sites Low to High
![]() Restricted sites High
Restricted sites High
NOTE
In most cases, once you uncheck Enable Protected Mode in one zone, the rest of the zones follow suit. But just in case, double-check whether it is unchecked as you adjust the security level for each zone.
11. Click Apply.
12. A warning message will pop up saying “The current security settings will put your computer at risk.” This is exactly what you want, so just click OK.
13. Go to the Privacy tab.
14. Change Settings to the lowest possible, which is Accept All Cookies.
15. Uncheck Turn On Pop-Up Blocker. Leave the InPrivate setting checked. This will be useful if in the future there is a need to experiment on malware that claims to bypass InPrivate browsing.
NOTE
InPrivate browsing is a feature in Internet Explorer that prevents browsing history, temporary Internet files, form data, cookies, and usernames and passwords from being retained by the browser.
16. Figure 8-8 shows the Privacy tab settings you want.
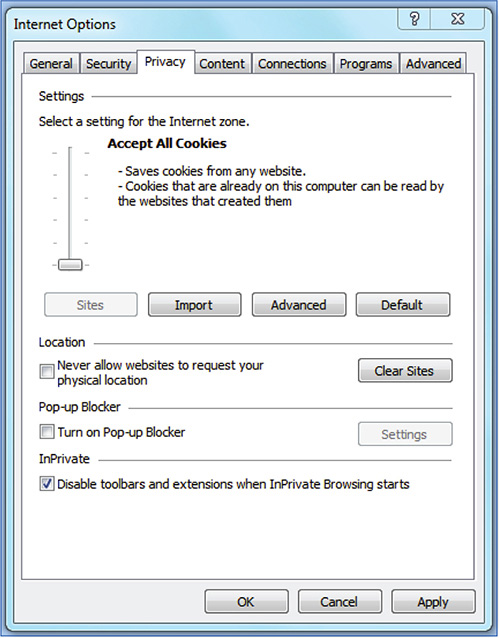
Figure 8-8 Internet Options Privacy tab.
18. Go to the Advanced tab.
19. Look for Security under Settings.
20. Select the following:
![]() Allow Active Content From CDs To Run On My Computer
Allow Active Content From CDs To Run On My Computer
![]() Allow Active Content To Run In Files On My Computer
Allow Active Content To Run In Files On My Computer
![]() Allow Software To Run Or Install Even If The Signature Is Invalid
Allow Software To Run Or Install Even If The Signature Is Invalid
21. Figure 8-9 shows the Advanced security settings you want.

Figure 8-9 Internet Options Advanced tab.
22. Click OK.
23. Restart the system to make sure that the changes made on the Advanced tab take effect.
In this lab, you will configure Mozilla Firefox to be malware friendly. As of this writing, the updated version of Firefox is 32.0.3. If there are changes in future versions regarding the settings you will manipulate, there shouldn’t be any problems. The changes in manipulating the settings are usually minimal, and the same principles will still apply.
What You Need:
![]() System running Windows 7
System running Windows 7
![]() Mozilla Firefox installed
Mozilla Firefox installed
Steps:
1. Open Mozilla Firefox.
2. Go to the upper-right corner and click the menu button represented by three parallel horizontal lines.
NOTE
Three parallel horizontal lines usually represent menu buttons in graphic-friendly user interface (UI) designs.
3. Click Options. Figure 8-10 shows the Mozilla Firefox Options window.
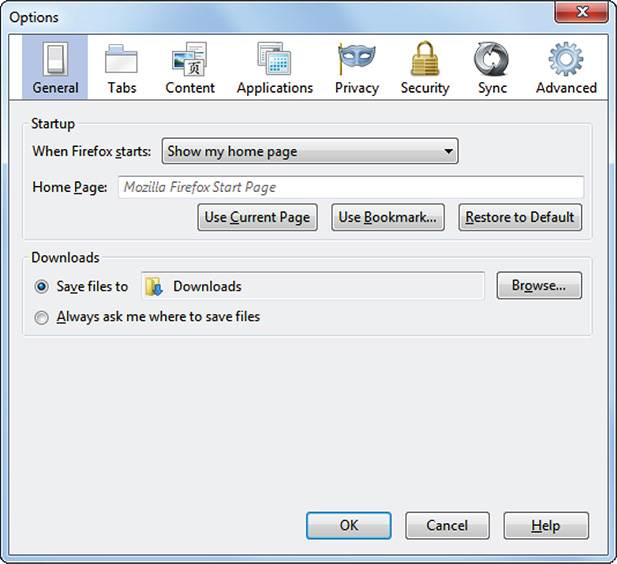
Figure 8-10 Mozilla Firefox Options window.
4. Go to the Content tab.
5. Uncheck Block Pop-Up Windows.
6. Go to the Applications tab and look for Windows Installer Package.
7. Change Action from Always Ask to Save File.
8. Go to the Security tab.
9. Uncheck the following:
![]() Warn Me When Sites Try To Install Add-Ons
Warn Me When Sites Try To Install Add-Ons
![]() Block Reported Attack Sites
Block Reported Attack Sites
![]() Block Reported Web Forgeries
Block Reported Web Forgeries
10. Click OK.
In this lab, you will configure Google Chrome to be malware friendly. As of this writing, the version of Google Chrome is 37.0.2062.124. If there are changes in future versions regarding the settings you will manipulate, there shouldn’t be any problems. The changes in manipulating the settings are usually minimal, and the same principles will still apply.
What You Need:
![]() System running Windows 7
System running Windows 7
![]() Google Chrome installed
Google Chrome installed
Steps:
1. Open Google Chrome.
2. Go to the upper-right corner and click the menu button represented by three parallel horizontal lines.
4. Another way to go to Settings is by typing the following in the address bar: chrome://settings.
5. Click Show Advanced Settings at the bottom of the page.
6. Under Privacy, click the Content Settings button. A window pop-up will then appear.
7. Navigate down the page and look for Pop-Ups. Toggle the radio button to Allow All Sites To Show Pop-Ups.
8. Navigate further downward and look for Unsandboxed Plug-In Access. Toggle the radio button to Allow All Sites To Use A Plug-In To Access Your Computer.
9. Below Unsandboxed Plug-In Access is Automatic Downloads. Under Automatic Downloads, toggle the radio button to Allow All Sites To Download Multiple Files Automatically.
10. Click Done at the bottom of the pop-up window.
11. Close the Settings page.
Although you want Internet browsers to be malware friendly, there will be instances when you want them to be secure as possible, especially if you are analyzing a malware that has the ability to bypass Internet browser security and privacy features.
Install Commonly Exploited Software
Typically the most popular software is often the most abused because it gives the malware the potential to have greater target coverage. Attackers spend hours finding vulnerabilities in this type of software that they can exploit. Now, there are lots of software that falls into this category, but for the purpose of brevity, I will concentrate on three often abused by attackers, listed here:
![]() Microsoft Office
Microsoft Office
![]() Adobe Flash Player
Adobe Flash Player
![]() Adobe Reader
Adobe Reader
Microsoft Office is included not only because of its macro capabilities but also because it is widely used in homes, schools, and businesses. Although there is not that much macro malware around, it is still good to have Office installed, especially if you are going to create enticing Office files. Having enticing files in Microsoft Office format but no Office installed might make attackers suspicious. A malware can always have a built-in functionality to detect programs installed in a system. A malware may refuse to steal any documents if the appropriate program for it does not exist in the system, especially if it is targeting a user or non-server system. This is one precaution malware writers take to beat honeypots with enticing files.
TIP
If you are going to use bait files for information stealers, make sure that the appropriate program for those files are installed. For example, Excel worksheets and Word documents must have Office Windows installed on the system.
Adobe Flash Player and Adobe Reader are also widely used and are free, making them good targets for attackers to exploit. Adobe Reader’s ability to run JavaScript makes it a good platform for attackers. Adobe Flash Player, on the other hand, is exploited through malformed Flash files that the browser loads.
TIP
The safest places to download Adobe Reader and Adobe Flash Player from are http://get.adobe.com/reader and http://get.adobe.com/flashplayer, respectively.
In this lab, you will configure Microsoft Office to be malware friendly. The version of Microsoft Office being used is Microsoft Office 2010. Even if you have a different version of Office installed, the same menu options and principles of making the software malware friendly still apply. If there are changes in how a menu is presented, they will be minimal.
What You Need:
![]() System running Windows 7
System running Windows 7
![]() Microsoft Office installed
Microsoft Office installed
Steps:
1. Open Microsoft Word.
2. Click the File tab under Help click Options. The Word Options window will pop up, as shown in Figure 8-11.
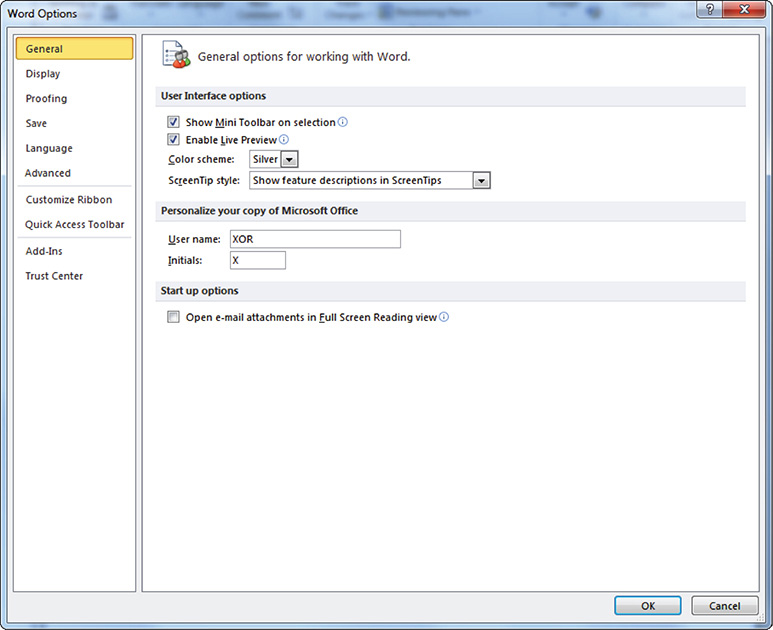
Figure 8-11 Word Options window.
3. Click Trust Center at the bottom-left side and then click Trust Center Settings at the lower-right side of the page.
4. In the Trust Center window, click Trusted Locations.
5. Click Add New Location. The Microsoft Office Trusted Location window will pop up.
6. Add the location where you will put suspicious malicious Word documents for opening and then check Subfolders Of This Location Are Also Trusted. Click OK.
NOTE
A Microsoft trusted location is treated as a trusted source for opening files. Microsoft Office assumes that these file locations are safe; therefore, content, code, and add-ins are allowed to load with a minimal amount of security.
7. Go to ActiveX Settings. Toggle the radio button Enable All Controls Without Restrictions And Without Prompting (Not Recommended; Potentially Dangerous Controls Can Run).
8. Uncheck Safe Mod (Helps Limit the Control’s Access To Your Computer).
9. Go to Macro Settings. Toggle the radio button Enable All Macros (Not Recommended; Potentially Dangerous Code Can Run).
10. Click OK until all pop-up windows are closed and then close Word.
TIP
Look at the different options in Trust Center and experiment with how they influence Word documents that have macros. You can always click Restore Defaults after experimenting and reconfigure as stated in the lab or as you see fit.
11. Open Excel and follow the same procedure.
12. Open PowerPoint and follow the same procedure.
13. Open Access and follow the same procedure.
NOTE
Some options that appear in Word will not appear in Excel, PowerPoint, and Access. This is fine. Simply skip those steps.
14. Open Publisher and follow the same procedure.
15. In Publisher there are two options: Macro Settings and DEP Settings.
16. In Macro Settings, follow the usual procedure.
17. In DEP Settings, uncheck Enable Data Execution Protection Mode.
LINGO
Data Execution Prevention (DEP) is a security feature that can help prevent damage to your computer from malware and other security threats. It can help protect your computer by monitoring programs to make sure they use system memory safely. If a program tries running code from memory in an incorrect way, DEP closes the program.1
18. Click OK until all pop-up windows are closed and then close all Microsoft Office applications.
In this lab, you will configure Adobe Reader to be malware friendly. The version of Adobe Reader I’m using is 11.0.09. Don’t worry if your available version is different; the same principles and configuration concepts remain the same. There might be minimal changes in the menu, but they can easily be identified.
What You Need:
![]() System running Windows 7
System running Windows 7
![]() Adobe Reader installer
Adobe Reader installer
Steps:
1. Download Adobe Reader from http://get.adobe.com/reader.
2. Choose the appropriate version and make sure that the option to install McAfee Antivirus is unchecked.
3. Install Adobe Reader.
4. Open Adobe Reader.
5. Choose Edit | Preferences.
6. Click JavaScript under Categories on the left side of the window.
7. Make sure Enable Acrobat JavaScript is checked and that Enable Global Object Security Policy is unchecked.
8. Click Security (Enhanced) on the left side of the window.
9. Make sure Enable Protected Mode at startup is unchecked. Once you do this, a message will pop up saying that the application needs to be restarted.
10. Make sure Enable Enhanced Security is unchecked.
11. Click Trust Manager on the left side of the window.
12. Under Internet Access From PDF Files Outside The Web Browser, click the Change Settings button.
13. Toggle the radio button Allow Pdf Files to Access All Websites and click OK.
14. Click Updater on the left side of the window.
15. Toggle the radio button Do Not Download Or Install Updates Automatically and click OK. A message will pop up asking whether you want to make changes to enhance security preferences. Click OK.
16. User Account Control will appear (if it is still enabled) asking whether you would allow Adobe Reader and Acrobat Manager to make changes to the computer. Click Yes.
17. Restart the Adobe Reader application.
Create Enticing Files
Most attacks are all about information stealing. Malware programs are designed to look for files that might contain company secrets or any confidential information that attackers can use to their advantage.
Creating a set of enticing files is easy. Simply get a letterhead of a bogus company or even a legitimate one and then put it in the dynamic analysis lab’s Documents folder or any folder renamed to sound like it contains company confidential files. The following are good folder names:
![]() Salaries
Salaries
![]() Bonuses
Bonuses
![]() MarketingResearch
MarketingResearch
![]() DesignProposals
DesignProposals
These are just suggestions; you are free to use your imagination. Then make sure that the enticing files have enticing names as well, such as EmployeesSalary.XLS. The more enticing it is, the more the attackers or the running malware will be convinced that it is a file worth stealing.
TIP
Make sure the enticing files are not empty. Creating enticing files with 0 bytes defeats the whole purpose of having enticing files. Remember that a malware can have checking mechanisms to know whether a file is valid.
Create and Utilize Dummy Social Media Accounts
Some malware has special needs such as having a Facebook or Twitter account in the compromised machine for it to function. Therefore, it is always good to have personas in your dynamic analysis lab. Having these dummy accounts ready is always helpful, so if you are faced with a malware that requires this, you can simply open a browser and log in to the social network of choice and then let the malware execute.
Configure the browsers to remember your social media account so you don’t need to input the password over and over again. This is also advantageous if the dynamic analysis lab will be part of an automated malware analysis infrastructure.
Anonymize the Lab
A dynamic analysis lab is an active computer environment. Depending on the malware running on the lab, the dynamic analysis lab may need to have an Internet connection to facilitate the malware communicating to its command and control, or C2.
LINGO
C2, C&C, and CnC are all abbreviations of a botnet’s command and control.
Therefore, it is important to anonymize the dynamic analysis lab. This protects the dynamic analysis lab from being tagged by the cybercriminals as research labs so the dynamic analysis systems won’t get blocked or attacked.
To anonymize the dynamic analysis lab, you will be using the following:
![]() Proxy servers
Proxy servers
![]() Virtual private network
Virtual private network
![]() Tor
Tor
It is one less than the anonymization technologies I discussed in the previous chapter. The one I took out is the online anonymizer. You do not need this since you will not be actively surfing the Internet, and the other three should take care of the anonymization you need in case the malware needs to utilize the browser.
Chapter 7 discusses all these technologies.
Isolate the Lab
Dynamic analysis labs need to be isolated even more than static analysis labs do. Malware is executed in a dynamic analysis lab; therefore, there is real risk that the malware can and will infect systems connected to it. This is why it is of paramount importance to isolate the dynamic analysis lab from any network.
A good rule of thumb for isolating a dynamic analysis lab is to have it totally isolated from any form of production network. It cannot be part of any network, and it cannot share any Internet connection with any device.
Restoring to a Clean State
Every time a malware is processed, the dynamic analysis lab has to be restored to its original clean state after the analysis process. This ensures that the result of the next dynamic malware analysis is not adulterated by the previous one.
Restoration time is an important characteristic of a dynamic analysis lab. The faster the restoration time, the more malware that can be analyzed dynamically. Restoration time becomes a big factor, especially if the dynamic analysis lab is part of an automated malware analysis system. Obviously, a virtualized dynamic analysis lab environment has faster restoration time compared to a bare-metal system.
Virtualized Environment Clean State Restoration
In a virtualized environment, a researcher can have different image snapshots. Image snapshots capture the current state of a virtual machine when the snapshot was taken. With virtual image snapshots, the researcher and analyst can always revert to an image that she wants to work on. This is great for malware analysis. But if the desire is automated dynamic malware analysis, setting an image to be non-persistent is the best option because it does not involve any manual step. The moment the virtual image is restarted, it automatically reverts to its clean state.
LINGO
A non-persistent image is an image that reverts to its original clean state after a reboot. A persistent image is the opposite.
In this lab, you set up a non-persistent image in VirtualBox.
What You Need:
![]() VirtualBox installed
VirtualBox installed
![]() A working VirtualBox image
A working VirtualBox image
1. Open VirtualBox.
2. Choose File | Virtual Media Manager.
3. On the Hard Drives tab, click the hard drive you want to make nonpersistent.
4. Click Modify under Actions or right-click the selected hard drive and choose Modify. The Modify Medium Attributes window will open.
5. Under Choose Mode, toggle the Writethrough radio button. In VirtualBox, this is the term used for non-persistent disk.
6. Click OK and close the Virtual Media Manager window.
7. Test the image for non-persistency.
TIP
You can find more information about VirtualBox special image write modes at https://www.virtualbox.org/manual/ch05.html#hdimagewrites.
In this lab, you set up a non-persistent image in VirtualBox using the command line in Windows.
What You Need:
![]() System running Windows
System running Windows
![]() VirtualBox installed
VirtualBox installed
![]() A working VirtualBox image
A working VirtualBox image
Steps:
1. Open a Windows command line.
2. Go to the VirtualBox folder. Its default location is C:Program FilesOracleVirtualBox.
3. Type and execute the following command line:
![]()
4. Execute VirtualBox and check the image for non-persistency.
Bare-Metal Environment Clean State Restoration
In the old days of bare-metal system malware analysis, there is no such thing as a non-persistent image. To go back to a clean state, the bare-metal system had to restored. Restoration had to be done all the time from a backup or clean image. This takes a lot of time, usually between 5 to 15 minutes depending on how fast the input/output (I/O) of the system is. Plus, everything is done manually. The most popular tool for a restoring bare-metal system during those days was Norton Ghost. Today, Clonezilla is the most popular and easy-to-use bare-metal system backup and restoration tool. I will discuss Clonezilla in greater detail later in this chapter.
Fortunately, there is a tool that enables non-persistency in a bare-metal system. This means that every time the bare-metal system is restarted or rebooted, it reverts to a clean state without the need for restoration from a backup image. This significantly lessens the time of the dynamic analysis lab’s readiness to tackle another malware. The tool is called Deep Freeze by Faronics. This is not a free tool, but in my humble opinion it is worth the money. You can find more information about this tool at http://www.faronics.com/products/deep-freeze/. As of this writing, the cost of this tool, specifically Deep Freeze Standard, is $35. With Deep Freeze, researchers and analysts have the capability to have a nonpersistent bare-metal system.
TIP
Deep Freeze Standard is available for a 30-day trial, so you can test it before making a decision to buy.
In this lab, you see how to use Deep Freeze Standard to create a non-persistent bare-metal system.
What You Need:
![]() System running Windows
System running Windows
![]() Deep Freeze Standard installed
Deep Freeze Standard installed
Steps:
1. Download and install Deep Freeze Standard from http://www.faronics.com/products/deep-freeze/standard/. A 30-day trial version is available.
2. Once installed, launch Deep Freeze Standard by pressing the Shift key and double-clicking the Deep Freeze Standard icon, represented by a polar bear, found in the notification area of the Windows taskbar.
3. Enter the password to unlock Deep Freeze Standard. This is the password you set during installation.
4. On the Status tab, choose Boot Frozen. This sets the bare-metal system to not record any changes. After every bootup, the bare-metal system goes back to its clean state.
TIP
Make sure you have done what needs to be done to the bare-metal dynamic analysis system before freezing it. If you forget to do something or need to update a setting or program, simply reboot to a clean state, set the status to Boot Thawed or Boot Thawed On Next, and make the necessary changes to the bare-metal system. Once done, set the status back to Boot Frozen.
5. Click OK.
6. You can also click Apply and Reboot for the changes to take effect and reboot the machine.
Backing Up and Restoring
After investing time and effort in creating a dynamic analysis lab, the next step is to back everything up. Nobody wants to go through the process of building the lab again from scratch if things go haywire. Plus, it is always important to back up critical part of your research systems, which includes the dynamic analysis lab. If it ever fails or behaves abnormally because of a new malware, you can easily restore it and be up and running in no time using its backup.
When it comes to backing up the dynamic analysis lab, the following items are important:
![]() The golden image
The golden image
![]() Host OS
Host OS
![]() Other systems supporting the lab
Other systems supporting the lab
The Golden Image
The golden image is the clean image on which all dynamic analysis labs are based. This image is the one that is used by the system to restore the dynamic analysis lab to its clean state.
In a virtualized environment, this is the snapshot or main image of the virtualized dynamic analysis lab. This is easy to back up because a copy of the virtual machine can just be kept offline and serve as the backup.
TIP
When setting up a virtual machine image, specifically in VMware, choose to have the image files divided into 2GB chunks. This makes it easy to copy and back up.
In a bare-metal environment, backing it up as an image is easy too. The tool I use is Clonezilla, which can be downloaded from http://clonezilla.org/downloads.php. As mentioned in the previous chapter, it is free and easy to use.
The number of golden images you have depends on the Windows flavor you have plus the different configurations and settings you have for each flavor. For example, if you have the different flavors covered here, then you will have at least six golden images:
![]() Windows XP Service Pack 3 32-bit
Windows XP Service Pack 3 32-bit
![]() Windows 7 32-bit
Windows 7 32-bit
![]() Windows 7 Service Pack 1 32-bit
Windows 7 Service Pack 1 32-bit
![]() Windows 7 64-bit
Windows 7 64-bit
![]() Windows 7 Service Pack 1 64-bit
Windows 7 Service Pack 1 64-bit
![]() Windows 8
Windows 8
If for each of the images you have different variations, such as one image has Adobe installed while the other one does not, then that’s an additional six golden images, making your total twelve. It is important to take into consideration the number of golden images you have and their sizes so you can plan your storage and backup space accordingly.
Host OS
Aside from backing up the golden images of a virtualized dynamic analysis lab, it is also important to back up the host OS. This ensures that if the host OS fails, there is no need to restore it from scratch and reconfigure it again to support the virtualized dynamic analysis lab. Sometimes the process of backing up the host OS is the most effective way to back up the whole dynamic analysis infrastructure because the backup also contains the golden images already. As a result, the system can resume its normal function after restoration, and there is no need to restore the golden images from their separate backups. The only thing that needs to be considered here is the space that will be taken up by backing up the host OS with the golden images.
Other Systems Supporting the Lab
Some dynamic analysis labs have other systems supporting them. For example, an interconnected multiple dynamic analysis lab might have a Dynamic Host Control Protocol (DHCP) server, its own private DNS server, a spoofed Internet box, and so on. These systems will also need backing up so they can easily be up and running in case of failure.
My tool of choice when it comes to backing up and restoring golden images of bare-metal dynamic analysis labs, the host operating system, and other systems supporting the lab is Clonezilla. It is free and easy to use.
As previously discussed, today Clonezilla is the most popular and easiest-to-use bare-metal system backup and restoration tool. Clonezilla, as described at http://clonezilla.org, is a partition and disk imaging/cloning program. It helps the user do system deployment, bare-metal backup, and recovery. There are two types of Clonezilla available: Clonezilla Live and Clonezilla SE (server edition). For these purposes, you will be using Clonezilla Live. Clonezilla Live is a small bootable GNU/Linux distribution for x86/amd64 (x86-64) computers. Clonezilla Live can be used to image or clone individual computers using a disc or USB flash drive. Since most computer systems nowadays, especially laptops, do not come with disc drives anymore, my concentration will be on using USB flash drives.
In this lab, you will be creating a Clonezilla Live in a USB flash drive that can be used to boot up a machine with no disc drive.
What You Need:
![]() USB flash drive with at least 8GB of space
USB flash drive with at least 8GB of space
![]() System running Windows
System running Windows
![]() Internet connection
Internet connection
1. Format the USB flash drive and choose FAT as the file system. Windows will format it as FAT32, which is the default.
2. Download Tuxboot from http://sourceforge.net/projects/tuxboot/files/. As of this writing, the latest version is Tuxboot 0.6.
3. Execute Tuxboot. Make sure the machine is connected to the Internet. Tuxboot will need to download the latest Clonezilla Live files during this process.
4. Fill in the following options, as shown in Figure 8-12:
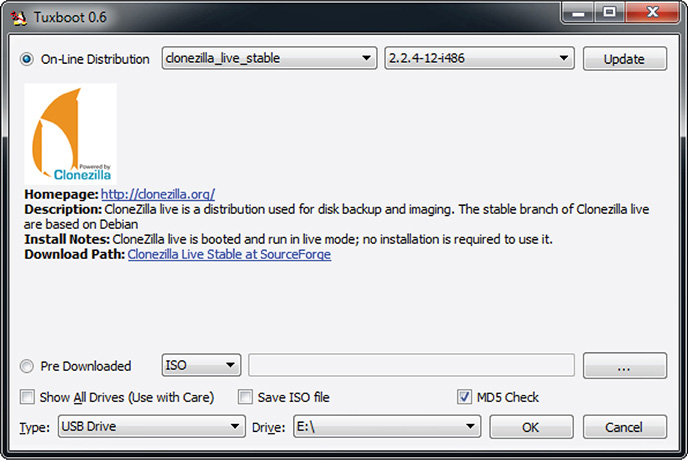
Figure 8-12 Tuxboot preferred options.
A. On-Line Distribution: clonezilla_live_stable | 2.2.4-12-i486 (latest as of this writing)
B. Type: USB Drive
C. Drive: The drive letter of the USB flash drive
TIP
Clicking Update in On-Line Distribution updates the version of Clonezilla Live to the latest one that supports the Windows version where Tuxboot is running.
5. Click OK. Tuxboot will then proceed with the following steps, as shown in Figure 8-13:
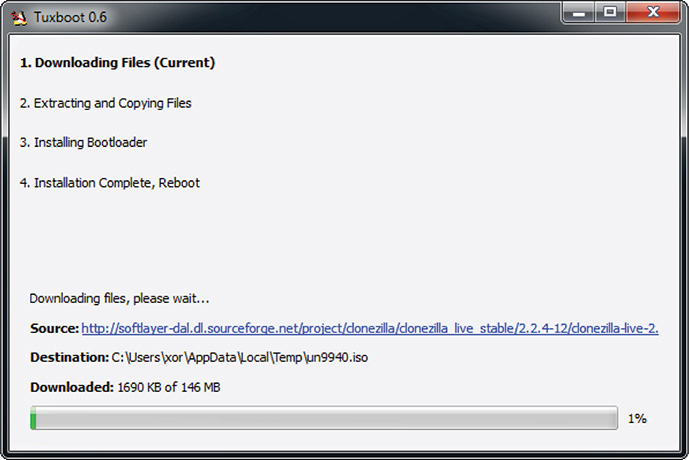
Figure 8-13 Tuxboot process.
A. Downloading Files The current version of Clonezilla Live is being downloaded by Tuxboot.
B. Extracting and Copying Files Downloaded files will be loaded to the USB flash drive.
C. Installing Bootloader This enables the USB flash drive to become bootable.
D. Installation Complete, Reboot Everything is set, and the USB is ready to be used.
6. Click the Reboot Now button to reboot the system.
7. As displayed in the Tuxboot window, after rebooting, select the USB boot option in the BIOS boot menu.
8. You now have a bootable Clonezilla Live USB installation.
In this lab, you will use Clonezilla Live to back up a hard disk partition.
What You Need:
![]() Clonezilla Live bootable USB flash drive
Clonezilla Live bootable USB flash drive
![]() System running in Windows
System running in Windows
Steps:
1. Make sure the system is shut down and powered off.
2. Insert the bootable Clonezilla Live USB flash drive.
3. Power on the system, go to the BIOS setup, and boot using the USB flash drive. Different systems have different ways of doing this. Please consult your system’s manual.
4. After successful reboot using the USB flash drive, the Clonezilla Live splash page is displayed.
5. Click Enter to activate Clonezilla Live. This is the default highlighted option in the Clonezilla Live menu. The system will then initialize.
6. Choose your language. English is the default.
7. Choose a policy for handling keymaps. Don’t Touch Keymap is the default. There’s no need to change this. Just press Enter.
8. Click Enter again to start Clonezilla.
9. Choose the default setting, which is Device-Image Work With Disks Or Partitions Using Images.
10. The next window will ask where the Clonezilla image will be saved to or read from. For this purpose, you will use the Local_dev option. If you want to use an external hard drive or USB flash drive to save to and read the image from, you can insert it now.
11. Choose the partition where you want to save the image.
12. Choose the directory where you want the image to be saved.
13. Choose the desired wizard mode. For this purpose, I will be using Beginner. Feel free to use Expert and experiment further.
14. The next window asks whether to save the whole disk or parts of the disk. Since you are saving only a partition, choose Saveparts.
15. Input the name for the saved image and press Enter.
16. Choose the source partition, press the spacebar to mark the selection, and click Enter. This is the partition you will back up.
17. Choose whether to check and repair the file system before saving it. If you have time, you can do this, but if you are in a hurry, simply choose Skip. I strongly suggest doing some checking when creating a backup of your system.
18. Follow the prompts to start the backup process. Backup might take a long time, especially if the save location is an external hard drive. A 50GB partition might take at least 30 minutes to back up.
19. After backup is done, you can choose Poweroff mode to shut down the system.
20. Turn on the system again and browse to the location of the saved image to verify it is there. Take note that the saved image is not a single file but rather a collection of different files. The name you assigned during the backup process is the name of the folder where these files are located.
In this lab, you will use Clonezilla Live to restore a hard disk partition from an image backup.
What You Need:
![]() Clonezilla Live bootable USB flash drive
Clonezilla Live bootable USB flash drive
![]() System running in Windows
System running in Windows
![]() Saved Clonezilla Live image file
Saved Clonezilla Live image file
Steps:
1. Make sure the system is shut down and powered off.
2. Insert the bootable Clonezilla Live USB flash drive.
3. If applicable, insert the external hard drive or USB flash drive where the Clonezilla Live image is saved. This step can be skipped because Clonezilla Live will let you insert any external media later in the process.
4. Power on the system, go to the BIOS setup, and boot up using the USB flash drive. Different systems have different ways of doing this. Please consult your system’s manual.
5. After successful reboot using the USB flash drive, the Clonezilla Live splash page is displayed.
6. Click Enter to activate Clonezilla Live. This is the default highlighted option in the Clonezilla Live menu. The system will then initialize.
7. Choose your language. English is the default.
8. Choose a policy for handling keymaps. Don’t Touch Keymap is the default. There’s no need to change this. Just press Enter.
9. Click Enter again to start Clonezilla.
10. Choose the default setting, which is Device-Image Work With Disks Or Partitions Using Images.
11. The next window will ask where the Clonezilla image will be saved to or read from. For this purpose, you will use the Local_dev option. If you want to use an external hard drive or USB flash drive to save to and read image from, you can insert it now.
12. Choose the partition where the saved image is located.
13. Go to the folder where the saved image is located.
14. Choose the desired wizard mode. For this purpose, I will be using Beginner. Feel free to use Expert and experiment further.
15. The next window is asking what Clonezilla Live functionality is needed. Since you are restoring an image to a local partition, choose Restoreparts and click Enter.
16. Clonezilla Live will ask which image file to restore. Choose the appropriate one and click Enter.
17. Choose the target partition to be overwritten by the image backup and click Enter.
18. Follow the prompts to initiate the restoration process. The restoration process may take some time depending on the system’s I/O speed. A restoration of 50GB partition can be at least 20 minutes.
19. After restoration is done, you can choose Poweroff mode to shut down the system.
20. Remove the Clonezilla Live bootable flash drive and any external hard drives connected to the system.
21. Reboot the system and check whether the restoration is successful.
Recap
In this chapter, I discussed how to set up a dynamic analysis lab. I identified the basic steps, which are as follows:
1. Choose the hardware.
2. Install the operating system.
3. Make the lab malware friendly.
4. Anonymize the lab.
5. Isolate the lab.
I also discussed the importance of restoration time when it comes to dynamic analysis labs. I explored the different methods and tools that you can use to restore a virtualized dynamic analysis lab and a bare-metal dynamic analysis lab to a clean state.
I stressed the importance of backing up what you have built so if ever a failure or an internal lab malware outbreak occurs, you can restore quickly with minimal downtime. I identified the important things that need to be backed up. They are as follows:
![]() The golden image
The golden image
![]() Host OS
Host OS
![]() Other systems supporting the lab
Other systems supporting the lab
In this chapter, the most important thing is making the dynamic analysis lab malware friendly. It is the key to success that will enable your dynamic analysis lab to successfully execute a malware so monitoring and recording of its behavior is possible.
Tools
![]() Virtualization software
Virtualization software
![]() VMware Player http://www.vmware.com/go/downloadplayer
VMware Player http://www.vmware.com/go/downloadplayer
![]() VirtualBox https://www.virtualbox.org/wiki/Downloads
VirtualBox https://www.virtualbox.org/wiki/Downloads
![]() VirtualPC http://www.microsoft.com/en-US/download/details.aspx?id=3702
VirtualPC http://www.microsoft.com/en-US/download/details.aspx?id=3702
![]() Adobe Reader http://get.adobe.com/reader
Adobe Reader http://get.adobe.com/reader
![]() Adobe Flash Player http://get.adobe.com/flashplayer
Adobe Flash Player http://get.adobe.com/flashplayer
![]() Deep Freeze Standard by Faronics http://www.faronics.com/products/deep-freeze/standard/
Deep Freeze Standard by Faronics http://www.faronics.com/products/deep-freeze/standard/
![]() Clonezilla http://clonezilla.org/download.php
Clonezilla http://clonezilla.org/download.php
![]() Tuxboot http://sourceforge.net/projects/tuxboot/files/
Tuxboot http://sourceforge.net/projects/tuxboot/files/
1 Microsoft Technet: http://technet.microsoft.com/en-US/.