
CHAPTER
9
The Portable Executable File
Malware inspection is where the excitement begins. This is the process where you actually dissect the malware sample and find out what it is capable of doing. But as with any inspection or analysis exercise, a process has to be followed to get the most out of the activity. And in a malware inspection activity (more popularly known as a malware analysis activity), there are steps that needed to be followed to effectively analyze malware.
Going back to the malware analysis process discussed in Chapter 1, the malware goes through multiple steps of analysis to get to the bottom of its malicious directive, as shown in Figure 9-1.
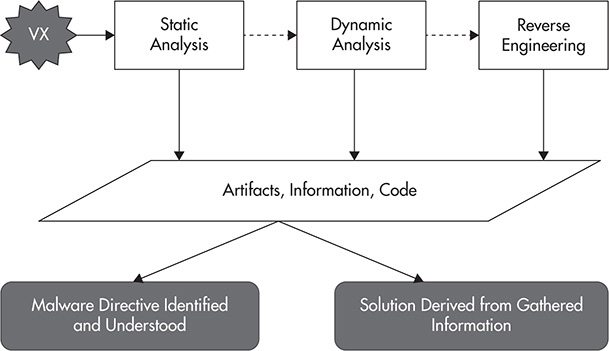
Figure 9-1 The malware analysis process.
But before analysis should begin, an understanding of the file format of the malware is important. Since this book covers Windows files, I will be concentrating on the Windows file format known as Portable Executable (PE).
In this chapter, I will discuss what the PE file format is, how it is structured, and what tools you can use to make sense of the data that you can extract from this format that will aid you in your investigation of malicious activity.
The Windows Portable Executable File
The Windows PE file is the file type of Windows operating systems starting in Windows NT and Windows 95. It is called Portable Executable because Microsoft’s vision was to use the same file format in future flavors of Windows, making the PE file common to all Windows platforms regardless of what central processing unit (CPU) they support. In my humble opinion, this idea has been accomplished because the descendants of Windows NT and Windows 95 still use the same Windows PE file.
The two most common file extensions of PE files are .EXE and .DLL, which I will refer to from now on as EXE and DLL files, respectively. An EXE is an executable file, whereas a DLL is a dynamic link library file. An executable file is pretty self-explanatory. A dynamic link library (DLL) file, as defined by Microsoft, is a library that contains code and data that can be used by more than one program at the same time. The main advantage of using DLLs is to promote code reuse and efficient memory usage. Instead of a program having to load the common functionality it needs on a separate memory space every time as a consequence of that functionality being coded into the program itself, the program can simply use the same functionality that is contained in and imported by the DLL. The program saves on memory usage, and the functionality it needs does not need to be coded into the program itself. Microsoft, as published in its knowledge base, summarizes the advantages offered by a DLL as follows:
![]() Uses fewer resources When multiple programs use the same library of functions, a DLL can reduce the duplication of code that is loaded on the disk and in physical memory. This can greatly influence the performance of not just the program that is running in the foreground but also other programs that are running on the Windows operating system.
Uses fewer resources When multiple programs use the same library of functions, a DLL can reduce the duplication of code that is loaded on the disk and in physical memory. This can greatly influence the performance of not just the program that is running in the foreground but also other programs that are running on the Windows operating system.
![]() Promotes modular architecture A DLL helps promote developing modular programs. This helps you develop large programs that require multiple language versions or a program that requires modular architecture. An example of a modular program is an accounting program that has many modules that can be dynamically loaded at run time.
Promotes modular architecture A DLL helps promote developing modular programs. This helps you develop large programs that require multiple language versions or a program that requires modular architecture. An example of a modular program is an accounting program that has many modules that can be dynamically loaded at run time.
![]() Eases deployment and installation When a function within a DLL needs an update or a fix, the deployment or installation of DLL does not require the program to be relinked with the DLL. Additionally, if multiple programs use the same DLL, they will all benefit from the update or the fix. This issue may more frequently occur when you use a third-party DLL that is regularly updated or fixed.
Eases deployment and installation When a function within a DLL needs an update or a fix, the deployment or installation of DLL does not require the program to be relinked with the DLL. Additionally, if multiple programs use the same DLL, they will all benefit from the update or the fix. This issue may more frequently occur when you use a third-party DLL that is regularly updated or fixed.
It is important to understand the modular advantage of DLLs because most malware today uses modular architecture, especially malware that updates itself with new functionality in a short period of time.
Even though it seems that there is huge difference in terms of file format between an EXE and a DLL, because of how DLL files are used, when you look closely, the difference is as simple as the difference in their extensions. Dissecting the two files will reveal that the only difference they have is a bit in one field of the PE header that tells Windows whether the file can be treated as an EXE or a DLL. What a PE header is will be discussed in the next section.
This bit is powerful because as long as it is set to characterize the file as a DLL, it will be treated as a DLL regardless of its extension. As a matter of fact, the following file extensions are implemented as DLLs:
![]() OCX files ActiveX control files
OCX files ActiveX control files
![]() CPL files Control Panel files
CPL files Control Panel files
![]() DRV files Device driver files
DRV files Device driver files
In your quest to analyze malware, it is important to know all DLL dependencies the malware needs to function properly. If one of the DLLs that a malware needs is not present in your dynamic analysis lab, the analysis will fail because the malware will not run as intended by the attacker. There will be instances wherein you need to install uncommon DLLs into your dynamic analysis lab to successfully run a malware or a suspected malware file.
A useful tool for this purpose of determining the DLL dependencies of a PE file is Dependency Walker. Dependency Walker is a free utility that scans any 32-bit or 64-bit Windows module (such as EXE, DLL, OCX, or SYS) and builds a hierarchical tree diagram of all the dependent modules. You can download Dependency Walker from http://www.dependencywalker.com.
In this lab, you will use Dependency Walker to identify the DLL dependencies of PE files.
What You Need:
![]() System running Windows 7
System running Windows 7
![]() Dependency Walker
Dependency Walker
1. Download Dependency Walker from http://www.dependencywalker.com.
2. Extract Dependency Walker from the downloaded ZIP file.
3. Execute depends.exe.
4. Choose File | Open and choose depends.exe.
5. The window, as shown in Figure 9-2, shows that depends.exe uses nine DLL files. If any of these files are corrupted or missing, Dependency Walker will not work.
6. To export this information to a text file, choose File | Save As.
7. In the next window, choose Text With Import/Export Lists (*.txt) in Save As Type and click Save.
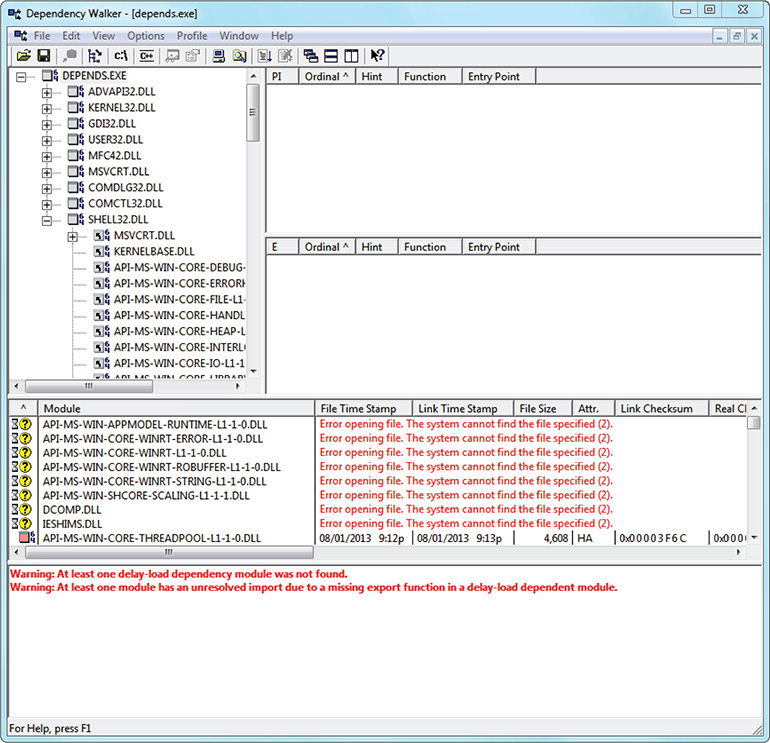
Figure 9-2 Dependency Walker dependencies.
The PE File Format
The Windows PE file format is derived from the Common Object File Format (COFF) that was used in Virtual Address eXtension (VAX) systems running the Virtual Memory System (VMS) operating system produced by Digital Equipment Corporation (DEC), which was acquired by Compaq in 1998 and merged with HP in 2002. Most of the original Windows NT development team came from DEC, and when coming up with the PE format, they used existing code that they were already familiar with.
To get a better feel of the PE format, take a look at a general view of its structure, as shown in Figure 9-3.

Figure 9-3 A general view of the PE format.
The PE file format consists of the following:
![]() DOS MZ header
DOS MZ header
![]() DOS stub
DOS stub
![]() PE header
PE header
![]() Section table
Section table
![]() Sections
Sections
DOS MZ Header
All PE files start with the DOS MZ header. It is located at offset 0 of a PE file. It was put there just in case the program is executed in a system running Disk Operating System (DOS). When the PE format was still being developed, most systems were still running DOS. So, the developers recognized that there was a possibility that an executable designed to run in the new Windows environment would be executed in a DOS environment. The DOS MZ header was placed there to enable a DOS operating system to recognize the PE file as a valid executable file so it can execute the DOS stub, which is discussed in the next section.
Figure 9-4 shows an example of a DOS MZ header. The hex values 4Dh and 5Ah represent MZ, which is the initial of Mark Zbikowski, who is the one of the original architects of the Microsoft Disk Operating System (MS-DOS).

Figure 9-4 DOS MZ Header of Calc.EXE.
DOS Stub
The DOS stub is a valid DOS executable file. As discussed in the previous section, the DOS MZ header enables DOS to recognize the PE file as a valid executable in DOS so the DOS stub can be executed. The main purpose of executing the DOS stub is to tell the user, in case the program was executed under DOS, that the program is for Windows. The stub simply displays a message that the program cannot be run in DOS mode. You can easily see the string in the DOS stub, as shown in Figure 9-5.
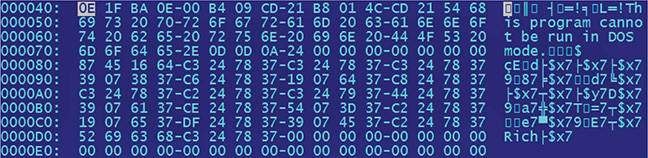
Figure 9-5 DOS stub of Calc.EXE.
PE Header
The PE file header, or simply PE header, is where the fun begins. This structure contains the important fields that the PE loader needs. As discussed previously and as shown in Figure 9-3, the PE header is not located at the start of the file. That location is occupied by the DOS MZ header and DOS stub. The location of the PE header can be found in offset 0x3C relative to the start of the file. The 4-byte value starting at address 0x3C represents the address of the PE header relative to the start of the file. So, looking at Figure 9-4, which shows the DOS MZ header of Calc.EXE, you can determine that the address of the PE header is at 0xF0 because the 4 bytes starting from 0x3C are F0h 00h 00h 00h. Take note that x86 processors use little-endian architecture, so data is actually read from right to left. This means that the least significant byte is stored in the smallest address. In the previous example, the least significant byte is F0h, located in address 0x3C. The next significant byte is 00h, 00h, and 00h, located respectively in 0x3D, 0x3E, and 0x3F. So when you write it, the order of the bytes is 00h 00h 00h F0h. 0x3C, being the smallest address, contains the lowest significant byte, which is F0h.
If the 4 bytes seen at the starting address 0x3c are 04h, 03h, 02h, 01h, then the highest significant byte is 01h, and the least significant byte is 04h. It will be written as 01h 02h 03h 04h.
Figure 9-6 shows the start of the PE header at location 0xF0.

Figure 9-6 PE header of Calc.EXE.
The start of the PE header is PE�� or the hex values 50h 45h 00h 00h. This is called the PE signature and, as stated previously, indicates the start of the PE header.
When a PE file is executed, the PE loader goes directly to the PE header. The PE loader bypasses the DOS MZ header and DOS stub and proceeds directly to the PE header. As previously discussed, the location of the start of the PE header is found in offset 0x3C of the file. The PE loader reads the address in this offset and goes to that address, which is the start of the PE header.
The PE header contains lots of essential fields utilized by the PE loader. It is actually a general term for the related structure of type IMAGE_NT_HEADERS. The structure is laid out as shown in Figure 9-7.
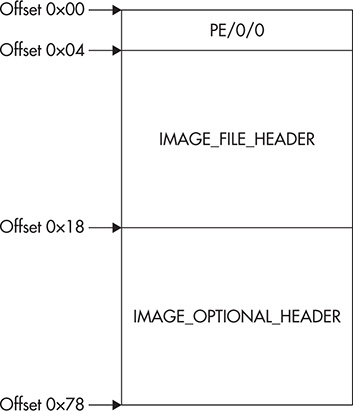
Figure 9-7 PE header structure.
From the figure, you can see that the structure consists of a DWORD, which represents the PE signature, and two substructures known as the IMAGE_FILE_ HEADER and IMAGE_OPTIONAL_HEADER.
NOTE
In the following discussion, you will encounter a new term, which is the relative virtual address (RVA). I’ll discuss what this is in the next section.
The IMAGE_FILE_HEADER contains basic information about the PE file. According to Microsoft, the structure appears to be unmodified from its original COFF implementations and appears not only as part of the PE header but also at the beginning of the COFF OBJ files produced by Microsoft Win32 compilers. Table 9-1 shows the fields of the IMAGE_FILE_HEADER. Take note that the offsets in the table are relative to the start of the PE header.


Table 9-1 IMAGE_FILE_HEADER Fields
A useful tool for parsing the PE header is pefile. It is a multiplatform Python module that enables the user to work with PE files. You can find more information about this tool at https://code.google.com/p/pefile/.
In this lab, you will install the pefile module to a system running Ubuntu.
What You Need:
![]() System running Ubuntu 14.04.1
System running Ubuntu 14.04.1
![]() Python 2.7.6
Python 2.7.6
![]() pefile
pefile
Steps:
1. Check whether Python is installed by typing python in the command line.
![]()
2. If Python is installed, the python command will result in opening the Python command-line environment. If this is the case, simply type exit() to exit the environment.
![]()
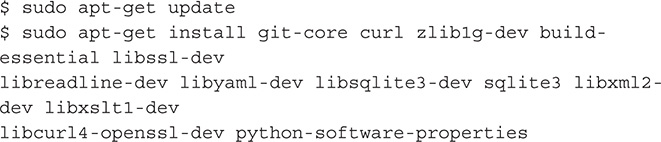
3. If Python is not installed, install it by using apt-get.
![]()
4. Download pefile from https://code.google.com/p/pefile/downloads/list.
5. As of this writing, the latest version is pefile 1.2.10-139. Choose and download pefile-1.2.10-139.tar.gz.
6. Extract the downloaded file.
![]()
7. Alternatively, you can download pefile-1.2.10-139.zip and simply decompress the file. The resulting folder is the same.
8. Go to the resulting folder. In this lab, it will be pefile-1.2.10-139.
9. Install pefile by issuing the following command line:
![]()
10. Another way of installing pefile without downloading and extracting it is by simply issuing the following command line:
![]()
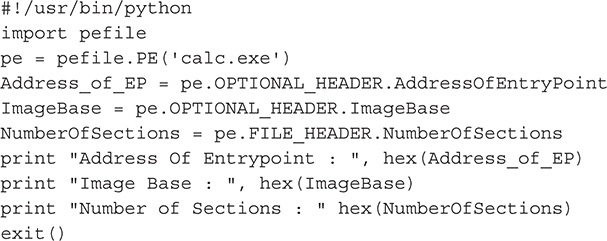
In this lab, you will write a Python script that will display three things about a PE file.
![]() Address of entry point
Address of entry point
![]() Image base
Image base
![]() Number of sections
Number of sections
What You Need:
![]() System running Ubuntu 14.04.1
System running Ubuntu 14.04.1
![]() Python 2.7.6
Python 2.7.6
![]() pefile
pefile
![]() calc.EXE from Windows 7
calc.EXE from Windows 7
Steps:
1. Create a Python script file.
2. Write the following code:
3. After creating the Python script, change it to executable mode by issuing the following command:
![]()
4. Execute your script. Make sure that calc.EXE is in the same folder as your script.
![]()
5. The output should look like the following:

The second substructure is the IMAGE_OPTIONAL_HEADER. Although the name says it’s optional, there is nothing optional about this substructure. As stated by Microsoft, this portion of the PE file certainly isn’t optional. The COFF format allows individual implementations to define a structure of additional information beyond the standard IMAGE_FILE_HEADER. The fields in the IMAGE_OPTIONAL_HEADER are what the PE designers felt was critical information beyond the basic information in the IMAGE_FILE_HEADER. Table 9-2 shows the fields of the IMAGE_OPTIONAL_HEADER. Take note that the offsets in the table are relative to the start of the PE header.
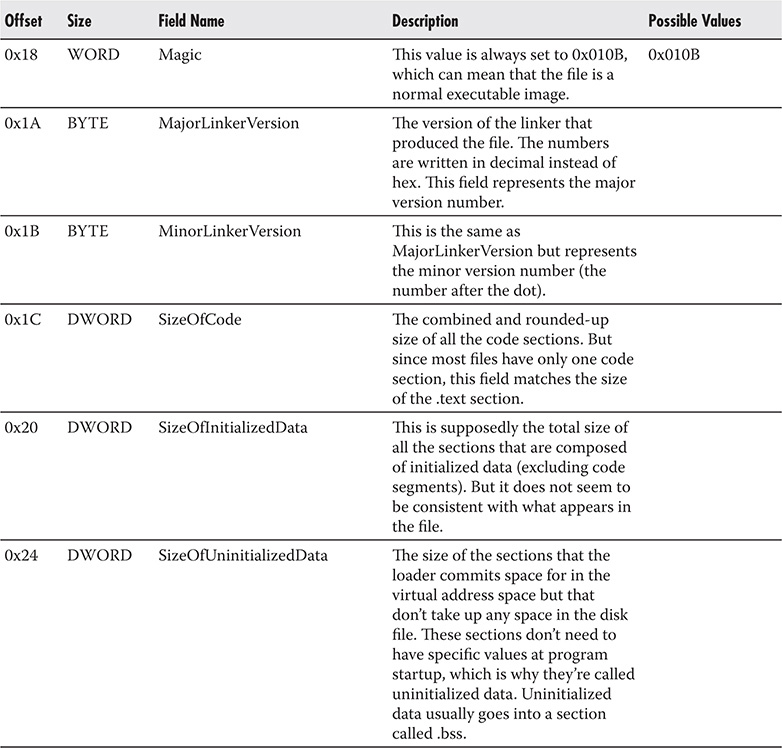


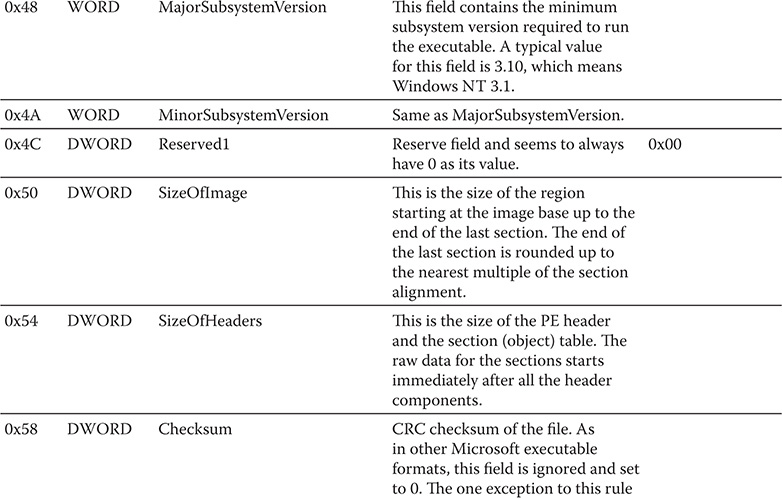
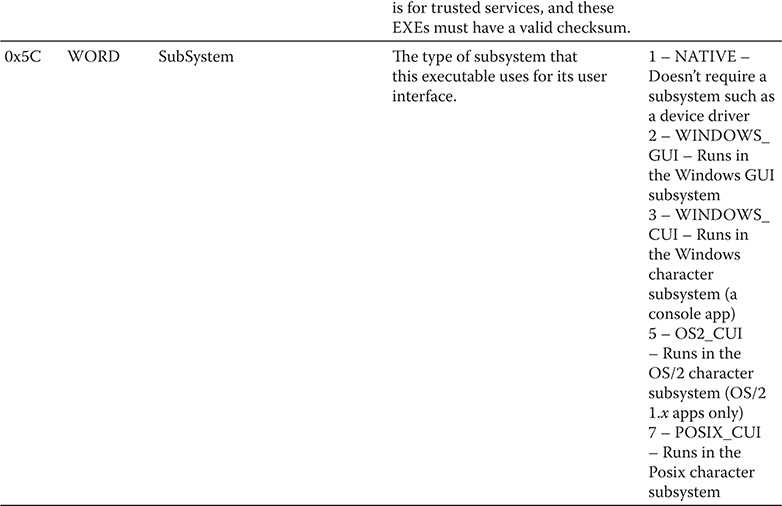
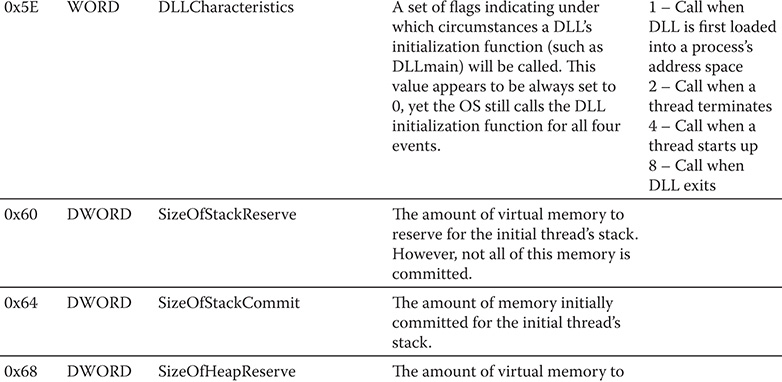
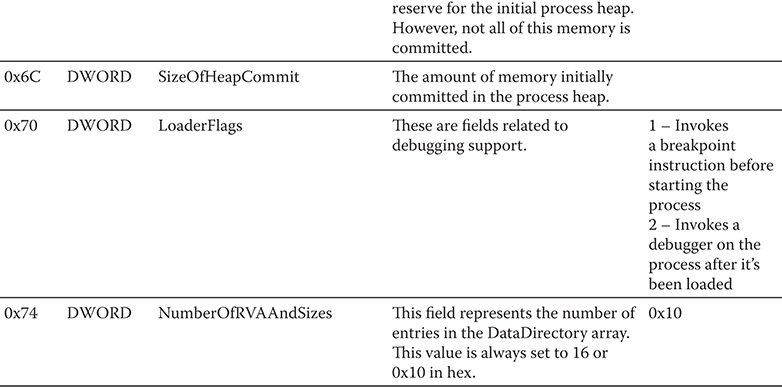
Table 9-2 IMAGE_OPTIONAL_HEADER Fields
The DataDirectory array discussed in the NumberOfRVAAndSizes field of the IMAGE_OPTIONAL_HEADER substructure is also referred to as the IMAGE_ DATA_DIRECTORY. It usually contains 16 entries. The entries are shown in Table 9-3. Take note that the offset is relative to the start of the DataDirectory.

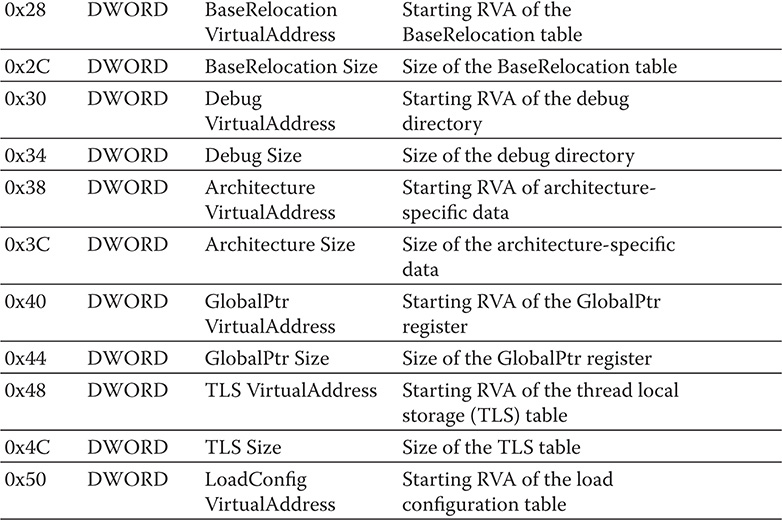
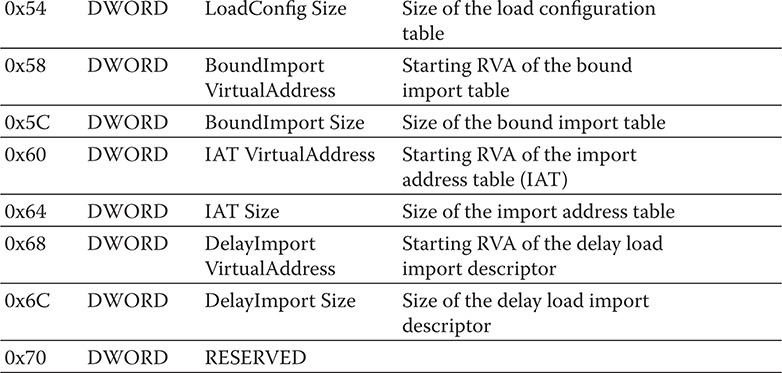
Table 9-3 IMAGE_DATA_DIRECTORY Entries
The IMAGE_DATA_DIRECTORY array makes it easy for the PE loader to find a particular section of the image without needing to go through each of the image sections and compare section names as it parses the image sections.
TIP
You can find more information about the IMAGE_DATA_DIRECTORY in WINNT.H.
Section Table
As shown in Figure 9-3, the section table is located between the PE header and the PE file’s sections. The section table contains information about the sections immediately following it in the PE structure. Think of a section table like a phone book. Each entry in the phone book contains information about a person. The more people who are listed, the thicker the phone book is. The number of entries in the section table depends on the number of sections contained in the image file. But unlike a phone book that contains hundreds of thousands of entries, a section table usually has only five. The number of entries (or sections, for that matter) is defined in the NumberOfSections field in the PE header.
The section table is also referred to as the IMAGE_SECTION_HEADER. Table 9-4 contains the fields of this structure. Take note that the offset is relative to the start of each entry.

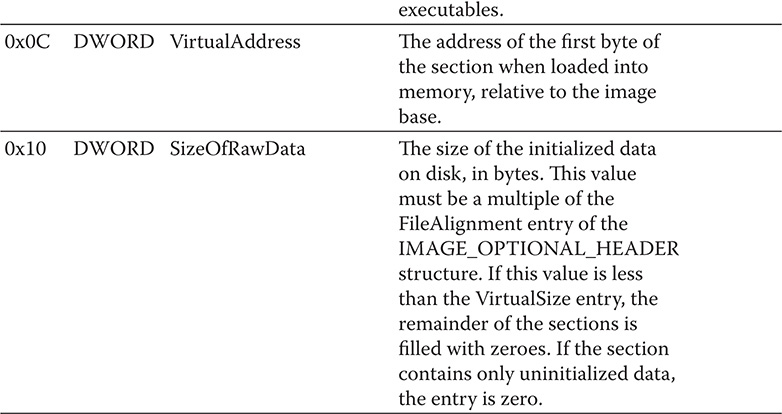

Table 9-4 IMAGE_SECTION_HEADER Entries
It is important to note that the section names have only eight characters reserved for them. If an image has more than eight characters for a section name, the name field will contain a forward slash (/) followed by an ASCII representation of a decimal number that is an offset into the string table. An image that has more than eight characters for a section name is anything but an executable file. Executable files only support section names up to eight characters, and they do not use a string table.
The last field in the section table defines the image characteristics. It is aptly called the Characteristics field. Table 9-5 describes the flag values of this field.

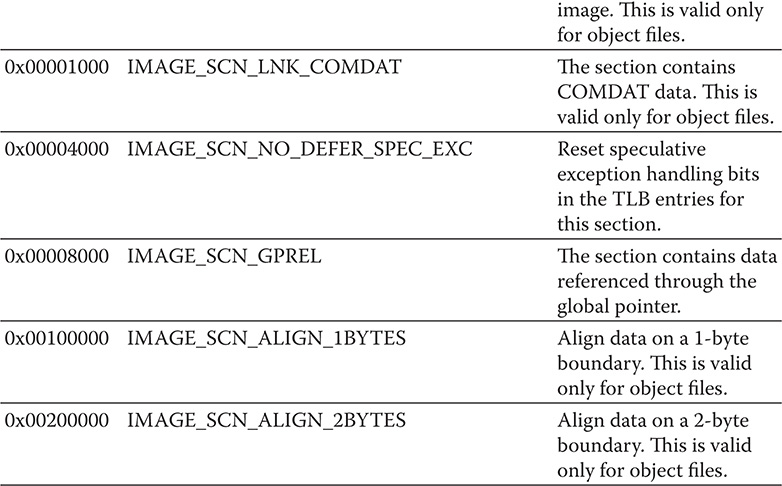
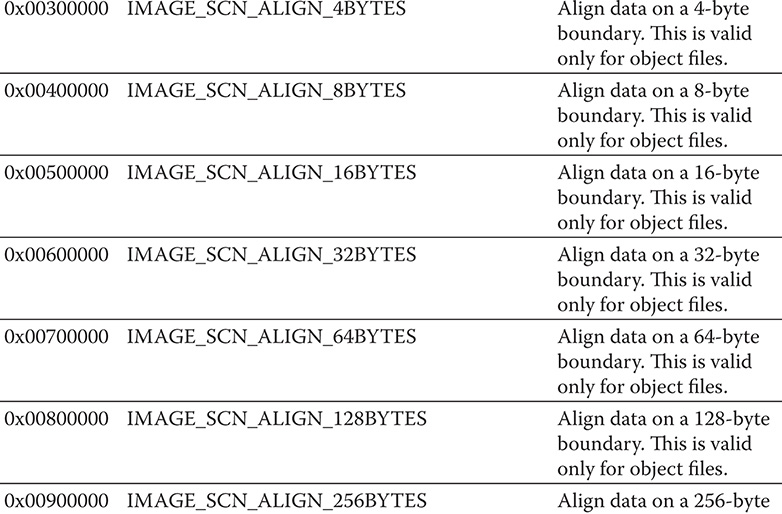
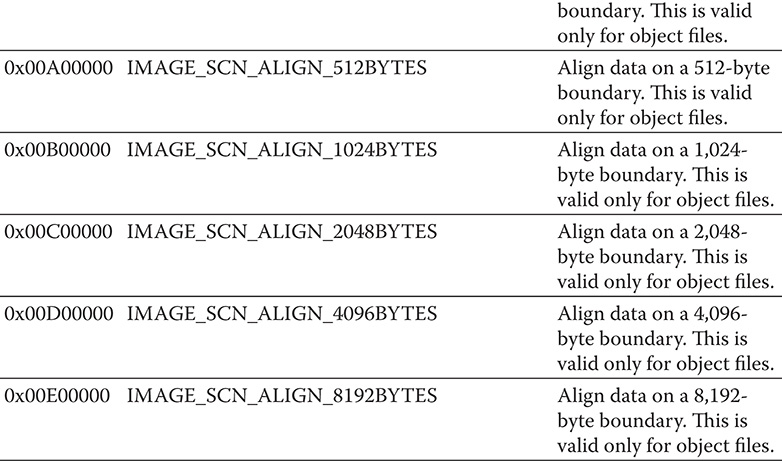


Table 9-5 Characteristics Field Values Defined
In the section table, the sections are sorted according to their relative virtual address rather than alphabetically.
Another useful tool that can be used to dump PE information is pedump. It is a Ruby implementation that can be used in Linux-based systems such as Ubuntu. It supports both 32- and 64-bit PE files. It also supports old file formats such as DOS and Windows NE (New Executable) file format, which is the file format of Windows versions before Windows 95. You can find more information about pedump at https://github.com/zed-0xff/pedump.
pedump can dump the following information:
![]() MZ/NE/PE header
MZ/NE/PE header
![]() DOS stub
DOS stub
![]() “Rich” header
“Rich” header
![]() Data directory
Data directory
![]() Sections
Sections
![]() Resources
Resources
![]() Strings
Strings
![]() Imports and exports
Imports and exports
![]() VS_VERSIONINFO parsing
VS_VERSIONINFO parsing
![]() PE packer/compiler detection
PE packer/compiler detection
pedump also offers an online service where users can upload PE files for analysis. The website is located at http://pedump.me.
In this lab, you will install pedump and use it to dump information of a PE file.
What You Need:
![]() System running Ubuntu 14.04.1
System running Ubuntu 14.04.1
![]() Ruby
Ruby
![]() pedump
pedump
![]() calc.EXE from Windows 7
calc.EXE from Windows 7
1. Install Ruby. As of this writing, the recommended version is 2.1.3.
A. Install Ruby dependencies.
B. Install Ruby.
![]()
2. Install pedump.
![]()
3. Go to the folder where calc.EXE is located and issue the following command line:
![]()
4. To save the output to a file, issue the following command line:
![]()
In this lab, you will write a Python script that will display the section information of a PE file.
What You Need:
![]() System running Ubuntu 14.04.1
System running Ubuntu 14.04.1
![]() Python 2.7.6
Python 2.7.6
![]() pefile
pefile
![]() calc.EXE from Windows 7
calc.EXE from Windows 7
Steps:
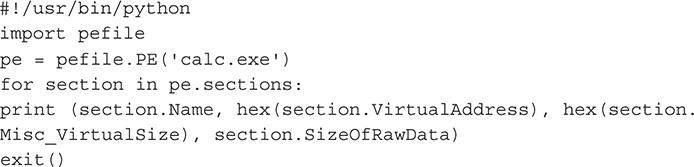
1. Create a Python script file.
2. Write the following code:
![]()
3. After creating the Python script, change it to executable mode by issuing the following command:
![]()
4. Execute your script. Make sure that calc.EXE is in the same folder as your script.
![]()
5. The output should look like the following:

Sections
The sections are the meat of the PE file. Together they represent the real content of the PE file. Sections, in general, are simply blocks of data, which can have certain attributes as described in the section table. A section can be code, data, or a combination of both. The main thing they have in common is their attributes.
As discussed previously, each section has a unique name. The name is there to describe what the section is. For example, a section named CODE can represent the code section, while a section named .rdata can represent a read-only data section. As a default setting, Borland linker uses section names such as CODE and DATA, while Microsoft prefixes sections with a period, such as .text and .rdata. It is important to remember that the PE loader and Windows itself does not care what the section is called. The names are there for us humans. A developer is free to name the sections of her programs as she sees fit as long as it does not go over the eight-character limit.
NOTE
The minimum number of sections a PE file can have is two: one for code and the other for data.
As you look at different binaries, you will see different section names. Some make sense and follow the standard naming, while some will have names that are hard to comprehend. To prepare you, it is good to be familiar with common sections. The following is a short list of common sections. Take note that these are section names produced by Microsoft compilers/linkers.
![]() .text
.text
![]() .data
.data
![]() .bss
.bss
![]() .CRT
.CRT
![]() .rsrc
.rsrc
![]() .idata
.idata
![]() .edata
.edata
![]() .reloc
.reloc
![]() .tls
.tls
![]() .rdata
.rdata
![]() .debug
.debug
The default section for code is .text. It is also known as the code section. This section contains all the instructions executed by the program. I’m not sure why Microsoft preferred to use the .text name instead of .code, which is more descriptive. But as previously mentioned, the operating system does not really care what the sections are called.
The .data section, on the other hand, is where all initialized data is stored. This includes global and static variables that are initialized during compile time. Global variables are variables accessible throughout the program, while static variables are variables that have a lifetime that extends from program start to end. The .data section also includes string literals.
For global and static variables that are uninitialized, they are stored in the .bss section. So, it is important to remember that initialized data goes to the .data section, while uninitialized data goes to the .bss section.
The .CRT is a weird one because it contains initialized data as well. It is a mystery why the data contained in the .CRT section is not joined with the data in the .data section.
The .rsrc section contains resource information used by the program. This section begins with a resource directory structure called IMAGE_RESOURCE_DIRECTORY. It contains the following information:
![]() Characteristics
Characteristics
![]() TimeDateStamp
TimeDateStamp
![]() MinorVersion
MinorVersion
![]() NumberOfNamedEntries
NumberOfNamedEntries
![]() NumberOfIdEntries
NumberOfIdEntries
TIP
The application programming interface (API) function EnumResourceTypes can be used to enumerate the types of resources stored in the .rsrc section.
The .idata section contains function and data information that the program imports from other dynamic link libraries (DLLs). Each function that a program imports is specifically listed in this section.
The .edata section, on the other hand, contains the list of functions and data that the program exports or makes available to other programs or modules. Take note that the .edata section appears only in DLL files because there is rarely a reason for EXE files to import functions to other programs.
The .reloc section contains a table of base relocations. As Microsoft puts it, a base relocation is an adjustment to an instruction or initialized variable value that’s needed if the PE loader could not load the file where the linker assumed it would. If the PE loader is able to load the image at the linker’s preferred base address, the PE loader completely ignores the relocation information in the .reloc section.
The .tls section contains data that was defined using the compiler directive _ _declspec(thread). The .tls section got its name from TLS, the acronym of thread local storage. When it comes to dealing with the .tls section, Microsoft explains it best: The .tls section is related to the TlsAlloc family of Win32 functions. When dealing with a .tls section, the memory manager sets up the page tables so that whenever a process switches threads, a new set of physical memory pages is mapped to the .tls section’s address space. This permits per-thread local variables. In most cases, it is much easier to use this mechanism than to allocate memory on a per-thread basis and store its pointer in a TlsAlloc’ed slot. There’s one unfortunate note that must be added about the .tls section and _ _declspec(thread) variables. In Windows NT and Windows 95, this thread local storage mechanism won’t work in a DLL if LoadLibrary loads the DLL dynamically. In an EXE or an implicitly loaded DLL, everything works fine. If you can’t implicitly link to the DLL but need per-thread data, you’ll have to fall back to using TlsAlloc and TlsGetValue with dynamically allocated memory.
The .rdata section contains read-only data such as literal strings, constants, and the debug directory, which can be found only in EXE files. As defined by Microsoft, the debug directory is an array of IMAGE_DEBUG_DIRECTORY structures. These structures hold information about the type, size, and location of the various types of debug information stored in the file.
The .debug section contains all the debug information pointed to by the debug directory in the .rdata section.
NOTE
It is important to remember that TLINK32 EXEs put the debug directory in the .debug section and not the .rdata section. So if you cannot find the debug directory in the .rdata section, look for it in the .debug section.
This concludes the most common sections you will encounter when analyzing PE files.
Relative Virtual Address
You first encountered the relative virtual address while I was discussing the PE header in the previous section. And you will encounter it some more as I discuss the PE file and as you analyze malware.
So, what is a relative virtual address? To understand what it is, you need to know first what a virtual address (VA) space is. As defined by Microsoft, a virtual address space is a set of virtual memory addresses that a process can use. A virtual address does not represent the actual physical location of an object in memory. Instead, the system maintains a page table for each process, which is an internal data structure used to translate virtual address into their corresponding physical addresses. Each time a thread references an address, the system translates the virtual address to a physical address.
NOTE
The virtual address space for 32-bit Windows is 4GB, while for 64-bit Windows, the default is 8TB.
The relative virtual address is simply a distance from a reference point in the virtual address space. A similar concept is a file offset. The file offset describes the location of something relative to the start of the file, while the relative virtual address describes the location of something relative to a point in the virtual address space. To illustrate further, let’s take a PE file that usually loads at 0x400000 virtual address, and let’s say that the start of the PE file’s .text or code section is at 0x401000. From this, the RVA of the code section is 0x1000 because that is where it is relative to the loading location of the file in the virtual address space. The formula for this is simply as follows:

To convert the RVA to the actual address, which is the target address, simply reverse the process by adding the load address to the RVA.
NOTE
The virtual address is simply an RVA with the HMODULE added in. HMODULE is the same as the load address.
PE Import Functions
Previously, I discussed that the .idata section contains function and data information that the program imports from other dynamic link libraries. The .idata section is also referred to as the import table of the executable image. This table contains all the information that the PE loader needs to determine the addresses of the functions that the executable image is importing so it can be patched into the executable image. These functions are called import functions because they are the ones being “imported” by the executable. Therefore, import functions are functions that do not reside in the caller’s module or program but are called by the caller from another module or program such as a DLL. The caller module only contains information about the functions it is calling from another module, which can be one or more DLLs. The information includes the function names and the names of the dynamic link libraries from which they are imported. This information can be found in the import table.
NOTE
Import functions reside in DLLs.
The import table starts with an array of IMAGE_IMPORT_DESCRIPTORs. Each DLL that the executable image or the PE executable file links to will have its own IMAGE_IMPORT_DESCRIPTOR. If the PE file imports from five DLLs, it will have five IMAGE_IMPORT_DESCRIPTORs in its .idata section. Take note that there is no field indicating how many IMAGE_IMPORT_DESCRIPTORs are in an executable image’s .idata section. The only way to determine this is to count the number of IMAGE_IMPORT_DESCRIPTORs there are and stopping count only when an IMAGE_IMPORT_DESCRIPTOR with null field values is encountered. This signals the last element of the IMAGE_IMPORT_DESCRIPTOR array. Table 9-6 shows the IMAGE_IMPORT_DESCRIPTOR structure.
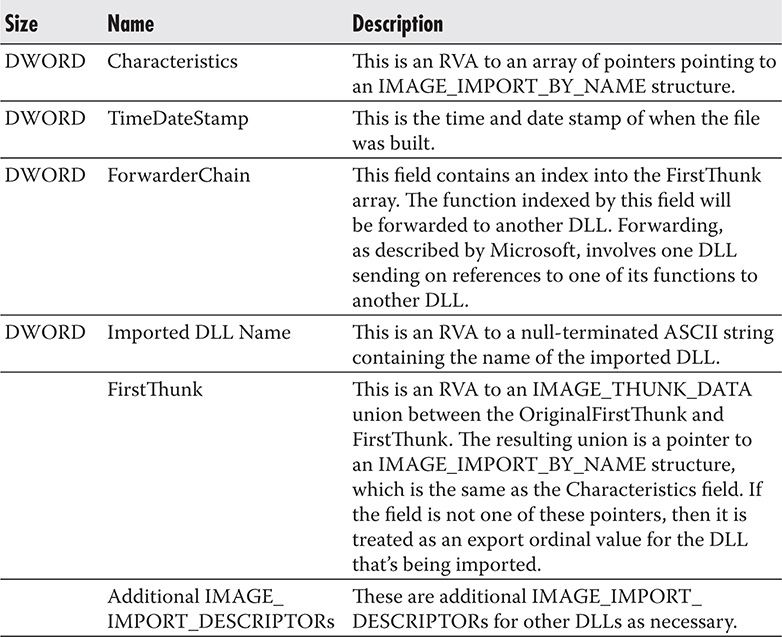
Table 9-6 IMAGE_IMPORT_DESCRIPTOR Structure
IMAGE_THUNK_DATA is a union of DWORD size containing the RVA or pointer to an IMAGE_IMPORT_BY_NAME structure and not the structure itself. The IMAGE_IMPORT_BY_NAME structure, on the other hand, contains information about an import function. Table 9-7 shows the IMAGE_IMPORT_ BY_NAME structure.

Table 9-7 IMAGE_IMPORT_BY_NAME Structure
In this lab, you will write a Python script that will display the import information of a PE file.
What You Need:
![]() System running Ubuntu 14.04.1
System running Ubuntu 14.04.1
![]() Python 2.7.6
Python 2.7.6
![]() pefile
pefile
![]() calc.EXE from Windows 7
calc.EXE from Windows 7
Steps:
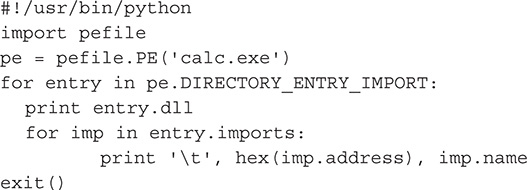
1. Create a Python script file.
2. Write the following code:
3. After creating the Python script, change it to executable mode by issuing the following command:
![]()
4. Execute your script. Make sure that calc.EXE is in the same folder as your script.
![]()
5. The output should look like the following:

PE Export Functions
Functions that are imported by an image usually come from a DLL file. As far as the image is concerned, it is importing the functions, but as far as the DLL is concerned, it is exporting the function. In short, when an image, usually a dynamic link library file, makes functions and data available for other PE files, it is effectively exporting code or data. And the code and data that is being exported is known as an export function.
The .edata section contains information about functions being exported by a PE file. The .edata section is also known as the export table. An export table usually contains the following:
![]() Tables of function names
Tables of function names
![]() Entry point addresses
Entry point addresses
![]() Export ordinal values
Export ordinal values
An export table or .edata section starts with an IMAGE_EXPORT_DIRECTORY structure and then is followed by the data pointed to by the fields in this structure. Table 9-8 shows the IMAGE_EXPORT_DIRECTORY structure.
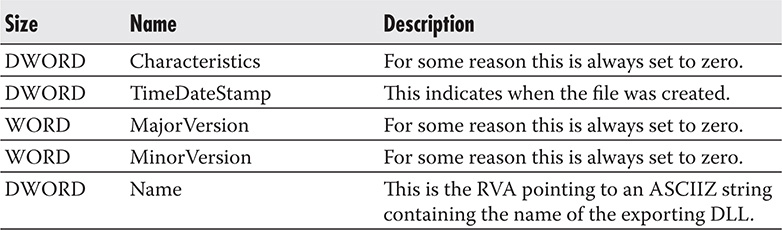
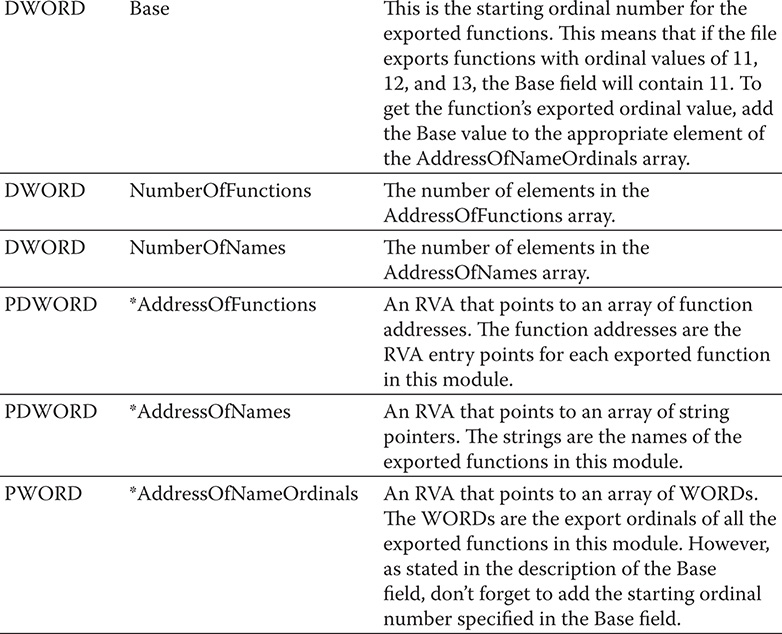
Table 9-8 IMAGE_EXPORT_DIRECTORY Structure
In this lab, you will write a Python script that will display the export information of a PE file.
What You Need:
![]() System running Ubuntu 14.04.1
System running Ubuntu 14.04.1
![]() Python 2.7.6
Python 2.7.6
![]() pefile
pefile
![]() comctl32.DLL from Windows 7 or any DLL file you have
comctl32.DLL from Windows 7 or any DLL file you have
1. Create a Python script file.
2. Write the following code:
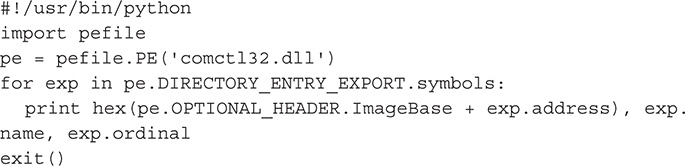
3. After creating the Python script, change it to executable mode by issuing the following command:
![]()
4. Execute your script. Make sure that comctl32.DLL is in the same folder as your script.
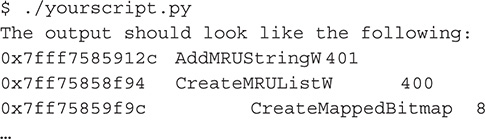
5. Take note that running this script with a PE file with no exports will display the following message:

When it comes to exporting functions, there is one feature that PE files can do, which is export forwarding. Export forwarding is a feature of export functions that has the ability to forward and export to another DLL. Let’s look at an example published by Microsoft regarding export forwarding.
In Windows NT, Windows 2000, and Windows XP, the KERNEL32 HeapAlloc function is forwarded to the RtlAllocHeap function exported by NTDLL. Forwarding is performed at link time by a special syntax in the EXPORTS section of the .DEF file. Using HeapAlloc as an example, KERNEL32’s DEF file would contain the following:

How can you tell whether a function is forwarded rather than exposed normally? It is somewhat tricky. Normally, the EAT contains the RVA of the exported symbol. However, if the function’s RVA is inside the exports section, as given by the VirtualAddress and Size fields in the DataDirectory, the symbol is forwarded.
When a symbol is forwarded, its RVA obviously can’t be a code or data address in the current module. Instead, the RVA points to an ASCII string of the DLL and symbol name to which it is forwarded.
In this lab, you will write a Python script that will display all available information of a PE file.
What You Need:
![]() System running Ubuntu 14.04.1
System running Ubuntu 14.04.1
![]() Python 2.7.6
Python 2.7.6
![]() pefile
pefile
![]() calc.EXE from Windows 7
calc.EXE from Windows 7
Steps:
1. Create a Python script file.
2. Write the following code:
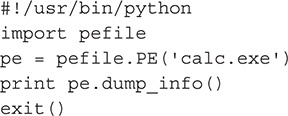
3. After creating the Python script, change it to executable mode by issuing the following command:
![]()
4. Execute your script. Make sure that calc.EXE is in the same folder as your script.
![]()
5. Part of the output should look like the following:

64-Bit PE File Format
With the advent of 64-bit Windows operating systems, the PE format, which was originally designed for 32 bits, had to undergo some minor changes. The new format that supports 64-bit Windows is called PE32+. No new fields were added, so structurally the two formats are still the same, with the modifications listed here:
![]() Fields widened to support 64 bits
Fields widened to support 64 bits
![]() BaseOfData field deleted
BaseOfData field deleted
![]() Magic field value changed from 0x10b to 0x20b representing different CPU type
Magic field value changed from 0x10b to 0x20b representing different CPU type
Table 9-9 summarizes the changes that were made to the PE file fields.
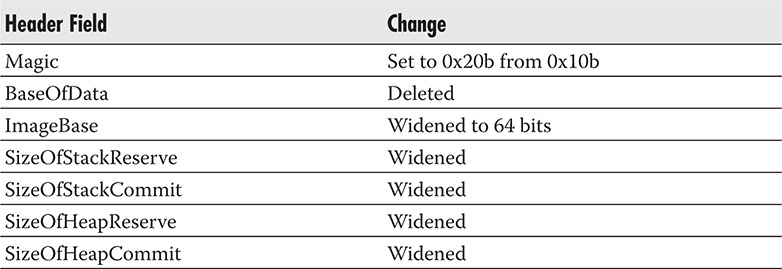
Table 9-9 PE File Field Changes from 32-Bit to 64-Bit (Source: http://msdn.microsoft.com)
That basically wraps up what you need to know about the PE file format. It is knowledge that will come in handy as you analyze malware.
Recap
In this chapter, I discussed what the PE file format is, how it is structured, and what tools you can use to decipher it. You took a look at the different components of the PE file format, listed here:
![]() DOS MZ header
DOS MZ header
![]() DOS stub
DOS stub
![]() PE header
PE header
![]() Section table
Section table
![]() Sections
Sections
I described each component and how it is structured. I described the different fields and the common entry values each has within each structure. Aside from all of this, you also tackled what a relative virtual address is and how the PE file imports and exports functions.
Tools
![]() Dependency Walker http://www.dependencywalker.com
Dependency Walker http://www.dependencywalker.com
![]() pefile https://code.google.com/p/pefile/
pefile https://code.google.com/p/pefile/
![]() pedump https://github.com/zed-0xff/pedump
pedump https://github.com/zed-0xff/pedump
![]() pedump online PE file submission http://pedump.me/
pedump online PE file submission http://pedump.me/