
CHAPTER
11
Inspecting Static Malware
The previous two chapters gave you an overview of the Portable Executable (PE) file and the proper way of handling unknown files and those that are found to be malicious. They introduced you to concepts that needed to be understood and done before you can begin malware analysis. Now that you have an understanding of these concepts and an increased awareness of the dangers and pitfalls that you might face if you do not follow them, you are now ready to analyze malware.
In this chapter, I will discuss how to inspect static malware, a process also known as static malware analysis or simply static analysis. I will go through the step-by-step process of analyzing static malware and the tools needed to accomplish your goal of extracting information from static malware.
Static Analysis Techniques
Malware analysis must answer the question of whether a file is malicious. And if it is malicious, what is the malicious file’s main directive?
In static analysis, you might not get as far as figuring out the malicious file’s main directive, but it is an important first step in malware analysis nonetheless. In static analysis, your main goal is to gather as much data and information as possible to aid you in determining the malware’s true nature and, if this is not possible, aid in a more effective and efficient way in dynamic analysis.
Since you are going to find out whether a file is malicious, you always start with the assumption that the file is unknown. You will also assume that any unknown file that is analyzed is malicious until proven benign. It is better to err on the side of caution.
To conduct an effective static analysis, you will be following some basic steps and techniques. And since you are concentrating on Windows malware, the following are more tuned to analyzing Windows files:
![]() ID assignment
ID assignment
![]() File type identification
File type identification
![]() Antivirus detection
Antivirus detection
![]() Protective mechanisms identification
Protective mechanisms identification
![]() PE structure verification
PE structure verification
![]() Strings analysis
Strings analysis
![]() Static code analysis
Static code analysis
Malware analysis is an art. The steps or techniques identified are to serve as a guide and not a checklist.
ID Assignment
The first thing you must do is to assign a unique identifier to the file. A common practice in the industry is to use a hash to identify a file uniquely. MD5 and SHA-1 are the most commonly used hashes. SHA-2 is another alternative that makes for minimal hash collision and better resistance from pre-image attack breaks. It includes SHA-224, SHA-256, SHA-384, SHA-512, SHA-512/224, and SHA-512/256.
LINGO
Hash collisions are when two different inputs produce the same hash. A pre-image attack, on the other hand, is finding the original input from its hash value.
There are lots of available tools to do this, including the following two:
![]() MD5SUM http://www.etree.org/md5com.html
MD5SUM http://www.etree.org/md5com.html
![]() Microsoft File Checksum Integrity Verifier http://www.microsoft.com/en-us/download/details.aspx?id=11533
Microsoft File Checksum Integrity Verifier http://www.microsoft.com/en-us/download/details.aspx?id=11533
Besides using these tools, you can create a script using hash libraries included in programming or scripting languages, such as Python. Whichever method is preferred, the main idea is to assign a unique ID to a file.
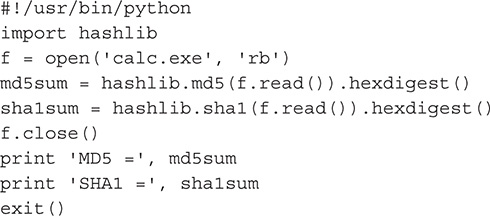
In this lab, you will create a script that computes a file’s MD5 and SHA-1 hash.
What You Need:
![]() System running Ubuntu 14.04.1
System running Ubuntu 14.04.1
![]() Python 2.7.6
Python 2.7.6
![]() Calc.EXE from Windows 7
Calc.EXE from Windows 7
1. Create a Python script file.
2. Write the following code:
3. After creating the Python script, change it to executable mode by issuing the following command:
![]()
4. Execute your script. Make sure that calc.EXE is in the same folder as your script.
![]()
5. The output should look like the following. Take note that depending on your calc.EXE, the hash might be different.
![]()
File Type Identification
Once a unique ID has been assigned to the file, the next step is to find out its file type. This helps the analyst weed out file types that are not supported by any analysis systems or those that are not needed to be analyzed.
It is important to take note that different file types require different approaches for analysis, so it is imperative that the file type is known before any analysis takes place. In this book, the concentration is on Windows files, so you will tackle only those that are identified as such.
When it comes to identifying file types, the following are the most common tools:
![]() PEiD
PEiD
![]() Linux-based file command
Linux-based file command
PEiD is a file type detector tool. Aside from detecting the file type, it can also detect whether a binary is packed or protected by common packers such as UPX, Armadillo, and so on. PEiD is a classic tool and has not been updated for a long time. The latest version, which is considered the final one, is v0.95. Regardless of its age, this tool is still useful because it has a customizable database commonly known as UserDB.TXT. This is a text file that can be modified or expanded to include new signatures to detect new file types and new packer programs. PEiD and its latest public release of UserDB.TXT can be downloaded from http://woodmann.com/BobSoft/Pages/Programs/PEiD.
TIP
There are lots of websites publishing PEiD. Take precaution when downloading this tool and make sure that the one you are downloading is legitimate and not carrying any malicious software.
Another common file type detection tool is the one that comes with Linux. It is the file command. To invoke the tool, simply open a terminal window and type file and the file in question, as shown here:
![]()
NOTE
The file command-line tool also displays whether a binary is packed or not as long as the packer is included in its signature database.
In this lab, you will get and use PEiD.
What You Need:
![]() System running Windows 7
System running Windows 7
![]() PEiD and UserDB.TXT
PEiD and UserDB.TXT
Steps:
1. Download PEiD and UserDB.TXT from http://woodmann.com/BobSoft/Pages/Programs/PEiD.
2. Extract the files. Make sure to replace the old UserDB.TXT that is included in the PEiD ZIP file with the latest one released in 2007 that comes in the UserDB ZIP file.
3. Go to the folder where PEiD was extracted and double-click PEiD.exe. Figure 11-1 shows the PEiD window.
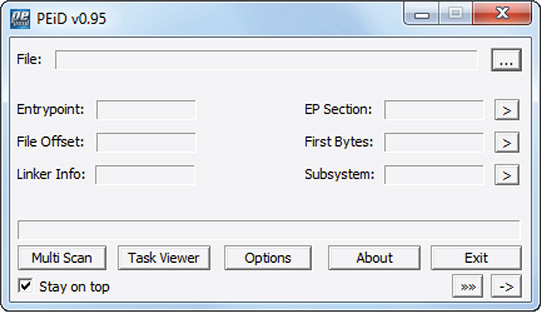
Figure 11-1 PEiD window.
4. Choose a file you want to play with and try different options of the tool to see what happens. Try playing with packed files also if you have some available.
In some cases, a script is much more desirable when identifying file types. For instances like this, you can use a Python script to identify file types.
In this lab, you will create a script that identifies file type of a given file.
What You Need:
![]() System running Ubuntu 14.04.1
System running Ubuntu 14.04.1
![]() Python 2.7.6
Python 2.7.6
![]() Calc.EXE from Windows 7
Calc.EXE from Windows 7
Steps:
1. Install python-pip. (You can skip this if pip is already installed.)
![]()
2. Install python-magic using pip.
![]()
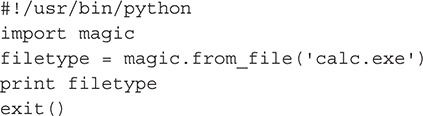
3. Create a Python script file.
5. After creating the Python script, change it to executable mode by issuing the following command:
![]()
6. Execute your script. Make sure that calc.EXE is in the same folder as your script.
![]()
7. The output should look like the following:
![]()
Antivirus Detection
When it comes to figuring out whether a file is malicious, a good indicator is the result of an antivirus product scan. This process also helps in determining the possible family of the malware. Take note that I am not talking in absolutes here because there is always the possibility of a false positive and misnaming of malware detection. In the analysis process, you use antivirus detection simply as an indicator to help you identify the maliciousness of a file and its possible malware family group.
There are two ways to subject a file to an antivirus scan. They are as follows:
![]() On-premise antivirus scanning
On-premise antivirus scanning
![]() Online antivirus scanning
Online antivirus scanning
On-premise antivirus scanning means you have the antivirus product installed in a system you control. It can be a set of different virtualized machines hosting different antivirus products each or an offline tool that utilizes different antivirus product engines to scan a file for possible infection. In an on-premise setup, the management of the system, such as updating scan signatures and ensuring uptime, is your responsibility. So, aside from hardware and software license cost, there is also maintenance cost. One thing that is important to remember is that no matter what the implementation is, the main idea is that you control the system and all the data and information produced by the system.
Online antivirus scanning is a cheaper alternative because there is no hardware and software to manage and maintain. Plus, most online antivirus scanning services are free or can be accurately described as having a zero dollar cost. The caveat is that whatever files you submit to them eventually become their property, and they can do whatever they want with those files and the information collected from those files by their systems. In reality, it is not really free. Some online antivirus scanning companies that offer this service for free sell the files and information gathered from those files.
The most popular online antivirus scanning service is Google’s VirusTotal, as shown in Figure 11-2. It is the most trusted and widely used in the industry.
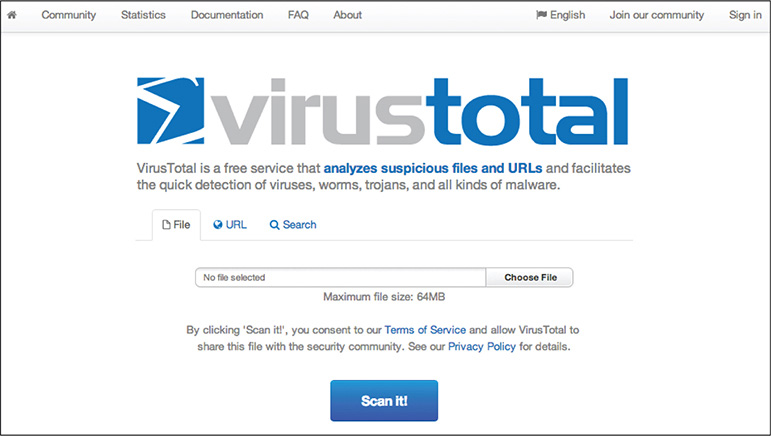
Figure 11-2 VirusTotal splash page.
TIP
Be mindful of submitting files for analysis, especially if they contain private or confidential information. If possible, such as in documents, remove all private or confidential information. If this is not possible, I suggest not submitting any of these files.
The following are the online antivirus scanning services that are free to use:
![]() VirusTotal by Google https://www.virustotal.com
VirusTotal by Google https://www.virustotal.com
![]() VirSCAN http://www.virscan.org
VirSCAN http://www.virscan.org
![]() Metascan by OPSWAT https://www.metascan-online.com
Metascan by OPSWAT https://www.metascan-online.com
![]() Jotti http://virusscan.jotti.org
Jotti http://virusscan.jotti.org
The online services enumerated in the previous list use multiple antivirus engines or scanners. They are a good way not only to check for file infection but also to compare different antivirus detection names. Figure 11-3 shows an example output of a scan session in VirusTotal.
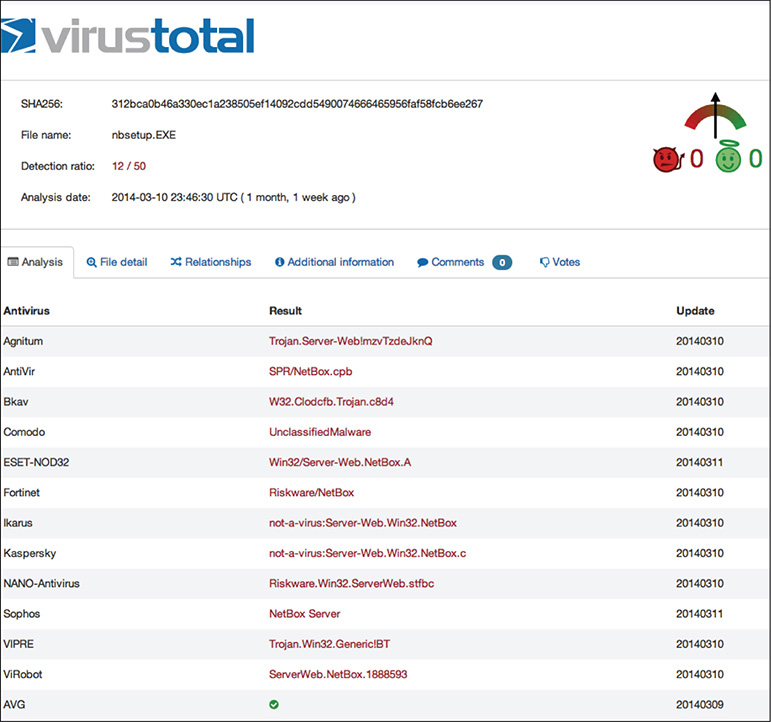
Figure 11-3 VirusTotal output of a scanning session.
Before using any free online antivirus scanning service, make sure to read their terms of service and privacy policy.
VirusTotal offers a public application programming interface (API). It is a free service available to anyone as long as the API is not used in commercial products or services. It is useful if you need to write client applications that can interact directly with VirusTotal.
In this lab, you will experiment using VirusTotal Public API. Since VirusTotal already has detailed documentation on how to do this, the lab will refer to the documentation and let you experiment on your own.
What You Need:
![]() VirusTotal Public API
VirusTotal Public API
Steps:
1. Request the VirusTotal Public API from VirusTotal.
2. Read and familiarize yourself with the documentation at https://www.virustotal.com/en/documentation/public-api/.
3. Accomplish the following capabilities:
A. Sending and scanning files
B. Rescanning already submitted files
C. Retrieving file scan reports
4. Feel free to experiment with other features and capabilities mentioned in the documentation.
Some antivirus vendors offer their own online scanning service that highlights their antivirus product or scan engine. Some of them are the following:
![]() Dr. Web http://www.drweb-online.com/en/online_check.asp
Dr. Web http://www.drweb-online.com/en/online_check.asp
![]() Fortiguard Online Virus Scanner http://www.fortiguard.com/antivirus/virus_scanner.html
Fortiguard Online Virus Scanner http://www.fortiguard.com/antivirus/virus_scanner.html
Alternatively, antivirus vendors offer a way for users to submit samples to them for analysis. Unlike an online scanning service where the result of the scan is posted immediately, the user has to wait for a response from the vendor. The response usually comes via e-mail. This means that when a user submits a sample, the user has to give up some information such as an e-mail address.
The following are some vendors that offer sample submission services to users:
![]() F-Secure Sample Analysis http://www.f-secure.com/en/web/labs_global/submit-samples/sas
F-Secure Sample Analysis http://www.f-secure.com/en/web/labs_global/submit-samples/sas
![]() Sophos https://secure2.sophos.com/en-us/support/contact-support/sample-submission.aspx
Sophos https://secure2.sophos.com/en-us/support/contact-support/sample-submission.aspx
Antivirus vendors offering these services for free not only help the user but also themselves, the antivirus companies. This is because they are able to collect suspicious samples for free. It is crowdsourcing at its best. Also, this helps the different antivirus vendors get a pulse of what’s going on in the digital world. If there is a set of samples being submitted (hundreds or even thousands of times in a short period of time), chances are these samples are hot and attention must be given to them.
Aside from on-premise and online virus scanning services, there is another alternative. This alternative relies more on the open source community. This caters to researchers who do not have a budget to create their own on-premise antivirus scanning infrastructure and do not want to submit any samples to an online antivirus scanning service provider. The alternative is using ClamAV.
ClamAV, as described by its publisher, is an open source (General Public License [GPL]) antivirus engine designed for detecting Trojans, viruses, malware, and other malicious threats. It provides a high-performance multi-threaded scanning daemon, command-line utilities for on-demand file scanning, and an intelligent tool for automatic signature updates. The ClamAV virus databases are updated regularly and posted online for download by users. This is a cheaper alternative to the on-premise virus scanning infrastructure and does not carry the privacy concerns of submitting samples to online antivirus scanning service providers.
You can find more information and download links for ClamAV at http://www.clamav.net.
In this lab, you will install and use ClamAV to scan files for possible infection.
What You Need:
![]() System running Ubuntu 14.04.1
System running Ubuntu 14.04.1
Steps:
1. Install ClamAV.
![]()
2. Update ClamAV virus definitions.
![]()
3. ClamAV virus definition updates are located in http://lurker.clamav.net/list/clamav-virusdb.html.
4. Scan files using ClamAV.
![]()
5. To see what options are available, simply invoke help.
![]()
ClamAV also offers a UI version called ClamTK.
In this lab, you will install and use ClamTK to scan files for possible infection.
What You Need:
![]() System running Ubuntu 14.04.1
System running Ubuntu 14.04.1
Steps:
1. Install ClamTK.
![]()
2. Open ClamTK by going to Applications and double-clicking ClamTK. Figure 11-4 shows ClamTK window.
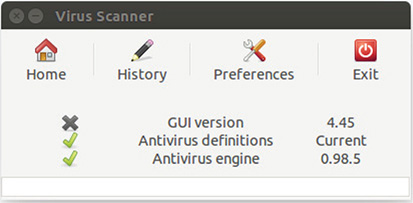
Figure 11-4 ClamTK.
3. To scan a file or folder, go to the Scan menu and choose the appropriate scanning option.
4. Familiarize yourself with the different capabilities offered by ClamTK by playing around with the different options.
If you need a new virus definition added to ClamAV and the most updated virus definitions found in http://lurker.clamav.net/list/clamav-virusdb.html does not include it, you can create your own signature and add it to your ClamAV virus definition.
In this lab, you will write a signature for ClamAV.
What You Need:
![]() System running Ubuntu 14.04.1
System running Ubuntu 14.04.1
Steps:
1. Download the “how-to” document from https://github.com/vrtadmin/clamav-devel/raw/master/docs/signatures.pdf.
2. Experiment with the different signature formats discussed in the document.
A. Hash-based signature
B. File checksum (SHA-1, SHA256)
C. PE section based
D. Body-based signature
E. Signatures for version information metadata in PE files
F. Signature based on different metadata
Protective Mechanisms Identification
Most malware has protective mechanisms to prevent it from being analyzed by malware researchers and analysts. The main idea is to prevent anyone or anything from having access to the malware code. Before exerting any effort, it is important to determine whether a file to be analyzed statically has protective mechanisms that will prevent the analyst from having access to the code.
The most common protective mechanism that malware employs when it comes to protecting its code is encryption. The most common tools malware authors employ to accomplish this are crypters and real-time packers. Crypters are tools that encrypt malware code. Real-time packers, on the other hand, not only encrypt but also compress the target malware.
It is important to identify whether a malware has undergone encryption through the use of a crypter or real-time packer before the attackers deployed it so that the appropriate decrypter or unpacker can be used to decrypt and unpack the malware. Unfortunately, an encrypted or packed malware renders static analysis useless. Knowing about a packed malware beforehand helps you conserve analysis energy by not bothering to put that malware into static analysis unless it has been successfully unpacked or decrypted.
LINGO
A packed malware is a malware file that has been encrypted and compressed by real-time packers.
Most crypters and real-time packers have a specific decrypter and unpacker. In cases like this, it is easy to decrypt or unpack the malware. The researcher can simply identify the specific crypter or packer used and then subject the malware to the appropriate decrypter or unpacker. The real challenge is when the identified protective mechanism does not have an appropriate decrypter or unpacker. This requires a manual unpacking session, which is a completely different topic.
In this book, I will concentrate more on real-time packers since they are the widely used protective mechanism employed by attackers. The following are the most common packers:
![]() Armadillo http://www.siliconrealms.com/armadillo.php
Armadillo http://www.siliconrealms.com/armadillo.php
![]() ASPack http://www.aspack.com/aspack.html
ASPack http://www.aspack.com/aspack.html
![]() ASProtect32 http://www.aspack.com/asprotect32.html
ASProtect32 http://www.aspack.com/asprotect32.html
![]() ASProtect64 http://www.aspack.com/asprotect64.html
ASProtect64 http://www.aspack.com/asprotect64.html
![]() PECompact http://bitsum.com/pecompact/
PECompact http://bitsum.com/pecompact/
![]() UPX http://upx.sourceforge.net/
UPX http://upx.sourceforge.net/
It is important to be familiar with all the packers you can get your hands on and how they work. It is also important to know how a binary looks like after it is packed. Having this knowledge is key in identifying packed malware.
NOTE
Real-time packers are not necessarily malicious. They can be software designed to protect a program code. They are also used by legitimate software writers to protect their code from piracy and also to make the program smaller for easy online distribution.
In this lab, you will pack a file using the most common packer of all, UPX.
What You Need:
![]() System running Ubuntu 14.04.1
System running Ubuntu 14.04.1
![]() Calc.EXE from Windows 7
Calc.EXE from Windows 7
![]() UPX
UPX
Steps:
1. Install UPX.
![]()
2. Pack calc.EXE.
![]()
3. Check whether calc.EXE has been successfully packed using the file command-line tool.
![]()
4. The output should be as follows:
![]()
In this lab, you will create a script that can detect whether a binary is packed and, if it is, what packer was used to pack it.
What You Need:
![]() System running Ubuntu 14.04.1
System running Ubuntu 14.04.1
![]() Python
Python
![]() UserDB.TXT
UserDB.TXT
![]() Packed binary, preferably from the previous lab, 11-8
Packed binary, preferably from the previous lab, 11-8
Steps:
1. Create a Python script file.
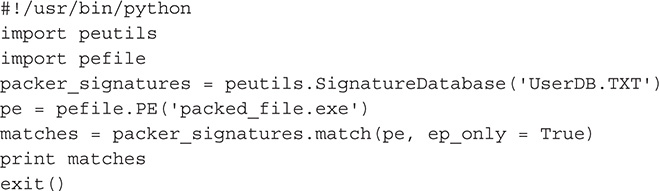
2. Write the following code:
3. After creating the Python script, change it to executable mode by issuing the following command:
![]()
4. Execute your script. Make sure that the packed file is in the same folder as your script.
![]()
5. The output should look like the following:
![]()
NOTE
In the script, ep_only stands for scan entry point only. If it is set to True, the script will scan only the entry point, but if it is set to False, the script will scan the whole body of the file, making the scanning process slower.
UserDB.TXT can be modified to include new packer signatures.
Identifying whether a file is packed is just half the battle. The challenging part is to unpack it. An unpacked and unencrypted file makes it easier for analysts and researchers to proceed in the static analysis process. There are lots of tools out there that can unpack a protected binary, especially if the packer used is common. For those packers that do not have unpackers, reverse engineering is the key to unpacking the file. The analyst then has to weigh whether the time needed to unpack the binary manually is worth it or just proceed directly to dynamic analysis. In most cases, the latter is chosen.
Most PE tools that are available in the market have the ability to unpack packed binaries. One of my favorites is PE Explorer (http://www.heaventools.com/overview.htm). It supports unpacking of UPX, Upack, and NsPack.
For packed binaries that are not supported by most tools, I usually go to this site to find an unpacker: http://www.woodmann.com/crackz/Packers.htm. Again, do not execute any of the tools published on this site in a production network. Always treat tools such as this with great caution and suspicion. It is always better to use these tools in a controlled environment.
PE Structure Verification
Another indicator of whether a file is malicious is a malformed PE structure. A malformed PE structure often indicates an infection or a sloppy way of hiding malicious code. Having knowledge of the PE structure is critical in this static analysis technique. An abnormal field value, a non-standard section, or anything that appears off is a good candidate for further investigation.
TIP
In Chapter 9, I discussed the PE file structure. It is always good to refer to that chapter as reference when it comes to the different fields and their possible values.
Strings Analysis
A file sample that is unencrypted can reveal a lot by looking at the strings found in its code. Just by extracting strings, you can identify a lot of things from a possible malware sample. The following are the more interesting ones:
![]() Location of malicious dropped files
Location of malicious dropped files
![]() Name of the dropped files
Name of the dropped files
![]() Domain name of a possible command-and-control (C&C) server
Domain name of a possible command-and-control (C&C) server
![]() Internet Protocol (IP) address of a possible C&C server
Internet Protocol (IP) address of a possible C&C server
Aside from these, another set of strings might be of interest, especially if it comes to tying the malware samples to their writers or the threat actors that are using them. Some strings might contain the following information:
![]() Dedications
Dedications
![]() Political statements
Political statements
![]() Group affiliations and mottos
Group affiliations and mottos
![]() Incendiary messages
Incendiary messages
In this lab, you will use the command-line strings that come with Ubuntu to extract strings from files.
What You Need:
![]() System running Ubuntu 14.04.1
System running Ubuntu 14.04.1
![]() Unpacked and unencrypted binary
Unpacked and unencrypted binary
Steps:
1. Open a terminal window.
2. Type the following command. You will use the unpacked version of calc.EXE from Windows 7.
![]()
3. If you want to save the output to a text file, issue the following command:
![]()
4. Examine the output, and you will notice a lot of useful information such as libraries and function calls that the program needs to run.
In this lab, you will use strings.EXE from Sysinternals to extract strings from files.
What You Need:
![]() System running Windows
System running Windows
![]() strings.EXE from Sysinternals
strings.EXE from Sysinternals
1. Download strings.EXE from http://technet.microsoft.com/en-us/sysinternals/bb897439.
2. Open a command prompt and go to the folder where strings.EXE is saved.
3. Issue the following command. You will use the unpacked version of calc.EXE from Windows.
![]()
4. If you want to save the output to a text file, issue the following command:
![]()
5. Examine the output, and you will notice a lot of useful information such as libraries and function calls that the program needs to run.
Recap
In this chapter, I discussed different static analysis steps and techniques to get as much information as you can from a static file. They are as follows:
![]() File type identification
File type identification
![]() Antivirus detection
Antivirus detection
![]() Protective mechanisms identification
Protective mechanisms identification
![]() PE structure verification
PE structure verification
![]() Strings analysis
Strings analysis
I also discussed different tools that are available to you from Windows and Ubuntu. You also created some scripts that will help you in your static analysis process.
Tools
![]() MD5SUM http://www.etree.org/md5com.html
MD5SUM http://www.etree.org/md5com.html
![]() Microsoft File Checksum Integrity Verifier http://www.microsoft.com/en-us/download/details.aspx?id=11533
Microsoft File Checksum Integrity Verifier http://www.microsoft.com/en-us/download/details.aspx?id=11533
![]() PEiD http://woodmann.com/BobSoft/Pages/Programs/PEiD
PEiD http://woodmann.com/BobSoft/Pages/Programs/PEiD
![]() ClamAV http://www.clamav.net
ClamAV http://www.clamav.net
![]() Sample submission online services
Sample submission online services
![]() F-Secure Sample Analysis http://www.f-secure.com/en/web/labs_global/submit-samples/sas
F-Secure Sample Analysis http://www.f-secure.com/en/web/labs_global/submit-samples/sas
![]() Sophos https://secure2.sophos.com/en-us/support/contact-support/sample-submission.aspx
Sophos https://secure2.sophos.com/en-us/support/contact-support/sample-submission.aspx
![]() Malware scanning services
Malware scanning services
![]() VirusTotal by Google https://www.virustotal.com
VirusTotal by Google https://www.virustotal.com
![]() VirSCAN http://www.virscan.org
VirSCAN http://www.virscan.org
![]() Metascan by OPSWAT https://www.metascan-online.com
Metascan by OPSWAT https://www.metascan-online.com
![]() Jotti http://virusscan.jotti.org
Jotti http://virusscan.jotti.org
![]() Dr. Web http://www.drweb-online.com/en/online_check.asp
Dr. Web http://www.drweb-online.com/en/online_check.asp
![]() Fortiguard Online Virus Scanner http://www.fortiguard.com/antivirus/virus_scanner.html
Fortiguard Online Virus Scanner http://www.fortiguard.com/antivirus/virus_scanner.html
![]() Packers
Packers
![]() Armadillo http://www.siliconrealms.com/armadillo.php
Armadillo http://www.siliconrealms.com/armadillo.php
![]() ASPack http://www.aspack.com/aspack.html
ASPack http://www.aspack.com/aspack.html
![]() ASProtect32 http://www.aspack.com/asprotect32.html
ASProtect32 http://www.aspack.com/asprotect32.html
![]() ASProtect64 http://www.aspack.com/asprotect64.html
ASProtect64 http://www.aspack.com/asprotect64.html
![]() PECompact http://bitsum.com/pecompact/
PECompact http://bitsum.com/pecompact/
![]() UPX http://upx.sourceforge.net/
UPX http://upx.sourceforge.net/
![]() PE Explorer http://www.heaventools.com/overview.htm
PE Explorer http://www.heaventools.com/overview.htm
![]() Packers and Unpackers http://www.woodmann.com/crackz/Packers.htm
Packers and Unpackers http://www.woodmann.com/crackz/Packers.htm
![]() Sysinternals Strings.EXE http://technet.microsoft.com/en-us/sysinternals/bb897439
Sysinternals Strings.EXE http://technet.microsoft.com/en-us/sysinternals/bb897439