
CHAPTER
12
Inspecting Dynamic Malware
The previous chapter discussed how to inspect or analyze static malware, or malware that is not running. I discussed the most common static analysis techniques and how information gathered from each of those techniques can be used to identify whether a file is malicious and, if it is indeed malicious, possibly identify its directive based on data gathered statically.
It is a known fact that static analysis is limited because most of the magic happens when the malware is running. When the malware is running in an environment it was designed to execute in, it reveals most of its functionalities, thus opening it up for observation and experimentation by malware analysts and researchers. This is inspecting dynamic malware, more popularly known as dynamic malware analysis or simply dynamic analysis.
In this chapter, I will discuss how to inspect and analyze dynamic malware. I will go through the different tools, techniques, and processes of dynamic analysis to accomplish your goal of extracting information from dynamic malware and ultimately get to the bottom of the malware behavior and its main attack directive.
Virtual vs. Bare Metal
When it comes to dynamic analysis, there is always a dilemma about whether to use a virtual environment or a bare-metal machine to host the operating system in which the malware will be executed. In my humble opinion, it is not a matter of or but and. It is best to have both. The two environments complement each other. Malware that is not virtual-aware can be executed and analyzed in a virtual environment, and malware that is virtual-aware can be executed and analyzed in a bare-metal environment. The researcher, with these two environment implementations on hand, gets the benefits these two setups have to offer as discussed in previous chapters.
It is best to execute malware first in a virtual environment. If execution fails, the next step is to execute it in a bare-metal system. This is to see whether the malware is virtual-aware. If execution fails in a bare-metal system, further investigation is needed to determine why the malware failed to execute in these two environments. It probably has something to do with the lab setup.
Chapter 8 discussed how to set up both virtual and bare-metal dynamic analysis labs. The chapter also discussed how to make the dynamic analysis lab malware friendly so malware execution will be successful as much as possible. That is the key in any dynamic analysis lab. A lab that is not malware friendly will have little chance of capturing dynamic malware behavior.
Dynamic Analysis
When it comes to observing malware behavior, it can be divided into two parts.
![]() Host behavior
Host behavior
![]() Network behavior
Network behavior
In the early years of malware, dynamic analysis was confined to analyzing a malware’s host behavior. The early malware did not have any network functionality. A dynamic analysis lab was a single isolated system. But with the advances of malware and its ability to communicate remotely with other malware and with its controller, it is a must to analyze its network behavior as well. Therefore, when it comes to dynamic analysis collecting and analyzing, both the malware host and the network behavior must be studied.
Analyzing Host Behavior
Dynamic analysis is all about monitoring and capturing information from malware in a target or compromised system. To do this, it is important to understand fundamental malware behavior in an infected system; in this case, the dynamic analysis lab.
For malware to accomplish its main directive, it has to do a number of modifications and actions in a target system. This is what you need to determine. Most of the actions the malware does in a compromised host are designed to achieve one or a combination of the following:
![]() Malware component installation
Malware component installation
![]() Malware persistency
Malware persistency
![]() Malware protective mechanism
Malware protective mechanism
![]() Malware directive
Malware directive
During infection or system compromise, the malware installs a copy of itself and other components if needed. This means additional files are added to the system without the victim’s knowledge. In most cases, the malware is deployed using a dropper, a downloader, or a hybrid of both.
The following are the most common locations where malware installs its components:
![]() Windows folder
Windows folder
![]() System folder
System folder
![]() Temporary folders
Temporary folders
A dropper is a malware installer that contains all the malware and all its components. It is like a typical software installer. Upon execution, it installs the malware and all its components, collectively also known as the malware package, to the appropriate location in the system.1
A downloader, on the other hand, does not contain the malware package. Instead, it downloads the package to be installed from the malware-serving domains. A downloader is similar to a download manager used by some software vendors wherein the user downloads a small executable, which upon execution checks the system for compatibility and then downloads and installs the appropriate software package. The same thing is done by a malware downloader, except for the fact that it downloads and installs malware instead of legitimate software.1 It is important to note that the downloader relies heavily on the compromised machine having an Internet connection. This is why dynamic analysis labs of today have a controlled environment that allows them to connect to the Internet when needed, especially if the malware needs to download its components.
TIP
When an Internet connection is needed for malware analysis purposes, always make sure that the Internet connection is not used by any system not designed to capture or analyze malware. It is also good practice to read and comply with the terms and agreements of your Internet service provider.
The attackers understand that some of the systems will have a limited Internet connection. To solve this, a hybrid of a downloader and a dropper is often used to deploy malware. A hybrid malware installer functions as a downloader first to ensure that the updated version of the malware is installed into the system. If there is no Internet connection, the hybrid malware installer functions as a dropper by installing the malware package it is carrying with it.
A downloader usually has a significantly smaller size compared to its dropper and hybrid counterpart since it does not have to bear the weight of the malware package. A hybrid and a dropper usually are similar in size.
After installing all the malware components, the malware installer, regardless of whether it is a dropper, downloader, or hybrid, deletes itself and passes control to the newly installed malware components. The malware installer deletes itself to remove of any traces it was there. It is important to remember that the malware installer is a separate technical component of the threat ecosystem, and its value increases for every successful malware deployment it does without a sample of it being captured by researchers. You can find a detailed discussion of this and the threat ecosystem in Malware, Rootkits & Botnets: A Beginner’s Guide, published by McGraw-Hill.
The malware then proceeds to make sure it survives a shutdown or a reboot. This is where it sets itself up and the other malware components to be persistent. This is achieved by using different autostart techniques in Windows. The following are some of the autostart techniques:
![]() Hijacking the boot sector
Hijacking the boot sector
![]() Infecting system files
Infecting system files
![]() Adding the malware in the StartUp folder
Adding the malware in the StartUp folder
![]() Utilizing Task Scheduler
Utilizing Task Scheduler
![]() Utilizing the registry
Utilizing the registry
Utilizing the registry is the most common autostart technique used by malware. With the registry, the malware can start up during the following:
![]() Boot execution
Boot execution
![]() Loading of drivers and services
Loading of drivers and services
![]() Upon logon
Upon logon
![]() Loading of Explorer shell extensions
Loading of Explorer shell extensions
![]() Loading of browser extensions
Loading of browser extensions
Aside from making sure the malware is persistent, it also takes the precaution to protect itself and its components in the compromised system. It does this by using some of the following techniques:
![]() Hiding using attributes
Hiding using attributes
![]() Hiding in plain sight
Hiding in plain sight
![]() Using rootkit technology
Using rootkit technology
Although this technique is considered rudimentary, most malware today still utilizes file and folder attributes to protect itself. The most common way to do this is to set the attributes of the malware files and the folders they are located in to Hidden or System. This is designed to fool optical inspection by researchers and analysts. Even with the ability to override this using operating system settings and widely available tools today, malware is still using this technique.
Another rudimentary technique is hiding in plain sight. The main idea here is that the malware components are dropped into a folder where there are thousands of files so they can blend in. The most common location utilized by malware is the Windows system folder. It contains lots of files that have names that are not easily recognizable, which is perfect for this kind of protective mechanism. One common way of hiding in plain sight is by using filename obfuscation by replacing the uppercase letter O with the number 0 (zero). Another one is by adding common strings as a prefix such as win to a malware filename or by simply adding 32 or 64 to the filename.
The most reliable way of hiding malware, of course, is by using rootkit technology. This is the best way to hide the presence of any malware components. You can learn more about rootkits and hiding in plain sight in Malware, Rootkits & Botnets: A Beginner’s Guide, published by McGraw-Hill.
The need to install malware components, make malware persistent, and protect the malware components’ presence in the system sums up a malware’s general initial host behavior. But this is just the tip of the iceberg; what you are really after is the malware directive. Depending on the attack type, a malware’s directive can be a simple nuisance, destructive, or data exfiltration, among others.
A malware that simply displays a message or reorient a screen can be viewed as a nuisance. A malware that deletes critical files in a system can be deemed as destructive. A malware that scrapes memory, captures the desktop, or logs keystrokes obviously is an information stealer. Identifying the malware’s main directive requires a combination of monitoring and recording what’s going on in the system after the malware has installed and protected its components and established its persistency.
To do this, you will monitor and record changes in the following areas of the system:
![]() File system
File system
![]() Registry
Registry
![]() Memory
Memory
File System
Changes in the file system help you determine how the malware installs and protects itself in the system during the initial stages of infection and upon successful system compromise. It can also offer a view of how malware achieves persistency through malware component placement, especially if it utilizes nonregistry techniques such as utilizing the StartUp folder.
File system changes can also be a good indicator of malware directive, especially if it has something to do with destroying files. It can also offer a glimpse of how it spreads through other systems such as infecting other files or creating bogus files for copying in local and network share folders.
There are three changes to the file system that you need to monitor.
![]() Added files
Added files
![]() Deleted files
Deleted files
![]() Modified files
Modified files
Added Files As previously mentioned, during the malware installation stage, the malware usually drops a copy of itself and other components it needs to function. Most malware nowadays is deployed or installed using a dropper, downloader, or hybrid of both. If the malware utilizes a dropper or a downloader, the installation of malware components is similar to the installation of legitimate software. The only difference is that the dropper or downloader deletes a copy of itself after control is passed to the malware components.
It is important to record all files that have been added to the system because chances are these are all malware components and getting hold of these files and where they are located is key to understanding how the malware installs itself in the system and how each file functions. In modern malware, each component has a separate function that complements each other. The following are the most common malware components:
![]() Main malware file
Main malware file
![]() Bot agent
Bot agent
![]() Regeneration component
Regeneration component
![]() Attack component
Attack component
![]() Configuration files
Configuration files
A malware package can contain one or a combination of any of the mentioned components.
The main malware file is the one that utilizes the other components to ensure its success. The bot agent is the one responsible for communicating to the attacker via command and control (C&C) or to any network resource the malware needs. The rootkit component possesses the rootkit technology that enables the malware to hide in the system. The regeneration component is the one responsible for rebuilding malware if one of its components is removed or any entry in the registry has been modified. The attack component defines the malware’s main directive. This component contains the functionality the malware needs to conduct the attack. If the malware is designed for a distributed denial-of-service (DDOS) attack, this component will contain DDOS functionality. If the malware is more for data exfiltration, this component will contain information-stealing capabilities. Getting hold of this component is critical in understanding the malware’s capability and directive. Last but definitely not the least, the configuration file contains information for other components. It can contain system targets, special instructions, updated network resources, or any information the malware needs to function. Usually, configuration files are used to change the malware’s behavior based on the attacker’s need.
NOTE
Older malware attacks consist of only a single file; that is, the malware itself and all the component functions are coded into the malware itself, and updating any functionality means updating the whole malware file. Modern malware is modular. Each component is a separate file for easy updates by the attacker.
Getting a copy of all these components enables the researcher or analyst to understand the malware’s behavior better.
LINGO
Modularized malware is malware whose functions are assigned to different files and not coded into a single malware code.
It is also important to remember that most malware authors do not want to reinvent the wheel. If the functionalities they need are present in existing tools, they will use those tools as a separate module or simply copy that tool’s code into the malware code. For example, if a malware wants to download files via File Transfer Protocol (FTP), it might use known FTP download tools. This is why it became common during the heyday of network worms that malware usually utilized network tools used by network administrators. The advantage of this is that the tools will not be flagged as malware because they are known to be benign tools. It came to the point that malware specifically written to compromise servers already assumes that the tools it needs are already installed there because these are the same tools used by network administrators to manage their servers.
Deleted Files Not counting droppers and downloaders, in some cases malware will delete files in the system that pose a threat to its existence. The following are the most common files deleted by malware during installation:
![]() System restore files
System restore files
![]() Configuration files
Configuration files
![]() Security product files
Security product files
If a malware is designed to be destructive and its main directive is to delete files, knowing what files were deleted will aid in identifying the malware’s main file target and what files needed to be restored.
Modified Files When file infectors ruled the threat landscape, the best way to tell whether a system was infected was by identifying all modified files and flagging them as possibly infected by a virus. This is the main reason why early antivirus solutions relied on cyclic redundancy check (CRC) and checksum. The idea here is that if a file’s CRC changes unexpectedly from the previous check, it is infected.
In today’s threat landscape, the importance of identifying modified files during compromise is still important. It usually is an indication of system or third-party software files infected by malware or modified for a specific purpose that will aid the malware in its operation. One operation is extortion. Malware such as CryptoLocker and CryptoWall encrypts important document files so that they cannot be accessed or read by the user. A series of modified document files can signal the presence of a ransomware that locks files for ransom.
File modification can also aid malware when it comes to persistency. One example is the modification of a .INI file to get itself started on every bootup. In the DOS days, the most common file that was modified to get malware to start up on every bootup was AUTOEXEC.BAT.
Registry
Modifications to the registry are usually made to achieve persistency. The following are the common registry entries modified by malware to achieve persistency.1 The registry keys are grouped according to the autostart technique utilized by malware to achieve persistency.
![]() Boot execution
Boot execution
![]() HKLMSystemCurrentControlSetControlSession Manager
HKLMSystemCurrentControlSetControlSession Manager
![]() Loading of driver and services
Loading of driver and services
![]() HKLMSystemCurrentControlSetServices
HKLMSystemCurrentControlSetServices
![]() Upon logon
Upon logon
![]() HKLMSoftwareMicrosoftWindowsCurrentVersionRun
HKLMSoftwareMicrosoftWindowsCurrentVersionRun
![]() HKLMSoftwareMicrosoftWindowsCurrentVersion RunOnce
HKLMSoftwareMicrosoftWindowsCurrentVersion RunOnce
![]() HKLMSoftwareMicrosoftActive SetupInstalled Components
HKLMSoftwareMicrosoftActive SetupInstalled Components
![]() Loading of Explorer shell extensions
Loading of Explorer shell extensions
![]() HKLMSoftwareClasses*ShellExContextMenuHandlers
HKLMSoftwareClasses*ShellExContextMenuHandlers
![]() HKLMSoftwareClassesDirectoryShellExContextMenuHandlers
HKLMSoftwareClassesDirectoryShellExContextMenuHandlers
![]() HKLMSoftwareClassesDirectoryShellExDragDropHandlers
HKLMSoftwareClassesDirectoryShellExDragDropHandlers
![]() HKLMSoftwareClassesFolderShellExContextMenuHandlers
HKLMSoftwareClassesFolderShellExContextMenuHandlers
![]() HKLMSoftwareClassesFolderShellExDragDropHandlers
HKLMSoftwareClassesFolderShellExDragDropHandlers
![]() Loading of browser extensions
Loading of browser extensions
![]() HKLMSoftwareMicrosoftWindowsCurrentVersionExplorerBrowser Helper Objects
HKLMSoftwareMicrosoftWindowsCurrentVersionExplorerBrowser Helper Objects
![]() HKLMSoftwareMicrosoftInternet ExplorerExtensions
HKLMSoftwareMicrosoftInternet ExplorerExtensions
Please take note that this also applies to other registry hives such as HKEY_ CURRENT_USER and specific user profile hives. A user profile hive, as defined by Microsoft, contains specific registry information pertaining to the user’s application settings, desktop, environment, network connection, and printers. User profile hives are located under the HKEY_USERS key.
Upon infection, some malware disables REGEDIT to prevent any user from viewing the registry. One disadvantage of this protective mechanism is that it raises suspicion that the system is compromised.
NOTE
Similar to the file system, a malware can add, modify, or delete a registry key depending on the malware’s purpose.
In this lab, you will use installation/uninstallation tools to determine system changes made by malware. These tools are designed to create uninstallers to effectively remove any software that is installed, but they are also useful in tracking changes made by malware. The tool you will use in this experiment is a classic tool called InstallRite.
This lab works well if you have in your possession a malware sample. If you do not have one, please review previous chapters on how to collect malware samples.
What You Need:
![]() System running Windows
System running Windows
![]() Malware sample
Malware sample
Steps:
1. Download and install InstallRite from http://www.softpedia.com/get/System/System-Info/InstallRite.shtml.
2. Start InstallRite. Figure 12-1 shows the InstallRite main window.

Figure 12-1 InstallRite main window.
3. Click Install New Software And Create An InstallKit and follow the prompts, as shown in Figures 12-2 to 12-4.

Figure 12-2 InstallRite configuration window.

Figure 12-3 InstallRite Create A Snapshot… window.
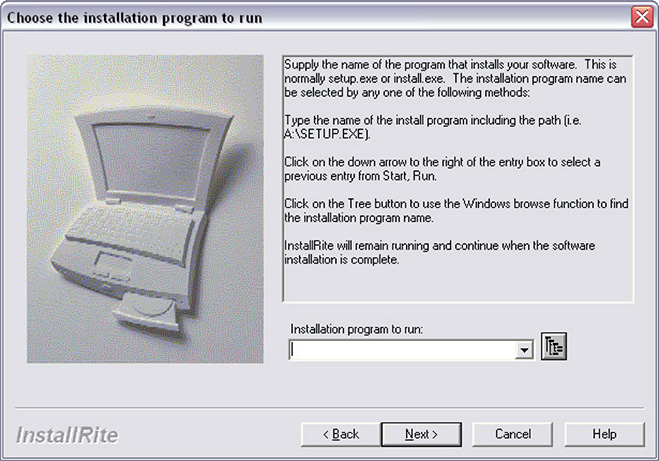
Figure 12-4 InstallRite window to choose which program to run.
4. The window in Figure 12-2 enables you to configure the tool. In this lab, there is no need to configure anything, but feel free to play around with the tool. Notice that the default configuration is that the entire registry should be monitored and all directories in all hard drives should be monitored as well.
5. The window in Figure 12-3 informs the user that a snapshot will be created. Clicking Next will initiate the snapshot creation. This becomes the base snapshot, and the tool will report any deviation or changes in the snapshot after the binary is installed/executed.
6. Once the snapshot is done, it is time to choose the program to run, as shown in Figure 12-4. You can type the file location in the space provided under Installation Program To Run or simply click the button on the right side to browse for the malware file you want to monitor.
7. In the succeeding illustrations, you will be using VOHO malware. If you do not have access to VOHO malware, any malware that you have collected following the steps outlined in previous chapters will do.
8. Figure 12-5 shows the file changes recorded by InstallRite after running the VOHO malware.

Figure 12-5 VOHO malware file changes.
9. Figure 12-6 shows the registry changes recorded by InstallRite after running the VOHO malware.

Figure 12-6 VOHO malware registry changes.
10. To save the output, simply right-click each branch and choose the format you want the output to be saved as.
In this lab, you will use installation/uninstallation tools to determine system changes made by malware. These tools are designed to create uninstallers to effectively remove any software that is installed, but they are also useful in tracking changes made by malware. The tool you will use in this experiment is Uninstall Tool by CrystalIdea Software.
This lab works well if you have in your possession a malware sample. If you do not have one, please review the previous chapters on how to collect malware samples.
What You Need:
![]() System running Windows
System running Windows
![]() Malware sample
Malware sample
Steps:
1. Download and install Uninstall Tool from http://www.crystalidea.com/uninstall-tool.
2. Take note that this is not free software, but it can be used as a trial for 30 days.
3. Start Uninstall Tool. Figure 12-7 shows the main window. As you can see, the Uninstaller tab displays all installed software.

Figure 12-7 Uninstall Tool main window.
4. At the bottom of the main window, click Install And Trace.
5. The Install And Trace A Program window opens, as shown in Figure 12-8.

Figure 12-8 Install And Trace A Program window.
6. From here, you can choose the file you want to install and trace.
7. In this experiment, I will be using VOHO malware. For your own experiment, please use the malware you have in your possession. Figure 12-9 shows the chosen malware.
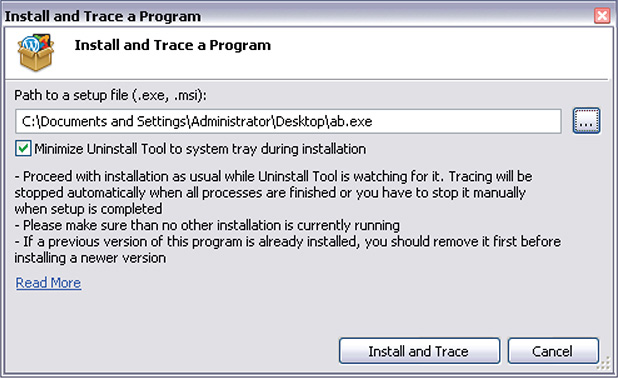
Figure 12-9 Installing and tracing VOHO malware.
8. Once the malware is chosen, click Install And Trace.
9. Once the installation process is finished, you will see a window, as shown in Figure 12-10, enumerating the changes that were traced by Uninstaller Tool.

Figure 12-10 Install And Trace A Program output.
10. Click Save Log and save the log as a text file. I will come back to this later.
11. To keep better track of the installed and traced malware, you can create a custom item name so it will show on the list in the main window. Clicking Save opens the window shown in Figure 12-11, which will enable you to create a name for the installed malware so you can see it in the list.
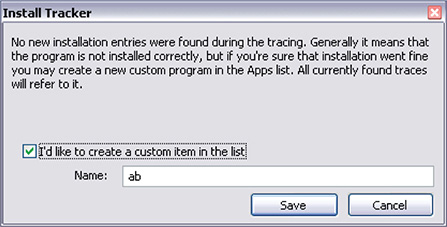
Figure 12-11 Install Tracker custom item name.
12. After you assign a name, you will be able to see it on the main page, as shown in Figure 12-12. In the example, I have used “ab.”

Figure 12-12 Uninstaller Tool main window showing the chosen name.
13. From here, you can right-click the newly installed malware and choose Traced Data, as shown in Figure 12-13.
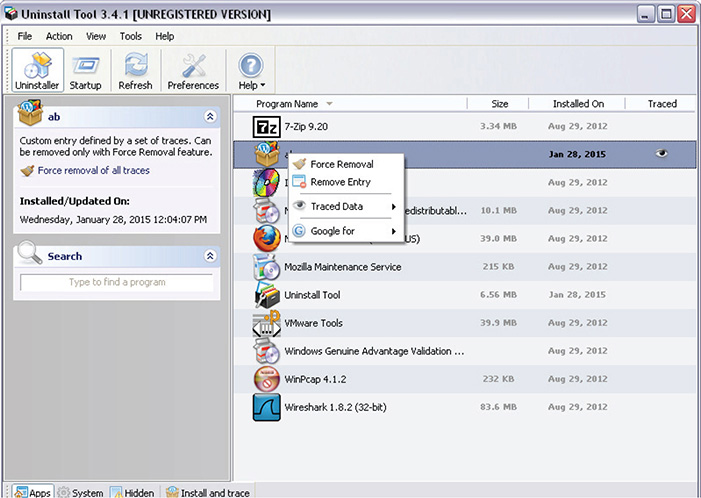
Figure 12-13 Right-click context menu for installed programs.
14. Choosing Traced Data will show the window in Figure 12-14.

Figure 12-14 Traced data output.
15. From here, you can see the changes it has made to the system in Extensible Markup Language (XML) format.
16. In the previous step, you saved the log to a text file. Open this text file and see what it contains. What you will see is similar to Figure 12-15.
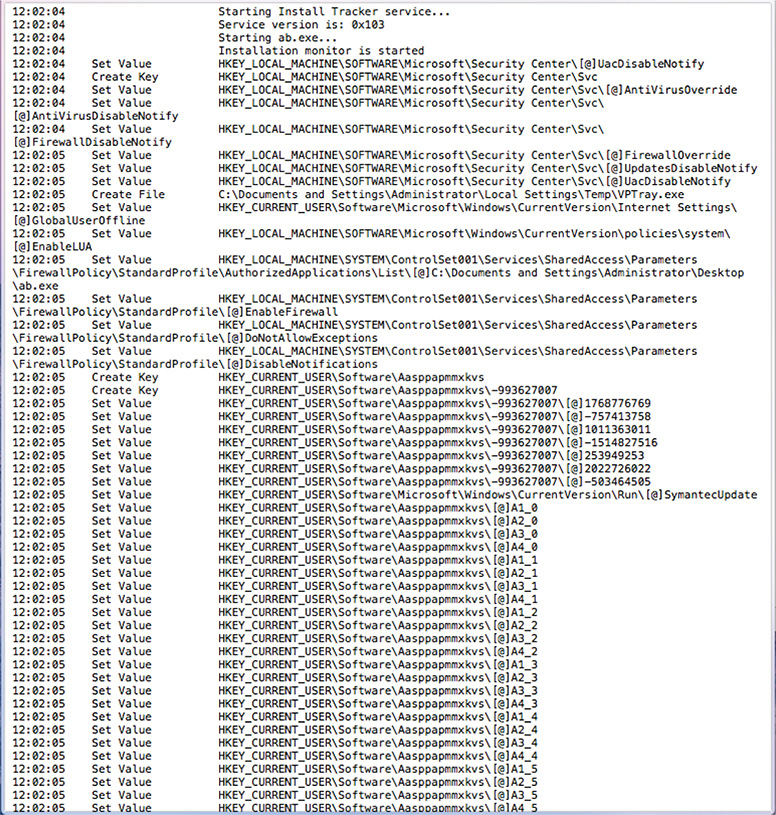
Figure 12-15 Uninstall Tool saved log.
17. The significance of this log is that it shows not only the changes done by the malware but also the chronological order of what was done.
Memory
The system’s memory is where the action takes place. Code and data are decrypted in memory. Having the ability to monitor and capture unencrypted code and data from memory is one of the best ways to understand a malware’s behavior.
In this lab, you will use Process Explorer to analyze a malware’s running process.
What You Need:
![]() Infected Windows system
Infected Windows system
![]() Sysinternals Suite
Sysinternals Suite
1. Download and install Sysinternals Suite from https://technet.microsoft.com/en-us/sysinternals/bb842062.aspx.
2. Extract the downloaded ZIP file to your desired folder.
3. Go to that folder, look for Process Explorer (procexp.exe), and open it.
4. If you do not want to download the whole Sysinternals Suite and want only Process Explorer, you can download it from https://technet.microsoft.com/en-us/sysinternals/bb896653.
5. In this experiment, you will be using the infected Windows system you used in previous experiments where you ran the infected malware. For this specific lab, I will use the system infected with the VOHO malware.
6. Figure 12-16 shows Process Explorer running in a system infected by VOHO malware.
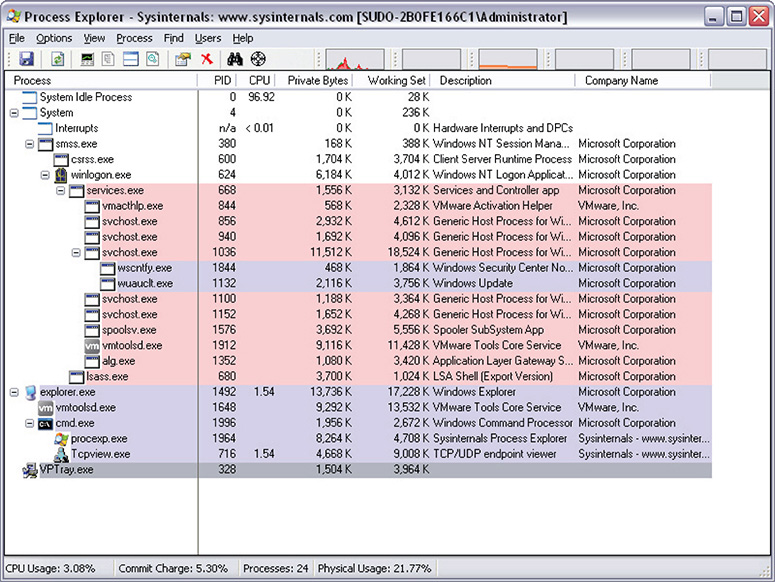
Figure 12-16 Process Explorer running in an infected system.
7. You know from the monitoring tools you used that VPTray.exe is one of the files installed by the VOHO malware. It can easily be spotted in the Process Explorer window.
8. Hovering the mouse pointer over the VPTray.exe process will reveal its location on disk. Figure 12-17 shows this.

Figure 12-17 Process Explorer reveals the path of a running process.
NOTE
This capability of revealing the path of a running process is useful, especially if you want to map a process to a file when doing system forensics and you have no idea which of the processes are malicious.
9. Double-clicking the process will reveal its properties, as shown in Figure 12-18. Another way of revealing its properties is by right-clicking the running process and clicking Properties.
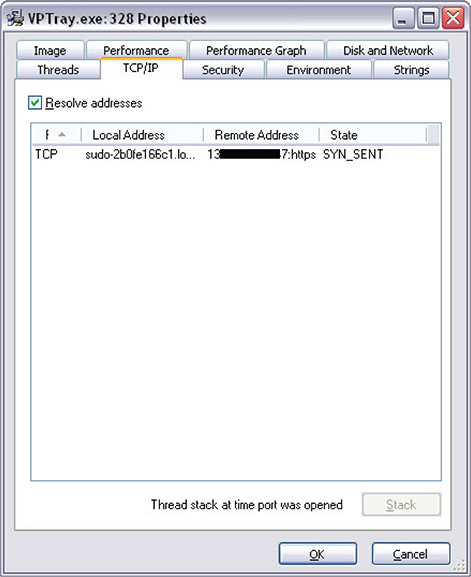
Figure 12-18 Running process properties TCP/IP tab.
10. From here, you can look at the different tabs to reveal information about the running process. The TCP/IP tab shown in Figure 12-18 reveals its network capability.
11. One interesting tab is the Threads tab, as shown in Figure 12-19.

Figure 12-19 Running process properties Threads tab.
12. Clicking the Stack button reveals the stack for that specific process thread. Figure 12-20 shows the stack for this specific malware.

Figure 12-20 Stack of a chosen thread in Process Explorer.
13. Another interesting tab is the Strings tab, as shown in Figure 12-21. This reveals the strings as shown on the file image and in memory.
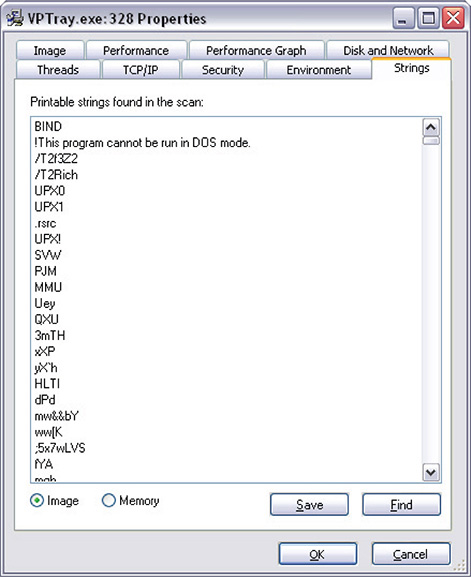
Figure 12-21 Running process properties Strings tab.
14. The default display on the Strings tab is the set of strings found on the file’s image. If the file is encrypted, the strings here will be encrypted as well. Notice that the fourth and fifth strings show UPX0 and UPX1, respectively. These are section names that tell you that the file is probably packed with UPX. I say probably because it can be faked. But upon inspection using static scanning, you are able to determine that the file is indeed packed by UPX.
15. Clicking Save will save these strings to a file. There is also a Find functionality if you want to find specific strings within the file’s image.
16. To see how the strings look like in memory, click the Memory radio button, as shown in Figure 12-22. Notice the difference between the strings in the file image (encrypted) and the strings as they are in memory.
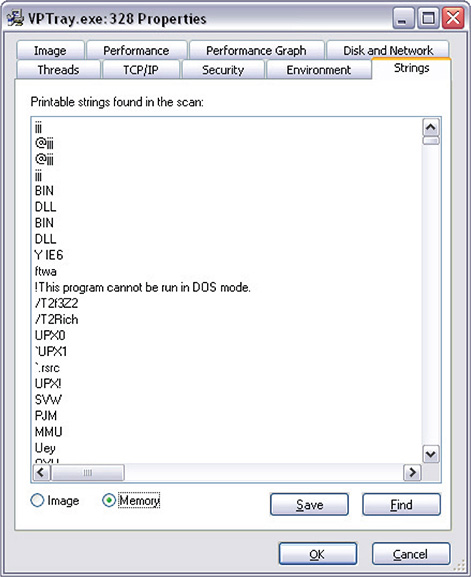
Figure 12-22 Strings in memory.
17. Remember that data in memory has to be decrypted so it can be processed. This means that the strings you see are decrypted. If you scroll down, you can see some useful strings. In this example, you can see the malware dropped file (VPTray.exe and up.bak), its fake name (pretending to be SymantecUpdate), and a command line it uses for one of its functionalities. Figure 12-23 shows these useful strings.
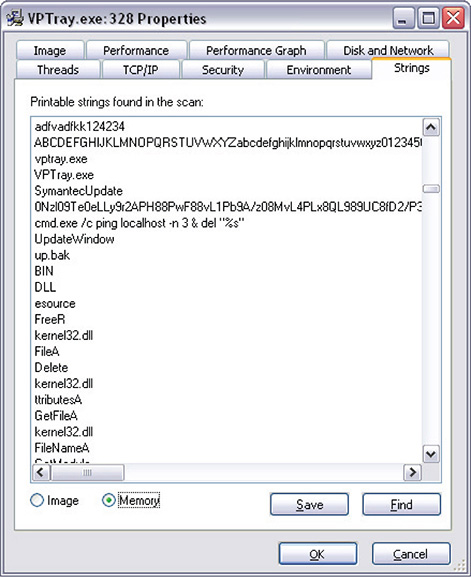
Figure 12-23 Strings in memory revealing useful information.
18. You can save the strings found in memory for future reference.
19. Feel free to experiment some more with the other capabilities of Process Explorer.
In this lab, you will determine whether the malware process you identified and analyzed using Process Explorer is persistent or has the capability to start up after every shutdown or reboot. For this specific purpose, you will be using Sysinternals Autoruns.
What You Need:
![]() Infected Windows system
Infected Windows system
![]() Sysinternals Suite
Sysinternals Suite
1. Download and install Sysinternals Suite from https://technet.microsoft.com/en-us/sysinternals/bb842062.aspx.
2. Extract the downloaded ZIP file to your desired folder.
3. Go to that folder, look for Autoruns (autoruns.exe), and open it.
4. If you do not want to download the whole Sysinternals Suite and want only Autoruns, you can download it from https://technet.microsoft.com/en-us/sysinternals/bb963902.aspx.
5. In this experiment, you will be using the infected Windows system you used in previous experiments where you ran the infected malware. For this specific lab, I will use the system infected with the VOHO malware.
6. Figure 12-24 shows Autoruns running in a system infected with VOHO malware.
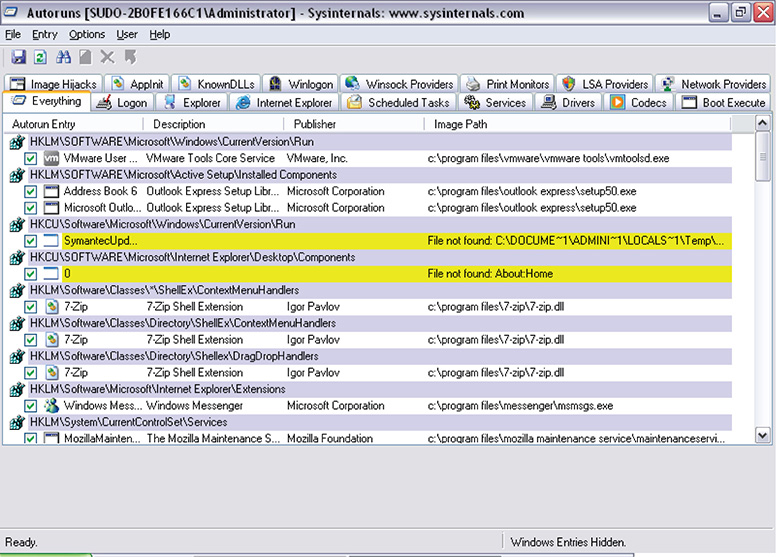
Figure 12-24 Autoruns running in a system infected with VOHO malware.
7. From Figure 12-24, you can see that SymantecUpdate is among the startup processes. Since you were able to determine that this is the process name used by VOHO in your previous laboratories and you know that your malware research lab does not have Symantec installed on it, you know already that this is the malware.
8. You can see that there are lots of tabs in the tool. Each tab represents the way a process starts up. Since you can see that the malicious process is being started up from the registry, you already know that the file starts during logon. To simplify the view and to target only those items that start up during logon, simply click the Logon tab. Figure 12-25 shows the resulting window.

Figure 12-25 Process that starts up during logon.
9. To go to the registry entry or to the folder of the file that initiated the process, right-click the process and choose either Jump To Entry if you want to go to the registry entry or Jump To Folder if you want to go to the folder where the file is located. Figure 12-26 shows this.

Figure 12-26 Context menu of startup process.
10. Notice also in Figure 12-26 that highlighting the process reveals the path and filename of the file that started it.
11. Feel free to experiment with the other capabilities of Autoruns.
Analyzing Network Behavior
As previously mentioned, modern malware has the capability to use different network resources for its malicious purpose. Malware can use network resources as a drop zone for stolen information, as a server for malware component updates, and as a command and control server where malware can interface with the attackers. In analyzing malware, it is important to understand its network behavior as well.
When it comes to network behavior, it is important to identify the network resources the malware is connecting to. Identifying the domains or Internet Protocol (IP) addresses that the malware connects to aids greatly in identifying the malware’s main purpose and also helps in attribution if there is enough information available.
In this lab, you will analyze network behavior of a malware using TCPView.
What You Need:
![]() Infected Windows system
Infected Windows system
![]() Sysinternals Suite
Sysinternals Suite
Steps:
1. Download and install Sysinternals Suite from https://technet.microsoft.com/en-us/sysinternals/bb842062.aspx.
2. Extract the downloaded ZIP file to your desired folder.
3. Go to that folder, look for TCPView (tcpview.exe), and open it.
4. If you do not want to download the whole Sysinternals Suite and want only TCPView, you can download it from https://technet.microsoft.com/en-us/sysinternals/bb897437.aspx.
5. In this experiment, you will be using the infected Windows system you used in previous experiments where you ran the infected malware. For this specific lab, I will use the system infected with the VOHO malware.
6. Figure 12-27 shows TCPView running in a system infected with VOHO malware.

Figure 12-27 TCPView running in a system infected by VOHO malware.
7. TCPView helps you determine where the malware connects. This information is contained under Remote Address. It can be either an IP address or a domain name. Be mindful also of the state of the connection. If the state does not change to LISTENING, chances are the network resource that the malware is attempting to connect to is already dead.
8. Feel free to explore and experiment with the other capabilities of TCPView.
In this lab, you will be using Wireshark to analyze malware’s network behavior.
What You Need:
![]() Infected Windows system
Infected Windows system
![]() Wireshark
Wireshark
Steps:
1. Download and install Wireshark from https://www.wireshark.org/. Take note that you will be prompted to install WinPcap if you do not have it on your system.
2. In this experiment, you will be using the infected Windows system you used in previous experiments where you ran the infected malware. For this specific lab, I will use the system infected with the VOHO malware.
3. Figure 12-28 shows the Wireshark main window.
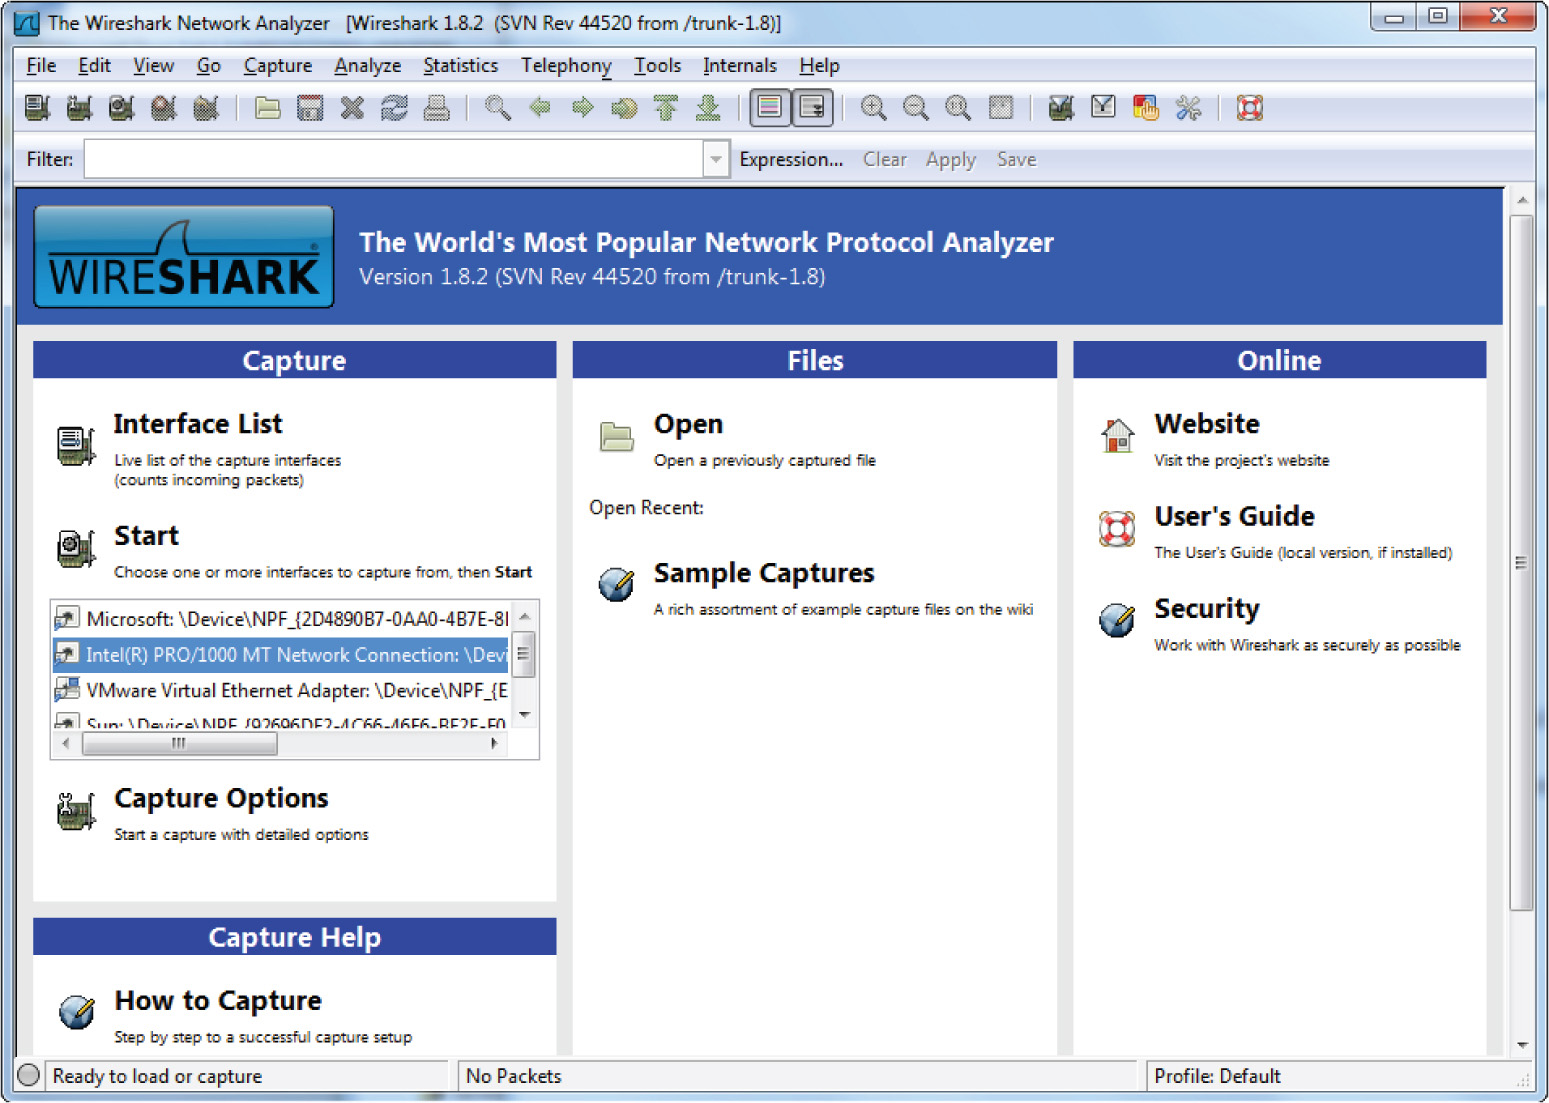
Figure 12-28 Wireshark main window.
4. To start the capture session, select an interface to monitor on the left-side menu under the Start button and then click the Start button. Take note that Wireshark needs to run under administrator mode.
5. Once the capture session starts, you can see the TCP connection to the destination address that has been shown in the TCPView session in your previous lab. Figure 12-29 shows this.

Figure 12-29 Capture session showing malware connection to its network resource.
6. Once the connection session has been identified, it can be further analyzed by expanding the data shown in the second window below the capture session. Figure 12-30 shows the expanded view of the session.
7. From here you can view a lot of information about the packet.
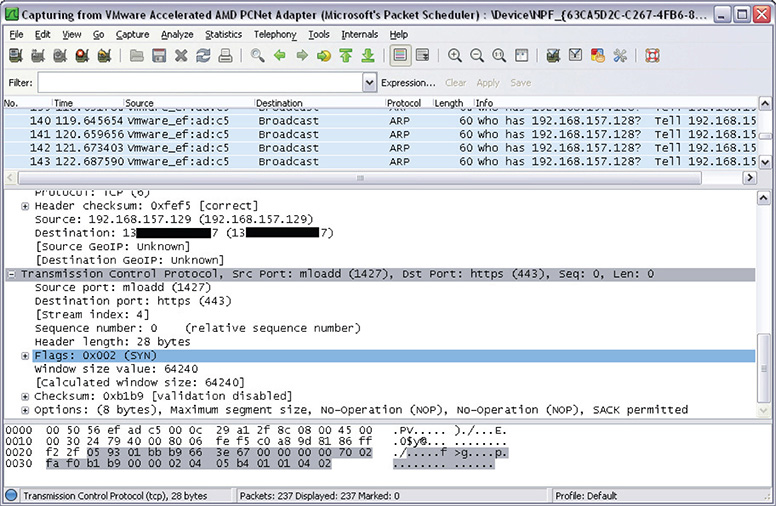
Figure 12-30 Expanded view of a session in Wireshark.
Dynamic Analysis Limitations
Dynamic analysis has its limitations. Malware will reveal information only as it executes. It is possible that not all of its functions or capabilities will be revealed because they may require certain conditions that you are not aware of. It is therefore an accepted limitation of dynamic analysis that certain functionalities of the malware cannot be monitored and captured. This is the reason why dynamic analysis is a feedback system. Malware that produces little or nothing at all in the target environment is further analyzed to determine the reason why. In most cases, malware reversing is conducted to find out why. Any new findings or any new conditions identified to make the system malware friendly is then added to the dynamic analysis lab so that other malware that relies on the same conditions will execute as intended by the attacker, which will result in the monitoring and capturing of the functions or capabilities that rely on those conditions.
Recap
In this chapter, I discussed how to analyze dynamic malware. I touched on how virtual and bare-metal environments can complement each other instead of making a hard choice of just using one and not the other. I discussed the two areas of dynamic analysis that is important in getting to the bottom of modern malware’s behavior. They are as follows:
![]() Analyzing host behavior
Analyzing host behavior
![]() Analyzing network behavior
Analyzing network behavior
In analyzing host behavior, I broke it down into monitoring and collecting data from the following areas of the dynamic analysis lab or target system:
![]() File system
File system
![]() Registry
Registry
![]() Memory
Memory
I discussed different tools and techniques in your lab to accomplish your goal of monitoring and recording data gathered from malware as it behaves on the host system and as it leaves traces while communicating through the network.
I also discussed the limitations of dynamic analysis to end the chapter so that there is clear understanding of the advantages you can get from conducting dynamic analysis while also recognizing that not all information can be gathered because it is dependent on the malware’s ability to execute within the environment.
Tools
![]() Sysinternals Suite https://technet.microsoft.com/en-us/sysinternals/bb842062.aspx
Sysinternals Suite https://technet.microsoft.com/en-us/sysinternals/bb842062.aspx
![]() System monitoring tools
System monitoring tools
![]() InstallRite http://www.softpedia.com/get/System/System-Info/InstallRite.shtml
InstallRite http://www.softpedia.com/get/System/System-Info/InstallRite.shtml
![]() Uninstall Tool http://www.crystalidea.com/uninstall-tool
Uninstall Tool http://www.crystalidea.com/uninstall-tool
![]() Process Explorer https://technet.microsoft.com/en-us/sysinternals/bb896653
Process Explorer https://technet.microsoft.com/en-us/sysinternals/bb896653
![]() Autoruns https://technet.microsoft.com/en-us/sysinternals/bb963902.aspx
Autoruns https://technet.microsoft.com/en-us/sysinternals/bb963902.aspx
![]() Network analysis tools
Network analysis tools
![]() TCPView https://technet.microsoft.com/en-us/sysinternals/bb897437.aspx
TCPView https://technet.microsoft.com/en-us/sysinternals/bb897437.aspx
![]() Wireshark https://www.wireshark.org/
Wireshark https://www.wireshark.org/
1 Malware, Rootkits & Botnets by Christopher C. Elisan, published by McGraw-Hill.