SCRATCH ISN’T JUST about variables, loops, and operators. It’s also a great place to create original interactive art and animations. In this adventure, you discover how to use Scratch to create, change, and animate your own artistic creations.
Creating Art with the Paint Editor
Scratch lets you create your own sprites and backdrops by drawing, painting, and importing graphics from your computer—or even by taking pictures using a camera connected to your computer!
The tool for creating your own graphics is called the Paint Editor. You’ve worked with the Paint Editor in previous adventures, but in this one, you learn about some more advanced ways to use it. In no time at all, you’ll be painting like a pro!
One popular use for the Paint Editor is to create multiple backdrops that can be connected to form a slideshow. Slideshows are a great way to show off several of your artistic creations or to teach new skills. To make a slideshow that teaches people how to make a peanut butter and jelly sandwich, follow these steps:
- Click File ⇒ New from the top toolbar to create a new project.
- Give the project a name, such as How to Make a PB&J Sandwich, by changing the title above the Stage.
Click the Paint New Backdrop icon.
The Paint Editor opens, with a new backdrop called backdrop2 highlighted, as shown in Figure 8-1. This backdrop is your title slide.
- Select the Text tool, which looks like a capital T, and click in the Paint Area of the Paint Editor, near the upper-left corner.
When the cursor appears, type How to Make a Peanut Butter and Jelly Sandwich. The text is too long to fit on one line, so press Return or Enter before you type Peanut Butter and Jelly Sandwich.
Your title backdrop should now look similar to Figure 8-2.
If your title still has a line around it, that means it’s selected. Click somewhere else in the Paint Editor to unselect it.
When you click outside of the text box, the title appears on the Stage, as shown in Figure 8-3.
- Click the icon in the Paint Toolbar with the dotted line and the hand. This is the Selection tool.
Use the Selection tool to drag a rectangle around all the text in your Paint Editor.
When you finish drawing the rectangle, it turns blue, and squares—called handles—appear at the corners and on the sides, as shown in Figure 8-4.
- Click and drag the handles on the sides and corners of the selected area to stretch it and make it as big as you want it to be, as shown in Figure 8-5.
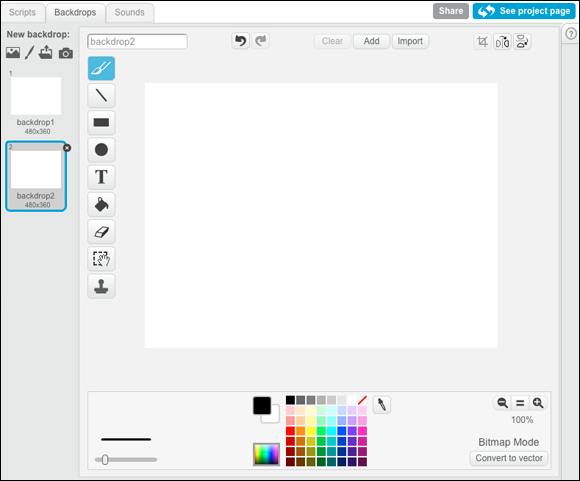
Figure 8-1 Creating a new backdrop

Figure 8-2 The start of the title backdrop
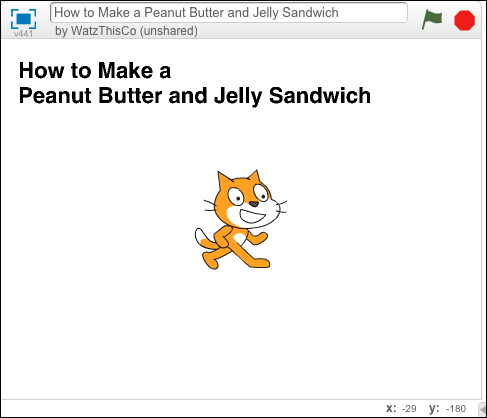
Figure 8-3 The title appears on the Stage
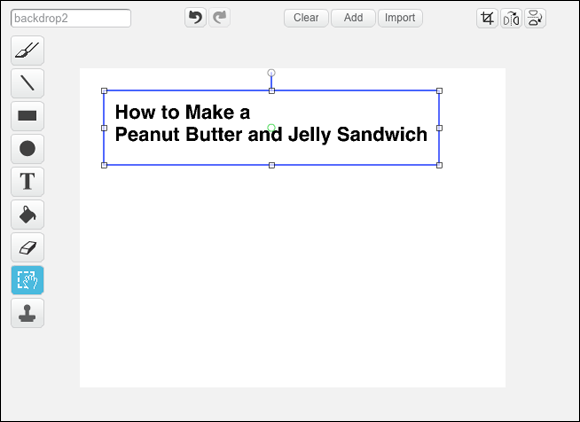
Figure 8-4 Using the Selection tool

Figure 8-5 Stretching the title using the handles
Notice how the edges of the text get choppy when you make it bigger? To understand why that happens and how you can fix it, you need to know about the two different ways that you can use the Paint Editor. These are Vector mode and Bitmap mode. Which one you’ll use at any one time depends on what kind of art you’re creating.
Using Bitmap and Vector Graphics
Whenever you open the Paint Editor to create something new, it opens in Bitmap mode. You know you’re in Bitmap mode when your tools are on the left side of the Paint Area.
Understanding the Bitmap Tools
The Bitmap tools let you draw anything you want. They paint shapes, text, lines, and color using tiny squares called pixels.
Bitmap tools work really well for editing with photographs or really complicated drawings. They give you precise control over every pixel in an image or graphic.
However, bitmap graphics are made of a certain number of pixels, so when you make them larger, they look distorted, or pixelated, as shown in Figure 8-6.

Figure 8-6 Bitmap graphics get pixilated when you make them bigger
Another drawback to bitmap graphics is that they don’t have the ability to be layered. For this reason, after you create text or a shape using bitmap tools, you can’t easily resize or modify them.
When you’re working with text or shapes, it’s much easier to work with the Paint Editor’s other tools, the Vector Drawing tools.
Drawing with the Vector Tools
Vector Drawing tools use lines, rather than pixels, to create graphics. Vector graphics work great for illustrations, text, and shapes.
When you use Vector Drawing tools, you can easily resize shapes and move things around in layers in the Paint Editor. Follow these steps to make a new title slide using the Vector Drawing tools.
- Click the Paint New Backdrop icon to create a new backdrop.
In the lower-right corner of the Paint Editor, click the button that says Convert to Vector.
Notice that the tools disappear from the left side of the Paint Editor and new tools appear on the right.
- Find the Vector Text tool, which looks like a capital T, and click it.
- Click your mouse inside the Paint Area where you want to put some text.
Type How to Make a Peanut Butter and Jelly Sandwich. You can press Return or Enter to create multiple lines of text that fit in the Paint Area.
If you want, you can change the font and the color by using the Font menu and the Color Palette at the bottom of the Paint Editor. When you’re done typing, the title should look similar to Figure 8-7.
Click the Select tool in the Vector Drawing tools.
It’s the tool at the very top, which looks like an arrow.
Use the Select tool to click the text in the Paint Area.
Handles appear around the text.
Use the handles around the text to resize it to fit the entire Paint Area, as shown in Figure 8-8.
Notice how vector text stays smooth no matter how large you make it or how much you squish and stretch it. This is because it’s made up of shapes and lines that can be any size, rather than pixels.
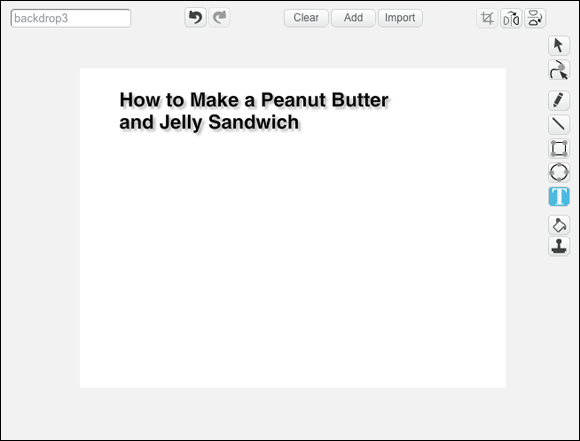
Figure 8-7 Creating a title slide with vector text

Figure 8-8 Resizing vector text
Making Slides
The next step in your slideshow project is to make the slides that tell people how to make this delicious sandwich. Follow these steps.
- Clean up your backdrops by deleting the blank backdrop and the one with the pixelated title text. Change the name of your title slide to Title.
- Click the Paint New Backdrop icon to make a blank backdrop. Name this backdrop Bread.
- Click Convert to Vector in the Paint Editor to work in Vector mode.
- Click the Rectangle tool and then select a color that resembles the color of bread from the Color Palette.
Draw two squares on your backdrop, as shown in Figure 8-9.
If you hold down the Shift key as you draw your rectangles, you make perfect squares!
These will be the pieces of bread for the sandwich.
- Click the Paint Bucket tool from the toolbar, select a lighter brown color, and click inside each of the bread squares to fill them, as shown in Figure 8-10.
- Use the Text tool to write Start with two pieces of bread. above your bread squares.
- Right-click the thumbnail of the backdrop you just created and select Duplicate, as shown in Figure 8-11. Name this backdrop Peanut Butter.
- Select a different brown color to be the peanut butter.
- Choose the Pencil tool and slide the Pen Size bar to make the widest possible pen, as shown in Figure 8-12.
- Use the Pencil tool to scribble peanut butter on one slice of bread, as shown in Figure 8-13.
- Use the Text tool to change the text on this backdrop to Spread peanut butter on one slice of bread.
- Duplicate the peanut butter backdrop. Name this new backdrop Jelly.
- Choose a color for your jelly, and scribble jelly on the other slice of bread, using the Pencil tool.
Change the text on this backdrop to Spread jelly on the other slice of bread.
Your project should now look like Figure 8-14.
- Duplicate the jelly backdrop. Name it Combine.
- Change the text on the new backdrop to Put the bread with peanut butter on the bread with jelly.
- Next duplicate the bread backdrop. Name this one Done.
- Use the Select tool to select one of the pieces of bread.
- Delete the selected slice of bread.
- Move the sandwich to the center of the Paint Editor.
Change the text on this backdrop to Enjoy your sandwich!
This completes your backdrops for the project. Your project should look like Figure 8-15.

Figure 8-9 Drawing bread squares
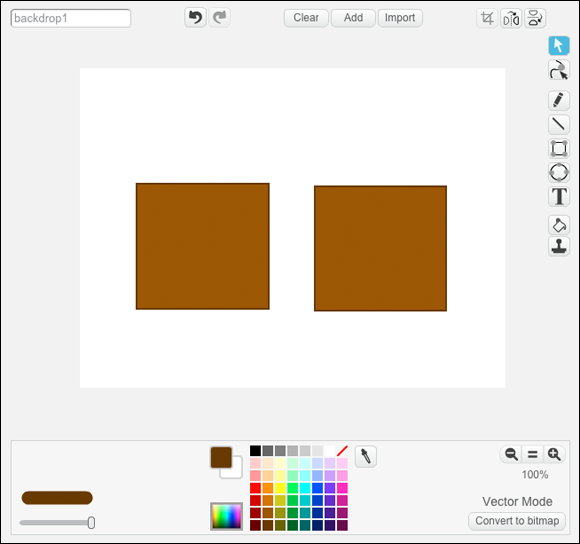
Figure 8-10 Filling in the bread squares
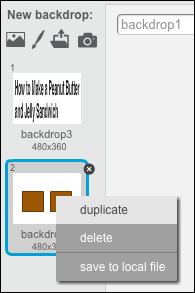
Figure 8-11 Duplicating the bread squares backdrop

Figure 8-12 Making the pen size as big as possible
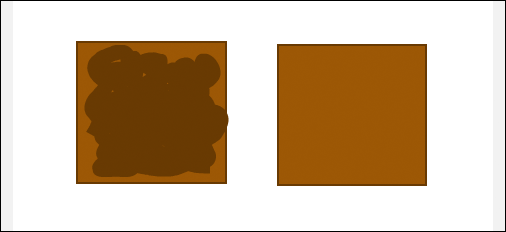
Figure 8-13 Scribbling the peanut butter
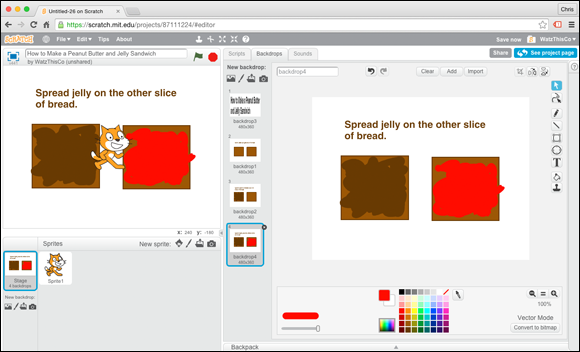
Figure 8-14 The jelly slide
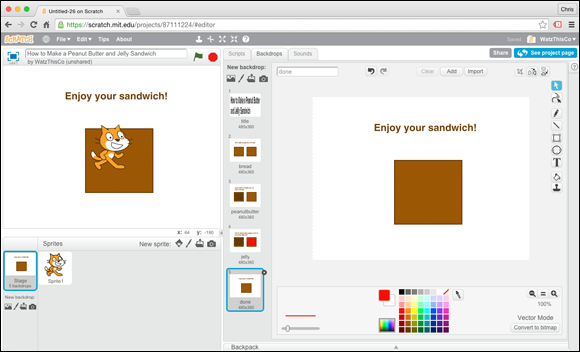
Figure 8-15 The finished backdrops
Next, you write a script to make the slides change. Follow these steps.
Click the Scratch the Cat sprite in the Sprites Pane.
The Costume Editor appears, with Scratch the Cat in the middle of it.
- Click the Scripts tab at the top of the Costume Editor.
- Drag a
when green flag clicked - Drag a
switch backdrop to ()block from the Looks Block Palette and snap it to thewhen green flag clickedblock. - Change the drop-down menu in the
switch backdrop to ()block to Title. - Drag a
when () key pressedblock from the Events Block Palette to the Scripts Area. - Change the drop-down menu in the
when () key pressedblock to Space. - Drag a
switch backdrop to ()block from the Looks Block Palette and snap it to the bottom of thewhen () key pressedblock. Change the drop-down menu in the
switch backdrop to ()block to Next Backdrop.Your script should now look like Figure 8-16.
- Right-click Scratch the Cat in the Sprite Pane and select Hide, as shown in Figure 8-17.

Figure 8-16 The finished slideshow script
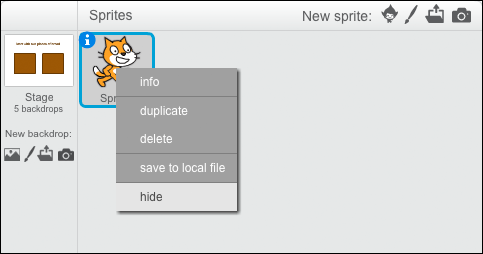
Figure 8-17 Hiding Scratch the Cat
Click the Green Flag to start your slideshow and press the space bar to go through each of the slides!
Use the Pen to Make a Skywriting Plane
Scratch’s Pen blocks make it possible for you to write programs that create graphics and help you to draw pictures on the Stage.
You saw an example of code that draws using the pen in the random drawing program in Adventure 2. In this adventure, you use the pen to create a skywriting plane program that draws in the sky with clouds as you move your mouse around the Stage.
Figure 8-18 shows what the finished program will look like on the Stage.
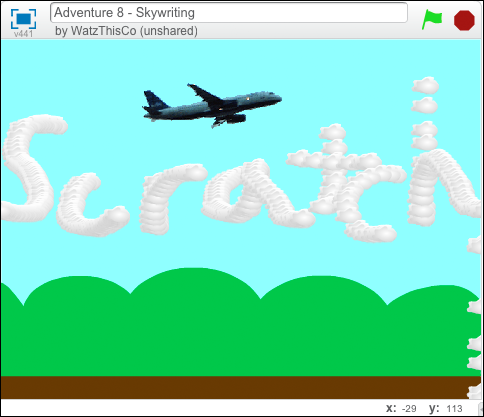
Figure 8-18 Drawing with clouds
To code the Skywriting app, follow these steps:
- Select File ⇒ New from the top toolbar.
- Give your new project a name, such as Daredevil Skywriting.
- Delete Scratch the Cat from the Sprites Pane so that you can choose a custom sprite.
Click Choose Backdrop from Library.
The Backdrop Library opens.
- Find the Blue Sky sprite and click it. Click OK to add it to your project.
Click the Choose Sprite from Library icon in the Sprites Pane.
The Sprite Library opens.
- Locate the Airplane sprite and add it to your project.
Click the Choose Sprite from Library icon in the Sprites Pane again and add the Cloud sprite to your project.
Your program should now look like Figure 8-19.

Figure 8-19 The Stage and sprites are set
Now that the Stage is set, your first task is to make this plane fly wherever your mouse goes on the Stage.
- Click the Airplane sprite in the Sprites Pane to open its Scripts Area.
- Drag a
when green flag clickedblock from the Events Block Palette to the Scripts Area. - Drag a
foreverblock from the Control Block Palette to the Scripts Area and snap it to thewhen green flag clickedblock. - Drag a
go to ()block from the Motion Block Palette and snap it inside theforeverblock. - Change the value in the drop-down menu in the
go to ()block to Mouse-pointer.
Your script should now look like Figure 8-20. Click the Green Flag and move your mouse around the Stage to see how the airplane follows it.
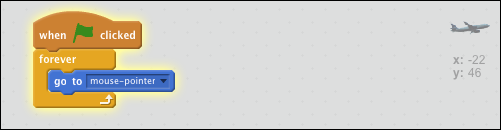
Figure 8-20 The script to make the airplane follow the mouse
Next, you add a script to the cloud to make it follow the plane and draw wherever the plane goes!
- Click the Cloud sprite in the Sprites Pane to view its Scripts Area.
- Use the Shrink tool from the top toolbar to shrink the cloud until it’s small enough to fit inside the plane, as shown in Figure 8-21.
- Drag a
when green flagclicked block from the Events Block Palette to the Scripts Area. Drag a
go back () layersblock from the Looks Block Palette and snap it to thewhen green flag clickedblock.This block causes the cloud to hide behind the airplane.
Drag a
clearblock from the Pen Block Palette and snap it to the bottom of thego back ()layersblock.The
clearblock erases the previous drawing every time you press the Green Flag.- Drag a
foreverblock from the Control Block Palette to the Scripts Area and snap it to thego back () layersblock. - Drag a
go to ()block from the Motion Block Palette and snap it inside theforeverblock. Change the drop-down menu in the
go to ()block to airplane.This causes the cloud to follow the plane around.
- Drag an
if () thenblock from the Control Block Palette and snap it inside theforeverblock, to the bottom of thego to (airplane)block. - Drag a
mouse down?block from the Sensing Block Palette and snap it into the hexagonal space in theif () thenblock. Drag a
stampblock from the Pen Block Palette and snap it inside theif (mouse down?) thenblock.The
stampblock causes an image of the sprite (the cloud, in this case) to be drawn, or stamped, at the current location of the sprite.

Figure 8-21 Making the cloud fit in the plane
The finished cloud script looks like Figure 8-22.
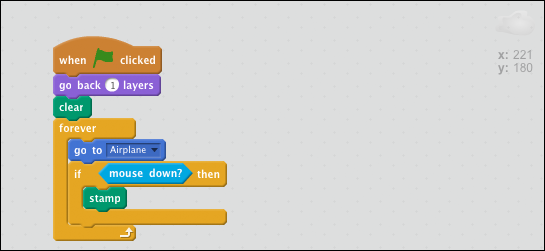
Figure 8-22 The finished cloud script
Now press the Green Flag to try it out!
Further Adventures in Coding
Achievement Unlocked: Scratch Artist
Bloom, by ykoubo, is a great starter project that you can copy and modify to create interesting flower patterns. You can check it out by going to https://scratch.mit.edu/projects/2546637/. Take a look at the other projects (in the Remixes pane) that are based on this program and then try making your own!
To find out more about bitmap and vector images, go to Scratch class at https://scratch.mit.edu/projects/10568936/.