IN THIS ADVENTURE, you learn about blocks that make decisions and create different kinds of loops besides the simple forever loop that you saw in previous adventures.
Understanding Code Nesting
The blocks you learn about and work with in this adventure are the C-blocks. The forever block that you used in the previous adventures is an example of a C-block. C-blocks wrap around other blocks to control when and whether the blocks inside of them are executed.
Figure 3-1 shows an example of a C-block wrapped around a move () steps block and a turn clockwise () degrees block. Without running this script in Scratch, can you guess what it will do?

Figure 3-1 A C-block
Now try building and running the script in Figure 3-1 to see if you were right about what it does! If you guessed that it moves the sprite in a circle, you’re right!
When code fits inside of other code like this, programmers call it nesting. Think about a bird inside a nest. Now, think about a nest with a nest inside of it, with a nest inside of that, with a bird in that nest. In the bird world, this might never happen, but it happens all the time in programming.
Figure 3-2 shows a C-block nested within another C-block. What do you think this one does when you run it?
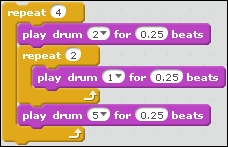
Figure 3-2 Nested C-blocks
In order to figure out what the nested loops do, you can start at the top and follow the loop in your head, as if you’re inside the program. Starting at the top, the program in Figure 3-2 does the following:
- Creates a loop to repeat the following code four times.
- Plays a drum beat (drum #2, which happens to be a bass drum) for .25 beats.
- Creates another loop to repeat the following code two times.
- Plays a drum beat (drum #1, which is the snare drum) for .25 beats.
- Goes back to the top of the inner loop.
Plays a drum (drum #1).
Now that the program went back to the top of the inner loop, the inner loop is finished (because it has looped twice), so the program moves on to the next block.
- Plays a drumbeat (drum #5, a hi-hat cymbal) for .25 beats.
- Checks whether the outer loop has repeated four times. If not, goes back to the beginning.
Now try to build this loop and run it for yourself. You can find the play drum block in the Sound Block Palette, and the repeat blocks are in the Control Block Palette.
After you’ve built and run this program, does it do what you expected it to do? Can you follow the steps as it runs? If it’s going too fast, try changing the number of beats that each drum runs to a larger number to slow it down.
By nesting blocks within C-blocks, you can create complex programs with fewer lines of code. The same program as shown in Figure 3-2 could be created without nesting, but it would take a lot more blocks. Figure 3-3 shows a program that does the exact same thing as the program in Figure 3-2, but without nesting.

Figure 3-3 Writing the program from Figure 3-2 without nesting
Branching Programs in Scratch
You can use C-blocks and nesting for more than just repeating blocks of code. Branching is how you tell a program to make choices between two or more possible paths.
For example, you might write a game in which a character comes to a fork in the road and must choose a path.
This is an example of branching. In English, you might say something like:
If the road looks less travelled, go down that one.
In Scratch (and every other programming language we know of), you write a branching statement using an if () then block.
The if () then Block
You can find the if () then block inside the Control Block Palette. It looks like Figure 3-4.

Figure 3-4 The if () then block
The if () then block is a C-block, so you can nest other blocks inside of it. But it also has a hexagon-shaped space for a Boolean block between the words if and then. This is where you put a block that responds with a True or False answer.
For example, if you want to write a program that plays a sound whenever you press the space bar, you can write that with an if () then block, as shown in Figure 3-5.

Figure 3-5 Playing a sound when the space bar is pressed
The program in Figure 3-5 contains a forever loop that runs when you click the Green Flag. The loop checks over and over to see whether you’ve pressed the space bar. If so, it plays the “meow” sound. If you never press the space bar, the meow sound never plays.
What if you want the program to do something else when the space bar isn’t being pressed? This is where the if () then, else block, which is covered in the next section, comes into play.
The if () then, else Block
The if () then, else block works much the same as an if () then block. The if is () then, else block has a second C-block within it that you can add blocks to that run when the blocks in the if section don’t run.
Figure 3-6 shows a program that waits for you to press the space bar. If you don’t press the space bar, Scratch turns clockwise 15 degrees.
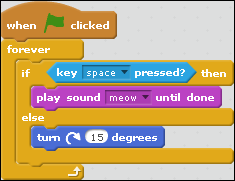
Figure 3-6 Demonstrating the if () then, else block
You can do so many interesting things with if () then, else blocks by nesting other if () then and if () then, else blocks within them. For example, if you want to play the meow sound when the space bar is pressed, and play a drum when the up-arrow key is pressed, you can nest another if () then inside of the else C-block, as shown in Figure 3-7.
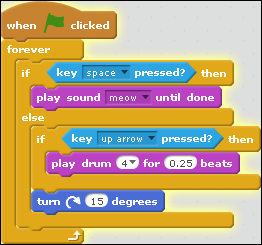
Figure 3-7 Nesting an if () then block inside of an if () then, else block
Things start to get pretty wild (and maybe a little confusing) when you have multiple levels of nesting inside of if () then and if () then, else blocks. But with practice, you can create some pretty cool things! Figure 3-8 shows how you can use nested if () then, else blocks to create a small drum set on your keyboard.

Figure 3-8 Creating a keyboard drum set with nested if () then, else blocks
The program in Figure 3-8 checks whether you’re pressing any of the arrow keys and plays a different drum for each of them.
Boolean Blocks
Any block that can be either true or false is called a Boolean block. The key pressed block is an example of a Boolean block. The key is either pressed (true) or not pressed (false). There’s no “sort of” when it comes to Boolean blocks.
Scratch’s Boolean blocks are kept in two block palettes: the Sensing Block Palette and the Operators Block Palette. You can identify Boolean blocks because they’re always hexagon-shaped.
Figure 3-9 shows all the hexagon-shaped blocks in Scratch.
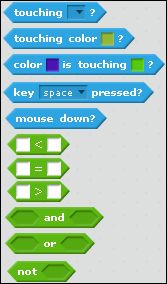
Figure 3-9 The hexagon-shaped blocks
There are only 11 hexagon-shaped (Boolean) blocks, but all of them, with the exception of the mouse down? block, contain many different possibilities for determining true or false values in your programs.
You can use only Boolean blocks inside Control blocks that have hexagon spaces. Here’s what each Boolean block does:
touching ()?block. Thetouching ()?block is true if the sprite is touching whatever you select from its drop-down menu. You can select any other sprite in the program, as well as mouse-pointer andedge. When you selectedge, thetouching ()?block is true if the sprite is touching the edge of the Stage. When you selectmouse-pointerthetouching ()?block is true when the mouse pointer is touching the sprite.touching color ()?. Thetouching color ()?block is true if the sprite is touching any object with the color you provide in its color menu.color () touching color ()?. Thecolor () touching color ()?block is true if the first color (which is within the sprite) is touching the second color, which may be part of the background or part of another sprite.key () pressed?. Thekey () pressed?block is true when the selected key is pressed.mouse down?. Themouse down?block is true when the mouse button is pressed.() < (). The() < ()block has two spaces for values. It’s true when the first value is less than the second one. For example, if you put 10 in the first box and 30 in the second box, then the less than block is true. If you put 30 in the first box and 10 in the second box, the less than block is false.() = (). The() = ()block is true if the value on the left is the same as the value on the right.() > (). The() > ()block is true if the value on the left is greater than the value on the right.() and (). The() and ()block compares the results of two Boolean Blocks and is true if both of the Boolean blocks it contains are true.() or (). The() or ()block compares the results of two Boolean blocks and is true if one or both of the Boolean blocks is true.not (). Thenot ()block reverses whatever Boolean blocks it contains.
Figure 3-10 shows an example use of the not () block. Is the result of the not () block true or false?

Figure 3-10 The not () block
If you said that the result of the not () block in Figure 3-10 is true, you’re right! Because “apples” is not equal to “oranges,” the not () block reports back with a true.
Making Comments in Scratch
As you start building longer programs things can start to get complicated. When you’re working on a program, you may completely understand how it works, and you may think that in the future you’ll never forget what you were thinking at the time you built them. But, trust us, if you put aside a program you’re working on for a few days and come back to it later, you’ll often sit there staring and scratching your head trying to figure out what you were doing.
Fortunately Scratch has a way to put notes in your scripts. In programming, notes inside your code that are meant to be read by people, and not by the computer, are called comments. Comments are where you can write anything you want to tell yourself or others about the code.
Scratch has two different kinds of comments: standalone comments and block comments.
Standalone Comments
Standalone comments are comments that you add to your script but that aren’t connected to any blocks or code in particular. Figure 3-11 shows an example of a standalone comment that we added to the keyboard drum set program.
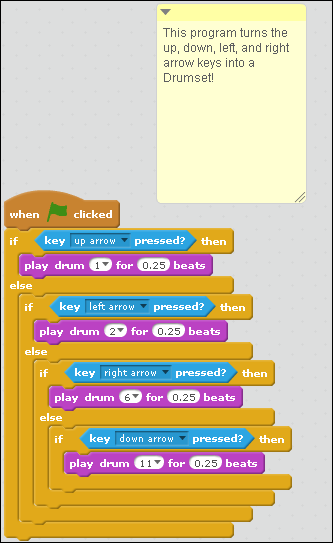
Figure 3-11 A standalone comment
Standalone comments are great for describing the whole program, as in Figure 3-11. You can also use them to give instructions on how to use the program, or how to play a game, or to remind yourself about improvements that you want to make to a program in the future.
To make a comment, right-click in the Scripts Area and select Add Comment. A new yellow note appears. You can drag a comment anywhere in the Scripts Area, and you can resize it by dragging its lower-right corner.
If you add several comments to your program, your Scripts Area can start to look cluttered. Fortunately, you can make comments smaller by clicking on the arrow in the top-left corner of the comment. Clicking the arrow on a comment “collapses” it so that it takes up less space, but you need to click the arrow again if you want to read it.
Figure 3-12 shows what a collapsed comment looks like.

Figure 3-12 A collapsed comment
Block Comments
You can also attach comments to blocks in the Scripts Area. When a comment is connected to a block, it’s called a block comment.
Block comments are useful for explaining what a particular block or group of blocks does. For example, Figure 3-13 shows the drum set program with block comments added to show at a glance what each part does.

Figure 3-13 Using block comments
Looping in Scratch
You’ve already seen a couple different kinds of loops. In this section, you take a closer look at how to get totally loopy in Scratch.
Looping Forever
The forever loop is the simplest type of loop. To use it, just drag it to your Scripts Area and put some blocks inside it to make those blocks loop forever until you stop it. There are several ways to stop a forever loop:
- Press the Stop Sign next to the Green Flag.
- Close the browser window where the program is running, or simply go to a different web page.
- Turn off your computer.
- Use the
stop ()block.
Stopping Loops with the stop () Block
The stop () block, shown in Figure 3-14, stops the running of a script, or of multiple scripts.

Figure 3-14 The stop () block
Notice that the stop () block has a flat edge on the bottom. Because its purpose is to end the script, it doesn’t make any sense to put anything after it. So, the flat edge indicates that it’s not possible to attach other blocks to its bottom.
The drop-down menu in a stop () block lets you choose whether the stop () block stops all the scripts for the current sprite, just part of it, or all the scripts running in the current sprite.
Creating a Counting Loop
Counting loops repeat the code within them a certain number of times. They’re created by using the repeat () block. Figure 3-15 shows what a repeat () block looks like.
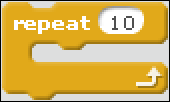
Figure 3-15 The repeat () block
Notice that the repeat () block has an oval in it. You can put a number into the oval, or you can put any of the oval-shaped blocks inside it. Figure 3-16 shows the use of an oval-shaped block inside of a repeat () block.
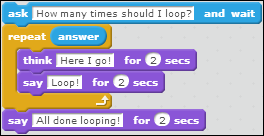
Figure 3-16 Using the repeat () block
The program in Figure 3-16 causes Scratch the Cat to ask the users how many times they want the loop to run. It then uses that number to loop the program that number of times! Pretty cool, eh?
Looping Until a Condition Is Met
The final type of loop is called a conditional loop. It’s created using the repeat until () block, which is shown in Figure 3-17.
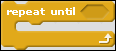
Figure 3-17 The repeat until () block
The repeat until () block uses a Boolean block inside of it to determine whether it should stop looping.
Figure 3-18 shows a program that creates a loop that makes Scratch the Cat move and say “Going for a walk!” until she runs into the edge of the Stage.

Figure 3-18 Looping with the repeat until () block
Waiting
When loops run too fast, or when you want something to wait for something else to happen in your program, you can use the wait blocks. Scratch has two wait blocks:
wait () secs. Waits a specified number of seconds (or a fraction of a second).wait until (). Waits until a condition is true.
Both wait blocks cause the running of the current script to sit there and do nothing for a while. We might hate waiting, but Scratch doesn’t mind a bit. Situations when you might want a script to wait include the following:
- To create a pause between movements
- To have a sprite in a game wait until a key is pressed before proceeding with what it was doing
- To pause a script whenever a “pause” button is clicked in a music-player script
Can you think of other times when you might want to pause a script?
Building the Fly Catcher Game
There’s nothing better than sitting on a warm rock by the river and catching flies with your tongue. At least, that’s what we’ve been told by frogs.
In this adventure, you create a game where you’re a frog that’s trying to catch the tastiest of tasty treats: the hippo-fly.
The finished game looks something like Figure 3-19.
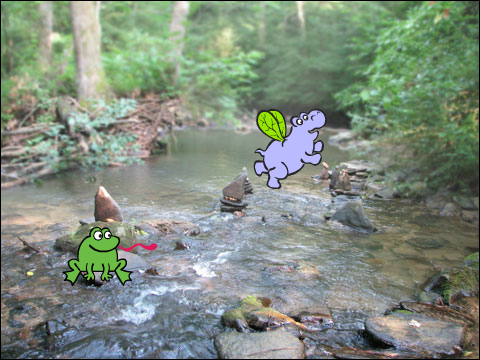
Figure 3-19 The finished Fly Catcher game
Looks like fun, right? Let’s get started! Follow these steps to get ready to code:
- Go to
http://scratch.mit.eduand click the Create tab at the top of the screen. Give your project a name by clicking inside the input area just above the Stage.
Call it something like “Fly Catching Adventure” or “Fun Fly Catching.”
- Remove Scratch the Cat from the Stage by using the Delete tool from the toolbar, or by right-clicking on her and selecting Delete.
Now you’re ready to go! Move on to the next section to set up the backdrop.
Setting the Stage
Our scene begins in a peaceful stream in the forest. But, all we have now is a polar bear in a snowstorm. Follow these steps to set the backdrop.
Click the first icon in the row of icons under New Backdrop in the lower-left corner of the Project Editor.
The Backdrop Library opens.
- Click Outdoors in the left menu of the Backdrop Library and find the backdrop named Water and Rocks.
Click the Water and Rocks backdrop and click the OK button to set it as a backdrop for the current project.
Your Stage should now look like Figure 3-20.
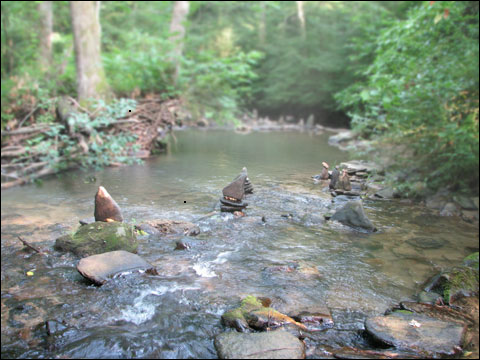
Figure 3-20 The Water and Rocks backdrop
Placing the Frog
It’s time to bring in the star of our game—the frog. Follow these steps to add a frog sprite:
- Click the first icon in the New Sprite menu to open the Sprite Library.
Locate the Frog sprite, click it, and click OK.
The frog is added to the center of the Stage.
- Drag the frog to position it on a nice fly-catching rock in the stream, like that one toward the left.
That’s all for the frog! All the action in this game takes place through the hippo-fly sprite and through a sprite that you create for the frog’s tongue.
Adding the Hippo-Fly
Now it’s time for the hippo-fly. Follow these steps to add him to the Stage.
- Open the Sprite Library and locate the flying hippo in the Animals category.
- Click the hippo and click OK to add it to the Stage.
- Click the Shrink tool in the toolbar and use it to make the hippo smaller. (A smaller hippo-fly will make the game more of a challenge.)
That’s all there is to it! You now have the two main characters on set and ready to go, as shown in Figure 3-21. Next up, you add some action!

Figure 3-21 The frog and hippo are on the Stage!
Scripting the Hippo-Fly
The hippo-fly’s only job in this game is to fly around as fast as he can, in random directions. Here’s how to make him do that:
- Click on the hippo in the Sprite Pane.
- Drag the
when green flag clickedblock to the Scripts Area. - Drag a
foreverloop to the Scripts Area and snap it to thewhen green flag clickedblock. - Inside the
foreverloop, drag amove () stepsblock. - Change the value in the
move () stepsblock to 30. - Drag a
turn clockwise () degreesblock to the Scripts Area and snap it to the bottom of themove () stepsblock. - Click into the Operators Block Palette and drag a
pick random () to ()block into theturn clockwise () degreesblock. - Set the values in the
pick random () to ()block to 1 and 10. - Drag an
if on edge, bounceblock to the Scripts Area and snap it to theturn clockwise () degreesblock.
Your finished script for the hippo-fly should look like Figure 3-22. Check your work carefully before moving on.
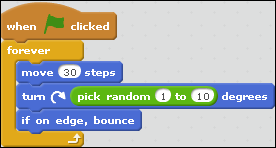
Figure 3-22 The flying script for the hippo-fly
Making the Tongue
You may have noticed that the frog’s tongue is always sticking out. It wouldn’t be much of a game if you programmed it to just wait until the hippo-fly happens to run into the tongue. To add an element of skill to the game, you’ll give the frog an extra-long tongue that shows up only when you press the space bar.
Follow these steps to create the tongue and to make it appear when the space bar is pressed.
Click the icon that looks like a paintbrush in the New Sprite toolbar.
The Paint Editor opens.
- Change the color for the brush to red by clicking red in the Color Palette at the bottom of the Paint Editor.
- Change the width of the paintbrush to something around the same width as the frog’s existing tongue, by sliding the Brush Size Bar.
Start at the edge of the canvas and draw a curvy tongue, as shown in Figure 3-23.
The tongue appears on the Stage as you draw it.
Click and drag the tongue on the Stage to move it into position so that it covers up the existing tongue on the frog.
You may need to redraw or tweak your new tongue so that it fits.
- Click the i icon on the tongue sprite to open the Sprite Info Pane.
Change the name of the sprite to Frog Tongue, and uncheck the box next to the word Show.
The tongue disappears from the Stage.
- Switch to the Scripts Area by clicking the Scripts tab at the top of the Project Editor.
- With the tongue selected in the Sprite Pane, find the
whenkey () pressedblock in the Events Block Palette and drag it to the Scripts Area. - Make sure that space is selected in the
whenkey () pressedblock. - Drag the
show blockfrom the Looks Block Palette and snap it to thewhen () key pressedblock. - Drag an
if () then, elseblock to the Scripts Area and snap it to the bottom of theshowblock. - Drag the
touching ()block from the Sensing Block Palette and drag it into theif () then, elseblock. - Change the value in the
touching ()block to the name of the hippo sprite. - Drag a
say ()block from the Looks Block Palette to inside theifpart of theif () then, elseblock. - Drag another
say ()block from the Looks Block Palette to inside theelsepart of theif () then, elseblock. - Change the words that the frog says when he catches or misses the fly to whatever you want him to say.
Drag a
hideblock from the Looks Block Palette to the bottom of theif () then, elseblock.This makes the tongue go away after the fly is caught or not caught.
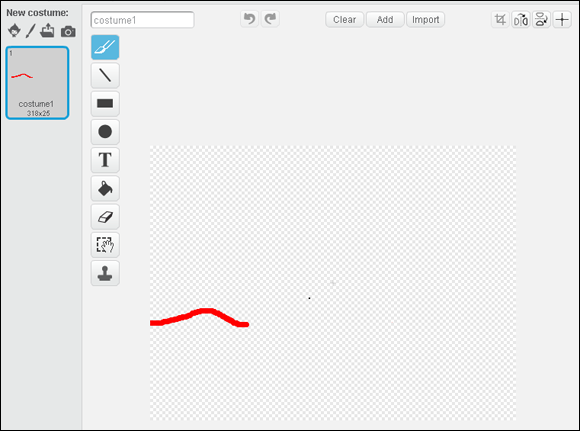
Figure 3-23 Drawing a curvy tongue
The finished frog tongue script should look like Figure 3-24.

Figure 3-24 The finished frog tongue script
Now it’s time to try it out! Click the Green Flag and see if everything works as it should.
Further Adventures in Coding
To advance your knowledge of coding using loops, read our article “Advanced Looping with JavaScript” at www.dummies.com/how-to/content/advanced-looping-with-javascript.html.
Achievement Unlocked: Branching and getting loopy