
SO FAR, YOU’VE been using Scratch’s built-in blocks and they’re great, but Scratch also lets you make your own blocks that you can personalize and customize to your particular needs. In this adventure, you use custom blocks and a handy tool called the Backpack to put on a fashion show!
Making Your Own Blocks
If you can dream it up, you can probably create it by using Scratch’s built-in blocks. But, sometimes, your programs can get pretty complicated, with many different blocks all put together in a very precise way.
When that happens, a great way to stay organized and make programming easier is to create your own custom blocks.
Let’s take another look at the arrow key sprite control script that you created in Adventure 4, which is shown in Figure 9-1.

Figure 9-1 Basic arrow key controls
That’s a lot of blocks to just make a sprite move around when you press the arrow keys. Wouldn’t it be great if there were a block like the one shown in Figure 9-2 that you could use to do the same thing as all of the blocks in Figure 9-1?

Figure 9-2 An arrow key movement block
Well, there can be, and you can make it yourself! We show you how to create custom blocks in the next section.
Splitting Programs into Custom Blocks
You’ve learned about and used a lot of different blocks so far, in each of the different categories in the Block Palette. There’s one very special category of the Block Palette where you can create an unlimited number of custom blocks. This is called the More Blocks Palette. To make your first custom block, follow these steps.
- Select File ⇒ New from the top toolbar to start a new project.
Click the More Blocks category in the Block Palette.
You see two buttons in the More Blocks Block Palette, as shown in Figure 9-3.
Click Make a Block in the More Blocks Block Palette.
The New Block pop-up window opens, as shown in Figure 9-4.
- Enter Draw Circle into the text area in the New Block pop-up window, as shown in Figure 9-5.
Click OK to create your new block.
A new stack block with the name
Draw Circledefine Draw Circleappears in the Scripts Area. Both of these are shown in Figure 9-6.
Figure 9-3 The More Blocks Block Palette
Figure 9-4 The New Block pop-up window

Figure 9-5 Naming a new block

Figure 9-6 A new block and a new block definition
Next you need to define what the Draw Circle block will do. Everything under the custom block’s hat block will run every time you use the custom stack block.
Follow these steps to define the Draw Circle block and make it actually draw a circle.
- Drag a
pen downblock from the Pen Block Palette to the Scripts Area and snap it to thedefine Draw Circleblock. - Drag a
repeat ()block from the Control Block Palette and snap it to the bottom of thepen downblock. - Change the value in the
repeat ()block to 180. - Drag a
move () stepsblock from the Motion Block Palette and snap it inside therepeat ()block. - Change the value in the
move () stepsblock to 1. - Drag a
turn clockwise () degreesblock from the Motion Block Palette and snap it to the bottom of themove () stepsblock. Change the value in the
turn clockwise () degreesblock to 2.Your
define Draw Circleblock script should now look like Figure 9-7.- Drag a
Draw Circlecustom block from the More Blocks Block Palette to the Scripts Area. Double-click the
Draw Circleblock in the Scripts Area.Scratch the Cat moves and draws in a circle.
- Use your mouse to drag Scratch the Cat to a different location on the Stage.
Double-click the
Draw Circleblock in the Scripts Area.Scratch the Cat draws another circle, starting in the new location.

Figure 9-7 Defining the Draw Circle custom block
Changing Custom Blocks
Your new Draw Circle block is pretty awesome. Anywhere where your sprite is on the Stage, when the Draw Circle block runs, it causes the sprite to draw a circle.
But it can only draw one size of circle, in one color. Wouldn’t it be great if you could draw different circles with this same block? You can! All you need to do is modify your custom block so that you can tell it what kind of circle to draw. Here’s how:
Click the More Blocks Block Palette.
You see your custom block,
Draw Circle.Right-click the
Draw Circleblock and select Edit, as shown in Figure 9-8.The Edit Block pop-up window opens, as shown in Figure 9-9.
Click the arrow next to Options in the Edit Block pop-up window.
You see the custom block options, as shown in Figure 9-10.
Click the oval icon to the right of the words Add Number Input.
An oval appears in the image of your custom block inside the pop-up window, as shown in Figure 9-11.
- Change the name of the number input to size by typing inside the oval.
- Click OK to save your block.
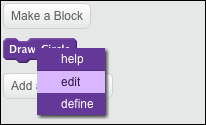
Figure 9-8 Editing a custom block
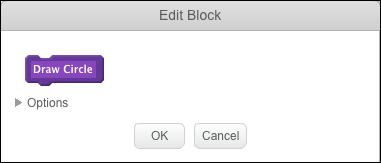
Figure 9-9 The Edit Block pop-up window

Figure 9-10 The custom block options
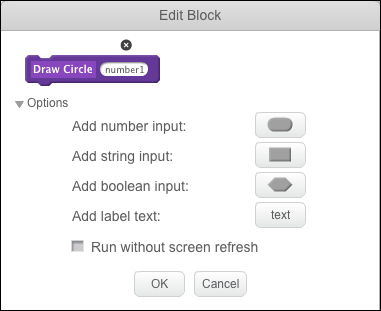
Figure 9-11 Adding a number input to the Draw Circle block
Take a look at your block definition in the Scripts Area now. You see that it has a new block called size next to the name of the block, as shown in Figure 9-12.
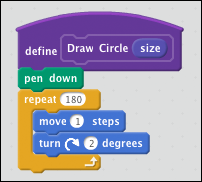
Figure 9-12 Adding a number input to the Draw Circle block
You also notice that your custom stack block now has a place in it for entering a number, as shown in Figure 9-13.

Figure 9-13 The Draw Circle block with a number input
Try changing the number in the Draw Circle () block in your Scripts Area to a larger number, such as 4, and then double-click it.
Did you see what happened? No? That’s right! Nothing changed.
In order for the number in the Draw Circle () block to do anything, you need to use your new variable size inside of your script.
- Click the size oval inside the
define Draw Circle ()hat block. Drag the size oval to the
move ()stepsblock and snap it inside of the oval betweenmoveandsteps.Your custom block definition should now look like Figure 9-14.
Change the value of the number input in the
Draw Circle ()stack block to 3 and double-click it.Scratch the Cat draws a larger circle on the Stage, as shown in Figure 9-15.

Figure 9-14 Using a number input inside a custom block
Figure 9-15 Making Scratch the Cat draw a larger circle
After you have a custom block, you can use that same custom block with any sprite by dragging the custom block definition onto the new sprite. Follow these steps to try it out:
Click Choose Sprite from Library in the Sprite Pane.
The Sprite Library opens.
- Select any sprite that you like and click OK to add it to your project.
- Click Scratch the Cat in your Sprite Pane to view Scratch the Cat’s Scripts Area.
- Click the
define Draw Circle ()hat block in the Scripts Area and drag it onto the image of your new sprite in the Sprite Pane. Click your new sprite in the Sprite Pane.
You see a copy of the
define Draw Circle ()block in the Scripts Area, and theDraw Circleblock in the More Blocks Block Palette, as shown in Figure 9-16.- Drag a
Draw Circle ()block from the More Blocks Block Palette to the Scripts Area. Double-click
Draw Circle().Your new sprite draws a circle of the size that you specify in the number input.

Figure 9-16 Copying a custom block to a new sprite
Now you know how to share custom blocks between sprites in the same program. But, what if you want to share a custom block (or any script, for that matter) between two different projects?
That’s where Scratch’s Backpack comes in.
Borrowing Blocks with the Backpack
The Backpack in Scratch is an area where you can store custom blocks and scripts that you create in one program so you can use them in other programs. To access the Scratch Backpack, you need to be signed into your account. If you haven’t already created an account, please refer to Adventure 1 for more information.
While you’re working within Scratch, the Backpack is always waiting there at the bottom of the screen, as shown in Figure 9-17.

Figure 9-17 The Backpack is at the very bottom of the Scratch Project Editor
When you click the up arrow on the Backpack bar, the Backpack Pane expands to show a new blank area of the Scratch Project Editor, as shown in Figure 9-18.

Figure 9-18 The expanded Backpack Pane
Here’s how to use the Backpack to carry your Draw Circle () custom block, or any other custom block, with you into a new program.
- Open the Scripts Area, if it’s not open already, by clicking the Scripts tab at the top of the Project Editor.
Click and drag your
define Draw Circle ()block definition from the Scripts Area into the Backpack.A copy of the
define Draw Circle ()block definition appears in the Backpack, as shown in Figure 9-19.- Select File ⇒ New from the top menu bar to create a new program.
Click the up arrow to expand the Backpack Pane.
You see the
define Draw Circle ()custom block definition inside your Backpack.- Drag the
define Draw Circle ()custom block definition from the Backpack and drop it into the Scripts Area in your new program. Open the More Blocks Block Palette.
You see your custom
Draw Circle ()block.- Drag a
Draw Circle ()block to the Scripts Area. - Double-click the
Draw Circle ()block in the Scripts Area to make your sprite draw a circle.

Figure 9-19 Copying a custom block definition to your Backpack
The Backpack and custom blocks are great tools for helping you to get more done with less coding—which is one of the most important skills for a programmer to learn!
Putting on a Fashion Show
Now it’s time to put together everything you’ve learned about custom blocks to organize a Scratch Fashion Show. In this program, sprites use a custom block to walk or dance toward the camera, showing off their different costumes on the way.
- Select File ⇒ New from the top toolbar to start a new project.
- Name your project Fashion Show by typing into the text area above the Stage.
- Click Choose Backdrop from Library in the Stage Sprite Pane.
- When the Backdrop Library opens, find the backdrop named Clothing Store, select it, and add it to your project.
- Click Scratch the Cat and go to her Scripts Area by clicking the Scripts tab, if necessary.
- Open the More Blocks Block Palette.
Click the Make a Block button.
The New Block pop-up window appears.
- Name the new block Fashion Walk and click OK to close the New Block pop-up window and create the new block.
- Drag a
set size to () %block from the Looks Block Palette to the Scripts Area. - Set the value in the
set size to ()%to 20. - Drag the
Fashion Walkblock from the More Blocks Block Palette to the Scripts Area. Double-click the
Fashion Walkblock in the Scripts Area.Scratch the Cat shrinks down to 20% of her normal size.
- Drag Scratch the Cat on the Stage to a place where it looks like she’s standing at the very back of the room, as shown in Figure 9-20.
Drag a
go to x: () y: ()block from the Motion Block Palette to the Scripts Area and snap it to theset size to ()%block.Because you just positioned Scratch the Cat, the block already contains the correct values for x and y.
- Drag a
showblock from the Looks Block Palette to the Scripts Area and snap it to the bottom of thego to x: () y: ()block. - Drag a
repeat ()block from the Control Block Palette and snap it to the bottom of theshowblock. - Change the value of the
repeat ()block to 20. - Drag a
wait () secsblock from the Control Block Palette and snap it inside therepeat ()block. - Change the value in the
wait () secsblock to 0.1. - Drag a
change size by ()block from the Looks Block Palette and snap it to the bottom of thewait () secsblock. - Set the value of the
change size by ()block to 5. - Drag a
change y by ()block from the Motion Block Palette and snap it to the bottom of thechange size by ()block. - Change the value of the
change y by ()block to –5. - Drag a
next costumeblock from the Looks Block Palette and snap it to the bottom of thechange y by ()block. - Drag a
glide () secs to x: () y:()block to the Scripts Area and snap it to the bottom of therepeat ()block. - Enter the values 2, 273, and –71 in the
glide () secs to x: () y: ()block. - Drag a
hideblock from the Looks Block Palette to the Scripts Area and snap it to the bottom of theglide () secs to x: () y: ()block. Drag a
wait () secsblock to the Scripts Area and snap it to the bottom of thehidescript.Your Scripts Area should now look like Figure 9-21.
- Double-click the
Fashion Walkcustom block on the Stage and watch as Scratch the Cat walks toward the camera and then glides off to the right!

Figure 9-20 Positioning Scratch the Cat on the Stage

Figure 9-21 The completed Fashion Walk custom block
Now you’re almost done! The next steps are to add several more sprites to the Stage and give them all the same Fashion Show custom block.
- Click Choose Sprite from Library in the toolbar above the Sprite Pane.
- When the Sprite Library opens, locate the sprite named Dan and add it to your project.
- Repeat Steps 1 and 2 to add the sprite named Breakdancer1 to your project.
- Click the Scratch the Cat sprite in the Sprite Pane to view Scratch the Cat’s Scripts Area.
- Click the
define Fashion Walkcustom block definition hat block. Drag it to the Sprite Pane and drop it on the Dan sprite. - Drag the
define Fashion Walkcustom block definition to the Breakdancer1 sprite in the Sprite Pane. - Click each of the sprites to make sure that they all have the
Fashion Walkcustom block. - Click Scratch the Cat in the Sprite Pane.
- Drag a
when green flagclicked block from the Events Block Palette and snap it to the top of theFashion Walkcustom block, as shown in Figure 9-22. Drag a
broadcast ()block from the Events Block Palette and snap it to the bottom of theFashion Walkstack block.You use broadcast events to tell the other sprites to start their fashion walks.
- Click the drop-down in the
broadcast ()block and choose New Message. - Set the new message to Dan.
- Click the Dan sprite in the Sprite Pane to open its Scripts Area.
- Drag a
when green flag clickedblock from the Events Block Palette to the Scripts Area. - Drag a
hideblock from the Looks Block Palette to the Scripts Area and snap it to thewhen green flag clickedblock. - Drag a
when I receive ()block from the Events Block Palette and drop it in the Scripts Area. - Change the value in the
when I receive ()block to Dan. - Drag the
Fashion Walkblock from the More Blocks Block Palette and snap it to thewhen Ireceive ()block. - Drag a
broadcast ()block from the Events Block Palette and snap it to the bottom of theFashion Walkblock. - Select New Message. from the
broadcast ()block and add a new message of Breakdancer1.
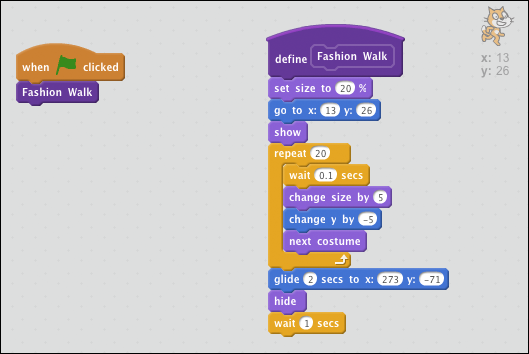
Figure 9-22 Starting the fashion show when the Green Flag is clicked
In the next steps, you make the break dancer walk!
- Click Dan in the Sprite Pane to open the Scripts Area.
- Drag the script starting with the
when green flag clickedblock and drop it onto the thumbnail of the Breakdancer1 sprite in the Sprite Pane. - Drag the script starting with
when I receive ()and drop it onto the thumbnail of the Breakdancer1 sprite in the Sprite Pane. Click the thumbnail image of the Breakdancer1 sprite in the Sprite Pane.
If the sprite’s scripts are overlapping, drag them to rearrange them in the Scripts Area.
Disconnect the
broadcast () blockfrom the bottom of theFashion Walkcustom block and drag it out of the Scripts Area.Because this is the last sprite to do its fashion walk, it doesn’t need to broadcast to any other sprites.
- Change the value of the
when I receive ()block to Breakdancer1. - Click the Green Arrow and enjoy the show!
Further Adventures in Coding
Check out custom blocks created by other people that you can use in your own programs at the Block Library at http://blocklibrary.weebly.com/.
Achievement Unlocked: Custom Blocks