
LEARNING SCRATCH (OR any other language, for that matter) is all about discovering and finding out new things. In the real world, you use your five senses to find out new things. In the Scratch world, you use a category of blocks called the sensing blocks.
In this adventure, you see how to use the sensing blocks to detect things such as typing on the keyboard, mouse movements, and more!
Learning the Sensing Blocks
The Sensing Block Pallet contains 20 blocks, as shown in Figure 4-1. These blocks are colored light blue. There are 4 stack blocks, 5 Boolean blocks, and 11 reporter blocks.

Figure 4-1 The sensing blocks
Sensing blocks can be used for a number of different things. They can be used to keep track of how long things take within your program. They can be used to ask questions and then store the answers to be used within other blocks, and they can also be used to detect whether a key has been pressed on your keyboard or if there’s been movement of your mouse.
You can also use Sensing blocks to detect whether your sprite is touching something, how far away from another sprite it is, or where a sprite is on the Stage.
Sensing blocks tell your project what’s going on so that it can do things in response.
Getting and Using Text Input
When you type words or numbers using your keyboard, that’s known as “text input” to Scratch. The ask () and wait block, shown in Figure 4-2, is how you make a sprite ask for text input.

Figure 4-2 The ask () and wait block
When you use an ask () and wait block in your project, it causes a sprite to ask a question. A text input area appears at the bottom of the Stage, as shown in Figure 4-3.

Figure 4-3 Scratch the Cat wants to know something.
When you’re done typing your answer, click the checkmark on the right of the text input or press Enter (or Return on a Mac) to submit your text input to Scratch.
When you submit input, the value from the input area gets put into another sensing block, the answer block, which you can see in Figure 4-4.

Figure 4-4 The answer block
The answer block stores whatever value you put into the text input area. You can then use the answer block to make different things happen. Follow these steps to create a simple chat bot program that uses the ask and wait and answer blocks to ask questions and store answers.
- Select New from the File menu in the Project Editor to create a new project.
- Drag a
when green flag clickedblock from the Events Block Palette to the Scripts Area. - Drag the
ask () and waitblock from the Sensing Block Palette to the Scripts Area. - Change the text in the
ask () and waitbox to What’s your favorite programming language? - Drag an
if () then, elseblock from the Control Block Palette and snap it to the bottom of theask () and waitblock. Drag the
() = ()block from the Operators Block Palette and drop it into the space afterifin theif () then, elseblock.Your Scripts Area should now look like Figure 4-5.
Drag the
answerblock from the Sensing Block Palette and drop it into the first space in the() = ()block.Notice that even though the
() = ()block’s open spaces are squares, you can still drop oval-shaped blocks into them.- Click in the second block and type the word Scratch.
- Drag the
say ()block from the Looks Block Palette and drop it into the space after thethenin theif () then, elseblock. - Change the value in the
say ()block to That’s my favorite, too! - Drag another
say ()block to the Scripts Area and drop it into the space after theelsein theif () then, elseblock. Change the value of this
say ()block to I don’t know that one.Your Scripts Area should now look like Figure 4-6.
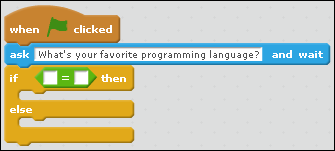
Figure 4-5 The () = () block inside of the if () then, else block

Figure 4-6 The beginning of a simple chat bot
Next, you make the chat bot more personable by having Scratch the Cat greet you. Follow these steps.
Drag an
ask () and waitblock from the Sensing Block Palette and snap it to the bottom of thewhen green flag clickedblock.Leave the value in this block set to What’s your name?
- Drag a
say () for () secsblock from the Looks Block Palette and snap it to the bottom of the block that asks for your name. - Drag a
join () ()block from the Operators Block Palette and drop it into thesay () for () secsblock. Drag an
answerblock from the Sensing Block Palette and drop it into the second space in thejoinblock.Your script should now look like Figure 4-7.

Figure 4-7 Adding a greeting to the chat bot
Now click the Green Flag and chat with Scratch!
Detecting Key Presses
Typing text is just one of the things you can do with the keyboard. If you’ve ever played a game on your computer that uses the keyboard, you know that you’re not always typing numbers or words in answer to questions.
The key () pressed block detects when a key is pressed. With this block, you can make a space ship fire its rockets when you press the space bar, or turn left and right with the arrow keys.
Follow these steps to make a helicopter that moves up and down when you press the arrow keys.
- Make a new project by selecting File ⇒ New from the top menu.
Click the Choose Sprite from Library icon in the New Sprite toolbar at the top of the Sprites Pane.
The Sprite Library opens.
- Locate the Helicopter sprite in the transportation category, as shown in Figure 4-8.
- Select the Helicopter sprite and click OK to add it to the Sprites Pane.
- Select the Scratch the Cat sprite and remove it from the project by right-clicking it and selecting Delete, or by using the Delete tool from the top menu.
- Drag a
when green flag clickedblock from the Events Block Palette to the Scripts Area. - Drag a
foreverblock from the Control Block Palette and snap it to thewhen green flag clickedblock. - Drag two
if () thenblocks from the Control Block Palette and place them inside theforeverblock. - Drag two
key () pressedblocks to the Scripts Area and drop them into each of theif () thenblocks. - Change the value of the first
key () pressedblock toup arrow. - Change the value of the second
key () pressedblock todown arrow. - Drag two
change y by ()blocks from the Motion Block Palette and place them inside each of theif () thenblocks. Change the value of the second
change y by ()block from 10 to –10.Your Scripts Area should now look like Figure 4-9.

Figure 4-8 The helicopter sprite
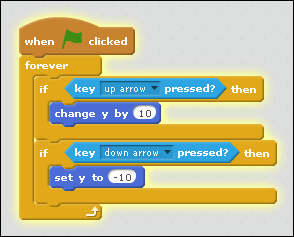
Figure 4-9 The up and down helicopter script
Click the Green Flag and then press the up and down arrows on your keyboard. The helicopter goes up and down, depending on which key you press.
Watching for Mouse Moves
When you move or click your mouse, or use a touchpad, Scratch can sense that too by using the mouse down?, mouse x, and mouse y blocks! Here’s how to change the helicopter script so that you can control the position of the helicopter using a mouse.
Start with the finished helicopter script, which is shown in Figure 4-10.
If your script doesn’t look like this, take a moment to make it match. Figure 4-10 also contains the answer to the previous challenge.
Drag the
if () then, elseblock so that it surrounds theif () thenblock in the Scripts Area, as shown in Figure 4-11.To make sure that it’s in the right place, position it so that it snaps inside of the
foreverblock.- Drag the
if () then, elseblock containing the arrow key commands from thethenpart into theelsepart, as shown in Figure 4-12. - Drag a
mouse down?block from the Sensing Block Palette and drop it into the newif () then, elseblock. - Drag a
go to x: () y: ()block into thethenpart of yourif () then, elseblock. Drop a
mouse xblock from the Sensing Block Palette into thex: ()part of thego to x: () y: ()block and amouse yblock into they: ()part.The final program should look like Figure 4-13.

Figure 4-10 The finished helicopter script
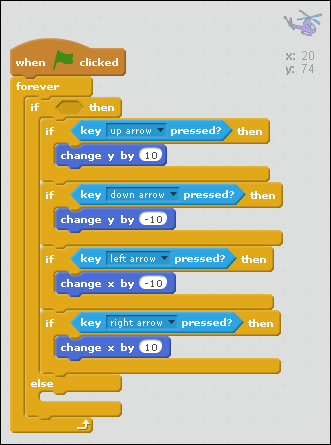
Figure 4-11 Adding another if () then, else block

Figure 4-12 Moving the keyboard commands to the else section
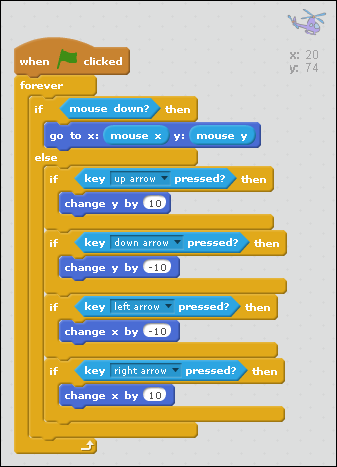
Figure 4-13 The finished mouse-controlled helicopter script
Click the Green Flag. Click anywhere on the Stage, and the helicopter will instantly move to that spot.
Using Timing
The timer block keeps track of time. You can use the timer to make things happen in your scripts after a certain amount of time, or find out how many seconds it takes a user to do something.
One game you can build with the timer is a game where you guess the number of seconds that have happened since the Green Flag was clicked. To build this game, follow these steps.
- Create a new project by selecting File ⇒ New.
- Drag a
when green flag clickedblock to the Scripts Area. Drag a
reset timerblock from the Sensing Block Palette to the Scripts Area, and snap it to the bottom of thewhen green flag clickedblock.This
reset timerblock resets the timer to 0 when you click the Green Flag.- Drag a
say ()block from the Looks Block Palette and change the words to Press the space bar in between 5 and 10 seconds! - Drag a
foreverblock from the Control Block Palette to the Scripts Area and snap it to the bottom of thesay ()block. - Drag an
if () thenblock to the stage and snap it to theforeverblock. - Drag a
key () pressed?block into the hexagonal space in theif () thenblock. Make sure that the value in the
key () pressedblock is space.At this point, your Scripts Area should look like Figure 4-14.

Figure 4-14 The first half of the timer game
In the next part, you create the code that checks whether the space bar was pressed in between 5 and 10 seconds. Follow these steps.
- Drag an
if () then, elseblock inside theif () thenblock in the Scripts Area. Drag a
() and ()block from the Operators Block Palette to the Scripts Area.Don’t snap this block into any other blocks at this point. The
() and ()block test two different things and produces TRUE if both of the tests produce TRUE.Drag a
() > ()block into the first space in the() and ()block.This block checks whether the first value is greater than the second one and produces TRUE if so.
Drag a
() < ()block into the second space in the() and ()block.This block checks whether the first value is less than the second one and produces TRUE if so.
- Drag the
timerblock from the Sensing Blocks Palette into the first opening in the() > ()block. - Change the number in the second part of the first
() > ()block to the number 5. - Drag another
timerblock from the Sensing Blocks Palette into the first opening of the() > ()block. - Change the number in the second part of the second
() < ()block to 10. Drag the completed
() and ()block into the hexagonal space in theif () then, elseblock.Your Scripts Area should now look like Figure 4-15.

Figure 4-15 The timer game with the timer test in place
The last part of the timer game is the part that tells the users whether they were successful in pressing the space bar at the right time. Follow these steps to finish the program!
- Drag a
say ()block from the Looks Block Palette into the first section of theif () then, elseblock, after the wordthen. - Change the value of the
say ()block to Good Job! - Drag another
say ()block to the Scripts Area and snap it into theelsepart of theif () then, elseblock. Change the value of this
say ()block to Nope! Not quite right!When finished, your Scripts Area should look like Figure 4-16.
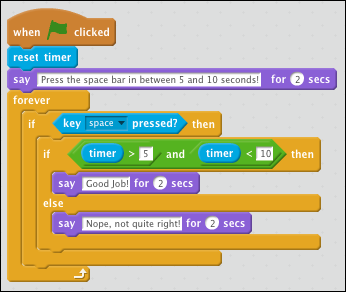
Figure 4-16 The finished timer guessing game
Sensing Touching and Distance
Besides detecting input from the keyboard, mouse, and timer, the sprites in Scratch can also detect other sprites and colors on the stage by using the touching () block, the touching color () block, and the distance to () block.
One cool use for the touching color () block is to create a maze. Here’s how you can do it!
- Select File ⇒ New to create a new project.
- Click the Paint Brush icon in the Backdrop Pane to open the Paint Editor and create a new backdrop.
- Select any color from the Color Palette.
- Use the Rectangle tool to draw a large rectangle, as shown in Figure 4-17.
- Select the Line tool and use the same color to draw a maze inside the rectangle.

Figure 4-17 Draw a rectangle to start the maze backdrop
The maze we created is shown in Figure 4-18.

Figure 4-18 A maze backdrop
The next step in creating the maze game is to shrink the sprite to a size where she can fit through the maze and to add the code that moves the sprite around the screen when you press the arrow keys.
- Click the Scripts tab to close the Paint Editor and Backdrop menu.
- Select the Shrink tool from the top menu and use it to shrink Scratch the Cat to a size where she’ll fit inside the maze.
- Drag a
when green flag clickedblock from the Events Block Palette to the Scripts Area. - Drag a
foreverblock from the Control Block Palette to the Scripts Area and snap it to thewhen green flag clickedblock. - Drag four
if () thenblocks from the Control Block Palette to inside of theforeverblock. - Drag a
key () pressed?block from the Sensing Block Palette to the hexagon shape in each of the fourif () thenblocks. - Set the keys for the four
key () pressed?blocks to the four arrow keys: up, down, left, and right (or any four keys of your choice). - Drag a
change x by ()block into theif () thenblock for the left arrow and set its value to –1. - Drag a
change x by ()block into theif () thenblock for the right arrow and change its value to 1. - Drag a
change y by ()block into theif () thenblock for the up arrow and change its value to 1. Drag a
change y by ()block into theif () thenblock for the down arrow and set its value to –1.You should now be able to click the Green Flag and move your sprite around with the arrow keys. Your Scripts Area should look similar to Figure 4-19.

Figure 4-19 The maze with the arrow key movement configured
Now you can move a sprite around the screen using the arrow keys, but it’s not really a maze because you can still go anywhere on the stage you want to go. Follow these steps to contain the sprite within the maze.
- Drag an
if () thenblock and snap it inside of theif () thenblock containing thekey (up arrow) pressed?block. - Drag a
touching color ()?block from the Sensing Block Palette and drop it inside the hexagon shape in the newif () thenblock. - Set the color inside the
touching color ()block to the same color that you used to draw the maze by clicking the color in thetouching color ()block and then clicking the wall of your maze. - Drag a
change y by ()block from the Motion Block Palette and snap it inside theif (touching color ()?)block. - Change the value in the
change y by ()block to –1. Repeat Steps 1 through 4 for each of the other three arrow keys.
Make sure that the up and down arrow keys have
change y by ()blocks and that the left and right arrow keys havechange x by ()blocks. Make sure all of your x: and y: values match the values in Figure 4-20.Your finished script should look like Figure 4-20.
- Click and drag your sprite to the beginning of the maze and click the Green Flag.
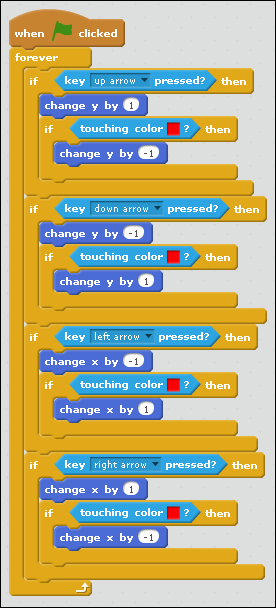
Figure 4-20 A working maze app
You should now be able to move the sprite through the maze. If it gets stuck, you may need to make the sprite smaller or make the maze bigger. To save your maze, give it a title and click File ⇒ Save.
Building the Apple Patrol Game
In this project, you take the maze game that you created in the last section and make it into a game where you need to navigate a sprite through a maze to get to a final goal as quickly as possible.
To build the game, follow these steps:
- Open the maze game in the Project Editor and select File ⇒ Save as a Copy from the top menu.
- Rename the new project Apple Patrol.
- Click the Choose Sprite from Library icon in the New Sprite menu above the Sprite Pane to open the Sprite Library.
- Locate the Apple sprite and add it to your project.
- Position the Apple sprite at the end of your maze by dragging it within the stage.
- Use the Shrink tool in the top menu to make the Apple sprite fit between the walls of the maze, as shown in Figure 4-21.
Select the Apple sprite in the Sprite Pane.
A new, blank Scripts Area appears.
- Drag a
when green flag clickedblock from the Events Block Palette to the Scripts Area. - Drag a
say () for () secsblock from the Looks Block Palette to the Apple’s Scripts Area and snap it to thewhen green flag clickedblock. - Change the text in the
say () for () secsblock to How fast can you find me? - Drag another
say () for () secsblock from the Looks Block Palette to the Scripts Area and snap it to the firstsay () for () secsblock. - Change the text of this block to Ready?
- Add another
say () for () secsblock and change the text to Set? - Add another
say () for () secsblock and change the text to Go! - Drag a
reset timerblock from the Sensing Block Palette and snap it to the lastsay () for () secsblock. - Drag a
foreverblock from the Control Block Palette and snap it to the bottom of thereset timerblock. - Snap an
if () thenblock inside theforeverblock. - Snap the
touching ()block from the Sensing Block Palette into the hexagon shape in theif () thenblock. - Change the value in the
touching ()block toSprite 1(or the name of the Scratch the Cat sprite, if you’ve changed it). Drag a
play sound ()block from the Sound Block Palette into theif () thenblock.You can leave the sound set to the default “pop” sound or change it to another.
- Drag a
say () blockfrom the Looks Block Palette and snap it to theplay sound ()block. - Drag a
join () ()block from the Operators Block Palette and snap it into thesay ()block. - Type Seconds you took: into the first box in the
join () ()block. - Drag a timer block from the Sensing Block Palette and drop it into the second box in the
join () ()block. Drag a
stop ()block from the Control Block Palette and snap it to the bottom of thesay ()block.When you’ve finished the script for the Apple sprite, it should look like Figure 4-22.
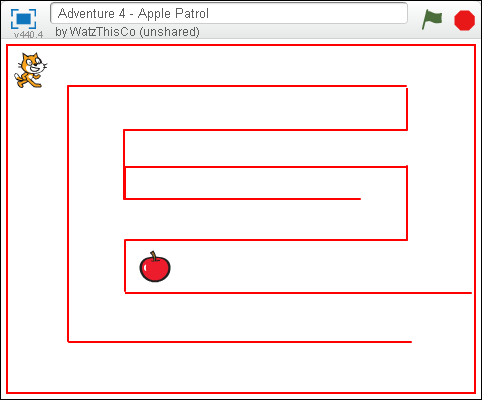
Figure 4-21 Placing the apple

Figure 4-22 The Apple sprite’s script
There’s one last thing you should do before this game is ready to go: Put Scratch the Cat back at the starting line every time the game is started. Follow these steps to make that happen!
- Click Scratch the Cat in the Sprite Pane to view her Scripts Area.
- Use your mouse to drag Scratch the Cat across the stage to the place where you want her to start each game.
Drag a
go to x: () y: ()block from the Motion Block Palette and snap it just under thewhen green flag clickedblock.The coordinates of the current spot where Scratch the Cat is sitting on the stage are already filled in for you, so there’s no need to change them!
That will just about do it! Click the Green Flag to try playing the game!
Further Adventures in Coding
The ultimate goal of people who create chat bot programs is to make the chat bot appear to be as human as possible. One way they test this is by using the Turing Test. Visit the link here: http://www.cnet.com/videos/what-is-the-turing-test/ to watch a video explaining the Turing Test.

Achievement Unlocked: Using Scratch’s A-maze-ing Sensing Blocks!