
SCRATCH IS MORE than a programming language and tool for learning to program. It’s also a community of kids and teachers who share their work online and help each other to become better programmers.
This adventure shows you some of the riches that are available for learning about Scratch and coding with Scratch. We show you how to “remix,” and we give you tips on how to ask for help when you get stuck with a particularly difficult problem.
Visiting scratch.mit.edu
The scratch.mit.edu website, where you’ve been spending so much time throughout this book, is just the tip of the iceberg when it comes to resources for learning to program. It is the center of the Scratch world, though, and so we’re starting there.
When you visit scratch.mit.edu, you see the Create button in the top menu. You know by now that this link takes you to the Scratch Project Editor. Right next to it is the Explore link, as shown in Figure 11-1. Click this link now.

Figure 11-1 The Explore link
The Explore section at scratch.mit.edu shows a categorized gallery of projects created and shared by other Scratch programmers. Anyone who has a confirmed Scratch account can share projects. After you share a project, it may show up in the Explore gallery.
Before you share your first project, take a minute to complete your Scratch Profile, if you haven’t done so already. Here’s how:
- Log into
scratch.mit.eduand click your username in the upper-right corner of the Scratch website. Select Profile. - You see your Scratch Profile, similar to Figure 11-2.
- Review the information on your profile and update it now if you want to.

Figure 11-2 A Scratch Profile
Sharing Your Projects
Now that you have a completed profile, you’re ready to show the world your unique creations! To share your Scratch projects, follow these steps.
- If you’re not already logged in, go to
scratch.mit.eduand log in to your account. Select My Stuff from the drop-down menu underneath your username in the upper-right corner of the screen.
The My Stuff screen appears, as shown in Figure 11-3. This screen lists all the projects that you’ve created.
- Scroll through your list of projects and find one that you’re particularly proud of.
Click the title of the project you want to share.
The project page for that program opens, as shown in Figure 11-4. You see a message at the top of the project page that tells you that the project isn’t shared.
- Click the Green Flag at the top of the Stage or the Green Flag in the middle of the Stage to run your program and to make sure that it’s ready for you to share.
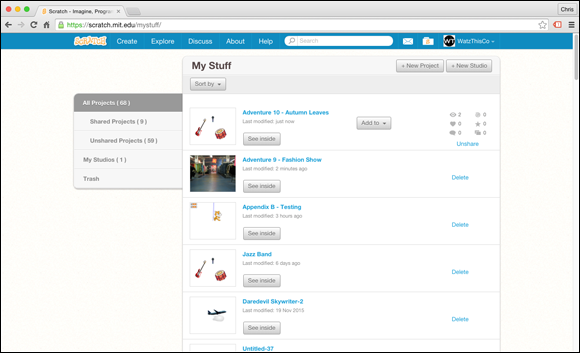
Figure 11-3 The My Stuff page
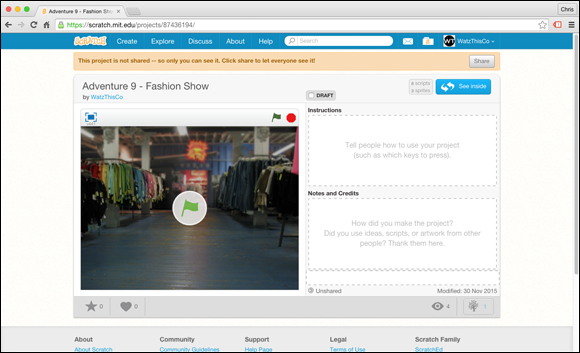
Figure 11-4 The project page
If everything looks good, the next step is to fill out the metadata for the project. Metadata is information that describes a program. When you create a Scratch program, you can provide metadata that includes
- Instructions
- Notes and credits
- Project tags
Filling out the project metadata is a very important step in the process of sharing Scratch programs, and you should always be sure to add something to these boxes. Adding metadata is your chance to tell other Scratch users about your program and to make sure that it shows up in the right category in the Explore pages.
Follow these steps to fill out your project’s metadata:
Click your mouse inside the box under Instructions. Enter some brief directions about how to use the program.
For example, for the Fashion Show project from Adventure 9, we might provide the following Instructions:
Click the Green Flag and watch the show!Click your mouse inside the Notes and Credits box and enter information about who created the program or anything else that you want someone viewing the project to know about it.
For example, for the Fashion Show project, our Notes and Credits look like this:
From Adventure 9 of Adventures in Coding by Chris Minnick and Eva Holland. This project demonstrates how to use custom blocks.Click your mouse inside the Add Project Tags box underneath the Notes and Credits box.
Several choices appear underneath the box.
Choose the most appropriate tags from the list.
For example, for the Fashion Show, we selected Animations.
Our project, with the metadata filled in, is shown in Figure 11-5.

Figure 11-5 Project metadata
When you’re happy with how your project page looks, click Share at the top of the page. After a moment, the page reloads and you see a new message at the top of the page saying that your project is now shared, as shown in Figure 11-6.
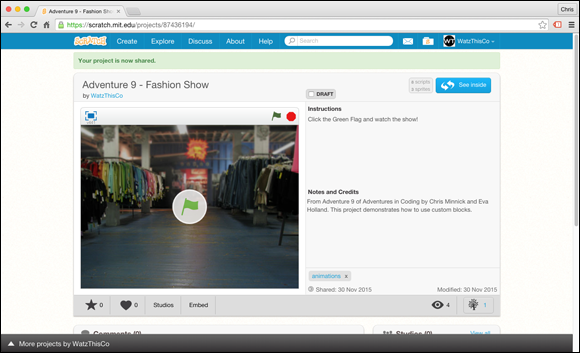
Figure 11-6 A shared project
The Scratch Community Rules
The Discuss link at the top of the Scratch website is how you access the Scratch forum. Here, you can get help with your projects, read announcements from the Scratch Team, show off your work, work with other Scratchers, and more!
Anyone with a confirmed Scratch account can participate in discussions in the forums. If you’re new to the forums, we recommend that you start out in the New Scratchers forum, shown in Figure 11-7. If your profile says New Scratcher, you’re not able to post images or links in the Scratch Forums, and you aren’t able to edit your posts.

Figure 11-7 The New Scratchers forum
Take a look at the posts at the top of the New Scratchers forum. They tell you things like “How to Become a Good Scratcher” and the very important “Basic Forum Guidelines.”
Just like with any group or place you visit, the Scratch Forum has rules and guidelines that you should follow to make sure that everyone has a good time. Some of the guidelines include
- Keep your posts relevant. If a discussion is about custom blocks, for example, don’t ask questions about the Paint Editor in that discussion. There’s probably a better place that’s just right for that question.
- Keep topics relevant. Make sure that any new topics you create in the forums are related to the category where you post them.
- Read Sticky posts. If a forum has topics that are marked as “Sticky,” those posts will always appear first in the forum. These are posts that the Scratch Team considers to be very important, and you should always take the time to read them.
After you’ve read the Sticky posts in the New Scratchers forum, follow these steps to make your first post to the forum!
- Go to the New Scratchers Forum by clicking the Discuss link at the top of the Scratch website and then clicking New Scratchers.
- Click the first post in the New Scratchers forum, which is called “Introduce Yourself Here.”
- Read some of the other posts from New Scratchers to get an idea of what sort of things to say.
- Scroll to the bottom of the page and look for the New Reply area, which looks like Figure 11-8.
- Write a message! Say “Hi!” and tell your fellow Scratchers why you’re learning to code, what your username means (if it has any special meaning to you), and maybe even a little bit about what kinds of projects you hope to make and how you’re learning.
- Try out some of the buttons above the text area in the New Reply area to see what they do.
- When you’re happy with your post, click Submit.
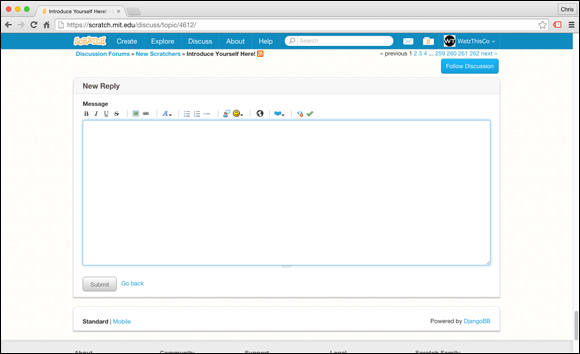
Figure 11-8 The New Reply area
Great job! You’re on your way to being a valuable and respected member of the Scratch community. Keep up the great work, keep learning, and have fun!
Remixing Projects
By sharing your project on Scratch, you’re agreeing that it can be viewed, copied, and modified by anyone else in the Scratch community. Everyone else agrees to the same thing. This is part of what makes Scratch so much fun! You can look at other people’s projects, see how they work, and then improve on them or change them as you want. It’s polite, and common practice, to thank the original author in your Notes and Credits, of course.
This process of making a copy and adding your own unique code to a project is what’s known in Scratch as remixing.
Follow these steps to try remixing a project:
Visit the Scratch Studio we created for this book.
You can find us by going to the Explore section of the Scratch site and searching for WatzThisCo, or by going directly to
https://scratch.mit.edu/studios/1505618/. You see our Studio, which looks similar to Figure 11-9.- Click any one of our projects to view its project page.
- Click the See Inside button in the upper right of the project page to view the blocks and sprites that make up our project.
Click the Remix button above the Scripts Area.
A copy of the project is created and added to your My Stuff area.

Figure 11-9 The Adventures in Coding Studio
After you create a copy, visit its project page. Notice that the original project is given credit just under the Notes and Credits area, and a note appears asking you to add a note thanking the original creator of the project and explaining what you added or changed, as shown in Figure 11-10.
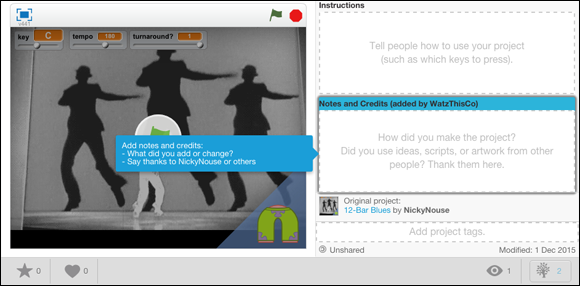
Figure 11-10 Giving credit where credit is due
Remixing is an important and exciting part of the Scratch universe. Done correctly, it benefits both the original creator (who gets new ideas and improvements from remixers) and the person doing the remixing (who gets to learn from examining and working with other people’s code)!
Interfacing with the Real World
Another great feature of Scratch is its ability to work with devices connected to your computer. Remember how we told you way back in Adventure 1 that computer programs are also known as “software”? In this section, we’re going to talk about hardware. Hardware is any physical device that interacts with software. For example, your computer itself is hardware, as are your keyboard, your mouse, and even your screen.
Some brilliant people have invented other types of hardware devices that connect to your computer and that you can use to control Scratch programs. One such device is called the Makey Makey.
A Makey Makey plugs into a USB port on your computer and then you can use it to simulate key presses and mouse clicks by connecting wires to different real-world objects.
Figure 11-11 shows a Makey Makey being used to create a keyboard from alphabet soup letters.
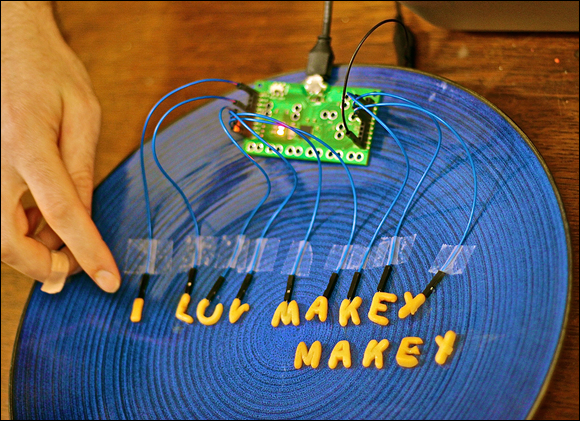
Photo courtesy of JoyLabz, LLC
Figure 11-11 Makey Makey soup keyboard
Using a Makey Makey, you can program a piano in Scratch (using the blocks you learned about in Adventure 10) and then use objects such as bananas as keys! You can connect wires to pieces of tinfoil on the floor that play drums in a Scratch project when you step on them. Or you can hold one wire and give another wire to your friend and make actions happen in Scratch when you and your friend high five! There are so many things you can do with a Makey Makey!
To understand how the Makey Makey works and what you can do with it, you first need to know a little bit about electricity.
Understanding Electricity
Electricity makes our world of computers and the web go round. But, what is it?
Electricity is a form of energy that can build up in one place or that can flow between two places. When it builds up in one place, it’s called static electricity. This is the electricity that builds up when you shuffle across a carpet or pet your cat.
When electricity moves from one place to another, it’s called current electricity, or an electric current. This is the type of electricity that powers your computer, your phone, electric lights, toasters, and much more.
Lightning is a very large electric current, but it can help you understand how the much smaller electric current that Makey Makey uses works.
Lightning builds up in one place (in the clouds) and then turns into current electricity by moving from one storm cloud to a storm cloud with less stored electricity, or from a storm cloud to the earth. In order to move from one place to another, the electricity needs to have something to move through. For example, lightning moves through the air. The path that an electric current flows over is called a conductor.
The clouds, air, and earth form a path, or loop, called an electric circuit. Without one of these three parts, there would be no lightning.
Hardware, like your computer or the Makey Makey, uses electric circuits made up of a place with a positive charge, a place with a negative charge, and a conductor that is typically made of metal wire. When current is flowing through the circuit, the electronic device can work. When it’s not flowing, the electronic device can’t work.
Understanding Makey Makey
Makey Makey lets you create circuits using wires and other conductors to control your computer. Take a look at the close-up of Makey Makey shown in Figure 11-12. It has numerous spots where you can connect wires, and a row of spots on the bottom that are labeled “earth.” Just like lightning, when electricity flows from one of the points in the upper part of the Makey Makey to any one of the spots labeled “earth,” a circuit is formed.

Figure 11-12 Makey Makey
The circuits that Makey Makey forms send signals to your computer that make it think that a keyboard key was pressed or the mouse button was clicked. You can then write programs in Scratch to detect those events!
The fun part about Makey Makey is that you can use different types of conductors (in addition to the wires) to form the circuits. For example, in Figure 11-13, bananas are being used as conductors. When you hold a wire connected to an “earth” terminal and touch a banana connected to one of the other terminals on Makey Makey, you complete the circuit and a signal is sent to your computer.

Figure 11-13 A banana keyboard
The next section explains conductivity and what types of things can be used as conductors.
Understanding Conductivity
A conductor is anything that electricity can flow through.
Different materials have different abilities to conduct electricity. For example, metals are great conductors, which is why they’re used to make wire. Air is a poor conductor, but it can conduct electricity when the electric charge is large enough (as in the case of lightning).
Metal isn’t the only material that can conduct electricity easily, however. Water also can conduct electricity. Pencil lead, which is made from graphite, is also able to conduct electricity. Plastic, rubber, ordinary rocks, and wood are all examples of materials that can’t conduct electricity.
Because water is a conductor and your body contains a large percentage of water, you can act as a conductor! Other things that can act as conductors include
- Fruits and vegetables
- Tin foil
- Any metal object
- Wet dirt
- A glass of juice
- Pretty much anything that’s wet
Examples of things that make poor conductors include
- Clothing
- Glass
- Non-metal furniture
- Walls
- Air
Sensing with the PicoBoard
Another device that you can connect to your computer to control Scratch programs is the PicoBoard, shown in Figure 11-14.
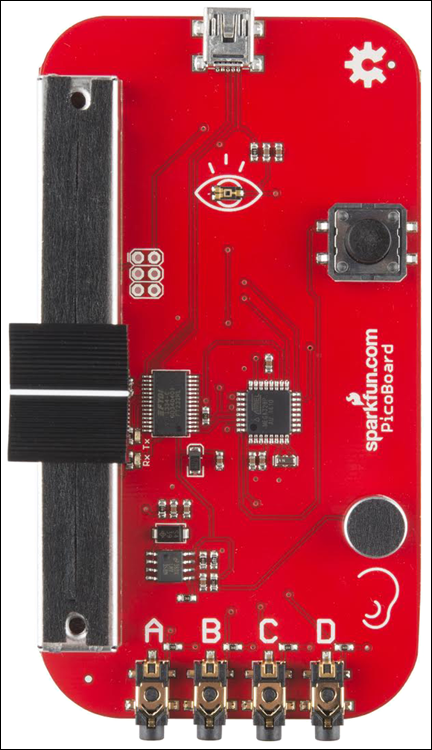
Photo courtesy of SparkFun Electronics
Figure 11-14 The PicoBoard
The PicoBoard has several sensors on it that you can use with special PicoBoard Scratch blocks to control your Scratch programs and get information from the outside world into your projects.
To use the special PicoBoard blocks, click Add an Extension in the More Blocks Block Palette. Inside the Add an Extension pop-up window, you see some extensions, including the PicoBoard extension, as shown in Figure 11-15.
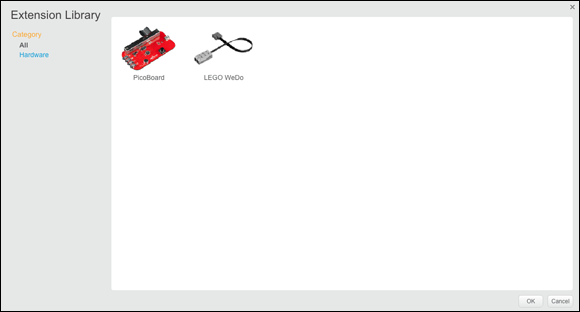
Figure 11-15 Adding the PicoBoard extension
After you add the Extension Library, you’ll see the new PicoBoard blocks in your More Blocks Block Palette, and some instructions will appear for installing the PicoBoard browser extension so that you can use it with Scratch.
If you have a PicoBoard, you can then detect changes to the sound and light sensor, or when the button on PicoBoard is pressed or its slider is slid.
By connecting your computer to other hardware such as a Makey Makey or a PicoBoard, the world of interactive programs comes alive!
Further Adventures in Coding
Achievement Unlocked: Scratch Community
To view examples of other Scratch projects that use the Makey Makey and PicoBoard visit the following links:
- Makey Makey Scratch projects:
https://scratch.mit.edu/studios/230629/ - PicoBoard projects:
https://scratch.mit.edu/studios/94856/