
IN THIS ADVENTURE, you explore the sounds of Scratch. More importantly, you learn how to use Scratch to record, play, and compose music! So, turn up your speakers (or put on your headphones) and let’s get started!
Using Sounds
The place where all of Scratch’s music and sound blocks live is in the Sound Block Palette, shown in Figure 10-1.

Figure 10-1 The Sound Block Palette
You can use the blocks in the Sound Block Palette to play sounds from the Sound Library, to play recorded sounds (even those that you record yourself), and to compose melodies by picking instruments and stringing notes together.
The Sound Library
Are you looking for that perfect sound for a sprite to make when it’s doing a particularly complex dance move? How about the sound of laughing or even of sneezing to add more realism to your project?
The Scratch Sound Library contains more than 100 sounds that you can use in your programs. These include a rooster crow, cat meows, cheering, and all sorts of musical instruments.
Before you can use any of these awesome sounds, you need to add them to your project in the same way that you add sprites and backdrops. It’s time to go to the library and check out some sounds. Go to the Scratch Project Editor and follow these steps:
- Select File ⇒ New from the top toolbar to create a new project.
- Click the Sounds tab to open the Sound Editor, as shown in Figure 10-2.
Click the Choose Sound from Library icon in the New Sound menu, which looks like a speaker.
The Sound Library opens, as shown in Figure 10-3.
- Browse through the library and click the arrows to the right of the sounds you want to hear.
- Find a sound you like and click it to select it. Click OK to add the sound to the sound palette for the current sprite, as shown in Figure 10-4.
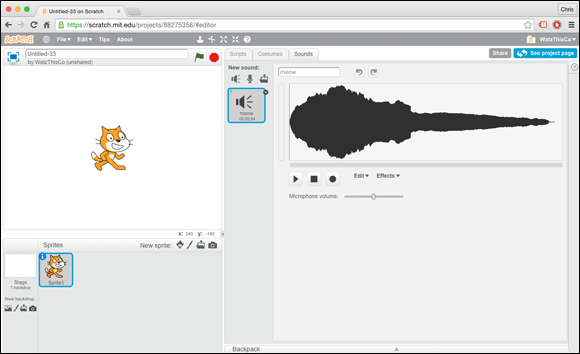
Figure 10-2 The Sound Editor

Figure 10-3 The Sound Library

Figure 10-4 Adding a sound to your sprite
Follow these steps to make your sprite play this new sound.
- Click the Scripts tab to open the Script Editor and the Block Palette.
- Drag a
when this sprite clicked - Drag a
play sound ()block from the Sound Block Palette to the Scripts Area and snap it to the bottom of thewhen this sprite clickedblock. - Change the drop-down menu in the
play sound ()block to the sound that you added from the Sound Library. - Click Scratch the Cat on the Stage to play the new sound!
The Sound Library has a lot of sounds, but you’re not limited to just these sounds. You can edit and change the sounds in the library and you can also upload and use any sound you can record or find on the web. You find out how to add custom sounds to your project in the next sections.
Using the Sound Editor
The Sound Editor is where you can view your sounds as waveforms, record new sounds, edit sounds, and apply effects to sounds.
To find out more about the Sound Editor, click the Sounds tab. You see the name of the selected sound, followed by a waveform diagram of that sound.
You can tell a lot about a sound from its waveform. The length of the waveform tells you how long the sound will play. The height of the waveform tells you how loud or quiet the sound is. The shape of the waveform tells you how complex the sound is.
Compare the waveform for the sound called Pop, shown in Figure 10-5, with the waveform for the sound called Computer Beeps3, shown in Figure 10-6.
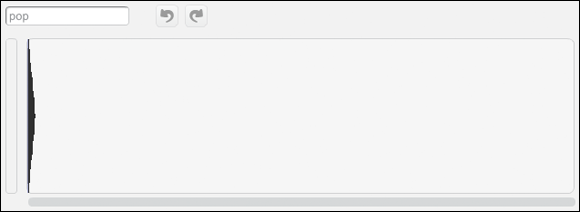
Figure 10-5 The Pop sound

Figure 10-6 The Computer Beeps3 sound
Editing Sounds
Using the tools below the waveform, you can edit any sound to make it louder, quieter, shorter, and even longer!
Follow these steps to customize one of Scratch’s sounds!
Select the Meow sound in the Sound Palette.
You see the sound’s waveform.
- Click and drag your mouse over the waveform to select it, as shown in Figure 10-7.
- Click the Play button underneath the waveform to hear how Meow sounds.
While the waveform is selected, click the Effects drop-down menu and select Reverse.
Notice that the waveform flips over, as shown in Figure 10-8.
- Press the Play button now to hear a backward cat sound!

Figure 10-7 Selecting a sound’s waveform
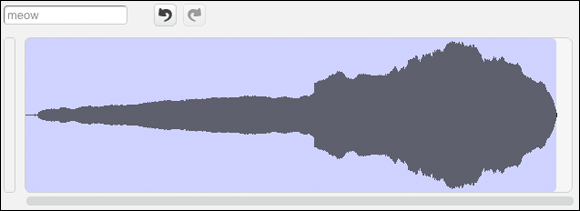
Figure 10-8 Reversing a sound
You can also select and edit any part of a sound. For example, you can use the Sound Editor to make part of a sound louder or quieter, to make sounds fade in or out, and even to copy and paste parts of sounds into other sounds.
Recording Sounds
If you have a microphone connected to your computer, you can use the Sound Editor to record your own voice or sounds!
To record a sound from your computer’s microphone, follow these steps:
Click the Record New Sound icon (it looks like a microphone) in the Sound Palette.
A new blank sound opens in the Sound Editor.
Click the round icon under the waveform box in the Sound Editor. This is the Record button.
You see a pop-up window, as shown in Figure 10-9, asking whether Scratch can have access to your computer’s microphone.
- Click the Allow button.
The first time you use the microphone with Scratch, you see another pop-up window asking you again if it’s okay for Scratch to use your microphone. Choose OK here, too.
Scratch starts recording.
When you’re done recording, press the square icon (the Stop icon) to the left of the Record button to stop recording.
If your sound was recorded successfully, you see a waveform in the Sound Editor, as shown in Figure 10-10, and you can click the Play icon to play back your sound.

Figure 10-9 Scratch asks for permission to use your microphone

Figure 10-10 A recorded sound in the Sound Editor
Importing Sounds
The last button under New Sound in the Sound Palette is the Upload Sound from File button. Using this button, you can find any sound file or music file on your computer and turn it into a sound inside Scratch that you can play inside your projects.
To import a sound, click the Import Sound from File button in the Sound Editor and then find any sound or music file on your computer and click Open. The new sound appears in your Sound Editor and is available to use with the sprite you imported it into.
Forming the Scratch Jazz Band
Most of the blocks inside the Sound Block Palette are for making your own music. You can think of these blocks as being very similar to an electronic keyboard. There are 21 different instruments and 18 different drums for you to choose from, and you can vary the speed of the music (its tempo), insert pauses (called rests), and change how loud or quiet the music plays (its volume).
With a little creativity and work, it’s possible to assemble Scratch blocks to make sprites work together to make beautiful music. In this section, you use Scratch’s sound blocks to put together a jazz band and play the beginning of an old standard.
The song you’ll be assembling is one of the most famous songs in all of jazz: “Autumn Leaves.”
Tuning Up Your Instruments
The first step in getting the band together is to put the sprites on the Stage. Follow these steps:
- Select File ⇒ New from the top toolbar to create a new project.
- Click Choose Sprite from Library from the New Sprite menu.
- Locate the sprite named Guitar Bass from the Music and Dance category and add it to your project.
- Click Choose Sprite from Library again and add the Microphone sprite to your project.
- Click Choose Sprite from Library one more time and add the Drum1 sprite to your project.
Remove Scratch the Cat from your project by using the Delete tool or right-clicking Scratch the Cat.
You should now have three sprites on your Stage. Arrange them in any way you want, as shown in Figure 10-11.

Figure 10-11 The sprites for the Scratch Jazz Band project
Now that you have a band, let’s give them something to do. We’ll start with the drummer.
Finding a Drummer
Jazz drumming uses a special type of beat called a “swing beat.” A swing beat is difficult to simulate with a computer program, but you can do a reasonably good job with the Scratch music blocks. Follow these steps to program a simulated swing beat.
- Click the Drum1 sprite in the Sprite Pane to open the Scripts Area for the drum.
- Drag a
play drum () for () beatsblock from the Sound Block Palette to the Scripts Area. - Change the value of the first drop-down menu to (2) Bass Drum.
- Change the value of the second drop-down menu to 0.66.
- Drag a
rest for () beatsblock from the Sound Block Palette to the Scripts Area and snap it to the bottom of theplay drum (2) for (0.66) beatsblock. - Change the value in the
rest for () beatsblock to 0.66. - Drag a
play drum () for () beatsblock from the Sound Block Palette to the Scripts Area and snap it to therest for (0.66) beatsblock. - Change the value of the first drop-down menu in the
play drum () for () beatsblock to 2 and the value of the second drop-down menu to 0.66. - Drag another
play drum () for () beatsblock to the Scripts Area and change its values to (6) Closed High Hat and 0.66 beats. - Drag another
rest for () beatsblock to the Scripts Area, snap it to your script, and change its value to 0.66 beats. - Snap another
play drum () for () beatsblock to the bottom of the script and change its values to (6) Closed High Hat and 0.66 beats. - Drag a
repeat () blockfrom the Control Block Palette and surround the entire drum script with it. Change the value in the
repeat ()block to 8.Your drum script should now look like Figure 10-12.

Figure 10-12 The drum script
Playing the Melody
Here’s how to make the script that will play the melody.
- Click the Guitar sprite in the Sprite Pane to open the Guitar Scripts Area.
- Drag a
when green flag clickedblock from the Events Block Palette to the Scripts Area. Drag a
set tempo to () bpmblock from the Sound Block Palette, snap it to thewhen green flag clickedblock, and set its value to 145.In music, the tempo is how fast or slow a song is. BPM stands for “beats per minute.” A clock ticks off seconds at 60 bpm. So, a bpm of 145 is a little faster than twice the speed of the second hand on a clock.
- Drag a
set instrument to ()block from the Sound Block Palette and snap it to theset tempo to (145) bpmblock. - Select the (4) Guitar from the instrument drop-down menu.
The next part of the song you’re programming has 17 notes. Most of these play for one beat. Follow these steps to program all 17 notes.
- Drag a
play note () for () beatsblock to the Scripts Area. - Change the value of the second number in the
play note () for () beatsblock to 1. - Make 11 copies of this block so that you have a total of 12
play note () for () beatsblocks. - Make four groups of three linked blocks, as shown in Figure 10-13.
- Set the notes for all the
play note () for () beatsblocks to the values shown in Figure 10-13. - Double-click each group of blocks, one at a time. You should notice that the notes in each group get higher, but each group of three notes starts on a lower note.
- Drag a new
play note () for () beatsblock from the Sound Block Palette and snap it to the bottom of the first group of three. - Set the note in this block to Eb (63) and the number of beats to 5.
- Drag a new
play note () for () beatsblock from the Sound Block Palette and snap it to the bottom of the second group of three (the one that starts on note 53). - Set the note in this block to D (62) and the number of beats to 2.
- Drag another new
play note () for () beatsblock from the Sound Block Palette and snap it to the bottom of this same group of notes. Set the note in this block to D (62) and the number of beats to 3.
Your guitar sprite’s Scripts Area should now look like Figure 10-14.
- Drag a
play note () for () beatsblock from the Sound Block Palette to the bottom of the third group (starting with 51) and set its note to Middle C (60) and its beats value to 5. - Drag a
play note () for () beatsblock from the Sound Block Palette to the bottom of the fourth group (starting with 50) and set its note to Bb (58) and its beats to 5.

Figure 10-13 Making groups of notes

Figure 10-14 Two note groups completed
Now you have all the notes programmed to play the first four lines of “Autumn Leaves.” If you double-click them in order, you can hear how the song goes.
In the next section, you program the timing between the players in the band.
Playing Together
Broadcasting blocks and event blocks can be used to coordinate between different scripts and sprites. In this section, you make the drummer start drumming and the singer start singing.
The first step is to start the drums at the right time. In this song, you want the drummer to start after the first three notes are played by the guitar. Follow these steps to program the guitar to broadcast messages to the other instruments.
- Separate the last note in the first group of notes from the other three.
- Drag a
broadcast()block from the Events Block Palette and snap it to the bottom of the third note in the first group. - Select New Message from the
broadcast ()block and create a new message with the word drum. - Click the Drum1 sprite in the Sprites Pane to view the drum sprite’s script.
- Drag a
when I receive ()hat block from the Events Block Palette and snap it to the top of the Drum1 sprite’s script. - Select the drum message from the
when I receive ()hat block’s drop-down menu. - Click the Guitar Bass Sprite in the Sprites Pane to return to the Guitar Bass sprite’s script.
- Snap the note that you removed from the bottom of the first group to the bottom of the
broadcast (drum)block. Double-click on the first group of notes.
The drums should start playing when after the third note plays.
Next, you program the events that cause the singer to sing each line of the song. The first four lines of “Autumn Leaves” are
The falling leaves
Drift by the window
The autumn leaves
Of red and gold
Each of these lines should be sung along with each of the groups of notes. Follow these steps to program the singing!
Drag a
broadcast ()block to the top of each group of three notes.You’ll be using these broadcast blocks to tell the singer when to sing each line of the song.
Create a new message for each of these new broadcast blocks. The four messages should be falling leaves, window, autumn leaves, and red and gold.
When you’re finished, your guitar Scripts Area should look like Figure 10-15.
Snap the five pieces together into one script.
The falling leaves broadcast block should snap to the
set instrument to (4)block. The window broadcast block should snap to the bottom of that. Then comes the piece that starts with the autumn leaves, and finally the section that begins with the red and gold broadcast block.

Figure 10-15 The guitar script with broadcasts
When the blocks are linked together, they should look like Figure 10-16.

Figure 10-16 The finished guitar script
In the next steps, you use the broadcasted messages from the guitar to trigger the microphone sprite to say the lines of the song. Follow these steps:
- Click the Microphone sprite in the Sprite Pane.
- Drag four
when I receive ()blocks from the Events Block Palette. - Select falling leaves in the first
when I receive ()block. - Drag a
say ()block from the Looks Block Palette, snap it to the firstwhen I receive (falling leaves)block, and change its value to The falling leaves. - Select window in the second
when I receive ()block. - Drag a
say ()block from the Looks Block Palette, snap it to thewhen I receive (window)block, and change its value to Drift by the window. - Select autumn leaves in the third
when I receive ()block. - Drag a
say ()block from the Looks Block Palette, snap it to thewhen I receive (autumn leaves)block, and change its value to The autumn leaves. - Select red and gold in the fourth
when I receive ()block. - Drag a
say () for () secsblock from the Looks Block Palette and snap it to thewhen I receive (red and gold)block. - Change the first value in this
say () for ()block to Of red and gold and change the second value to 4. - Click the Green Flag to see and hear your finished jazz band program do its thing!
Singing Along!
After you have the melody and drums in place, you can play the song and sing along. Or, if you have a microphone connected to your computer, you can record yourself singing along and hear it every time you press the Green Flag!
Follow these steps to record your lyrics and add them to the band:
- Click the Microphone sprite in the Sprite Pane.
- Click the Sounds tab to open the Sound Editor.
- Click the Record New Sound icon.
- Click the Record button and start singing!
- When you’re done singing, click the Stop button.
Name your sound.
If everything worked correctly, you see a waveform for your singing in the Sound Editor, as shown in Figure 10-17.
Play back the sound. If it has any silence at the beginning, select it and use Edit ⇒ Cut to delete it.
You want the singing to start as soon as the Green Flag is clicked.
- Click the Scripts tab to open the Scripts Area for the Microphone sprite.
- Drag a
when green flag clickedblock from the Events Block Palette to the Scripts Area. - Drag a
play sound ()block from the Sound Block Palette and snap it to thewhen green flag clickedblock. - Select your singing sound in the drop-down menu for the
play sound ()block. - Click the Green Flag to hear yourself singing along with the music!

Figure 10-17 The new singing sound
How did you do? Does it sound amazing? If not, try again! Unfortunately, Scratch doesn’t give us a way to play the song while we’re singing, so you just need to experiment. But, that’s what Scratch is all about! Play around with it and have fun!
Further Adventures in Coding
Want to find cool new sounds to use in your projects? Check out Free Sounds at https://freesound.org/, where you can find hundreds of different sounds that are all free to download and use. You can even record and upload your own sounds to freesound.org!

Achievement Unlocked: The Sounds of Scratch Music