
AfterShot Pro can be extended with plugins. A selection of them can be found at the AfterShot Pro Plugin repository at www.aftershotpro.com/plugins. That said, it would be impossible to present all available plugins due to space constraints. So, we have to limit ourselves to three very interesting ones:
- Wavelet Sharpen
- Nostalgia
- GradFilter Plugin
You might remember that I've already written about the default sharpening of AfterShot Pro and that it is highly deficient and should not be used. The plugin Wavelet Sharpen, which is free software, is a much better way of sharpening your images.
As you can see, you have three ways to sharpen your image with this plugin. You can activate two wavelet filters which can be used in conjunction, or can use a standard unsharp mask filter that is still better than what AfterShot Pro uses, or use a gradient filter. Needless to say that you should not activate USM together with Gradient or wavelet filters and vice versa.
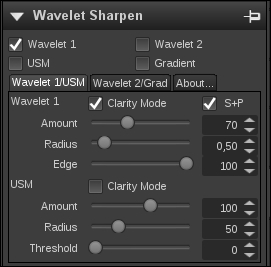
For the simple reason to save screen estate, the controls for the filters have been arranged in two tabs: Wavelet 1/USM and Wavelet 2/Grad. The controls for the wavelet filters are the same on both tabs.
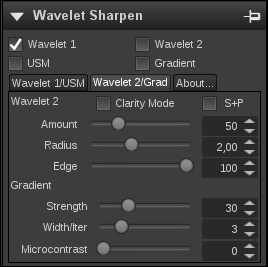
Wavelet Sharpen uses a sharpening algorithm that decomposes the image into multiple images with different frequency content. The high frequency parts are then amplified and the images are then recomposed again. The resulting image appears to be sharper than the original one. You can control the amount with the Amount slider and the radius with the Radius one. The Edge slider controls the edge detection algorithm. You can use it to make sure that the filter is applied to edges in your images, thus avoiding sharpening artifacts. Setting the Edge to 0 turns off edge detection, while setting it to 100 will only sharpen edges. Turning on S+P will remove salt and pepper noise that sometimes gets introduced by the filter.
You can use two different Wavelet Sharpen filters at the same time and have each one be controlled by different settings.
The USM filter is the filter for enhancing sharpness that is found in nearly any image editing software. You control the amount of sharpening with the Amount slider and the radius with the Radius one. Turning on Clarity Mode will sharpen the image with a luminance based mask. According to the author, a radius of 50 with an amount between 0 and 100 and enabled Clarity Mode will give the best results.
Gradient sharpen can be used to counter unsharpness introduced by the AA filter of modern DSLRs. It's effect and usefulness vary from camera to camera, so you will have to try it out with your gear to see if it is useful for your images. The default settings are said to be good.
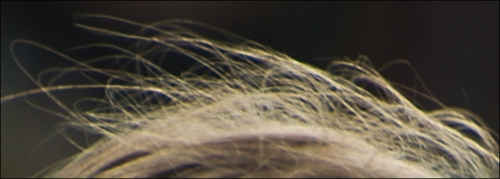
Example of unsharpened 100% crop image is as follows:

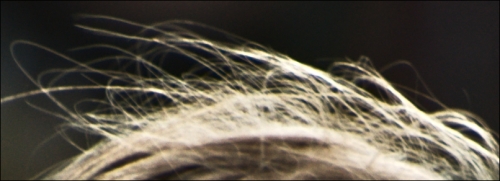
Example of wavelet sharpen with amount (100), radius (0.50) and edge (100) is as follows:
Example of unsharp mask with amount (100), radius (50), and threshold (0) is as follows:
Example of gradiant with strength (30), width/Iter (3), and microcontrast (0) is as follows:
While I definitely don't want to split hairs here, in my personal opinion, the crop sharpened by the wavelet filter looks best.
If you used film before switching to digital or simply love the look of old film images and would like to add it to your digital workflow, Nostalgia is the plugin you need to get. In short, it modifies your image to look like well-known film emulsions.
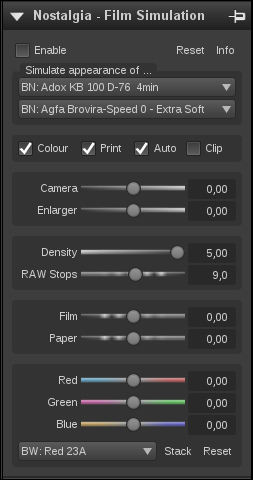
As you can see the tool consists of several sections. On the top, you can select the film emulsion and the paper you wish to emulate. The codes in front of the names signify black and white negative (BN), black and white positive (BP), color negative (CN), and color positive (CP).
The checkboxes below control how the simulation operates. The Colour checkbox will force the output to color even if you have selected a black and white film. The Print checkbox will simulate printing the image on paper like in a darkroom when it is checked. This is of course normal for negative films. Checking Auto will automatically check Colour when you select a color film emulsion and will automatically check Print when you select a negative emulsion. Clip will show clipping in the image.
The Camera and Enlarger sliders control the exposure of the film simulation. Drag them to the right-hand side to brighten the image and to the left-hand side to darken it.
The Density and RAW Stops sliders control how your image is converted for the simulation. Density sets the contrast level between black and white in the final output. RAW Stops specifies the stops between black and white of the original image and depends on your camera sensor. If you are using a DSLR, seven to 10 stops are fine. For a point and shoot camera, five to seven stops should be used. To effectively use more than 10 stops on this slider, your source material should come from a digital back or film scanner. Generally, it is better to underestimate the capabilities of your hardware than to overestimate them here.
The Film and Paper sliders give us the chance to increase or decrease the development time of the simulated film or paper by sliding to the right-hand (increasing) or the left-hand side (decreasing). Try to do that with a film!
The final section of the plugin gives us the ability to add filters to the film simulation. You can use the sliders Red, Green, and Blue for an individual mix or select a traditional one from the selection box and click the Stack button to have it applied. You can, by the way, stack as many filters as you like. In case you get carried away with them, a click on the bottom Reset button will revert all your filter choices. A click on the top Reset button will revert all changes you have made to the complete plugin, giving you a completely fresh start.
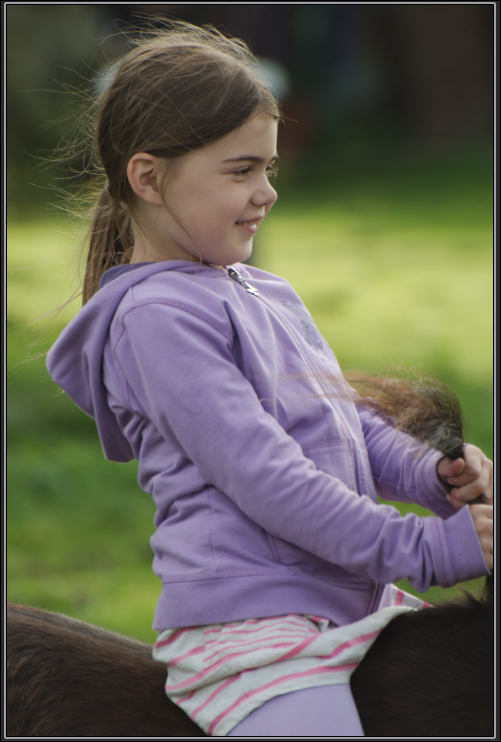
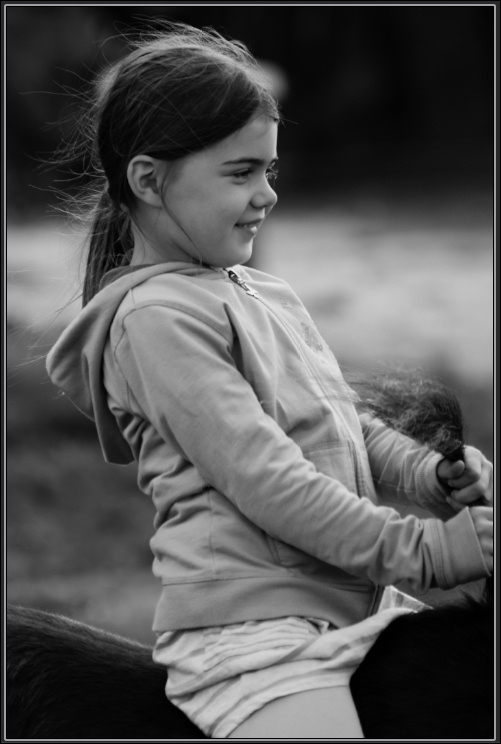
Now let's see what we can do with this plugin. This is a photo of a happy girl riding, completely unprocessed.
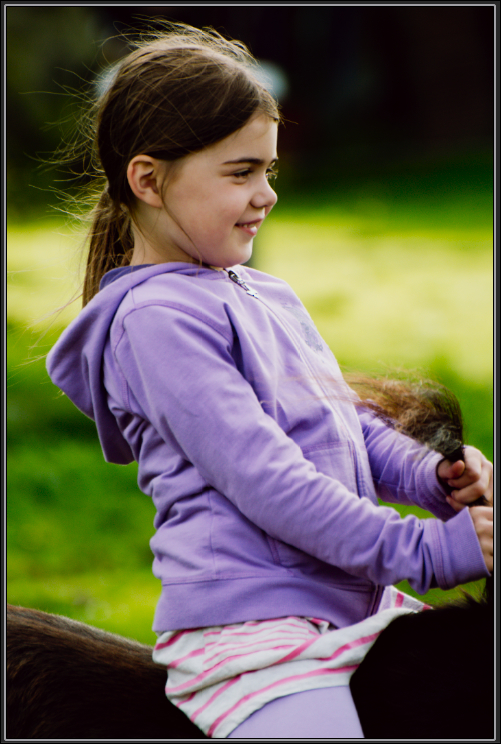
I've always liked the colors of the Fuji Velvia 100T, so here is the simulation of it. I did not make any changes to the exposure or colors but simply used the entry CP: Fuji Velvia 100T.
When it comes to black and white, I've always been fond of the ILford FP4 together with Agfa Multicontrast Premium paper. I've used gradation 1 paper for the simulation. All other settings remained untouched.
In case you get unwanted results, make sure that both AutoLevel and Perfectly Clear are turned off. Both of these settings cause problems with the Nostalgia plugin.
GradFilter is not a free plugin. However, it deserves to be mentioned here simply because it can save you a great deal of work. I'd still like to point out that everything that this plugin does can be achieved by using Adjust Layers and regions. It just takes longer.
Photography can be tricky, especially when we leave home without a graduated neutral density filter with all the burden we carry in our bags, because we've not used it in the current millennium. Murphy's law has been waiting for this and presents us with the perfect scene where we would require the filter. Luckily, all is not lost as we can try to rectify the situation with the GradFilter Plugin.
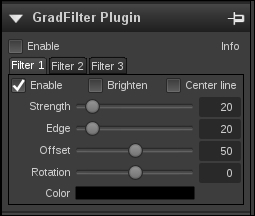
As you can see, we can enable three graduated filters with different settings for our image. For each filter, the following settings apply:
The Strength slider adjusts the strength of the filter.
The Edge slider adjusts the size of the edge between affected and unaffected image areas. It is comparable to the feather size of the region tools. Take care, though, because a large edge gives harder transitions. The Offset slider controls the location of the boundary (called Center line) between affected and unaffected image parts. The Rotation slider lets us rotate the Center line to our needs. We can change the color of the filter with the Color box. To make working with this filter easier, it is best to enable the checkbox Center line. This makes positioning the filter a snap. In case you want to brighten and not darken your image, check the Brighten checkbox.
Here I have a beach shot where the sky is a bit too light for my taste. As you can see, I already enabled the GradFilter plugin.
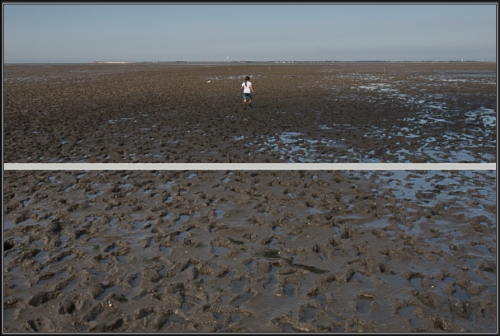
The upper half is already darker than the lower half. However, I only want to darken the sky, so I adjust the Center line until it is right between sky and beach. There is no need to rotate the line as the horizon is pretty much flat. After moving the Center line to 18 and adjusting Strength and Edge to 50 each, the image looks like the following screenshot:
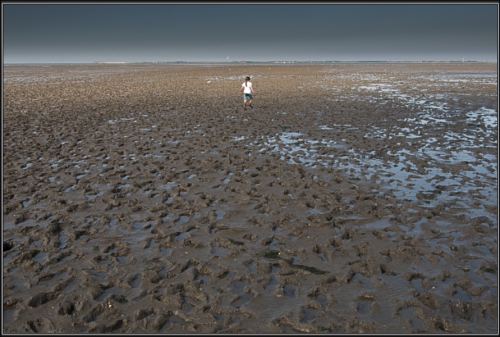
Only the sky is darker now, much like it was when I took the photo.
Always remember that you can use plugins together with layers and regions, too.
However, don't forget to turn off AutoLevel or Perfectly Clear before using plugins. If you don't, you will get strange results. Most of the time, these settings will compensate for the changes that the plugin introduced, leaving you wondering if the plugin works. It does, but you are not seeing the results.