
You're probably not 100% happy with the way the batches are set up. Don't worry, we are going to adapt the batches to our needs right now. Let's start with the Gallery batch. After you've worked through that, you can easily create or modify any batch to suit your workflow.
To adapt a batch, you can simply change it's settings by right-clicking on it and selecting Settings.... However, most of the time it is good to keep the original batch as a reference point, even if you don't use it any longer. Misconfigurations do happen and it is always good if we can start fresh.
So, let's duplicate the Gallery batch with a click on Duplicate instead. (To create your own batch from scratch, simply select New....) The new batch is blatantly called Gallery copy.
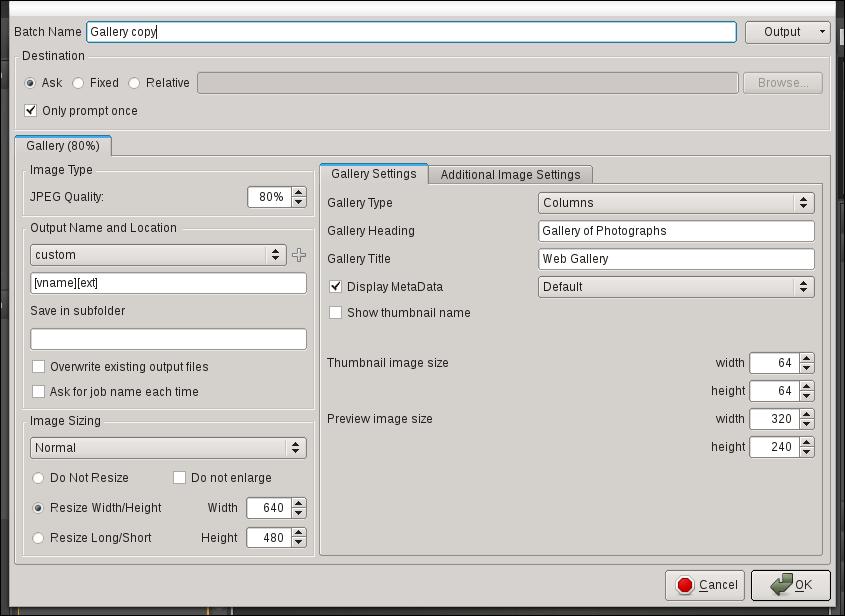
Some of the settings are the same for all batches, while some only apply to certain output formats (gallery, pictures, and so on). Needless to say that all batches have a Batch Name field. We'll change this one to something useful, like My Gallery.
The Output button is very important. With it, you have the following four choices:
- Add File Output: This will add a file output to the batch. With AfterShot Pro batches, you can have more than one file output per batch. So, you could create a
One-Batch_Fits-Allbatch that creates full resolution JPEG images, web resolution JPEG images, and a gallery at the same time. I strongly advise against this, though. As has already been pointed out, exporting images uses a lot of processing power of your machine and a batch like this would surely bring it to a screeching stop. Your mileage may vary, though. - Add Copy Output: This will add a copy output to the batch. AfterShot Pro will rename and copy the created files to a given location.
- Add Gallery Output: This will add a gallery output to the batch. This is quite useful, but as we are creating a gallery batch right now, it is better left alone. Adding this output to a batch that creates preview images for clients however, has its uses.
- Remove Current Output: This will remove the currently selcted output.
The Destination section of the dialog box takes the settings where the gallery, or any other output we create with a batch, will be saved in the filesystem:
- Ask will let AfterShot Pro ask you to enter a location. In case the Only prompt once checkbox is ticked, this location is remembered throughout the session and will be used for all similar questions.
- Fixed will save the output to the folder specified. You can change this with the Browse button.
- Finally Relative will export the gallery to a folder relative to the original folder of the images. This is what you should usually choose. It keeps your RAW image files in one folder and then full-size JPEG images, thumbnail JPEG images, and a gallery in folders below them.
For now, tick Relative and enter my_gallery into the field. This will let AfterShot Pro create the gallery in the given subfolder. Note that these folders don't need to exist prior to running the batch. AfterShot Pro will create them automatically.
The Gallery (80%) tab now controls how the gallery is created. The first thing to set up is the JPEG Quality field. The default is 80% which is usable for the Web. For full-size images I still recommend 100% if you use JPEG images. Notice that the section name always reflects the quality in its name.
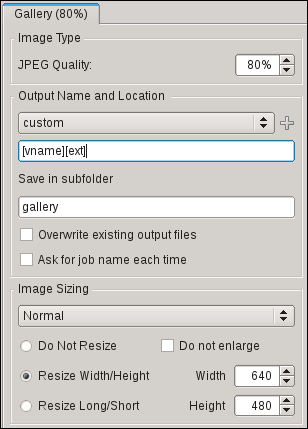
You can also set the Output Name and Location field for the created images. Simply choose the one you'd like from the combobox or create your own custom format. As the renaming variables of AfterShot Pro are plenty, it is best if you refer to the corresponding section of the online help for a list of them: http://product.corel.com/help/AfterShot/540111115/Main/EN/Doc/index.html?rename_formats.html
I personally prefer to use the format of [jobname]_[onum][oext] in my Download batch. This prompts for a job name and uses the original file number and original extension. So a RAW file called DSC0067.NEF would be saved as Repelen_0067.NEF on my hard disk. Because of this, I keep [vname][ext] in the Output Name field. This gives me files with the names of the AfterShot Pro versions and the extension corresponding to the file type.
Save in subfolder comes in handy when you have several output tabs defined in a batch. Just enter a name here and the files created by this Output tab will be saved in a subfolder of the folder you have specified in the Destination section. Let's name the subfolder gallery.
If you tick Overwrite existing output files, AfterShot Pro will do exactly that. Otherwise, it will append a counter to the filenames of the newly exported images to preserve any files already on your hard disk. Ticking Ask for job name each time makes AfterShot Pro ask you for a job name each time the batch is run. This is only useful if you actually use it in your naming format. If you don't use the job name to rename the images, there is no need to enable this option.
In the Image Sizing section we control the dimensions of the exported images. Any size change can be done with the Width and Height controls. Simply enter the dimensions you'd like the images to have.
We have five otions of resizing:
- Normal: This lets AfterShot Pro use the normal, or high quality, process for resizing.
- Proof: This lets AfterShotPro use the quicker, but not as good, process for resizing.
- Do Not Resize: This option will not resize your images. This option is best used for batches in which you export full size images for your work. It is not really useful for a gallery on the Web.
- Resize Width/Height: This option will resize your images to make them fit into the specified dimensions.
- Resize Long/Short: This option will resize your images to make sure that the long and short edges of the exported images are smaller than the dimensions specified.
If you let your images resize, it is sometimes viable to enable the Do not enlarge option. Otherwise AfterShot Pro might enlarge a source image that has a smaller resolution than the dimensions given to fit the batch. Also, this section ends the batch settings that are the same for all export types.
The special settings for the gallery are in the Gallery tab:
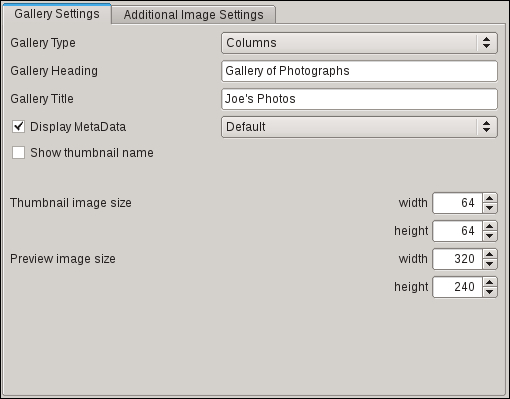
You can choose Gallery Type and enter the Gallery Heading as well as Gallery Title here. If you want the gallery to Display MetaData, you can enable it here. You can also select the metadata you want to be shown in the corresponding combobox. The option Show thumbnail name lets you decide if you want the names of the thumbnails visible or not. The sensible default is off. Finally, you can enter the dimensions of Thumbnail image size and Preview image size. We have already selected the full screen size with the resize options before.
You have probably seen the Additional Image Settings tab. This tab is present for all outputs and will be discussed momentarily. To do that, imagine that you need high resolution TIFFs for all the images in your gallery. These are of course not for a publication on the Web, but for other purposes.
So let's add another file output and change the image type from JPEG which is the default to TIFF (16 bit).
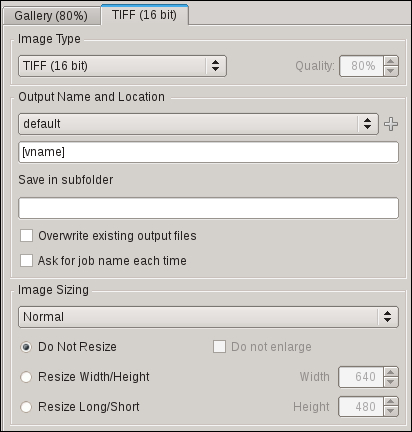
As you can see, most fields of the new tab are already known to you. We'll set the Save in subfolder field to TIFFs, to make sure those images don't end up in our gallery. Now let's have a look at the Additional Image Settings section.
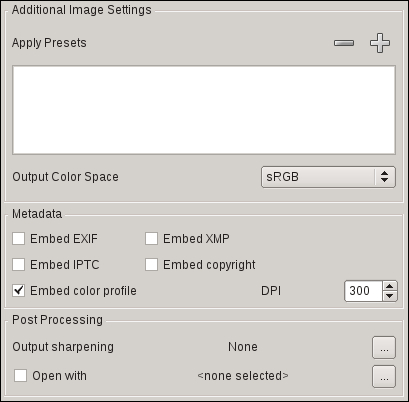
You can use the Apply Presets field when exporting your images. Add them with the plus sign or remove them by selecting them and then clicking on the minus sign. Take good care when you select the Output Color Space checkbox. Make sure that the hardware you want to use the exported images on can display images in your selected color space. If in doubt, stick to the sRGB default.
The Metadata section lets you select which metadata is saved in the exported files. You can also choose to embed the color profile and the DPI of the resulting images. Embedding the color profile is usually a good idea. Embedding the other metadata is a matter of personal choice, I always embed EXIF and IPTC metadata.
Finally, in the Post Processing section you can add Output sharpening to your images. The default is None, and I prefer to stick to that because I already sharpen my images while editing them. Adding output sharpening has a tendency to oversharpen and we don't want that. Your mileage may vary, though.
In case you want to open the exported image with another program, you can do that by enabling Open with and selecting the desired program. This is useful if you need to finalize images with a pixel editor like the Gimp.
If we now test our new batch, we'll get the desired output:
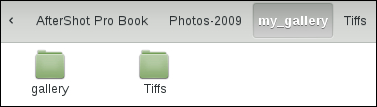
The batch exports a gallery to a my_gallery/gallery folder and at the same time exports TIFFs to my_gallery/Tiffs.