Chapter 6. The user experience
This chapter covers
- Key features of usable code
- Common notification features
- A reusable framework for notifications
- Highlighting updated data in situ
In chapter 1, we discussed usability, the keystone to any software application. No matter how well organized your codebase and how clever the technical merits of your application, if the usability stinks, you leave a bad association in the user’s mind. This can be grossly unfair, but it’s a fact of life. More people recognize Albert Einstein for his hangdog looks and wild hair than understand what he was trying to say about the nature of space-time. First impressions—and attention to detail—matters.
In chapters 2 to 5, we introduced a lot of cool technology and did some clever things with Ajax. The focus on organization throughout the latter part of this journey has enabled us to be flexible and highly adaptive about how we do these things. However, our examples have been rather rough around the edges, and rightly so while we focused on the cleverness at hand, but now we need to step back and assess what we have done in terms of creating something that people will actually want to use, possibly for several hours a day. The topics presented in this chapter will go a long way toward helping you get your Ajax application ready and presentable for the real world.
One of the biggest things that you can do to make your users feel comfortable with your application is to keep them informed about background events in a discrete and consistent fashion. They aren’t the be-all and end-all of usability, but we will focus on them in this chapter in order to show how an in-depth, consistent treatment benefits the application as a whole. Most Ajax applications will want to notify the user at some point too, so we hope you’ll find the finished components useful in your own projects as well.
We develop several solutions in this chapter for letting the users know what is going on, without getting in the way of their workflow. Before we go into these specifics, though, let’s take a quick look at what we mean by quality and how to get there.
6.1. Getting it right: building a quality application
Usability is an especially hot topic for Ajax because web app users can be an extremely fickle bunch. The downside of being able to download and run your app with zero effort is that the users have invested no time and effort in it when they start to use the application and will be willing to throw it away and move on to the next of the 8 billion web pages that Google can point them to. To complicate matters further, with Ajax we are seeing the convergence of two different usability traditions, namely the desktop application and the web page. Getting the mixture right can be quite a challenge, and failing to get it right can consign your hard work to obscurity.
In chapter 1, we looked at usability from the users’ point of view. What do they want in an application? And what are they willing to put up with? Let’s turn the question around now and ask what qualities we need in our code to meet the goal of usability. With this as a starting point, we can figure out what we can do in practical terms to make our application work. The following sections detail a number of key features that add quality to your application.
6.1.1. Responsiveness
The most basic frustration that a computer user can suffer from is to have workflow interrupted while the computer struggles to catch up with him. Basic design mistakes, such as locking up the entire user interface while writing some lengthy configuration file to disk, can cause the user to lose track of what he is doing and force him to make the mental leap between the domain model in which he is engaged to the harsh reality of computer hardware.
When looking at responsiveness, it can be important to understand your target audience and its typical system setups. In the case of writing a configuration file, the speed may be acceptable on the developer’s high-speed 7200-RPM SATA disk drive on the local workstation, but the customer writing the file to a congested network share or a USB thumb drive may have a different experience. In the specific case of web app development, a similar mistake is often made in only testing the application running over the loopback interface, that is, the web server running on the same development machine as the web browser. This doesn’t give a useful evaluation of network latency issues, and all web apps ought to be either tested over a real LAN or WAN or simulated using a traffic-shaping tool.
Beyond network issues, the performance of the client code can make a huge difference to responsiveness. Performance is a big issue, so we’ll defer a closer look at it to chapter 7.
6.1.2. Robustness
An application is robust if it can withstand the usual conditions encountered at a busy workstation. How does it cope with a temporary network outage? If a badly behaved program hogs the CPU for five minutes, will your application still work afterwards? At one recent project that I was involved in, we would test our application’s robustness by pounding randomly on the keyboard for 10 seconds or so, and by “scribbling” the mouse across the page while clicking it. A crude sort of test—but effective—and quite good fun!
What can such a test reveal? For one thing, it can highlight inefficiencies in event-handler code. Keypresses, mouse moves, and the like need to return quickly, since they are apt to be called very frequently. Further, they can reveal unintentional dependencies between components. A particular condition may arise in a GUI, for example, where a modal dialog is blocking access to the main application, but an open menu item is blocking access to the modal dialog. If such a situation depends on precise timing in the opening of the dialog and the menu, it might take a single user two months of daily work to discover it. Once released to an audience of several thousand, however, it might start showing up within hours and be extremely hard to reproduce from field reports. Identifying the problem up front, and correcting it, increases the overall robustness of the application.
There is more to robustness than randomly thumping the keyboard. Just as valuable is the process of watching someone other than the developer trying to use the application. In the case of a complete newcomer, this can provide helpful information on the overall usability design, but it is also useful to let someone closely acquainted with the domain knowledge, even the product, test-drive a new bit of functionality. When the person who wrote the code runs the program, she can “see” the code behind it and may subconsciously avoid specific combinations of actions or particular actions in specific contexts. The end user won’t have this insider knowledge, of course, and neither will the developer sitting next to you (unless you do pair programming). Getting someone else to informally run through your app workflow can help to build up robustness early on.
6.1.3. Consistency
As we already noted, the usability patterns of Ajax are still evolving from a mish-mash of desktop application and web browser conventions. Some Ajax toolkits, such as Bindows, qooxdoo, and Backbase, even present widget sets deliberately styled to look like desktop application buttons, trees, and tables.
The right answer to this conundrum is still being worked out by webmasters, usability gurus, and everyday users of the Web as it continues to evolve. In the meantime, the best advice available is to keep things consistent. If one part of your application uses web-style single clicks to launch pop-up windows, and another part requires double-clicks on similar-looking icons, your user will quickly become confused. And if you must have a talking pig that guides your users around the site, make sure that it doesn’t suddenly change its accent, costume, or hairstyle halfway through!
From the point of view of your codebase, consistency and reuse go hand in hand. If you cut and paste functionality from one location to another, and then respond to a change request in three copies of the button-rendering code but miss a fourth, the consistency of your interface will erode over time. If there is only one copy of the button-rendering code that everyone uses, then the consistency of your application is likely to remain high. This applies not only to visual UI behavior but also to less-visible parts of the interface, such as network timeouts and responses to bad data.
6.1.4. Simplicity
Finally, we need to stress the importance of simplicity. Ajax allows you to do a number of wild and creative things, the likes of which have never been seen in a web page before. Some of these things have never been seen because the necessary technology is only just arriving on the scene. In other cases, there are good reasons for not implementing a feature. Spring-loaded menus that bounce onto the screen and gradually dampen their oscillations may be great fun to code and great fun for a short-term user dropping by for five minutes to let off steam. If the user is going to use the application for several hours a day, though, she is less likely to appreciate the fun by the day’s end.
It is always worth asking whether a new feature will actually improve the end experience. In many cases with Ajax, the answer will be yes, and the developer can concentrate on coding features that will be genuinely beneficial.
6.1.5. Making it work
It’s probably the case that your code doesn’t exhibit all the features we just mentioned. Mine certainly doesn’t. These are merely ideals that we’ve presented. Making the effort to move toward these ideals can pay big dividends when it comes to maintaining your codebase in the future, and refactoring existing code can introduce these qualities as you go along. Choosing where to concentrate the effort is something of a black art, and the only way to get good at it is by practicing. If you’re new to refactoring, start with something small and gradually work outward. Remember, refactoring is an incremental process, and you can add quality to your code without pulling it apart and leaving bits on the floor for weeks on end.
In the remainder of this chapter, we’ll look at some specific features that you can build into Ajax applications. A large part of the chapter focuses on notification frameworks, which are ways of keeping the user informed while background processes such as calculations or network requests take place. By providing the user with a visual cue that the process is under way, we improve the responsiveness of the application. By running all such notifications through a common framework, we ensure that presentation is consistent and make it simple for the user to work with the notifications because everything works in the same way.
Let’s start off by looking at the various ways in which we can notify the user of events taking place within the application.
6.2. Keeping the user informed
In an Ajax application, we may often need to run off across the network and fetch some resources from the server and then pick up the results in a callback function and do something with them. If we were handling server requests synchronously, we would have a relatively easy time working out how to handle this in user interface terms. The request would be initiated, the entire user interface would lock up and stop responding, and when the results come back from the server, the interface would update itself and then start responding to input. What’s good for the developer here is lousy for the user, of course, so we make use of an asynchronous request mechanism. This makes the business of communicating server updates through the user interface that much more complicated.
6.2.1. Handling responses to our own requests
Let’s pick up a concrete example to work with. The planetary information viewer that we developed in chapter 5 allowed the user to update a couple of editable properties for planets: the diameter and the distance from the sun (see section 5.5). These updates are submitted to the server, which then responds, saying whether it has accepted or rejected them. With the introduction of the command queue concept in section 5.5.3, we allowed each server response to carry acknowledgments to several updates from a given user. A sample XML response document follows, showing one successful and one unsuccessful command:
<commands>
  <command id='001_diameter' status='ok'/>
  <command id='003_albedo' status='failed'
   message='value out of range'/>
</commands>
From the user’s perspective, she edits the property and then moves on to some other task, such as editing the list of facts associated with that planet or even staring out of the window. Her attention is no longer on the diameter of the planet Mercury. Meanwhile, in the background, the updated value has been wrapped in a JavaScript Command object, which has entered the queue of outgoing messages and will be sent to the server shortly thereafter. The Command object is then transferred to the “sent” queue and is retrieved when the response returns, possibly along with a number of other updates. The Command object is then responsible for processing the update and taking appropriate action.
Let’s recap where we had left this code before we start refactoring. Here is our implementation of the Command object’s parseResponse() method, as presented in chapter 5:
planets.commands.UpdatePropertyCommand
  .parseResponse=function(docEl){
  var attrs=docEl.attributes;
  var status=attrs.getNamedItem("status").value;
  if (status!="ok"){
    var reason=attrs.getNamedItem("message").value;
    alert("failed to update "+this.field
      +" to "+this.value+"

"+reason);
  }
}
This is good proof-of-concept code, ripe for refactoring into something more polished. As it stands, if the update is successful, nothing happens at all. The local domain model was already updated before the data was sent to the server, so everything is assumed to be in sync with the server’s domain model. If the update fails, then we generate an alert message. The alert message is simple for the developer but makes for poor usability, as we will see.
Let’s return to our user, who is probably no longer thinking about the albedo of the planet Mercury. She is suddenly confronted with a message in an alert box saying, “Failed to update albedo to 180 value out of range,” or something similar. Taken out of context, this doesn’t mean very much. We could upgrade our error message to say “Failed to update albedo of Mercury...,” but we would still be interrupting the user’s workflow, which was the reason that we switched to asynchronous message processing in the first place.
We would, in this particular case, also be creating a more serious problem. Our editable fields implementation uses the onblur event to initiate the process of submitting data to the server. The onblur() method is triggered whenever the text input field loses focus, including when it is taken away by an alert box. Hence, if our user has moved on to editing another property and is midway through typing into the second textbox, our alert will result in the submission of partial data and either mess up the domain model on the server or generate an error—and a further alert box if our validation code catches it!
A more elegant solution than the alert box is needed. We’ll develop one shortly, but first let’s further complicate the picture by considering what other users are up to while we make our requests to the server.
6.2.2. Handling updates from other users
Our planetary viewer application allows more than one user to log in at once, so presumably other users may be editing data while we are. Each user would presumably like to be informed of changes made by other users more or less as they happen. Most Ajax applications will involve more than one browser sharing a domain model, so this is again a fairly common requirement.
We can modify our XML response, and the Command queue object, to cope with this situation in the following way. For each update to the server-side model, we generate a timestamp. We modify the server-side process that handles updates to also check the domain model for recent updates by other users, and attach them to the response document, which might now look like this:
<responses updateTime='1120512761877'>
  <command id='001_diameter' status='ok'/>
  <command id='003_albedo' status='failed' message='value out of range'/>
  <update planetId='002' fieldName='distance' value='0.76' user='jim'/>
</responses>
Alongside the <command> tags, which are identified by the ID of the Command object in the sent queue, there is an <update> tag, which in this case denotes that the distance from the sun of Venus has been set to a value of 0.76 by another user called Jim. We have also added an attribute to the top-level tag, the purpose of which we explain shortly.
Previously, our command queue sent requests to the server only if there were commands queued up. We would need to modify it now to poll the server even if the queue were empty, in order to receive updates. Implementing this touches upon the code in several places. Listing 6.1 shows the revised CommandQueue object, with the changes in bold.
Listing 6.1. CommandQueue object
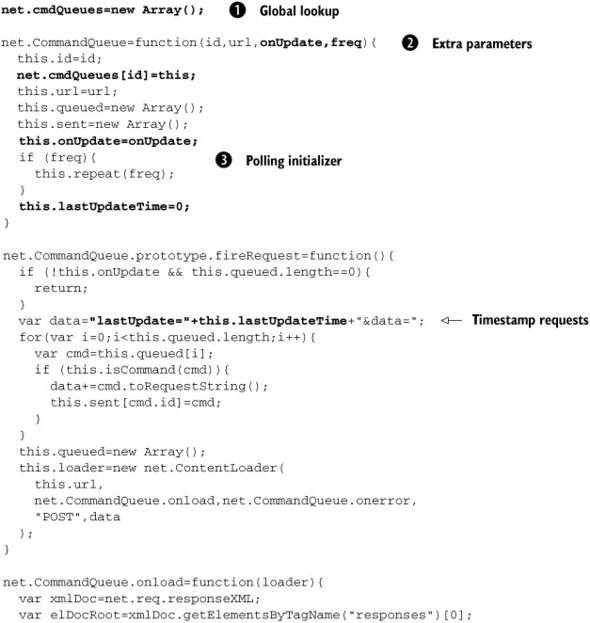
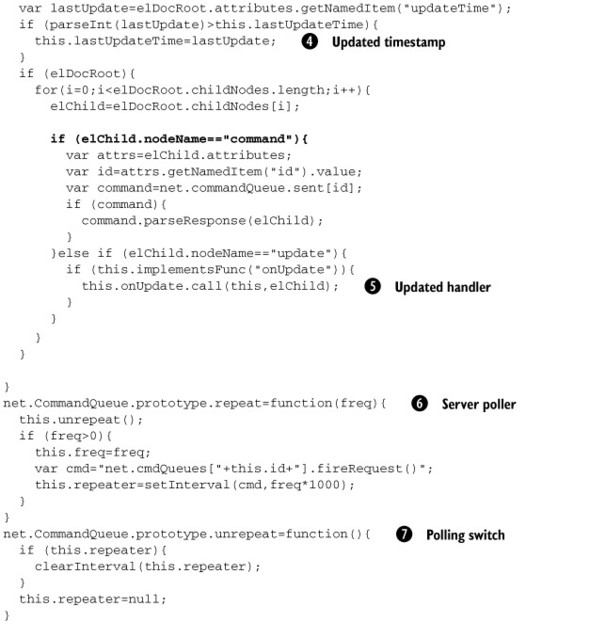
We’ve added quite a bit of new functionality here. Let’s step through it.
First, we’ve introduced a global lookup of command queue objects ![]() . This is a necessary evil given the limitations of the setInterval() method, which we’ll discuss shortly. The constructor takes a unique ID as an argument and registers itself with this lookup
under this key.
. This is a necessary evil given the limitations of the setInterval() method, which we’ll discuss shortly. The constructor takes a unique ID as an argument and registers itself with this lookup
under this key.
The CommandQueue constructor now takes two other new arguments ![]() . onUpdate is a Function object that is used to handle the <update> tags that we introduced into our response XML. freq is a numerical value indicating the number of seconds between polling the server for updates. If it is set, then the constructor
initializes a call to the repeat() function
. onUpdate is a Function object that is used to handle the <update> tags that we introduced into our response XML. freq is a numerical value indicating the number of seconds between polling the server for updates. If it is set, then the constructor
initializes a call to the repeat() function ![]() , which uses JavaScript’s built-in setInterval() method to regularly execute a piece of code. setInterval() and its cousin setTimeout() accept only strings as arguments under Internet Explorer, so passing variable references directly into the code to be executed
is not possible. We use the global lookup variable and the unique ID of this queue to develop a workaround to this problem
in the repeat() method. We also keep a reference to the repeating interval, so that we can stop it using clearInterval() in our unrepeat() method
, which uses JavaScript’s built-in setInterval() method to regularly execute a piece of code. setInterval() and its cousin setTimeout() accept only strings as arguments under Internet Explorer, so passing variable references directly into the code to be executed
is not possible. We use the global lookup variable and the unique ID of this queue to develop a workaround to this problem
in the repeat() method. We also keep a reference to the repeating interval, so that we can stop it using clearInterval() in our unrepeat() method ![]() .
.
In the fireRequest() method, we previously exited directly if the queue of commands to send was empty. That test has been modified now so that
if an onUpdate handler is set, we will proceed anyway and send an empty queue in order to fetch any <update> tags waiting for us. Alongside our own edited data, we send a timestamp telling the server the date that we last received
updates ![]() , so that it can work out to send us relevant updates. This is stored as a property of the command queue and set to 0 initially.
, so that it can work out to send us relevant updates. This is stored as a property of the command queue and set to 0 initially.
We pass these timestamps as UNIX-style dates, that is, the number of milliseconds elapsed since January 1, 1970. The choice of timestamp is based on portability. If we chose a date format that was easier to read, we would run into issues with localization, differences in default formats across platforms and languages, and so on. Getting localization right is an important topic for Ajax applications, since the application will be exposed to users worldwide if it is on the public Internet or the WAN of a large organization.
In the onload() function, we add the code required to update the last updated timestamp when a response comes in ![]() and to parse <update> tags
and to parse <update> tags ![]() . The onUpdate handler function is called with the command queue as its context object and the <update> tag DOM element as the sole argument.
. The onUpdate handler function is called with the command queue as its context object and the <update> tag DOM element as the sole argument.
In the case of our domain model of the solar system, the update handler function is shown in listing 6.2.
Listing 6.2. updatePlanets() function
function updatePlanets(updateTag){
   var attribs=updateTag.attributes;
   var planetId=attribs.getNamedItem("planetId").value;
   var planet=solarSystem.planets[planetId];
   if (planet){
     var fld=attribs.getNamedItem("fieldName").value;
     var val=attribs.getNamedItem("value").value;
     if (planet.fld){
       planet[fld]=val;
     }else{
       alert('unknown planet attribute '+fld);
     }
   }else{
     alert('unknown planet id '+planetId);
   }
}
The attributes in the <update> tag give us all the information that we need to update the domain model on the JavaScript tier. Of course, the data coming from the server may not be correct, and we need to take some action if it isn’t. In this case, we have fallen back on an alert() statement compounding the problems that were discussed in section 6.2.1.
We’ve added quite a bit more clever code to our command queue object in the process of handling updates from other users, including passing timestamps between the client and web tiers, and adding a pluggable update handler function. Eventually we come full circle to the issue of informing the user of changes and asynchronous updates as they take place. In the next section, we look at our options for presenting this information to the user in a more workable fashion, and we’ll factor out that pesky alert() function.
6.3. Designing a notification system for Ajax
The alert() function that we’ve been relying on up to now is a primitive throwback to the earlier, much simpler days of JavaScript, when web pages were largely static and the amount of background activity was minimal. We can’t control its appearance in any way through CSS, and for production-grade notification, we’re much better off developing our own notification mechanisms using the techniques employed to build the rest of our Ajax user interface. This also provides a much greater degree of flexibility.
If we look across the full spectrum of computer systems, we see that notifications come in many shapes and sizes, varying considerably in their impact on the user. At the low end of the scale regarding obtrusiveness are changes to the mouse cursor (such as the Windows hourglass or the Mac “spinning beach ball”) or the addition of secondary icons or emblems to an image denoting the status of the files or other items in a folder. These simple indicators offer relatively little information. A status bar can provide a bit more detail on background events, and finally the full-blown dialog can show a greater degree of detail than either. Figure 6.1 illustrates a range of notification conventions being used in the KDE desktop for UNIX.
Figure 6.1. Various conventions for providing status information in a user interface: modifying the icons to reflect particular characteristics (here access permissions), a status bar providing summary information, and a modal dialog. The interface shown here is the KDE desktop for UNIX workstations, but similar conventions are found in most popular graphical interfaces.
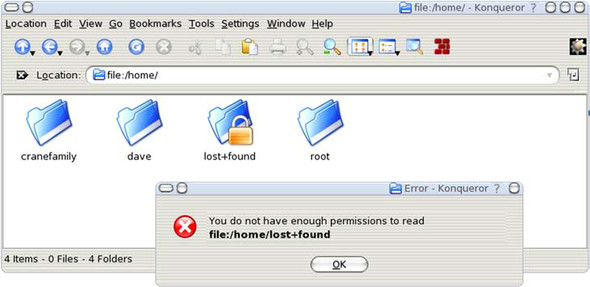
The folder called lost+found is not accessible to the current user, so a secondary image of a padlock has been superimposed over that folder. The status bar at the bottom of the main window gives further information on the contents of the folder being viewed, without interrupting the user. Finally, the error window that is presented when the user tries to open the locked folder presents a stronger notification requiring immediate action by the user.
Compared to these notifications, the use of alert() is essentially ad hoc, as well as being simplistic and ugly. In our quest for robustness, consistency, and simplicity, it makes sense to develop a framework for presenting notifications to the user that we can reuse throughout our application. In the following sections we’ll do just that.
6.3.1. Modeling notifications
As a first step, let’s define what a notification message looks like. It contains a text description for the user and optionally an icon to display alongside the message.
When we notify the user of background activity, some messages are going to be more urgent than others. Rather than working out each time whether or not to show a particular message, let’s define some generic priority levels, which we can then assign to each message.
In general, we want to tell the user something, which they can acknowledge and dismiss. Some messages might be important enough to stay around indefinitely until the user does dismiss them, whereas others will be relevant only for a limited time. Where a message does remove itself without user intervention, it may be in response to a callback, if it is telling the user that some background process such as a network download is under way and the process finishes before the user dismisses the notification. In other cases, such as a news feed, we may simply wish to assign a given lifetime to a message, after which it will tidy itself away.
With these requirements in mind, listing 6.3 presents a Message object, which provides a generic behind-the-scenes representation of a notification that is to be presented to the user. Once we’ve established this model of notification messages, we can dress them up in various ways, as we will see later.
Listing 6.3. Message object
var msg=new Object();

msg.PRIORITY_LOW=    { id:1, lifetime:30, icon:"img/msg_lo.png" };
msg.PRIORITY_DEFAULT={ id:2, lifetime:60, icon:"img/msg_def.png" };
msg.PRIORITY_HIGH=   { id:3, lifetime:-1, icon:"img/msg_hi.png" };

msg.messages=new Array();

msg.Message=function(id,message,priority,lifetime,icon){
  this.id=id;
  msg.messages[id]=this;
  this.message=message;
  this.priority=(priority) ? priority : msg.PRIORITY_DEFAULT.id;
  this.lifetime=(lifetime) ? lifetime : this.defaultLifetime();
  this.icon=(icon) ? icon : this.defaultIcon();
  if (this.lifetime>0){
    this.fader=setTimeout(
      "msg.messages['"+this.id+"'].clear()",
      this.lifetime*1000
    );
  }
}
msg.Message.prototype.clear=function(){
  msg.messages[this.id]=null;
}

msg.Message.prototype.defaultLifetime=function(){
  if (this.priority<=msg.PRIORITY_LOW.id){
    return msg.PRIORITY_LOW.lifetime;
  }else if (this.priority==msg.PRIORITY_DEFAULT.id){
    return msg.PRIORITY_DEFAULT.lifetime;
  }else if (this.priority>=msg.PRIORITY_HIGH.id){
    return msg.PRIORITY_HIGH.lifetime;
  }
}

msg.Message.prototype.defaultIcon=function(){
  if (this.priority<=msg.PRIORITY_LOW.id){
    return msg.PRIORITY_LOW.icon;
  }else if (this.priority==msg.PRIORITY_DEFAULT.id){
    return msg.PRIORITY_DEFAULT.icon;
  }else if (this.priority>=msg.PRIORITY_HIGH.id){
    return msg.PRIORITY_HIGH.icon;
  }
}
We define a global namespace object msg for our notification system, and within that an associative array from which any message can be looked up by a unique ID. The ID generation scheme will depend on the application using the framework.
We define three constants defining the three priority levels—low, default, and high—to which a message can be assigned. Each priority defines a default icon and lifetime (in seconds), both of which may be overridden by optional arguments in the constructor function. A lifetime value of -1, assigned to high-priority messages, indicates that the message will not expire automatically but will need to be dismissed explicitly, either by the user or by a callback function.
6.3.2. Defining user interface requirements
In MVC terms, we have provided a Model for our notification system here. To make it useful, we need to define a View. There are many possible ways of visually representing notifications. For this example, we have chosen to provide a status bar of sorts, upon which notifications are represented as icons, as illustrated in figure 6.2.
Figure 6.2. Status bar user interface for our notification system. Individual messages are represented by their icons.
![]()
The red X icon is a standard icon provided for low-level notifications by our system. The third message object on the status bar has provided its own icon, a blue, shaded sphere, which overrides the default X. Each notification that is added to this status bar can be inspected as a tooltip device, as shown in figure 6.3.
Figure 6.3. Messages on the status bar can be inspected by rolling the mouse over the icon, causing a tooltip to appear.

This mechanism is designed to be unobtrusive. The status bar occupies relatively little screen space, but it is apparent to the user when a new notification has arrived by the presence of an additional icon. For more urgent messages, we may wish for something more immediate. To this end, we will initially display only low-priority messages in the status bar; default and high-priority messages will first appear in a pop-up dialog, as illustrated in figure 6.4, before being dismissed.
Figure 6.4. Higher-priority messages are shown in a pop-up dialog, in which messages are listed in order of priority.
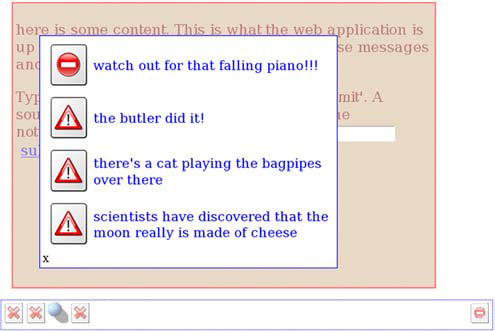
The dialog can be modal or nonmodal. In the case of modal dialogs, we use a semitransparent layer to block off the rest of the user interface until the user dismisses the dialog. When dismissed, the dialog is represented by an icon on the right side of the status bar. In the following two sections, we’ll look at implementations of these features.
6.4. Implementing a notification framework
We’ve defined two main parts to our user interface: the status bar and the pop-up dialog. Let’s have a look at implementing this functionality now. The full notification system is quite complicated, so we’ll break it down into stages. First, we’ll enhance our Message object so that it knows how to render a user interface for itself, both for when it is sitting in the status bar as an icon and when it is showing its full details, either in a tooltip or within the pop-up dialog. Let’s begin with the implementation of the status bar component.
6.4.1. Rendering status bar icons
The status bar needs to render itself on the screen and contain the icons representing active messages. We delegate rendering of the individual icons to the Message objects themselves. The Message will effectively implement a small-scale MVC pattern, with the rendering ability delivering a View, whose interactive features fulfill the role of Controller. Designing it this way could be problematic if we wished to add arbitrary alternative rendering mechanisms to our notifications framework. We don’t want to do that, however, because we want the notifications to be uniform across our application, for consistency’s sake. Listing 6.4 shows a rendering method for the Message object.
Listing 6.4. Message framework with user interface


We’ve introduced the top-level rendering code for our Message object, and the specific details for the representation used
in the status bar here. Let’s address the top-level code first. We provide a render() method ![]() , which takes a DOM element as an argument. This delegates to either a renderSmall()
, which takes a DOM element as an argument. This delegates to either a renderSmall() ![]() or renderFull()
or renderFull() ![]() method, based on the priority of the message. Messages being shown in the status bar are always low priority, and will be displayed as an icon that presents a tooltip on mouseover (see figures 6.2 and 6.3).
method, based on the priority of the message. Messages being shown in the status bar are always low priority, and will be displayed as an icon that presents a tooltip on mouseover (see figures 6.2 and 6.3).
renderSmall() renders the icon inside the DOM element and provides event handlers for displaying the pop-up tooltip.
Because this chapter is about adding professional polish to Ajax applications, the tooltip that we create for the icon has
been implemented in a complete fashion, with three event handlers. It will appear when the mouse rolls over the icon ![]() and disappear when the mouse moves off the icon
and disappear when the mouse moves off the icon ![]() . If the icon is clicked, however, the tooltip becomes “pinned”
. If the icon is clicked, however, the tooltip becomes “pinned” ![]() and will stay in place until either the icon is clicked again, the message expires, or another tooltip is selected (only
one tooltip will be visible at any given time).
and will stay in place until either the icon is clicked again, the message expires, or another tooltip is selected (only
one tooltip will be visible at any given time).
6.4.2. Rendering detailed notifications
Messages in the dialog are either default or high priority, and will display an icon and a message alongside (see figure 6.4). We also need this type of display for the status-bar icons’ tooltips. When the tooltip is invoked in showPopup(), it calls the renderFull() method to present the full details of the message. The same method is reused to render messages in the dialog. This reuse saves us from duplicating unnecessary code and also ensures a high degree of visual consistency in the user interface. The renderFull() method is presented in listing 6.5.
Listing 6.5. renderFull() method
msg.Message.prototype.renderFull=function(el){
  var inTable=(el.tagName=="TBODY");
  var topEl=null;
  this.row=document.createElement("tr");
  if (!inTable){
    topEl=document.createElement("table");
    var bod=document.createElement("tbody");
    topEl.appendChild(bod);
    bod.appendChild(this.row);
  }else{
    topEl=this.row;
  }

  var icoTd=document.createElement("td");
  icoTd.valign='center';
  this.row.appendChild(icoTd);
  var ico=document.createElement("img");
  ico.src=this.icon;
  icoTd.className="msg_large_icon";
  icoTd.appendChild(ico);
  var txtTd=document.createElement("td");
  txtTd.valign='top';
  txtTd.className="msg_text";
  this.row.appendChild(txtTd);
  txtTd.innerHTML=this.message;

  el.appendChild(topEl);
}
The renderFull() method generates a table row for the message. It checks the DOM element that it is being appended to, and it will append itself directly if it is a <tbody> tag or generate the necessary <table> and <tbody> tags if not. This allows multiple messages to be presented in the same table in the main dialog and the tooltip <div> tag to be correctly populated.
Note that the message text is attached to the user interface using innerHTML rather than the W3C DOM methods that we usually use. This allows notifications to use HTML markup to present themselves in a richer fashion than if we were simply generating a text node.
6.4.3. Putting the pieces together
Having provided mechanisms for iconized and full-size display of messages, we’ve provided a comprehensive render() method for individual messages. The dialog and status bar themselves are generated by a top-level render() method, as shown in listing 6.6.
Listing 6.6. msg.render() function
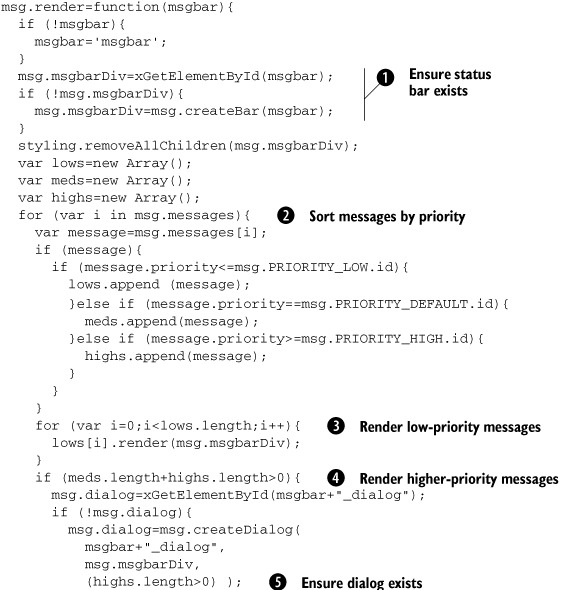
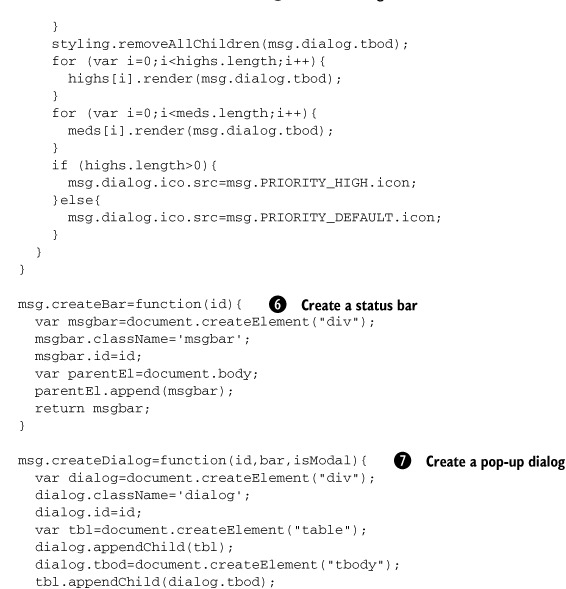
render() can be called more than once. It will check for the presence of the common UI components ![]() ,
, ![]() and create them if necessary, using the createDialog()
and create them if necessary, using the createDialog() ![]() and createBar()
and createBar() ![]() functions. These assemble the UI components using standard DOM manipulation methods and event handlers, such as those used
to show and hide the dialog.
functions. These assemble the UI components using standard DOM manipulation methods and event handlers, such as those used
to show and hide the dialog.
To render all notifications, the system first sorts them by priority into three temporary arrays ![]() . Low-priority messages are then rendered to the status bar
. Low-priority messages are then rendered to the status bar ![]() and other messages to the dialog, higher-priority messages first
and other messages to the dialog, higher-priority messages first ![]() .
.
To implement a modal dialog, we simply nest the visible dialog within another DIV element that occupies the entire screen,
blocking any mouse events from getting through to the main user interface ![]() . This modal DIV has a background pattern of alternating white and transparent pixels to gray out the interface, giving a
clear indication that the dialog is modal. We use this rather than CSS transparency settings because the latter will make
any nested elements, such as the dialog itself, transparent, too. This is implemented in the CSS file for our notification
framework, presented in listing 6.7.
. This modal DIV has a background pattern of alternating white and transparent pixels to gray out the interface, giving a
clear indication that the dialog is modal. We use this rather than CSS transparency settings because the latter will make
any nested elements, such as the dialog itself, transparent, too. This is implemented in the CSS file for our notification
framework, presented in listing 6.7.
Listing 6.7. msg.css
.msg_small_icon{
  height: 32px;
  width: 32px;
  position:relative;
  float:left;
}

.msg_dialog_icon{
  height: 32px;
  width: 32px;
  position:relative;
  float:right;
}

.msg_large_icon{
  height: 64px;
  width: 64px;
}

.msg_text{
  font-family: arial;
  font-weight: light;
  font-size: 14pt;
  color: blue;
}
.msgbar{
  position:relative;
  background-color: white;
  border: solid blue 1px;
  width: 100%;
  height: 38px;
  padding: 2px;
}

.dialog{
  position: absolute;
  background-color: white;
  border: solid blue 1px;
  width: 420px;
  top: 64px;
  left: 64px;
  padding: 4px;
}

.popup{
  position: absolute;
  background-color: white;
  border: solid blue 1px;
  padding: 4px;
}

.non-modal{
}

.modal{
  position: absolute;
  top: 0px;
  left: 0px;
  width: 100%;
  height: 100%;
  background-image:url(img/modal_overlay.gif);
}
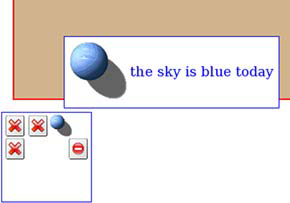
It’s worth noting the use of the CSS float attribute in the msg_small_icon and msg_dialog_icon classes, which are used to render the icons in the status bar. msg_small_icon, which renders the icons for low-priority messages that present the tooltips, uses a left float to align them to the left edge, and msg_dialog_icon uses a right float to align the icon that launches the dialog to the right edge. The framework allows the status bar to be rendered in any shape or size of DIV element. Floating elements will align themselves in a sensible fashion, wrapping into vertically aligned bars, if needed (figure 6.5).
Figure 6.5. Using CSS float attributes allows a list of icons to fit into a variety of shapes of container. Here we have changed the status bar to a square, and the cross and blue sphere icons on the left wrap themselves into the new area automatically, while the launcher for the dialog floats to the right.
Finally, we need to modify our Message object now that we have a user interface for it. As individual messages are created, they have the ability to add themselves to the user interface and will remove themselves when the message expires. Listing 6.8 presents the changes needed to implement this functionality.
Listing 6.8. Modified Message object
var msg=new Object();

msg.PRIORITY_LOW=    { id:1, lifetime:30, icon:"img/msg_lo.png" };
msg.PRIORITY_DEFAULT={ id:2, lifetime:60, icon:"img/msg_def.png" };
msg.PRIORITY_HIGH=   { id:3, lifetime:-1, icon:"img/msg_hi.png" };

msg.messages=new Array();
msg.dialog=null;
msg.msgBarDiv=null;
msg.suppressRender=false;
msg.Message=function(id,message,priority,lifetime,icon){
  this.id=id;
  msg.messages[id]=this;
  this.message=message;
  this.priority=(priority) ? priority : msg.PRIORITY_DEFAULT.id;
  this.lifetime=(lifetime) ? lifetime : this.defaultLifetime();
  this.icon=(icon) ? icon : this.defaultIcon();
  if (this.lifetime>0){
    this.fader=setTimeout(
      "msg.messages['"+this.id+"'].clear()",
      this.lifetime*1000
    );
  }
  if (!msg.suppressRender){   Extra arguments
    this.attachToBar();
  }
}

msg.Message.prototype.attachToBar=function(){   Extra arguments
  if (!msg.msgbarDiv){
    msg.render();

  }else if (this.priority==msg.PRIORITY_LOW.id){
    this.render(msg.msgbarDiv);
  }else{
    if (!msg.dialog){
      msg.dialog=msg.createDialog(
        msg.msgbarDiv.id+"_dialog",
        msg.msgbarDiv,
        (this.priority==msg.PRIORITY_HIGH.id)
      );
    }
    this.render(msg.dialog.tbod);
    msg.showDialog();
  }
}

msg.Message.prototype.clear=function(){
  msg.messages[this.id]=null;
  if (this.row){                      Extra arguments
    this.row.style.display='none';
    this.row.messageObj=null;
    this.row=null;
  }
  if (this.icoTd){
    this.icoTd.style.display='none';
    this.icoTd.messageObj=null;
    this.icoTd=null;
  }
}
We want the framework to be easy for developers to work with, so when a message is created, we automatically attach it to
the user interface ![]() . Simply invoking the constructor will cause the new message to render itself. Depending on the message priority, it will
attach itself to the status bar or dialog as appropriate
. Simply invoking the constructor will cause the new message to render itself. Depending on the message priority, it will
attach itself to the status bar or dialog as appropriate ![]() . For cases where we don’t want the overhead of rendering for each message—such as when adding several messages at once—we
provide a flag to suppress automatic rendering. In such cases, we can manually call msg.render() after creating a large number of messages.
. For cases where we don’t want the overhead of rendering for each message—such as when adding several messages at once—we
provide a flag to suppress automatic rendering. In such cases, we can manually call msg.render() after creating a large number of messages.
Likewise, when removing a message in the clear() function, we automatically remove any user interface elements, so that the message goes away ![]() .
.
We now have a useful framework for presenting notifications to the user. We can trigger it manually but also make use of it in our other reusable code components. In the following section, we demonstrate how to hook it up to our ContentLoader object to report on the progress of network downloads.
6.5. Using the framework with network requests
In chapter 5 we introduced the ContentLoader object as a common encapsulation for network traffic. We can make use of our notification framework to provide status reports on any data request that we make automatically. Let’s scope out the requirements first.
When a request is made to the server, we would like to indicate that it is in progress, with a low-priority notification. To differentiate network requests from other low-level notifications, we would like to use a different icon. We have the image of the earth from our planetary viewer example in chapters 4 and 5, so let’s use that.
When the network request completes, we would like the notification to be cleared and replaced by a low-level notification if everything went okay or by a medium-level notification if there was an error.
To implement this, we simply need to create Message objects at appropriate points in the lifecycle of the request, such as when the request is fired, when it completes or errors, and so on. The modified code for our ContentLoader object is given in listing 6.9.
Listing 6.9. ContentLoader with notifications
net.ContentLoader=function( ... ){ ... };
net.ContentLoader.msgId=1;
net.ContentLoader.prototype={
 loadXMLDoc:function(url,method,params,contentType){
  if (!method){
    method="GET";
  }
  if (!contentType && method=="POST"){
    contentType='application/x-www-form-urlencoded';
  }
  if (window.XMLHttpRequest){
    this.req=new XMLHttpRequest();
  } else if (window.ActiveXObject){
    this.req=new ActiveXObject("Microsoft.XMLHTTP");
  }
  if (this.req){
    try{
      var loader=this;
      this.req.onreadystatechange=function(){
        loader.onReadyState.call(loader);
      }
      this.req.open(method,url,true);
      if (contentType){
        this.req.setRequestHeader('Content-Type', contentType);
      }
      this.notification=new msg.Message(   Notify request has started
        "net00"+net.ContentLoader.msgId,
        "loading "+url,
        msg.PRIORITY_LOW.id,
        -1,
        "img/ball-earth.gif"
      );
      net.ContentLoader.msgId++;
      this.req.send(params);
    }catch (err){
      this.onerror.call(this);
    }
  }
 },

 onReadyState:function(){
  var req=this.req;
  var ready=req.readyState;
  if (ready==net.READY_STATE_COMPLETE){
    var httpStatus=req.status;
    if (httpStatus==200 || httpStatus==0){
      this.onload.call(this);
      this.notification.clear();   Clear initial notification
    }else{
      this.onerror.call(this);
    }
  }
 },

 defaultError:function(){              Notify on error
   var msgTxt="error fetching data!"
     +"<ul><li>readyState:"+this.req.readyState
     +"<li>status: "+this.req.status
     +"<li>headers: "+this.req.getAllResponseHeaders()
     +"</ul>";
   if (this.notification){
     this.notification.clear();
   }
   this.notification=new msg.Message(
     "net_err00"+net.ContentLoader.msgId,
     msgTxt,msg.PRIORITY_DEFAULT.id
   );
   net.ContentLoader.msgId++;
  }
};
When we make a network request using loadXMLDoc(), we create a low-level notification ![]() and attach a reference to it to the ContentLoader object. Note that we set the lifetime to -1, so that the notification won’t expire by itself.
and attach a reference to it to the ContentLoader object. Note that we set the lifetime to -1, so that the notification won’t expire by itself.
In the onReadyState() method, we clear the notification if everything has gone well ![]() . In the case of an error, we call the defaultError() method, which now generates a notification of its own
. In the case of an error, we call the defaultError() method, which now generates a notification of its own ![]() . The message for this notification uses HTML markup to create a richer report than plain text could.
. The message for this notification uses HTML markup to create a richer report than plain text could.
Listing 6.10 demonstrates an example page using this modified ContentLoader.
Listing 6.10. Notifications sample page
<!DOCTYPE html PUBLIC "-//W3C//DTD XHTML 1.0 Strict//EN"
"http://www.w3.org/TR/xhtml1/DTD/xhtml1-strict.dtd">
<html>
<head>
<title>Notifications test</title>
<link rel=stylesheet type="text/css" href="msg.css"/>
<script type="text/javascript" src="x/x_core.js"></script>
<script type="text/javascript" src="extras-array.js"></script>
<script type="text/javascript" src="styling.js"></script>
<script type="text/javascript" src="msg.js"></script>
<script type="text/javascript" src="net_notify.js"></script>
<script type="text/javascript">
window.onload=function(){
msg.render('msgbar'),
}
var msgId=1;
function submitUrl(){
var url=document.getElementById('urlbar').value;
var loader=new net.ContentLoader(url,notifyLoaded);  Make request
} to server
function notifyLoaded(){
var doneMsg=new msg.Message(
  Notify that resource is loaded
"done00"+msgId,
"loaded that resource you asked for: "+this.url,
msg.PRIORITY_LOW.id
);
msgId++;
msg.render('msgbar'),
}
</script>
</head>
<body>
<div class='content'>
<p>here is some content. This is what the web
application is up to when not being bugged silly
by all these messages and notifications and stuff.
<p>Type in a URL in the box below (from the
same domain, see Chapter 7), and hit 'submit'.
A souped-up contentloader that understands the
notification system will be invoked.
<input id='urlbar' type='text'/>
<a href='javascript:submitUrl()'>submit</a>
</div>
<div id='msgbar' class='msgbar'></div>
</body>
</html>
The page (as seen in figures 6.6 and 6.7) renders a simple HTML form into which the user can type URLs. Clicking the submit link will attempt to load that URL ![]() and fire the notifyLoaded() callback function if successful. notifyLoaded() doesn’t actually do anything with the resource, other than report that it has fetched it by creating another Message object
and fire the notifyLoaded() callback function if successful. notifyLoaded() doesn’t actually do anything with the resource, other than report that it has fetched it by creating another Message object
![]() .
.
Figure 6.6. A successfully loaded resource will be displayed as a tooltip on the status bar.
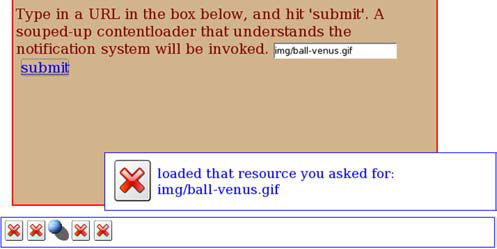
Figure 6.7. An unsuccessful network request will result in the notification dialog being shown. (There are two messages shown here, the second of which is a network error notification.)
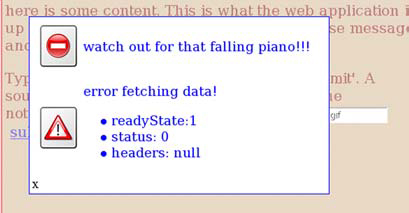
Note that the behavior on a successful request is not written into the framework but provided by a custom onload handler function. This allows the framework to be adapted to differing requirements. In the example in listing 6.9, we have hard-coded the default behavior in case of error. In a real application, every network failure may not be sufficiently important to warrant a big in-your-face dialog. We leave it as an exercise for the reader to add a parameter to the ContentLoader to denote the urgency of the notification required on failure (or else provide an overridden onError handler with a gentler notification policy).
We’ve taken this framework as far as we need to for now and demonstrated how it can play nicely with our existing code. In the following section, we’ll look at an alternative graphical convention for notifications that can also serve us well.
6.6. Indicating freshness of data
The notifications framework that we developed in the previous section provides a series of new top-level components that display information about system activity. In some circumstances, we may want to display a more contextual form of notification, indicating a change to a piece of data in situ. In this section, we augment our ObjectViewer developed through chapters 4 and 5 to provide extra visual cues on recently changed data.
6.6.1. Defining a simple highlighting style
Let’s start off with a simple way of highlighting the data by using a reverse video effect. The Object Viewer user interface is mostly quite pale, and uses blue/gray tones, so a deep red color will stand out nicely. The first thing that we need to do is to define an additional CSS class to represent newly changed data:
.new{
  background-color: #f0e0d0;
}
We have chosen a very simple styling here. In a more polished application, you may want to be a little more adventurous. Listing 6.11 shows the changes to the ObjectViewer code required to style recently edited properties as new and to remove the styling automatically after a given length of time.
Listing 6.11. ObjectViewer with styling of recent edits
objviewer.PropertyViewer.prototype.commitEdit=function(value){
  if (this.type=objviewer.TYPE_SIMPLE){
    this.value=value;
    var valDiv=this.renderSimple();
    var td=this.valTd;
    td.replaceChild(valDiv,td.firstChild);

    this.viewer.notifyChange(this);
    this.setStatus(objviewer.STATUS_NEW);   Set status as new
  }
}

objviewer.STATUS_NORMAL=1;
objviewer.STATUS_NEW=2;

objviewer.PropertyViewer.prototype.setStatus=function(status){
  this.status=status;
  if (this.fader){
    clearTimeout(this.fader);
  }
  if (status==objviewer.STATUS_NORMAL){
    this.valTd.className='objViewValue';
  }else if (status==objviewer.STATUS_NEW){
    this.valTd.className='objViewValue new';
    var rnd="fade_"+new Date().getTime();
    this.valTd.id=rnd;
    this.valTd.fadee=this;
    this.fader=setTimeout("objviewer.age('"+rnd+"')",5000);   Set timeout
  }
}

objviewer.age=function(id){
  var el=document.getElementById(id);
  var viewer=el.fadee;
  viewer.setStatus(objviewer.STATUS_NORMAL);   Reset status when
  el.id="";                                        timer expires
  el.fadee=null;
}
We define two statuses, normal and new. We could have set a boolean term isNew instead, but we chose this approach to allow for future expansion, say to style items whose updates are being submitted to
the server. We call the setStatus() method when committing an edited value ![]() . This sets the CSS class appropriately, and, in the case of the “new” status, it also sets up a timer that will reset the
status to normal after five seconds
. This sets the CSS class appropriately, and, in the case of the “new” status, it also sets up a timer that will reset the
status to normal after five seconds ![]() . (In real life, we’d probably want it to last longer, but five seconds is good for testing and demonstration purposes.) The
object retains a reference to the timer, which it can cancel if another change of status takes place before it has expired.
. (In real life, we’d probably want it to last longer, but five seconds is good for testing and demonstration purposes.) The
object retains a reference to the timer, which it can cancel if another change of status takes place before it has expired.
Because of the limitations of the JavaScript setTimeout() method, we assign a unique ID to the DOM node being styled, to allow us to find it again when the timer calls the age() function ![]() . age() also tidies up the ID and other temporary references. Figure 6.8 shows the ObjectViewer with a recently edited value.
. age() also tidies up the ID and other temporary references. Figure 6.8 shows the ObjectViewer with a recently edited value.
Figure 6.8. The modified ObjectViewer displaying a recently edited value for the diameter property, which is styled to have a colored background. The styling will disappear after a short period of time, when the edit is no longer new and noteworthy.
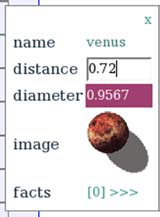
The user’s eye will be drawn toward the recently edited value because of the change in color. Another way of drawing the user’s attention is to use animation, and we’ll see how simple that can be in the next section.
6.6.2. Highlighting with the Scriptaculous Effects library
We’ve created a simple styling effect by hand here, in part because it’s easy to display in the static medium of a printed book with screen shots. For production, we recommend the Scriptaculous library’s Effect objects as a simple way of adding sparkle to your inline notifications. We briefly introduced this library in section 3.5.2, where we noted that it provides one-line calls for styling DOM elements with a variety of animated effects and transitions.
We can easily rewrite our setStatus() method from listing 6.11 to make use of Scriptaculous Effects. Let’s say that we want to make recently edited entries pulsate using the Effects.Pulsate object. This will make them fade in and out repeatedly, in a way that certainly catches the eye, but unfortunately can’t be captured in a screen shot. Listing 6.12 shows the changes necessary to make this work.
Listing 6.12. Styling recent edits with Scriptaculous
objviewer.PropertyViewer.prototype.setStatus=function(status){
  this.status=status;
  if (this.effect){
    this.effect.cancel();
    this.effect=null;
  }
  if (status==objviewer.STATUS_NEW){
    this.effect=new Effect.Pulsate(
      this.valTd,
      {duration: 5.0}
    );
  }
}
The Effect object takes care of some of the plumbing work for us, and we no longer need to manage our own timeouts. The age() function can be removed altogether. We simply invoke the constructor of the Pulsate effect, passing in a reference to the DOM element to operate on, and an associative array of any options whose defaults we wish to override. By default, the Pulsate effect runs for 3 seconds. We have modified it here to 5 seconds, in keeping with our previous example, by passing a duration parameter into the options array.
The same styling techniques could be applied to other events affecting the data, such as updates originating from the server. To prevent any clashes between effects, we check first for any effect that is already in progress, and cancel it. (As of version 1.1, all Scriptaculous effects respect a standard cancel() function.)
This kind of styling provides instant feedback to the user at the point at which his attention is already focused, unlike the status bar and dialog notifications, which are better suited to more general information. Taken together, these visual feedbacks can do a lot to improve the user experience.
6.7. Summary
In this chapter, we’ve looked at a number of topics that add a professional feel to an Ajax application. At the outset, we defined responsiveness, robustness, consistency, and simplicity as key factors in providing that sense of quality.
The majority of the chapter has been dedicated to looking at ways of providing the user with feedback while she works. Along the way, we developed several implementations of visual feedback mechanisms, including a status bar, a pop-up dialog, and inline highlighting of data. Going the extra distance to add these features can enrich the user experience considerably, and wrapping the functionality up as a reusable framework as we have done here removes a lot of burden from the developer. Having developed the frameworks, we showed how to easily integrate them with some of our previous code examples. We added status bar notifications to provide feedback on the progress of our server requests and inline highlighting of recently updated data in the ObjectBrowser that we use to view data about planets in the solar system.
That’s enough glamour for now, though. The next two chapters look at topics that help the usability of an application from behind the scenes, namely security and performance.
6.8. Resources
The Scriptaculous Effects library can be found at http://wiki.script.aculo.us/scriptaculous/list?category=Effects.
Additional icons for the notifications examples were taken from the Nuvola icon set developed by David Vignoni (www.icon-king.com/).
