
Chapter 18
It’s a Wireless Life
IN THIS CHAPTER
![]() Using the mobile-data network
Using the mobile-data network
![]() Enabling Wi-Fi
Enabling Wi-Fi
![]() Accessing a Wi-Fi network
Accessing a Wi-Fi network
![]() Connecting to a WPS router
Connecting to a WPS router
![]() Sharing the mobile-data network
Sharing the mobile-data network
![]() Pairing with a Bluetooth peripheral
Pairing with a Bluetooth peripheral
![]() Transferring information with Android Beam
Transferring information with Android Beam
Portable implies that something can be moved, but not how far or how easily. My first TV was a “portable” because it had a handle — never mind that it weighed about 25 pounds. Cordless implies a degree of freedom beyond portable, but still with limitations. Wireless is at the top of the mobility heap. It implies freedom from wires but is also lightweight and tiny.
Your phone or tablet is truly wireless, especially if it doesn’t require a wire for charging. Even when you need that wire to charge the battery, after the process is complete, you can tote your Android anywhere and use it wire-free. You can access the mobile network, a Wi-Fi network, and wireless peripherals. Truly, it’s a wireless life.
Android Wireless Networking
Your phone or tablet demands an Internet connection. To sate that desire, the device communicates with the information superhighway in a wireless way. Given how wireless networking has proliferated around the globe, finding an available connection is no longer a big deal. No, the issue is how to coax the Android into making this connection happen.
Using the mobile-data network
All Android phones and LTE tablets use the mobile-data network to connect to the Internet. For this service, you pay a handsome fee every month. (Phone users pay a second fee for the telephone service.) The fee grants your Android wireless Internet access anywhere the signal is available.
Several types of mobile-data network service are available:
- 4G LTE: The fourth generation of wide-area data networks is the fastest and most popular network. Some providers may refer to this type of network as HSPA.
- 3G: The third-generation mobile-data network is available in locations that don’t offer 4G LTE service or where the signal is unavailable.
- 1X: The original mobile-data network had no name, but is now called 1X. This service might be available when the two faster services have been obliterated by some moron with a backhoe.
Your phone or LTE tablet always uses the best network available. So, when the 4G LTE network is within reach, it’s used for Internet communications. Otherwise, the 3G network is chosen, and then 1X networking in an act of last-ditch desperation.
- Your phone or LTE tablet shows a special icon that indicates the currently connected mobile-data network type.
- The H+ status icon represents the HSPA mobile-data network, which is equivalent to 4G LTE.
- The Signal Strength icon represents the mobile-data network connection, though on some phones it refers only to the telephone service.
- You can still place calls on an Android phone when the mobile-data network is unavailable.
-
 When both a mobile-data network and Wi-Fi are available, your Android uses Wi-Fi for all Internet access. To avoid data surcharges, I recommend connecting to and using a Wi-Fi network wherever possible.
 - Non-LTE Android tablets use only the Wi-Fi connection for Internet access.
-
 Your mobile-data network subscription has its limits — usually, a certain quantity of data you can use monthly for a flat fee. When you exceed that quantity, the costs can become prohibitive.
 - See Chapter 23 for information on how to avoid cellular data surcharges.
Understanding Wi-Fi
The mobile-data connection is nice, and it's available pretty much all over, but it costs you money every month. A better option for an Internet connection is Wi-Fi, the same wireless networking standard that computers use.
To make the Wi-Fi connection work requires two steps. First, you must activate the device’s Wi-Fi radio. Second, connect to a specific wireless network. The next two sections cover these steps in detail.
 Wi-Fi stands for wireless fidelity. It’s brought to you by the numbers 802.11 and various letter suffixes too many to mention.
Activating Wi-Fi
Follow these steps to activate your Android’s Wi-Fi radio under stock Android version 8.0, or Oreo:
- Open the Settings app.
- Choose Network & Internet.
-
Ensure that the Wi-Fi master control is set to the On position.
To further access Wi-Fi settings, tap the Wi-Fi item.
On earlier versions of Android, choose Wi-Fi in Step 2.
For current Samsung devices, follow these steps:
- Open the Settings app.
- Choose Connections.
-
Choose Wi-Fi.
The Wi-Fi master control is on the Wi-Fi screen.
To deactivate the Wi-Fi radio, which also disconnects the device from the Wi-Fi network, set the master control to the Off position.
-
Use the Wi-Fi quick setting to instantly activate or deactivate the Wi-Fi connection. See Chapter 3 for information on accessing the quick settings.
- Once the Wi-Fi is activated, the phone or tablet automatically connects to any memorized Wi-Fi networks. See the later section “Managing connections.”
- It’s okay to keep the Wi-Fi radio on all the time. It is not a major drain on the battery.
-
 Using Wi-Fi to connect to the Internet doesn’t incur data usage charges — unless you’re accessing a metered network. See the later section “Configuring a metered Wi-Fi connection.”
Connecting to a Wi-Fi network
After you’ve activated the Wi-Fi radio, your phone or tablet automatically connects to any known Wi-Fi network, one that you’ve accessed before where the password is still valid. If not, you can hunt down an available network. Follow these steps:
-
Visit the Wi-Fi screen in the Settings app.
Refer to the preceding section for details.
-
Select a wireless network from the list.
Available Wi-Fi networks appear on the screen, similar to what’s shown in Figure 18-1. When no wireless networks are listed, you're out of luck regarding wireless access from your current location.
-
If prompted, type the network password.
Tap the Show Password check box so that you can see what you’re typing; some of those network passwords can be long. -
Tap the CONNECT button.
The network is connected immediately. If not, try the password again.
-
If prompted to remember the network, do so.
Some Androids may ask whether you want to automatically reconnect to the same Wi-Fi network in the future. I recommend choosing that option.
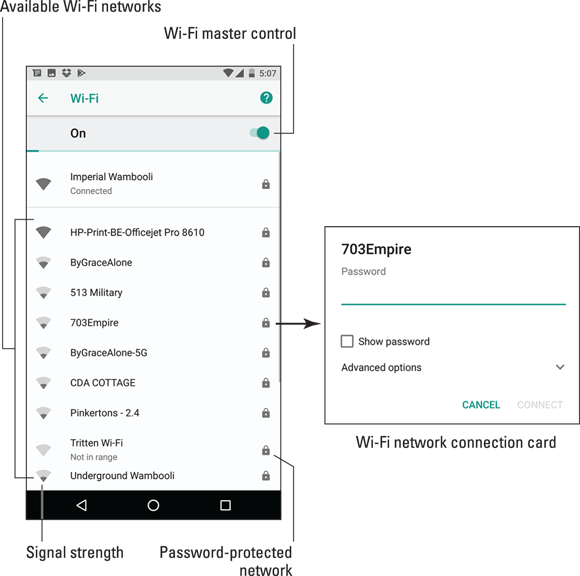
FIGURE 18-1: Hunting down a wireless network.
![]() While your Android is connected to a wireless network, the Wi-Fi Connected status icon appears atop the touchscreen, looking like the one shown in the margin. This icon indicates that the Wi-Fi radio is on and the device is connected and communicating with a Wi-Fi network.
While your Android is connected to a wireless network, the Wi-Fi Connected status icon appears atop the touchscreen, looking like the one shown in the margin. This icon indicates that the Wi-Fi radio is on and the device is connected and communicating with a Wi-Fi network.
- Some public networks require that you sign in to their web pages after connecting. The sign-in page may appear automatically. If not, open the web browser app and visit any page to be redirected to the sign-in page. Heed the directions there to gain network access.
- See the later section “Managing connections” for more information on dealing with an automatic connection where the password has changed.
-
A wireless network without a password is considered unsecure. The absence of security makes it easier for the Bad Guys to do bad-guy things on the network. My advice is to use the connection but avoid sending sensitive information over a nonsecured public network.
- The Wi-Fi connection works best when you plan on being in a specific location for an extended time. That’s because the Wi-Fi signal goes only so far. If you wander too far away, the signal — and your connection — are lost.
- The Wi-Fi connection stays active until you wander out of range. To deliberately disconnect from a Wi-Fi network, turn off the device’s Wi-Fi radio, as covered in the preceding section.
Connecting to a hidden Wi-Fi network
Some wireless networks don't broadcast their names, which adds security but also makes it more difficult to connect. In these cases, follow these steps to make the Wi-Fi network connection:
-
Visit the Wi-Fi screen.
Refer to the earlier section “Activating Wi-Fi.”
-
 Tap the ADD NETWORK button.
The button is found at the bottom of the list of available networks.
-
Type the network name.
The Network Name text box might be labeled SSID.
-
Choose the security setting.
How do you know which item to choose? Ask the person who gave you the network name. Otherwise, WPA/WPA2 PSK is the most common option.
If an option is available to reconnect automatically (Auto Reconnect), choose that setting.
- Tap the SAVE button or CONNECT button.
- If prompted, type the network password.
As with other Wi-Fi networks, after the connection is made, your Android memorizes the connection. You must toil through these steps only once.
SSID stands for Service Set Identifier. Any further information on this acronym would needlessly lower your blood pressure, so I’ll leave it at that.
Connecting to a WPS router
Many Wi-Fi routers feature WPS, which stands for Wi-Fi Protected Setup. It’s a network authorization system that’s simple and secure. If the wireless router features WPS, follow these steps to quickly connect your phone or tablet to the network:
-
Visit the Wi-Fi screen in the Settings app.
Directions are found in the earlier section “Activating Wi-Fi.”
-
 Tap the WPS connection button on the router.
The button either is labeled WPS or uses the WPS icon, shown in the margin.
-
On your Android, choose Wi-Fi Preferences.
This item is found at the bottom of the list of available networks on the Wi-Fi screen. If not, tap Action Overflow and choose Advanced.
-
Choose WPS Push Button or WPS Pin Entry, depending on how the router does its WPS thing.
If you don’t see these items, expand the Advanced category.
For a WPS push-button router, push the WPS button on the router.
For a WPS PIN router, look on the device’s touchscreen for a PIN. Type that number on the Wi-Fi router.
Connection with the router may take a few moments, so be patient. The good news is that, as on all Wi-Fi networks, once the initial connection is established, the connection is made again automatically in the future.
Configuring a metered Wi-Fi connection
Not every Wi-Fi network provides free, unlimited access. For example, a metered connection implies that the provider charges you per minute or per megabyte for Internet access. To help avoid surcharges, you can configure the connection as metered. Follow these steps:
-
Connect to the network as you normally would.
Directions are found earlier in this chapter.
-
Visit the Wi-Fi screen in the Settings app.
Refer to the earlier section “Activating Wi-Fi” for directions.
- Choose Data Usage.
-
Choose Network Restrictions.
This action might be titled Restrict Networks.
- Locate the current connection in the list and set its master control to the On position.
When a Wi-Fi connection is set as metered, your phone or tablet monitors and restricts data access. You are warned when a large download or upload is attempted.
Managing connections
It’s not necessary to review the list of memorized Wi-Fi networks — unless you need to change a network’s password. In that case, you must direct the phone or tablet to forget the network so that you can reestablish the connection and set the new password.
To review the list of memorized networks, visit the Wi-Fi screen in the Settings app and choose Saved Networks. On Samsung devices, follow these steps:
- Open the Settings app.
- Choose Connections.
- Choose Wi-Fi.
- Tap Action Overflow and choose Advanced.
-
Choose Manage Networks.
You see the list of saved Wi-Fi networks.
To forget a network, tap its entry. On the network’s card, tap the FORGET button. The network is removed from the list. To input the new password, access the network again, as described earlier in this chapter. Set the new password, and you’re good.
Forgetting a network doesn’t prevent you from connecting to that same network again. It means only that the connection isn’t established automatically.
Share the Connection
Your Android phone or LTE tablet need not jealously guard its mobile-data connection. It’s possible to share that Internet access in one of two ways. The first is to create a mobile hotspot, which allows any Wi-Fi–enabled gizmo to access the Internet via your device. The second is a direct connection between your Android and another device, which is a process called tethering.
Creating a mobile hotspot
To share your gizmo’s mobile data connection with other Wi-Fi devices in the vicinity, heed these steps:
- Open the Settings app.
-
Choose Network & Internet.
If this category isn’t available, skip to Step 3.
-
Turn off the Wi-Fi radio.
Why create a Wi-Fi hotspot when one is already available?
-
Connect your Android to a power source.
The mobile hotspot feature draws a lot of power.
-
Choose Hotspot & Tethering.
This item might be located by tapping the More category in the Wireless & Networks section of the Settings app.
- Choose Set Up Wi-Fi Hotspot.
-
Fill in the card with the network and password, and then tap the SAVE button.
You can keep the default settings, which are unique to your phone or LTE tablet. Tap the Show Password box to view the preset password, or replace it with something less onerous to type.
-
Set the Portable Wi-Fi Hotspot master control to the On position.
Your device may check with the cellular provider’s mothership to affirm that your mobile-data subscription plan features the mobile hotspot feature. If so, the Wi-Fi net is up and running right away.
On a Samsung phone or tablet, follow these steps:
- Open the Settings app.
- Choose Mobile Hotspot and Tethering.
-
Set the master control by Mobile Hotspot to the On position.
Your cellular subscription is checked. If you have access to this feature, Wi-Fi is automatically disabled.
- Once it’s active, tap the Mobile Hotspot item again to set the password and other options.
Once it’s active, the Wi-Fi hotspot is accessed like any other network and by any device with a Wi-Fi radio.
To disable the mobile hotspot, repeat Steps 1 through 5, and then set the master control by Portable Wi-Fi Hotspot to the Off position.
-
Some devices feature a Mobile Hotspot app. If so, use it instead of following the steps in this section.
- If your phone or LTE tablet is unable to create a mobile hotspot, check with your cellular provider about upgrading your plan to offer that feature. Or, instead, use the tethering feature covered in the next section.
 While the mobile hotspot is active, a Hotspot Active status icon appears, similar to the one shown in the margin.
- The range for the mobile hotspot is about 30 feet. Items such as walls and cement trucks can interfere with the signal, rendering it much shorter.
- When you use the mobile hotspot, data usage fees apply. When a crowd of people are using the hotspot, a lot of data is consumed rather quickly.
-
Don’t forget to turn off the mobile hotspot when you’re done using it.
Tethering the Internet connection
A more intimate way to share an Android’s mobile data connection is to connect the device directly to a computer and activate the tethering feature. Follow these steps:
-
Use the USB cable to connect the phone or LTE tablet to a computer or laptop.
I’ve had the best success with this operation when the computer is a PC running Windows.
- Open the Settings app.
- Choose Network & Internet.
- Choose Hotspot & Tethering.
- Set the master control by the USB Tethering option to the On position.
On a Samsung galactic gizmo, obey these steps to tether the cellular connection:
- Open the Settings app.
- Choose Mobile Hotspot and Tethering.
- Slide the master control by the USB Tethering option to the On position.
The computer or laptop should instantly recognize the Android as a “modem” with Internet access. Further configuration may be required, which depends on the computer using the tethered connection. For example, you may have to accept the installation of new software in Windows.
To end the connection, repeat Steps 2 and 3 in this section, but disable tethering in Step 3. Then you can disconnect the USB cable.
 While tethering is active, a Tethering status icon may appear, similar to what’s shown in the margin.
-
Sharing the mobile data connection incurs data usage charges against your cellular data plan. Mind your data usage when you’re sharing a connection.
-
It’s possible to use tethering on a Mac, but the driver required to recognize the Android as a modem is missing in OS X. You can obtain a free driver from the following site:
joshuawise.com/horndis
The Bluetooth Connection
Bluetooth has nothing to do with the color blue or dental hygiene. No, it’s a protocol for wirelessly connecting peripherals. Your Android happens to have a Bluetooth wireless radio in its belly, so it can pal around with Bluetooth devices, such as keyboards, headphones, and even your car.
Understanding Bluetooth
To make Bluetooth work, you need a Bluetooth peripheral, such as a wireless earpiece or keyboard. The goal is to pair that peripheral with your phone or tablet. The operation works like this:
-
Turn on the Android’s Bluetooth wireless radio.
The radio must be on for both your Android and the Bluetooth gizmo.
-
Make the peripheral discoverable.
The peripheral must announce that it’s available and willing to date other electronics in the vicinity.
- On your phone or tablet, choose the peripheral from the list of Bluetooth devices.
-
If required, confirm the connection.
For example, you may be asked to input or confirm a code. You might need to press a button on peripherals that have buttons.
- Use the Bluetooth peripheral.
You can use the Bluetooth peripheral as much as you like. Turn off the Android. Turn off the peripheral. When you turn both on again, they’re automatically reconnected.
![]() Bluetooth devices are branded with the Bluetooth logo, shown in the margin. It's your assurance that the gizmo works with other Bluetooth devices.
Bluetooth devices are branded with the Bluetooth logo, shown in the margin. It's your assurance that the gizmo works with other Bluetooth devices.
Activating Bluetooth
You must turn on the Android’s Bluetooth radio before you can enjoy using any Bluetoothy peripherals. Heed these steps:
- Open the Settings app.
-
Choose Connected Devices.
On a Samsung device, this category is titled Connections. If you see neither the Connected Devices nor Connections categories, skip to Step 3.
- Choose Bluetooth.
- Ensure that the Bluetooth master control is set to the On position.
![]() When Bluetooth is on, the Bluetooth status icon appears. It uses the Bluetooth logo, shown in the margin.
When Bluetooth is on, the Bluetooth status icon appears. It uses the Bluetooth logo, shown in the margin.
To turn off Bluetooth, repeat the steps in this section but slide the master control to the Off position in Step 4.
You’ll also find a Bluetooth activation button in the quick settings, as foretold in Chapter 3.
Pairing with a Bluetooth peripheral
To make the Bluetooth connection between your Android and another gizmo, such as a Bluetooth keyboard, follow these steps:
-
Ensure that the Bluetooth radio is on.
Refer to the preceding section.
-
Make the Bluetooth peripheral discoverable.
Turn on the gizmo and ensure that its Bluetooth radio is on. Keep in mind that some Bluetooth peripherals have separate power and Bluetooth switches. If so, press the Bluetooth button or take whatever action is necessary to make the peripheral discoverable.
-
On the Android, open the Settings app to access the Bluetooth screen.
Refer to Steps 1 through 3 in the preceding section.
 The Bluetooth screen shows already paired and available peripherals, similar to what’s shown in Figure 18-2. If not, tap the SCAN button or tap Action Overflow and choose Refresh. If the Refresh icon is available, shown in the margin, tap it.
 - Choose the Bluetooth peripheral from the list.
-
If necessary, type the device’s passcode or otherwise acknowledge the connection.
For example, with a Bluetooth keyboard, you may see on the touchscreen a prompt showing a series of numbers. Type those numbers on the keyboard, and then press the Enter or Return key. That action completes the pairing.
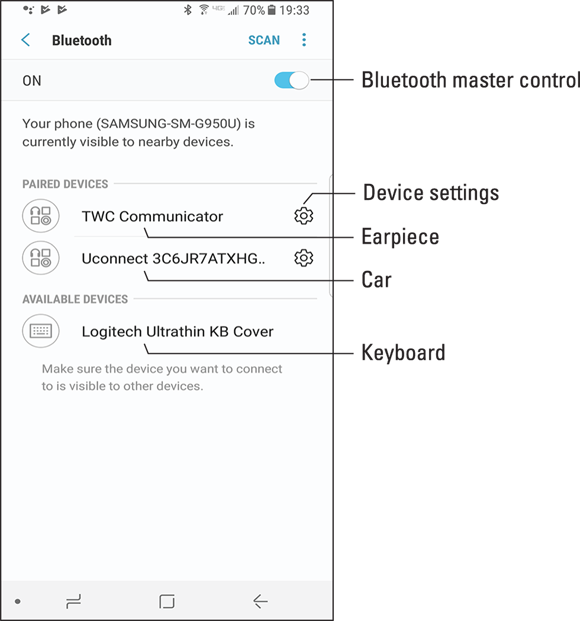
FIGURE 18-2: Finding Bluetooth gizmos.
After the device is paired, you can begin using it.
Connected devices appear in the Bluetooth Settings window, under the heading Paired Devices, as shown in Figure 18-2.
- Bluetooth peripherals stay paired whether you turn off the Android, turn off the device, or disable the Bluetooth radio. The connection is reestablished automatically when you turn things on again.
- Yes, your car can be a Bluetooth peripheral, if it has a Bluetooth radio installed. That way, you can use an Android phone hands-free while driving. Pairing the phone with your car works differently for each vehicle, though the general steps proceed as outlined in this chapter. Do be aware that the car will not pair while it is in gear; stop the car to being the pairing process.
 To stop using a device long-term, you unpair it. To do so, visit the Bluetooth screen (refer to Figure 18-2) and tap the Settings icon by the peripheral’s entry. Tap the FORGET button or the Unpair action. The device is unpaired.
- Unpair only the devices that you plan never to use again. Otherwise, turn off the Bluetooth device when you’re done using it.
-
The Bluetooth radio consumes a modicum of power. It’s not a lot of juice for the Android, but could be for the peripheral. If you don’t plan to use the peripheral for a while, turn it off.
Android, Beam It to Me
A handful of Android devices feature an NFC radio, where NFC stands for Near Field Communications and radio is a type of vegetable. NFC allows your Android to communicate wirelessly with other NFC devices. That connection is used for the quick transfer of information. The technology is called Android Beam.
To play with the Android Beam feature, ensure that the NFC radio has been activated. Follow these steps:
- Open the Settings app.
-
Choose Connected Devices.
On Samsung devices, choose Connections.
-
Ensure that the NFC item is activated; set its master control to On.
This item might be titled NFC and Payment.
To make the Android Beam feature work, touch your Android to another NFC device, usually back-to-back. As long as both devices have an NFC radio and the Android Beam feature is active, they can share information.
On the sending device, tap the text Tap to Beam.
On the receiving device, choose the option to accept the item.
You can beam items such as a contact, map location, web page, YouTube video, or just about anything else you’re viewing on the touchscreen.
 Generally speaking, if an app features the Share icon, you can use Android Beam to share an item between two NFC gizmos.
-
NFC is not the same as the Nearby Devices feature found on some Samsung galactic gizmos. The Nearby Devices feature is used for sharing media over a network.