
Chapter 3
Android Tour
IN THIS CHAPTER
![]() Using the touchscreen
Using the touchscreen
![]() Changing the volume
Changing the volume
![]() Working on the Home screen
Working on the Home screen
![]() Checking notifications
Checking notifications
![]() Getting at quick settings
Getting at quick settings
![]() Running apps
Running apps
![]() Accessing recently used apps
Accessing recently used apps
![]() Exploring common icons
Exploring common icons
It used to be that you could judge how advanced something was by how many buttons it had. Starting with the dress shirt and progressing to the first computer, more buttons imply sophistication. Your Android phone or tablet tosses that rule right out the window. Beyond the Power/Lock key and the volume key, the device is shamefully low on buttons.
As an alternative to the button-festooned modern marvel, your phone or tablet features a touchscreen as its main input device. A touchscreen can do all sorts of wondrous and useful things. Knowing how to use it is important.
Basic Operations
Your Android’s capability to frustrate you is only as powerful as your fear of the touchscreen and how it works. After you clear that hurdle, as well as understand some other basic operations, you’ll be on your way toward mobile device contentment.
Manipulating the touchscreen
The touchscreen works in combination with one or two of your fingers. You can choose which fingers to use, or whether to be adventurous and try using the tip of your nose, but touch the screen you must. Here are some of the many ways you manipulate your Android’s touchscreen:
- Tap: The basic touchscreen technique is to touch it. You tap an object, an icon, a control, a menu item, a doodad, and so on. The tap operation is similar to a mouse click on a computer. It may also be referred to as a touch or a press.
- Double-tap: Tap the screen twice in the same location. A double-tap can be used to zoom in on an image or a map, but it can also zoom out. Because of the double-tap’s dual nature, I recommend using the pinch and spread operations to zoom.
- Long-press: Tap part of the screen and keep your finger down. Depending on what you’re doing, a pop-up or card may appear, or the item you’re long-pressing may get “picked up” so that you can drag (move) it around. Long-press might also be referred to as tap and hold.
- Swipe: To swipe, tap your finger on one spot and then move your finger to another spot. Swipes can go up, down, left, or right; the touchscreen content moves in the direction in which you swipe your finger, similar to the way scrolling works on a computer. A swipe can be fast or slow. It’s also called a flick or slide.
- Drag: A combination of long-press and then swipe, the drag operation moves items on the screen. Start with the long press, and then keep your finger on the screen to swipe. Lift your finger to complete the action.
- Pinch: A pinch involves two fingers, which start out separated and then are brought together. The effect is used to zoom out, to reduce the size of an image or see more of a map. This move may also be called a pinch close.
- Spread: In the opposite of pinch, you start out with your fingers together and then spread them. The spread is used to zoom in, to enlarge an image or see more detail on a map. It’s also known as a pinch open.
- Rotate: Use two fingers to twist around a central point on the touchscreen, which has the effect of rotating an object on the screen. If you have trouble with this operation, pretend that you’re turning the dial on a safe.
Variations on these techniques are available in several apps. For example, you swipe down from the top of the screen using two fingers to access the quick settings drawer. A short swipe from the top-center of the screen downward refreshes a web page as well as the contents of other apps.
 You can’t manipulate the touchscreen while wearing gloves unless the gloves are specially designed for using electronic touchscreens, such as the gloves that Batman wears.
Selecting a group of items
A common touchscreen technique that might be new to you is the way a group of items is selected. On a computer, you drag the mouse over the items. On a touchscreen, you perform these steps:
-
Long-press the first item, such as a photo thumbnail in an album or another item in a list.
The item is selected. It appears highlighted, is adorned with a tiny check mark, or features a filled-in circle. An action bar appears atop the screen, like the one shown in Figure 3-1. It lists icons such as Share, Delete, and so on, which manipulate the group of selected items.
-
Tap additional items to select them.
The action bar lists the total number of selected items, as illustrated in Figure 3-1.
-
Do something with the group.
Choose an icon from the action bar.

FIGURE 3-1: A typical Action Bar.
![]() To cancel the selection, tap the Cancel (X) icon on the action bar, which deselects all items. You can also tap the Back navigation icon to back out of Group-Selection mode.
To cancel the selection, tap the Cancel (X) icon on the action bar, which deselects all items. You can also tap the Back navigation icon to back out of Group-Selection mode.
Using the navigation icons
Below the touchscreen dwell three navigation icons. They can appear as part of the touchscreen itself, they may be part of the bezel, or they can be physical buttons. These icons serve consistent functions throughout the Android operating system.
The navigation icons are Home, Back, and Recent. Table 3-1 illustrates how the navigation icons appear for the current and recent releases of the Android operating system, as well the variation found on Samsung devices.
TABLE 3-1 Navigation Icon Varieties
|
Icon |
Android 5.0 and Later |
Earlier Releases |
Samsung Variation |
|
Home |
|
|
|
|
Back |
|
|
|
|
Recent |
|
|
|
![]() Home: No matter what you’re doing on the phone or tablet, tap this icon to display the Home screen. When you’re already viewing the Home screen, tap this icon to view the main or center Home screen page.
Home: No matter what you’re doing on the phone or tablet, tap this icon to display the Home screen. When you’re already viewing the Home screen, tap this icon to view the main or center Home screen page.
![]() Back: The Back icon serves several purposes, all of which fit neatly under the concept of “back.” Tap the icon once to return to a previous page, dismiss an onscreen menu, close a card, and so on.
Back: The Back icon serves several purposes, all of which fit neatly under the concept of “back.” Tap the icon once to return to a previous page, dismiss an onscreen menu, close a card, and so on.
![]() When text or voice input is active, the Back icon changes its orientation as shown in the margin. Tap this icon to hide the onscreen keyboard, dismiss dictation, or perform other actions.
When text or voice input is active, the Back icon changes its orientation as shown in the margin. Tap this icon to hide the onscreen keyboard, dismiss dictation, or perform other actions.
![]() Recent: Tap the Recent icon to display the Overview, a list of recently opened or currently running apps. See the later section “Switching between running apps” for more information on the Overview.
Recent: Tap the Recent icon to display the Overview, a list of recently opened or currently running apps. See the later section “Switching between running apps” for more information on the Overview.
The navigation icons hide themselves when certain apps run. To access the icons, tap the screen. For some full-screen apps and games, swipe the screen from top to bottom to access the navigation icons.
 Some apps feature a left-pointing arrow in the upper left corner of the screen. This icon represents the Back action in addition to the Back navigation icon.
- The Home, Back, and Recent icons may be hollow, as shown in Table 3-1, or filled-in. The shapes are consistent, though.
- Samsung departs from the stock Android navigation icon shapes, as shown in Table 3-1. On some Samsung devices, a setting determines whether the navigation buttons appear. When they’re hidden, swipe up at the bottom of the screen to see them.
- Older Samsung devices feature a physical Home button or key, which performs the same duties as the Home navigation icon. The key may double as a fingerprint reader.
- Android 5.0 and later includes the Android operating system nicknames Lollipop, Marshmallow, Nougat, and Oreo.
-
 Android version 4.4, codename KitKat, uses the examples shown on the right in Table 3-1.
Setting the volume
The volume key is located on the edge of your phone or tablet. Press the top part of the key to raise the volume. Press the bottom of the key to lower the volume. When the volume key is located on the top edge of an Android tablet, press the left part to increase volume and the right part to decrease volume.
As you press the volume key, a card appears on the touchscreen, to illustrate the relative volume level, as shown in Figure 3-2. You can continue pressing the volume key, or use your finger to adjust the onscreen slider and set the volume.

FIGURE 3-2: Setting the volume.
Not every volume card looks like the one shown in Figure 3-2, though they all feature a slider control. Additional controls let you set specific volumes; tap an icon on the card to view details. If a Settings icon appears on the card, tap it to make more specific adjustments.
- The volume key controls whatever noise the phone or tablet is making when you use it: If you’re on a call, the volume key sets the call level. When you’re listening to music or watching a video, the volume key adjusts those sounds.
- When the volume is set all the way down, the speaker is muted.
-
 The volume key works even when the touchscreen is locked. That means you don’t need to unlock the device if you’re playing music and you only need to adjust the volume.
 - Some Androids may enter Vibration mode when the volume is muted. All Android phones have Vibration mode, though not every tablet has this feature.
- Refer to Chapter 21 for more details on volume controls.
“Silence your phone!”
How many times have you heard the admonition “Please silence your cell phone”? The quick way to obey this command with an Android phone is to unlock the touchscreen and keep pressing the bottom part of the volume key until the phone vibrates. You’re good to go.
-
Some phones feature a Mute action on the Device Options card: Press and hold the Power/Lock key and then choose Mute or Vibrate.
 When the phone is silenced or in Vibration mode, an appropriate status icon appears on the status bar. The stock Android status icon is shown in the margin.
- You make the phone noisy again by reversing the directions in this section. Most commonly, press the “louder” end of the volume key to restore the phone’s sound.
Changing the orientation
Your Android features a gizmo called an accelerometer. It determines in which direction the device is pointed as when its orientation has changed from horizontal to vertical – or even upside down. That way, the information displayed on the touchscreen always appears upright, no matter how you hold it.
To demonstrate how the phone or tablet orients itself, rotate the gizmo to the left or right. Most apps, such as the web browser app, change their presentation between horizontal and vertical to match the device’s orientation.
- The rotation feature may not work for all apps or even the Home screen. Specifically, most games present themselves in one format only.
- The onscreen keyboard is more usable when the device is in its horizontal orientation. Chapter 4 covers using the onscreen keyboard.
-
You can lock the orientation if the rotating screen bothers you. See Chapter 21.
- A great app that demonstrates the device’s accelerometer is the game Labyrinth. You can purchase it at Google Play or download the free version, Labyrinth Lite. See Chapter 17 for more information about Google Play.
Home Screen Chores
The Home screen is where you start your Android day. It’s the location from which you start an app and perform other duties. Knowing about the Home screen is an important part of understanding your Android phone or tablet.
![]() To view the Home screen at any time, tap the Home navigation icon, found at the bottom of the touchscreen.
To view the Home screen at any time, tap the Home navigation icon, found at the bottom of the touchscreen.
Exploring the Home screen
Typical Android Home screens are illustrated in Figure 3-3 — a phone on the left and a tablet on the right. Several fun and interesting things appear on the Home screen. Find these items on your own device’s Home screen:
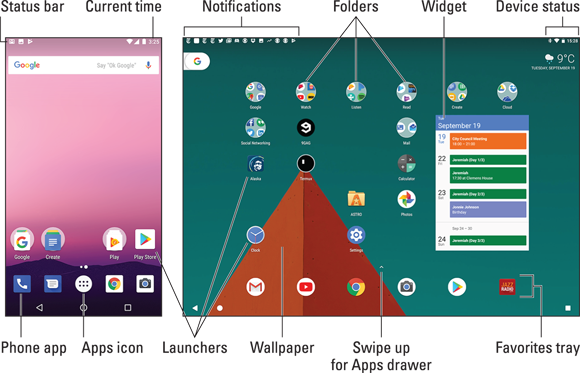
FIGURE 3-3: The Home screen (phone left, tablet right).
- Status bar: The top of the Home screen shows the status bar. It contains notification icons, status icons, and the current time. If the status bar disappears, a quick swipe from the top of the screen downward redisplays it.
- Notifications: These icons come and go, depending on what happens in your digital life. For example, a new notification icon appears whenever you receive a new email message or for a pending appointment. See the later section “Reviewing notifications.”
- Device Status: Icons on the right end of the status bar represent the Android’s current condition, such as the type of network connection, signal strength, Wi-Fi status, and battery charge, as well as other items.
- Launchers: Tap a launcher to run, or “launch,” the associated app.
- Widgets: Widgets display information or let you control the phone or tablet, manipulate a feature, access an app, or do something purely amusing.
- Folders: Multiple launchers can be stored in a folder. Tap the folder to open it and view the launchers inside.
- Wallpaper: The Home screen background image is the wallpaper, which can be changed.
- Favorites Tray: The bottom of the screen is reserved for popular launchers. The favorites tray shows the same launchers at the bottom of every Home screen page.
- Phone app: You use the Phone app to make calls on an Android phone. It’s kind of a big deal.
- Apps icon: Tap this icon to view the Apps drawer, a collection of all apps available on your Android. Not every device has an Apps icon. For example, to access the Apps drawer from the tablet shown on the right in Figure 3-3, you swipe up the screen. See the later section “Finding an app in the Apps drawer.”
Ensure that you recognize the names of the various parts of the Home screen. These terms are used throughout this book and in whatever other scant Android documentation exists.
- The Home screen is entirely customizable. You can place launchers, create folders, add widgets, and change the wallpaper. See Chapter 21 for information.
- Touching a part of the Home screen that doesn’t feature an icon or a control does nothing. That is, unless you’re using the live wallpaper feature. In that case, touching the screen changes the wallpaper in some way, depending on the wallpaper that’s selected. You can read more about live wallpaper in Chapter 21.
 You may see numbers affixed to certain Home screen icons. Those numbers are notifications for pending actions, such as unread email messages, as shown in the margin.
Switching Home screen pages
The Home screen is more than what you see. It’s actually an entire street of Home screens, with only one Home screen page visible at a time.
To switch from one panel to another, swipe the Home screen left or right. On some devices, a Home screen page index appears above the favorites tray. You can tap an icon on the index to zoom to a specific Home screen page.
 When you tap the Home navigation icon, you return to the last Home screen page you viewed. To return to the main Home screen panel, tap the Home icon a second time.
- On some devices, the main Home screen page is shown by a House icon on the Home screen page index.
- The far right Home screen page might be occupied by a full-screen app, such as the Google app or Google Assistant. On Samsung devices, the Bixby assistant appears on the far right page.
- The number of available Home screen pages depends on the device. See Chapter 21 for directions on adding or removing Home screen pages.
Reviewing notifications
Notifications appear as icons on the left side of the status bar atop the Home screen, as illustrated earlier, in Figure 3-3. To review them, or to pull down the notifications drawer, you drag your finger from the top of the screen downward. The notifications drawer is illustrated in Figure 3-4.
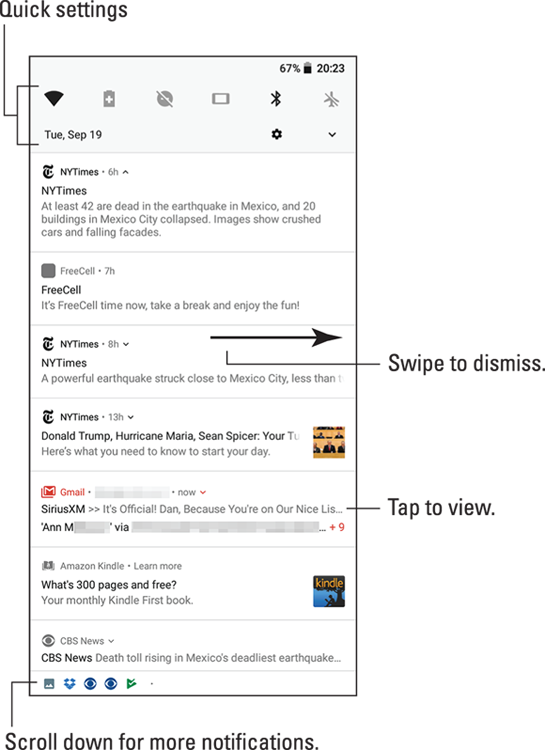
FIGURE 3-4: The notifications drawer.
Swipe the list of notifications up or down to peruse them. To deal with a specific notification, tap it. What happens next depends on the notification or the app that generated it. Typically, the app runs and shows more details.
To dismiss an individual notification, swipe it left or right. To dismiss all notifications, tap the CLEAR ALL button. This button dwells at the end of the list, so you may have to swipe the notification drawer all the way to the bottom to see it.
![]() To hide the notifications drawer, tap the Back icon, swipe the screen upward, or tap anywhere else on the Home screen.
To hide the notifications drawer, tap the Back icon, swipe the screen upward, or tap anywhere else on the Home screen.
- Notifications can stack up if you don’t deal with them!
 When more notifications are present than can appear on the status bar, a More Notifications icon appears, similar to what’s shown in the margin.
- Dismissing some notifications doesn’t prevent them from appearing again in the future. For example, notifications to update your apps continue to appear, as do calendar reminders.
- The bottom of the notifications list may contain ongoing items, such as details about traffic, weather, or status information such as when the phone or tablet is charging, Wi-Fi and Bluetooth connections, and so on. These notifications cannot be dismissed.
 Older Android devices used a Clear Notifications icon, shown in the margin, to dismiss notifications. This icon dwells at the bottom of the notifications drawer.
- Some apps, such as Facebook and Twitter, don’t display notifications unless you’re signed in to the service.
- New notifications are heralded by a notification ringtone. Chapter 21 provides information on changing the sound.
- Notifications may also appear on the Android’s lock screen. Controlling which types of notifications appear is covered in Chapter 22.
Accessing the quick settings
The quick settings appear as large buttons or icons atop the notifications drawer. These buttons let you access popular features or turn options on or off, such as Bluetooth, Wi-Fi, Airplane mode, Auto Rotate, and more.
To access the quick settings, use two fingers to swipe the touchscreen from the top downward. The quick settings appear as illustrated in Figure 3-5, though many devices have variations on the quantity and presentation of buttons and icons.

FIGURE 3-5: The Quick Settings drawer.
To use a quick setting, tap its icon. Some icons represent on–off features, such as Flashlight and Airplane mode, shown in Figure 3-5. Other buttons feature menus that let you select options, such as Wi-Fi and Bluetooth. Tap the menu to peruse additional options.
To dismiss the quick settings drawer, tap either the Back or Home navigation icons.
-
Tap the Settings icon on the Quick Settings drawer to quickly open the useful Settings app.
- The Edit (pencil) icon, shown in Figure 3-5, lets you add or remove items from the Quick Settings drawer.
- The notification drawer appears below the quick access drawer. Swipe up the screen, or tap the Hide chevron (refer to Figure 3-5) to view pending notifications.
- Some Samsung devices present the quick settings as a left-right scrolling list.
- Many of the features accessed from the quick settings drawer are covered elsewhere in this book.
The World of Apps
The Android operating system can pack thrill-a-minute excitement, but it’s probably not the only reason you purchased the device. No, Android’s success lies with the available apps. Knowing how to deal with apps is vital to becoming a successful, happy phone or tablet user.
Starting an app
To start an app, tap its launcher icon. The app starts.
Apps are started from the Home screen: Tap a launcher to start its associated app. Apps can be started also from the Apps drawer, as described in the later section “Finding an app in the Apps drawer.”
You can also start an app found in a Home screen folder: Tap to open the folder, and then tap a launcher to start that app.
Quitting an app
Unlike on a computer, you don’t need to quit apps on your Android. To leave an app, tap the Home navigation icon to return to the Home screen. You can keep tapping the Back navigation icon to back out of an app. Or you can tap the Recent navigation icon to switch to another running app.
- Some apps feature a Quit or Exit command, but for the most part you don’t quit an app like you quit a program on a computer.
-
If necessary, the Android operating system shuts down apps you haven’t used in a while. You can directly stop apps run amok, which is described in Chapter 20.
Finding an app in the Apps drawer
The launchers you see on the Home screen don't represent all the apps in your Android. To view all installed apps, visit the Apps drawer: Tap the Apps icon on the Home screen. Variations on the Apps icon are shown in Figure 3-6. This icon appears on the favorites tray, at the bottom of every Home screen.

FIGURE 3-6: Apps icon varieties.
If you don’t see the Apps icon, swipe up the Home screen. You may see a small chevron about the favorites tray, indicating the swipe-up action. Some devices might even let you swipe down the touchscreen to access the Apps drawer.
The Apps drawer lists all installed apps on your phone or tablet. You may see a long list, or the apps may be presented on pages you swipe left and right. Atop the list you might find a row of apps you use most frequently.
![]() The Apps drawer features a search bar, which helps you quickly locate a specific app: Tap the search box and type the app name. This tool is handy for locating a specific app in a highly populated Apps drawer.
The Apps drawer features a search bar, which helps you quickly locate a specific app: Tap the search box and type the app name. This tool is handy for locating a specific app in a highly populated Apps drawer.
To run an app, tap its icon. The app starts, taking over the screen and doing whatever magical thing that app does.
- Apps you add to your phone or tablet appear in the Apps drawer as well as on the Home screen. See Chapter 17 for information on adding new apps.
- Some Androids let you create folders in the Apps drawer. These folders contain multiple apps, which helps keep things organized. To access apps in the folder, tap the Folder icon.
- The stock Android Apps drawer displays apps alphabetically. Some devices let you change the order and edit the Apps drawer. Look for an Edit (pencil) or Action Overflow icon on the Apps drawer to edit the pages.
Switching between running apps
![]() The apps you run on your phone or tablet don’t quit when you dismiss them from the screen. For the most part, they stay running. To switch between running apps, or to access any app you’ve recently opened, tap the Recent navigation icon. You see the Overview, similar to what’s shown in Figure 3-7.
The apps you run on your phone or tablet don’t quit when you dismiss them from the screen. For the most part, they stay running. To switch between running apps, or to access any app you’ve recently opened, tap the Recent navigation icon. You see the Overview, similar to what’s shown in Figure 3-7.

FIGURE 3-7: The Overview shows recently used apps.
Swipe the list to view all the apps, though the presentation differs on some devices. For example, you may see a grid of thumbnails on an Android tablet. Tap the app’s card to switch to that app.
To exit from the Overview, tap the Back navigation icon.
- To remove an app from the Overview, swipe it off the list or tap the Close (X) icon, as illustrated in Figure 3-7.
- Removing an app from the Overview is pretty much the same thing as quitting an app.
- For older Androids that lack the Recent navigation icon, long-press the Home navigation icon to see the Overview.
 Samsung gizmos use the Recent navigation icon, shown in the margin.
-
The Android operating system may shut down apps that haven’t received attention for a while. Don’t be surprised if you can’t find a recent app on the Overview. If so, just start it up again as you normally would.
Common Android Icons
In additional to the navigation icons, the Android operating system features a consistent armada of other, helpful icons. These icons serve common and consistent functions in apps as well as in the Android operating system. Table 3-2 lists the most common of these icons and their functions.
TABLE 3-2 Common Icons
|
Icon |
Name |
What It Does |
|
|
Action Overflow |
Displays a list of actions, similar to a menu. |
|
|
Add |
Adds or creates an item. The plus symbol (+) may be used in combination with other symbols, depending on the app. |
|
|
Chevron |
Points in various directions; tap this icon to expand or collapse a card, a menu, or another item. |
|
|
Close |
Dismisses a card, clears text from an input field, or removes an item from a list. |
|
|
Delete |
Removes one or more items from a list or deletes a message. |
|
|
Dictation |
Activates voice input. |
|
|
Done |
Dismisses the action bar or confirms and saves edits. |
|
|
Edit |
Lets you edit an item, add text, or fill in fields. |
|
|
Favorite |
Flags a favorite item, such as a contact or a web page. |
|
|
Refresh |
Fetches new information or reloads. |
|
|
Search |
Searches the screen, the device, or the Internet for a tidbit of information. |
|
|
Settings |
Adjusts options for an app. |
|
|
Share |
Shares information via a specific app, such as Gmail or Facebook. |
|
|
Side Menu |
Also called the hamburger, tap this icon to view the navigation drawer available in most Android apps. |
Various sections throughout this book give examples of using these icons. Their images appear in the book’s margins where relevant.
- Other common symbols are used on icons in various apps. For example, the standard Play and Pause icons are used as well.
- The Chevron icon might also appear as a solid triangle.
 The Share icon shown in Table 3-2 has an evil twin, shown in the margin. Both icons represent the Share action.
- Some Samsung galaxy gizmos use a MORE button in place of the Action Overflow icon. In fact, you often see text buttons such as SAVE or DONE instead of icons on Samsung phones and tablets.
 Another variation on the Settings icon is shown in the margin. It serves the same purpose as the Gear icon, shown in Table 3-2. Though this older Settings icon is being phased out, it still appears in some apps.