
Chapter 7
The Address Book
IN THIS CHAPTER
![]() Exploring the address book
Exploring the address book
![]() Searching and sorting contacts
Searching and sorting contacts
![]() Creating a new contact
Creating a new contact
![]() Editing contacts
Editing contacts
![]() Putting a picture on a contact
Putting a picture on a contact
![]() Deleting contacts
Deleting contacts
Way back when, humans were required to memorize phone numbers. Think of it! Not everyone’s number was committed to memory — just a few key contacts. So kids stranded at the bowling alley could phone Mom’s workplace, Grandpa, or even a neighbor lady to ask for a lift. The human brain has marvelous power.
Memorizing a phone number isn’t a requirement for being human today. That’s because Android devices, both phones and tablets, are capable of storing incredibly detailed information about people, including phone numbers, email addresses, physical world addresses, and just about everything else you can imagine, all in a single app.
The People You Know
The address book app is central to many operations in an Android phone — less so on a tablet, but still necessary. It’s used by Gmail, Email, Hangouts, and (most obviously) the Phone app.
- The address book app is named Contacts. Older Androids may call the app People, which is the same thing. For the sake of consistency, this chapter refers to the app as Contacts.
- The address book is probably full of people already; your Gmail contacts are instantly synchronized, as are social networking contacts and any contacts associated with other accounts and apps you’ve added to the device.
Accessing the address book
To open the Contacts app, look for its launcher on the Home screen. It might be in the Google folder. And if it’s not available on the Home screen, look for it in the Apps drawer.
Figure 7-1 shows how the Contacts app might look, though its appearance differs from device to device. Specifically, some apps list favorites at the top, followed by frequently contacted entries. A full index might also appear on the side of the list.
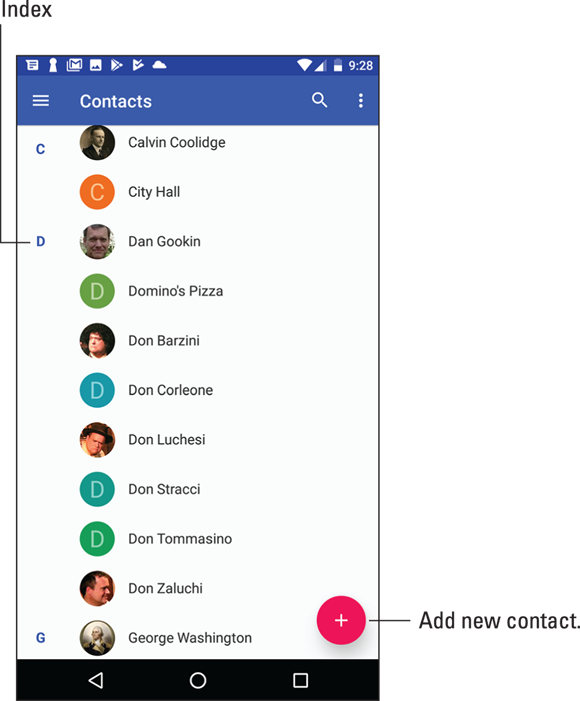
FIGURE 7-1: The Contacts list.
By default, the Contacts app shows all contacts presented alphabetically by first name. Swipe your finger on the touchscreen to scroll the list.
To see more details about a contact, tap the entry. The details screen varies, depending on the Contacts app, but it looks similar to what’s shown in Figure 7-2.

FIGURE 7-2: More details about a contact.
The number of things you can do with a contact depends on the information shown and the apps installed on your phone or tablet. Here are some common activities:
- Place a phone call. To call a contact on an Android phone, tap one of the phone entries. This activity works on an Android tablet as well, providing you have a phone-dialer app installed, such as the Hangouts Dialer or Skype.
- Send a text message. Tap the Text Message icon (refer to Figure 7-2) to open the text messaging app (phones only) and send the contact a message. See Chapter 8 for information about text messaging.
- Send email. Tap the contact’s email address to compose an email message. When the contact has more than one email address, you can choose to which one you want to send the message. Chapter 9 covers email.
- View a social networking status. Some address book apps display social networking information on the contact’s screen, such as a tweet or Facebook status update. See Chapter 11 for more information on social networking.
- Locate the contact’s address. When the contact’s information shows a home or business address, tap that item to summon the Maps app and view the location. Refer to Chapter 12 to see all the fun stuff you can do with Maps.
Some tidbits of information that show up for a contact have no associated actions. For example, the Android doesn’t sing “Happy Birthday” whenever you tap a contact’s birthday information.
- You can also access the list of contacts from within the Phone app: Tap the Contacts tab to view the list.
- Not every contact has a picture, and the picture can come from many sources (Gmail or Facebook, for example). See the later section “Adding a contact picture” for more information.
- Many Androids feature an account named Me. It shows your personal information as known by the device. The Me account may be in addition to your other accounts shown in the address book.
- Some cellular providers add accounts to an Android’s address book. You may see entries such as BAL, MIN, or Warranty Center. Those aren’t real people; they're shortcuts to various services. For example, the BAL contact is used on Verizon phones to get a text message detailing your current account balance.
- Also see the later section “Managing contacts” for information on how to deal with duplicate entries for the same person.
Sorting the address book
Your Android gizmo’s address book displays contacts in a certain order. By default, that order is alphabetically by first name. You can change this order if the existing arrangement drives you nuts. Follow these steps when using the Contacts app:
 Tap the Side Menu icon.
-
Choose Settings.
In some Contacts apps, tap the Action Overflow icon and then choose Settings. Some Samsung devices use the MORE button instead of the Action Overflow icon.
- Choose Sort By.
- Select First Name or Last Name, depending on how you want the contacts sorted.
- Choose Name Format.
-
Choose First Name First or Last Name First.
This command specifies how the contacts appear in the list: first name first or last name first.
The list of contacts is updated, displayed per your preferences.
Searching contacts
The Contacts app doesn’t provide a running total for all your contacts. Either you have very few friends, or a lot of people owe you money. When it’s the latter, you can choose to endlessly scroll the list of contacts, or you can employ the powerful Search command to quickly find a contact:
-
 Tap the Search icon.
Some versions of the Contacts app may always show the Search text box at the top of the screen. If so, tap in the box.
-
Start typing a contact name.
As you type, a list of matching contacts appears. The list narrows the more you type.
- Once you see the matching person, tap that entry.
To clear a search, tap the X at the right side of the Search text box. To exit the search screen, tap the Back navigation icon.
 No, there’s no correlation between the number of contacts you have and how popular you are in real life.
Making New Friends
Having friends is great. Having more friends is better. Keeping all those friends as entries in the Contacts app is best.
- Contacts are associated with your various online accounts and services. For example, your Google account plays host to all your Gmail contacts as well as new contacts you create.
- If you use Yahoo! as your primary email account, create new contacts and associate them with that account. The next section offers details.
Creating a new contact from scratch
Sometimes it’s necessary to create a contact when you actually meet another human being in the real world. Or maybe you finally got around to transferring information from your old datebook. In either instance, you have information to input, and it starts like this:
 Tap the Add Contact icon in the Contacts app.
The ADD button is illustrated in the margin, as well as shown earlier, in Figure 7-1. The icon may appear in a festively colored circle.
-
Ensure that your Google account is associated with the new contact.
You may see your Google (or Gmail) account listed on the Create Contact card. If not, choose that account from a list. Or, if you primarily use another email service, such as Yahoo!, choose that account instead.
 I recommend choosing your Google account because this account is synchronized with the Internet and any other Android gizmos you may own.
 Do not choose the Device account, which might also be labeled Phone or Tablet. When you do, the contact information is saved only on your Android. It won't be synchronized with the Internet or any other devices.
 -
Fill in the contact’s information as best you can.
Type text in the various boxes with the information you know. The more information you provide, the better. At minimum, the contact needs a name.
Tap the chevron to the right of a field to set more details, such as whether a phone number is Mobile, Home, Work, or so on.
To add a second phone number, email, or location, tap the ADD NEW button, which may look like a large Plus icon.
Always type a phone number with the area code.At the bottom of the Add New Contact screen, you’ll find the button MORE FIELDS or ADD ANOTHER FIELD. Use that button when you can add more details for the contact, such as a birthday or website address.
- Tap the SAVE button to complete editing and add the new contact.
The new contact is created. As a bonus, it’s also automatically synced with your Google account on the Internet, or with whichever account you chose in Step 3.
Adding a contact from the call log
A quick and easy way to build up the address book on an Android phone is to add people as they call. To do so, check the call log:
- Open the Phone app.
-
Display the call log.
Tap the History or Recent tab. See Chapter 6 for specific directions.
Unknown phone numbers appear by themselves, without a contact picture, name, or other details.
-
Display details about the phone number for an incoming call.
If the details aren’t presented right away, long-press the entry or tap the DETAILS button.
-
Choose the option to create a new contact.
Two options present themselves: one to update an existing contact and a second to create a new contact.
- Continue adding contact details.
- Save the new contact.
If you make a mistake and create a new contact for an entry already in the address book, you can merge the contacts later. See the later section “Managing contacts.”
Creating a contact from an email message
You can use email messages to help build the address book, by either creating a new account based on a message or adding someone’s email address to an existing account. The good news is that the email message supplies both the contact name and the email address. Follow these steps:
-
View the email message.
You can’t add a contact from the inbox; tap the message to view its contents.
-
 Tap the contact's name or the icon by the contact’s name.
The icon has a letter in it, like the one shown in the margin. This boring icon is a sign that the email address isn’t associated with a contact in your Android’s address book. After tapping the icon, you see more details.
-
 Tap the Add Contact icon.
If you don’t see the Add Contact icon (shown in the margin), choose the action View Contact.
-
Choose an existing contact from the list, or tap the top item, Create Contact.
The commands may be shown separately from the entire address book list. For example, you may see two actions: CREATE CONTACT and UPDATE EXISTING.
Choosing an existing contact adds the email address to that contact’s information. Otherwise, you see the Create Contact card and can proceed as outlined in the earlier section “Creating a new contact from scratch.” Of course, the email address is already supplied.
Manage Your Friends
Sure, some folks just can’t leave well enough alone. For example, Tracy may change her phone number. Sandy moves all the time. And Steve finally got rid of his 25-year-old AOL email addresses. When such things occur, you must undertake the task of address book management.
Making basic changes
![]() To make minor touch-ups on any contact, locate and display the contact’s information. Tap the Edit icon, similar to the Pencil icon shown in the margin. The button might say EDIT, or you can tap Action Overflow and choose Edit.
To make minor touch-ups on any contact, locate and display the contact’s information. Tap the Edit icon, similar to the Pencil icon shown in the margin. The button might say EDIT, or you can tap Action Overflow and choose Edit.
To change or add information, tap a field and then edit or add new text.
Some contact information cannot be edited. For example, fields pulled in from social networking sites can be edited only by that account holder on the social networking site.
![]() When you’re finished editing, tap the Done icon or the SAVE button.
When you’re finished editing, tap the Done icon or the SAVE button.
Adding a contact picture
Contact photos are supplied automatically, depending on the contact’s email address. For example, your Android may show the contact’s photo from their own Gmail or Facebook accounts. If not, you can assign your own picture of the contact, a photo that reminds you of the contact, or something wholly inappropriate.
To use the Android’s camera to snap a contact picture, heed these directions:
- Edit the contact’s information.
-
Tap the contact’s picture or the Picture Placeholder icon.
 The placeholder may feature a Camera icon, like the one shown in the margin.
 -
Choose Take Photo.
Some devices may skip this step, automatically displaying the Camera app (or a variation).
-
Use the device’s camera to snap a picture.
Chapter 13 covers using the Camera app. Both the front and rear cameras can be used (though not at the same time). Tap the Shutter icon to take the picture.
-
Review the picture.
 Nothing is set yet. If you want to try again, tap the Retry icon, similar to what’s shown in the margin. Repeat Step 4. This icon might appear as a Minus (–) icon on the Camera app.
 -
Tap the Done icon to confirm the new image and prepare for cropping.
Some devices skip this step, automatically setting the image you just took. If so, skip to Step 9.
-
Crop the image.
Adjust the cropping box so that it surrounds only the portion of the image you want to keep. Refer to Chapter 14, which specifically covers how to use the cropping tool.
- Tap the DONE button to crop the image.
- Tap the SAVE button to save and update the contact’s information.
The contact’s image appears onscreen when the person calls, as well as when referenced in other apps, text messaging, Gmail, and so on.
If the contact isn’t around, or nothing nearby is worthy of snapping a picture, you can assign one of the device’s images to the contact. In Step 3, choose the action Select New Photo or Choose Photo. Browse the device’s images to pluck out something suitable.
If you select the Choose Photo action, you might be prompted with a Complete Action Using card. My advice is to choose an app and tap JUST ONCE. See Chapter 20 for details on setting a default app.
- To remove an image from a contact, edit the contact and tap their image icon, as described in this section. Choose the action Remove Photo or tap the Minus (–) icon to reset the image.
- To replace an existing image, choose the action Select New Photo in Step 3. Or, on some devices, you’re presented with the Camera app and can immediately shoot a new image.
- A generic image or icon appears for a contact without an assigned photo or image.
- Some stored images may not work for contact icons. For example, images synchronized with your online photo albums may be unavailable.
Playing favorites
A favorite contact is someone you stay in touch with most often. The person doesn’t have to be someone you like — just someone you (perhaps unfortunately) contact often, such as your parole officer.
![]() To make a contact a favorite, display the contact’s information and tap the Favorite (star) icon by the contact’s image, as shown in Figure 7-2. When the star is filled, the contact is one of your favorites and is stored in the Favorites group.
To make a contact a favorite, display the contact’s information and tap the Favorite (star) icon by the contact’s image, as shown in Figure 7-2. When the star is filled, the contact is one of your favorites and is stored in the Favorites group.
To remove a favorite, tap the contact’s star again and it loses its highlight.
- The Contacts app lists favorites first, atop the list. You may see a Star icon in the index, or the favorites might be shown on their own tab.
- Favorite contacts are often displayed separately on an Android phone’s Phone app. Refer to Chapter 5.
- Removing a favorite doesn’t delete the contact, but instead removes it from the Favorites group.
- By the way, contacts have no idea whether they're among your favorites, so don’t believe that you’re hurting their feelings by not making them favorites.
Managing contacts
Older versions of the Contacts app allowed you to find duplicate contacts and glue them together. The process was called joining, linking, or merging. Likewise, you could separate contacts improperly joined. With the current iteration of the Contacts app, this process has become automated.
To review your Android’s address book for potential duplicate contacts, follow these steps while using the Contacts app.
- Tap the Side Menu icon to display the navigation drawer.
-
Choose Suggestions.
A description card may appear. If so, tap the GOT IT button.
- Peruse the suggestions.
On some Samsung devices, tap Action Overflow in the Contacts app. Choose the Manage Contacts action and then Merge Contacts.
The suggestions include merging potential duplicate contacts as well as updating contact information pulled in from other sources.
It’s up to you whether you merge the contacts shown, and it’s not something you must do. For example, different individuals at an organization might have the same main phone number, but different email addresses. In that case, don’t merge the contacts.
Removing a contact
Every so often, consider reviewing your Android’s address book. Purge the folks whom you no longer recognize or you’ve forgotten. It’s simple:
-
Edit the forlorn contact.
For some versions of the Contacts app, this step isn’t necessary. Instead, display the contact’s info, and then move on with Step 2.
-
Tap Action Overflow and choose Delete.
If you don’t see the Delete item, the contact is brought in from another source, such as Facebook. You need to use that app to disassociate the contact.
-
Tap DELETE button to confirm.
Poof! They’re gone.
![]() On some devices, you may find a Delete icon (shown in the margin) directly on the contact’s details card. Tap that icon to remove it, and then tap the OK button to remove the contact.
On some devices, you may find a Delete icon (shown in the margin) directly on the contact’s details card. Tap that icon to remove it, and then tap the OK button to remove the contact.
- To mass-purge contacts, long-press the first one in the address book list. This step activates mass-selection mode: Continue tapping unwanted contacts. When you’ve built the list, tap the Delete icon to remove the batch.
-
Because the Contacts list is synchronized with your Google account, the contact is also removed there — and on other Android devices.
- Removing a contact doesn’t kill the person in real life.