
Chapter 19
Connect, Share, and Store
IN THIS CHAPTER
![]() Making the USB connection
Making the USB connection
![]() Setting the connection type
Setting the connection type
![]() Hooking up to a PC or Mac
Hooking up to a PC or Mac
![]() Using the cloud to share files
Using the cloud to share files
![]() Printing with an Android
Printing with an Android
![]() Performing basic file management
Performing basic file management
![]() Managing the microSD card
Managing the microSD card
No Android is an island. True, your gizmo is wireless, but it does need to communicate with other devices. You can use those avenues of communication to share photos, transfer files, print items, or beam movies and music to another technology gizmo. That way, your Android might think it’s an island, but it’s not a lonely one.
The USB Connection
The most direct way to connect an Android phone or tablet to a computer is to use a wire — specifically, the wire nestled at the core of a USB cable. Conveniently, such a cable came with the device. It has purposes beyond giving the battery a charge.
Configuring the USB connection
The USB connection is configured automatically whenever you connect your Android to a computer. Everything should work peachy. When it doesn’t, you can try manually configuring the USB connection. Follow these steps:
- Swipe down the notifications drawer.
-
Choose the USB notification.
The USB notification might appear at the bottom of the list, down where Android shows system activities. Figure 19-1 illustrates how the notification might appear. Some devices may show two notifications: one for charging the device and another for transferring files.
You might have to tap the USB connection notification twice before you see the connection card, shown on the right in Figure 19-1.
-
Select a connection option.
The USB connection card lists several options for configuring the USB connection:
Charge This Device: The USB connection charges the phone or tablet. This is the default action and no matter which option you select, the device charges while it’s connected to the computer.
Transfer Files: This connection is ideal for transferring files. The computer views the Android as a thumb drive or similar storage device. Other titles for this setting are File Transfer, Transferring Media Files, MTP, and CTP.
Transfer Photos (PTP): In this mode, which might also be labeled Transferring Image, the computer sees the Android as a digital camera, which is ideal for importing photos and videos.
Use Device as MIDI: Choose this mode to use the Android as a keyboard or similar device for musical input.

FIGURE 19-1: USB connection configuration details.
At some point in the process, you may see a permissions card, asking for access to the device’s storage. If so, tap the ALLOW button.
After configuring the connection, you may see a notification on the computer, prompting you to do something with the Android. Your choices are based on which option you choose in Step 4.
- The titles of the items on the USB connection card differ from device to device. The functions, however, are the same.
-
 If the computer fails to recognize the Android, select another USB connection option.
 - Often the connection fails because of the Android’s security level. If so, unlock the device and then try the connection again.
- If you’re using a Macintosh, see the later section “Connecting to a Mac.”
- Some devices insist that you use their own file transfer software, which is annoying, but you must deal with it. For example, older Samsung gizmos require you to use the Samsung Kies utility to transfer files.
- Your Android may not charge its battery when you connect the USB cable to a computer. To ensure that it charges, connect the device to a USB port on the computer’s console as opposed to connecting to an external USB hub.
- If your Android has a microSD card, its storage is also mounted to the computer, in addition to internal storage.
- Androids with a USB 3.0 jack come with a USB 3.0 cable. You can still use the old-style, USB 2.0 micro-USB cables on such devices: Connect the micro-USB plug to the larger side of the USB 3.0 jack on the device’s edge.
- For data transfer to take place at top speeds over the USB 3.0 cable, you must connect the Android’s USB 3.0 cable into the USB 3.0 port on a computer. These ports are color-coded blue.
- Android mobile devices lack the capability to use the USB connection to add peripherals to the device, such as a mouse or thumb drive. Some devices may come with a multimedia dock that offers this connectivity, but it can’t happen with a direct USB connection.
-
 MTP stands for Media Transfer Protocol. This setting persuades the computer to believe that the Android is a portable media player or thumb drive. The PTP, or Picture Transfer Protocol, setting misleads the computer into thinking that the phone or tablet is a digital camera, which it is.
Connecting to a PC
Upon making the USB connection between an Android and a PC, a number of things happen. Don't let the flurry of activity frighten you.
You may see drivers install. That’s normal Windows behavior when a new USB gizmo is connected.
You may also see a notification, such as the Windows 10 notification, shown in Figure 19-2. Click or tap that notification to see how to deal with the new connection.
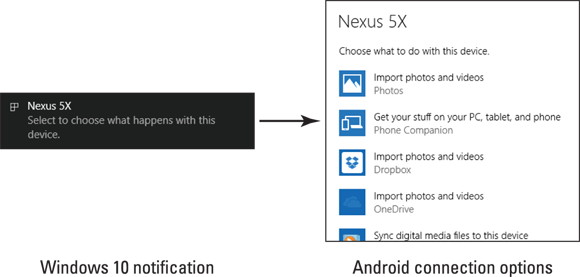
FIGURE 19-2: Windows 10 connection choice.
For example, choose Open Devices to View Files (not shown in Figure 19-2, but it’s on the scrolling list of options). This choice opens a File Explorer window listing files and folders on the Android. Or you can choose Import Photos and Videos to quickly copy over pictures and videos.
- The choice you make from the list of items is retained by Windows 10. The next time you connect your Android, that option is chosen automatically.
- Other versions of Windows also display a list of actions, though they appear in an AutoPlay dialog box. As with Windows 10, if you select a specific item, that choice is always selected for you when the Android is connected.
Connecting to a Mac
You need special software to deal with the Android-to-Macintosh connection. That’s because the Mac doesn’t natively recognize Android devices. Weird, huh? It’s like Apple wants you to buy some other type of mobile gizmo. I just don’t get it.
To help deal with the USB connection on a Mac, obtain the Android File Transfer program. On your Mac, download that program from this website:
Install the software. Run it. From that point on, whenever you connect your Android to the Mac, you see a special window appear, similar to the one shown in Figure 19-3. It lists the device’s folders and files. Use that window for file management, as covered later in this chapter.
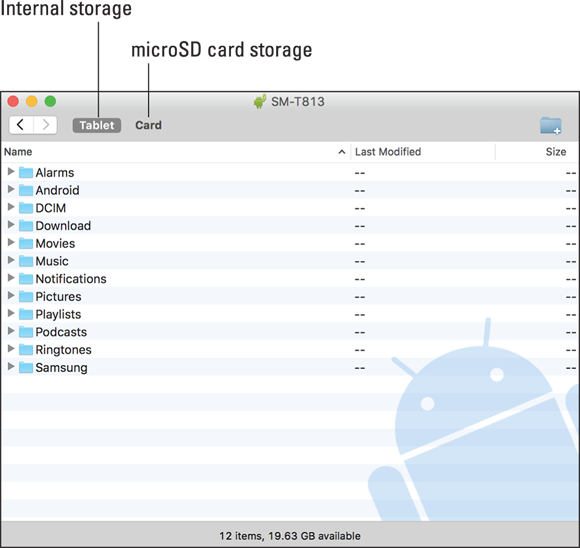
FIGURE 19-3: The Android File Transfer program.
If the phone or tablet has a microSD card inserted, you see two buttons on the Android File Transfer program window: Tablet (or Phone) and Card, as shown earlier, in Figure 19-3. Click one or the other to see files and folders in that storage location.
Using the USB cable to transfer files
After you make the USB connection between your Android and a computer, you can transfer files back and forth. This is the traditional method of file exchange, though further, and mostly wireless, methods are offered in the later section “Files Back and Forth.”
To best move files between the two devices, ensure that folder windows for both the Android and the computer are open. Figure 19-4 illustrates such an arrangement.
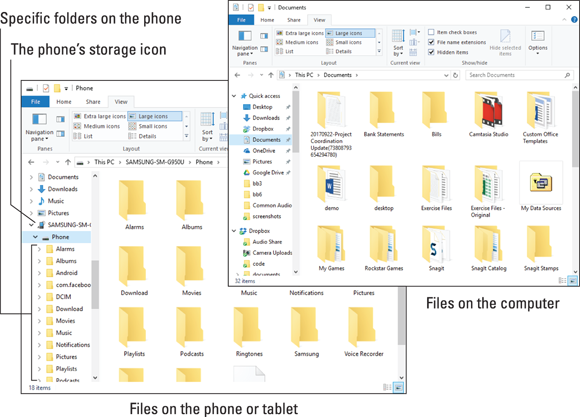
FIGURE 19-4: Copying files to an Android phone or tablet.
Drag file icons between the two windows to copy. And keep in mind that if your Android has a microSD card installed, it shows two folder windows on the desktop: one for internal storage and a second for the microSD card (removable) storage.
Here are some suggestions for transferring files:
- Unless you know specifically where a file must go on the Android, copy the file to the Download folder.
- Pictures and videos on the Android are stored in the DCIM/Camera folder.
-
Use the MTP configuration to import photos and videos over a USB cable. That way, photos and videos are copied from the Android into the proper folder or program on the PC.
- If you’re transferring music, use the Windows Media Player program, as described in Chapter 15.
When you’re done copying files, close both windows and detach the phone or tablet, as described in the next section.
 Getting a file into your Android is no guarantee that you can do productive things with it. Specifically, don’t expect to be able to read an eBook file you’ve copied from elsewhere.
A good understanding of basic file operations is necessary for successful file transfers between a computer and your gizmo. Knowing basic procedures such as copy, move, rename, and delete is an important part of the process. Understand how a folder works. The good news is that you don’t need to manually calculate a 64-bit cyclical redundancy check on the data, nor do you need to know what a parity bit is.
Disconnecting from a computer
The process is cinchy: When you’re done transferring files, music, or other media between a computer and your Android, close all programs and folders you have opened on the computer — specifically, those you’ve used to work with the device’s storage. Then you can disconnect the USB cable. That’s it.
-
 It’s a Bad Idea to unplug the Android while you’re transferring information or while a folder window is open on your computer. Doing so can damage the device’s storage, rendering unreadable some of the information that’s kept there. To be safe, close those programs and folder windows you’ve opened before disconnecting.
 - Unlike other external storage on the Macintosh, you don’t need to eject the Android’s storage when you’re done accessing it. Quit the Android File Transfer program on the Mac, and then unplug the phone or tablet — or vice versa. The Mac doesn’t get angry, either way.
Files Back and Forth
The USB connection provides only one way to transfer files between your Android and another device. Files can also flee to and fro on cloud storage, via the microSD card, to a printer, and to a screencasting gizmo. Set your files free!
Sharing files on the cloud
The wireless way to swap files between your Android and just about any other device is to use cloud storage. That’s just fancy talk for storing files on the Internet.
Google’s cloud storage is called Google Drive. Like other services, it’s tied to your Google account. You have access to the storage on your Android or any other device that has Internet access. You sign in to your Google account — boom! — you see your files. (The boom is an exclamation; nothing actually explodes.)
On your Android, use the Drive app to browse and manage your Google Drive files. On the Internet, you access your Google Drive at drive.google.com. From that site, you can also obtain the Google Drive program for your computer, which I recommend installing.
To move an item from your Android to your computer via Google Drive, follow these steps:
-
Locate the item you want to save or copy to your Google Drive storage.
It can be a picture, movie, web page, YouTube video, or just about anything.
-
 Tap the Share icon.
If you don’t see the Share icon, the item you’re viewing cannot be copied to Google Drive.
-
Choose Save to Drive.
 You may instead see the Google Drive icon, shown in the margin. Tap it.
If you’ve not yet used Google Drive, you’ll see a permissions card. Tap the ALLOW button.
-
Fill in the Save to Drive card.
The card already lists the item’s filename or title, but you can change it to something shorter or more descriptive. Also, because I’m organized, I tap the Folder action bar to choose a specific Google Drive folder on which to save the item. If you’re unsure which folder is best, just use the main My Drive folder for now.
- Tap the SAVE button.
The item is saved or copied to your Google Drive storage. In mere Internet moments, it’s available to your computer or any other device where you can access your Google Drive storage.
- To move a file from a computer to your Android, use Google Drive on your Computer: Copy the file to the Google Drive folder. When you next access the Drive app, open the proper folder and find the file.
- Other cloud storage apps include the popular Dropbox, Microsoft’s OneDrive, the Amazon Cloud, and more. Each of these works similarly to Google Drive; just choose the proper app in Step 3.
-
Cloud storage apps are free. You’re provided with a modest amount of online storage at no charge. For a monthly subscription, you can obtain more storage.
Using the media card to transfer files
Welcome to the 1980s! Back before computers had networking capabilities, and long before Wi-Fi, files moved from one computer to another on removable storage media. The vehicle of choice was the floppy drive. The power came from your feet. The method was called “sneaker net.” Everyone hated it.
If your Android features removable storage, you can use it to transfer files — just like those proto-geeks from the last century: Remove the microSD card from the phone or tablet and insert it into a computer. From that point, the computer can read the files just as they can be read from any media card.
- Don’t worry about getting the files on the microSD card. If your Android has one installed, it’s the default location for photos and other media.
- You can also use a file management app to move files to a microSD card while you use your Android. See the later section “Managing files.”
- Directions for removing the microSD card are found in the later section “Unmounting the microSD card.”
- To read the microSD media on your computer, you’ll need a microSD card adapter. This hardware comes with the microSD card, so don’t lose it!
Adding a print service
Another form of file transfer is printing: The output device is a printer, not storage on another computer. Your Android deftly handles the printer task. Just ensure two things:
- A printer is available to the same wireless network that the Android uses. It doesn’t need to be a wireless printer — just available to the network.
- The proper print service software is installed.
Printing is covered in the next section. Before you can print, however, your Android must have a print service installed. It probably does, but follow these steps to confirm:
- Open the Settings app.
-
Choose Connected Devices and then choose Printing.
For older versions of the Android operating system, choose the Printing item located on the main Settings app screen.
On some Samsung devices, choose Connections, More, Printing.
You see a list of print services. You’re looking for a service that matches the printer models on the Wi-Fi network — for example, the HP Print Service Plugin, which lets you print to any networked HP printer.
-
If a print service is listed as Off, choose it and switch its master control to the On position.
You’re done. Otherwise, if you don’t see a print service for the network printer, continue with Step 4.
-
Choose Add Service or Download Plug-In.
The Play Store app opens, listing available printing services.
-
Select and install a print service.
For example, if you use Canon printers, choose and install the Canon Print service. Refer to Chapter 17 for details on installing apps. You do not need to open the service after it’s installed.
After the service is installed, or if you confirm that the service is available, you can print from your Android. Keep reading in the next section.
Printing
As long as your Android is connected to a Wi-Fi network with an available printer and that printer’s printing service is installed, printing works like this:
- View the material you want to print.
You can print a web page, photo, map, or any number of items.
2a. Tap Action Overflow and choose the Print action, or:
2b. Tap the Share icon, or choose the Share action from the Action Overflow, then choose Print.
It’s crazy, but both methods (Steps 2a and 2b) are used in different apps. Sometimes the Print action is on an Action Overflow; other times, you must choose Share and then tap a Print icon.
If you can’t find a Print action or icon on a Share menu, your Android lacks this feature, or the item cannot be printed.
- Choose a printer.
The current printer is shown on the action bar, as shown in Figure 19-5. To view additional printers, tap the action bar.
- To change any print settings, tap the Show More Details chevron.
The items presented let you set which pages you want to print, change the number of copies, and make other common printer settings.
- Tap the PRINT button.
The item prints.
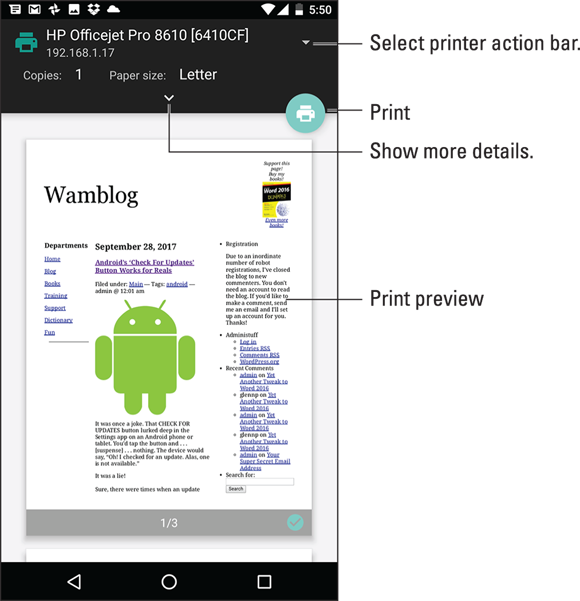
FIGURE 19-5: Android printing.
Not every app supports printing. The only way to know is look for the Print action or icon. If you can’t find it, you can’t print.
Streaming your own media
When you desire to watch movies, look at your photos, or listen to music on a large-format screen, it’s time to screencast: This technology takes the media presented on your Android (video or music) and sends it to an HDTV, monitor, or other compatible device.
You need several items prepared for streaming, or screencasting, to work properly:
- An HDTV or a monitor with HDMI input
- A screencasting dongle, such as Chromecast, attached to one of the HDMI ports
- Access to the same Wi-Fi network for both the HDTV or monitor and your Android phone or tablet
After the Chromecast dongle is installed and configured on the HDTV, follow these steps to stream media:
-
Open the app that plays the media you want to watch or listen to.
Compatible apps include Play Music, Play Movies & TV, YouTube, Netflix, and so on.
-
Tune the HDTV or monitor to the proper HDMI input.
For example, if a Chromecast dongle is installed on HDMI Input 4, switch the TV to that input. The casting dongle must be awake and active.
-
 Tap the Chromecast icon.
The icon appears similar to the one shown in the margin. If you don’t see this icon, either the Chromecast dongle isn’t awake or the media cannot be cast to another device.
- Choose the TV or monitor’s Chromecast from the list.
-
Play the media.
The media appears or is heard from the other device.
You can still use your Android while it’s casting. The app on the screen may offer you controls, such as Play and Pause, or it might display additional information about the media.
To stop streaming, tap the Chromecast icon and then tap the STOP CASTING or DISCONNECT button.
Android Storage Mysteries
Somewhere, nestled in your Android’s bosom, lies a storage device. That storage works like the hard drive in a computer, and for the same purpose: to keep apps, music, videos, pictures, and a host of other information for the long term.
- Android phones and tablets come with a given quantity of internal storage. The amount is preset by the manufacturer, usually given as an option at purchase time.
- Typical quantities of internal storage include 16GB, 32GB, 64GB, and more.
- Removable storage in the form of a microSD card is available on some Androids.
-
GB stands for gigabyte, or 1 billion bytes (characters) of storage. A typical 2-hour movie occupies about 4GB of storage, but most items that you store on your Android — music and pictures, for example — occupy only a sliver of storage.
Reviewing storage stats
To see how much storage space is available on your Android, follow these steps:
- Open the Settings app.
-
Choose the Storage item.
This item might be titled Storage & USB on some devices. On some Samsung galactic gizmos, choose the Device Maintenance category and then choose Storage.
Figure 19-6 shows a typical storage screen. It details information about internal storage and, if available, the microSD card.
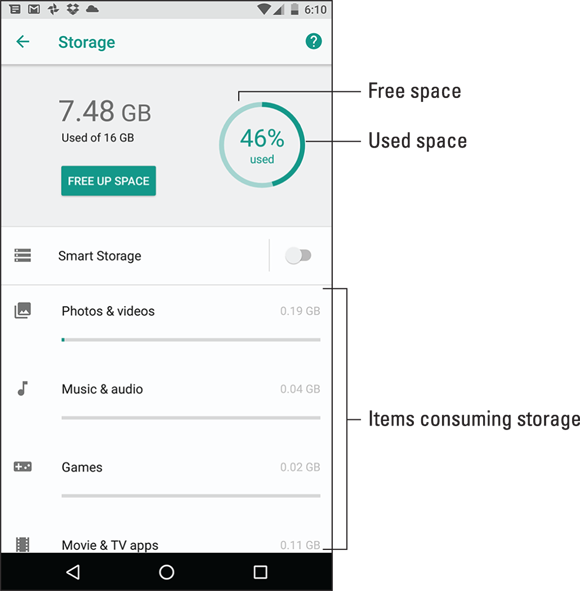
FIGURE 19-6: Android storage details.
Tap the storage item or category to view details on how the storage is used or to launch an associated app. For example, tap the Photos and Videos item to see (and manage) photos and media storage on the device.
- Things that consume the most storage space are videos, music, and pictures, in that order.
-
Most media is stored in the cloud and streamed from the Internet to your Android. That’s how music, videos, and books work, as described in Chapter 16. If you’re keeping media on the device (described in Chapter 17), you can remove it to free storage.
- If storage space is getting low, tap the FREE UP SPACE button, illustrated in Figure 19-6. This feature isn’t available to every version of the Android operating system.
- The Smart Storage feature (refer to Figure 19-6) also frees up storage by automatically removing backups over 90 days old.
-
Don’t feel ripped-off if the Total Space value is far less than the stated capacity of your Android. For example, your device may have 32GB of storage but the Storage screen reports only 29.85GB of total space. The missing space is considered overhead, as are several gigabytes taken by the government for tax purposes.
Managing files
You probably didn’t get a snazzy new phone or tablet because you enjoy managing files on a computer and you wanted another gizmo to hone your skills. Even so, you can practice the same type of file manipulation on the Android as you would on a computer. Is there a need to do so? Of course not! But if you want to get dirty with files, you can.
To view files and folders, attempt these steps:
- Open the Settings app.
-
Choose Storage.
This item might be titled Storage & USB. For some Samsung devices, choose Device Maintenance and then choose Storage.
-
Swipe to the bottom of the screen and choose Files or Explore.
You see folders and files stored on your device.
Some Androids come with a file management app. It’s called Files or My Files, and it’s a traditional type of file manager, which means that if you detest managing files on your computer, you’ll experience the same delightful frustration on your mobile gizmo.
-
If you want to peruse files you’ve downloaded from the Internet, open the Downloads app, found in the Apps drawer.
- If your Android lacks a file management app, you can swiftly obtain one. An abundance of file management apps is available from Google Play. See Chapter 17.
Unmounting the microSD card
The microSD card provides removable storage on some Android devices. When the gizmo is turned off, you can insert or remove the microSD card at will; directions are provided in Chapter 1. The microSD card can also be removed when the Android is turned on, but you must first unmount the card. Obey these steps:
-
Open the Settings app and choose Storage.
This item might be titled Storage & USB.
-
Choose Unmount SD Card or tap the EJECT button.
The button may be located by the USB storage item shown on the Storage screen. Otherwise, the Unmount SD Card action is found near the bottom of the screen.
- Ignore the warning and tap the OK button.
- Remove the microSD card.
It’s important that you follow these steps to safely remove the microSD card. If you don’t, and you just pop out the card, it could damage the card and lose information.
You can insert a microSD card at any time. See Chapter 1 for details.
Formatting microSD storage
Your Android instantly recognizes a microSD card after it’s inserted. If not, you can try formatting the card to see if that fixes the problem.
All data on the microSD card is erased by the formatting process.
To format a microSD card, follow these steps:
- Open the Settings app and choose Storage or Storage & USB.
-
Choose the action Format SD Card.
If necessary, tap the microSD cards item on the Storage screen to locate the Format action.
- Tap the FORMAT or FORMAT SD CARD button.
-
If prompted, tap the DELETE ALL button to confirm.
The microSD card is unmounted, formatted, and then mounted again and made ready for use.
After the card is formatted, you can use it to store information, music, apps, photos, and stuff like that.