
Chapter 13
Everyone Say “Cheese!”
IN THIS CHAPTER
![]() Understanding the Camera app
Understanding the Camera app
![]() Taking a picture or recording video
Taking a picture or recording video
![]() Recording yourself
Recording yourself
![]() Activating the flash
Activating the flash
![]() Including yourself in a photo
Including yourself in a photo
![]() Changing resolution and quality
Changing resolution and quality
![]() Controlling the location tag
Controlling the location tag
I have no idea why people say “Cheese” when they get their pictures taken. Supposedly, it’s to make them smile. Even in other countries, where the native word for cheese can’t possibly influence the face’s smile muscles, they still say their word for cheese whenever a picture is taken. Apparently, it’s a tradition that’s present everywhere.
Alexander Graham Bell never thought anyone would utter “cheese” around his invention. That’s because the notion of integrating the phone with a camera didn’t occur until just before his death. Folks had to wait decades for a phone to take a picture. You don’t have to wait any time at all.
The Android’s Camera
A camera snob gladly tells you, “No true camera has a ringtone.” You know what? He’s correct: Phones and tablets don’t make the best cameras. Regardless, the mobile device has completely replaced cameras for all but professionals and serious amateur photographers.
Getting to know your device’s camera
Cameras have improved over the years, getting better with each new generation of Android mobile devices. Some phones and tablets take pretty good pictures. That’s great. The problem, however, is that not every Android has the same type of camera. Worse: Each manufacturer has its own Camera app.
The Camera app is the app you use to control the Android’s cameras. Details are offered throughout this chapter. In the big picture, taking still shots or recording video works pretty much the same. All Camera apps offer similar, basic controls. You can get the job done — take that photo or capture that movie — with a minimum of stress.
- All Androids feature front and rear cameras, though some low-end models may lack one or the other.
- Both cameras can take still shots and record video.
- The front camera isn’t as powerful as the rear camera. Therefore, the rear camera is considered the primary camera.
-
 If your pictures or videos appear blurry, ensure that the camera lens on the back of the device isn't dirty. Or you may have neglected to remove the plastic cover from the rear camera when you first set up your Android.
 - Only the rear camera features an LED flash, which can be used for both still shots and video. Some tablets may lack the LED flash.
- The Camera app sets the camera’s resolution as well as the zoom and whether the flash activates. It’s also used to switch between front and rear cameras.
-
 You can take as many pictures or record as much video as you like, as long as the device doesn’t run out of space.
Using basic camera controls
Here are some pointers that apply to all Android Camera apps:
- Use your phone or tablet in either landscape or portrait orientation while taking a still shot. Don’t worry either way: The image is always saved with the proper side up.
-
I strongly recommend that you record video in horizontal orientation only. This presentation appears more natural.
- The device’s touchscreen serves as the viewfinder; what you see on the screen is exactly what appears in the final photo or video.
- Tap the screen to focus on a specific object. You’ll see a focus ring or square that confirms how the camera lens is focusing. Not every device’s camera hardware can focus; the front-facing camera features a fixed focus.
- Spread your fingers on the screen to zoom in.
- Pinch your fingers on the screen to zoom out.
- Some Androids let you use the volume key to zoom in or out, though, more commonly, pressing the volume key snaps a still shot — even while recording video.
-
Hold the Android steady! I recommend using two hands for taking a still shot and shooting video.
-
 All Androids store pictures and videos in the DCIM/Camera folder. Still images are saved in the JPEG or PNG file format; video is stored in the MPEG-4 format. If your Android offers removable storage, the Camera app automatically saves images and videos to that media, though you might be able to control this feature. See the later section “Choosing the storage device.”
The Google Camera App
It would be impossible to cover every Android Camera app variation, so in this book I focus on the Google Camera app, which is included in stock Android. Your device’s Camera app may be identical or subtly different.
- The big difference between Camera apps is how the controls are presented on the screen.
- The Camera app’s basic shooting modes are Still Shot and Video. Additional modes include Panorama, Photo Sphere, and others. Some manufacturers include a host of different shooting modes.
- Like many apps, the Camera app takes over the entire touchscreen. To summon the navigation icons (Back, Home, Recent), tap the screen or swipe top-to-bottom.
- Other apps beyond the Camera app can access the device’s cameras. Sometimes these apps use their own camera apps, but mostly they use the device’s default Camera app to capture stills and videos.
- The Google Camera app is available for any Android gizmo from the Google Play Store. See Chapter 17 for details on Google Play.
Capturing a still shot
Taking a still image requires only two steps. First, ensure that the Camera app is in Single-Shot mode. Second, tap the Shutter icon to snap the photo.
![]() In Still Shot mode, you see the Shutter icon appear, as shown in Figure 13-1. If you don’t, tap the Still Shot icon, similar to what’s shown in the margin. If that icon doesn’t appear on an Android tablet, swipe the screen left-to-right.
In Still Shot mode, you see the Shutter icon appear, as shown in Figure 13-1. If you don’t, tap the Still Shot icon, similar to what’s shown in the margin. If that icon doesn’t appear on an Android tablet, swipe the screen left-to-right.
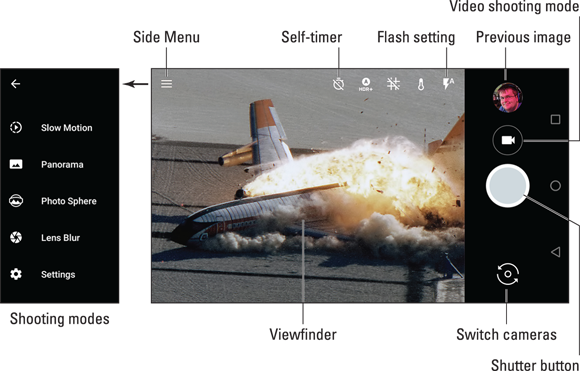
FIGURE 13-1: Still Shot shooting mode.
Frame the image. Pinch or spread your fingers on the touchscreen to zoom out or in, respectively.
Tap the shutter icon to snap the photo, as illustrated in Figure 13-1. You may hear a shutter noise. The picture is saved and appears as a thumbnail preview in the Camera app, also illustrated in Figure 13-1.
-
Set the resolution before you shoot. See the later section “Setting resolution and quality.”
- To review the image, tap the Thumbnail icon. You can swipe through the various shots you’ve taken. Tap the Back navigation icon to return to the Camera app.
 If you don’t like a photo you just took, tap the Thumbnail icon to view the image. Tap the Delete (trash) icon to remove it.
Recording video
![]() To record video, switch the Camera app to Video mode. For the Google Camera app, tap the Video shooting mode icon, illustrated in Figure 13-1. On the Android tablet version of the app, swipe the screen right-to-left. Other Camera apps may show a Video icon, similar to what appears in the margin. Some Samsung devices may show both the Shutter button and Video Record icon at the same time, so switching modes isn’t necessary.
To record video, switch the Camera app to Video mode. For the Google Camera app, tap the Video shooting mode icon, illustrated in Figure 13-1. On the Android tablet version of the app, swipe the screen right-to-left. Other Camera apps may show a Video icon, similar to what appears in the margin. Some Samsung devices may show both the Shutter button and Video Record icon at the same time, so switching modes isn’t necessary.
![]() To start recording the video, tap the Record icon, shown in the margin. The elapsed time, and maybe even storage consumed, appears on the touchscreen as video is being recorded. The Record icon changes to a Stop icon, as illustrated in Figure 13-2.
To start recording the video, tap the Record icon, shown in the margin. The elapsed time, and maybe even storage consumed, appears on the touchscreen as video is being recorded. The Record icon changes to a Stop icon, as illustrated in Figure 13-2.

FIGURE 13-2: Recording video.
To snap a still shot while recording, tap the icon, illustrated in Figure 13-2. You might also try pressing the device’s volume key.
The Pause icon is used to halt recording but not end the video. After you tap this icon again (which changes to look like the Record icon), recording resumes.
Tap the Stop icon to end the recording.
- Video quality is set before you shoot. See the later section “Setting resolution and quality.”
- On some Samsung devices, the Record icon appears on the Camera app’s main screen. Tap the icon to start recording.
-
Hold the Android horizontally when you record video. Keep your hands steady. Do not zoom in and out!
Exploring other shooting modes
Beyond still shots and video, all Camera apps offer additional shooting modes. The variety depends on the app, though common modes include Panorama and Photo Sphere.
In the Google Camera app, tap the Side Menu icon to view the various shooting modes, as illustrated in Figure 13-1. Choose one to set that mode for the Camera app. You may see directions on the screen, offering details on how to operate the specific mode.
- See Chapter 25 for specifics on shooting a panorama.
- The Google Camera app automatically exits a special shooting mode, returning to Still Shot or Video mode. Other Camera apps, however, may require that you reselect Still Shot or Video mode.
- Beyond shooting modes, some Camera apps may feature special-effects modes or other enhancements to basic image-taking duties.
Camera Settings and Options
The variety of Camera app controls can be overwhelming, especially when a manufacturer gussies up the app with multiple shooting modes. Among the many choices, a few settings and options are common and necessary to properly use the Android’s camera.
Switching cameras
You can do more with the device’s front-facing camera than take those infamous selfie shots. Exactly what more you can do, I can’t think of right now, but the point is how to switch between front and rear cameras while using the Camera app.
The Switch Cameras icon is usually found right on the main Camera app screen, as illustrated in Figure 13-1. Variations on these icons appear in Figure 13-3. If you don’t see such an icon on your gizmo’s Camera app screen, tap the Action Overflow or Settings icon to look for the Switch Cameras icon or action.

FIGURE 13-3: Switch Camera icons.
Another technique is popular on some Samsung Camera apps: Swipe the screen from top to bottom. This action flips the display as you switch between front and rear cameras.
Tap the same icon again to switch back to the rear camera. The icon may change its appearance, but you should find it in the same location on the Camera app’s screen.
Setting the flash
Camera apps feature three flash settings, illustrated in Table 13-1. The current setting appears on the screen (refer to Figure 13-1), or you may have to access the flash setting control to view the current setting.
TABLE 13-1 Flash Settings
|
Setting |
Icon |
When the Flash Activates |
|
Auto |
|
During low-light situations but not when it’s bright out |
|
On |
|
Always |
|
Off |
|
Never, even in low-light situations |
To change or check the flash setting in the Google Camera app, tap the current flash icon shown on the app’s main screen. Tap that icon to cycle through and set the camera’s flash setting. In other Camera apps, tap a Settings icon to access the Flash setting.
- Not all Android tablets feature a flash on the rear camera.
- No Android — phone or tablet — features a flash for the front camera, which is a good thing.
-
A good time to turn on the flash is when taking pictures of people or objects in front of something bright, such as Aunt Ellen showing off her prized peach cobbler in front of a burning munitions factory.
- A “flash” setting is also available for shooting video in low-light situations. In that case, the flash LED is on the entire time. This setting is made similarly to setting the flash, though the options are only On and Off. It must be set before you shoot video, and yes, it devours a lot of battery power.
Using the self-timer
One common feature found on just about every Camera app is the self-timer. Though it’s normally disabled, you can enable this feature to delay taking a still image for a given number of seconds after you tap the Single-Shot shutter icon. Supposedly, that gives you enough time to run in front of the device so that you, too, can be in the photo.
To activate the self-timer feature, tap its icon. In the Google Camera app, tap the Self-Timer icon to choose no delay, a 3-second delay, or a 10-second delay. The icon you tap is one of those shown in Table 13-2.
TABLE 13-2 Self-Timer Icon Round-Up
|
Icon |
Setting |
|
|
The self-timer function is disabled; photos snap instantly. |
|
|
The photo snaps 3 seconds after you tap the icon. |
|
|
The photo snaps 10 seconds after you tap the icon. |
After you set the timer, tap the Still Shot shutter icon. Then dash out in front of the Android so that it can take your photo.
Oh: You probably want to prop up the phone or tablet on something stable, or even get a mobile device tripod mount. The self-timer is pretty useless without one.
Turn off the self-timer when you want to return to standard Still Shot mode or when you’re exhausted from running around.
Setting resolution and quality
You don’t always have to set the highest resolution or top quality for images and videos. Especially when you’re shooting for the web or uploading pictures to Facebook, top quality is a waste of storage space and upload time because the image is shown on a relatively low-resolution computer monitor or mobile device screen.
As you may suspect, setting the image resolution or video quality is done differently by the various Camera apps. No matter what, you must set the new still-shot resolution or video quality before you shoot.
In the Google Camera app, follow these steps to access still-shot resolution and video quality settings:
-
Tap the Side Menu icon to display the Camera app’s shooting modes.
Refer to Figure 13-1.
-
 Tap the Settings icon.
You see categories for Photo and Video. Each has an item for the front and rear cameras.
-
Choose a mode and a camera.
For example, tap Back Camera Photo Resolution to set the still-image resolution for the rear camera. Or tap Front Camera Video Resolution to set the video quality for the device’s front-facing camera.
-
Choose a resolution or video-quality setting from the list.
Options are presented in aspect ratio and megapixels for still images; video-quality settings are rated in HD, UHD, and vertical pixel resolution.
Options are presented in aspect ratio and in megapixels.
For other Camera apps, tap the Action Overflow or Settings icon to view resolution and video quality options. The item may be titled Resolution, Picture Size, or Photo Size. You may also have to switch cameras (back or front) before setting the resolution.
- The aspect ratio expresses the relationship between an image’s horizontal and vertical dimensions. The 4:3 aspect ratio is 4 units wide by 3 units tall. The typical widescreen computer monitor has an aspect ratio of 16:9.
- A picture’s resolution describes how many pixels, or dots, are in the image. The more dots, the better the image looks when enlarged.
- The video quality settings HD and SD refer to High Definition and Standard Definition, respectively. Qualities shown with a “p” value indicate vertical resolution, with higher values for higher quality.
- The resolution and video quality choices are more limited on the front-facing camera because it’s not as sophisticated as the rear camera.
-
If I were taking a photo for uploading to Facebook, I’d choose a medium resolution. For recording vacation photos or family events, higher resolution is best because you can print the images and get better quality.
- Choose lower video quality for recordings you want to share on social media or send as an email or text message attachment.
-
Megapixel is a measurement of the amount of information stored in an image. One megapixel is approximately 1 million pixels, or individual dots that comprise an image. It’s often abbreviated MP.
Checking the location tag feature
The Camera app not only takes pictures but also keeps track of where you’re located when you take the picture — if you’ve activated that option. The feature is called location tag, geotag, or GPS-tag.
To confirm the location tag setting in the Google Camera app, follow these steps:
- Tap the Side Menu icon and choose Settings.
-
Enable or disable the Save Location feature.
The master control by the Save Location item is either on or off, reflecting the location tag setting.
For some Samsung Camera apps, obey these steps to check the location tag feature:
- Tap the Settings icon on the main Camera app screen.
- Set the master control by the Location Tags item on or off.
Other Camera apps may require you to jump through various hoops, such as wade through an Action Overflow or Settings icon menu, to locate the Location Tag item.
- Deactivating the location tag feature doesn’t remove that information from photos you’ve already taken.
- The location tab information is stored in the picture itself. This means that other devices, apps, and computer programs can read the GPS information to determine where the image was taken.
- See Chapter 14 for information on reviewing a photograph’s location.
Choosing the storage device
When you place a microSD card in your Android’s removable storage slot, the Camera app automatically chooses that location to save new photos and videos. To confirm or change this setting, follow these steps in the device’s Camera app:
- Tap the Action Overflow or Settings icon.
-
Choose Storage Location.
The option may have a name that’s different from, but similar to, Storage Location.
-
Set the location.
The options are Device or Internal for internal storage; or microSD, Memory Card, or External Storage for the removable media card.
Not every phone or tablet features removable storage.