
Chapter 6
Forward Calls, Missed Calls, and Voicemail
IN THIS CHAPTER
![]() Configuring call forwarding options
Configuring call forwarding options
![]() Refusing calls automatically
Refusing calls automatically
![]() Checking on missed calls
Checking on missed calls
![]() Browsing call history
Browsing call history
![]() Configuring basic voicemail
Configuring basic voicemail
![]() Listening to voicemail messages
Listening to voicemail messages
![]() Using Google Voice for voicemail
Using Google Voice for voicemail
![]() Receiving a Google Voice message
Receiving a Google Voice message
Gone are the days when you could say you were “out” and missed a call. That’s because your Android phone goes with you everywhere. The quantity of excuses for not taking a call is weak and limited. You can blame call forwarding. You can confirm a missed call on the call log. And you can always resort to voicemail, which is becoming more accepted — especially when the message is sincere.
- As in Chapter 5, most of the information here is specific to Android phones.
- Your Android tablet can use the Google Voice app, covered later in this chapter. You may not receive a call on your tablet, but you can check your voicemail.
Forward Calls Elsewhere
Call forwarding is traditionally a trick you used from your old landline phone to a cell phone. It’s odd to think of it used another way, but the tool still exists. In fact, voicemail itself is a form of call forwarding in action.
Forwarding phone calls
The Android operating system offers call forwarding options, though your cellular provider might control that feature instead. To determine which is which, follow these steps to configure call forwarding:
- Open the Phone app.
- Tap the Action Overflow icon.
- Choose Settings or Call Settings.
-
Choose Calls.
If you don’t see this item, skip to Step 5.
- Choose Call Forwarding.
-
Select a call forwarding option.
Sometimes only one option is available: a phone number to use for forwarding all incoming calls. You might instead see separate options, such as these:
- Always Forward: All incoming calls are sent to the number you specify; your phone doesn’t even ring. This option overrides all other forwarding options.
- When Busy: Calls are forwarded when you’re on the phone and choose not to answer. This option normally sends a missed call to voicemail.
- When Unanswered: Missed calls are forwarded. Normally, the call is forwarded to voicemail.
- When Unreachable: Calls are forwarded when the phone is turned off, out of range, or in Airplane mode. As with the two previous settings, this option normally forwards calls to voicemail.
-
Set the forwarding number or edit an existing number.
For example, you can type your home landline number for the Forward When Unreached option so that your cell calls are redirected to your home number when you’re out of range.
To disable the option, tap the TURN OFF button.
- Tap the UPDATE button to confirm the new forwarding number.
If your phone lacks Call Forwarding settings, you must rely upon the cellular carrier to set up and forward your calls. For example, Verizon in the United States uses the call forwarding options described in Table 6-1.
TABLE 6-1 Verizon Call Forwarding Commands
|
To Do This |
Input First Number |
Input Second Number |
|
Forward unanswered incoming calls |
*71 |
Forwarding number |
|
Forward all incoming calls |
*72 |
Forwarding number |
|
Cancel call forwarding |
*73 |
None |
So, to forward all calls to (714) 555-4565, open the Phone app and dial the number *727145554565. You hear only a brief tone after dialing, and then the call ends. After that, any call coming into your phone rings at the other number.
 You must disable call forwarding to return to normal cell phone operations: Dial *73.
Call forwarding may affect your phone’s voicemail service. See the later section “Using Google Voice for voicemail” for details.
Blocking calls
To stifle those calls that bug you repeatedly, block the phone number before it rings. Obey these steps:
- Open the Phone app.
- Tap the Action Overflow icon or the MORE button.
- Choose Settings.
-
Choose Call Blocking or Block Numbers.
On some phones, you then choose Block List; otherwise, you see a list of numbers or contacts currently blocked.
- Tap the ADD A NUMBER button or just type a number to block.
-
Tap the BLOCK button or DONE button to confirm.
Repeat Steps 5 and 6 to add more numbers.
An easier way to block calls is to use the call log or history list, which is covered in the next section. From the list, long-press an entry and choose the Block action.
To remove a number from the Blocked Numbers list, follow Steps 1 through 4 to view blocked numbers. Tap the X or minus (–) icon next to a number, and then tap the UNBLOCK button to confirm.
Who Called Who When?
All phone calls made on your Android phone are noted: to whom, from whom, date, time, duration, and whether the call was incoming, outgoing, missed, or dismissed. I call this feature the call log, although on your phone it may be referenced as Recent Calls or Call History. The place to look is in the Phone app.
Dealing with a missed call
![]() When you miss a call, a Missed Call notification icon appears atop the touchscreen. This icon, similar to the one in the margin, specifically applies to a call you didn’t pick up; it doesn’t appear for calls you dismiss or calls missed because the phone was turned off or in Airplane mode.
When you miss a call, a Missed Call notification icon appears atop the touchscreen. This icon, similar to the one in the margin, specifically applies to a call you didn’t pick up; it doesn’t appear for calls you dismiss or calls missed because the phone was turned off or in Airplane mode.
Choose the Missed Call notification to view the Phone app’s call log, illustrated in Figure 6-1. There you see details about who called and when. Choose an item from the call log to view more details and return the call.
- Some Android phones show more details on the Missed Call notification, including icons that let you return the call, text, and so on.
-
The phone doesn’t consider a call you’ve dismissed as being missed.
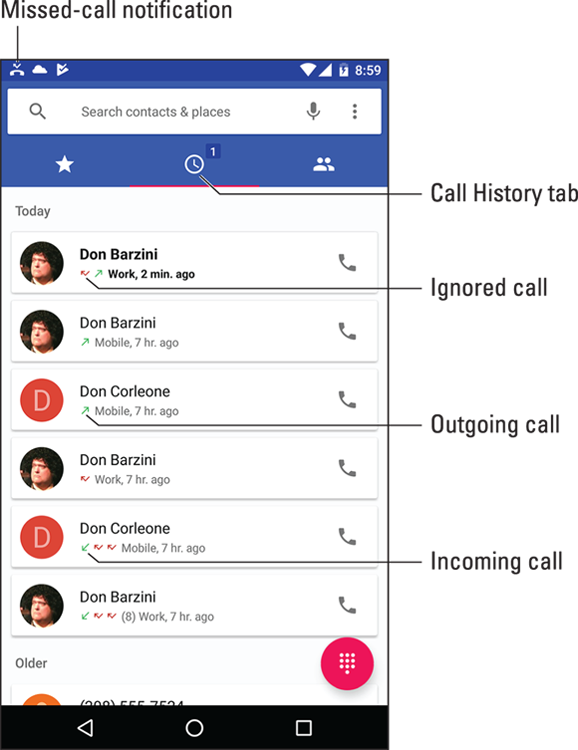
FIGURE 6-1: The call log.
Reviewing the call log
Your Android phone tracks all calls in a list or call log. It’s found in the Phone app: Tap the Call History tab, which might be titled Recent or Logs. Refer to Figure 6-1 to see what a call log might look like.
Swipe through the list to examine recent calls. The list is sorted so that the most recent calls appear at the top. Information is associated with each call, such as the date and time, call duration, and whether the call was incoming, outgoing, missed, or ignored.
To see more details about the call, tap an item in the list. You see a call history specific to that number or contact, options to block the call, or an action to display the contact’s information.
- On Samsung phones, swipe an entry in the RECENTS (call history) list right-to-left to redial that number or contact. Swipe the entry left-to-right to send a text message.
-
 The call log provides a quick way to create new contacts: Tap a phone number in the list, one that lacks contact information. Choose the action Create New Contact or Add to Contacts. See Chapter 7 for more information about contacts.
 - To remove an item from the call log, get more information on the item: Tap it and choose INFO. On the next screen, tap the Delete (trash) icon. On Samsung phones, long-press items in the RECENTS list to select them, and then tap the DELETE button to purge.
Voicemail
“At the sound of the tone …” You know the drill. The once humble tape recorder that connected to a landline, or “answering machine,” gained the fancy term voicemail back in the 1990s. The service is a collection bin at the bottom of the rejection chute for your phone’s incoming messages. Missed calls, dismissed calls, calls received while the phone is offline — they all go to voicemail for later retrieval.
Setting up carrier voicemail
The most basic and least sophisticated form of voicemail is the free voicemail service provided by your cell phone company. This standard feature has few frills and nothing that stands out differently for your nifty Android phone.
One of the first duties you must do on your phone is set up that boring voicemail service. Obey these steps:
- Open the Phone app.
- Display the dialpad, if necessary.
-
Long-press the 1 key.
 The 1 key is preset to speed-dial your carrier’s voicemail service. It’s adorned with the standard Voicemail icon, shown in the margin.
 -
Pull the phone away from your head and activate the speaker and dialpad.
Tap the speaker and dialpad icons so that you can listen and type as you configure the carrier’s voicemail service.
-
Heed the directions as dictated.
Obey the robot to set up the voicemail service.
Your callers cannot leave messages until you configure carrier voicemail. Even when you plan on using another voicemail service, I recommend that you set up carrier voicemail.
- An example of another voicemail service is Google Voice, covered later in this chapter.
- Your phone may also feature a Voicemail app, which you can use to collect and review your messages.
-
The most important step for voicemail setup is to create a customized greeting. If you don’t do so, you may not receive voicemail messages, or people may believe that they’ve dialed the wrong number.
Picking up carrier voicemail messages
![]() Carrier voicemail collects missed calls as well as calls you thrust into voicemail. The standard Voicemail notification icon appears, looking like the one shown in the margin, whenever a new message is pending. You can choose this notification to dial into your carrier’s voicemail system, listen to your calls, and use the phone’s dialpad to manage the carrier voicemail system.
Carrier voicemail collects missed calls as well as calls you thrust into voicemail. The standard Voicemail notification icon appears, looking like the one shown in the margin, whenever a new message is pending. You can choose this notification to dial into your carrier’s voicemail system, listen to your calls, and use the phone’s dialpad to manage the carrier voicemail system.
Most carrier voicemail systems work the same: You dial in, type your PIN, and then use the dialpad to review and delete messages. Therefore, it’s best to look at the phone and display the dialpad and then activate the speaker as you hear the prompts and listen to the messages.
To help you remember the prompts, write them down here:
Press _____ to listen to the first message.
Press _____ to delete the message.
Press _____ to skip a message.
Press _____ to hear the menu options.
Press _____ to hang up.
While you’re at it, write your voicemail PIN: _______
Using Google Voice for voicemail
Perhaps the best option I’ve found for working with voicemail is Google Voice. It’s more than just a voicemail system: You can use the service to make phone calls in the United States, place cheap international calls, and perform other amazing feats, though I use it primarily for voicemail.
To configure your Android phone for use with Google Voice, you must do two things: First, create a Google Voice account. Second, obtain the Google Voice app.
Start your adventure by visiting the Google Voice home page at:
I recommend using a computer to complete these steps: Follow the directions on the screen. Log in to your Google account, if necessary, and agree to the terms of service.
![]() Click the Action Overflow icon on the web page to link your Android’s phone number with the Google Voice service. You must set up a Google Voice number for your account, so choose a number if one isn’t already available.
Click the Action Overflow icon on the web page to link your Android’s phone number with the Google Voice service. You must set up a Google Voice number for your account, so choose a number if one isn’t already available.
Second, visit Google Play to get the Google Voice app. Specific directions for using Google Play are offered in Chapter 17.
After you install the app, open it to complete configuration. Follow the steps on the screen to associate your Android’s phone number with Google Voice. Accept the confirmation code. You’re done. Now you just have to wait to miss a call to see how the service works.
- Even when you choose to use Google Voice, I still recommend setting up and configuring the boring carrier voicemail, as covered earlier in this chapter.
-
 Your phone’s call forwarding feature disables Google Voice. If you forward calls, you must reset Google Voice after you’re done. That’s because Google Voice relies upon call forwarding to deal with unanswered or dismissed calls.
Checking your Google Voice messages
Google Voice transcribes your voicemail messages, turning the audio from the voicemail into a text message you can read. The messages show up eventually in the Google Voice app and in your Gmail inbox, if you’ve configured that option on the Google Voice website.
![]() When a new Google Voice message arrives, a notification icon appears, like the one shown in the margin. Choose the notification to open the Google Voice app and listen to your message. The app’s main interface looks like, and works similarly to, an email program and is illustrated in Figure 6-2.
When a new Google Voice message arrives, a notification icon appears, like the one shown in the margin. Choose the notification to open the Google Voice app and listen to your message. The app’s main interface looks like, and works similarly to, an email program and is illustrated in Figure 6-2.
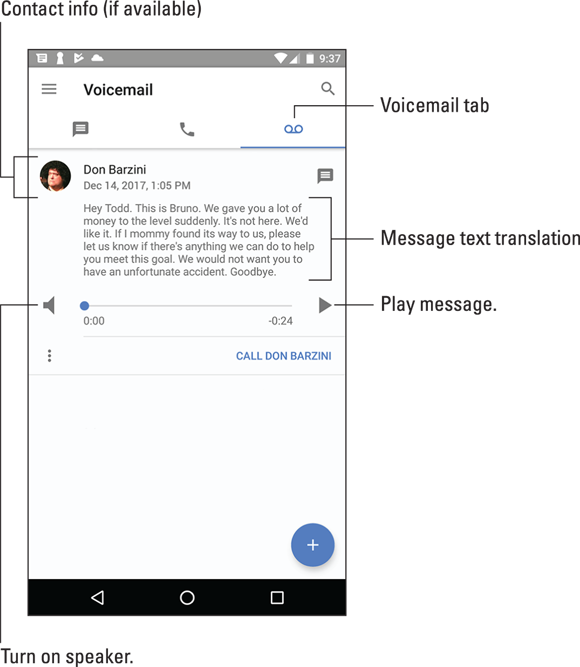
FIGURE 6-2: Voicemail with the Google Voice app.
Tap the Play icon to listen to your message, or just read the transcript.
The text Transcript Not Available appears whenever Google Voice is unable to create a text message from your voicemail or whenever the Google Voice service is temporarily unavailable.
Reviewing voicemail settings
Your Android phone contains internal settings that further configure the voicemail service. If everything is working well with voicemail, don’t mess with the settings. Otherwise, work through these steps to see what’s going on:
- Open the Phone app.
-
Tap the Action Overflow icon.
On some phones, tap the MORE button.
- Choose Settings.
-
Choose the Voicemail action, which may be titled Voicemail Services. Or Voicemail Settings.
On some phones, you must choose the Calls or Call Settings item first and then locate the Voicemail action.
-
Choose Service.
If you don’t see this item, choose Advanced or Advanced Settings.
-
Select the voicemail service.
The options are Carrier (or Your Carrier) and Google Voice, though only one option might be available.
When the Carrier option is chosen, the phone number used for voicemail is the carrier’s voicemail service. You can confirm that number by choosing the Setup or Voicemail Settings item on the Voicemail screen.
The voicemail service might be configured by using call forwarding options, as described earlier in this chapter. For Verizon phones, that’s how it’s done, especially with Google Voice: Unanswered calls are forwarded to your Google Voice number and then processed as voicemail.