
Chapter 24
Maintenance, Troubleshooting, and Help
IN THIS CHAPTER
![]() Cleaning an Android
Cleaning an Android
![]() Checking on the battery
Checking on the battery
![]() Saving battery power
Saving battery power
![]() Solving annoying problems
Solving annoying problems
![]() Searching for support
Searching for support
![]() Troubleshooting issues
Troubleshooting issues
![]() Getting answers
Getting answers
Maintenance is that thing you were supposed to remember to do but you didn’t do, and that’s why you need help and troubleshooting advice.
Don’t blame yourself; no one likes to do maintenance. Okay, well, I like maintaining my stuff. I even change the belt on my vacuum cleaner every six months. Did you know that the vacuum cleaner manual tells you to do so? Probably not. I read that in Vacuum Cleaners For Dummies. This book is Android Phones & Tablets For Dummies, which is why it contains topics on maintenance, troubleshooting, and help for Android mobile devices, which lack belts that you should change every six months.
The Maintenance Chore
Relax. Unlike draining the lawnmower’s oil once a year, regular maintenance of an Android phone or tablet doesn’t require a drip pan or a permit from the EPA. In fact, an Android requires only two basic regular maintenance tasks: cleaning and backing up.
Keeping it clean
You probably already keep your Android clean. Perhaps you’re one of those people who uses their sleeves to wipe the touchscreen. Of course, better than your sleeve is something called a microfiber cloth. This item can be found at any computer or office-supply store.
-
 Never use ammonia or alcohol to clean the touchscreen. These substances damage the device. If you must use a cleaning solution, select something specifically designed for touchscreens.
 - Touchscreen-safe screen cleaners are available for those times when your sleeve or even a microfiber cloth won’t cut it. Ensure that you get a screen cleaner designed for a touchscreen.
- If the touchscreen keeps getting dirty, consider adding a screen protector: This specially designed cover prevents the glass from getting scratched or dirty but still allows you to use your finger on the touchscreen. Be sure that the screen protector is designed for use with the specific brand and model of your phone or tablet.
- For an Android phone, consider a phone case, belt clip, or another protector, which can help keep the phone looking spiffy. Be aware that these items are mostly for decorative or fashion purposes and don’t even prevent serious damage should you drop the phone.
- Android tablets offer special cases or folios. Some are even combination case-keyboards, which eases the frustration of typing with the onscreen keyboard.
Backing up your stuff
For a majority of the information on your Android, backup is automatic. Your Google account takes care of Gmail, the calendar, and your contacts, music, eBooks, movies, and apps. This stuff is synchronized and backed up automatically.
To confirm that your account’s media is synchronized and other information is backed up, heed these steps:
- Open the Settings app.
- Choose Users & Accounts.
- Ensure that the master control by Automatically Sync Data is on.
- Tap your Google account in the list.
- Choose Account Sync.
-
Ensure that the master control by each item is on.
These are the items that synchronize between the device and your Google account on the Internet.
- Tap the Back navigation icon until you see the main Settings app screen.
- Choose System.
- Choose Backup.
-
Ensure that the master control by Back Up to Google Drive is on.
You can review each item in the list to confirm that a recent backup was made.
The steps to confirm sync and backup settings are different for older versions of the Android operating system. If you don’t see the User & Accounts item (see Step 2 in the preceding steps), follow these steps instead:
- Open the Settings app and choose Accounts.
- Choose Google to access your Google account settings.
- Ensure that the master control by each item in the list is enabled.
- Back at the main Settings app screen, choose Backup & Reset.
- Ensure that the item Back Up My Data is enabled.
Specific items from your device can be backed up manually. For example, if you download a PDF and want to keep a backup, copy that file from the device to a computer. Chapter 19 covers options for getting files out of your Android.
Updating the system
Every so often, your Android signals that a system update is available. Android operating system security updates occur about once a month. The device’s manufacturer may release an update. And Google occasionally releases a new version of the Android operating system.
![]() When an update is available, you see the System Update notification icon, as shown in the margin. Choose that notification to apply the update.
When an update is available, you see the System Update notification icon, as shown in the margin. Choose that notification to apply the update.
You might also see a pop-up message, or “toast,” appear on the screen when an update is available. Your options are to immediately update or postpone. My advice is to apply the update immediately, as long as the Android has sufficient battery life left (or you can connect to a power supply) and you’re not expecting to do anything major with the phone or tablet during the next few minutes.
You can also manually check for an update. Heed these directions:
- Open the Settings app.
- Choose System.
- Choose System Updates.
-
Tap Check for Update.
If an update is pending, you’ll see it listed.
In older versions of the Android operating system, choose About Phone or About Tablet in Step 2. The System Updates item is located on that screen.
- Android version 8.0 “Oreo” fetches an update if one is pending. Older versions of the Android operating system allow updates by quota. So, manually checking for an update, even when one is pending, may not result in updating the device.
-
 Connect your device to a power source during a software update. You don't want the battery to die in the middle of the operation.
Battery Care and Feeding
Perhaps the most important item you can monitor and maintain on your Android is its battery. The battery supplies the necessary electrical juice by which the device operates. Without battery power, your gizmo is basically an expensive drink coaster or trivet. Keep an eye on the battery.
Monitoring the battery
Your Android displays its current battery status at the top of the screen, in the status area, next to the time. The icons used are similar to those shown in Figure 24-1. They can appear white-on-black or use a charming color scheme, as illustrated in the figure.

FIGURE 24-1: Battery status icons.
You might also see an icon for a dead battery, but for some reason I can’t get my Android to turn on and display that icon.
- Heed those low-battery warnings! You hear a warning sound and see a notification whenever the battery power gets low. Another sound chimes whenever the battery gets very low.
- When the battery level is too low, the device shuts itself off.
-
 The best way to deal with low battery power is to connect the Android to a power source: Either plug it into a wall socket or use the USB cable to connect it to a computer. The phone or tablet begins charging itself immediately; plus, you can use the device while it’s charging.
 - Android devices charge more efficiently when plugged into a wall socket rather than a computer.
- You aren’t required to fully charge the battery. For example, if you have only 20 minutes before the next flight, and you get only a 70 percent battery level, that’s great. Well, it’s not great, but it’s far better than a lower battery level.
-
 Battery percentage values are best-guess estimates. Just because you get 8 hours of use from the device and the battery meter shows 20 percent remaining doesn’t imply that 20 percent equals 2 more hours of use. In practice, the amount of time you have left is much less than that. As a rule, when the battery percentage value gets low, the battery appears to drain faster.
Determining what is drawing power
The Battery screen in the Settings app informs you of the device’s battery usage over time, as well as which apps have been consuming power, as illustrated in Figure 24-2.
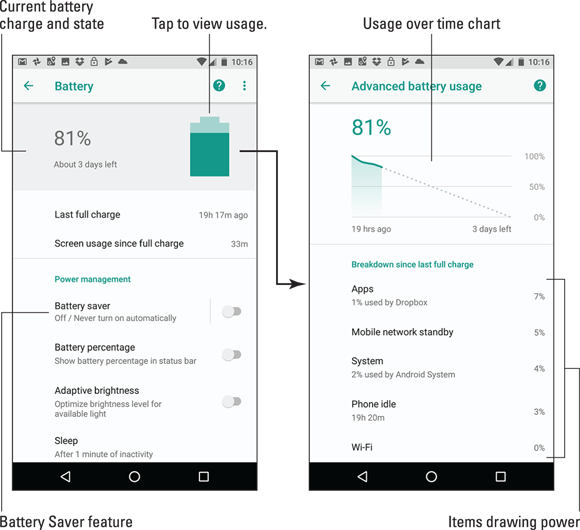
FIGURE 24-2: Power consumption details.
To view the battery usage, follow these steps:
- Open the Settings app.
-
Choose Battery.
On Samsung devices, choose the Device Maintenance category, and then choose Battery.
You see general information about battery usage, plus some power-saving tools, shown on the left in Figure 24-2. At the bottom of the screen (swipe down), you see which apps are using power.
-
Tap the Battery icon at the top of the screen (refer to Figure 24-2).
You see a charge illustrating battery power over time, plus which apps are using the most power.
The number and variety of items shown on the battery usage screen depend on what you’ve been doing with your Android between charges. Don’t be surprised if an item doesn’t show up in the list; not every app consumes a lot of battery power.
Extending battery life
A surefire way to make a battery last a good, long time is to never turn on the device in the first place. That’s kind of impractical. So instead, I offer a smattering of suggestions you can follow to help prolong battery life:
- Dim the screen: The touchscreen display draws quite a lot of battery power. Although a dim screen can be more difficult to see, especially outdoors, it saves on battery life.
- Lower the volume: Consider lowering the volume for the various noises the Android makes, especially notifications.
- Disable the vibration options: Vibration is caused by a teensy motor. Though you don’t see much battery savings by disabling the vibration options, it’s better than no savings.
- Turn off Bluetooth: When you’re not using Bluetooth, turn it off. The fastest way to do that is to use the Bluetooth quick action.
Rather than fuss with these individual settings, consider activating your Android’s battery-saver feature. Illustrated in Figure 24-2, switch on the master control by Battery Saver. When the power gets low, the actions listed earlier are all taken: The screen is dimmed, and services are disabled. The result is more battery life without fully affecting overall device performance.
- Samsung devices feature an “ultra” battery-saving mode. In this mode, the screen dims and color is disabled. The Home screen is replaced by a special interface that lists only necessary features. I’ve used this mode when my phone’s battery level dipped below 30%, and it helped extend the battery life for hours.
-
The Wi-Fi radio can drain the battery quickly, even when you’re not using it. When driving long distances, I disable Wi-Fi on my Android. If I don’t, it seems that the device tries to connect with every Wi-Fi signal available. Especially in highly populated areas, this activity can quickly — and surprisingly — drain the battery.
Help and Troubleshooting
Getting help with technology today isn’t as bad as it was years back. I remember only two sources for help: the atrocious manual that came with your electronic device and a phone call to the guy who wrote the atrocious manual. It was unpleasant. Today, the situation is better. You have many resources for solving issues with your gizmos, including your Android.
Fixing random and annoying problems
Aren’t all problems annoying? A welcome problem doesn’t exist, unless the problem is welcome because it diverts attention from another, preexisting problem. And random problems? If problems were predictable, they would serve in office.
General trouble
For just about any problem or minor quirk, consider restarting the phone or tablet: Long-press the Power/Lock key. The device options menu may feature a Restart action. If so, use it. Otherwise, turn it off, and then turn it on again. This procedure fixes most of the annoying problems you encounter.
See Chapter 2 for basic Android on–off instructions.
Connection woes
As you move about, the cellular signal can change. In fact, you may observe the status icon change from 4G LTE to 3G to even the dreaded 1X or — worse — nothing, depending on the strength and availability of the mobile data network.
My advice for random signal weirdness is to wait. Oftentimes, the signal comes back after a few minutes. If it doesn't, the mobile data network might be down, or you may just be in an area with lousy service. Consider changing your location.
For Wi-Fi connections, ensure that Wi-Fi is set up properly and working. This process involves pestering the person who configured the Wi-Fi router or, in a coffee shop, bothering the cheerful person with the tattoos and piercings who serves you coffee.
Be aware that some Wi-Fi networks have a “lease time” after which your device is disconnected. If so, follow the directions in Chapter 19 for turning off the Wi-Fi radio and then turn it on again. That often solves the issue. Also refer to Chapter 19 for details on metered Wi-Fi connections.
Another problem I’ve heard about is that the Wi-Fi router doesn’t recognize your Android. In this case, the router might use older technology and it needs to be replaced.
Music is playing and you want it to stop
It’s awesome that your Android continues to play music while you do other things. Getting the music to stop quickly, however, requires some skill. You can access the Play controls for the Play Music app from a number of locations. They’re found on the Lock screen, for example. You can also find them in the notifications drawer.
An app has run amok
Sometimes, apps that misbehave let you know. You see a warning on the screen announcing the app’s stubborn disposition. When that happens, tap the FORCE QUIT button to shut down the app. Then say, “Whew!”
To manually shut down an app, refer to Chapter 20.
You've reached your wit's end
When all else fails, you can do the drastic thing and perform a factory data reset on your device. Before committing to this step, you should contact support as described in the next section.
Refer to Chapter 22 for details on the factory data reset.
Getting help and support
Never discount your Android device’s manufacturer for assistance when you need it. If you have an Android phone or LTE tablet, consider contacting the cellular provider. Between the two, I recommend contacting the cellular provider first, no matter what the problem. Beyond these resources, you can read the information I’ve presented in this section.
The Help app
Some manufacturers include a Help or Getting Started app with their devices. They may offer pop-up toasts, which present tips as you explore new features on your phone or tablet.
Google Support is available in the Settings app, though this feature was added only with newer releases of the Android operating system. Follow these steps:
- Open the Settings app.
- Choose Support.
The options on the Support screen include phoning or chatting with a Google support person, as well as searching online Help. An option for reviewing tips and tricks is also presented.
- Also look for a Help eBook in the Play Books app.
 The Settings app features the Search icon, which helps you locate specific settings without knowing exactly under which category the item might be found.
Cellular support
Contact information for both the cellular provider and device manufacturer is found in the material you received with your Android. In Chapter 1, I recommend that you save those random pieces of paper. You obviously have read that chapter and followed my advice, so you can easily find that information.
Okay, so you don’t want to go find the box, or you didn’t heed my admonition and you threw out the box. Table 24-1 lists contact information for U.S. cellular providers. The From Cell column lists the number you can call by using your Android phone; otherwise, you can use the toll-free number from any phone.
TABLE 24-1 U.S. Cellular Providers
|
Provider |
From Cell |
Toll-free |
Website |
|
AT&T |
611 |
800-331-0500 | |
|
Sprint Nextel |
*2 |
800-211-4727 | |
|
T-Mobile |
611 |
877-453-1304 | |
|
Verizon |
611 |
800-922-0204 |
Manufacturer support
Another source of support for your device, or only source if you have a Wi-Fi-only tablet, is the manufacturer, such as Samsung or LG. Information about support can be found in those random papers and pamphlets included in the device’s box. If not, refer to Table 24-2 for contact information.
TABLE 24-2 Android Manufacturers
|
Manufacturer |
Website |
|
HTC | |
|
LG | |
|
Motorola | |
|
Samsung |
|
App support
For app issues, contact the developer. Follow these steps:
- Open the Play Store app.
- Tap the Side Menu icon to display the navigation drawer.
- Choose My Apps & Games.
- Tap the Installed tab.
- Tap the entry for the specific app, the one that’s bothering you.
-
Choose the Send Email item.
Swipe the screen bottom-to-top to scroll down the app’s Info screen and find the Send Email item. It’s usually one of the last items on the screen.
Contacting the developer is no guarantee that they’ll respond.
Google Play support
For issues with Google Play itself, contact Google at
Valuable Android Q&A
I love Q&A! Not only is it an effective way to express certain problems and solutions, but some of the questions might also cover things I’ve been wanting to ask.
“I can’t turn the thing on (or off)!”
Sometimes an Android locks up. It’s frustrating, but I’ve discovered that if you press and hold the Power/Lock key for about 8 seconds, the device turns either off or on, depending on which state it’s in.
If waiting 8 seconds doesn’t work, let the phone or tablet sit for 10 minutes or so. Try again.
“The touchscreen doesn’t work!”
A touchscreen requires a human finger for proper interaction. The screen interprets the static potential between the human finger and the device to determine where the touchscreen is being touched. The touchscreen will not work if the screen is damaged. It will not work when you’re wearing gloves, unless they’re specially designed touchscreen gloves. The touchscreen might fail also when the battery power is low.
“The screen is too dark!”
Android device’s feature a teensy light sensor on the front. If the Adaptive Brightness or Auto Brightness feature is active, the sensor adjusts the touchscreen’s brightness based on the amount of ambient light at your location. If the sensor is covered, the screen can get very, very dark.
Ensure that you don’t unintentionally block the light sensor. Avoid buying a case or screen protector that obscures the sensor.
The automatic brightness setting might also be vexing you. See Chapter 21 for information on setting screen brightness.
“The battery doesn’t charge!”
Start from the source: Is the wall socket providing power? Is the cord plugged in? The cable may be damaged, so try another cable.
When charging from a USB port on a computer, ensure that the computer is turned on. Most computers don’t provide USB power when they’re turned off. Also, some USB ports may not supply enough power to charge the battery. If possible, use a port on the computer console (the box) instead of a USB hub.
Some Android tablets charge from a special cord, not the USB cable. Check to confirm that your tablet is able to take a charge from the USB cable.
“The gizmo gets so hot that it turns itself off!”
Yikes! An overheating gadget can be a nasty problem. Can you hold the Android in your hand, or is it too hot to hold? When it’s too hot to hold, turn off the power. Disconnect it from the power supply. Let it cool.
If the overheating problem continues, have the Android looked at for potential repair. The battery might need to be replaced. Some phones may have removable batteries, but most Android phones and tablets are sealed units where you cannot replace the battery yourself.
- It’s normal for a phone to get warm (not hot) as you use it. If you blab for an hour or so, the phone will seem warmer than normal. That’s just the battery doing its job.
- It’s also normal for an Android to be warm as it’s charging. If the device is too hot to hold, you need to disconnect the power cord and let the gizmo cool down.
-
Do not continue to use any device that’s too hot! The heat damages the electronics. It can also start a fire.
“The screen doesn’t do Landscape mode!”
Not every app can change its orientation between Portrait and Landscape modes — or even Upside-Down mode. For example, many games present themselves in one orientation only. Some Androids don’t rotate their Home screens. So, just because the app doesn’t go into Horizontal or Vertical mode doesn’t mean that anything is broken.
Confirm that the orientation lock isn’t on: Check the quick settings. Ensure that the Auto-Rotate or Screen Rotation item is properly set. Also, some eBook reader apps sport their own screen rotation lock feature. Tap the Action Overflow to determine whether it’s enabled.