In this section, we will scaffold the Angular application using the Angular CLI, add Angular Material to our application, and create a simple e-commerce application.
Let's create another application on the same level where you have the es-api folder. We will use the Angular CLI by using the following command:
> ng new electronic-store --prefix es
We will be using Angular Material for this application. Angular Material is a component library that follows the Material Design guidelines. It is maintained by the Angular Material team at Google. Angular Material follows the Material Design guidelines strictly and has very high-quality components with high standards for accessibility.
Let's go into the electronic-store folder and add Angular Material using the ng add command, as follows:
> ng add @angular/material
You will be prompted to answer a few questions; select the following options:
? Choose a prebuilt theme name, or "custom" for a custom theme: Indigo/Pink [ Preview: https://material.angular.io?theme=indigo-pink ]
? Set up HammerJS for gesture recognition? Yes
? Set up browser animations for Angular Material? Yes
Once you've answered these questions, you will find that the following files have been updated:
UPDATE src/main.ts (391 bytes)
UPDATE src/app/app.module.ts (423 bytes)
UPDATE angular.json (4060 bytes)
UPDATE src/index.html (481 bytes)
UPDATE src/styles.css (181 bytes)
UPDATE package.json
This updates all the files and dependencies that we need so that we can add Material to our application. If you would like to manually add Angular Material to your application, follow the following steps: https://material.angular.io/guide/getting-started.
Angular Material provides additional schematics so that you can generate navigation, tables, dashboards, and tree and address forms. Let's use the nav generate command to create navigation for our application:
> ng g @angular/material:nav nav
Now, let's use the navigation in our application by replacing the content in app.component.html with just the nav component:
<es-nav></es-nav>
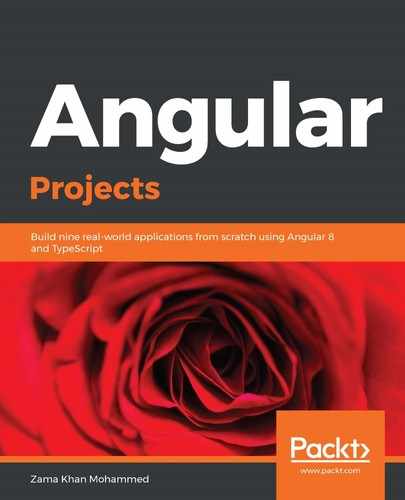
When we serve our application, we should see that our navigation with the header is generated by Angular Material, as follows:
Let's also go ahead and add all the Angular Material dependencies to our application that we will use in the rest of this chapter:
...

import { MatToolbarModule, MatButtonModule, MatSidenavModule, MatIconModule, MatListModule, MatCardModule, MatSelectModule, MatDialogModule, MatBadgeModule, MatSnackBarModule } from '@angular/material';

const matDesignModules = [ MatToolbarModule, MatButtonModule, MatSidenavModule, MatIconModule, MatListModule, MatCardModule, MatSelectModule, MatDialogModule, MatBadgeModule, MatSnackBarModule ];

@NgModule({
    ...
    imports: [
        BrowserModule,
        BrowserAnimationsModule,
        LayoutModule,
        ...matDesignModules,
    ],
    ...
})
export class AppModule { }
I created a variable called matDesignModules so that I could keep all the Material Component modules together.
We will make some modifications to the nav.component.html file since we don't need a side menu in our application. We will also use ng-content to pass the main content. We will pass this content via the right-hand side of the navigation bar:
<mat-sidenav-container class="sidenav-container">
    <mat-sidenav-content>
        <mat-toolbar color="primary">
            <span>Electronic Store</span>
            <span class="spacer"></span>
            <ng-content select="[right]"></ng-content>
        </mat-toolbar>
        <!-- Add Content Here -->
        <ng-content></ng-content>
    </mat-sidenav-content>
</mat-sidenav-container>
Let's add styles for the spacer class, which will make sure that the right slot is aligned on the right-hand side, as follows:
.spacer {
    flex: 1 1 auto;
}
Let's pass the content for the right-hand side of the navigation and the main content:
<es-nav>
    <div right>
        <button aria-label="Cart" mat-icon-button>
            <mat-icon>shopping_cart</mat-icon>
        </button>
    </div>
    <div class="products">
        <h1>Products</h1>
        <!-- Products will come here -->
    </div>
</es-nav>
Add some styles to the app.component.css file, as follows:
.product-card {
 max-width: 200px;
 margin-top: 20px;
}

.products {
 display: flex;
 flex-wrap: wrap;
 justify-content: space-around;
 margin-top: 30px;
}
Now, we will see a shopping cart icon on the header, as well as a heading in the content area of the page, as shown in the following screenshot:

Now, let's create the ProductsService using the following command:
> ng g s products
From here, we will create a function so that we can call the PRODUCTS_API that we created using Nest.js:
import { Injectable } from '@angular/core';
import { HttpClient } from '@angular/common/http';

const PRODUCTS_API = 'http://localhost:3000/products';

@Injectable({
    providedIn: 'root'
})
export class ProductsService {
    constructor(private http: HttpClient) { }

    getProducts() {
        return this.http.get(PRODUCTS_API);
    }
}
Let's create a products$ property in our AppComponent that will be used along with the async pipe in the template:
import { Component } from '@angular/core';
import { Observable } from 'rxjs';
import { ProductsService } from './products.service';

@Component({
    selector: 'es-root',
    templateUrl: './app.component.html',
    styleUrls: ['./app.component.scss']
})
export class AppComponent {
    products$: Observable<any>;
    constructor(private productsService: ProductsService) {
        this.products$ = this.productsService.getProducts();
    }
}
Now, we will display the products in a mat-card. You can find all the details about mat-card in the following: https://material.angular.io/components/card/overview:
<es-nav>
    ...
    <div class="products">
        <mat-card class="product-card" *ngFor="let product of
         products$ | async; let i = index">
            <img [attr.alt]="product.name" mat-card-image
              [src]="product.images[0]">
            <mat-card-content>
                <mat-card-title>{{product.name}}</mat-card-
                 title>
                <mat-card-subtitle>{{product.category}}</mat-
                 card-subtitle>
                <mat-card-subtitle class="sale-price">
                    {{product.salePrice | currency}}
                    <span class="original-price">
                     {{product.price | currency}}</span>
                </mat-card-subtitle>
                <p>{{product.description}}</p>
            </mat-card-content>
        </mat-card>
    </div>
</es-nav>
Now, we can see the products in the Material cards, along with a description of each product, as shown in the following screenshot:

Now, let's create a button that can add/remove multiple items of each product to/from the cart. Let's call it the add-to-cart component, as follows:
> ng g c add-to-cart
Let's add a button. We will use a Material stroke button for this. When clicked, we will replace this with an element that will have two buttons for incrementing and decrementing the product count, and that also counts products that have been added to the cart:
<button class="buy-btn" (click)="add()" mat-stroked-button color="primary" *ngIf="count === 0; else cartBtns">Buy Now</button>
<ng-template #cartBtns>
    <div class="btn-mimicry">
        <button color="primary" mat-icon-button *ngIf="count === 1;
         else removeBtn" (click)="remove()"><mat-icon>delete</mat-
         icon></button>
        <ng-template #removeBtn>
            <button mat-icon-button color="primary"><mat-icon
            (click)="remove()">remove_circle_outline</mat-icon>
            </button>
        </ng-template>
        {{count}}
        <button mat-icon-button (click)="add()" color="primary">
            <mat-icon>add_circle_outline</mat-icon>
        </button>
    </div>
</ng-template>
Add a count input and an updateCount output to your AddToCartComponent and implement the add and remove methods:
import { Component, OnInit, Input, Output, EventEmitter } from '@angular/core';

...
export class AddToCartComponent implements OnInit {
    @Input() count = 0;
    @Output() updateCount = new EventEmitter();

    constructor() { }

    ngOnInit() {
    }

    add() {
        this.count++;
        this.updateCount.emit(this.count);
    }

    remove() {
        this.count--;
        this.updateCount.emit(this.count);
    }
}
Let's finish the AddToCartComponent with some styles to make the button fit the card better in add-to-cart.component.css:
.buy-btn {
    width: 100%;
}

.btn-mimicry {
    border: 1px solid rgba(0,0,0,.12);
    border-radius: 5px;
    box-shadow: 0 0 0 0 rgba(0,0,0,.2), 0 0 0 0 rgba(0,0,0,.14), 0
    0 0 0 rgba(0,0,0,.12);
    display: flex;
    justify-content: space-between;
    align-items: center;
}

button[mat-icon-button] {
    width: 34px!important;
    height: 34px!important;
}

mat-icon {
    height: 32px;
    width: 25px;
}
Now, let's add our component to app.component.html within the mat-card-actions component:
<es-nav>
    ...
    <div class="products">
        <mat-card class="product-card" *ngFor="let product of
         products$ | async; let i = index">
            ...
            <mat-card-actions>
                <es-add-to-cart></es-add-to-cart>
            </mat-card-actions>
        </mat-card>
    </div>
</es-nav>
Now, you should be able to see the add to cart button, which can be interacted with independently:

Let's create a CartService so that we can use this information in other components:
> ng g s cart
In our CartService, we will create a cart object with the product id as a key and product details with the count as the value. The addToCart method that will update the cart object is as follows:
import { Injectable } from '@angular/core';
import { BehaviorSubject } from 'rxjs';

@Injectable({
    providedIn: 'root'
})
export class CartService {
    cart: any = {};
    cart$;

    constructor() {
        this.cart.cartTotal = 0;
        this.cart$ = new BehaviorSubject(this.cart);
    }

    addToCart(count, product) {
        if (count === 0) {
            delete this.cart[product._id];
        } else {
            this.cart = {
                ...this.cart,
                [product._id]: {
                    ...product,
                    count,
                }
            };
        }
        this.cart.cartTotal = 0;
        Object.values(this.cart)
            .filter(x => typeof x === 'object')
            .forEach((p: any) => this.cart.cartTotal = this.cart.cartTotal
            + p.count);
        this.cart$.next(this.cart);
    }
}
Let's add our CartService to our AppComponent:
import { Component } from '@angular/core';
import { Observable } from 'rxjs';
import { ProductsService } from './products.service';
import { CartService } from './cart.service';

@Component({
    selector: 'es-root',
    templateUrl: './app.component.html',
    styleUrls: ['./app.component.scss']
})
export class AppComponent {
    products$: Observable<any>;
    cart$: Observable<any>;
    cart;

    constructor(
        private productsService: ProductsService,
        private cartService: CartService
    ) {
        this.products$ = this.productsService.getProducts();
        this.cart$ = this.cartService.cart$.subscribe(cart => this.cart
        = cart);
    }

    onAddProduct(count, product) {
        this.cartService.addToCart(count, product);
    }
}
Let's display the cartTotal on the shopping_cart badge and display the product count from the cart. We will also pass the count to the es-add-to-cart component, as well as an event to updateCount, as follows:
<es-nav>
    <div right>
        <button aria-label="Cart" mat-icon-button>
            <mat-icon [matBadge]="cart.cartTotal"
             matBadgeColor="accent"
             matBadgePosition="before">shopping_cart</mat-icon>
        </button>
    </div>
    <div class="products">
        <mat-card class="product-card" *ngFor="let product of products$
         | async; let i = index">
            ...
            <mat-card-actions>
                <es-add-to-cart [count]="cart[product._id]?.count || 0"
                (updateCount)="onAddProduct($event, product)"></es-add-to-
                cart>
            </mat-card-actions>
        </mat-card>
    </div>
</es-nav>
Now, when you add a product, you should see the count of products in the cart in the header as the cart's badge, as shown in the following screenshot:

Let's end this application by showing the cart in a dialog box. Let's add a cart component via Angular CLI by using the following command:
> ng g c cart
We're adding the CartComponent to the entryComponents of the AppModule since it will be added dynamically by the MatDialog service provided by Angular Material:
...
import { CartComponent } from './cart/cart.component';
...
@NgModule({
    ...
    entryComponents: [CartComponent]
})
export class AppModule { }
Let's trigger a click event on the shopping cart button in our navigation:
<button aria-label="Cart" mat-icon-button (click)="openCart()">
    <mat-icon [matBadge]="cart.cartTotal" matBadgeColor="accent"
     matBadgePosition="before">shopping_cart</mat-icon>
</button>
Now, we'll use the MatDialog service to show the Cart component. This can be done with the following code:
...
import { MatDialog } from '@angular/material';
import { CartComponent } from './cart/cart.component';
...
export class AppComponent {
    ...
    constructor(
        ...
        private dialog: MatDialog
    ) {
        ...
    }

    openCart() {
        this.dialog.open(CartComponent, {
            width: '500px',
        });
    }
}
Now, when we click on the cart in the header, we should see the CartComponent displayed in the dialog:

Now, let's use CartService in our CartComponent to get all the items in the cart and also create the getValues method to convert the cart object into an array of objects. We will use the onSelectionChange method whenever the selected drop-down value changes (we will use mat-select to change the number of items in the cart for the product):
import { Component, OnInit } from '@angular/core';
import { CartService } from './../cart.service';

@Component({
    selector: 'es-cart',
    templateUrl: './cart.component.html',
    styleUrls: ['./cart.component.css']
})
export class CartComponent implements OnInit {
    cart$;
    constructor(private cartService: CartService) {
        this.cart$ = this.cartService.cart$;
    }

    ngOnInit() {
    }

    getValues(obj) {
        return Object.values(obj)
            .filter(x => typeof x === 'object');
    }

    onSelectionChange($event, product) {
        this.cartService.addToCart($event.value, product);
    }
}
Let's use the async pipe to display all the items in the card using mat-list and have mat-select change the number of items in the cart for the product:
<ng-container *ngIf="(cart$ | async) as cart">
<h1 mat-dialog-title>Cart</h1>
<div mat-dialog-content>
<mat-list>
<mat-list-item *ngFor="let product of getValues(cart)">
<h4 mat-line>{{ product.name }}</h4>
<p mat-line>{{ product.salePrice | currency }}</p>
<mat-form-field class="count">
<mat-select
[value]="product.count"
(selectionChange)="onSelectionChange($event,
product)"
>
<mat-option
*ngFor="let count of [1, 2, 3, 4, 5, 6, 7, 8,
9, 10]" [value]="count"
>
{{ count }}
</mat-option>
</mat-select>
</mat-form-field>
{{ product.count * product.salePrice | currency }}
</mat-list-item>
<mat-divider></mat-divider>
<h3 mat-subheader>
Sub Total: <b><!-- Sub Total Placeholder-
-></b>
</h3>
</mat-list>
</div>
</ng-container>
Finally, to show the subtotal of all the products in the cart, we will create a pipe, to which we will pass the cart and get back the subtotal:
> ng g p sub-total
Let's add the transformation logic for the pipe in the transform method of the pipe:
import { Pipe, PipeTransform, Injector } from '@angular/core';

@Pipe({
    name: 'subTotal'
})
export class SubTotalPipe implements PipeTransform {
    currencyPipe;

    constructor() {
    }

    transform(cart): any {
        let total = 0;
        Object.values(cart).forEach((product: any) => {
            if (product.count) {
                total += product.count * product.salePrice;
            }
        });
        return total;
    }
}
Now, let's use the pipe in the placeholder of our cart.component.html to get a subtotal:
<h3 mat-subheader>
Sub Total: <b>{{ cart | subTotal | currency }}</b>
</h3>
Now, when you add the products and click on the cart in the navigation bar, you should see the following output:

This is our simple e-commerce app, where we can view our products and add items to the cart. Before we go ahead and convert our application into a complete PWA with offline and home screen support, we will audit our application so that we can compare the beginning and end of our audit at each step.
Now, we'll learn how we can audit our application using Lighthouse and check whether it meets all our requirements so that it can become a PWA.