
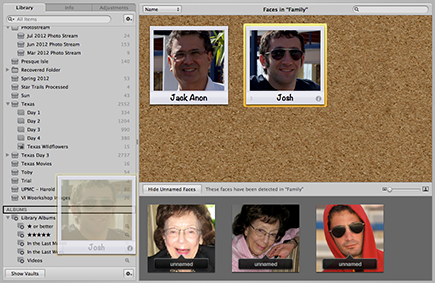
5.5 Click Confirm Faces to verify the name on the photos.
Chapter 5: How Do I Use Faces and Places to Categorize My Images?
Faces and Places take advantage of cutting-edge face detection and face recognition technology as well as GPS information and Google Maps, even if your camera lacks these technologies. You use Faces and Places not only to identify people and places in your images but also to organize your images so you can see all the shots you have of a particular person or all the images you took in a certain location without having to keyword each one. Faces and Places now work across both iPhoto and Aperture, so once you identify and locate images in one app, the information is maintained if you open the same library in the other program.
Using Faces
Faces is designed to make it easy for you to assign names to people in your photos and then to find photos of each person with a minimum of fuss. If you take advantage of Faces, years from now you’ll be able to look at these photos and still know who’s who. When you assign a name (or place) to a photo, Aperture automatically adds it to the keywords that are exported. If you’ve ever looked at old photos and wondered who you were looking at, it’s easy to see why this feature is a huge advantage. In this section, we cover enabling Faces, using the interface, searching for photos of certain people, and changing names.
Enabling Faces
Aperture is set to scan every photo that you import as well as every image in your library if you update a library from an earlier version of Aperture for any and all potential faces. This is because the preference to enable Faces is selected by default. This search runs in the background but may slow some operations such as the initial import as well as the processing for extensive adjustments.
If you don’t need to identify the people in your photos, or you want to speed up your import or adjustments, you can turn off Faces. Your downloads will be faster, and you can turn on Faces whenever you want to use it. To turn off Faces (or to turn it back on) follow these steps:
1. Choose Aperture → Preferences. The Preferences dialog opens.
2. Click the General tab and select or deselect the Enable Faces check box.
3. Click the Appearance tab and select or deselect the Show corkboard background for Faces check box as desired. This is completely a matter of personal preference, but we like the corkboard because it makes it obvious that we’re in the Faces view.
4. Close the Preferences dialog.

If you enable Faces after a period of having it disabled, Aperture automatically scans all your projects looking for faces. This occurs as a background task with minimal interruption to your activities unless you’re trying to make image adjustments at the same time.
Using the Faces interface
There are two main ways to use the Faces interface: via the Faces button and via the Name button. Using the Name button is covered shortly. Keep in mind that the Faces interface is a Viewer mode like Split view and Places. The Faces view displays the photos with faces that Aperture detects, including those that you’ve named as well as those that are still unnamed. Images that you’ve named appear on the corkboard where the Viewer normally appears, and images with unnamed faces appear on the bottom where the Browser normally sets.
Do one of the following to access the Faces view via the Faces icon, as shown in Figure 5.1:
![]() Select a specific project, album, or folder in the Library Inspector to show the faces just for that entity and click the Faces icon.
Select a specific project, album, or folder in the Library Inspector to show the faces just for that entity and click the Faces icon.
![]() Select the Faces icon in the Library Inspector to display all faces in the entire library.
Select the Faces icon in the Library Inspector to display all faces in the entire library.
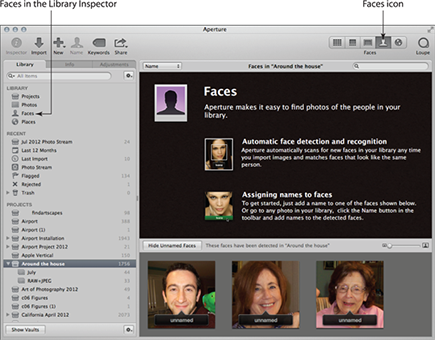
5.1 Use the Faces view to add names to images.

If you prefer shortcuts, press Shift+F to enter Faces.
Assigning names using Faces
You can assign names to images from within Faces or from within the Browser by clicking the Name button. We begin by showing you how to use Faces to name your photos.
To assign names using Faces, follow these steps:
1. Click the unnamed overlay on an image. The overlay changes to type name, and then you do so. Aperture tries to use the information in your Contacts and Facebook to auto-fill the information. In Figure 5.2, Jack’s name is added to his photo.
5.2 Click the unnamed overlay and type a name.
2. Press Return and the image appears on the corkboard with the name you assigned.
3. As you mouse over the thumbnail on the corkboard, a small i appears in the lower right of the thumbnail, as shown in Figure 5.3. Click the i to reveal the Info dialog also shown. Choose how much information you want to include such as the person’s address and phone number, e-mail address, and so on.
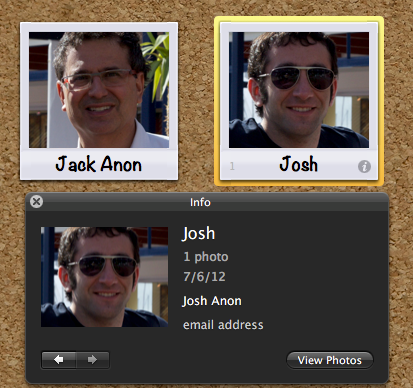
5.3 Hover the cursor over the image until the i appears in the lower-right corner, and then click the i to fill in information about the person in the resulting dialog.
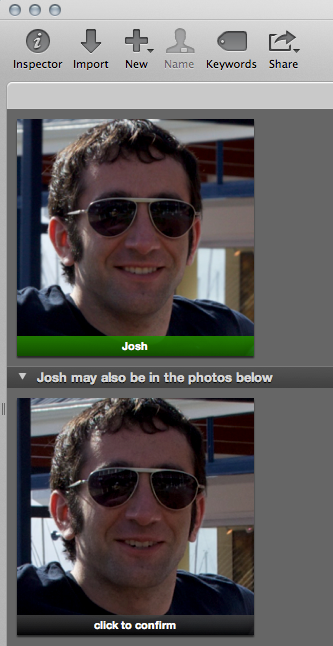
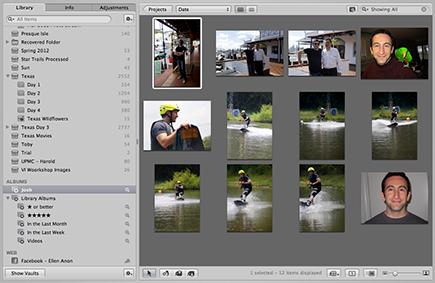
4. Click View Photos to see other photos that you’ve identified (as Josh in this example) as well as any pictures that Aperture thinks might contain the same person, as shown in Figure 5.4. You can also view other images of this person that you’ve previously identified by moving your cursor over the thumbnail in this dialog.
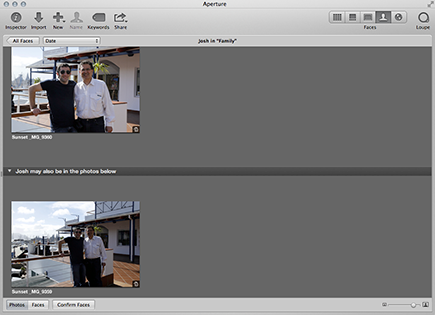
5.4 Use this dialog to see all the pictures of this person that you’ve named so far and any images that Aperture thinks might be that person. When you click Faces, Aperture displays close-ups of the Faces rather than the entire image. Click Photos to view the entire image.
To set one of the images as the key photo in the corkboard, click on the thumbnail. That image will be displayed whenever you open that dialog as well as in the corkboard.
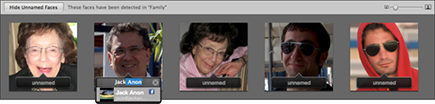
5. Click Confirm Faces at the bottom of the interface. A new view appears with the images you’ve identified on the top and images that Aperture thinks might be that person on the bottom.
6. Click the images to confirm as sharing the same name, as shown in Figure 5.5, and then click Done. Aperture returns to the previous interface and those images join the original in the top part of the interface.
• To reject an image, hold down the Option key and the overlay changes to say Click to reject. If you click, the overlay turns red and says Not the Person.
• If you mistakenly click an image and confirm the wrong identity, hover the cursor over the name and you’ll see an option saying Click to reject as shown in Figure 5.6. After you click, the bar at the bottom of the image turns red and says Not the person.
7. Click All Faces to return to Faces to identify more photos. To exit Faces and return to editing images, choose Split View, Viewer, or Browser.
To quickly assign names for unnamed images in the lower part of the Faces interface, select the images and drag them onto named images on the corkboard. The name is automatically assigned to the images without you having to type each one.
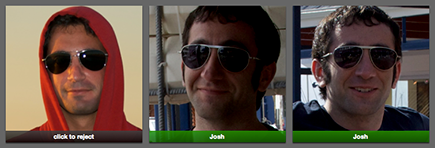
5.6 Click the name to reject the name if you make a mistake.
Sometimes Aperture misidentifies an image as having a face or if there is a face, it’s not someone you want to identify. In that case, as you hover the cursor over the thumbnails in the bottom of the Faces view, the option Skip appears as an overlay on the thumbnail, as shown in Figure 5.7. Click Skip to remove it from Faces.

5.7 Hover the cursor over the thumbnail and click Skip to remove an image from Faces.
Assigning names using the Name button
If while going through your images in the Viewer and/or Browser you discover images with faces that Aperture missed or images to which you haven’t assigned names yet, make sure Faces is enabled in Preferences.
Then to assign names using the Name button, as shown in Figure 5.8, follow these steps:

5.8 Click the Name button to assign names while in Viewer mode.
1. Select the image(s) in the Browser.
2. Click the Name button. An overlay appears that you use to assign a name, as shown in Figure 5.9.
5.9 Use the overlays to assign names to individual images while in the Split view or Viewer mode.
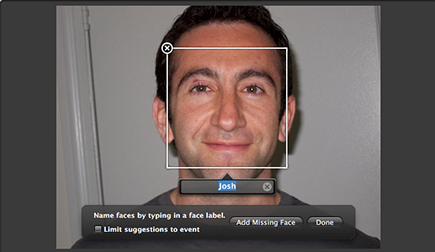
3. Click Add Missing Face, if necessary. A rectangle appears that you drag and resize to frame the face. Then click the Click to Name button and type the name. If there’s more than one person in the photo, click the button again and repeat the process.
4. Click Done to exit and continue viewing your images, or click the right arrow next to the name to enter Faces. Doing the latter opens Faces showing all images of that person that have been identified on top and images that might be that person on the bottom. Continue as described earlier to confirm or reject these other images.
Correcting a name
If while viewing images within a project or album you discover you’ve accidentally given someone the wrong name, you can easily correct it by taking these steps:
1. While in the Viewer or Split view mode, select the image with the incorrect name.
2. Click the Name button in the toolbar.
3. Click the name, and then type the correct name in the text field.
4. To delete the name entirely, click the X in the upper-left corner of the positioning box overlay that’s over the person’s face. The image becomes unnamed and is not included in Faces. To leave the image in Faces but have it become unnamed, click the X to the right of the text field containing the name.
5. Click Done when you’ve renamed or unnamed the image.
If you discover that you’ve misspelled someone’s name on all the images in that project or album, select the Faces view, double-click the name on the corkboard, and retype it correctly. Aperture updates all the images associated with the name.
Finding people using Faces
One of the purposes of adding names to your photos is so that you can easily find pictures of that person. To find images of a certain person that you’ve already named using Faces, follow these steps:
1. In the Library Inspector, choose Library → Faces.
2. Type the person’s name in the search field at the top right. Aperture limits the corkboard display to that person.
3. Click the small i in the lower-right corner of the person’s photo on the corkboard.
4. Click View Photos or mouse over the thumbnail to see the various photos of the person as well as photos that Aperture thinks might be that person. Note that with this procedure Aperture displays all images of this person that it finds anywhere in the library, not just within a specific album or project.
5. To add photos to the named photos, choose them in the Browser and drag them into the Viewer. Aperture automatically adds the Faces information.
6. Double-click to open a particular photo in the Viewer. To view the image within its project, choose File → Show in Project. Aperture automatically displays the image within the project or album.
Another approach is to create a Smart Album for each person. To create Smart Albums for people, do the following:
1. Name a photo in Faces as described earlier.
2. While in Faces, drag the thumbnail of the named photo to the word Albums to create a new Smart Album containing just images of that person found anywhere in the library, as shown in Figures 5.10 and 5.11. If the Smart Album is at the library level, it will contain all images of that person and will update when you import new images of that person (and confirm the identity of the person in Faces). If you create the Smart Album at a more specific level by dragging the thumbnail to a specific folder, project, or album, then it will update only when new images are added at that level.
3. To search for photos of a person, choose the appropriate Smart Album. It doesn’t get easier than that!
5.10 Drag an image onto Albums in the Library Inspector to automatically create a new Smart Album that updates to contain all images of that person when you import and identify more images.
5.11 Click the Smart Album to view all images of that person within the library.
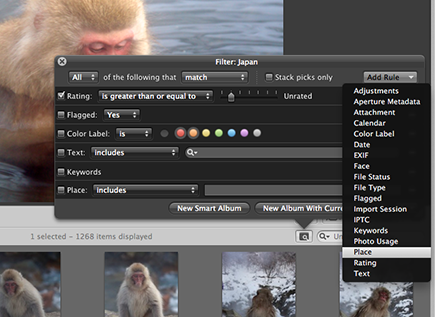
You can use the Browser Filter and add a field for Faces to search for images of a person while specifying other criteria as well. For example, if the Smart Album is at the library level and you want to see all your five-star images of that person, you’d use the filter and choose Rating is equal to or greater than 5 stars. Then click the Add Rule button and choose Faces includes or is and add the person’s name. That’s a quick way to see just the images that meet your criteria.
Using Places
Knowing exactly where you took an image or choosing a location and quickly seeing all the photos you made there can come in handy. Places uses the built-in GPS information that some cameras offer to automatically plot where you took the images. But if your camera doesn’t offer GPS data, you can still take advantage of Places. You can use GPS data from an iPhone or other GPS tracking device, or assign location information manually. In this section, we cover how to enable Places, how to assign locations to images regardless of whether your camera has a GPS feature, as well as how to search for images by location.
Enabling Places
By default, Aperture’s Preferences are set to enable Places. However, you must have Internet access for Places to work. If you want to disable (or reenable) Places, follow these steps:
1. Choose Aperture → Preferences. The Preferences dialog appears.
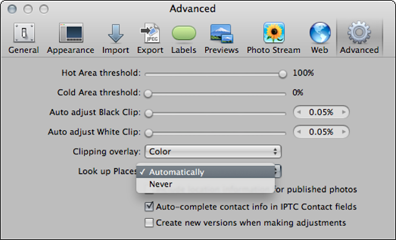
2. Click the Advanced tab.
3. In the Look up Places pop-up menu, choose Never to disable Places and Automatically to enable it, as shown in Figure 5.12. In addition you can specify whether to include location information for published photos.
4. Close Preferences.
Assigning locations to photos
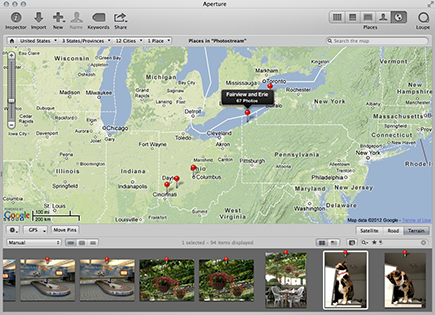
There are a variety of ways to assign locations to your images depending on your situation. If your camera embeds GPS data into the files, Aperture automatically assigns locations to each file as long as Places is enabled, as shown in Figure 5.13. (As you increase the magnification of the map, more individual pins appear.)
5.12 Set Preferences to enable or disable Places.
5.13 If your camera is GPS enabled, Aperture automatically displays the locations of all your shots.
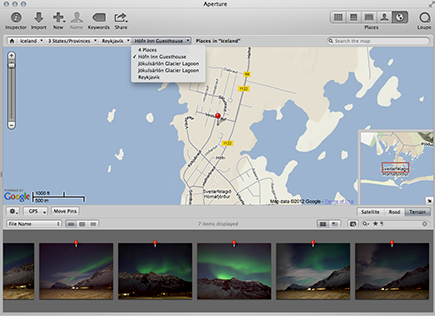
In addition, click any of the sections of the Places bar at the top of the interface to see a list of all the locations that you’ve assigned so far. Then click any of the places to see the images you took at that location, as shown in Figure 5.14.
If your camera doesn’t have a GPS feature, you can drag images to a location on a map, use a search feature within Places to assign a location, or use the search feature on the map located in the Info Inspector. You can also use GPS information from a handheld device. All of these methods are covered next.
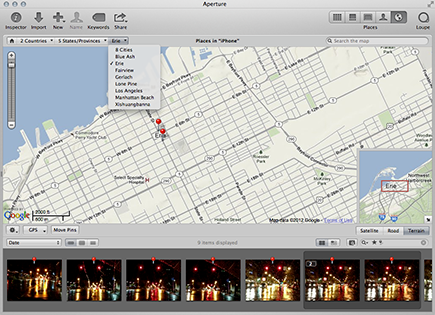
5.14 Use the Places navigation bar to display photos taken at specific locations and to see where you’ve taken shots.
Dragging images onto the map using Places
One of the easiest ways to assign locations is to just drag the images onto the map. To use this approach, do the following:
1. Open Places by clicking the Places icon in the upper-right part of the interface, as shown in Figure 5.15.

5.15 Click the Places icon to open Places.
2. ![]() +click and use the cursor to draw a rectangle over the area of the map you want to see in detail. The map changes magnification to show that area in as much detail as possible. Then click and drag the +/– slider to increase or decrease the magnification as necessary, or drag two fingers up or down the trackpad to change the magnification.
+click and use the cursor to draw a rectangle over the area of the map you want to see in detail. The map changes magnification to show that area in as much detail as possible. Then click and drag the +/– slider to increase or decrease the magnification as necessary, or drag two fingers up or down the trackpad to change the magnification.
3. Select one or more images in the Browser and drag them onto the map. A pin appears on the map with the name of the location and the number of images assigned to that pin, as shown in Figure 5.16.
5.16 Drag one or more images to the map to create a new pin and assign the images to that location.
4. Choose the Viewer, Split view, or Browser to return to the regular Aperture interface.
If a pin already exists at a certain location and you want to add more photos to it, select the photos and drag them onto the existing pin. Initially, it may appear as though Aperture is trying to create a second pin, but if you superimpose the pins, the images will be added to the initial pin.
Using the Info Inspector map to assign a location
If you prefer to assign locations while still using one of the regular viewing modes, use the map on the Info Inspector to assign locations to one or more images at a time. To assign locations using the Info Inspector map, follow these steps:
1. Select one or more images in the Browser.
2. Click the Info tab in the Inspector.
3. Click the Show/Hide Map button at the bottom of the panel, as shown in Figure 5.17. A small version of the Places map appears.

5.17 Click the Show/Hide Map button to reveal the map in the Info Inspector.
4. Type the location in the search field. A list of possible locations appears. Choose the best one. The map zooms in to that location, as shown in Figure 5.18. Click the +/– buttons as needed to increase or decrease the magnification of the map.
5.18 Use the map in the Info Inspector to assign locations.
5. Click the check mark to assign the location or click the X to cancel. If you click the check mark, Aperture assigns the location to the images.

If you create multiple pins that are close together, as you decrease the magnification of the map, Aperture merges the pins together to keep things more orderly. As you increase the magnification, the number of pins expands to show all the pins that you’ve created.
Using the search option in Places to assign a location
At times it can be awkward to manipulate the map to show you the precise location that you need. For those times you can use the search feature in Places to have Aperture suggest a list of possible places.
To use the search feature to find and assign locations, do the following:
1. Click the Places icon to open Places. The Viewer changes to a map.
2. Select one or more images in the Browser.
3. Type the location in the search field. A list of possible locations appears. Choose the best one, then the map zooms in to that location, as shown in Figure 5.19.
4. Click Assign Location at the bottom of the pop-up menu.
5.19 Use the search field to set the map and assign the selected images to a specific location.
Creating and assigning custom locations
If you take a lot of photos in a certain area, you may want to be very detailed about the locations you assign or you may want to create a custom name such as “Home” or “Joe’s House” and so on. To create and assign custom locations, do the following:
1. Select the image or images to assign to the new location in the Browser.
2. Choose Metadata → Assign Location from the main menu bar, as shown in Figure 5.20. A new dialog appears.
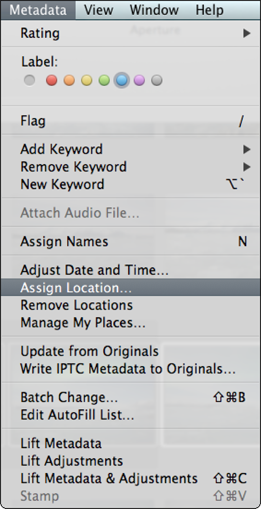
5.20 Choose Assign Location from the Metadata menu to assign custom locations.
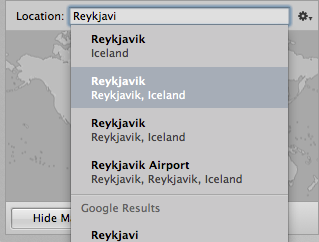
3. Type a location in the search field. In some areas, this can even be a local landmark or a national park and so on, although in other areas you may be limited to the name of a town. A list of possible locations appears under Google Results on the left.
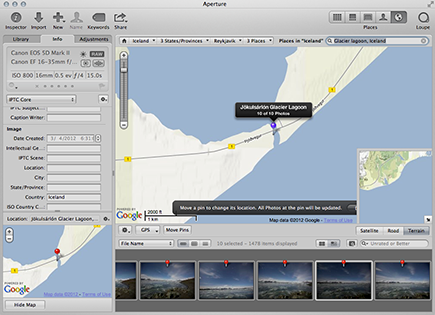
4. Choose the nearest location. The map changes to a highly magnified view centered on that location with a large blue circle indicating the area included in that location, as shown in Figure 5.21. Click and drag the double blue arrows on the edge of the circle to expand or limit the area. If necessary, drag the blue circle precisely where you want it. Note that you can choose a satellite view, road view, or terrain view for the map.
5. In the Place Name text field, type a custom name if desired. This is where you can rename a place “Home” or anything else.
6. Click Assign to create a pin with that name for the images that you selected. When you return to this dialog at any time in the future, all the custom places and names appear initially.
5.21 Modify the size and location of the blue circle to define the precise location you want, and then add a custom name.
If you discover you’ve assigned the wrong location to a group of images, select those images and use the Assign Location dialog to reassign a new location to those images.
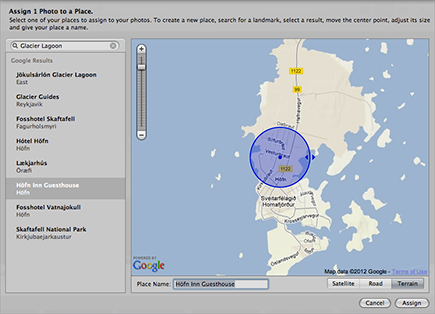
Assigning locations using iPhone GPS information
One of the really cool features in Places is that if your camera doesn’t record GPS information but you have an iPhone, you can use the GPS information from the iPhone and assign it to the rest of your photos. You don’t even have to upload the images from the iPhone!
To use the GPS location from your iPhone to assign a location to your images, do the following:
1. In the field, take a quick shot with your iPhone. Be sure you photograph something that you’ll easily recognize as being a shot of the location. If you take a close-up of a person, you may not recall that you intended to use the GPS information from that shot.
2. After you upload the rest of your images into a project or album, click Places from the toolbar.
3. Connect your iPhone and then choose the GPS pop-up menu beneath the map. Choose Import GPS from iPhone Photos. The display changes to show photos that are on your iPhone, as shown in Figure 5.22.
4. Select the photo or photos that have the GPS information you need, and click OK. Aperture adds each of the GPS points to the map.
5. To assign photos to the points, select one or more images and drag them to the desired point.
5.22 Use your iPhone to import GPS data for images from another camera.
You must physically attach the iPhone. You can’t download iPhone pictures and then try to retrieve the GPS information directly from them to apply to other photos. You can, however, use the pins Places creates for iPhone images that you’ve already downloaded and drag the new images from your camera onto those pins to assign location information.
Assigning locations using GPS receivers
If your camera doesn’t support GPS but you have a separate GPS unit, use the GPS unit to record your locations while you’re out shooting. It’s helpful to make certain that the time setting in your camera matches the time settings on the GPS unit because Aperture can use the time information to determine which photos should be assigned to which locations. Otherwise, you’ll need to manually assign images to the various locations. After you download your images into a project and the GPS tracks from the GPS unit, you need to import the GPS track file into Aperture.
Some GPS receivers allow you to download the GPS tracks directly, while others require that you use third-party software such as rubiTrack (www.rubitrack.com) to download the files to the computer first.
To import the GPS track files and assign images to waypoints, do the following:
1. Select the project that needs the GPS file and then click Places in the toolbar to open the Places interface.
2. Click the GPS button and then select Import GPS Track. A dialog appears showing your GPS tracks.
3. Click the Choose Track File to navigate to the GPS track. When the track is imported into the project, it appears as a purple line on the map when you’re in Places view.
4. In the Browser, select the image or images that you want to assign to a location.
5. Control+click the waypoint that you want to use as a location for the images, and then choose Assign Photos from the shortcut menu that appears as an overlay on the waypoint. The waypoint’s location information is assigned to the images.
To have Aperture automatically assign locations based on time information in the GPS track, do the following:
1. Select a project containing a GPS track.
2. Select an image in the Browser and drag it onto a waypoint in Places. A dialog appears at the bottom of Places asking if you want to assign location information to other images in your project based on time.
3. Click Assign Locations to have Aperture automatically match the time stamps from the GPS files with the time stamps on the camera so that your images are automatically assigned to their correct locations on the map.
Assigning location information using Projects view
If you shot all the images in a project at the same location, the fastest way to assign location information to them is to use the Projects view. To assign a single location to all the images in a project, do the following:
1. Choose Projects in the Library Inspector to change to the Projects view.
2. Click the Info button on the lower right of the project thumbnail, as shown in Figure 5.23. The Info HUD appears.
5.23 Click the Info (i) button that appears over the project thumbnail while in Projects view to access the Info HUD.
3. In the Info HUD, click Assign Location. The Assign Location interface appears, as shown in Figure 5.24. Choose a location from the list of custom places you’ve created under My Places, or type a location in the text field and then choose the closest match from the list that Google generates. To give the location a custom name, fill in the Place Name text field.

5.24 Use the Info HUD to assign a location as well as to add any other notes about the project.
4. Click Assign. Each image in the project is assigned to that location.
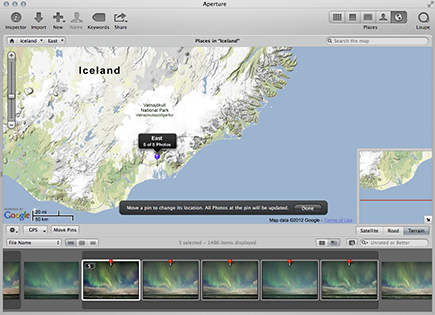
Moving a pin
If you notice that a pin is not in precisely the right location as you zoom in, you can move the pin, and all the images that are assigned to that pin will move as well. To move a pin, do the following:
1. While in Places view, click Move Pins. A small overlay appears, as shown in Figure 5.25, and the pins change to purple.
2. Use the +/– slider on the left to zoom in as far as necessary.
3. Move the pin to the more accurate location, and then click Done in the overlay. All images move to the new location and the pin returns to red.
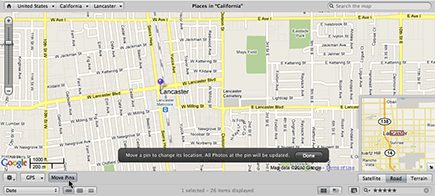
5.25 Click Move Pins to fine-tune the location of the pins.
Removing location information from an image
It’s conceivable that you might want to remove location information from some images, particularly if you’re sending an image to a client or contest or in a similar situation where you prefer to keep the precise location confidential. (Remember that you can also opt to have Aperture not include location information with exported images by setting the option in Preferences → Advanced.) To remove location information, do the following:
1. Select the image in the Browser.
2. Open the Info Inspector, and click the Show Map button at the bottom of the panel to reveal the map.
3. Choose Remove Location from the Map Pane Action pop-up menu, as shown in Figure 5.26.
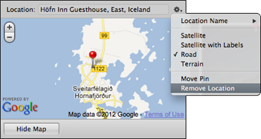
5.26 Use the Remove Location option to delete the place assigned to an image.
You may find it even easier to remove a location from one or more images by selecting the image and then choosing Metadata → Remove Locations.
Finding images using Places
After you assign locations to your images, you can locate all the images you’ve taken at specific locations by using Places, creating a Smart Album, or using the Smart Settings HUD and the Filter HUD. To find all your images at a specific location using Places, as shown in Figure 5.27, do the following:
5.27 Aperture can display all the images you’ve taken at a specific location.
1. Click Places in the Library Inspector.
2. Click the location from the bar at the top to limit the images displayed in the Browser to just the images at that particular location or click a pin directly. This step automatically creates a Smart Settings filter in the Filter HUD.
Alternatively, type the location in the search field. Any locations you’ve created whose names match the text appear at the top of the search results, while additional results generated by Google appear in the Google results at the bottom.
3. Select the correct location. Places view changes to display the pin for that location and the bar across the top.
4. Click the pin to have Aperture select those images within the Browser.
When you opt to show all the images taken at a certain location by clicking on the location from the Places menu bar at the top of the interface, Aperture automatically creates a Places filter setting for the Viewer, as shown in Figure 5.28. To create a Smart Album based on that location, click the Filter button to access the dialog and then click the New Smart Album button. A Smart Album is created within the albums section of your Library Inspector. Aperture automatically updates this album anytime you identify additional images as being from this location. That way, you can just click on the Smart Album from a particular location to see all the images you’ve taken there. We find this the easiest and most useful way to search for images from a particular location.
5.28 Use the filter that Aperture creates when it displays images taken from a specific location to create a new Smart Album.
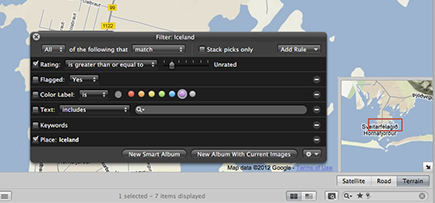
If you didn’t create a Smart Album, you can still search for images using the Smart Settings HUD and then create an album or Smart Album populated with images sharing a certain location. This can be helpful if the images from that location are currently stored in a variety of projects or albums and you want to create a book, slide show, or other project using those images. To use the Smart Settings HUD to search for images, do the following:
1. From the Split view or Browser view or the filmstrip in full-screen mode, click the Smart Setting Filter button, as shown in Figure 5.29. A new dialog appears.
2. Click the Add Rule pop-up menu and choose Place. A new rule appears at the bottom of the dialog for Place.
5.29 Use the Smart Setting filter to create a Smart Filter to show images by locations.
3. Select the Place rule, and from the includes pop-up menu, choose the desired category, and then complete the text field with the location. Aperture filters the current view to display only those files meeting the criteria.
4. Click New Smart Album or New Album with Current Images to create albums containing the images that meet your criteria. That way you can continue to work with those images and not have to search for them again. Click the X in the top-left corner to close the filter. Note that the filter text field reflects your search criteria. To return to seeing all the images, click the small X at the right of the filter text field.
Using Places and Faces gives you unparalleled power to organize your images and retrieve them in ways that would have been nearly impossible — and certainly cumbersome — before Aperture 3.
..................Content has been hidden....................
You can't read the all page of ebook, please click here login for view all page.