
Chapter 9: How Can I Use Aperture with My HDSLR’s Video Files?
One of the biggest recent features in dSLRs is the ability to shoot high-definition video. Yet most of the tools designed to work with these video files are geared toward cutting them together into a sequence and not actually managing and organizing the files. Fortunately, Aperture 3 makes it so that you can manage your video files just as easily as you do your images, and it even lets you pull still images out of your video files.
How Does Aperture Handle Video Files?
How Does Aperture Handle Video Files?
Put simply, video files in Aperture appear just like any other file, except when you have your metadata display set to display badges you see a small movie icon on each video file like in Figure 9.1. It’s easy to organize your video files into projects and albums, set ratings, labels, and other metadata on them, and even include them in slide shows. While you can’t make adjustments to a video file, aside from basic trims, just being able to manage your video files alongside your images is a huge step forward for anyone shooting video with a dSLR.
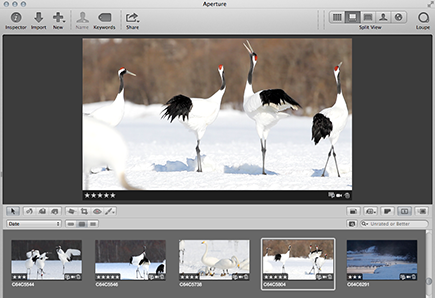
9.1 Videos appear just like any other file in Aperture, although they show a movie badge to distinguish them from your still images.
Importing Video Files
As you might expect, video files appear in Aperture’s Import panel just like any other file. If for some reason you don’t see your movie clips, look in the File Types brick (choose File Types from the Import Settings pop-up menu) and make sure that Exclude videos is not selected. In Grid view, your movie files will again have a small badge indicating that they’re movie files (see Figure 9.2), and in List view, their type will be QuickTime movie.
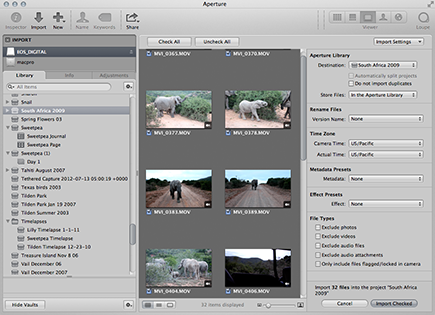
9.2 Movie files in the Import panel appear just like your images.
If you switch to Viewer mode in the Import panel, Aperture displays transport controls over your movie when you move your mouse over it that allow you to play your movie and to step through or scrub through it. Follow the instructions in the next section to learn how to use these controls.
To finish importing your movie files, make sure they’re selected and click Import Checked.
Viewing Video Files
Select a video file in Browser just like you would an image, and open Viewer. You will see a still frame (by default the first frame in your video file). When you move your mouse over Viewer, a set of transport controls appears in the HUD, as indicated in Figure 9.3.

9.3 The playback controls for a video file appear in an HUD over Viewer.
There are four key playback controls in this HUD that you can use to view your video files.
![]() Play/Pause. Click this button to play or pause your movie. The spacebar is the keyboard shortcut for this button.
Play/Pause. Click this button to play or pause your movie. The spacebar is the keyboard shortcut for this button.
![]() Next Frame/Previous Frame. These buttons let you step to a particular frame in your movie. This is useful if you intend to extract a JPEG still from your movie.
Next Frame/Previous Frame. These buttons let you step to a particular frame in your movie. This is useful if you intend to extract a JPEG still from your movie.
![]() Time slider. This slider indicates where the playhead is in your movie, and you can also click and drag this slider to scrub through your movie.
Time slider. This slider indicates where the playhead is in your movie, and you can also click and drag this slider to scrub through your movie.
![]() Volume slider. Use this slider to adjust the playback volume.
Volume slider. Use this slider to adjust the playback volume.

When you have a video file selected, the Info Inspector replaces the Camera LCD display with information about your clip’s length, size, and frame rate.
Editing a Clip
While Aperture lets you manage your clips quite effectively, its video-editing capabilities are quite limited. They’re even more limited than in QuickTime Player X, as you can’t perform any adjustments on the image itself, not even a brightness change. However, it is possible to perform two types of adjustments: changing the clip’s poster frame and adjusting the clip’s in and out points, which define the first and last frames of the movie’s playback range and are by default the first frame and last frame in the movie.

Aperture has settings for separate video and audio external editors so that you can do more sophisticated editing in an external program. Set those editors by choosing Aperture →Preferences →Export, and edit your file by choosing Photos →Edit with External Editor.
Setting the clip’s poster frame
A poster frame is simply the frame that Aperture uses as your movie’s thumbnail. If you think about a shot, you typically try to record extra frames before and after the main action (the extra frames are referred to as head and tail) to make it easier to edit the clip into a sequence. However, to make it easier to tell at a quick glance which clip you’re looking at, you will probably want to set the clip’s thumbnail to be more representative of the clip’s action than the first frame.
Follow these simple steps to set the poster frame:
1. Select the clip in Browser.
2. Use the transport controls in Viewer, and play or scrub to the frame you want to use as the clip’s poster frame.
3. From the Transport Controls HUD Action pop-up menu, choose Set as poster frame. Notice that your clip’s thumbnail in the Browser updates to display the new frame.
Trimming the clip
Chances are the clip you recorded is longer than you want to actually show people. For example, when you pressed the Stop Recording button on your camera, you probably shook the camera slightly, and it would be nice to edit that bump out of your clip. Aperture 3’s main video-editing capability is trimming a clip, where you adjust the in and out points to remove any unwanted head and tail on your video clip. To trim a clip, follow these steps:
1. Select the clip in Browser.
2. From the Transport Controls HUD Action pop-up menu in Viewer, choose Trim. Aperture changes the HUD to the Trim HUD, as shown in Figure 9.4.
![]()
9.4 The Trim HUD allows you to adjust your clip’s in and out points.
3. Click the yellow handles representing the in and out points in your video and drag them to the desired in and out points. Note that there is no Snap to Playhead feature or way to zoom in for a frame-accurate trim. It can take a couple tries to set the right in and out frames on long clips.
4. Click Trim to finish trimming your clip.
To reset your clip’s in and out points, choose Reset Trim from the Transport Controls HUD Action pop-up menu.
Exporting a Video Clip
It’s possible to export either your original clip or the trimmed version of your clip. Select it and choose either File →Export →Original or Version, respectively. Unfortunately these commands don’t provide any transcoding options.
If you want to reencode your video or to cut together a sequence of video clips that you export as one movie, you have to repurpose another Aperture feature. Specifically, create a new slide show with your clip (or clips) and use the Classic theme. Assemble it as we describe in Chapter 8, and pay close attention to the aspect ratio setting (make sure it matches your movie files, most likely 16:9). You will probably also want to turn off the show title. Then follow the steps in Chapter 8 to export your clip or sequence in one of the preset formats or to enter your own export settings.
To create a still JPEG image from your movie, scrub to the appropriate frame and choose New JPEG from frame from the Transport Controls HUD Action pop-up menu. Aperture creates a JPEG of the frame at the same resolution of your video, stacked with your video.
Working with Audio Files
In addition to managing video files, Aperture also handles audio files, such as voice memos that some cameras can record and attach to an image.
Importing audio files
By default, Aperture shows any audio files or audio attachments in the Import window. Audio files will have a gray background with a speaker icon, and images with an audio attachment have a speaker badge, as shown in Figure 9.5. If you do not see your audio files or this badge, make sure that Exclude audio files and Exclude audio attachments are not selected in the File Types brick.

9.5 The speaker badge indicates that the image has an audio attachment.
Playing audio
If your audio file is attached to an image, the playback controls are in the Info Inspector (see Figure 9.6). Click the Play button to hear your audio file, and click and drag the Time slider to scrub through your audio file. When you mouse over the Time slider, Aperture displays handles around the in and out points for your audio attachment. Click and drag these handles to adjust the audio file’s in and out points.

9.6 An audio attachment’s playback controls are in the Info Inspector.
If you’re working with an audio file that isn’t attached to an image, its playback controls will appear in an HUD over the image in Viewer. To change your audio file’s in and out points, click Trim, and Aperture displays in and out handles around your audio file that you can click and drag to trim your file. Click Trim again to confirm your changes.
Attaching and detaching audio files
If you use your camera’s built-in microphone to record a voice memo, it will most likely be automatically attached to an image, meaning that it moves with the image behind the scenes and is available to play back from the Info inspector. But if you use it to record an audio file or use a separate audio recording device, you will just have an audio file, such as an MP3 or AAC file not automatically associated with any image. It’s possible to associate this audio file with a specific image, manually attaching it, or to detach an audio file from an image so that you can leave them as separate files or attach them to a different image.
Attaching audio files
There are two ways to attach an audio file to an image. The first way involves attaching an audio file that you’ve already imported into Aperture with an image in the same project. Do the following:
1. Select the image to which you want to attach the audio file.
2. Click the Metadata menu and choose Attach Audio File. Aperture opens the Attach Audio File sheet, as shown in Figure 9.7.
3. Select the audio file to attach.
4. Click Attach. Your audio file disappears from Browser because it’s now attached to the selected image from Step 1.

9.7 The Attach Audio File sheet lets you pick an audio file to link to the selected image.

If you’re attaching an existing audio file to an image, the two items must be in the same project or the audio file won’t appear in the Attach Audio File sheet.
The second way to attach an audio file involves bringing a new audio file from the Finder into Aperture and attaching it to an image. To do so, simply select an image and display it in Viewer. Then drag and drop your audio file from the Finder onto Viewer. Aperture displays a green outline around your image, and when you drop the audio file it attaches it to the selected image.
Detaching audio files
To split an audio attachment out into its own file, select an image with an audio attachment and choose Detach Audio File from the Metadata menu. Aperture creates a new audio file item in your project.