
Chapter 4: How Can I Use Metadata to Organize and Find My Images?

Metadata is data about a file that helps describe the contents of the file. Aperture provides powerful tools to manage the metadata attached to an image, whether it’s entering IPTC Core contact information, adding keywords to help you quickly find an image, or setting an image rating so that you can easily pull your top images from your library. This chapter helps you explore how to use metadata in Aperture to make it easier to manage your library.
Using Flags and Labels to Further Organize Images
Adjusting Date and Time after Import
Applying Batch Metadata Changes
Writing IPTC Information to an Original
Using Ratings to Sort Images
One of the fundamental pieces of metadata that you can set on an image is a rating. When you first start to shoot, a keep/delete system is probably more than sufficient, but as you become a better photographer and your image collection grows, you will realize that keeping or deleting isn’t enough to separate your best images. Ratings are incredibly useful because they let you quickly pull the best images from your library, separate the best from the good-enough-to-keep images, and identify the worst images that you can delete first when you run low on space.
Each image can have either no rating or a rating from one to five stars. Table 4.1 illustrates the system we use, which has proved rather useful over the years.
Table 4.1 Our Image Rating System
|
Rating |
Meaning |
|
5 stars |
These are your absolute best images. Post them to your website, include them in slide shows, and show them to clients. Absolutely back these up. |
|
4 stars |
These images are above average, and you will most likely include some of these in a slide show or web gallery. While they are not quite as good as your five-star images, you don’t want to lose them and back these up, too. |
|
3 stars |
These are your average images. You keep them to submit for various, specific image requests, even if you don’t typically show them to clients. You back up three-star images, too. |
|
2 stars |
Two-star images are images that you keep for some particular reason, even though they’re not good enough to show to a client. An example would be a below-average photo of a rare animal. You don’t back them up because it doesn’t really matter if these get erased. |
|
1 star |
One-star images are your lowest-quality images. Typically, you keep these for a specific part that you might consider compositing into another image, but they’re not important enough to back up. If you run low on hard drive space, these are the first images that you delete. |
Setting ratings
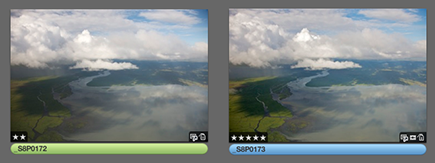
Setting a rating on an image is quite straightforward. Select the image and choose the appropriate rating by choosing Metadata →Rating. Assuming you have your metadata overlays (which we discuss in Chapter 3) configured to show a rating, you see the rating appear as a badge on the image, such as in Figure 4.1. Alternatively, use the keyboard shortcuts 1–5 to set a rating of one to five stars on the selected images (note that you don’t press the ![]() key, just press the number). Use the minus (–) and equals (=) keys to decrease or increase the selected image’s rating. Pressing 0 clears the rating and makes the image unrated, and pressing 9 gives the image a special rejected rating, which we discuss shortly.
key, just press the number). Use the minus (–) and equals (=) keys to decrease or increase the selected image’s rating. Pressing 0 clears the rating and makes the image unrated, and pressing 9 gives the image a special rejected rating, which we discuss shortly.
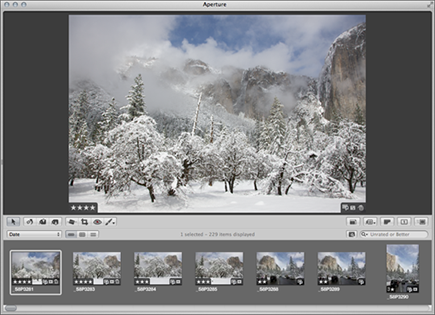
4.1 Aperture can display an image’s rating as a badge in both Browser and Viewer.

In the Albums group within the Library Inspector, there’s a 5-Star Smart Album that shows you all the five-star images in your library. This is a great way to quickly display your best images.
The control bar, as shown in Figure 4.2, also provides buttons to reject an image, lower its rating, raise its rating, or to mark it as a five-star select. If the control bar is not visible, choose Window →Show Control Bar.
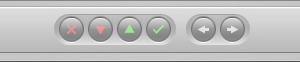
4.2 The control bar.
Working with rejected images
How often have you finished a shoot, started looking through your images, and become unhappy with what you shot, suddenly feeling the urge to just throw away everything? Fortunately, by marking an image as rejected rather than just deleting it, Aperture gives you a second chance to recover it so that if you change your mind, it’s easy to restore your image.
If there’s an image that you want to get rid of, choose Metadata →Rating →Rejected or press 9 on your keyboard. This command displays an X in the ratings badge, and when you move to the next or previous image, the rejected image disappears from the Browser (later in this chapter, when we discuss searching for images, we show you how to see your rejected images within an album or project).
Under the Recent group in the Library Inspector, there’s a Rejected collection, shown in Figure 4.3. Clicking it shows all your rejected images in Browser, just like any other album. If you want to unreject an image, select it and set its rating to something other than rejected, be it unrated or one to five stars. If you really want to get rid of these images, click inside Browser and choose Edit →Select All. Then choose File →Delete Original Image and All Versions.

4.3 The Rejected collection in the Recent group and its contents.
It’s a good idea to periodically click on the Rejected collection to see if there are any images that you can delete to free up hard drive space.
Prior to Aperture 3, choosing Delete Original Image and All Versions would have removed the images from Aperture and moved the original files to your system’s trash. However, as discussed in Chapter 1, this command instead moves your images to Aperture Trash in Aperture 3.
If you realize that you made a mistake deleting one of these images, follow these steps to retrieve it:
1. Select Trash in the Library Inspector.
2. Select the image you want to retrieve.
3. Control+click on that image and choose Put Back.
To empty the Trash, choose Aperture →Empty Aperture Trash. Empty Aperture Trash moves the images to your system trash, but the images aren’t actually removed from your drive until you empty your system trash.
Using Flags and Labels to Further Organize Images
While ratings are a great way to start organizing your images, you will most likely quickly find that you want another level of organizing. For example, if you come back from a trip with 75 five-star images, you probably don’t want to upload all 75 to your website. Wouldn’t it be great if Aperture had a way to say “flag these images for my website”? If you work with a stock agency, perhaps you’d also like to be able to flag some images to send to your agent? Fortunately, Aperture 3 provides two levels of organization, flags and labels, which allow you to handle both of the previous examples, and it’s also possible to customize the label names to be more applicable to your workflow.
Setting flags and labels
Flagging images is quite easy. Select the appropriate images and choose Metadata →Flag (or press the / key). When you do so, assuming you have your metadata overlays enabled and set to show flags, Aperture displays a flag icon in the top-right corner of the image (in Viewer) or thumbnail (in Browser), as shown in Figure 4.4. To unflag an image, select it and choose Metadata →Unflag.
To quickly flag and unflag an image in Browser, first make sure your metadata overlay is on for Browser and set to display flags. When you mouse over your image, a ghosted flag icon appears. Click on that icon to flag your image; click on the solid flag icon to unflag it.
There’s a special item in the Library Inspector under the Recent group at the top for flagged images called, you guessed it, Flagged. This collection shows all flagged images in your library.

If you need to pull images from your entire library for some purpose and want to do so by flagging your selected images, we recommend first going to the Flagged collection, selecting all the images in there, and choosing Metadata →Unflag so that you don’t end up with previously flagged images in your new selection.
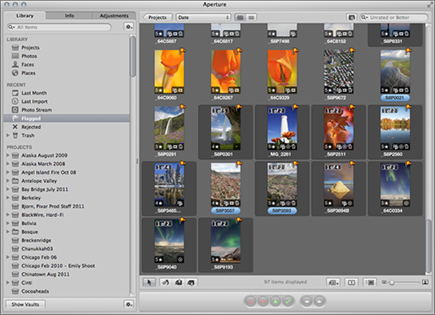
4.4 Flagged images in Browser.
While flagging provides an extra level of organization, it’s a fairly straightforward and simple one — is this image flagged or not? While that’s great for direct questions such as “Which images should I post to my website?” it doesn’t provide the flexibility you need when really working with your images. That’s where labels come in. Labels let you tag images with a specific status, such as “send all images with this label to my agent” in addition to the separate rating and flagged metadata.
Aperture has seven labels that you can apply to an image (as well as a No Label label). As you probably have come to expect from Aperture, it’s easy to add a label to an image. Select the image, and from the Metadata menu move your mouse over the Label section shown in Figure 4.5.
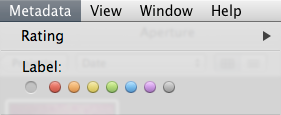
4.5 The Label section of the Metadata menu.
After you pick the label you want, let go. Control+clicking on an image displays a contextual menu with a similar Label control, too.
If you have Viewer or Browser set to display metadata overlays, you’ll see one of two types of indicators for your image’s label. Viewer’s basic and expanded metadata overlays and Browser’s basic overlay show the label as a small, colored circle on the right side of the image. Browser’s expanded overlay shows the label color behind the version name, as shown in Figure 4.6.
4.6 Labels in Browser with the expanded metadata overlay.
Selecting an image and setting its label to No Label removes the label.
Customizing label names
Unfortunately, Aperture doesn’t let you customize your label colors, but there’s a good reason for that. The label colors within Aperture match the uncustomizable label colors within the Finder. When you export a version of your image, as we cover in Chapter 8, Aperture labels the file it creates with the same color it has in Aperture in the Finder. This is a wonderful feature because it means that if you use a label to indicate an image status in Aperture, that status is preserved when you export your image outside of Aperture.
You are able to customize the label name, though, so rather than saying something useless like Green, the label has the status name like needs sharpening. To customize a label name, follow these steps:
1. Choose Aperture →Preferences.
2. Click the Labels tab, as shown in Figure 4.7.
3. Click in the text field next to the appropriate label and type the new label text.
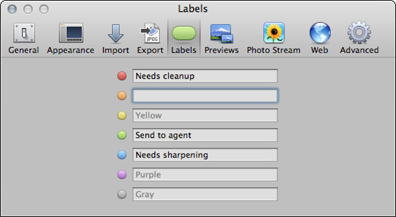
4.7 Custom label names allow you to adjust label meanings for your specific workflow.
Now when you select the label color from the Metadata menu, rather than seeing the color name below the label color you see your label name.
Using the Info Inspector
While ratings, flags, and labels are powerful pieces of metadata within Aperture, there are other types of metadata automatically associated with an image, starting when you first press the shutter button on your camera. Exchangeable Image File (EXIF) data consists of information that the camera records about the image, from shutter speed to GPS location (if available), into the file. Typically, you can view but not modify this data. International Press Telecommunications Council (IPTC) metadata is the next type of metadata. Consisting of fields like keywords, captions, and copyright, this is data that you will modify (and often will even set at import, as we discuss in Chapter 2). No matter which type of metadata you’re working with, Aperture’s Info Inspector is the central place to view and edit image metadata. It’s even possible to create preset metadata values, such as your contact info, that you can quickly apply to an image.
To view the Info Inspector, make sure the Inspector is visible; if it’s not, choose Window →Show Inspector. Next, click the Info tab in the inspector or choose View →Inspector →Info.
At the top of the Info Inspector is the Camera Info panel, as shown in Figure 4.8. If it’s not visible, select Show Camera Info from the Inspector’s Action pop-up menu. The Camera Info panel is very useful because at a quick glance, it gives you access to essential EXIF information, such as shutter speed and ISO, as well as Aperture metadata, such as your image rating. Additionally, each of the Aperture metadata displays (label, rating, and flagged) is also a control that you can click on to adjust each item’s respective value.

Although selecting multiple images in Browser and using the commands under the Metadata menu affect all the selected images, using the commands in the Info Inspector only affects the primary selection (the one with the bolder outline).
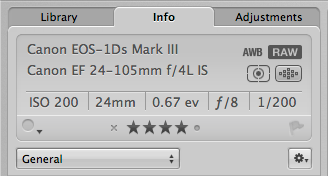
4.8 The Camera Info panel provides an easy way to see key image metadata.
Another neat feature in the Camera Info panel is the focus points display. Mouse over the Focus Points button, which looks like a diamond made up of rectangles in the top-right part of the panel, and Aperture displays the selected focus point for the selected image (if it’s available), like in Figure 4.9. Clicking this button makes the display stick so that you always see your focus point superimposed on the image, and clicking it again turns the focus point display off. Choosing View →Show Focus Points also toggles focus points on and off.
At the very bottom of the Info Inspector is the Maps pane (note that the Maps pane isn’t available in the Metadata heads-up display [HUD], only in the windowed Info Inspector). If it’s not visible, click the Reveal button to open the pane, and you’ll see a map of the United States. If there’s GPS information with the image, Aperture displays it on the map. Use the Action pop-up menu to switch map types (such as satellite or terrain). Working with place information is covered in depth in Chapter 5.

4.9 An image with its focus points superimposed on top.
Switching and customizing metadata views
In the middle of the Info Inspector, you find a bunch of different metadata fields and values, from caption information (which you can edit) to file size (which you can’t edit). The collection of metadata fields displayed in this area is called a metadata view. Aperture ships with a number of default metadata views, but it’s also possible to customize these views and to create your own.
The default view is called General. It contains a mix of Aperture, EXIF, and IPTC metadata, including rating, version name, shutter speed, aperture, and copyright notice. To switch views, use the pop-up menu at the top of the Info Inspector. Many of the metadata views are self-explanatory, such as Caption Only, but there are two special views toward the bottom of the list worth mentioning:
![]() IPTC Core. This is a special metadata schema that the IPTC group created to be widely compatible between different programs, and Aperture 3 supports it completely. The IPTC Core metadata view displays all the fields in this schema, and you can set values for all these fields.
IPTC Core. This is a special metadata schema that the IPTC group created to be widely compatible between different programs, and Aperture 3 supports it completely. The IPTC Core metadata view displays all the fields in this schema, and you can set values for all these fields.
![]() Large Caption view. Sometimes, if you’re spending hours organizing your images, Aperture’s small font can be tiring on your eyes. To make things easier, the Large Caption view, shown in Figure 4.10, has only one field in it, Caption, but the text and field sizes are larger.
Large Caption view. Sometimes, if you’re spending hours organizing your images, Aperture’s small font can be tiring on your eyes. To make things easier, the Large Caption view, shown in Figure 4.10, has only one field in it, Caption, but the text and field sizes are larger.
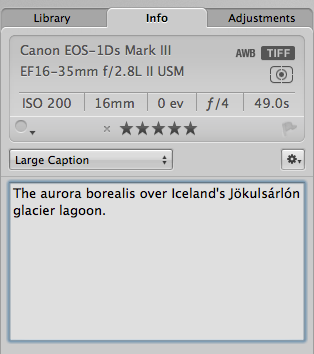
4.10 The Large Caption metadata view makes it easier on the eyes.
Fortunately, these metadata views are not set in stone and are quite customizable. The easiest way to customize them is to rearrange the items. Perhaps, for example, you want the File Name field to appear next to the Version Name field in the general view. To do so, move your mouse over the File Name label so that it’s highlighted. Then drag and drop the field wherever in the list you want it to appear. The other fields animate out of the way to help you tell where you will drop the field.
However, Aperture’s metadata view customization goes far beyond just rearranging preexisting fields. It’s also possible to add and remove fields from views as well as to create a completely custom view. Here’s how to get started:
1. From the Metadata Views pop-up in the Info Inspector, choose the Edit item at the bottom of the menu. The Metadata Views dialog opens, as shown in Figure 4.11. On the left side of this dialog is a list of your metadata views, and on the right side is a list of all possible metadata fields that Aperture knows about. When you click on a view in the list on the left, you see that certain fields become selected in the right list. A check mark next to an item means it’s part of the metadata view.
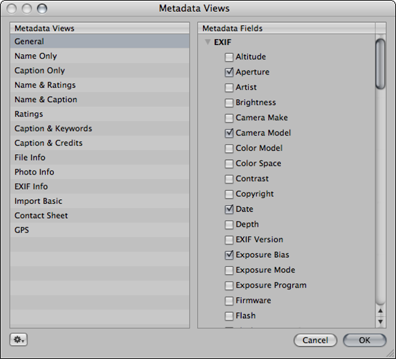
4.11 The Metadata Views customization dialog helps you create exactly what you need.
2. From here you can do the following:
• Add or remove a field from a preexisting metadata view. Select the view on the left and select or deselect the field’s check box on the right.
• Rename a view. Double-click its name on the left and type a new name.
• Create a new view. Click the Action pop-up menu on the bottom left of the window, choose New View, type its name, and select fields to include from the right.
• Edit a copy of an existing view. Select the view and choose Duplicate View from the Action pop-up menu.
• Delete a view. Select the view and choose Delete View from the Action pop-up menu or press Delete on your keyboard. Be careful, as Aperture does not prompt you about whether you’re sure you want to delete this view.
• Rearrange the views so that ones you use more frequently are at the top of the list. Select the appropriate item in the Metadata Views list and drag and drop it to wherever you want it to be ordered.
3. Click OK when you finish customizing your metadata views.
Setting metadata
While some values, like image ISO, are read-only, it’s possible and necessary in most cases to set most values manually. For example, the camera and computer can’t automatically guess what the image caption should be. To set a value, simply click in the appropriate metadata field in the Info Inspector and start typing. When you finish, either press Tab to go to the next field or click outside the current text field.
There are a couple special fields where you don’t type a value. To set a value for the Rating, Flag, and Label fields, click on the desired value. For the IPTC Core date created field, even though it’s prepopulated with the image date, it’s possible to change this value by either clicking on the date and typing a new date or by using the stepper buttons on the right side of the field to adjust the date and time up or down.
Although Aperture lets you type long values for any metadata field, the IPTC Core specification limits certain fields. For example, a title can be at most 64 characters long, each keyword phrase can be at most 64 characters long, and instructions can be at most 256 characters long.
To quickly clear all IPTC metadata from an image, select the image and choose Clear IPTC Metadata from the Info Inspector’s Action pop-up menu.
If you’re using referenced files and use another program such as Adobe Photoshop to update an image’s metadata outside of Aperture, select the image and choose Metadata →Update from Original to import the image’s new metadata back into Aperture.
Managing and applying presets
As you start to work with metadata, you might find yourself typing certain values (such as your contact information) over and over again. To avoid always having to retype these values, you can create a Metadata Preset containing multiple values to apply when needed, even on import.
To start creating a preset, choose Aperture →Presets →Metadata or choose Manage Presets from the Info Inspector’s Action pop-up menu. Aperture opens the dialog shown in Figure 4.12.
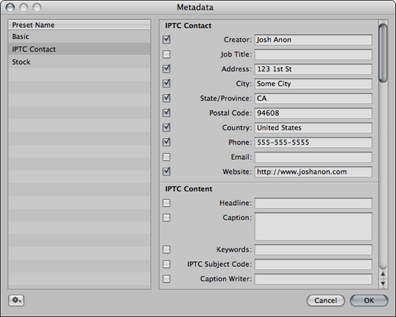
4.12 The Metadata Presets dialog.
Notice how this dialog is very similar to the Metadata Views dialog, but on the right side there are fields for setting values. To create a Contact Metadata Preset, follow these steps:
1. In the Metadata Presets dialog, choose New Preset from the Action pop-up menu.
2. Type its name, IPTC Contact Information, into the table row on the left that Aperture automatically makes editable.
3. Select the check box next to each contact field on the right that you want to use, and type a value for each field.
4. Click OK when you finish.
Now when you select an image and click the Action pop-up menu in the Info Inspector, you see your IPTC Contact Information preset under the Append with Preset and Replace with Preset menus. Selecting IPTC Contact Information from the Append with Preset menu adds the preset’s information to whatever values you set for the image. Be careful — as if you manually typed a field like your e-mail address into the image’s metadata — because choosing Append with Preset leaves you with duplicate values in your image’s metadata. Choosing Replace with Preset clears out the image’s values for all the fields in the preset, replacing them with the values in the preset.
If you type values onto an image and want to use those values to set up a new preset, select the image and choose New Preset from Version from the Action pop-up menu in the Info Inspector. Aperture opens the Presets dialog with this new preset selected and ready for you to rename.
A unique feature of the Presets dialog is that it’s possible to export and import presets, making it easy to share them among multiple computers. To export a preset, do the following:
1. In the Metadata Presets dialog, select the preset in the list.
2. Choose Export from the Action pop-up menu.
3. Choose a folder to export the preset to.
4. Give your preset a unique name.
5. Click Export. Aperture creates an .apmetadata file that you can share with another computer.
Similarly, to import a preset, open the Metadata Presets dialog and choose Import from the Action pop-up menu. Find the .apmetadata file within the Import dialog, select it, and click Import.
If you already have the .apmetadata file selected in the Finder, drag and drop the file onto the Import panel. Aperture will automatically go to its folder and select it.
Adjusting Date and Time after Import
One of the most annoying pieces of metadata to work with is image date and time. It’s very useful to figure out when a shot was taken and if it’s a sunrise or sunset, and you’ve probably set the date and time on your camera, but what happens when you shoot outside your normal time zone or forget to update the time for daylight saving time? Fortunately, Aperture lets you adjust an image’s capture date and time both while importing (see Chapter 2) and after the fact.
To adjust an image’s date and time, follow these steps:
1. Select either a single image or group of images.
2. Choose Metadata →Adjust Date and Time. Aperture displays the dialog shown in Figure 4.13.
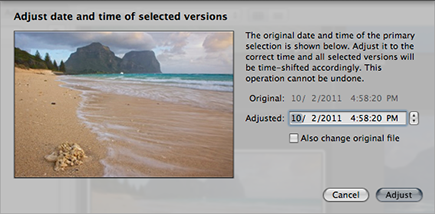
4.13 The Adjust Date and Time dialog makes it easy to fix your images’ time stamps.
3. Type the desired time into the Adjusted field.
4. Select the Also change original file check box if you want Aperture to adjust the creation date on the originals as well as the image time within Aperture.
5. Click Adjust. Aperture adjusts the primary selection to the displayed time and adjusts any other selected images relative to how you changed the primary selection. For example, if you set the time to be an hour earlier, Aperture subtracts an hour from all the other selected images.
Working with Keywords
While many of the different metadata fields are simple and straightforward, keywords deserve special attention. Keywords are special identifiers that you put on an image to help describe it, from the scientific name of an animal in the photograph to a word to describe the image’s overall mood. Keywords make it easy to search for an image or to make a Smart Album, web page, book, or more based on a particular keyword.
Aperture provides a number of tools to help you add keywords to your images, including the Info Inspector, Keyword control bar, and Keywords heads-up display (HUD), as well as a central Keywords library that stores your custom keyword hierarchy. Later in this section, we cover how to export your custom Keywords library to another computer.
Start with the simplest tool to set keywords and work your way up. In the Info Inspector, switch to the General view or some other view that shows the keywords field. Click in that field and start typing a comma-separated list of values that describe your image, such as Pacific Ocean, surf, stormy sky. When you finish, press the Tab key to move to the next field or click outside the keywords field to confirm the values you entered. To remove a keyword, delete it from the keywords field.
We recommend selecting the Check Spelling While Typing option when typing keywords and captions. To enable it, Control+click on the keywords (or caption) field and choose Spelling and Grammar →Check Spelling While Typing if it’s not already selected.
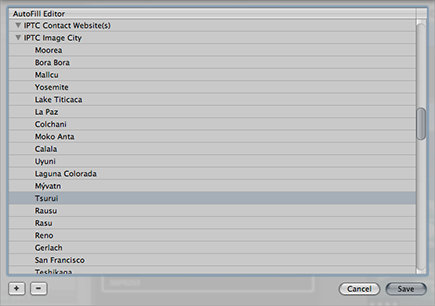
When you start typing keywords for the next image, assuming you start with the same few letters, Aperture’s AutoFill feature fills the rest of the keywords field with the same keywords you typed the first time. For example, if you typed Pacific Ocean, surf, stormy sky for the first image and start typing Pac for the second image, Aperture by default suggests auto-completing the keywords with Pacific Ocean, surf, stormy sky. This is useful when keywording very similar images because it can help save you typing. But it can also be frustrating if there’s a typo in the suggested keywords, because Aperture continues to suggest that you auto-complete your typing with the typo. Fortunately, Aperture provides a way to edit the AutoFill values.
1. Choose Metadata →Edit AutoFill List. Aperture displays the AutoFill Editor dialog, as shown in Figure 4.14, containing all the values you’ve ever typed for each metadata field.
2. To adjust the keywords AutoFill values, scroll down until you see the IPTC Keywords group, and open the group. Each table row represents a set of keywords that Aperture tries to auto-complete as you type.
3. To edit a row, double-click on it and type any adjustments.
4. To remove a row, select it (or multiple rows), and click the Remove (–) button.
5. Repeat this process as needed, adjusting values for other fields such as IPTC Caption as well. This dialog also lets you add new AutoFill values for some fields, though not IPTC Caption or Keywords. To do so, select the field name, click the Add button, and type a new value.
6. Click Save when finished.
4.14 The AutoFill Editor dialog allows you to edit the autofill values that Aperture uses when you enter metadata.
The Keywords control bar
Another way of adding keywords to images is to use the keywords controls in the control bar. To show the keyword controls, first make sure the control bar is visible by choosing Window →Show Control Bar. Then show the keyword controls by choosing Window →Show Keyword Controls. You see the area indicated in Figure 4.15.
![]()
4.15 The keyword controls in the control bar.
There are three main controls in this area. The first control is the Add Keyword text field. Select an image, type a new keyword into this field (Aperture will auto-complete it if you’ve used the keyword before), and press Return to add the keyword to the selected image. To remove a keyword from an image, select the image, type the keyword into this field, and press Shift+Return.
The next control is the group of keyword buttons on the left. Select an image and click one of these buttons to assign that keyword to the image. The first eight (going top to bottom from left to right) are also assigned the keyboard shortcut Option+Keyword Number 1–8. The Metadata →Add Keyword menu shows the same values as the keyword buttons with the hotkeys, and selecting a keyword in that menu also adds it to an image.
If you have multiple images selected, then by default Aperture adds the keyword to every selected image. If you have Primary Only (which is covered in Chapter 3) enabled, then Aperture only adds the keyword to the primary selection.
To remove a keyword, hold down the Shift key while clicking the keyword button or pressing the keyboard shortcut, or choose Metadata →Remove Keyword. To remove all keywords, select the image and choose Metadata →Remove Keyword →Remove All Keywords.
The last control is the Keyword Preset Group pop-up menu. A keyword preset group is a collection of related keywords, such as the People and Snapshots presets that Aperture ships with. This pop-up menu contains a list of presets, and switching presets changes the keywords assigned to the keyword buttons as well as the contents of the Metadata →Add Keyword and Metadata →Remove Keyword menus. Use the comma (,) and period (.) keys to switch between keyword preset groups.
Editing button sets and keywords
While the default keyword preset groups cover a wide range of common keywords, you’ll more than likely want to create your own groups. To begin, choose Edit Buttons from the Keyword Preset Group pop-up menu. Aperture displays a dialog that looks like Figure 4.16.
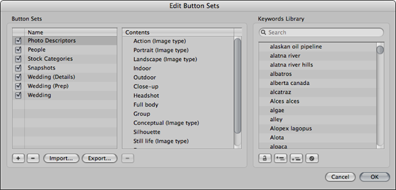
4.16 The Edit Button Sets dialog.
The left side of this window contains controls to manage your preset groups, which are called Button Sets in the dialog. The right side of this dialog is the Keywords library, which contains every keyword you’ve ever assigned to an image as well as some preinstalled keywords.
Keywords library
Before we can discuss creating new preset groups, we need to take a short detour to talk about the Keywords library. The Keywords library, which is also accessible via the Keywords HUD that is discussed in the next section, is where you manage all your keywords. Here, you can add, remove, and change keywords as well as create hierarchy among keywords.
The first button on the left, Lock/Unlock Keywords, lets you lock your Keywords library so that you can’t make any changes. At first it might seem odd that you’d want to lock your Keywords library. However, often photographers use a standard keywording vocabulary for their images. If you take the time to enter that vocabulary into Aperture, locking your keywords ensures that you don’t accidentally use a keyword not in the keyword vocabulary. If you try to type a new keyword when your Keywords library is locked, Aperture prompts you to either cancel or unlock the library.
To find an existing keyword, either scroll through the list to find it or start typing the keyword in the Search field at the top to filter the list. Once you find the keyword you’re looking for, double-click it to change it; for example, to fix a typo. Note that this is a live update, and if you’re using that keyword in any image, Aperture prompts you to make sure you want to update that keyword in every image to which it’s applied.
To delete a keyword, select it and click the Remove Keyword button or press the Delete key. Again, if this keyword is in use, Aperture prompts you to confirm that you truly want to delete it, as deleting it removes it from any image to which it’s applied.
Adding a keyword is slightly complex because keywords in Aperture are hierarchical. For example, say that you create a bird keyword, and you have a bunch of shots of parrots to tag. Rather than having to apply bird and parrot keywords to each image, wouldn’t it be great if you could make parrot a child of bird so that any time you applied parrot to an image, it automatically was also tagged with bird? Aperture’s keywording structure lets you do this. Let’s look at how:
1. Click the Add Keyword button indicated in Figure 4.17 (on the left).
![]()
4.17 The Add Keyword and Add Subordinate Keyword buttons.
2. Type bird.
3. Make sure bird is selected, and click the Add Subordinate Keyword button. Notice how a disclosure triangle appears next to bird.
4. Type parrot.
5. Select parrot, and click the Add Subordinate Keyword button.
6. Type eclectus.
7. Select bird again.
8. Click the Add Keyword button.
9. Type eagle. Notice how it’s added at the same level as bird.
10. Click and drag eagle onto bird so that bird becomes highlighted. When you let go, Aperture makes eagle a child of bird.
What you just did was to make a new parent keyword, bird, with two children, parrot and eagle. Furthermore, eclectus was added as a child to parrot. Now, any image tagged with eclectus will also have the parrot and bird keywords, and any image tagged with eagle will also have the bird (but not parrot or eclectus) keyword. However, any images tagged only with bird will not be tagged with eclectus or eagle.
You can drag and drop keywords onto and above other keywords to easily change their hierarchy.
Any hierarchy updates you make are also live. If you make a keyword that’s in use (hawk) or the child of another keyword (bird), Aperture prompts you to make sure you really want to do so. After you make the change, the images adjust accordingly (all the images you tagged with hawk are also now tagged with bird).
If you create a keyword hierarchy such as bird/parrot and then create another hierarchy, such as parrot/eclectus/male and parrot/eclectus/female, at the top level it’s easy to merge the two together. Click and drag the top-level parrot onto bird. Aperture warns you that there’s a keyword with the same name at the destination hierarchy level and asks if you want to merge hierarchies. Click Merge, and now you have bird/parrot/eclectus/male and bird/parrot/eclectus/female keyword hierarchies.
Customizing button sets
Under the Button Sets group are two columns: Name and Contents. The Name column represents the different groups of keywords you see in the pop-up menu. To temporarily disable a group so that it still exists but doesn’t appear in the pop-up menu, deselect the check box by the group’s name. The Contents column lists all the keywords that are part of each group.
Underneath the Name column are four buttons: Add (+), Remove (–), Import, and Export. To create a new keyword preset group, click the Add button and then give your preset group a name. Next, you need to add contents to this group. To do so, either find an existing keyword or add a new one. Once you find the desired keyword (which can be anywhere in a keyword hierarchy, too), drag and drop it from the Keywords library to the Contents column.
Rearrange items in the Contents column by dragging and dropping them to the desired location, and delete an item by selecting it in the list and either pressing the Delete key or clicking the Remove button below the Contents column. Remember, you can use the keyboard shortcut Option+1 through 8 to assign the first eight keywords to an image.
Once you’re happy with your keyword preset group, click OK to close the dialog. Note that you can also export the keyword preset group by selecting it in the Name column and clicking Export. Aperture exports it as a PLIST file that you can import into Aperture on another computer by opening the Edit Button Sets dialog, clicking Import, and selecting the exported PLIST file.
The Keywords heads-up display
The last way to apply keywords to an image is by using the Keywords heads-up display (HUD) shown in Figure 4.18. Open the Keywords HUD by choosing Window →Show Keywords HUD (Shift+H) or by clicking the Keywords button in the toolbar. The contents of the Keywords HUD should look very familiar to you — they’re identical to the Keywords library that was covered in the previous section. Rather than having to use the Edit Button Sets dialog to access your Keywords library, the Keywords HUD provides direct access, including all the features (add/delete/reorganize keywords) described previously.
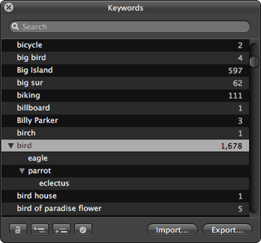
4.18 The Keywords HUD.
Use the Export and Import buttons in the Keywords HUD to share your custom keywords between computers.
To assign a keyword to an image, drag and drop the keyword onto the image, either in Browser or Viewer. As described previously, if you have a hierarchy of keywords such as bird/parrot/eclectus, dropping eclectus onto your image also tags it with bird and parrot.
If you have multiple images selected, dropping a keyword onto one image adds it to all selected images. However, if Primary Only is selected, then Aperture only adds the keyword to the primary image.
Adding Custom Metadata
While there are many standard metadata tags, sometimes you really want to add a custom field to an image. For example, we add a Stock Agent field to our images to keep track of which agency represents which images. There are two parts to adding custom metadata: creating the field and adding it to a view. To create a new field, follow these steps:
1. Open the Info Inspector.
2. Select Manage Custom Fields from the Action pop-up menu. Aperture displays a dialog like you see in Figure 4.19.
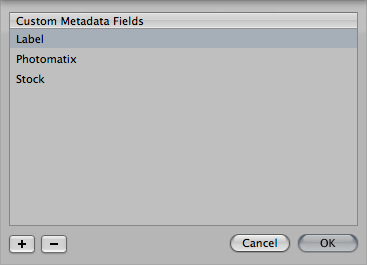
4.19 The Custom Metadata Fields dialog.
3. To add a new field, click the Add (+) button and type its name.
4. To delete a field, select it and click the Remove (–) button. Aperture prompts you to confirm this deletion if you’ve set a value for this field in any image.
5. Click OK to close the dialog.
Use the techniques described earlier in this chapter regarding switching and customizing metadata views to add this new field to a metadata view.
Applying Batch Metadata Changes
While you will have to set some metadata values per image, such as Caption, there are others, such as Copyright Notice, that you’ll want to set on a group of images. Aperture provides two ways to apply metadata in bulk: the Batch Change tool and the Lift and Stamp tool.
Using the Batch Change tool
To use the Batch Change tool, open the images whose metadata you want to change and choose Metadata →Batch Change. You will then see the Batch Change dialog, as shown in Figure 4.20. There are three main sections in this tool that allow you to adjust the time zone in your images, to change your images’ filenames, and to add or remove metadata from your presets.
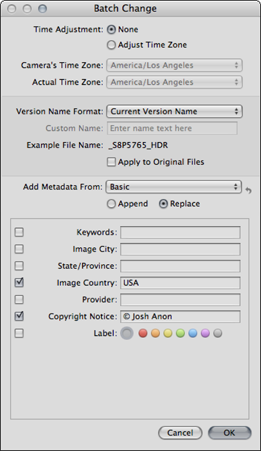
4.20 The Batch Change dialog allows you to adjust the metadata of many images at once.
To adjust the time zone, select the Adjust Time Zone radio button. Then pick the time zone that your camera is set to from the Camera’s Time Zone pop-up menu and the time zone you shot the images in from the Actual Time Zone menu. When you click OK, Aperture adjusts the time zone settings for your images.
The second block lets you rename your images using a naming preset (naming presets are covered in Chapter 2). Note that renaming a version only renames your image within Aperture. If you also want to rename your original files on the hard drive with this new name format, select the Apply to Original Files check box.
The last block is where you can change specific fields. Rather than giving you access to every possible field, Aperture displays a pop-up menu with your Metadata Presets. To set a new value, start by picking a preset that contains your desired field. Then choose whether you want to append the new value to the existing value or replace the existing value completely, select the fields for which you want to set values, type the value, and click OK. If you choose to replace the existing value, select a field and leave its value empty. Aperture clears the specified field from the selected images.
We’ve found that the built-in Basic preset has the fields we use most of the time (keywords, image city/state/country, and copyright notice) with batch change.
Using the Lift and Stamp tool
The other way to set metadata values in bulk is with the Lift and Stamp tool, which lets you lift values from one image and stamp them onto other images. Lift and Stamp is quite powerful because in addition to lifting metadata values like keywords and ratings, it also allows you to lift some or all of the adjustments you made to one image and to stamp those adjustments onto a group of images. We cover how to set adjustments in Chapter 6, and the procedure to lift and stamp them is identical to lifting and stamping metadata.
1. Select the source image whose values you want to lift.
2. Choose Metadata →Lift Metadata and Adjustments. Aperture opens the Lift & Stamp dialog, as shown in Figure 4.21.

4.21 The Lift & Stamp dialog.
3. Select the check box next to each metadata value you want to lift. For metadata groups, like IPTC in the previous figure, where Aperture only has a check box next to each group rather than each line, if there are fields that you don’t want to lift, select the line with that value and press the Delete key.
4. Using the pop-up menu in the bottom left of this dialog, choose whether you want to add or replace the metadata on the destination images.
5. Select each image on which you want to stamp these values, and click Stamp Selected Images.
You don’t have to select up front every image that you want to stamp. Simply leave the Lift & Stamp dialog open, select a new image, and click Stamp Selected Images until you’ve stamped every image.
Searching for Images
Throughout this chapter, we’ve talked a lot about how to add metadata to your images, but we’ve yet to talk about how to use that metadata to find images. There are two primary ways to search for an image in Aperture: using Browser’s search field and filtering HUD to search within Browser’s contents or making a new Smart Album that searches either within a project or your entire library. These two methods are quite similar and, in fact, use the same filter HUD to create a search query. The main difference is that using Browser’s search field and filter HUD to search is a temporary operation. Typically, you’ll search within Browser for a few particular images and then clear the search query. Smart Albums are more permanent, offering a way to essentially save a search query. The way Aperture searches within stacks isn’t always obvious, and we clarify what happens for you after we explain basic searching.
Searching within Browser
In Chapter 1, the search field and Filter button were quickly pointed out but largely glossed over. As a reminder, you’ll find them in the upper-right corner of Browser, but if they’re not visible, choose View →Browser →Show Sort & Filter Controls.
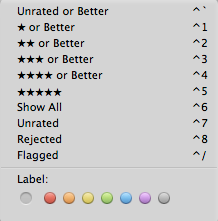
Browser’s search field is more than just a simple text search, though, providing easy access to common searches. When you click its pop-up menu, Aperture opens the menu, as shown in Figure 4.22, which has commands like Three Stars or Better and Rejected. Select one of these commands to filter Browser’s contents, and click the Clear button that appears in the search field to clear the filter.
4.22 Browser’s search field’s pop-up menu.
Earlier in this chapter, we mentioned how rather than deleting an image right away it’s best to mark it as a rejected image first. If you look in the search field, you’ll notice that it’s set to Unrated or Better by default. This means that by default, Browser filters out and hides your rejected images. If you want to also see your rejected images, either change the search field to show only your rejected images or set it to show every image within Browser’s scope.
If you type some text into the search field and press the Return key, Browser also searches your image’s metadata for the specified text.
To specify more complex search criteria, click the Filter HUD button to the left of the search field and Aperture opens the HUD you see in Figure 4.23. There are five key areas to this HUD. The title bar is the first, as it tells you the scope of this filter, whether it’s a project, album, or library. The second significant area shows the controls at the top left that let you switch between matching all the selected criteria (meaning the results will meet every piece of criteria) or any of the selected criteria (meaning the results match one or more criteria). Near the top right is the Add Rule pop-up menu, which you use to add search criteria. The main, middle area of this HUD contains all your criteria. Last, the buttons at the bottom of the HUD let you create a new collection, whether it’s an album, book, or other, from the search results.
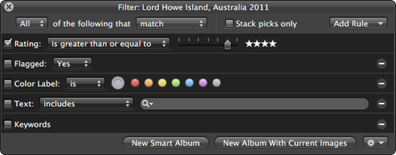
4.23 The Filter HUD.
If the Stack picks only check box is selected, Aperture only examines the top image in a stack to see if it matches your search criteria. If it’s not selected, Aperture searches within the whole stack.
Using the filter HUD is fairly straightforward. Pick whether you want to match all or any of the selected rules, add rules as needed by using the pop-up menu, select the rules that you want to be active, and specify the criteria for each rule, such as images with a yellow label and a four-star or higher rating. However, there are a few key rules that we want to point out:
![]() Aperture Metadata. Use this rule to search for custom metadata. Your custom metadata field appears in its field pop-up menu.
Aperture Metadata. Use this rule to search for custom metadata. Your custom metadata field appears in its field pop-up menu.
![]() Attachment. If your camera is capable of recording audio files, Aperture imports it as an attachment to an image (there’s more on this in Chapter 9). The Attachment rule explicitly filters images that either have or don’t have an attachment.
Attachment. If your camera is capable of recording audio files, Aperture imports it as an attachment to an image (there’s more on this in Chapter 9). The Attachment rule explicitly filters images that either have or don’t have an attachment.
![]() File Status. This rule lets you search for managed, referenced, offline, online, or missing original images.
File Status. This rule lets you search for managed, referenced, offline, online, or missing original images.
![]() File Type. The File Type rule allows you to find files that are video files, specific types of files (including RAW as a generic reference for all RAW files), and externally edited files.
File Type. The File Type rule allows you to find files that are video files, specific types of files (including RAW as a generic reference for all RAW files), and externally edited files.
![]() Text. While the Text rule should be fairly obvious, as it’s a search for whether an image has a specific piece of text in its metadata, there’s an option in the text field that we want to point out. If you click the pop-up menu in this rule’s text field, you see the following useful options:
Text. While the Text rule should be fairly obvious, as it’s a search for whether an image has a specific piece of text in its metadata, there’s an option in the text field that we want to point out. If you click the pop-up menu in this rule’s text field, you see the following useful options:
• Full text search. This is the default; it searches all of an image’s metadata.
• Limited text search. This is faster, especially when searching a large collection of images, but it only searches caption, creation date, filename, keywords, project name, and version name.
If you want to save your search results as a regular album, meaning the contents won’t be dynamically updated as you change your image’s metadata, open the Filter HUD and click New Album With Current Images. If you want to save this search as a new Smart Album, whose contents will be dynamically updated as you change your images’ metadata, open the Filter HUD and click the New Smart Album button. To make a book, slide show, Facebook album, and more, click the Action pop-up menu in the filter HUD and select the type of collection you want to create. When you finish searching in Browser, click the Clear (X) button in Browser’s search field to clear the current search query.
Creating Smart Albums
To create a new Smart Album, start by selecting its scope in the Library Inspector. Specifically, if you want that Smart Album to only search within a project, select the project. If you want it to search within your whole library, clear your selection in the Library Inspector by clicking on the word Albums right above the other library-level albums. Next, choose File →New →Smart Album, and Aperture opens Smart Settings HUD, as shown in Figure 4.24, which looks very similar to the Filter HUD.

4.24 The Smart Settings HUD.
The Smart Settings HUD works almost exactly the same way as the Filter HUD, where you add rules and set criteria. The main difference is that it includes a Source row that tells you what scope the Smart Album’s looking at. If you drag your Smart Album into a different scope within the Library Inspector, such as from the library level into a project and vice versa, the new scope’s name appears as an option in the Smart Settings HUD for that Smart Album. Click the new scope’s name to switch the Smart Album to only look at that scope. For example, if you drag a Smart Album you created at the library to a project named Odessa Canyon, click the Odessa Canyon button in the Smart Settings HUD’s Source row to switch this Smart Album to only look at the Odessa Canyon project instead of your entire library.
The other difference is that the Smart Settings HUD doesn’t have buttons on the bottom to create a new Smart Album or normal album because you’re already creating a Smart Album when you see it. In fact, when you click New Smart Album within the Filter HUD, Aperture automatically closes the Filter HUD and opens the Smart Settings HUD for this new Smart Album with the exact same rules and criteria you selected in the Filter HUD.
Searching with stacks
Searching for images always gets a little confusing when you work with stacks, and we wanted to explicitly mention what happens.
By default, Aperture searches each image in the stack for a matching image. If it finds a match, it only displays the matching images from within a stack. However, it still displays a stack badge label and dark area around the image, as shown in Figure 4.25, indicating that the image is part of a stack.
4.25 The default search behavior in Browser when one image within a stack matches the search criteria.
If you open the Filter HUD and select Stack picks only, Aperture only sees if the top image in a stack matches the criteria. If a three-star image is your stack pick but your stack contains a five-star image and you tell Browser to only display five-star images, it won’t display this stack at all.
Writing IPTC Information to an Original
One frequent question people have is what happens to all their metadata if Apple stops supporting Aperture down the road? Aperture 3 provides a command that lets you embed your IPTC metadata into an original file. To use this command, select your images and choose Metadata →Write IPTC Metadata to Original.
Write IPTC Metadata to Original requires Mac OS X 10.6 or newer. It has no effect on OS X 10.5.
You might be wondering why you shouldn’t use this command on all your images. While it should work fine most of the time, put simply, RAW was meant to be a read-only type of file. There’s a chance that writing this metadata into the original will make the RAW file unreadable by other programs. While chances are that you’ll be fine, we recommend testing this command with your RAW files and then making sure you can open that RAW file in another RAW converter before using this command on multiple images.