

To create one or more folders within a project, first select a Project, and then click the New button and choose Folder. Then you can use the folders to organize any Albums, Books, Web Pages, Web Journals, or Slide Shows within it.
Chapter 3: What Methods Can I Use to See My Images?
As you work with Aperture, there are times that you want to focus on a single image at a time, while at other times you need to compare two or more images or even to peruse all the images in an album or project. Sometimes you need to take a closer look at an image, and at other times you want to see certain information about images. In this chapter, you learn how to customize the way you see your images.
Configuring and Using Metadata Overlays
Switching between RAW+JPEG Originals
Working with Referenced Images
Working with Stacks in Browser
Creating and Working with a Light Table
Customizing the Interface
Aperture’s engineers realize that you may prefer to organize the interface differently in order to work more efficiently, so there are many ways to customize the interface. This section covers rearranging library items, using different Viewer modes, using the Viewer with multiple monitors, using multiple Browsers, and showing hot and cold areas (clipping) in images.
Rearranging and grouping library items
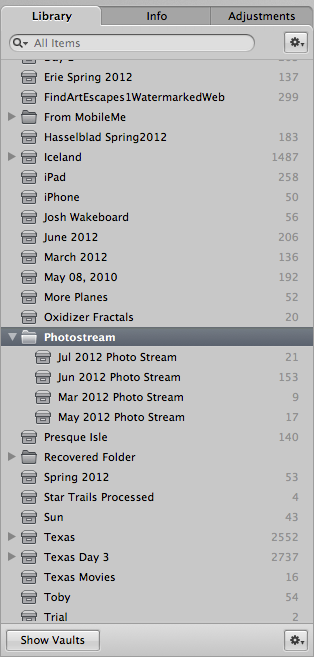
Chapter 1 covers several ways to filter what you see in the Library Inspector, but the more you shoot and use Aperture, the more cluttered the Library Inspector becomes. There are several ways you can organize and rearrange your albums and projects so that you can easily find them. By default, Aperture organizes the items by name. If you’d rather it organize items by kind or manually, go to the Action pop-up menu at the top right of the Library Inspector shown in Figure 3.1 and choose Keep Projects & Albums Arranged By →Kind (or Manual).

3.1 Choose how to organize your projects and albums.
If you opt to manually order the projects and albums, the next step is to select the projects, albums, and/or folders to move, and then click and drag them to the desired location.
Another way to organize albums and projects is to add folders to the structure. Using Folders is similar to taking a pile of papers that is sitting on your desk and putting it in a folder — the papers are still in the same order they were while sitting out on your desk, but your desktop looks cleaner and more organized. To use folders to help organize your projects, as shown in Figure 3.2, do the following:
To create one or more folders within a project, first select a Project, and then click the New button and choose Folder. Then you can use the folders to organize any Albums, Books, Web Pages, Web Journals, or Slide Shows within it.
1. Click on the word Library in the Library Inspector to remove any selections, and then click the New button and choose Folder to create a new folder at the same level as projects. A new untitled folder appears at the bottom of the list of projects. (If you have a project selected, the new folder is added within that project.)
3.2 Move some projects and albums into folders to simplify the Library Inspector. We’ve created a folder for our Photo Stream projects.
2. Name the folder. If you’ve opted to organize the library by Name, the folder moves to the correct alphabetical location. If you’ve organized the library by Kind, the new folder is added alphabetically to the other folders, following projects.
3. Drag the folder wherever you want it.
4. Drag projects and albums into the folder.
5. Toggle the disclosure arrow by the folder to display or hide the projects and albums.
Using Viewer modes
You might think there’s only one way for Aperture to display your images in the Viewer, but in fact, Aperture offers a number of choices when you choose View →Main Viewer, as shown in Figure 3.3.
3.3 Choices for the Main Viewer.
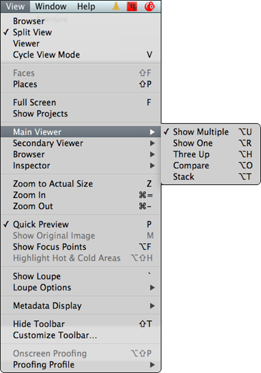
Choose one of the Main Viewer options as follows:
![]() Show Multiple. This is the default setting, and it allows the Viewer to display one to 12 images at a time.
Show Multiple. This is the default setting, and it allows the Viewer to display one to 12 images at a time.
![]() Show One. This option allows the Viewer to display only one image, no matter how many images are selected in the Browser.
Show One. This option allows the Viewer to display only one image, no matter how many images are selected in the Browser.
![]() Three Up. This option displays the image you select as well as the one immediately before it and after it in the Browser.
Three Up. This option displays the image you select as well as the one immediately before it and after it in the Browser.
![]() Compare. This option helps you select the best image from a group of similar images.
Compare. This option helps you select the best image from a group of similar images.
![]() Stack. This option helps you select the best image within a stack. We cover that in more detail later in this chapter.
Stack. This option helps you select the best image within a stack. We cover that in more detail later in this chapter.
To use the Compare mode, follow these steps:
1. Select two images and choose View →Main Viewer →Compare. Both images appear in the Viewer; the one on the left has a green border in both the Viewer and the Browser and the one on the right has a white border, as shown in Figure 3.4. The image that has the green border is the “keeper so far” and the one with the white border is the one you’re comparing to it.
2. To compare the next image to the keeper, press the right arrow on your keyboard.
3. If you decide you want the image with the white border to be the new keeper, press Return. That image moves to the left in the Viewer and now has a green border, and the next image in the Browser automatically appears with a white border.
4. When you’re happy with the image you’ve chosen, ![]() +click the image you don’t want. Then add stars, a label, or a flag to the remaining image, as covered in Chapter 4, to identify your favorite image from the group.
+click the image you don’t want. Then add stars, a label, or a flag to the remaining image, as covered in Chapter 4, to identify your favorite image from the group.
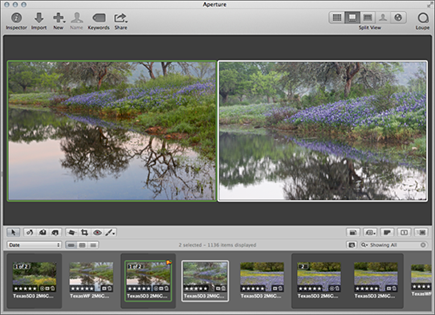
3.4 Use the Compare mode to help choose your favorite image from a series.
Using the Viewer with multiple monitors
If you’re fortunate enough to have multiple monitors, Aperture is designed to take advantage of them. As you might expect, you have choices as to what’s displayed on the second monitor. Access these choices by choosing View →Secondary Viewer, as shown in Figure 3.5.
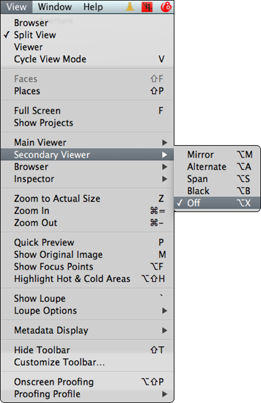
3.5 Choices for what to display on a secondary monitor.
Choose one of the Secondary Viewer options as follows:
![]() Mirror. This allows each monitor to display the same thing. You might use this option if you’re doing a live demonstration and have a large monitor set up for your audience.
Mirror. This allows each monitor to display the same thing. You might use this option if you’re doing a live demonstration and have a large monitor set up for your audience.
![]() Alternate. This displays the currently selected image only in the secondary Viewer. That way you can have multiple images visible in the main Viewer and a single image on the other monitor.
Alternate. This displays the currently selected image only in the secondary Viewer. That way you can have multiple images visible in the main Viewer and a single image on the other monitor.
![]() Span. This extends a single Aperture window across both monitors. We rarely find this helpful.
Span. This extends a single Aperture window across both monitors. We rarely find this helpful.
![]() Black. This leaves the other monitor black so that it’s not distracting.
Black. This leaves the other monitor black so that it’s not distracting.
![]() Off. This enables you to see the contents of your desktop displayed on the secondary monitor while Aperture is visible on the primary monitor.
Off. This enables you to see the contents of your desktop displayed on the secondary monitor while Aperture is visible on the primary monitor.
Using multiple Browsers
Sometimes you want to select images from multiple projects or albums; for example, if you’re creating a slide show or a book or entering a contest and you know the task would be easier if you could view two projects or albums at a time. To open two Browsers, select the first project or album as usual. Then hold the Option key and click on another project or album. This divides the Browser into two panes, as shown in Figure 3.6. You can then select images from each Browser to copy or transfer to another item in the Library.
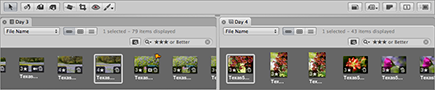
3.6 Divide the Browser into two panes to access images from two projects or albums.
Click the Close (X) button on the top left of the Browser pane tab to close one of the Browsers.
Showing hot and cold areas of an image
Some of your images may have highlights that are quite bright (hot) and/or shadows that are quite dark (cold) in which no details are visible. We refer to these areas as clipped. This can happen while you’re taking the shot in-camera, particularly in contrasty conditions, or while you’re optimizing your images. Aperture can display these areas with a color overlay so that it’s easy to see where the image is losing detail. That way you can set the adjustments to restore as much detail as possible
To set Aperture to display the hot and cold areas, choose View →Highlight Hot & Cold Areas, or press Option+Shift+H. Aperture displays clipped shadows with a blue overlay and clipped highlights with a red overlay, as shown in Figure 3.7.
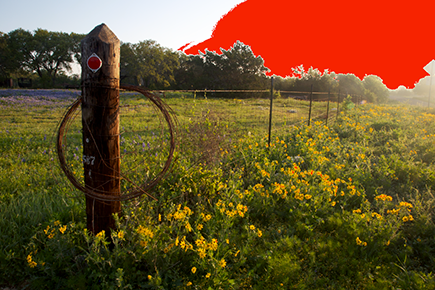
3.7 Aperture can place a red or blue overlay on any highlight or shadow areas that are losing detail due to clipping.
Clipping can occur in one or more of the Red, Green, and Blue channels. If it occurs in all three channels, then the pixels appear pure white or pure black. But if only one or two channels are clipped, the area may appear as a very saturated color without detail, as in the image shown previously in Figure 3.7.
By default, Aperture places the overlay on pixels in which at least one channel is completely clipped. To change the sensitivity of the threshold so that the overlay shows areas that are quite dark, but not completely clipped, or that are extremely light but not completely clipped, follow these steps:
1. Choose Aperture →Preferences to open the Preferences dialog.
2. Click the Advanced icon.
3. Adjust the Hot Area threshold slider and the Cold Area threshold slider as desired.
To change the clipping overlay to monochrome, which can be easier to see on images with areas of saturated reds and blues, choose Monochrome in the Clipping overlay pop-up menu in the same Advanced Preferences dialog. That way the overlay appears as a shade of gray.
Taking a Closer Look
At times when adjusting your images, just seeing the image filling your monitor isn’t enough; you need to look closely at parts of the image at increased magnification. For example, when you apply sharpening, check for chromatic aberration, remove a dust spot, and so forth, viewing the image at 100 percent magnification or even more is important so that you work as accurately as possible. That way you can check details to make certain you’re not accidentally adding (or leaving) artifacts. In this section, we show you how to use the Zoom tool and the Loupe tool to readily see the details in your pictures.
Zooming and scrolling in Viewer
The Zoom tool increases the magnification of the entire image in the Viewer. There are several ways to access the Zoom tool.
![]() Click the Zoom Viewer button, shown in Figure 3.8, to magnify the image to 100 percent focused on the center of the image.
Click the Zoom Viewer button, shown in Figure 3.8, to magnify the image to 100 percent focused on the center of the image.
![]() Choose View →Zoom to Actual Size to accomplish the same thing.
Choose View →Zoom to Actual Size to accomplish the same thing.
![]() To zoom in centered on a specific part of the image, place your cursor on that area, and then press Z. Aperture increases the magnification to 100 percent and the area under the cursor is visible. We find this the most efficient way to zoom.
To zoom in centered on a specific part of the image, place your cursor on that area, and then press Z. Aperture increases the magnification to 100 percent and the area under the cursor is visible. We find this the most efficient way to zoom.
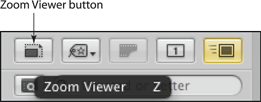
3.8 Use the Zoom Viewer button to increase or decrease the magnification of the image in the Viewer.
![]() Press
Press ![]() +± to zoom in/out incrementally centered on the part of your image under the cursor.
+± to zoom in/out incrementally centered on the part of your image under the cursor.
After zooming in using any of the preceding methods, you see the Zoom Scroll tool appear displaying the current magnification in the image, as shown in Figure 3.9. As you hover your cursor over it, it increases in size and displays a tiny thumbnail of the image with a small white rectangle. Click and drag the rectangle to navigate through the image so that different areas are displayed at the increased magnification.

3.9 Use the white rectangle in the Zoom Scroll tool to navigate through the magnified image view.
To zoom out to see the entire image, press Z again or choose View →Zoom to Actual Size and click to toggle it off. To decrease the magnification incrementally, press ![]() +–.
+–.
Although you can press the spacebar and hold it while dragging in the Viewer to navigate through the image, in most cases we find it far easier to use the Zoom Scroll tool.

To increase or decrease the magnification of the image to any amount from 25 percent to 1000 percent, click and drag the cursor over the field displaying the current magnification on the Zoom Scroll tool or click and hold the arrow to the right or left of the numerical display. The magnification changes accordingly.
Using and customizing the Loupe
If you’d rather see a small part of your image in detail and still see the overall image, as shown in Figure 3.10, you can use the Loupe tool. You can also use the Loupe tool to view the thumbnails in the Browser at increased magnification.

3.10 Use the Loupe tool to view a small section of the image at increased magnification while still seeing the entire image.
To access the Loupe tool, do one of the following:
![]() Click the Loupe tool button at the top right of the interface.
Click the Loupe tool button at the top right of the interface.
![]() Choose View →Show Loupe.
Choose View →Show Loupe.
![]() Press Shift+`.
Press Shift+`.
To use the Loupe tool, click in the dark area near the bottom right and drag it over the part of the image you want to see magnified.
Click the downward arrow next to the magnification percent in the lower-right area of the Loupe to access the dialog shown in Figure 3.11, in which you can customize the Loupe tool as follows:
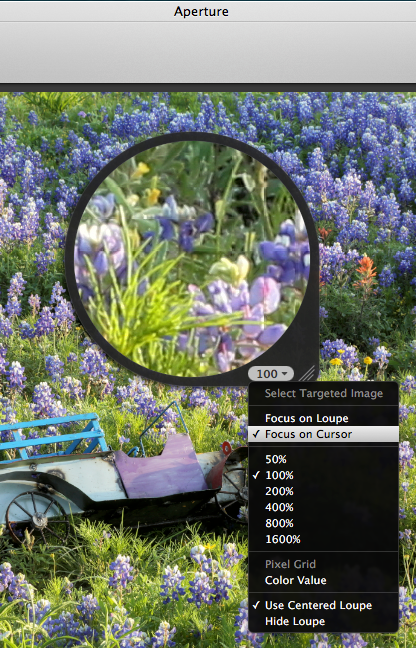
3.11 Use this dialog to customize the Loupe tool.
![]() Choose Focus on Cursor to change the behavior of the Loupe tool so that you can leave the Loupe tool in one place and have it display whatever is under your cursor. Some people prefer to use it this way so that the Loupe doesn’t block part of the image.
Choose Focus on Cursor to change the behavior of the Loupe tool so that you can leave the Loupe tool in one place and have it display whatever is under your cursor. Some people prefer to use it this way so that the Loupe doesn’t block part of the image.
![]() Choose a magnification from 50 percent to 1600 percent.
Choose a magnification from 50 percent to 1600 percent.
![]() At magnifications greater than 200 percent, choose Pixel Grid to display a grid within the Loupe tool.
At magnifications greater than 200 percent, choose Pixel Grid to display a grid within the Loupe tool.
![]() Choose Color Value to add a readout to the Loupe of the Red, Green, and Blue channel values as well as the luminosity value of the point under the Loupe.
Choose Color Value to add a readout to the Loupe of the Red, Green, and Blue channel values as well as the luminosity value of the point under the Loupe.
![]() Choose Use Centered Loupe to toggle off the Use Centered Loupe option and return to the older style Loupe that was introduced in the original version of Aperture. The Loupe will change shapes slightly, and whatever is shown under the small circle will appear magnified in the larger part of the Loupe. Some people may find this convenient, but we prefer to keep Use Centered Loupe selected and use the newer Loupe. To return to the newer style Loupe, Control+click on the Loupe and choose Loupe Options →Use Centered Loupe.
Choose Use Centered Loupe to toggle off the Use Centered Loupe option and return to the older style Loupe that was introduced in the original version of Aperture. The Loupe will change shapes slightly, and whatever is shown under the small circle will appear magnified in the larger part of the Loupe. Some people may find this convenient, but we prefer to keep Use Centered Loupe selected and use the newer Loupe. To return to the newer style Loupe, Control+click on the Loupe and choose Loupe Options →Use Centered Loupe.
Viewing in Full-Screen Mode
Although the default workspace is very usable, some people prefer an interface with the least amount of distractions possible. Full-screen mode hides your desktop completely, and you control what parts of the Aperture interface are visible.
To access full-screen mode, press F or click the Full Screen button in the toolbar, as shown in Figure 3.12. The display changes to full-screen mode, as shown in Figure 3.13. To exit full-screen mode, press F again, Esc, or click the Exit Full Screen button in the Full Screen toolbar.

3.12 Click this button to enter and exit full-screen mode.
In this section, we show you how to work with the Viewer and Browser in full-screen mode, as well as how to work with the filmstrip and toolbar and the heads-up displays (HUDs).
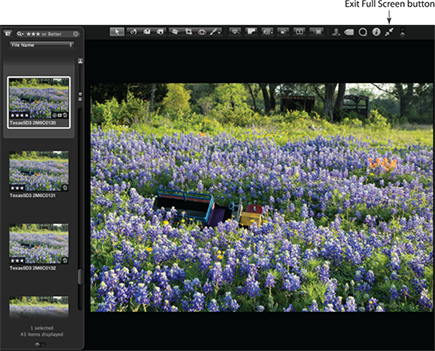
3.13 Full-screen mode showing the Viewer and the optional toolbar.
Using Browser and Viewer in full-screen mode
In full-screen mode, you can view a single image or multiple images (if you’ve set the Viewer mode to Multiple) in the Viewer with an optional filmstrip Browser or just the Browser showing a grid of thumbnails, as shown in Figure 3.14. To toggle between the two views, press V.

3.14 The Browser in full-screen mode.
Whether you’re in full-screen mode or the regular interface, double-click an image in the Viewer to toggle between the Viewer mode and the Browser mode.

Initially, the full-screen background is black, which is dramatic against your images. If you’re using full-screen mode to show your images to others, you may want to keep the background black. But if you’re using full-screen mode to make adjustments to your images, it’s a good idea to change the background to a shade of gray. That way your eyes won’t be fooled by the increased contrast of the background, and you’ll be more able to accurately adjust the contrast and saturation of your images.
To change the brightness of the background in full-screen mode, take these steps:
1. Choose Aperture →Preferences to access the Preferences dialog.
2. Click Appearance.
3. Drag the Full Screen Viewer brightness slider to the right. We suggest setting it to 18 percent, which is the default setting for the Viewer in the regular interface. Note you can also change the brightness of the Browser background the same way.
Working with the filmstrip and toolbar
To navigate through the images while in the Viewer mode in full screen, you need to use the filmstrip. If the filmstrip is not visible initially, it’s hiding. To see it, move your cursor to the left edge or the bottom edge of the interface, and it will appear, as shown in Figure 3.15.
Click and drag the Always Show Filmstrip control to the locked position to make the filmstrip always visible. When the filmstrip is locked, the image decreases slightly in size to make room for it without any overlapping. When you unlock the filmstrip, the image reverts to full size with the filmstrip overlapping it. When you move the cursor away from the filmstrip, it disappears.
To position the filmstrip at the left, bottom, or right edge of the interface, click in the gray area and drag it to the desired location.
Use the search field in the filmstrip to filter the display so that only certain images are visible in the filmstrip. For example, you can set it to show the four-star or better images, or the flagged images. To show all the images again, click the small X to the right of the search field.
To filter using more complex rules, click the Filter button to the left of the search field. This elicits the Browser Filter panel that we cover in Chapter 4.

3.15 The filmstrip is always available even if it’s not initially visible.
To control the order in which the images are displayed, click the Sort pop-up menu shown in Figure 3.16 and choose the criteria to use to organize the images and whether they should be in ascending or descending order.

3.16 The Sort order options.
To adjust the size of the thumbnails in the filmstrip (and thus the size of the filmstrip as well), drag the small slider that’s near the top of the filmstrip (or at the left if the filmstrip is at the bottom of the screen).
Drag the large slider to quickly scan among the images in the filmstrip.
Hovering your cursor near the top center of your monitor reveals the toolbar, as shown earlier in Figure 3.15. The key commands and tools you need are all right there. Just as with the filmstrip, slide the lock to make the toolbar always visible while in full-screen mode. Otherwise, it disappears when you move your cursor. When the toolbar is locked, the image decreases slightly in size and moves out of the way so nothing is hidden.
3.17 The Inspector HUD.
Working with heads-up displays
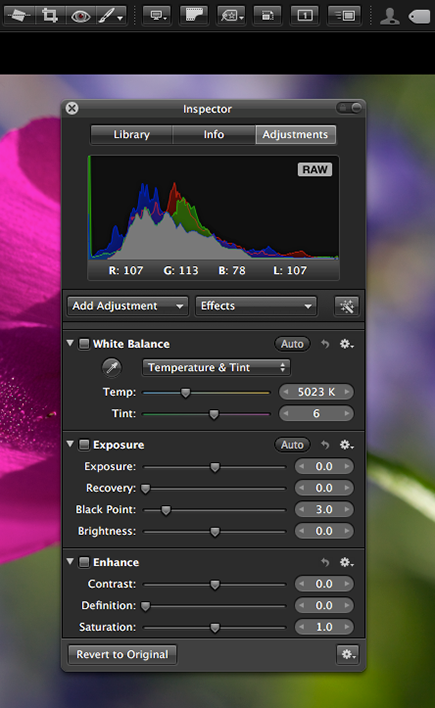
In addition to the toolbar and filmstrip, you can use a heads-up display version of the Inspector or the Keywords HUD, as shown in Figure 3.17. To access the Inspector HUD, click the Inspector button in the toolbar or press H. An Inspector appears that floats over your image. If you slide the lock, the HUD moves to a vacant side of the interface, and the image decreases in size to accommodate it. The Inspector HUD has all the same controls and options as the Inspector does in the regular Aperture interface that is covered in Chapter 1. To hide the Inspector, press H or click the icon again.
If you hold down the Shift key while dragging any slider in the Adjustments HUD, everything in the HUD disappears except the slider so that you can see most of your image while making the adjustment, as shown in Figure 3.18. We love this feature!
To access the Keywords HUD, choose the icon in the toolbar or press Shift+H. A floating HUD appears that you can use to create and assign keywords. The Keyword HUD is covered in detail in Chapter 4. To hide the Keyword HUD, press Shift+H or click the icon again.

3.18 Hold the Shift key while dragging a slider to make the rest of the HUD disappear.
Additional Viewer Options
Regardless of whether you’re using full-screen mode or the regular interface, there are three more Viewer options that you need to know: Primary Only, Quick Preview, and viewing originals, which we cover in this section.
Using Primary Only
When you have multiple images selected that are visible in the Viewer, any changes (other than adjustments) that you make are applied to all the selected images. So if you assign a star rating or apply a label and so forth, you won’t affect just one image; you modify all of them. But the reality is that at times while working you’re likely to want to make changes to just one of the images. To do that, click the Primary Only button. Notice that when you select multiple images, one of them has a wider white border. That’s the one that will still have a white border when you click Primary Only, as shown in Figure 3.19.
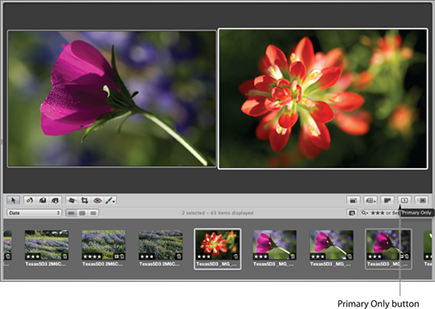
3.19 Click the Primary Only button to apply changes to just one of several images that are selected.
Using Quick Preview
After you download your images, if you’re like us you’re impatient to start seeing them and perhaps making some preliminary edits. Although images load pretty quickly in Aperture 3.3, if you’re uploading a lot of images it still takes time for Aperture to complete the download. If you try to go through the images too quickly you may discover that the spinning beach ball appears. If you hate waiting and are willing to go through your images having Aperture use the initial previews rather than loading the full file, use Quick Preview mode.
To engage Quick Preview mode, click the Quick Preview button in the toolbar, as shown in Figure 3.20. A yellow border appears around the images you select. You won’t be able to make any adjustments while you’re in Quick Preview mode, and we suggest you not make any decisions about the final sharpness or exposure because the Quick Preview version may differ considerably from the actual file.
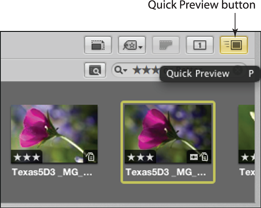
3.20 Use Quick Preview to view your images quickly.
Still, it’s a good way to quickly get a sense of the images you’ve captured. To exit Quick Preview, click the Quick Preview button again.
Viewing the original image
While you work in Aperture, as long as you’re not using Quick Preview mode, the image preview in the Viewer updates to reflect all your edits. Although you can toggle any particular adjustment off and on using the check boxes in the Adjustments Inspector, sometimes it’s helpful to glance at the original image to make sure you’re heading in the right direction. The fastest way to do that is to click the Show Original button shown in Figure 3.21.

3.21 Click the Show Original button to see the original file with no adjustments.
The image in the Viewer reverts to the original before you applied any adjustments, although all your adjustments are still intact. To return to edited view, click the Show Original button again.
Configuring and Using Metadata Overlays
Most of the time, you’ll want to be able to see certain information about your images at a glance. For example, you’ll want to see any ratings, labels, or flags that you’ve applied, whether you’ve assigned keywords, whether you’ve edited the image in a plug-in or external editor, and so forth. But some of the time you may want to just see the image without any distractions, and other times you may want to see even more information about the files. You can use the Metadata Overlays pop-up menu in the tool strip, shown in Figure 3.22, to control the display of metadata in the Viewer and the Browser as follows:
![]() Under Viewer, choose Show Metadata to have Aperture display a metadata overlay. By default, the display uses the Basic View unless you choose Switch to Expanded View, and shows basic information such as ratings, labels, flags, and badges. (Aperture uses badges to convey a variety of information about the file such as if it’s a referenced file, if the original is available, if you’ve assigned keywords to it, and so on. We cover this in detail in Chapter 10.)
Under Viewer, choose Show Metadata to have Aperture display a metadata overlay. By default, the display uses the Basic View unless you choose Switch to Expanded View, and shows basic information such as ratings, labels, flags, and badges. (Aperture uses badges to convey a variety of information about the file such as if it’s a referenced file, if the original is available, if you’ve assigned keywords to it, and so on. We cover this in detail in Chapter 10.)
![]() Under Viewer, choose Switch to Expanded View to see more information such as any keywords that you’ve applied, the version name, the date the file was created, and even whether you’ve e-mailed the image or used it in a book. Once you choose this, the option in the pop-up menu changes to Switch to Basic View. Choose that to return to an overlay with less information.
Under Viewer, choose Switch to Expanded View to see more information such as any keywords that you’ve applied, the version name, the date the file was created, and even whether you’ve e-mailed the image or used it in a book. Once you choose this, the option in the pop-up menu changes to Switch to Basic View. Choose that to return to an overlay with less information.
![]() Under Browser, choose Show Metadata to see a metadata overlay in the Browser with each thumbnail. By default, the display uses the Basic View unless you choose Switch to Expanded View, and shows basic information such as ratings, labels, flags, and badges.
Under Browser, choose Show Metadata to see a metadata overlay in the Browser with each thumbnail. By default, the display uses the Basic View unless you choose Switch to Expanded View, and shows basic information such as ratings, labels, flags, and badges.
![]() Under Browser, choose Switch to Expanded View to see more information.
Under Browser, choose Switch to Expanded View to see more information.
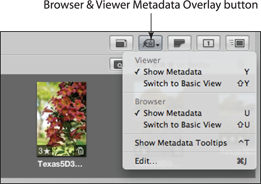
3.22 Click the Browser & Viewer Metadata Overlay button to apply metadata overlays.
If the Browser is set to filmstrip, it may only show some, but not all, of the information in the overlay. To be certain the overlays show exactly the information you expect, use the Grid view or the List view in the Browser. Because the Browser has only limited area to display information, we suggest you only use the Expanded View in the Browser metadata overlay if the Browser is set to List view.
To specify what information is included in the Basic and Expanded View overlays in both the Viewer and the Browser, do the following:
1. Choose Edit in the Metadata Overlays pop-up menu. A new dialog appears, as shown in Figure 3.23.
2. Choose which view to configure from the View pop-up menu. The items that will be displayed are listed on the right under Display Order.
3. To remove any items, click the minus (–) button next to the item in the Display Order list.
4. To choose additional items to include, use the expansion arrows next to the items on the left under Metadata Fields. Select the check box next to that item and that field then appears on the right under Display Order.
5. Select the Show metadata below image check box (at least in the Viewer) and the Show metadata labels check box. We recommend choosing these options; otherwise the metadata blocks some of your image. The metadata labels help organize the metadata that you’re seeing. A metadata label is a word such as Keywords that appears before the list of keywords in the overlay.
6. Click OK to apply the changes.
To quickly apply or remove the overlays, use the following shortcuts: Press Y to toggle metadata on and off in the Viewer, press Shift+Y to toggle between the Expanded and Basic views, press U to toggle metadata on and off in the Browser, and press Shift+U to toggle between the Basic and Expanded views.
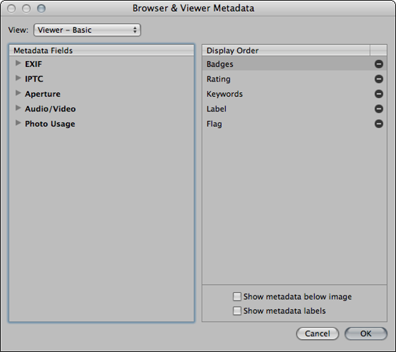
3.23 Customize the data that appears in the metadata overlay using this dialog.
Switching between RAW+JPEG Originals
If you’ve imported RAW+JPEG pairs with either the RAW or JPEG set as original, you only see one member of the pair in the Viewer. However, any metadata or adjustment changes you make to one are applied to the other as well.
To switch an entire album of RAW+JPEG pairs to use the other format as the original, or if you have an album or project that contains RAW+JPEG pairs, some with RAW as Original and some with JPEG as Original, select the Album or Project in the library, then choose Photos →Switch Album/Project to use RAW Originals, or Switch Album/Project to use JPEG Originals.
To change the format that is used as the original, choose Photos →Use RAW as Original. If the original was already a RAW file, the option automatically appears as Use JPEG as Original, as shown in Figure 3.24. This enables you to change original formats on an image-by-image basis.

3.24 You can toggle between the JPEG as Original and RAW as Original options to check metadata and changes.
Working with Referenced Images
In earlier chapters, we talk about importing images as referenced files. As you already know, referenced files are convenient in some cases because you can store your original files outside the Aperture library where other programs can access them as well, and you can store the images on external drives so that you don’t run out of room on your computer. However, working with referenced files requires a bit more attention on your part. This section covers identifying and managing the original images for referenced files as well as reconnecting missing originals and relocating images.
Identifying and managing referenced images
Anytime you import a referenced image, Aperture places a badge on it, as shown in Figure 3.25, so that you can readily tell it’s referenced. The badge is visible in the metadata overlay, as discussed earlier in this chapter. If the badge is green, the drive containing the image is connected, but if it’s red, the original is offline.
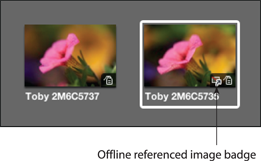
3.25 The badge clearly identifies files that are referenced.
Once you identify an image as a referenced file, you need to make sure that the drive containing the original file is connected if you want to make any adjustments to the image or output it. Otherwise, you may be left wondering why the Adjustments Inspector is grayed out and why Aperture suddenly won’t export an image.
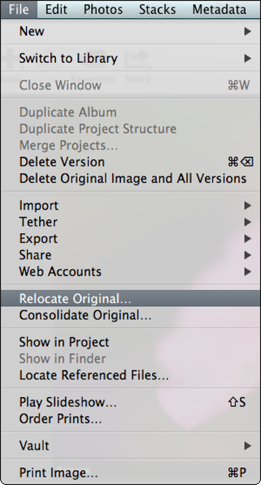
If you use more than one drive to store your original files, the chances are that you won’t remember which drive you need. To have Aperture jog your memory, select a file and then choose File →Show in Finder. If the drive containing the image is connected and online, the Finder appears with the path to the file selected. If the drive is offline, Aperture tells you that, but it also shows you the name of the drive, as shown in Figure 3.26. All you have to do is find that drive and connect it. Aperture automatically sees it, and you’re good to go.
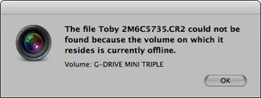
3.26 Use the Show in Finder option to see where your original files are stored.
Reconnecting a missing original
If you accidentally move the original file from where it was when you imported the image as a referenced file or changed it in some way, Aperture may not know how to find it. We’ve noticed that Aperture 3.3 is far more able to locate files by itself than earlier versions, but it’s still possible that it may not be able to locate the original. In that case you have to tell it where to look. To reconnect one or more missing original files, do the following:
1. Reconnect the hard drive containing the referenced originals.
2. Select the project or album containing the referenced files.
3. Choose File →Locate Referenced Files. The dialog shown in Figure 3.27 appears. On the left is a list of the names of hard drives where you’re storing referenced originals, as well as how many originals were found and any that weren’t located. The next column tells you the specific location of the original file for each referenced file.
4. Click Show Reconnect Options if they are not already visible.
5. Select the file at the top that you want to reconnect with its original. A thumbnail of the image and some identifying metadata appear next to it.
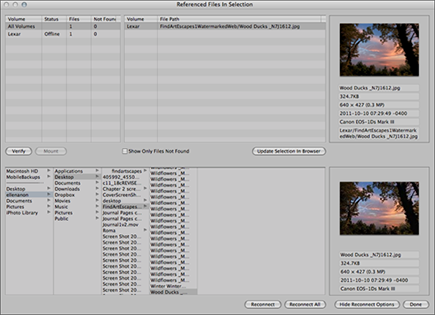
3.27 Use the Locate Referenced Files option to reconnect referenced files and their originals.
6. In the bottom section of the dialog, navigate to the location of the referenced original and select the original. A thumbnail of the image and some identifying metadata appear next to it so you can compare it to the image selected above and be sure that you’re connecting the right original.
7. Click Reconnect to reconnect a specific image. Alternatively, you can select a group of images to reconnect and click Reconnect All.
Relocating referenced originals
If you decide that you need to move the originals for some (or all) of your referenced files — for example, to place them on an external drive — there’s a way to do it so that Aperture knows exactly where to look for them. Then you won’t have to spend time later trying to reconnect the originals and referenced files. To relocate the originals for referenced files, follow these steps:
1. Select the referenced images in the Browser.
2. Choose File →Relocate Originals. A dialog appears, as shown in Figure 3.28.
3.28 Use the Relocate Originals option to move original files.
3. Choose a location to store the images. We often create a new folder in Pictures, but if you’re moving the files to an external drive, you may just need a folder on that drive. Be sure to use a name for the folder that alerts you that it contains referenced originals. Consider putting the letters RO after the name or any other convention that works for you.
4. Choose None from the subfolder pop-up menu to store each file individually within the folder you just selected in Step 3. If you want Aperture to organize the images into subfolders, choose one of the subfolder presets or create your own by choosing Edit and following the prompts to configure a custom preset.
5. Specify a naming convention to use. Choose Original Filename to use the current original filename. This is the format we recommend so that you can easily identify the images. However, you can use any of the other formats such as Version or Custom.
6. Click Relocate Originals. Aperture moves the originals to their new location.
You can relocate originals that are managed as well. In that case, they become referenced files. To relocate managed files, follow the same steps you use to relocate referenced files.
Although relocating originals is usually a very quick process, depending on how many files you’re moving it could require some time. Be sure to leave the external drive connected while Aperture moves the originals to it. If you’re not sure whether all the files have been moved, choose Window →Show Activity. If Aperture is still moving the originals, the task appears in this window.
Converting referenced originals to managed originals
You may find that you have a number of referenced files that you want to convert to managed files. For example, if you are traveling with a laptop and leave the external hard drives that contain all your referenced files at home, you might want to be able to make adjustments or export some files while you travel. To change referenced files into managed files, follow these steps:
1. In the Browser, select the files you want to convert to managed files.
2. Choose File →Consolidate Originals. In the dialog that appears, choose whether you want to move the files into the Aperture library or make a copy of them that is managed in the library.
3. Click Continue.
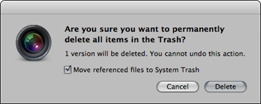
Deleting referenced files
When you delete a referenced file, you follow the same steps covered in Chapter 1 to delete files. However, when you press Shift+![]() + Delete to empty the Trash, a dialog appears as shown in Figure 3.29.
+ Delete to empty the Trash, a dialog appears as shown in Figure 3.29.
3.29 The Empty Trash dialog.
To delete the referenced original file as opposed to just deleting the version within Aperture, select the Move referenced files to System Trash check box. If you want to leave the original file intact but remove the version that’s in Aperture, leave that check box unselected.
Working with Stacks in Browser
As we mention in Chapter 1, you can organize groups of related images into stacks. These can be images that are very similar, part of a panorama, part of a High Dynamic Range (HDR) series, different versions of the same image, or any images that you want to group together for any reason. Stacked images have a dark-gray box around them and a number in the upper-left corner of the first image indicating the number of images in the stack, as shown in Figure 3.30. Stacks can contain as many images as you want.
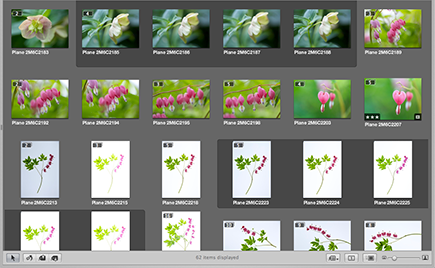
3.30 Stacks can organize groups of related images.
Aperture can auto-stack all the images in a project based on the time sequence in which you took them. To auto-stack images based on time, follow these steps:
1. Select a project or album.
2. Choose Stacks →Auto-Stack.
3. Adjust the Auto-Stack Images dialog slider to the desired time frame from 0 seconds to 1 minute. As you do, the images are organized into stacks.
4. Choose Stacks →Close All Stacks.
Aperture automatically creates stacks whenever you create a new version of an image, including when you use a plug-in or external editor such as Photoshop, so the files stay together. You can change this behavior by deselecting the Automatically stack new versions option in General Preferences, but we recommend you leave it selected.
To manually create stacks, select the images to include and then press ![]() +K, or choose Stacks →Stack.
+K, or choose Stacks →Stack.
When stacks are open, all the images are displayed. When they’re closed, only a single image — the one farthest to the left — is visible. By closing stacks you reduce the number of files you have to visually sort through in the project or album, and that can save time.
Stacks work in both the regular mode and full-screen mode.
You can drag the images around within a stack to reorder them as well as drag images in and out of existing stacks. To divide a stack, place your cursor on the thumbnail that you want to begin a new stack and choose Stacks →Split Stack.
To open and close a stack, click on the number in the first image. Alternatively, choose Stacks →Open All Stacks or Close All Stacks to open or close all the stacks within the album or project.
To set the image that appears on the top of a stack (called a stack pick), do one of the following:
![]() Select the image and then choose Stacks →Pick.
Select the image and then choose Stacks →Pick.
![]() Select the image and press
Select the image and press ![]() +.
+.
![]() Drag the image to the farthest left position in the stack.
Drag the image to the farthest left position in the stack.
If the stack appears in multiple albums, such as one for a book and one for a web page or slide show, you may want different pick images for each album. To set an image as the album pick, select the image and choose Stacks →Set Album Pick. You can use a different image in each album.
To unstack a group of images, select the stack and choose Stacks →Unstack.
You can use the Compare mode within stacks to help you compare the images in the stack. This is similar to comparing individual images using the Compare mode, which is discussed earlier in the chapter. To compare images within a stack, follow these steps:
1. Select a stack.
2. Choose View →Main Viewer →Stack, or press Option+T. The stack pick is automatically set as the currently chosen image and has a green border.
3. Compare images within the stack to the stack pick, and press Return if you want an image with a white border to become the new stack pick, which changes its border to green. The next image in the stack appears for you to compare until you have reviewed all the images in the stack.
4. Use the keyboard up and down arrows to move from stack to stack.
Creating and Working with a Light Table
As great as it is to work with digital images, sometimes it feels like it would be easier if you could spread the images out in front of you and arrange then as if you were dealing with prints or slides. Using a Light Table enables you to work with your digital images in a very similar way with the advantages that you can resize the images as well as the Light Table itself. A Light Table can be particularly helpful when trying to organize images for a slide show or book, when color-correcting many related photos, or when creating a collage. To create a Light Table, take these steps:
1. In the Library Inspector, choose the project or album where you want the Light Table to appear. Then select the images you want to view in the Light Table. You can select more images than you ultimately need because the images you select initially only appear in the Browser for the Light Table.
2. To create the new Light Table, click the New button in the toolbar and choose Light Table. A dialog appears in which you give the new Light Table a name.
3. In addition to typing a name for the Light Table, select the Add selected items to new light table option.
4. Click OK. The new Light Table appears in the Library Inspector. The interface changes slightly, as shown in Figure 3.31. The Viewer is now a Light Table with a grid, and there are some different buttons above it and above the Browser.
5. To add additional images to the Light Table, choose any image or images in the library and drag them onto the Light Table in the Library Inspector.
To begin arranging your images, select one or more in the Browser and drag them onto the Light Table. As long as the group of images is selected, they all move as a unit on the Light Table. To move a single image, click anywhere on the Light Table except on an image. Then click the image. You’ll see the image has a thick white border, as shown in Figure 3.31.
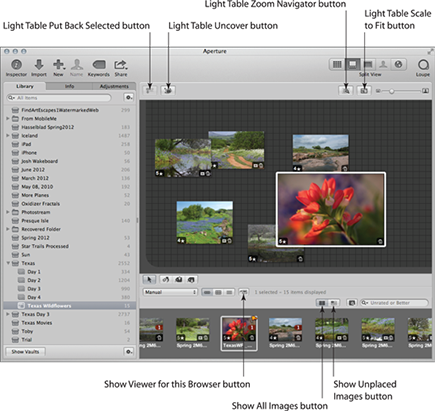
3.31 Use the Light Table to arrange groups of images.
Drag the image wherever you want. As you do, the yellow alignment lines appear to help you align the image with the other images. In addition, small square handle boxes appear along the edges of the image. Click and drag these handles to resize the image. If necessary, use the slider in the top right of the interface to resize the Light Table or click the Light Table Scale to Fit button. Click the Light Table Zoom Navigator button to magnify a portion of the Light Table.
To have Aperture automatically arrange the images, Control+click on the Light Table next to the images and choose Arrange All from the pop-up menu. To restore an image to its previous size, Control+click the image and choose Reset Selected Size from the pop-up menu.
Click and drag the cursor over several images on the Light Table to select a group of images and move them as a unit.
To remove an image from the Light Table, click the Light Table Put Back Selected button shown earlier in Figure 3.31. If you can’t see an image that’s hiding under another image, select it in the Browser and click the Light Table Uncover button. The image will be visible even if it’s completely under another image. Then you can resize or move one of the images.
Notice that a number 1 appears in the top right of the thumbnail for each image that you place onto the Light Table. To easily see any images that haven’t yet been used, click the Show Unplaced Images button so that only the unplaced images appear in the Browser. To see all the images again, click the Show All button.
You can use the Adjustments Inspector to apply adjustments to the images while they’re on the Light Table. However, some of the adjustments such as Straighten, Crop, Red-Eye, and Quick Brushes are not available in the toolbar. To use these adjustments, click the Show Viewer button that’s above the Browser. The regular Viewer appears where you make the necessary adjustments. When you’re finished making adjustments, click the Show Viewer button again to return to the Light Table.
If you’ve created a grouping of images that you want to print as a collage, deselect all the images by clicking on the background of the Light Table. Then choose File →Print Light Table to get the Print dialog so you can output the print, which is discussed in detail in Chapter 7. Note that you can use this same dialog to save the Light Table layout as a PDF by clicking the PDF button and choosing Save as PDF in the pop-up menu.
To delete a Light Table, select the Light Table in the Library Inspector and choose File →Delete Light Table.